Feedback
Table Of Contents
Administration Console: Dispatcher Tasks
VTG Workspace Window Areas and Lists
Adding Participants to and Removing Participants From an Active VTG
Muting or Unmuting a PMC User in the VTG Workspace Window
Best Practices for Managing VTGs
Viewing and Editing Policy Details
Specifying the VTGs that are Associated with a Policy
Enabling and Disabling a Policy
Administration Console: Dispatcher Tasks
A Cisco IPIC dispatcher is responsible for setting up virtual talk group (VTG) templates, activating VTGs to begin conferences, and adding or removing members or participants in VTG templates and active VTGs. A dispatcher also monitors active VTGs and can mute and unmute users as necessary.
In addition, a dispatcher manages policies, each of which activates a VTG template at a particular time and then deactivates it after a designated interval.
You perform the Cisco IPICS dispatcher activities from the Dispatcher window in the Administration Console. To access this window, log in to the Administration Console as described in the "Accessing the Administration Console" section, then choose the Dispatcher tab.
Note
You must be assigned the dispatcher role to access the Dispatcher window.
This chapter includes these sections:
Note
Managing VTGs
A VTG enables multiple participants on various channels to communicate using a single multicast address. Participants in a VTG can include users, user groups, channels, channel groups, and other VTGs. An active VTG, also called an event, is a VTG in which all the participants have live connections with each other.
You can stage a VTG by creating a VTG template, which is an inactive VTG. You use a VTG template to arrange members that can communicate when you activate the VTG template. You can create as many VTG templates as necessary and activate any of them when needed.
After you activate the VTG, you can easily manage it by adding and removing users, PTT channels, and other VTGs, and by muting an unmuting PMC users.
As a Cisco IPICS dispatcher, you can perform these VTG management tasks:
You perform the VTG management tasks in the VTG Workspace Window. For more information about this window, including how to access it, see the "VTG Workspace Window" section.
For related information, see the "Best Practices for Managing VTGs" section.
Note
VTG Workspace Window
A Cisco IPICS Dispatcher performs dispatcher tasks in the VTG Workspace window.
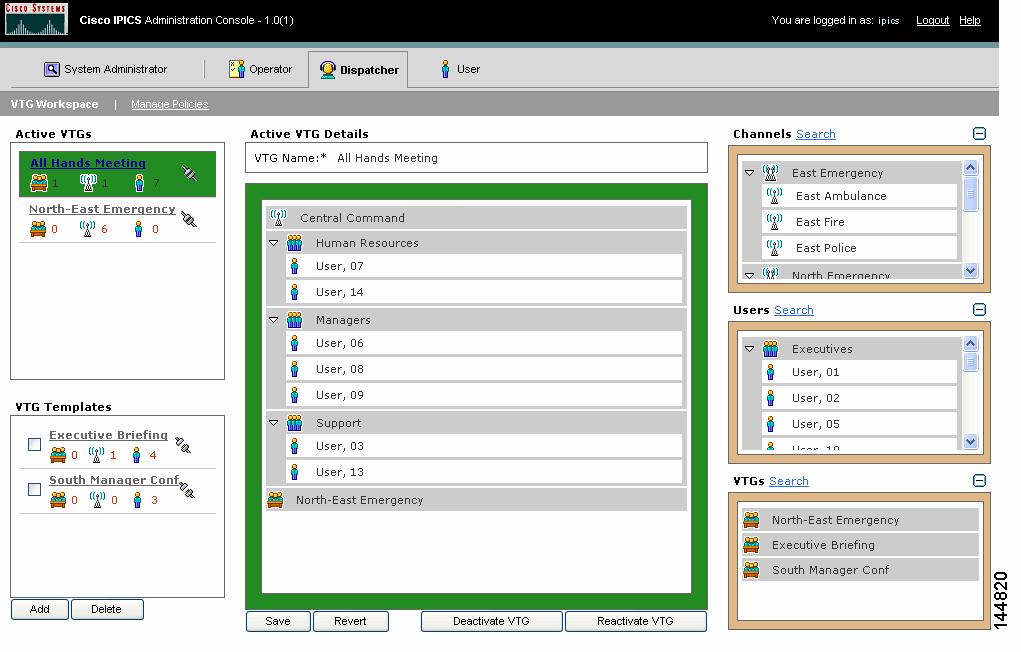
To access the VTG Workspace window, log in to the Administration Console as described in the "Accessing the Administration Console" section, then choose the Dispatcher tab. Figure 4-1 shows an example of this window.
Note
Figure 4-1 VTG Workspace Window
For additional information about the VTG Workspace window, see these sections:
•
VTG Workspace Window Icons
Various icons in the VTG Workspace window provide important information. Some icons in the Active VTGs area and in the VTG Templates area display with a number to their right. This number indicates how many of the corresponding item, such as user or PTT channel, are in the VTG or in the VTG template.
Table 4-1 describes the icons that can display in the VTG Workspace window.
Table 4-1 VTG Workspace Window Icons
Cisco IPICS user.
User group.
PTT channel.
PTT channel group.
Busy PTT channel.
A channel is busy when it is use by an active VTG.
Secure PTT channel.
You can designate a PTT channel as secure when you add the channel.
Unavailable PTT channel.
A channel is unavailable when it is disabled.
VTG.
Unavailable VTG channel.
For more information, see the "Reactivating a VTG" section.
VTG Workspace Window Areas and Lists
The VTG Workspace Window contains various areas and lists, as described in Table 4-2.
Table 4-2 VTG Workspace Window Areas and Lists
Active VTGs area
Displays names of the VTGs that are active and lets you select an active VTG.
To see detailed information about a VTG in this area, click the VTG name. Information displays in the Active VTG Details area.
VTG Templates area
Displays names of the VTG templates that have been configured in Cisco IPICS and lets you select a VTG template.
To see detailed information about a VTG template in this area, click the VTG name. Information displays in the VTG Template Details area.
The check box next to a VTG template name lets you select the template for deletion. For more information, see the "Deleting a VTG Template" section.
Active VTG Details area
Displays when you choose a VTG in the Active VTGs area and shows the participants in the selected active VTG.
To see members of a user group or a channel group in this area, expand the group by clicking the right arrow next to the group name. Click the down arrow next to a group name to collapse an expanded group.
Note
VTG Template Details area
Displays when you choose a VTG template in the VTG Templates area and lists the members in the selected VTG template.
To see members of a user group or a channel group in this area, expand the group by clicking the right arrow next to the group name. Click the down arrow next to a group name to collapse an expanded group.
Channels list
Displays the PTT channels and channel groups that can be added to VTGs.
To expand this list, click the plus (+) sign to its right. To collapse this list, click the minus sign (-) to its right.
To see members of a channel group in this list, expand the group by clicking the right arrow next to the group name. Click the down arrow next to a group name to collapse an expanded group.
To search for an item in this list, see the "Using the Search Utility" section.
Users list
Displays the users and user groups that can be added to VTGs. This list displays only PMC or Cisco IP Phone users. It does not display users who participate in VTGs using handheld radios or LMRs.
To expand this list, click the plus sign (+) to its right. To collapse this list, click the minus (-) sign to its right.
To see members of a user group in this list, expand the group by clicking the right arrow next to the group name. Click the down arrow next to a group name to collapse an expanded group.
To see additional information about a user, or to mute a user, double-click the user name. The User Details window appears. This window displays information from the user profile, and includes these buttons:
•
•
Clicking Mute Mic + Speaker prevents the user from speaking or listening in a VTG. Clicking Unmute Mic + Speaker allows the user to listen and speak in a VTG. Applies to all VTGs and channels in which the user is a participant.•
To search for an item in this list, see the "Using the Search Utility" section.
VTGs list
Displays VTG templates that can be added to another VTG. You can add VTG templates from this list to an active VTG or to another VTG template. If you add a VTG template to an active VTG, the VTG that you added and all of its participants become active.
To expand this list, click the plus (+) sign to its right. To collapse this list, click the minus (-) sign to its right.
To search for an item in this list, see the "Using the Search Utility" section.
Search Results list
Displays the results of a search for channels, users, or VTGs.
To expand this list, click the plus sign (+) to its right. To collapse this list, click the minus (-) sign to its right.
To see members of a group in this list, expand the group by clicking the right arrow next to the group name. Click the down arrow next to a group name to collapse an expanded group.
For more information about searching for a channel, user, or VTG, see the "Using the Search Utility" section.
Managing VTG Templates
A VTG template lets you create various arrangements of members (users, PTT channels, and VTGs), without committing network resources or affecting VTGs that are in progress. A dispatcher can activate a VTG template at any time, which brings the VTG participants together into a live conference.
You can view information about any VTG template by clicking the template name in the VTG Templates area. Information about the template displays in the VTG Template Details area.
When you modify a VTG template, no changes occur in system resources or in the communication between participants until you activate the VTG template. When you make changes to an active VTG, the original template remains unchanged.
As a Cisco IPICS dispatcher, you can perform these VTG template management tasks:
You perform the VTG template management tasks in the Administration Console VTG Workspace window. For more information about this window, including how to access it, see the "VTG Workspace Window" section.
Adding a New VTG Template
When you add a VTG template, you specify the name of the VTG and, typically, designate the members in it. You can activate the VTG template any time after you save it.
The following guidelines apply to VTGs templates:
•
•
•
•
•
Similarly, if VTG-A contains the sub-VTG-D and VTG-C contains the sub-VTG-D, you cannot add VTG-C to VTG-A.
•
To add a new VTG template, perform the following steps.
For information about accessing the VTG Workspace window, see the "VTG Workspace Window" section.
Procedure
Step 1
A blank VTG Members area displays with an orange border.
Step 2
The name can include alphanumeric characters, spaces, and any of these characters: . , - ` # ( ) / : ,.
Step 3
•
•
•
•
•
•
To expand a collapsed Channels, Users, VTGs, or Search Results list, click the plus sign (+) to the right of it. To expand a PTT channel group or a user group, click the right arrow next to it.
When you release the mouse button, the item that you added to the VTG template displays in green until you click Save to commit the change. To remove an item that displays in green, drag it out of the orange border in the VTG Members area.
Step 4
If you want to abandon your additions, click Revert before you click Save.
Modifying a VTG Template
When you modify a VTG template, you can change its name, and add or remove members.
Because a VTG template is not an active event, you can make any changes to the template without affecting any current communication between users.
The following guidelines apply when you modify a VTG template:
•
•
•
•
•
•
•
Similarly, if VTG-A contains the sub-VTG-D and VTG-C contains the sub-VTG-D, you cannot add VTG-C to VTG-A.
•
To modify a VTG template, perform the following steps.
For information about accessing the VTG Workspace window, see the "VTG Workspace Window" section.
Procedure
Step 1
The VTG template displays in the VTG Templates Details area.
Step 2
The name can include alphanumeric characters, spaces, and any of these characters: . , - ` # ( ) / : ,.
Step 3
•
•
•
•
•
•
To expand a collapsed Channels, Users, VTGs, or Search Results list, click the plus sign (+) to the right of it. To expand a PTT channel group or a user group, click the right arrow next to it.
When you release the mouse button, the item that you added to the VTG template displays in green until you click Save to commit the change. To remove an item that displays in green, drag it out of the orange border in the VTG Members area.
Step 4
When you release the mouse button, the item changes to red. It is permanently removed from the VTG template when you click Save.
If a user or a channel appears in a VTG more than once and you remove a single listing of the user or the channel, Cisco IPICS removes all instances of the user or the channel from the VTG.
Step 5
If you want to abandon your modifications, click Revert before you click Save.
Activating a VTG
Activating a VTG causes Cisco IPICS to commit the network resources required to enable the participants in a VTG template to communicate with each other.
A VTG template can also be activated by a policy. For more information, see the "Managing Policies" section.
When you activate a VTG, it attempts to obtain a multicast address from the multicast pool. If it is successful, it attempts to acquire resources for each of its channels and sub-VTGs. (Channels go into the pending state during this process.) If the VTG successfully obtains a multicast address and some resources, it becomes active. Otherwise, it does not activate.
For information about managing an active VTG, including instructions for deactivating and reactivating a VTG, see the "Managing Active VTGs" section.
Note
To activate a VTG, perform the following steps.
For information about accessing the VTG Workspace window, see the "VTG Workspace Window" section.
Procedure
Step 1
The VTG template displays in the VTG Templates Details area.
Step 2
The VTG becomes active and it moves from the list in the VTG templates area to the list in the Active VTGs area.
Deleting a VTG Template
If a VTG template is no longer needed, you can delete it from Cisco IPICS. Deleting a VTG template has no effect on the members within it.
You cannot delete a VTG template that is associated with an active VTG. To delete such a VTG template, first deactivate the active VTG.
To delete one or more VTGs, perform the following steps.
For information about accessing the VTG Workspace window, see the "VTG Workspace Window" section.
Procedure
Step 1
Step 2
A dialog box prompts you to confirm the deletion.
Step 3
If you do not want to delete the VTG or VTGs, click Cancel.
Managing Active VTGs
Managing active VTGs can involve the following activities:
•
•
The following guidelines apply to active VTGs:
•
•
•
•
•
•
Adding Participants to and Removing Participants From an Active VTG
You can add participants to or remove participants from an active VTG.
When you add participants to an active VTG, Cisco IPICS does not commit network resources to the VTG until you click Save. At that point, Cisco IPICS commits the necessary resources to enable the existing VTG participants to communicate with those that you added.
Changes that you make to an active VTG do not affect the VTG template and are not saved to the VTG template when you deactivate the VTG.
Note
A user who is added to an active VTG is affected as follows:
•
•
•
To add participants to or remove participants from an active VTG, perform the following steps.
For information about accessing the VTG Workspace window, see the "VTG Workspace Window" section.
Procedure
Step 1
The VTG displays in the Active VTG Details area.
Step 2
•
•
•
•
•
•
To expand a collapsed Channels, Users, VTGs, or Search Results list, click the plus sign (+) to the right of it. To expand a PTT channel group or a user group, click the right arrow next to it.
When you release the mouse button, the item that you added to the VTG template displays in green until you click Save to commit the change. To remove an item that displays in green, drag it out of the orange border in the VTG Participants area. The item that you added cannot participate in the VTG until you click Save.
Step 3
When you release the mouse button, the item changes to red. It is permanently removed from the VTG template when you click Save. The item can continue participating in the VTG until you click Save.
If a user or channel appears in a VTG more than once and you remove a single listing of the user or channel, Cisco IPICS removes all instances of the user or the channel from the VTG.
Step 4
If you want to abandon your modifications, click Revert before you click Save.
Muting or Unmuting a PMC User in the VTG Workspace Window
Cisco IPICS lets you as a dispatcher mute a PMC user in an active VTG or in all VTGs in which the user is a participant, and to unmute any muted user. This feature can be useful if a user is participating from a noisy location, or if you want to mute a user for any other reason.
You can choose how to mute a PMC user as follows:
•
•
•
•
The Cisco IPICS operator can mute a user from the Edit User Details window. For instructions, see the "Muting or Unmuting a User in the Edit User Details Window" section.
The Mute feature affects PMC users only. It does not mute the microphone or the speaker of a Cisco IP Phone, and it does not mute the microphone of a particular user in a PTT channel. In addition, because all the user transmissions in a PTT channel are mixed into a single signal, it is not possible to mute the microphone of a LMR user in a PTT channel.
To mute or unmute a user in an active VTG, perform the following steps.
For information about accessing the VTG Workspace window, see the "VTG Workspace Window" section.
Procedure
Step 1
•
If necessary, click the right arrow next to a user group in the Active VTG Details area to expand the group so that you can see a user.
•
If necessary, click the right arrow next to a user group in the Active VTG Details area or in the Users list to expand the group so that you can locate a user.
The User Details window displays. If you double-clicked the user in the Users list, the PMC Settings for VTG mute buttons are not available
Step 2
•
–
–
–
–
The button that you click changes to Unmute Mic or Unmute Mic + Speaker.
•
Buttons under PMC Settings for VTG affect the active VTG only. Buttons under Global PMC Settings affect all channels.
The button that you click changes to Mute Mic or Mute Mic + Speaker.
Step 3
Deactivating a VTG
When you deactivate a VTG, the channels in the VTG are no longer connected to each other. You can deactivate a VTG at any time.
To deactivate a VTG, perform the following steps.
For information about accessing the VTG Workspace window, see the "VTG Workspace Window" section.
Procedure
Step 1
The VTG displays in the Active VTG Details area.
Step 2
The VTG becomes inactive and it moves from the list in the Active VTGs area to the list in the VTG templates.
Reactivating a VTG
If all channels are not available for a VTG when you activate it, Cisco IPICS activates the channels that are available. A channel may be unavailable because there are insufficient router resources available for it or because it is in use by another active VTG.
An blue X displays to the right of an unavailable VTG channel in the Active VTG Details area. To see why the channel is unavailable, hold the mouse over the X and look at the tooltip that pops up.
When a VTG channel is unavailable, Cisco IPICS allows the VTG to continue operating without the channel, and lets you take the necessary action to obtain the unavailable channel and reactivate the VTG. When you reactivate a VTG, Cisco IPICS determines whether previously unavailable channels are available and adds them to the active VTG if they are. In this way, Cisco IPICS ensures that you do not have to disrupt a VTG if some channels are not available when you activate it.
To reactivate a VTG, perform the following steps.
For information about accessing the VTG Workspace window, see the "VTG Workspace Window" section.
Procedure
Step 1
Cisco IPICS displays a blue X next to each unavailable channel in the VTG Workspace window Active VTG Details area. Hold the mouse cursor over the blue X to see why the channel is unavailable.
Step 2
•
•
Note
Step 3
•
•
Step 4
Make sure that the channel is not needed in this active VTG before you perform this step.
Step 5
The contents of the original VTG display in the Active VTG Details area. If the VTG contains other unavailable resources, repeat Step 2 through Step 4.
Step 6
Using the Search Utility
You can use the scroll bars next to the Channels, Users, and VTGs lists in the VTG Workspace window to locate an item in a list. However, if a list is long, you may find it easier to use the Search utility to quickly find a PTT channel, user, or VTG.
When you complete a search, the results display in the Search Results list in the lower-right corner of the VTG Workspace window. To expand this list, click the plus sign (+) to its right. To collapse this list, click the minus sign (-) to its right.
To use the search utility to find a PTT channel, user, or VTG, perform the following steps.
For information about accessing the VTG Workspace window, see the "VTG Workspace Window" section.
Procedure
Step 1
The Search window appears.
Step 2
•
•
•
The Search window adjusts to display fields that apply to the item that you want to search for.
Step 3
•
A text string can be an entire channel name or VTG name, or it can be any consecutive characters in the name. For example, if you are searching for a VTG called Fire West, you could enter the text string "fire," and Cisco IPICS would return all VTGs that include fire in their name.
Text strings are not case sensitive.
•
–
A text string can be an entire name or e-mail address, or it can be any consecutive characters in the name or address. For example, if you are searching for a search for the user with the last name Williamson, you could enter the text string, "illi" in the Last Name field, and Cisco IPICS would return users whose last names include this string, such as Willis, Williams, and Williamson.
Text strings are not case sensitive.
–
–
–
For example, if you know only a portion of the user name, but you also know that the user a dispatcher in the West Side location, you can enter a character string in the User Name field and then choose Dispatcher and West Side from the Role and Location drop-down lists.
Step 4
The items that meet your search criteria display in the Search Results area.
Each item displays on its own row under columns that vary depending on the type of item (channel, user, or VTG) that you searched for.
You can resize any column by dragging the border to the right of its name.
You can toggle the display so that items display in ascending or descending order by any column heading. To do so, click the name in a column heading. An up arrow in a column indicates that items are in ascending order by that column, and a down arrow indicates that items are in descending order by that column.
If the search returns a long list or does not display the item that you want, go back to Step 3 and refine your search criteria.
Step 5
The Search window closes and the search results display in the Search Results list in the VTG Workspace window.
If you want to abandon the search, click Cancel.
Best Practices for Managing VTGs
Cisco IPICS presents new opportunities for members of your organization to participate in conferences. Some of these members may be unfamiliar with the technology, conventions, and practices of PTT communication. For example, these users may have never used a PTT device or participated in a large conference with radio users.
Other PTT users may be surprised by the experience of participating in a Cisco IPICS-managed conference. For example, a handheld radio user may be familiar with the experience of conferring only with a small number of other handheld users on a certain LMR channel. When the LMR channel for that user is placed in a VTG, that user becomes part of a potentially much larger and more diverse conference.
Changes in a conference can occur suddenly for a conference participants, especially those participating with handheld radios. For example, at one moment, a user may be speaking with one or more radio users from the same department. Then, when the dispatcher adds the LMR channel to a VTG, the user hears completely different voices.
The following guidelines can be helpful in assisting your new and experienced users with Cisco IPICS:
•
•
–
–
–
–
Managing Policies
A policy activates a VTG or VTG. You can create these types of policies:
•
•
For example, you might have a VTG that you want to activate for two hours at 9:00 a.m. (0900) on the first Friday of every month, for Fire and EMT teams of a city to discuss emergency readiness.
You could create a policy that would cause Cisco IPICS to automatically activate this VTG, which might include the City Fire PTT channel, the City EMT PTT channel, the mayor (participating on a PMC), and the Police Department Fire/EMT liaison calling from home.
When you create a policy, ensure that your system has sufficient resources to accommodate the associated VTGs. Cisco IPICS does not warn you that a policy would over-commit system resources when it activates VTGs.
As a Cisco IPICS dispatcher, you can perform these policy management tasks:
•
•
•
You perform the policy management tasks in the Administration Console Manage Policies window. For more information about this window, including how to access it, see the "Manage Policies Window" section.
Manage Policies Window
The Manage Policies window lists the policies that are configured in Cisco IPICS. It also lets you perform the policy management functions.
To open the Manage Policies window, click the Manage Policies link in the Administration Console Dispatcher tab.
Icons in the Manage Policies window provide information about each policy, as described in Table 4-3.
In addition, a policy has these designations:
•
•
Viewing and Editing Policy Details
You can view and edit information for any policy. You do so in the Edit Policy Details area.
This area also lets you enable or disable a policy.
To edit or view policy details, perform the following steps.
For information about accessing the Manage Policies window, see the "Manage Policies Window" section.
Procedure
Step 1
•
•
The Edit Policy Details area for the selected policy displays.
Note
Step 2
Note
Table 4-4 Edit Policy Details Area Fields
Policy Name
Name of the policy, for example, Executive Conference or Weekly Status Meeting.
Manually Triggered Only
Designates whether the VTGs that are associated with this policy are activated immediately when you enable the policy.
If you check this check box, Cisco IPICS makes the Activation Properties fields unavailable, and it ignores any scheduling information that is in these fields.
Associated VTGs
VTGs that this policy activates.
If you click Edit, Cisco IPICS displays the Associate VTGs to Policy window, in which you can add or remove VTGs for this policy. For more information, see the "Specifying the VTGs that are Associated with a Policy" section.
Activation Properties
Start Time: Date
Month, day, and year that the VTGs that are associated with this policy should activate.
For example, December 3 2005.
Start Time: Time
Hour, minute, and time designation (AM or PM) that the VTGs that are associated with this policy should activate.
For example, 11:45 AM.
Duration
If the VTGs that are associated with this policy should remain active for a designated time, click this radio button, and enter the duration in any combination of the days, hours, and minutes fields.
For example, 3 days 12 hours 0 minutes.
End Time: Date
If the VTGs that are associated with this policy should deactivate a designated date and time, click the End Time radio button, and choose the month, day, and year that the VTGs should deactivate.
End Time: Time
If the VTGs that are associated with this policy should deactivate at a designated date and time, enter the month, and day, and choose the hour, minute, and time designation (AM or PM) that the VTGs should deactivate.
Repeat: Every
If the VTGs that are associated with this policy should automatically activate more than once, check the Repeat check box and enter any combination of days, hours, and minutes to designate the interval between activation times.
Repeat: indefinitely
If the VTGs that are associated with this policy should continue to activate and deactivate until you disable or delete the policy, click the indefinitely radio button.
Repeat: until
If the VTGs that are associated with this policy should activate and deactivate until a designated date and time, click the until radio button enter the month, day, year, hour, minute, and time designation (AM or PM) at which the VTGs should stop activating and deactivating.
Step 3
If you want to undo the changes that you made since you last clicked Save, click Revert.
Creating a Policy
Creating a policy makes it available for use by Cisco IPICS.
To create a policy, perform the following steps.
For information about accessing the Manage Policies window, see the "Manage Policies Window" section.
Procedure
Step 1
The Edit Policy Details area for a new policy displays.
Step 2
Step 3
Otherwise, continue to Step 4.
Step 4
a.
b.
Step 5
•
•
Step 6
a.
b.
–
–
Step 7
If you decide not to create this policy, click Cancel.
Step 8
Step 9
If you do not want to enable the policy now, you can enable it later as described in the "Enabling and Disabling a Policy" section.
If you checked the Manually Triggered Only check box, any VTGs that are associated with the policy will activate immediately when you click Enable Policy.
Specifying the VTGs that are Associated with a Policy
When you associate VTGs with a policy, you designate the VTGs that activate when the scheduled policy is enabled.
To associate VTGs with a policy, perform the following procedure.
For information about accessing the Manage Policy Window, see the "Manage Policies Window" section.
Procedure
Step 1
•
•
The Edit Policy Details area for the selected policy displays.
Step 2
Note
The Associate VTGs to Policy window displays. This window displays information in these areas:
•
•
Step 3
•
The VTG name appears in green in the VTGs Assigned to Policy area. A VTG in green is associated with the user when you click Save.
Repeat this procedure as needed to associate additional VTGs with the policy.
•
When you release the mouse button, the VTG name changes to red. A VTG in red is disassociated from the policy when you click Save.
Note
Repeat this procedure as needed to disassociate additional VTGs from the policy.
Step 4
If you want to undo the changes that you made since you last clicked Save, click Revert.
To exit without saving changes, click Cancel.
Step 5
The VTGs that you associated with the policy are saved in either case.
Enabling and Disabling a Policy
Enabling or disabling a policy specifies how the policy controls its associated VTGs. Table 4-5 Describes the results of these actions.
To enable or disable a policy, perform the following procedure.
For information about accessing the Manage Policy Window, see the "Manage Policies Window" section.
Procedure
Step 1
•
•
The Edit Policy Details area for the selected policy displays.
Step 2
•
The Enabled icon appears next to the policy in the Policies list, and the Enable Policy button changes to Disable Policy.
•
The Disabled icon appears next to the policy in the Policies list, and the Disable Policy button changes to Enable Policy.
Deleting a Policy
When you delete a policy, it is permanently removed from Cisco IPICS. The process also deactivates any active VTGs that are associated with the policy. Deleting a policy does not affect any VTGs that are associated with that policy.
You cannot delete a policy when any VTGs that are associated with the policy have been activated by the policy.
To delete a policy, perform the following procedure.
For information about accessing the Manage Policy Window, see the "Manage Policies Window" section.
Procedure
Step 1
The policy becomes highlighted in blue.
Step 2
A dialog box prompts you to confirm the deletion.
Step 3
If you do not want to delete this policy, click Cancel.