簡介
本文檔介紹如何配置Active Directory Federation Service (AD FS) 2.0版,以便為思科合作產品(如Cisco Unified Communications Manager (CUCM)、Cisco Unity Connection (UCXN)、CUCM IM and Presence和Cisco Prime Collaboration)啟用安全斷言標籤語言(SAML)單一登入(SSO)。
必要條件
需求
必須安裝並測試AD FS 2.0版。
注意:本安裝指南基於實驗室設定,假設AD FS 2.0版僅用於帶有Cisco Collaboration產品的SAML SSO。如果其他業務關鍵型應用程式使用它,則必須根據Microsoft官方文檔進行必要的自定義。
採用元件
本文中的資訊係根據以下軟體和硬體版本:
- AD FS版本2.0
- Microsoft Internet Explorer 10
- CUCM版本10.5
- Cisco IM和狀態伺服器版本10.5
- UCXN版本10.5
- Cisco Prime合作布建10.5
本文中的資訊是根據特定實驗室環境內的裝置所建立。文中使用到的所有裝置皆從已清除(預設)的組態來啟動。如果您的網路正在作用,請確保您已瞭解任何指令可能造成的影響。
設定
下載AD FS 2.0版身份提供程式(IdP)後設資料
若要下載IdP中繼資料,請在瀏覽器上執行此連結:https://<ADFS的FQDN>/FederationMetadata/2007-06/FederationMetadata.xml。
下載合作伺服器(SP)後設資料
CUCM IM和線上狀態服務
打開Web瀏覽器,以管理員身份登入CUCM,然後導航至系統> SAML單一登入。
Unity Connection
打開Web瀏覽器,以管理員身份登入UCXN,然後導航到系統設定> SAML單一登入。
Cisco Prime合作布建
打開Web瀏覽器,以globaladmin身份登入到Prime Collaboration Assurance,然後導航到Administration > System Setup > Single Sign On。
增加CUCM作為信賴方信任
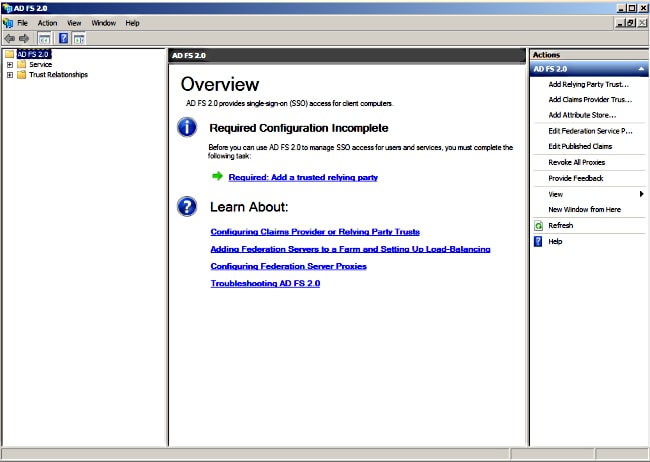
- 登入AD FS伺服器,並從Microsoft Windows Programs功能表啟動AD FS 2.0版。
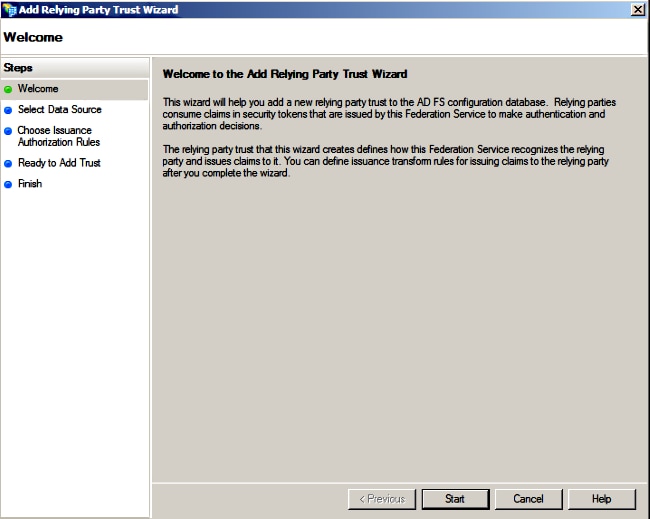
- 選擇Add Reliing Party Trust。
- 按一下Start。
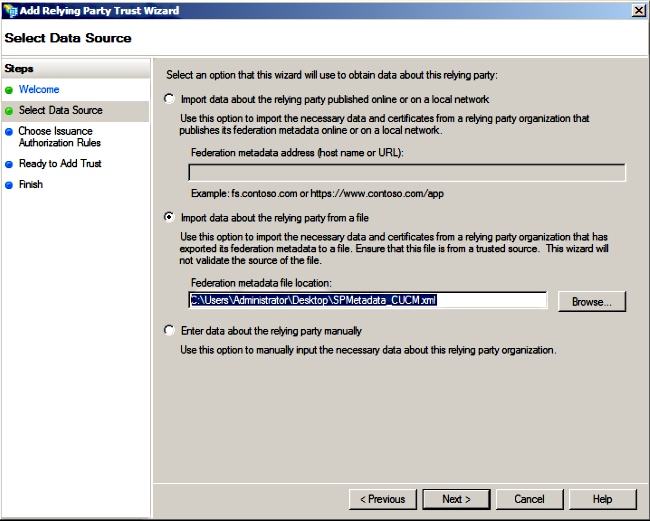
- 選擇從檔案導入有關信賴方的資料選項,選擇之前從CUCM下載的SPMetadata_CUCM.xml後設資料檔案,然後按一下下一步。
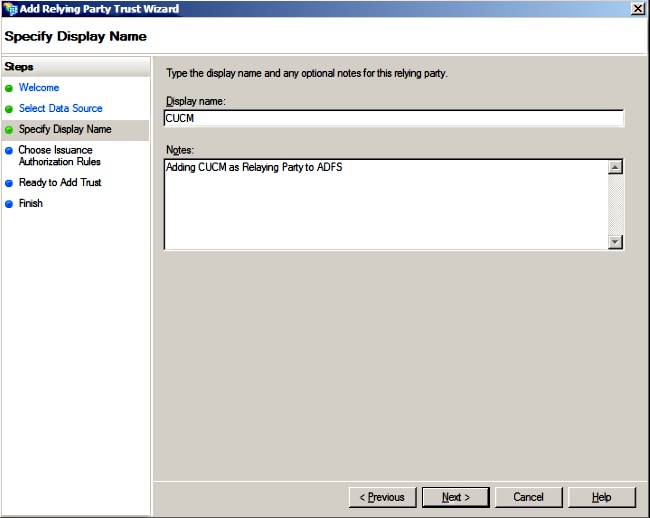
- 輸入Display name並按一下Next。
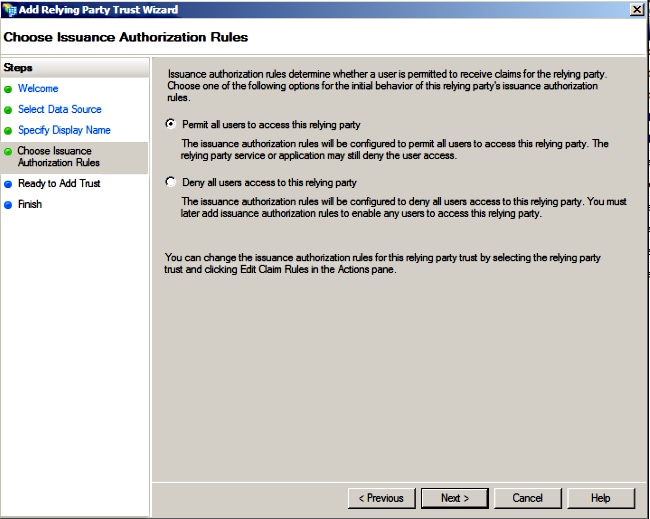
- 選擇允許所有使用者訪問此信賴方並按一下下一步。
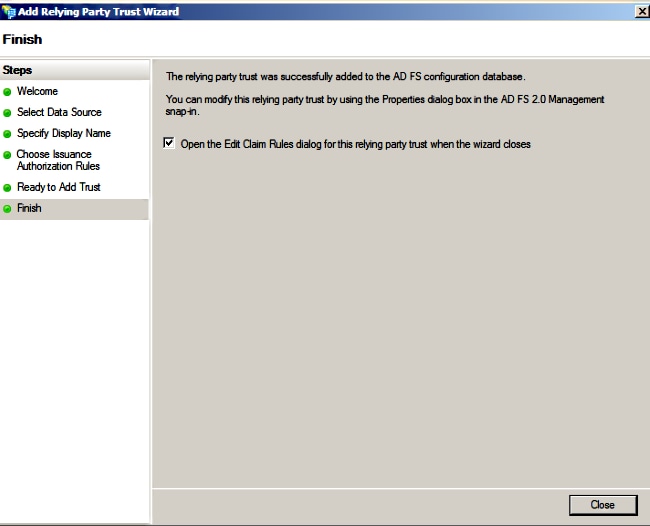
- 選擇在嚮導關閉時打開信賴方信任的「編輯宣告規則」對話方塊,然後按一下關閉。
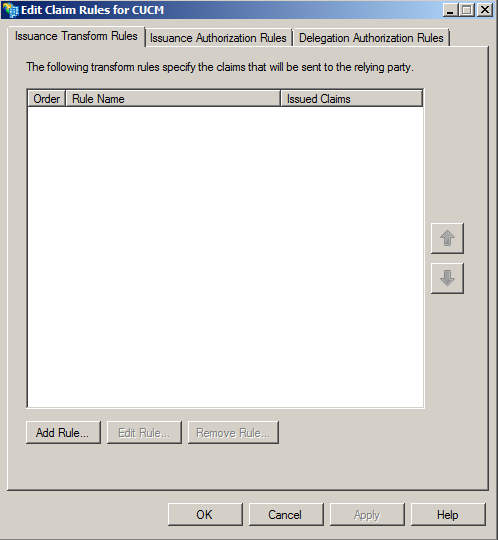
- 按一下Add Rule。
- 在預設宣告規則模板設定為Send LDAP Attributes as Claims的情況下,按一下Next。
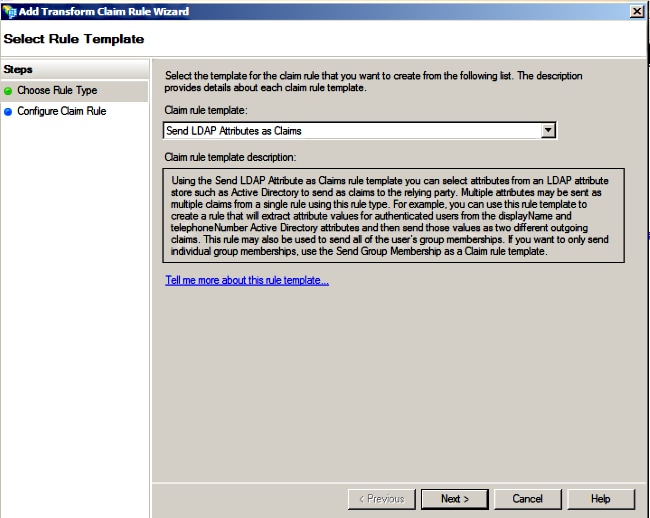
- 在配置規則中,輸入宣告規則名稱,選擇Active Directory作為屬性儲存,配置LDAP屬性和傳出宣告型別(如圖所示),然後按一下完成。
附註:
- 輕型目錄訪問協定(LDAP)屬性應與CUCM上的目錄同步屬性匹配。
- 「uid」應使用小寫。

- 點選增加規則,選擇使用自定義規則傳送宣告作為宣告規則模板,然後點選下一步。


- 輸入宣告規則名稱的名稱,並在自訂規則下指定的空格中複製此語法:
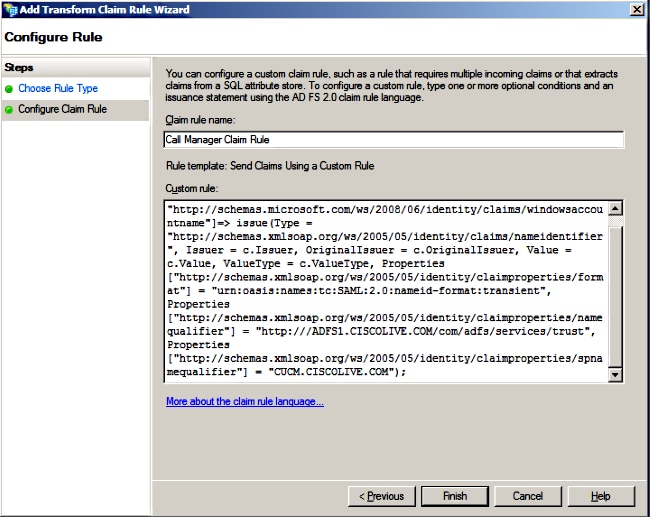
c:[Type == "http://schemas.microsoft.com/ws/2008/06/identity/claims/windowsaccountname"]=> issue(Type = "http://schemas.xmlsoap.org/ws/2005/05/identity/claims/nameidentifier", Issuer = c.Issuer, OriginalIssuer = c.OriginalIssuer, Value = c.Value, ValueType = c.ValueType, Properties["http://schemas.xmlsoap.org/ws/2005/05/identity/claimproperties/format"] = "urn:oasis:names:tc:SAML:2.0:nameid-format:transient", Properties["http://schemas.xmlsoap.org/ws/2005/05/identity/claimproperties/namequalifier"] = "http://<FQDN of ADFS>/com/adfs/services/trust", Properties["http://schemas.xmlsoap.org/ws/2005/05/identity/claimproperties/spnamequalifier"] = "<FQDN of CUCM>");
(注意:如果您複製並貼上這些範例中的文字,請注意某些文書處理軟體會以UNICODE版本(「」)取代ASCII引號(「)。UNICODE版本會導致宣告規則失敗。)
附註:
- 在本示例中,CUCM和ADFS完全限定域名(FQDN)預填充了實驗CUCM和AD FS,必須對其進行修改以符合您的環境。
- CUCM/ADFS的FQDN區分大小寫,必須與後設資料檔案匹配。
- 按一下「Finish」(結束)。
- 按一下Apply,然後按一下OK。
- 從Services.msc重新啟動AD FS版本2.0服務。
增加CUCM IM和線上狀態作為信賴方信任
- 重複增加CUCM為信賴方信任所述的步驟1到11,然後繼續步驟2。
- 輸入宣告規則名稱的名稱,並在自訂規則下指定的空格中複製此語法:
c:[Type == "http://schemas.microsoft.com/ws/2008/06/identity/claims/windowsaccountname"]=> issue(Type = "http://schemas.xmlsoap.org/ws/2005/05/identity/claims/nameidentifier", Issuer = c.Issuer, OriginalIssuer = c.OriginalIssuer, Value = c.Value, ValueType = c.ValueType, Properties["http://schemas.xmlsoap.org/ws/2005/05/identity/claimproperties/format"] = "urn:oasis:names:tc:SAML:2.0:nameid-format:transient", Properties["http://schemas.xmlsoap.org/ws/2005/05/identity/claimproperties/namequalifier"] = "http://<FQDN of ADFS>/com/adfs/services/trust", Properties["http://schemas.xmlsoap.org/ws/2005/05/identity/claimproperties/spnamequalifier"] = "<FQDN of IMP>");
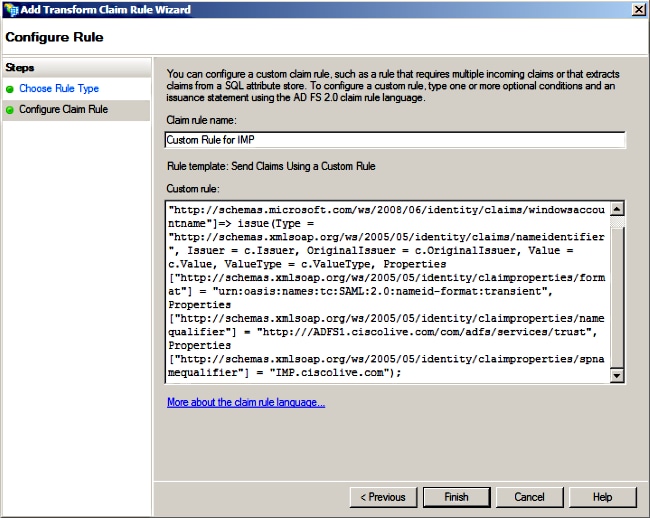
請注意,在本例中,IM and Presence和AD FS FQDN預填充了實驗室IM and Presence和AD FS,必須對其進行修改以符合您的環境。
- 按一下「Finish」(結束)。
- 按一下Apply,然後按一下OK。
- 從Services.msc重新啟動AD FS版本2.0服務。
增加UCXN作為信賴方信任
- 重複增加CUCM為信賴方信任所述的步驟1到步驟12,然後繼續步驟2。
- 輸入宣告規則名稱的名稱,並在自訂規則下的空白處複製此語法:
c:[Type == "http://schemas.microsoft.com/ws/2008/06/identity/claims/windowsaccountname"]=> issue(Type = "http://schemas.xmlsoap.org/ws/2005/05/identity/claims/nameidentifier", Issuer = c.Issuer, OriginalIssuer = c.OriginalIssuer, Value = c.Value, ValueType = c.ValueType, Properties["http://schemas.xmlsoap.org/ws/2005/05/identity/claimproperties/format"] = "urn:oasis:names:tc:SAML:2.0:nameid-format:transient", Properties["http://schemas.xmlsoap.org/ws/2005/05/identity/claimproperties/namequalifier"] = "http://<FQDN of ADFS>/com/adfs/services/trust", Properties["http://schemas.xmlsoap.org/ws/2005/05/identity/claimproperties/spnamequalifier"] = "<FQDN of UCXN>");
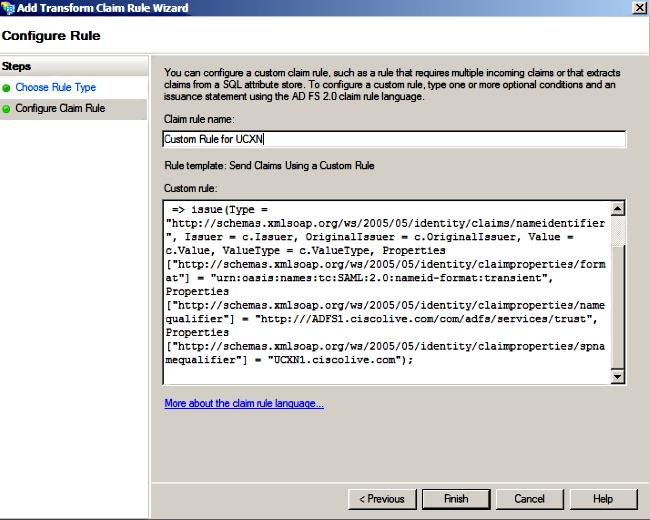
請注意,在本例中,UCXN和AD FS FQDN預填充了實驗UCXN和ADFS,必須對其進行修改以符合您的環境。
- 按一下「Finish」(結束)。
- 按一下Apply,然後按一下OK。
- 從Services.msc重新啟動AD FS版本2.0服務。
增加Cisco Prime合作調配作為信賴方信任
- 重複增加CUCM為信賴方信任所述的步驟1到步驟12,然後繼續步驟2。
- 輸入宣告規則名稱的名稱,並在自訂規則下的空白處複製此語法:
c:[Type == "http://schemas.microsoft.com/ws/2008/06/identity/claims/windowsaccountname"]=> issue(Type = "http://schemas.xmlsoap.org/ws/2005/05/identity/claims/nameidentifier", Issuer = c.Issuer, OriginalIssuer = c.OriginalIssuer, Value = c.Value, ValueType = c.ValueType, Properties["http://schemas.xmlsoap.org/ws/2005/05/identity/claimproperties/format"] = "urn:oasis:names:tc:SAML:2.0:nameid-format:transient", Properties["http://schemas.xmlsoap.org/ws/2005/05/identity/claimproperties/namequalifier"] = "http://<FQDN of ADFS>/com/adfs/services/trust", Properties["http://schemas.xmlsoap.org/ws/2005/05/identity/claimproperties/spnamequalifier"] = "<FQDN of PCP>");

請注意,本示例中的Prime調配和AD FS FQDN預填充了實驗Prime合作調配(PCP)和AD FS,必須對其進行修改以符合您的環境。
- 按一下「Finish」(結束)。
- 按一下Apply,然後按一下OK。
- 從Services.msc重新啟動AD FS版本2.0服務。
設定AD FS版本2.0後,繼續啟用思科合作產品上的SAML SSO。
驗證
目前沒有適用於此組態的驗證程序。
疑難排解
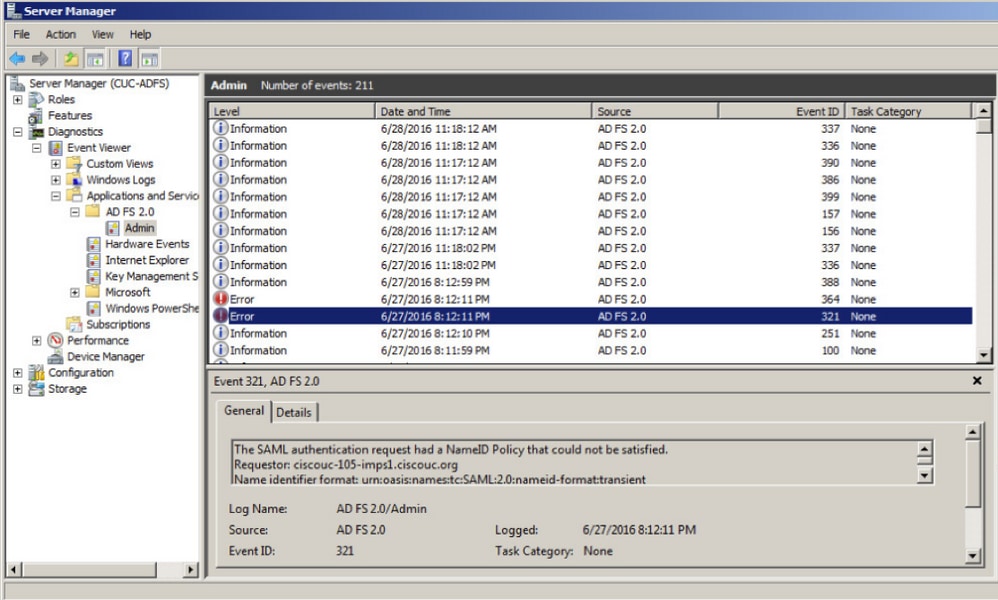
AD FS將診斷資料記錄到系統事件日誌。 從AD FS伺服器上的伺服器管理器打開Diagnostics -> Event Viewer -> Applications and Services -> AD FS 2.0 -> Admin
查詢為AD FS活動記錄的錯誤
 意見
意見