簡介
本檔案介紹如何使用Umbrella Module for Kandji RMM(macOS)設定Cisco Secure Client(CSC)。
必要條件
需求
思科建議您瞭解以下主題:
- 對Umbrella Dashboard的訪問。
- 訪問坎吉入口網站。
- 安全使用者端Umbrella模組設定檔(orginfo.json)。
- 用於要部署的版本的安全客戶端預部署包。

附註:本指南利用Kandji中的.zip部署方法,以及安裝後指令碼。
採用元件
本檔案中的資訊是根據具備Umbrella模組的思科安全使用者端。
本文中的資訊是根據特定實驗室環境內的裝置所建立。文中使用到的所有裝置皆從已清除(預設)的組態來啟動。如果您的網路運作中,請確保您瞭解任何指令可能造成的影響。
概觀
本文說明如何使用Umbrella Module for Kandji RMM(macOS)設定Cisco Secure Client(CSC)。

注意:本文自2025年3月3日起提供。Cisco Umbrella支援不保證這些說明在此日期之後有效,並且可能會根據來自Kandji的更新進行更改。
準備.zip安裝程式
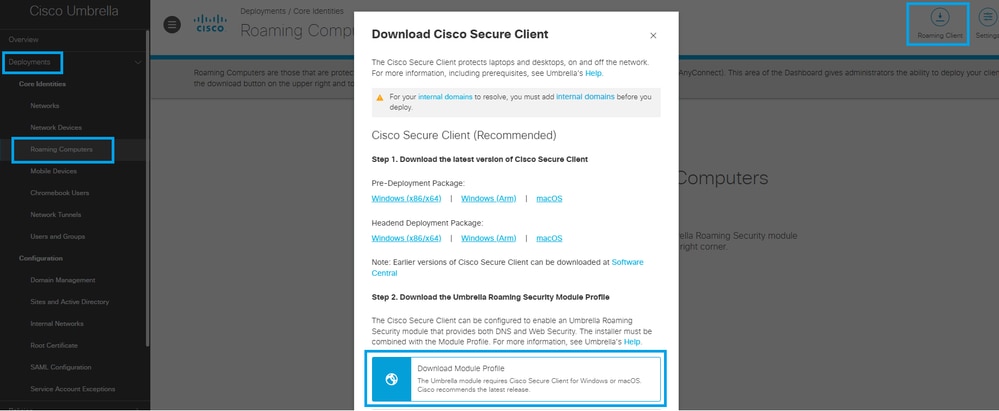
1.導航到部署>漫遊客戶端>下載>下載模組配置檔案,從而訪問您的Umbrella儀表板並下載安全客戶端Umbrella模組配置檔案(orginfo.json)。
 34747396643092
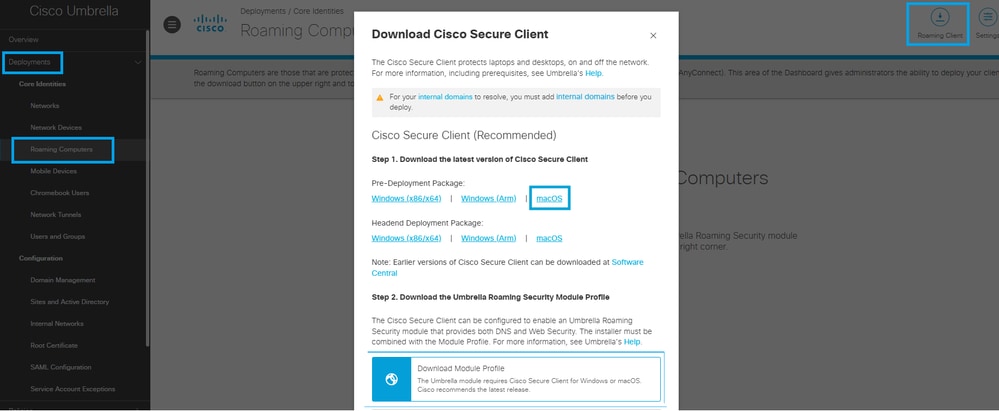
2.您還可以通過選擇預部署包來下載最新版本的macOS安裝程式。
 34747396644884
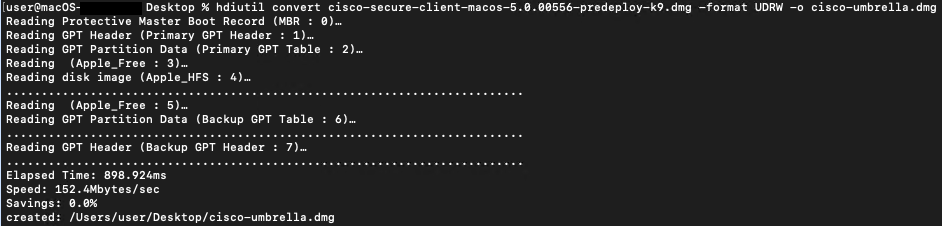
3.現在,通過將安裝程式映像更改為可寫版本,可以配置.dmg檔案以進行部署。可以使用Disk Utility或Terminal應用程式使用以下命令完成此操作:
hdiutil convert -format UDRW -o
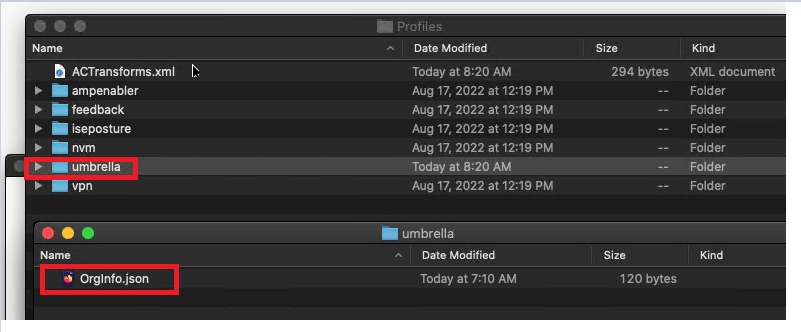
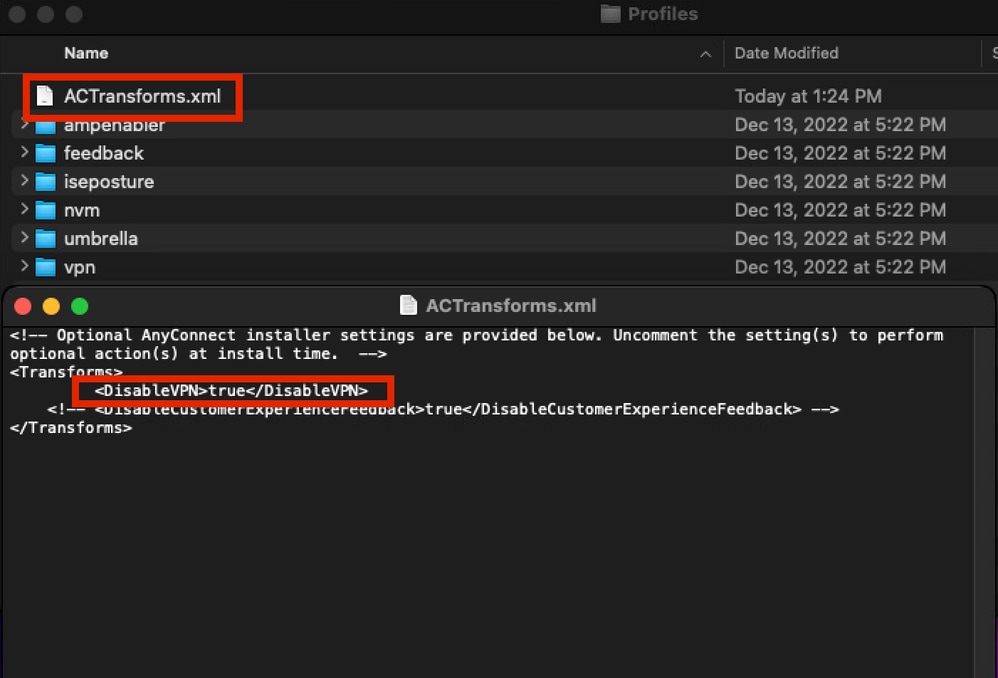
4.開啟新轉換的.dmg檔案,導航到「配置檔案」資料夾。然後,在Umbrella資料夾中,放置從儀表板下載的OrgInfo.json檔案。
 34747396647444
4.1.要選擇隱藏VPN模組,請編輯ACTransforms.xml檔案。將<DisableVPN>元素更新為true,然後刪除註釋標籤<!—和—>
 34747372903956
5.接下來,建立一個名為install_choices.xml的新檔案。此檔案可以指定要安裝的模組。
運行此命令以生成檔案:
installer -pkg /volumes/Cisco\ Secure\ Client\ /Cisco\ Secure\ Client.pkg -showChoiceChangesXML > ~/Downloads/install_choices.xml
- 要跳過模組,請使用0定義模組。
- 要安裝模組,請使用1定義模組。
該檔案需要與修改的.dmg檔案位於同一資料夾中。您的資料夾結構可能與此螢幕截圖類似:
 34747372904212
在本示例中,install_choices.xml檔案包括Core VPN、Umbrella和DART模組,每個模組都設定為1,表示它們包含在安全客戶端安裝中:
attributeSetting

choiceAttribute
visible
choiceIdentifier
choice_anyconnect_vpn


attributeSetting

choiceAttribute
enabled
choiceIdentifier
choice_anyconnect_vpn


attributeSetting
1
choiceAttribute
selected
choiceIdentifier
choice_anyconnect_vpn


attributeSetting

choiceAttribute
visible
choiceIdentifier
choice_fireamp


attributeSetting

choiceAttribute
enabled
choiceIdentifier
choice_fireamp


attributeSetting
0
choiceAttribute
selected
choiceIdentifier
choice_fireamp


attributeSetting

choiceAttribute
visible
choiceIdentifier
choice_dart


attributeSetting

choiceAttribute
enabled
choiceIdentifier
choice_dart


attributeSetting
1
choiceAttribute
selected
choiceIdentifier
choice_dart


attributeSetting

choiceAttribute
visible
choiceIdentifier
choice_secure_firewall_posture


attributeSetting

choiceAttribute
enabled
choiceIdentifier
choice_secure_firewall_posture


attributeSetting
0
choiceAttribute
selected
choiceIdentifier
choice_secure_firewall_posture


attributeSetting

choiceAttribute
visible
choiceIdentifier
choice_iseposture


attributeSetting

choiceAttribute
enabled
choiceIdentifier
choice_iseposture


attributeSetting
0
choiceAttribute
selected
choiceIdentifier
choice_iseposture


attributeSetting

choiceAttribute
visible
choiceIdentifier
choice_nvm


attributeSetting

choiceAttribute
enabled
choiceIdentifier
choice_nvm


attributeSetting
0
choiceAttribute
selected
choiceIdentifier
choice_nvm


attributeSetting

choiceAttribute
visible
choiceIdentifier
choice_secure_umbrella


attributeSetting

choiceAttribute
enabled
choiceIdentifier
choice_secure_umbrella


attributeSetting
1
choiceAttribute
selected
choiceIdentifier
choice_secure_umbrella


attributeSetting

choiceAttribute
visible
choiceIdentifier
choice_thousandeyes


attributeSetting

choiceAttribute
enabled
choiceIdentifier
choice_thousandeyes


attributeSetting
0
choiceAttribute
selected
choiceIdentifier
choice_thousandeyes


attributeSetting

choiceAttribute
visible
choiceIdentifier
choice_duo


attributeSetting

choiceAttribute
enabled
choiceIdentifier
choice_duo


attributeSetting
0
choiceAttribute
selected
choiceIdentifier
choice_duo


attributeSetting

choiceAttribute
visible
choiceIdentifier
choice_zta


attributeSetting

choiceAttribute
enabled
choiceIdentifier
choice_zta


attributeSetting
0
choiceAttribute
selected
choiceIdentifier
choice_zta
6.現在使用Disk Utility或Terminal應用程式將安裝程式映像更改為只讀版本:
hdiutil convert <source dmg> -format UDRO -o <output dmg>
7.準備Umbrella安裝的最後一步是將安裝資料夾轉換為.zip檔案,該檔案已準備上載到Kandji儀表板。
Kanji儀表板更改
1.對於macOS 13(及更高版本)和Secure Client 5.1,VPN代理需要使用者批准才能由OS啟動。要自動執行此審批流程或防止使用者禁用Secure Client擁有的登入專案,您必須部署具有為Managed Login Items配置的屬性的MDM配置檔案。
- 捆綁包識別符號字首:com.cisco.secureclient
- 團隊識別符號:DE8Y96K9QP
可以使用使用捆綁包識別符號的乾吉指南配置登入和後台項庫項建立這些項:com.cisco.secureclient。
2. Cisco Secure Client使用macOS 11(及更高版本)上的網路系統擴展,將其捆綁到一個名為「Cisco Secure Client - Socket Filter」的應用中。 接下來,您需要讓Kandji使用此處提供的識別符號安裝此程式:
- 團隊識別符號:DE8Y96K9QP
- 捆綁包識別符號:com.cisco.anyconnect.macos.acsockext
- 系統擴展型別:網路擴展
可以使用Kandji指南設定這些識別符號:系統擴展 — 概述和指南
3.思科安全客戶端必須作為自定義應用進行部署,可以使用乾吉指南完成:部署自定義應用
進入Add & Configure階段後,請針對部署進行以下調整:
- 選擇包型別:選擇ZIP檔案
- 上傳安裝程式:上傳先前在步驟7中設定的.zip檔案。
- 如果您選擇.zip檔案型別,則還可以使用其他欄位來定義解壓縮位置。(預設位置為/var/tmp/)
- 安裝後指令碼:提供要在運行包之後執行的指令碼。
- 請將
<Filename.zip>更新為先前步驟7中使用的名稱。
- 用於
包含.dmg檔案和install_choices.xml檔案的更新<資料夾名稱>
- 將
<Output dmg file.dmg>更新為先前步驟5中宣告的名稱。
示例指令碼
#!/bin/bash

# Optional extract the ZIP file. (Kandji extracts to /var/tmp by default)
#unzip "/var/tmp/Cisco Secure Client 5-1-7-80.zip" -d /var/tmp/

# Mount the DMG.
hdiutil attach "/var/tmp/<Folder Name>/<Output dmg file.dmg>"

# Run the installer with our xml choices file.
installer -pkg "/Volumes/Cisco Secure Client 5.1.7.80/Cisco Secure Client.pkg" -applyChoiceChangesXML "/var/tmp/<Folder Name>/install_choices.xml" -target /

# Check installer exit code.
if [ $? -ne 0 ]; then
echo "Error: Installation failed."
# Add any necessary cleanup or rollback actions here
exit 1
fi

# Unmount the DMG.
hdiutil detach "Cisco Secure Client 5.1.7.80"

# Remove the temp files & folders.
rm -rf /var/tmp/<Folder Name>
rm -f /var/tmp/<Filename.zip>

exit 0
如果您遇到與部署思科安全客戶端相關的部署問題,可以聯絡思科TAC團隊。
有關與Umbrella模組相關的部署問題,請通過Cisco Umbrella支援記錄支援票證。
 意見
意見