簡介
本文說明如何將Intune流動裝置管理(MDM)與思科身份服務引擎(ISE)整合。
必要條件
需求
思科建議您瞭解以下主題:
- 思科ISE中的MDM服務知識
- 瞭解Microsoft Azure Intune服務
採用元件
本文中的資訊係根據以下軟體和硬體版本:
- 思科身分識別服務引擎3.0
- Microsoft Azure Intune應用程式
本文中的資訊是根據特定實驗室環境內的裝置所建立。文中使用到的所有裝置皆從已清除(預設)的組態來啟動。如果您的網路運作中,請確保您瞭解任何指令可能造成的影響。
背景資訊
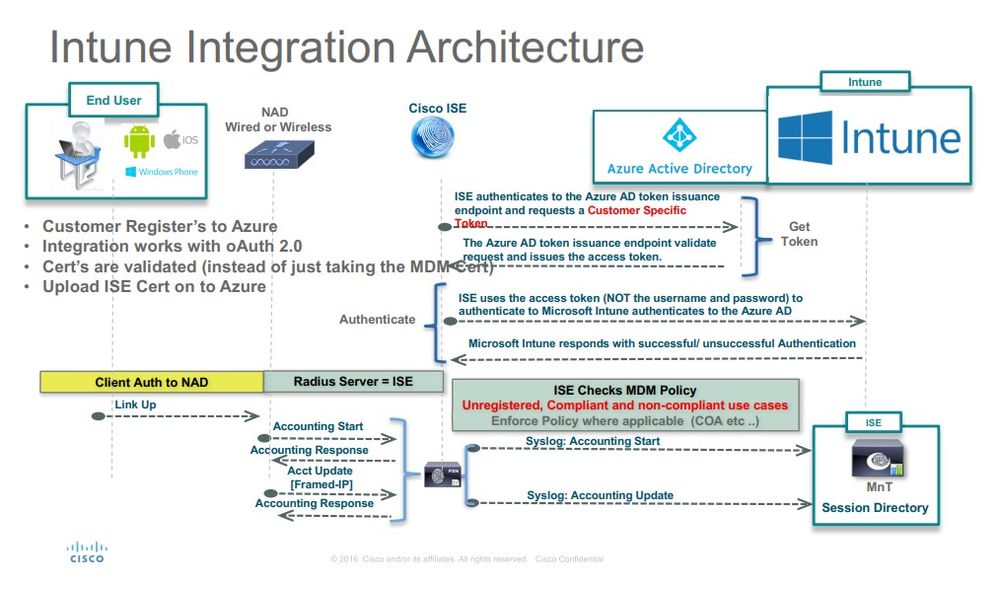
MDM伺服器可保護、監控、管理並支援跨移動運營商、服務提供商和企業部署的流動裝置。這些伺服器充當策略伺服器,控制部署環境中流動裝置上的某些應用程式(例如電子郵件應用程式)的使用。但是,網路是唯一可以根據存取控制清單(ACL)提供終端精細存取的實體。ISE向MDM伺服器查詢必要的裝置屬性,以便建立為這些裝置提供網路訪問控制的ACL。思科ISE與Microsoft Intune MDM伺服器整合,在裝置嘗試訪問本地資源時幫助組織保護企業資料。
設定
網路圖表
配置Microsoft Intune
將證書從Intune門戶匯入到ISE受信任儲存
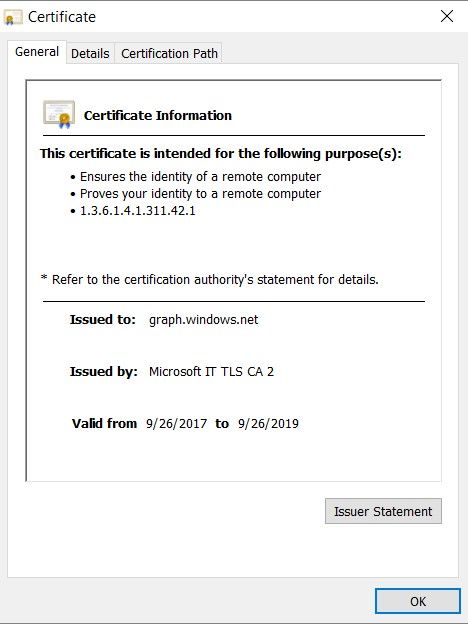
登入到Intune管理控制檯或Azure管理控制檯,無論哪個網站有你的租戶。使用瀏覽器以取得憑證詳細資訊:
步驟 1.從Web瀏覽器開啟Microsoft Azure portal。
步驟 2.按一下瀏覽器工具欄中的鎖定符號,然後按一下 View Certificates.
步驟 3.在「證書」視窗中,按一下選Certification Path 項卡。以下提供範例:

步驟 4.尋找Baltimore Cyber Trust root, 哪個是通常的根CA。但是,如果存在任何其他不同的根CA,請點選該根CA證書。在該根CA證書的Details(詳細資訊)頁籤上,可以將其複製到該檔案,並將其另存為BASE64證書。
步驟 5.在ISE中,導航到Administration > System > Certificates > Trusted Certificates, 並匯入剛儲存的根證書。為證書指定一個有意義的名稱, Azure MDM例如。對中間CA憑證也重複此程式。
將ISE部署為Azure門戶中的應用程式
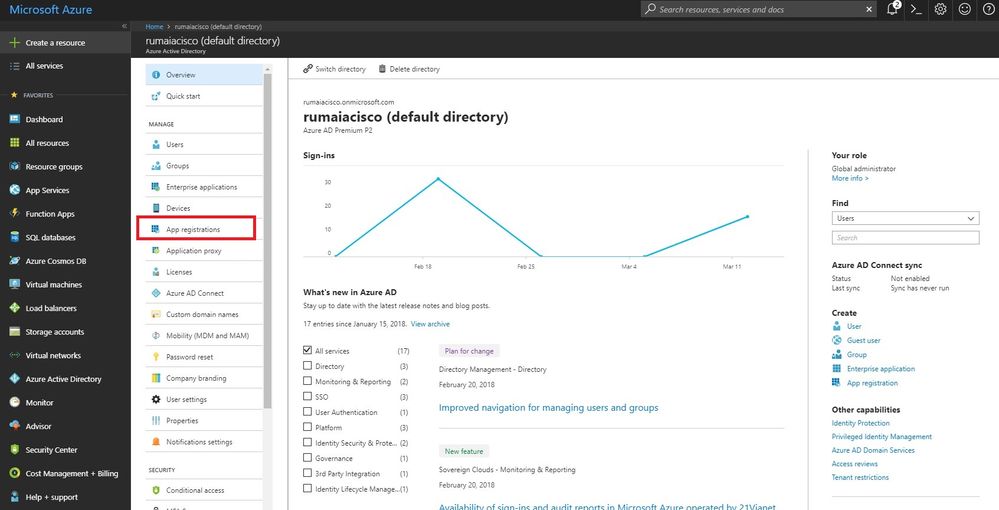
步驟 1.導航到Azure Active Directory,然後選擇 App registrations.
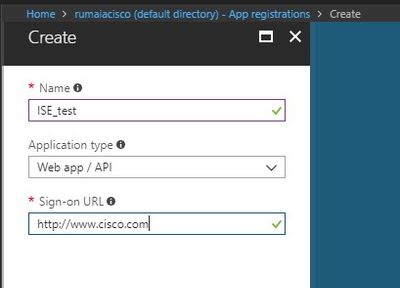
步驟 2.在中App registrations, 使用ISE名稱建立新的應用程式註冊。按一下Create,如下圖所示。
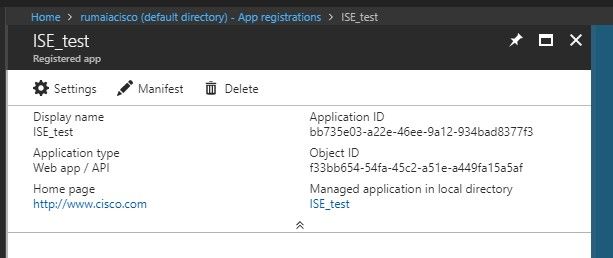
步驟 3.選擇Settings,以編輯應用程式並新增所需的元件。
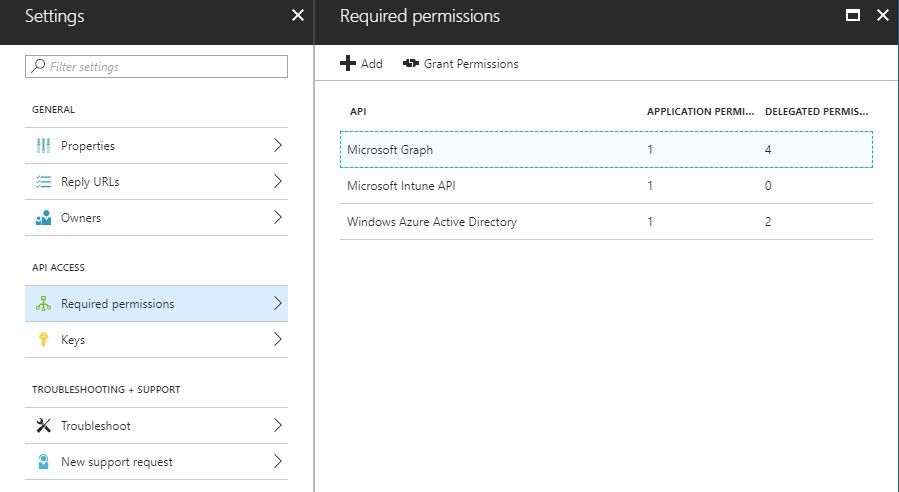
步驟 4.在下Settings, 選擇所需的許可權,並應用以下選項:
- Microsoft Graph
- 授權的許可權
- 閱讀Microsoft Intune裝置配置和策略
- 讀取Microsoft Intune配置
- 使用者登入
- 隨時訪問使用者資料
- Microsoft Intune API
- 從Microsoft Intune獲取裝置狀態和合規性資訊
- Windows Azure Active Directory
組態的結果與以下所示類似:
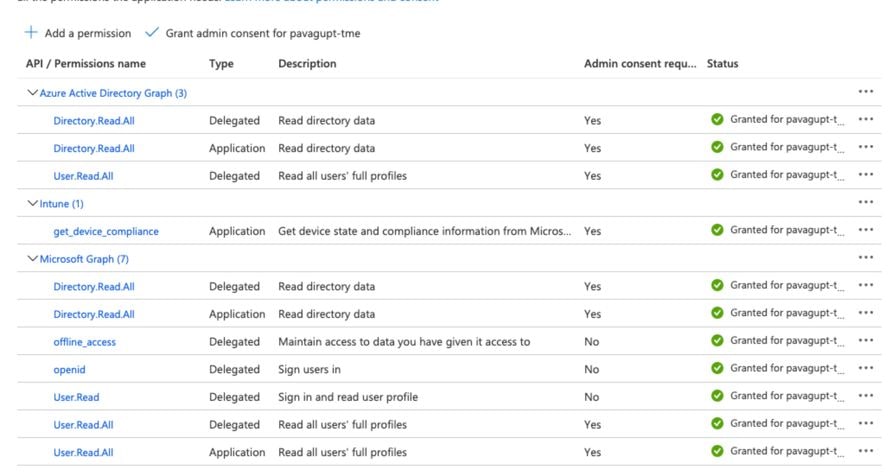
步驟 5.按一下Grant Permissions,確認所有應用程式許可權。此過程需要5-10分鐘才能生效。編輯創建的應用程式的檔案,以匯入內部ISE CA證書Azure Manifest。
將ISE證書匯入Azure中的應用程式
步驟 1.下載應用程式的清單檔案。
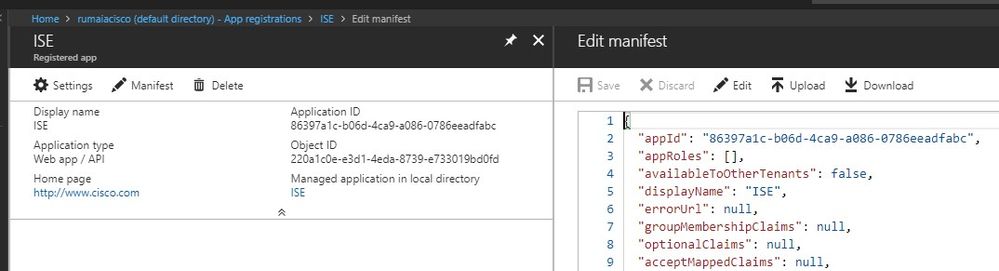
註:該檔案具有JSON副檔名。請勿編輯檔名或副檔名,否則它將失敗。
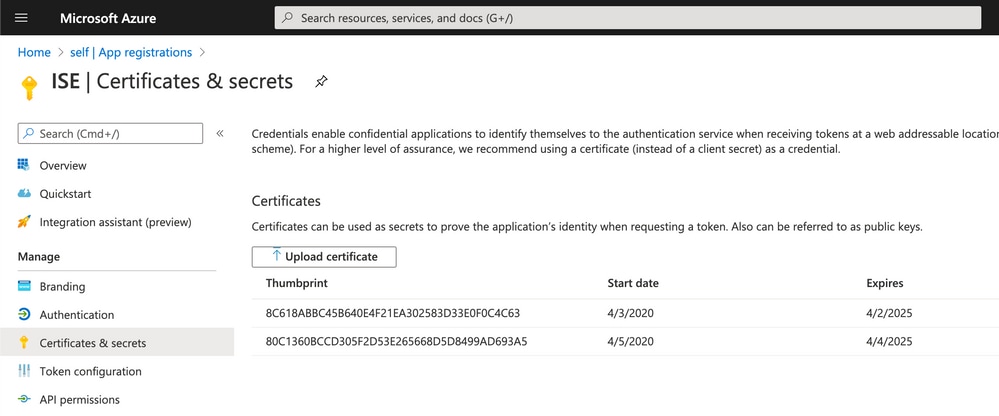
步驟 2.從所有節點匯出ISE系統證書。在PAN上,導航至Administration > System > Certificates > System Certificates, 選擇Default self-signed server certificate,然後點選Export.。選擇Export Certificate Only(預設),然後選擇要儲存的位置。從證書中刪除BEGIN和END標籤,並將其余文本作為一行進行複製。這適用於舊版選項部分所述的2020年6月之前的版本。

從2020年6月起,門戶允許您直接上傳證書。
舊版選項:
步驟 1.運行PowerShell過程以將證書轉換為BASE64並正確將其匯入到Azure JSON清單檔案。從Windows使用Windows PowerShell或Windows PowerShell ISE應用程式。使用以下命令:
$cer = New-Object System.Security.Cryptography.X509Certificates.X509Certificate2 $cer.Import(“mycer.cer”) $bin = $cer.GetRawCertData() $base64Value = [System.Convert]::ToBase64String($bin) $bin = $cer.GetCertHash() $base64Thumbprint = [System.Convert]::ToBase64String($bin) $keyid = [System.Guid]::NewGuid().ToString()
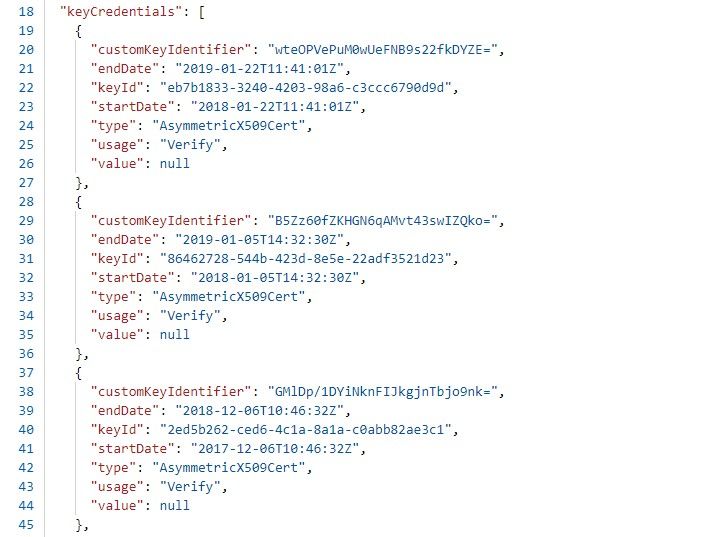
步驟 2.保留、和 $base64Thumbprint, $base64Value的值, $keyid這些值將在下一步中使用。所有這些值都將新增到JSON欄位keyCredentials中,因為預設情況下如下所示:

為此,請確保按以下順序使用值:
"keyCredentials": [ { “customKeyIdentifier“: “$base64Thumbprint_from_powerShell_for_PPAN”, “keyId“: “$keyid_from_above_PPAN“, "type": "AsymmetricX509Cert", "usage": "Verify", "value": "Base64 Encoded String of ISE PPAN cert" }, { “customKeyIdentifier“: “$base64Thumbprint_from_powerShell_for_SPAN”, “keyId“: “$keyid_from_above_SPAN“, "type": "AsymmetricX509Cert", "usage": "Verify", "value": "Base64 Encoded String of ISE SPAN cert" } ],
步驟 3.將編輯的JSON檔案上傳到Azure門戶,以便從keyCredentialsISE上使用的證書中驗證。
其外觀必須如下所示:
步驟 4.請注意,上傳後,系統會顯示下面的字 value 段,因為Microsoft端會強制執行該操 keyCredentials 作,以便在第一次上傳後不允許看到這些值 null 值。
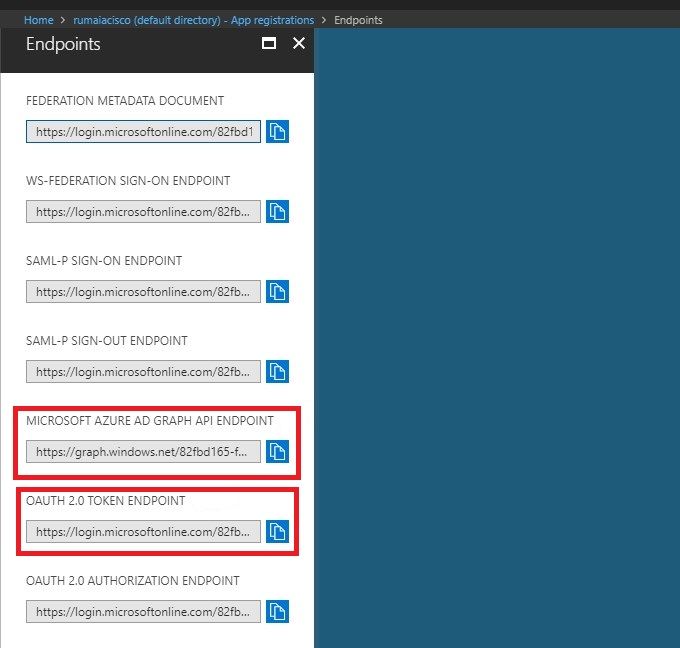
ISE中新增MDM伺服器所需的值可從和 Microsoft Azure AD Graph API Endpoint 復 OAUTH 2.0 Token Endpoint制。
必須在ISE GUI中輸入這些值。導覽至Administration > Network Resources > External MDM 並新增伺服器:
| ISE |
Intune |
| 自動發現URL |
終結點> Microsoft Azure AD Graph API終結點 |
| 客戶端ID |
{Registered-App-Name} >應用程式ID |
| 令牌頒發URL |
終結點> OAuth 2.0令牌終結點 |
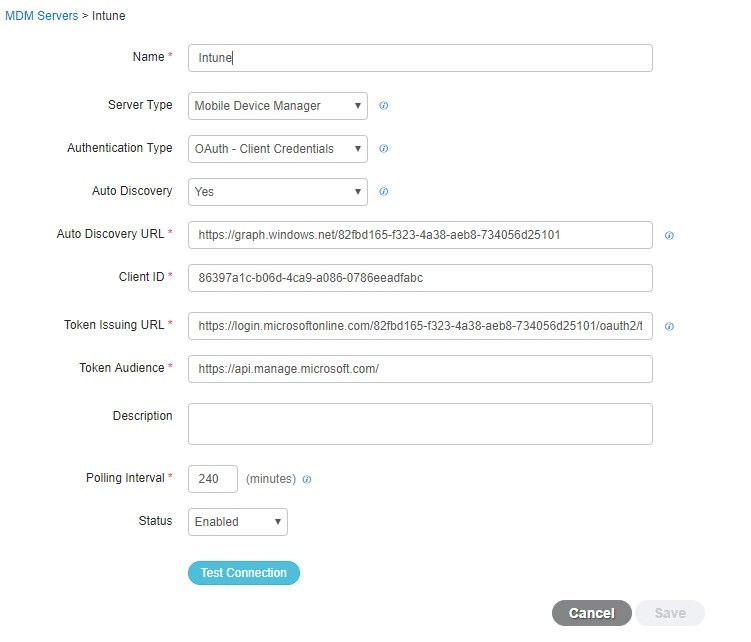
組態完成後,狀態顯示已啟用。

驗證和疑難排解
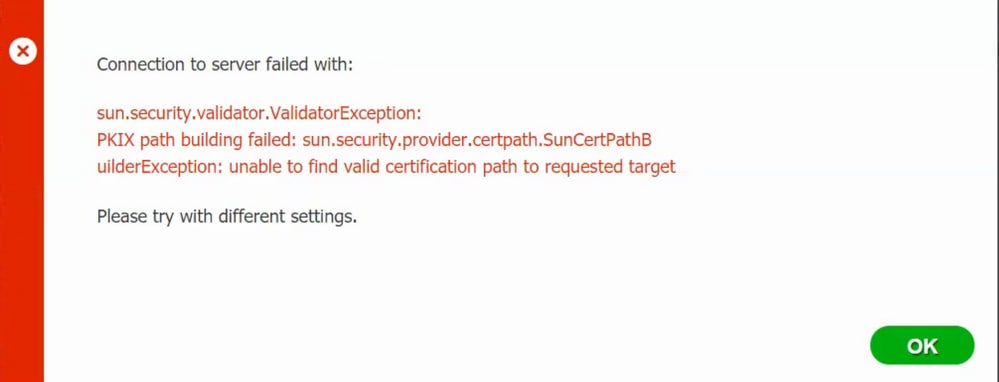
基於sun.security.validator.ValidatorException的「連線到伺服器失敗」
步驟 1.在TRACE級別使用以下日誌收集支援捆綁包:
portal (guest.log) mdmportal (ise-psc.log) external-mdm (ise-psc.log)
步驟 2.檢查 ise-psc.log 以下日誌:
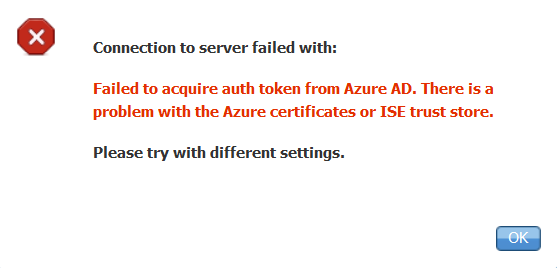
2016-10-17 12:45:52,158 DEBUG [admin-http-pool9300][] cisco.cpm.mdm.authtoken.MdmAzureActiveDirectoryClient -::::- ClientId - a46a6fd7-4a31-4471-9078-59cb2bb6a5ab, Token issuance endpoint - https://login microsoftonline.com/273106dc-2878-42eb-b7c8-069dcf334687/oauth2/token, ResourceId/App Id uri - https://graph.windows.net 2016-10-17 12:45:52,329 DEBUG [admin-http-pool9300][] cisco.cpm.mdm.authtoken.MdmCertAndKeyUtil -::::- Certificate Friendly Name -USMEM-AM01-ISE.Sncorp.smith-nephew.com#USMEM-AM01-ISE.Sncorp.smith-nephew.c om#00003 2016-10-17 12:45:52,354 DEBUG [admin-http-pool9300][] cisco.cpm.mdm.authtoken.MdmCertAndKeyUtil -::::- Result of command invocation 2016-10-17 12:45:52,363 DEBUG [admin-http-pool9300][] cisco.cpm.mdm.authtoken.MdmCertAndKeyUtil -::::- Result of command invocation 2016-10-17 12:45:52,364 DEBUG [admin-http-pool9300][] cisco.cpm.mdm.authtoken.MdmCertAndKeyUtil -::::- Successfuly decrypted private key 2016-10-17 12:45:52,794 ERROR [admin-http-pool9300][] cisco.cpm.mdm.authtoken.MdmAzureActiveDirectoryClient -::::- There is a problem with the Azure certificates or ISE trust store. sun.security.validator .ValidatorException: PKIX path building failed: sun.security.provider.certpath.SunCertPathBuilderException: unable to find valid certification path to requested target 2016-10-17 12:45:52,794 ERROR [admin-http-pool9300][] cisco.cpm.mdm.authtoken.MdmAzureActiveDirectoryClient -::::- Unable to acquire access token from Azure java.util.concurrent.ExecutionException: javax.net.ssl.SSLHandshakeException: sun.security.validator.ValidatorException: PKIX path building failed: sun.security.provider.certpath.SunCertPathBuilderException : unable to find valid certification path to requested target
這表示需要匯入此頁graph.microsoft.com 上的證書。

步驟 3.點選圖標locker並檢查證書詳細資訊。
步驟 4.以BASE64格式將其儲存到檔案,並匯入到ISE受信任儲存。確保匯入完整的證書鏈。然後,再次測試與MDM伺服器的連線。
無法從Azure AD獲取身份驗證令牌
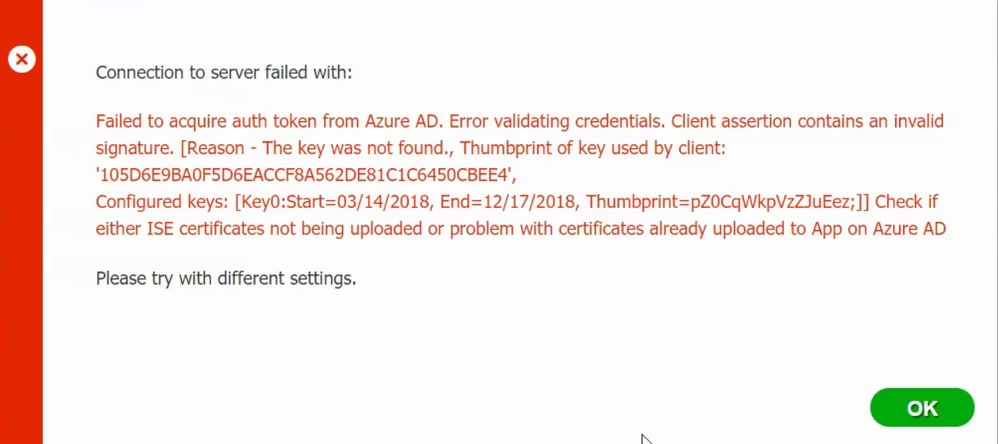
通常,當清單檔案包含錯誤JSON 的ISE證書鏈時會發生此錯誤。在將清單檔案上載到Azure之前,請驗證是否至少存在此配置:
"keyCredentials": [ { “customKeyIdentifier“: “$base64Thumbprint_from_powerShell_for_PPAN”, “keyId“: “$keyid_from_above_PPAN“, "type": "AsymmetricX509Cert", "usage": "Verify", "value": "Base64 Encoded String of ISE PPAN cert" }, { “customKeyIdentifier“: “$base64Thumbprint_from_powerShell_for_SPAN”, “keyId“: “$keyid_from_above_SPAN“, "type": "AsymmetricX509Cert", "usage": "Verify", "value": "Base64 Encoded String of ISE SPAN cert" } } ],
上一個示例基於存在PAN和SAN的場景。再次從PowerShell運行指令碼並導入正確的BASE64值。嘗試上載清單檔案,並且不能面臨任何錯誤。
$cer = New-Object System.Security.Cryptography.X509Certificates.X509Certificate2 $cer.Import(“mycer.cer”) $bin = $cer.GetRawCertData() $base64Value = [System.Convert]::ToBase64String($bin) $bin = $cer.GetCertHash() $base64Thumbprint = [System.Convert]::ToBase64String($bin) $keyid = [System.Guid]::NewGuid().ToString()
請記得應用「配置」 $base64Thumbprint, $base64Value 部 $keyid 分中步驟中提到的和的值。
無法從Azure AD獲取身份驗證令牌
通常,當中沒有為Azure應用授予正確的許可權時,會發生此錯 portal.azure.com誤。驗證你的應用具有正確的屬性,並確保每次更改後都按一下Grant Permissions。
當ISE嘗試訪問令牌頒發URL並返回ISE沒有的證書時,會出現此消息。確保完整CA鏈位於ISE信任儲存中。如果在ISE的受信任儲存中安裝了正確的證書後問題仍然存在,請執行資料包捕獲並測試連線,以便檢視正在傳送的內容。
相關資訊
 意見
意見