簡介
本檔案介紹如何透過GUI和CLI從網路功能虛擬化基礎架構軟體(NFVIS)和企業網路運算系統(ENCS)收集技術支援檔案。
技術支援檔案包含配置資訊、日誌和診斷資料,可幫助TAC進行故障排除和解決技術問題。
必要條件
需求
本文件沒有特定需求。
採用元件
本檔案中的資訊是根據Cisco Enterprise NFVIS 3.7.1及更新版本。
本文中的資訊是根據特定實驗室環境內的裝置所建立。文中使用到的所有裝置皆從已清除(預設)的組態來啟動。如果您的網路運作中,請確保您瞭解任何指令可能造成的影響。
NFVIS技術支援套件:WebUI方法
在NFVIS Web介面中,您可以下載技術支援捆綁包日誌捆綁包,如下所示:
步驟1.登入NFVIS並瀏覽至Host(1)底下的Diagnostics(2),如下圖所示。
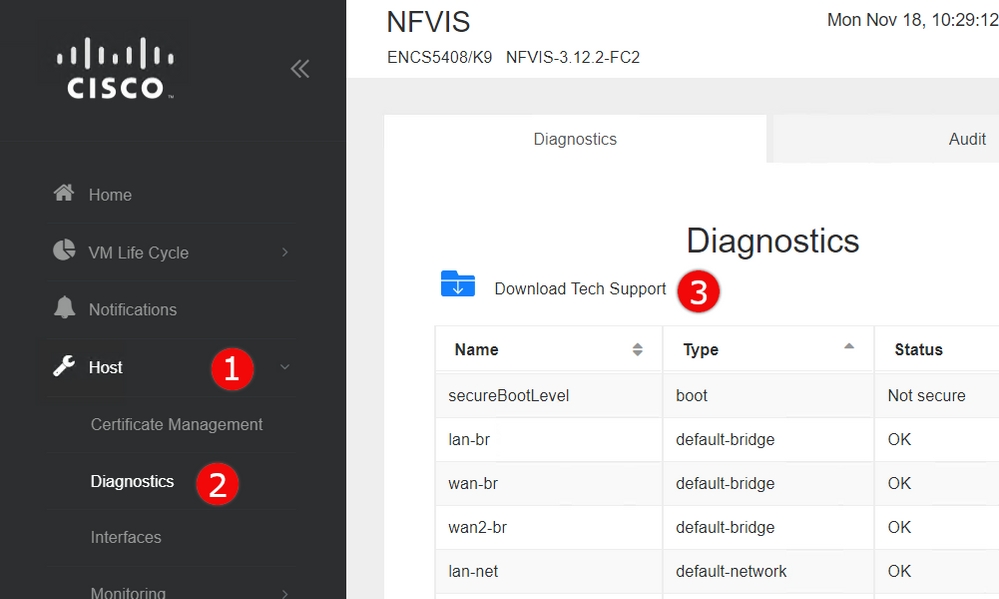
步驟2.按一下Download Tech Support(3)。 等待幾分鐘後,將出現一個彈出視窗來下載該檔案。如果未出現此情況,請確保將您的Web瀏覽器設定為允許來自您連線的NFVIS伺服器的彈出視窗。
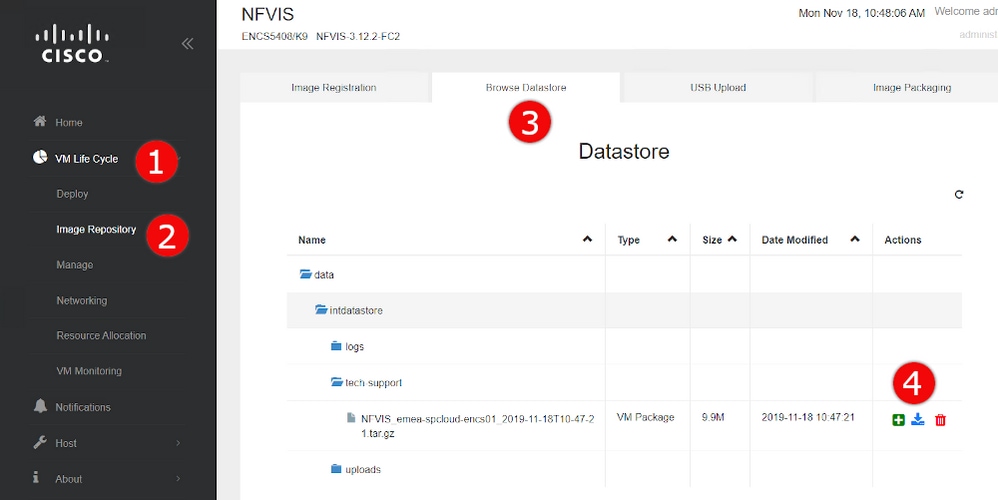
下載以前生成的技術支援檔案:如果您需要重新下載以前生成的技術支援檔案,請導航到Image Repository(2)頁(位於VM生命週期(1)下),然後選擇Browse Datastore(3)。 您可以在intdatastore的tech-support子目錄下找到以前生成的技術支援。按一下藍色箭頭圖示(4)以下載檔案(如圖所示)。
NFVIS技術支援套件:CLI方法
通過NFVIS命令列介面(CLI),您可以生成技術支援捆綁包,然後通過上載到SCP伺服器或複製到USB驅動器來傳輸它。要訪問CLI,請通過安全外殼(SSH)或控制檯連線到NFVIS。
上載到SCP伺服器
使用以下步驟生成技術支援捆綁包,並通過SCP將其傳輸到遠端伺服器:
|
命令或操作 |
目的 |
| 步驟 1 |
nfvis#技術支援 |
啟動NFVIS技術支援收集
|
| 步驟 2 |
nfvis# show system file-list disk local path /data/intdatastore/tech-support |
這將返回所有技術支援捆綁包的清單。請務必識別在上一步中建立的捆綁包的檔名,因為以下步驟中需要該檔案。
|
| 步驟 3 |
nfvis#system file-copy source source-path destination target-path
|
(選用)
將檔案移到另一個目錄
| 提示 |
使用3.9.1之前的NFVIS版本,只能執行到/從「intdatastore:」、「extdatastore1:」、「extdatastore2:」、「usb:」和「nfs:」路徑字首的安全複製,其中都不包括儲存技術支援捆綁包的預設路徑,因此您必須手動將檔案複製到這些路徑之一,才能在下一步中將其進行SCP。
在NFVIS 3.9.1及更高版本中,為儲存技術支援捆綁包的路徑新增了新的路徑字首「techsupport:」,允許直接執行安全複製,因此不需要執行此附加步驟。
|
|
步驟 4
|
nfvis# scp <path prefix>:<filename> <remote user>@<remote host>:<path> |
使用前面步驟中確定的路徑和檔名將檔案傳輸到遠端SCP伺服器。
|
附註:您還可以使用安全複製協定(SCP)客戶端從NFVIS下載該檔案。您需要首先允許傳入SCP連線至NFVIS。有關詳細資訊,請參閱思科企業網路功能虛擬化基礎設施軟體配置指南。
以下示例說明如何使用NFVIS 3.9.1或更高版本生成技術支援捆綁包並將其傳送到SCP伺服器:
encs01# tech-support

encs01# show system file-list disk local path /data/intdatastore/tech-support
SI NO NAME PATH SIZE TYPE DATE MODIFIED
-------------------------------------------------------------------------------------------------------------------------------------
388 NFVIS_encs01_2018-12-28T08-32-47.tar.gz /data/intdatastore/tech-support 737K VM Package 2018-12-28 08:32:47

encs01# scp techsupport:NFVIS_encs01_2018-12-28T08-42-35.tar.gz root@192.168.0.1:/tmp
root@192.168.0.1's password:
NFVIS_encs01_2018-12-28T08-42-35.tar.gz
encs01#
複製到USB驅動器:
使用以下示例中的步驟生成技術支援捆綁包並將其複製到USB驅動器。
附註:在連線到NFVIS之前,必須使用exFAT檔案系統的FAT32對USB驅動器進行格式化。
1. Mount the connected USB drive:
     BXB5406-NFVIS(config)# system usb-mount mount ACTIVE
     BXB5406-NFVIS(config)# commit
     Commit complete.
     BXB5406-NFVIS(config)# end

2. Generate the tech-support bundle with the “tech-support” command.
     BXB5406-NFVIS# tech-support

3. Get the name of the tech-support file:
     BXB5406-NFVIS# show system file-list disk local path /data/intdatastore/tech-support system file-list disk local 1
      name          NFVIS_BXB5406-NFVIS-401_2020-01-21T15-53-23.tar.gz
      path          /data/intdatastore/tech-support
      size          21K
      type          "VM Package"
      date-modified "2020-01-21 15:53:23"

4. Identify the filepath for your USB drive using "show system file-list disk usb" (note, usb3 will not be selected each time), for example:
     nfvis# show system file-list disk usb
       SI NO NAME PATH SIZE TYPE DATE MODIFIED
       ------------------------------------------------------------------------------------------------------------
       1 WPSettings.dat /mnt-usb/usb3/System Volume Information 12 Other 2019-12-02 11:15:22
       2 IndexerVolumeGuid /mnt-usb/usb3/System Volume Information 76 Other 2019-12-02 11:15:22
       3 boarding-pass-london.pdf /mnt-usb/usb3 668K Other 2020-02-06 22:26:54

5. Use the filename learned above to copy that file to the USB drive using the SCP command (note that here the 'scp' command used allows
   for making a simple local file copy by specifying a local source and destination, there is no actual scp transfer).
     BXB5406-NFVIS# scp techsupport:NFVIS_BXB5406-NFVIS_2020-01-21T15-53-23.tar.gz usb:usb3/BXB5406-NFVIS_2020-01-21T15-53-23.tar.gz

6. Confirm the tech-support file is now on the USB drive:
     BXB5406-NFVIS # show system file-list disk usb name
     SI NO  NAME
     -------------------------------------------------------
     1      Cisco_NFVIS_BRANCH_Upgrade-3.12.3-RC4.nfvispkg
     2      Logs-for-pahayes.zip
     3      NFVIS_BXB5406-NFVIS_2020-01-21T15-53-23.tar.gz

7. Un-mount the USB drive and remove it
     BXB5406-NFVIS (config)# no system usb-mount mount ACTIVE
     BXB5406-NFVIS (config)# commit
     Commit complete.
     BXB5406-NFVIS (config)# end
CIMC Tech-Support捆綁包:WebUI方法
此方法適用於Cisco UCS-E系列、UCS-C系列、思科雲服務平台(CSP)和ENCS(ENCS 5104除外)。
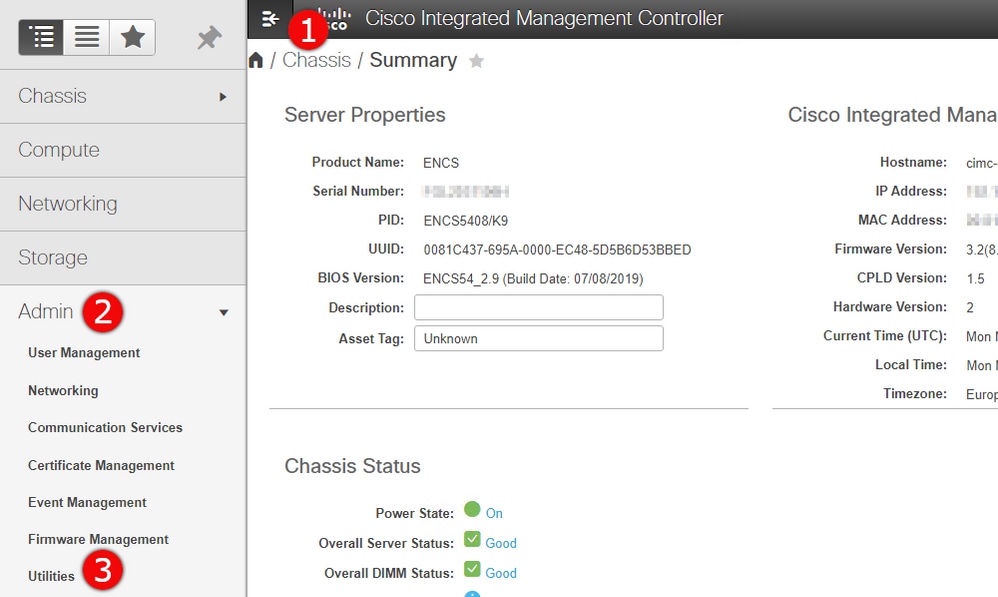
步驟1.登入CIMC,開啟左側選單(1)並瀏覽至Admin(2)底下的Utilities(3)。
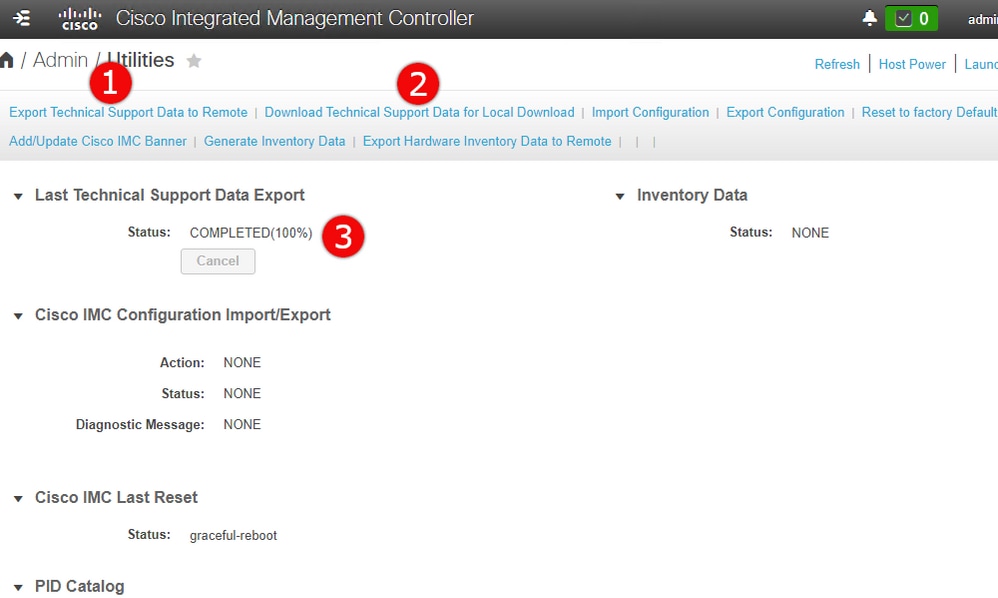
步驟2.在「實用程式」下,有兩個選項 — Export Technical Support Data to remote(1)或Download Technical Support Data for Local download(2)。它還會顯示Last Technical Support Data Export(3)的狀態。 按一下「Download Technical Support Data for Local Download(2)」,如下圖所示。
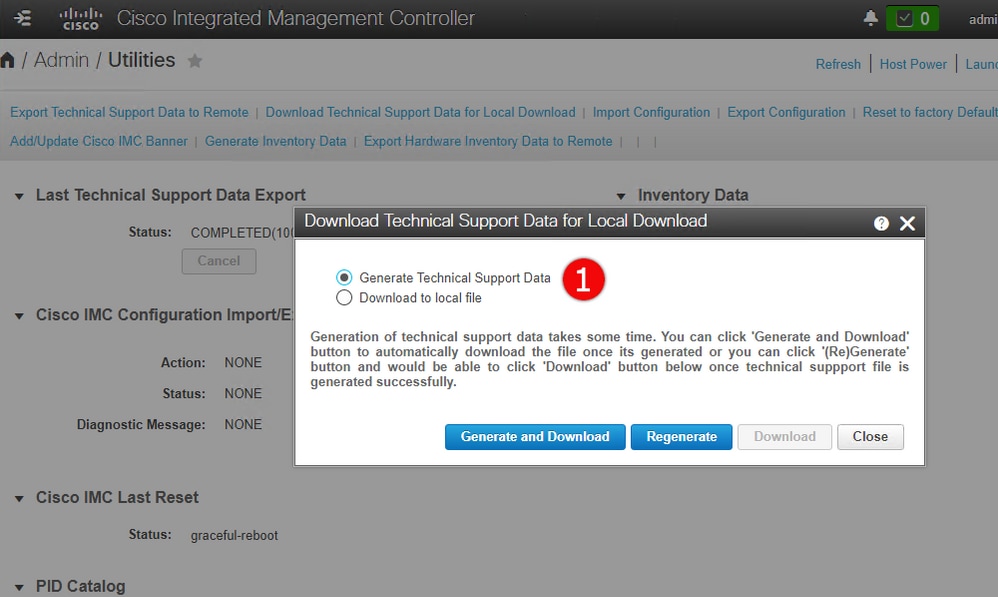
步驟3.在快顯訊息中按一下Generate and Download Technical Support Data(1)。 產生技術支援套件組合需要幾分鐘時間,如下圖所示。
CIMC技術支援套件:CLI方法
此方法適用於Cisco UCS-E系列、UCS-C系列、CSP和ENCS(ENCS 5104除外)。
若要產生技術支援,請使用所選的SSH使用者端連接至思科整合式管理控制器(CIMC)。
附註:若要使用此方法,需要將本地網路中的主機配置為TFTP/FTP/SFTP/SCP/HTTP服務器。
|
命令或操作 |
目的 |
| 步驟 1 |
Server# scope cimc |
進入CIMC命令模式。
|
| 步驟 2 |
Server /cimc # scope 技術支援 |
進入技術支援命令模式。
|
| 步驟 3 |
Server /cimc/tech-support # set remote-ip ip-address |
指定應儲存技術支援資料檔案的遠端伺服器的IP地址。
|
| 步驟 4 |
Server /cimc/tech-support # set remote-path path/filename |
指定支援資料應儲存在遠端伺服器上的檔名。輸入此名稱時,請包含從伺服器樹頂部到所需位置的檔案的相對路徑。
| 提示 |
要使系統自動生成檔名,請輸入檔名default.tar.gz。
|
|
| 步驟 5 |
Server /cimc/tech-support # set remote-protocol protocol |
|
| 步驟 6 |
Server /cimc/tech-support # set remote-username name |
指定應儲存技術支援資料檔案的遠端伺服器上的使用者名稱。如果協定是TFTP或HTTP,此欄位不適用。
|
| 步驟 7 |
Server /cimc/tech-support # set remote-password password |
指定應儲存技術支援資料檔案的遠端伺服器上的密碼。如果協定是TFTP或HTTP,此欄位不適用。
|
| 步驟 8 |
Server /cimc/tech-support # commit |
將事務提交到系統配置。
|
| 步驟 9 |
Server /cimc/tech-support # start |
開始將資料檔案傳輸到遠端伺服器。
|
| 步驟 10 |
Server /cimc/tech-support # show detail |
(選用)
顯示將資料檔案傳輸到遠端伺服器的進度。
|
| 步驟 11 |
Server /cimc/tech-support # cancel |
(選用)
取消將資料檔案傳輸到遠端伺服器。
|
此示例建立技術支援資料檔案並將該檔案傳輸到SCP伺服器:
encs01 /cimc/tech-support # scope cimc
encs01 /cimc/tech-support # scope tech-support
encs01 /cimc/tech-support # set remote-ip 172.16.0.1
encs01 /cimc/tech-support *# set remote-path techsupport.tar.gz
encs01 /cimc/tech-support *# set remote-protocol scp
encs01 /cimc/tech-support *# set remote-username root
encs01 /cimc/tech-support *# set remote-password
Please enter remote-password:
Please confirm remote-password:
encs01 /cimc/tech-support *# commit
encs01 /cimc/tech-support #
encs01 /cimc/tech-support # start
Server (RSA) key fingerprint is 4b:b9:a5:14:d0:c3:64:14:54:00:b9:d7:aa:47:1d:6d
Do you wish to continue? [y/N]y
Tech Support upload started.

encs01 /cimc/tech-support # show detail

  Tech Support:
  Server Address: 172.16.0.1
  Path: techsupport.tar.gz
  Protocol: scp
  Username: root
  Password: ******
  Progress(%): 20
  Status: COLLECTING
 意見
意見