Ultra-M AutoVNF群集故障的恢复过程 — vEPC
下载选项
非歧视性语言
此产品的文档集力求使用非歧视性语言。在本文档集中,非歧视性语言是指不隐含针对年龄、残障、性别、种族身份、族群身份、性取向、社会经济地位和交叉性的歧视的语言。由于产品软件的用户界面中使用的硬编码语言、基于 RFP 文档使用的语言或引用的第三方产品使用的语言,文档中可能无法确保完全使用非歧视性语言。 深入了解思科如何使用包容性语言。
关于此翻译
思科采用人工翻译与机器翻译相结合的方式将此文档翻译成不同语言,希望全球的用户都能通过各自的语言得到支持性的内容。 请注意:即使是最好的机器翻译,其准确度也不及专业翻译人员的水平。 Cisco Systems, Inc. 对于翻译的准确性不承担任何责任,并建议您总是参考英文原始文档(已提供链接)。
目录
简介
本文档介绍在托管StarOS虚拟网络功能(VNF)的Ultra-M设置中恢复Ultra Automation Services(UAS)或AutoVNF群集故障所需的步骤。
背景信息
Ultra-M是经过预先打包和验证的虚拟化移动数据包核心解决方案,旨在简化VNF的部署。
Ultra-M解决方案包括指定的虚拟机(VM)类型:
- 自动IT
- 自动部署
- UAS或AutoVNF
- 元素管理器(EM)
- 弹性服务控制器(ESC)
- 控制功能(CF)
- 会话功能(SF)
Ultra-M的高级体系结构和涉及的组件如下图所示:
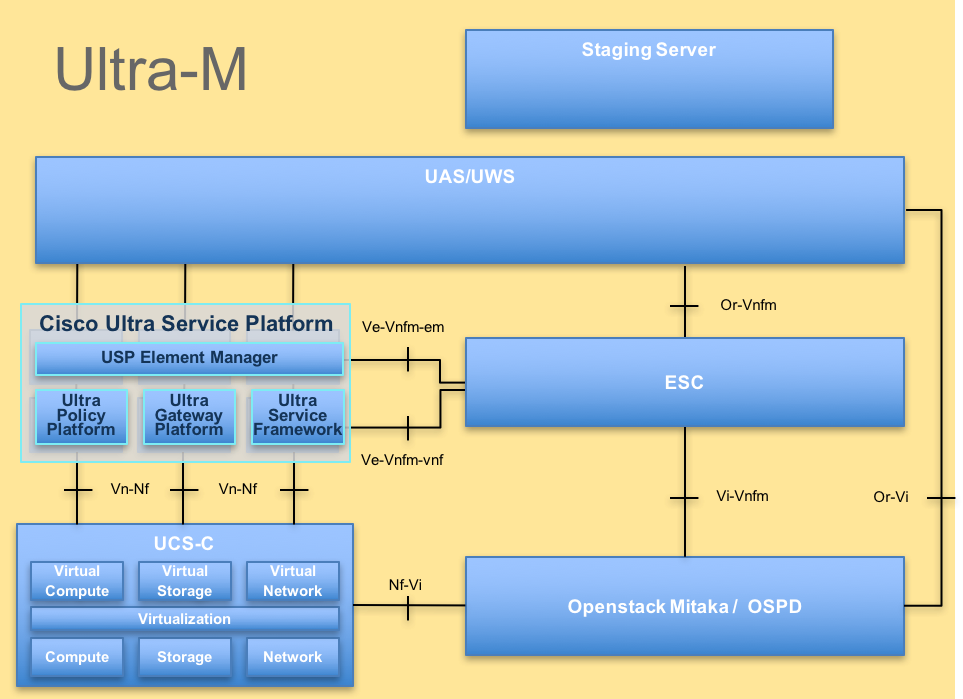 UltraM体系结构
本文档面向熟悉Cisco Ultra-M平台的思科人员。
注意:Ultra M 5.1.x版本用于定义本文档中的过程。
缩写
| VNF | 虚拟网络功能 |
| CF | 控制功能 |
| 旧金山 | 服务功能 |
| ESC | 弹性服务控制器 |
| MOP | 程序方法 |
| OSD | 对象存储磁盘 |
| HDD | 硬盘驱动器 |
| SSD | 固态驱动器 |
| VIM | 虚拟基础设施管理器 |
| VM | 虚拟机 |
| EM | 元素管理器 |
| UAS | 超自动化服务 |
| UUID | 通用唯一ID标识符 |
MoP的工作流程
案例1.恢复UAS群集的单个故障
状态检查
1. Ultra-M Manager执行Ultra-M节点的运行状况检查。导航到UAS报表的reports /var/log/cisco/ultramhealth/directory和grep。
-
[stack@pod1-ospd ultram-health]$ more ultram_health_uas.report

---------------------------------------------------------------------------------------------------------
 VNF ID           | UAS Node | Status   | Error Info, if any
---------------------------------------------------------------------------------------------------------
 172.21.201.122   | autovnf  | XXX      | AutoVNF Cluster FAILED : Node: 172.16.180.12, Status: error, Role: NA
 172.21.201.122   | vnf-em   | :-)      |
 172.21.201.122   | esc      | :-)      |
---------------------------------------------------------------------------------------------------------
2.UAS集群的预期状态如图所示,三个UAS全部处于活动状态。
[stack@pod1-ospd ~]# ssh ubuntu@10.1.1.1
password:

ubuntu@autovnf1-uas:~$ ncs_cli -u admin -C

autovnf1-uas-0#show uas
uas version 1.0.1-1
uas state ha-active
uas ha-vip 172.16.181.101
INSTANCE IP STATE ROLE
------------------------------------
172.16.180.3 alive CONFD-MASTER
172.16.180.7 alive CONFD-SLAVE
172.16.180.12 alive NA
尝试连接到UAS时无法连接到Confd服务器
1.在某些情况下,您无法连接到confd服务器。
ubuntu@autovnf1-uas-0:/opt/cisco/usp/uas/manager$ confd_cli -u admin -C
Failed to connect to server
2.检查uas-confd进程的状态。
ubuntu@autovnf1-uas-0:/opt/cisco/usp/uas/manager$ sudo initctl status uas-confd
uas-confd stop/waiting
3.如果confd服务器未运行,请重新启动服务。
ubuntu@autovnf1-uas-0:/opt/cisco/usp/uas/manager$ sudo initctl start uas-confd
uas-confd start/running, process 7970
ubuntu@autovnf1-uas-0:/opt/cisco/usp/uas/manager$ confd_cli -u admin -C
Welcome to the ConfD CLI
admin connected from 172.16.180.9 using ssh on autovnf1-uas-0
从错误状态恢复UAS
1.如果集群中的一个AutoVNF出现故障,UAS集群将显示一个UAS处于Error状态。
[stack@pod1-ospd ~]# ssh ubuntu@10.1.1.1
password:

ubuntu@autovnf1-uas:~$ ncs_cli -u admin -C

autovnf1-uas-0#show uas
uas version 1.0.1-1
uas state ha-active
uas ha-vip 172.16.181.101
INSTANCE IP STATE ROLE
------------------------------------
172.16.180.3 alive CONFD-MASTER
172.16.180.7 alive CONFD-SLAVE
172.16.180.12 alive error
2.将corerc文件(您的VNF的rc文件)从OSPD服务器中的/home/stack复制到AutoDeploy并将其作为源。
3.使用uas-check.py脚本检查UAS/AutoVNF的状态。autovnf1是AutoVNF名称。
ubuntu@auto-deploy-iso-590-uas-0:~$ /opt/cisco/usp/apps/auto-it/scripts/uas-check.py auto-vnf autovnf1
2017-11-17 14:52:20,186 - INFO: Check of AutoVNF cluster started
2017-11-17 14:52:22,172 - INFO: Found 2 AutoVNF instance(s), 3 expected
2017-11-17 14:52:22,172 - INFO: Instance 'autovnf1-uas-2' is missing
2017-11-17 14:52:22,172 - INFO: Check completed, AutoVNF cluster has recoverable errors
4.使用uas-check.py脚本和add-fix关键字恢复UAS。
ubuntu@auto-deploy-iso-590-uas-0:~$ /opt/cisco/usp/apps/auto-it/scripts/uas-check.py auto-vnf autovnf1 --fix
2017-11-17 14:52:27,493 - INFO: Check of AutoVNF cluster started
2017-11-17 14:52:29,215 - INFO: Found 2 AutoVNF instance(s), 3 expected
2017-11-17 14:52:29,215 - INFO: Instance 'autovnf1-uas-2' is missing
2017-11-17 14:52:29,215 - INFO: Check completed, AutoVNF cluster has recoverable errors
2017-11-17 14:52:29,386 - INFO: Creating instance 'autovnf1-uas-2' and attaching volume 'autovnf1-uas-vol-2'
2017-11-17 14:52:47,600 - INFO: Created instance 'autovnf1-uas-2'
5.您将看到新创建的UAS处于活动状态,是群集的一部分。
autovnf1-uas-0#show uas
uas version 1.0.1-1
uas state ha-active
uas ha-vip 172.16.181.101
INSTANCE IP STATE ROLE
------------------------------------
172.16.180.3 alive CONFD-MASTER
172.16.180.7 alive CONFD-SLAVE
172.16.180.13 alive NA
案例2.所有三个UAS(AutoVNF)均处于错误状态
1. Ultra-M Manager执行Ultra-M节点的运行状况检查。
[stack@pod1-ospd ultram-health]$ more ultram_health_uas.report

---------------------------------------------------------------------------------------------------------

 VNF ID           | UAS Node | Status   | Error Info, if any

---------------------------------------------------------------------------------------------------------

 172.21.201.122   | autovnf  | XXX      | AutoVNF Cluster FAILED : Node: 172.16.180.12, Status: error, Role: NA,Node: 172.16.180.9, Status: error, Role: NA,Node: 172.16.180.10, Status: error, Role: NA

 172.21.201.122   | vnf-em   | :-)      |

 172.21.201.122   | esc      | :-)      |

---------------------------------------------------------------------------------------------------------
2.如输出中所示,Ultra-M管理器报告AutoVNF存在故障,它显示集群的所有三个UAS都处于“错误”状态。
使用uas-check.py脚本检查UAS运行状况
1.登录到“自动部署”,然后检查是否可以访问AutoVNF UAS并获取状态。
ubuntu@auto-deploy-iso-590-uas-0:~$ /opt/cisco/usp/apps/auto-it/scripts$ ./uas-check.py auto-vnf autovnf1 --os-tenant-name core

2017-12-05 11:41:09,834 - INFO: Check of AutoVNF cluster started
2017-12-05 11:41:11,342 - INFO: Found 3 ACTIVE AutoVNF instances
2017-12-05 11:41:11,343 - INFO: Check completed, AutoVNF cluster is fine
2.从自动部署,安全外壳(SSH)到AutoVNF节点并进入confd模式。使用show uas检查状态。
ubuntu@auto-deploy-iso-590-uas-0:~$ ssh ubuntu@172.16.180.9
password:
autovnf1-uas-1#show uas
uas version 1.0.1-1
uas state ha-active
uas ha-vip 172.16.181.101
INSTANCE IP    STATE  ROLE

----------------------------

172.16.180.9   error  NA
172.16.180.10  error  NA
172.16.180.12  error  NA
3.建议检查所有三个UAS节点中的状态。
检查OpenStack级别上VM的状态
检查AutoVNF VM在新星列表中的状态。如果需要,请执行nova start以启动关闭VM。
[stack@pod1-ospd ultram-health]$ nova list | grep autovnf

| 83870eed-b4e9-47b3-976d-cc3eddecf866 | autovnf1-uas-0                                                 | ACTIVE | -          | Running     | orchestr=172.16.180.12; mgmt=172.16.181.6
| 201d9ce5-538c-42f7-a46c-fc8cdef1eabf | autovnf1-uas-1                                                 | ACTIVE | -          | Running     | orchestr=172.16.180.10; mgmt=172.16.181.5
| 6c6d25cd-21b6-42b9-87ff-286220faa2ff | autovnf1-uas-2                                                 | ACTIVE | -          | Running     | orchestr=172.16.180.9; mgmt=172.16.181.13
检查Zookeeper视图
1.检查zookeeper的状态,以验证作为引导的模式。
ubuntu@autovnf1-uas-0:/var/log/upstart$ /opt/cisco/usp/packages/zookeeper/current/bin/zkServer.sh status
ZooKeeper JMX enabled by default
Using config: /opt/cisco/usp/packages/zookeeper/current/bin/../conf/zoo.cfg
Mode: leader
2. Zookeeper通常应该启动。
AutoVNF故障排除 — 流程和任务
1.确定节点处于“错误”状态的原因。要运行AutoVNF,必须启动并运行一组进程,如下所示:
AutoVNF

uws-ae

uas-confd

cluster_manager

uas_manager
ubuntu@autovnf1-uas-0:~$ sudo initctl list | grep uas
uas-confd stop/waiting ====> this is not good, the uas-confd process is not running

uas_manager start/running, process 2143
root@autovnf1-uas-1:/home/ubuntu# sudo initctl list
....
uas-confd start/running, process 1780
....
autovnf start/running, process 1908
....
....
uws-ae start/running, process 1909
....
....
cluster_manager start/running, process 1827
....
.....
uas_manager start/running, process 1697
......
......
2.验证这些python进程正在运行:
uas_manager.py

cluster_manager.py

usp_autovnf.py
root@autovnf1-uas-1:/home/ubuntu# ps -aef | grep pyth
root      1819  1697  0 Jun13 ?        00:00:50 python /opt/cisco/usp/uas/manager/uas_manager.py
root      1858  1827  0 Jun13 ?        00:09:21 python /opt/cisco/usp/uas/manager/cluster_manager.py
root      1908     1  0 Jun13 ?        00:01:00 python /opt/cisco/usp/uas/autovnf/usp_autovnf.py
root     25662 24750  0 13:16 pts/7    00:00:00 grep --color=auto pyth
3.如果任何预期进程未处于启动/运行状态,请重新启动该进程并检查状态。如果它仍然显示为“错误”状态,请按照下一节中提到的步骤操作以解决此问题。
修复处于错误状态的多个UAS
1.nova — 从OSPD硬重启<VM名称>,在进入下一个UAS之前,请留出一些时间恢复此VM。在所有UAS VM上执行。
或
2.登录到每个UAS并使用sudo重新引导。等待恢复,然后继续访问其他UAS虚拟机。
对于事务日志,请检查:
/var/log/upstart/autovnf.log

show logs xxx | display xml
这将修复问题并从“错误”状态恢复UAS。
1.使用ultrum_health_check报告验证相同情况。
[stack@pod1-ospd ultram-health]$ more ultram_health_uas.report

---------------------------------------------------------------------------------------------------------

 VNF ID           | UAS Node | Status   | Error Info, if any

---------------------------------------------------------------------------------------------------------

 172.21.201.122   | autovnf  | :-)      |

 172.21.201.122   | vnf-em   | :-)      |

 172.21.201.122   | esc      | :-)      |

---------------------------------------------------------------------------------------------------------
由思科工程师提供
- 帕蒂班·拉贾戈帕尔思科高级服务
- 帕德马拉伊·拉马努贾姆思科高级服务
 反馈
反馈