简介
本文档介绍在Catalyst 9800上生成、下载和安装证书的整体过程
先决条件
要求
Cisco 建议您了解以下主题:
- 如何配置9800 WLC(接入点[AP])以实现基本操作
- 如何使用OpenSSL应用
- 公钥基础设施(PKI)和数字证书
使用的组件
本文档中的信息基于以下软件和硬件版本:
- 9800-CL、Cisco IOS® XE版本17.9.4
- OpenSSL应用(版本3.1.3)
本文档中的信息都是基于特定实验室环境中的设备编写的。本文档中使用的所有设备最初均采用原始(默认)配置。如果您的网络处于活动状态,请确保您了解所有命令的潜在影响。
配置
在16.10.X上,9800不支持Web身份验证和Web管理的其他证书。网络登录门户始终使用默认证书。
在16.11.X上,可以为Web身份验证配置专用证书,在全局参数映射中定义信任点。
有两个选项可以获取9800 WLC的证书。
- 使用OpenSSL或任何其他SSL应用生成证书签名请求(CSR)。生成(使用OpenSSL)或获取由证书颁发机构(CA)签名的PKCS12证书,然后将其直接加载到9800 WLC。这意味着私钥与该证书绑定。
- 使用9800 WLC生成 CSR,通过CA对其进行签名,然后将链中的每个证书手动加载到9800 WLC。
使用最符合您需求的产品。
选项1 — 在WLC上加载预先存在的PKCS12签名证书
步骤 1:创建证书签名请求
如果您还没有证书,则需要生成证书签名请求(CSR)以提交到您的CA。
从当前目录(在安装了OpenSSL的笔记本电脑上)创建一个名为“openssl.conf”的文本文件,复制并粘贴这些行,以便在新创建的CSR中包含主题备用名(SAN)字段。
[ req ]
default_bits       = 4096
distinguished_name = req_distinguished_name
req_extensions     = req_ext
prompt             = no
[ req_distinguished_name ]
countryName                 = <Country Name (2 letter code)>
stateOrProvinceName         = <State or Province Name (full name)>
localityName               = <Locality Name (eg, city)>
organizationName           = <Organization Name (eg, company)>
commonName                 = <Common Name (e.g. server FQDN or YOUR name)>
[ req_ext ]
subjectAltName = @alt_names
[alt_names]
DNS.1   = testdomain.com
DNS.2   = example.com
DNS.3   = webadmin.com
IP.1    = <WLC_IP_ADDRESS> (note : this is optionnal, but can be added in case you want to access your WLC using the IP address instead of FQDN)
将DNS.X名称替换为您的SAN(主题备用名称)。 将主字段替换为所需的证书详细信息。确保在SAN字段(DNS.x)中重复通用名称。 Google Chrome要求URL中的名称位于SAN字段中,以便信任证书。
对于Web管理员,您还需要使用URL的变体填充SAN字段(例如仅主机名,或完全限定域名(FQDN)),以便无论浏览器地址栏中URL中的管理员类型是什么,证书都匹配。
使用以下命令从OpenSSL生成CSR:
openssl req -out myCSR.csr -newkey rsa:4096 -nodes -keyout private.key -config openssl.conf
除非为命令提供完整路径,否则CSR在运行OpenSSL的目录中生成为myCSR.csr,其密钥生成为private.key。

警告:确保private.key文件在用于加密通信时的安全性
步骤 2:验证CSR的内容
您可以将CSR的内容复制粘贴到在线工具(例如,在Google上键入“CSR解码器”)以检查其内容。确保CSR中包含SAN(Subject Alternative Name),因为有些浏览器需要它。
您还可以使用此命令使用OpenSSL验证CSR的内容:
openssl req -noout -text -in myCSR.csr
步骤 3:将CSR提交到您的CA
然后,您可以向您的CA提供此CSR,以签名并接收回证书。确保从CA下载完整链,并且证书采用Base64格式,以防需要进一步处理。您通常会从您的CA收到多个文件:签名设备证书、根CA证书和一个或多个中间CA证书。
步骤 4:在WLC上创建和/或导入pkcs12文件
如果您使用OpenSSL在计算机上生成CSR,则您的CA可能仅向您提供已签名的证书及其自己的证书和最终的中间证书。在这种情况下,您需要使用OpenSSL自己生成PKCS12文件。如果CA也有权访问您的私钥,它可以直接为您提供PKCS12文件(PFX文件),在这种情况下,您只需将其导入到控制器上。请参阅“导入PKCS12文件”一节执行此操作。
创建PKCS12文件
最终可能会出现以下情况:您有PEM或CRT格式的私钥文件和证书,并且希望将它们以PKCS12(.pfx)格式组合以上传到9800 WLC。您还可以在导入9800 WLC之前具有一个或多个也需要包含在此pfx文件中的CA证书。
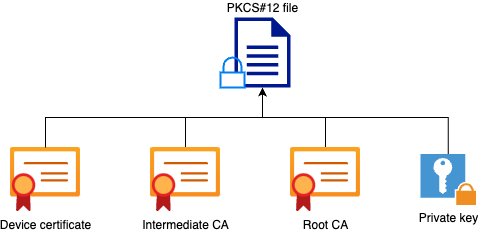
您需要做的第一件事是将所有中间CA和根CA文件合并到一个文件中。将内容复制并粘贴在一起(以.pem格式保存文件):
----- BEGIN Certificate --------
<intermediate CA cert>
------END Certificate --------
-----BEGIN Certificate -----
<root CA cert>
-----END Certificate--------
然后,您可以使用以下命令创建.pfx文件:
For versions older than 17.12.1 :
openssl pkcs12 -export -macalg sha1 -legacy -descert -out chaincert.pfx -inkey  -in  -certfile

For version 17.12.1 or above :
openssl pkcs12 -export -out chaincert.pfx -inkey  -in  -certfile

提示:配置.pfx文件的密码时,请勿使用ASCII字符:*、^、()、[]、、“”和+。使用这些ASCII字符会导致配置错误,并且不会将证书导入控制器。

注意:由于Cisco Bug ID CSCvz41428,早于17.12.1的版本需要“ — macalg sha1”标志。由于OpenSSL版本3通常默认限制使用传统算法,因此也需要“ — legacy -descert”标志。但是,17.12.1版及更高版本支持较新的算法,因此,如果您打算在这些版本上导入pfx文件,则不需要这些标志。
验证创建的PKCS12文件
您可以使用以下命令检查PKCS12文件的内容:
openssl pkcs12 -info -in
在此输出中,您可以看到完整的证书链以及私钥。此文件使用您之前配置的密码进行保护。
导入PKCS12文件
现在可以使用GUI或CLI在9800 WLC上导入.pfx文件。
使用GUI:
打开9800 WLC GUI并导航到配置>安全> PKI管理,单击添加证书选项卡。展开Import PKCS12 Certificate菜单。如果.pfx文件存储在计算机上,请在传输类型下拉列表中选择桌面(HTTPS)选项,该选项允许通过浏览器进行HTTP上传。Certificate Password是指生成PKCS12证书时使用的密码。
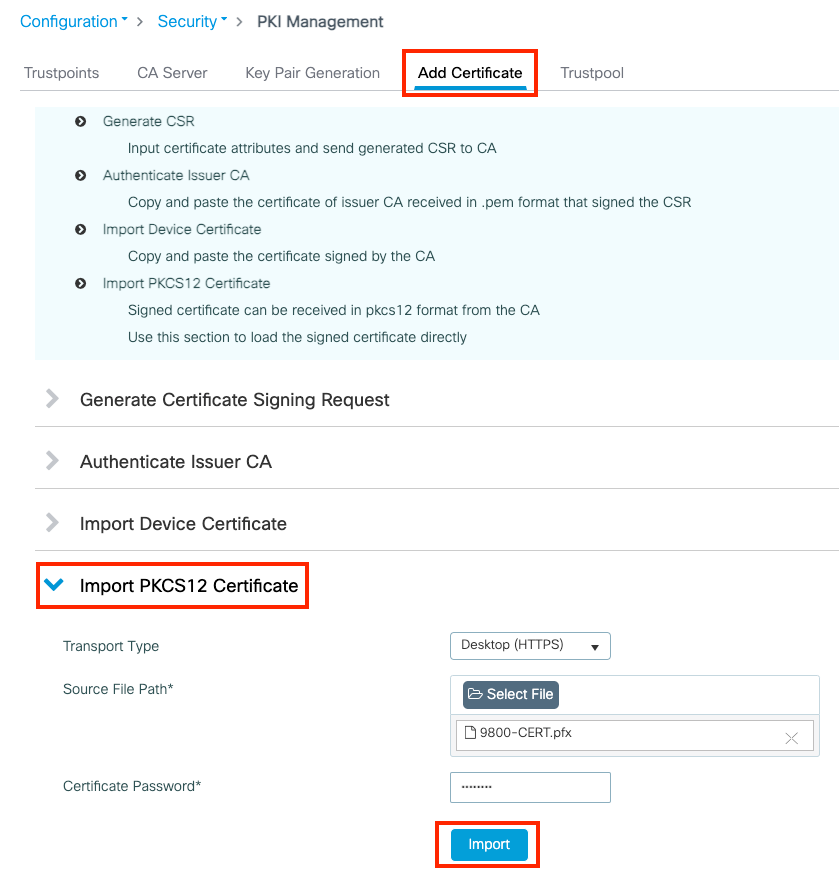
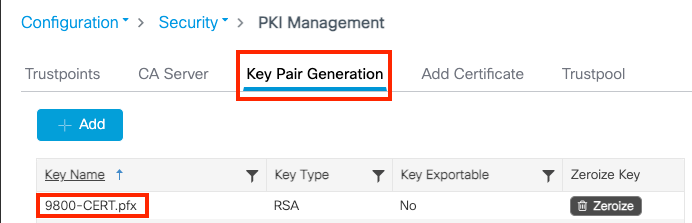
验证信息是否正确,然后单击Import(导入)。之后,您将在Key Pair Generation选项卡中看到此新信任点的新证书密钥对。在成功导入后,9800 WLC还会为多级CA创建额外的信任点。
警告:在.pfx文件的密码中包含特定ASCII字符时,会出现以下错误:从bootflash pfx CRYPTO PKI Import PKCS12操作中配置读取文件时出错,错误HMAC可能出现错误导致密码错误或PKCS12损坏密码中包含以下字符会导致错误:*、^、()、[]、\包含字符("和+)时,会出现以下错误:“配置出错”。 证书不会导入到WLC。
注意:注意:目前,当特定信任点用于webauth或webadmin时,9800 WLC不会呈现完整的证书链,而是呈现设备证书及其直接颁发者。此错误与Cisco Bug ID CSCwa23606(已在Cisco IOS® XE 17.8中修复)进行跟踪。
使用CLI:
9800# configure terminal
9800(config)#crypto pki import  pkcs12 [tftp:/// | ftp:/// | http:/// | bootflash:] password
注意:对于9800 WLC,证书文件名和信任点名称必须完全匹配,以便为多级CA创建任何其他信任点。
选项2 — 在9800 WLC上定义密钥和证书签名请求(CSR)
步骤 1:生成通用RSA密钥对
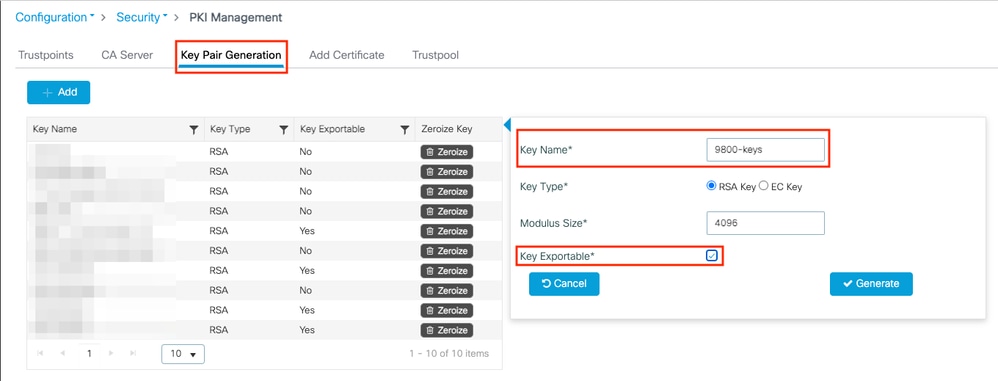
导航到Configuration > Security > PKI Management,选择Key Pair Generation选项卡,然后单击+添加。输入详细信息,确保选中Key Exportable复选框,然后单击Generate。
CLI 配置:
9800(config)#crypto key generate rsa general-keys label 9800-keys exportable
The name for the keys will be: 9800-keys
Choose the size of the key modulus in the range of 512 to 4096 for your
General Purpose Keys. Choosing a key modulus greater than 512 may take
a few minutes.

How many bits in the modulus [1024]: 4096
% Generating 4096 bit RSA keys, keys will be exportable...
[OK] (elapsed time was 9 seconds)
第2步:在9800 WLC上生成CSR
导航到Add Certificate选项卡并展开Generate Certificate Signing Request,填写详细信息并从下拉列表中选择之前创建的密钥对。Domain Name必须与9800 WLC上为客户端访问定义的URL(Web管理员页面、Web身份验证页面等)匹配,Certificate Name是信任点名称,因此您可以根据其使用进行命名。
注意:9800 WLC支持在其公用名中包含通配符参数的证书。
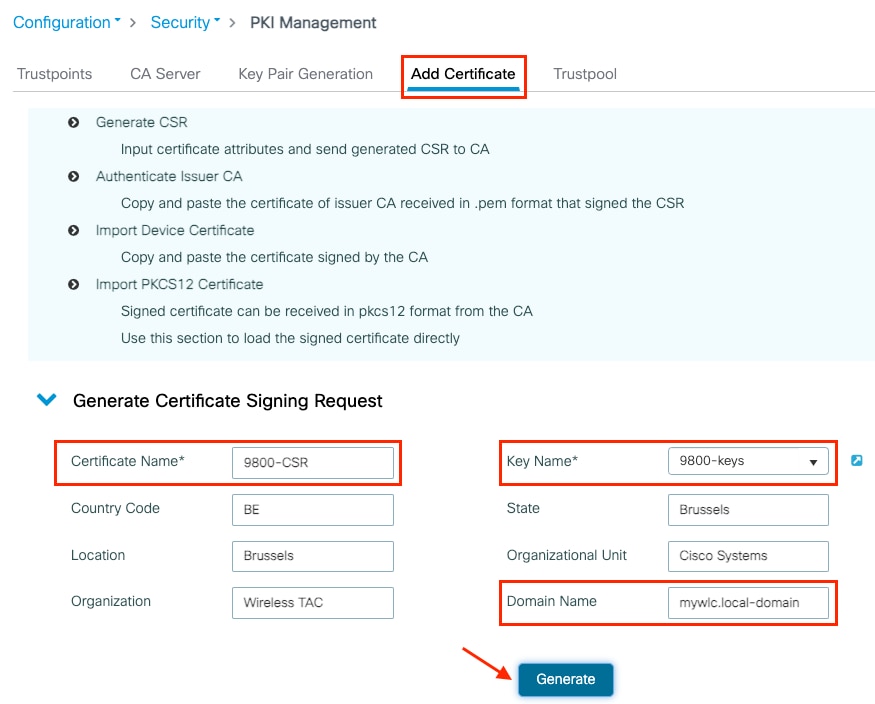
确保信息正确,然后单击Generate。这会将CSR显示在原始表单旁边的文本框中
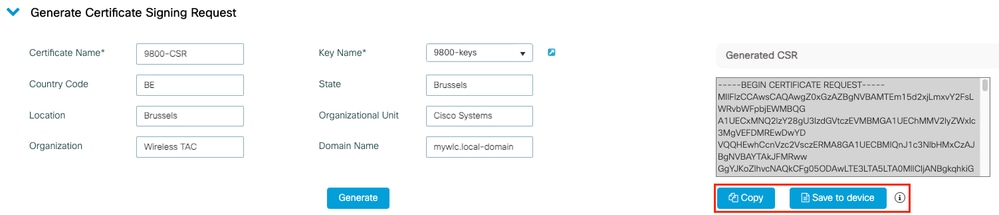
复制会将副本保存到剪贴板,以便您可以将其粘贴到文本编辑器并保存CSR。
“保存到设备”会创建CSR的副本并将其存储在bootflash:/csr中。要查看该命令,请运行以下命令:
9800#dir bootflash:/csr
Directory of bootflash:/csr/

1046531 -rw- 1844 Sep 28 2021 18:33:49 +00:00 9800-CSR1632856570.csr

26458804224 bytes total (21492699136 bytes free)
9800#more bootflash:/csr/9800-CSR1632856570.csr
-----BEGIN CERTIFICATE REQUEST-----
<Certificate Request>
-----END CERTIFICATE REQUEST-----
CLI 配置:
9800(config)#crypto pki trustpoint 9800-CSR
9800(ca-trustpoint)#enrollment terminal pem
9800(ca-trustpoint)#revocation-check none
9800(ca-trustpoint)#subject-name C=BE, ST=Brussels, L=Brussels, O=Cisco Systems, OU=Wireless TAC, CN=mywlc.local-domain
9800(ca-trustpoint)#rsakeypair 9800-keys
9800(ca-trustpoint)#subject-alt-name example.com,guestportal.com,webadmin.com
9800(ca-trustpoint)#exit

(config)#crypto pki enroll 9800-CSR
% Start certificate enrollment ..

% The subject name in the certificate will include: C=BE, ST=Brussels, L=Brussels, O=Cisco Systems, OU=Wireless TAC, CN=mywlc.local-domain
% The subject name in the certificate will include: mywlc
% Include the router serial number in the subject name? [yes/no]: no
% Include an IP address in the subject name? [no]: no
Display Certificate Request to terminal? [yes/no]: yes
Certificate Request follows:

-----BEGIN CERTIFICATE REQUEST-----
<Certificate Request>
-----END CERTIFICATE REQUEST-----

---End - This line not part of the certificate request---

Redisplay enrollment request? [yes/no]: no
可用于主题名称配置的参数:
C:国家/地区,只能是两个大写字母。
ST:某些州/省,指省或州名称。
L:位置名称,指城市。
O:组织名称,指公司。
OU:组织单位名称,请参阅一节。
CN:(公用名称)指证书颁发到的使用者,您必须指定要访问的特定IP地址(无线管理IP、虚拟IP等)或使用FQDN配置的主机名。
注意:如果要添加主题备用名称,由于Cisco Bug ID CSCvt15177,在17.8.1之前的Cisco IOS XE版本上无法添加Subject Alternate Name。  .此情况可能会因SAN不存在而引发某些浏览器警报,为了避免出现这种情况,请按照选项1所示创建密钥和CSR离线状态。
步骤 3:向您的CA(证书颁发机构)提交您的CSR
需要向CA发送完整字符串才能对其进行签名。
-----BEGIN CERTIFICATE REQUEST-----
<Certificate Request>
-----END CERTIFICATE REQUEST-----
如果使用Windows Server CA对证书签名,请下载Base64格式的签名证书。否则,您需要使用Windows证书管理器等实用程序进行导出。
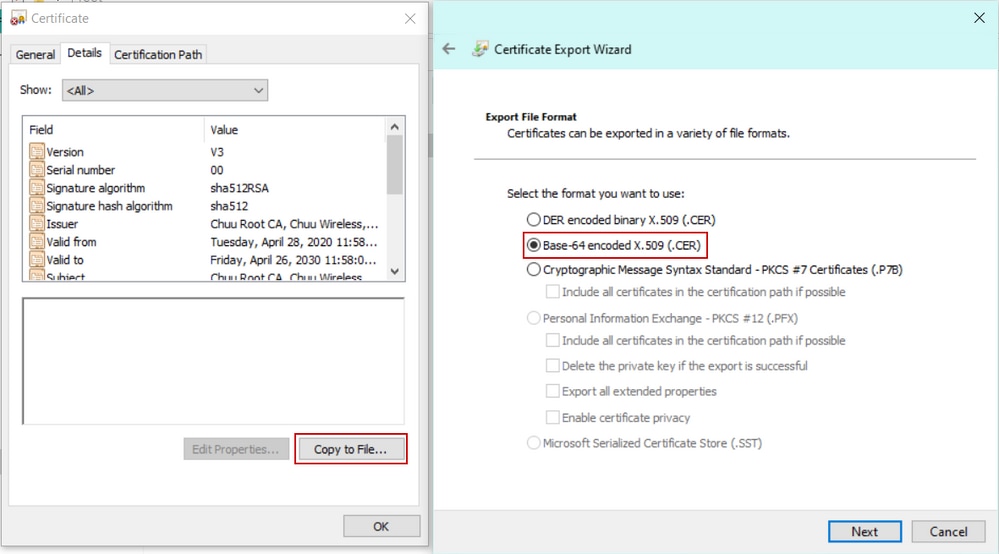
您通常从CA收到已签名的设备证书、中间CA(如果有)证书和根CA证书。
步骤 4:对9800 WLC的CA进行身份验证
如果证书由根CA直接签名,则可检查Step4a中的说明(可以使用GUI完成所有操作)。
如果您的证书由多级CA签名,则转至Step4b(在这种情况下需要CLI)中列出的说明。
第4a步:对根CA进行身份验证
使9800信任颁发者CA。下载或获取.pem格式的颁发者CA证书(Base64)。 展开同一菜单中的Authentication Root CA部分,从Trustpoint下拉列表中选择先前定义的信任点,并粘贴颁发者CA证书。确保详细信息配置正确,然后单击Authenticate。

CLI 配置:
9800(config)# crypto pki authenticate 9800-CSR

Enter the base 64 encoded CA certificate.
End with a blank line or the word "quit" on a line by itself

-----BEGIN CERTIFICATE-----

-----END CERTIFICATE-----

Certificate has the following attributes:
       Fingerprint MD5: DD05391A 05B62573 A38C18DD CDA2337C
      Fingerprint SHA1: 596DD2DC 4BF26768 CFB14546 BC992C3F F1408809

% Do you accept this certificate? [yes/no]: yes
Trustpoint CA certificate accepted.
% Certificate successfully imported
第4b步:验证多级CA
在存在多个授权级别的情况下,每个额外的CA级别都需要一个新的信任点。如果您的证书直接由根CA签名,则请参阅步骤4a,因为只需要一个信任点(在生成CSR时创建的信任点)。
如果您有一个中间CA和一个根CA,则需要2个信任点:一个已创建(包含设备证书和中间CA证书,指根CA信任点),另一个包含根CA证书的新证书。如果您有2个中间证书,则需要3个信任点。等等。这些其他信任点仅包含身份验证证书并指向下一个身份验证级别。此过程只能在CLI中完成。
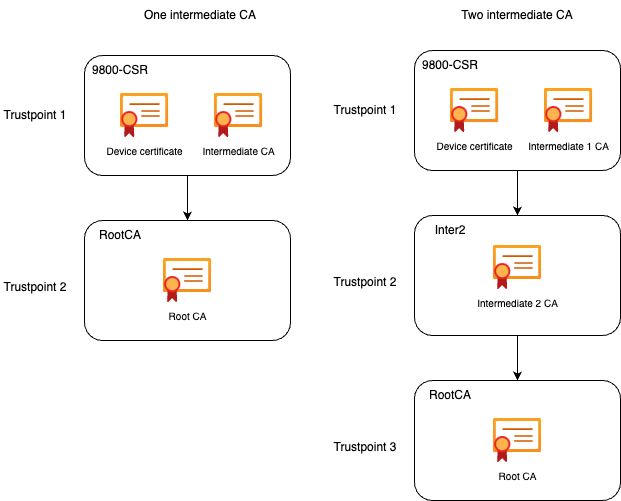
CLI配置(一个中间CA的示例):
9800(config)#crypto pki trustpoint RootCA
9800(ca-trustpoint)#enrollment terminal
9800(ca-trustpoint)#chain-validation stop
9800(ca-trustpoint)#revocation-check none
9800(ca-trustpoint)#exit
9800(config)#crypto pki authenticate RootCA

Enter the base 64 encoded CA certificate.
End with a blank line or the word "quit" on a line by itself

-----BEGIN CERTIFICATE-----

-----END CERTIFICATE-----

Certificate has the following attributes:
Fingerprint MD5: 6CAC00D5 C5932D01 B514E413 D41B37A8
Fingerprint SHA1: 5ABD5667 26B7BD0D 83BDFC34 543297B7 3D3B3F24

% Do you accept this certificate? [yes/no]: yes
Trustpoint CA certificate accepted.
% Certificate successfully imported

9800(config)#crypto pki trustpoint 9800-CSR <<< This is the trustpoint created with the CSR
9800(ca-trustpoint)#chain-validation continue RootCA <<< This is the trustpoint created above
9800(config)#crypto pki authenticate 9800-CSR

Enter the base 64 encoded CA certificate.
End with a blank line or the word "quit" on a line by itself

-----BEGIN CERTIFICATE-----

-----END CERTIFICATE-----

Certificate has the following attributes:
Fingerprint MD5: DD05391A 05B62573 A38C18DD CDA2337C
Fingerprint SHA1: 596DD2DC 4BF26768 CFB14546 BC992C3F F1408809
Certificate validated - Signed by existing trustpoint CA certificate.

Trustpoint CA certificate accepted.
% Certificate successfully imported
注意:如果认证链中存在多个中间CA,则必须为每个额外的认证级别生成新的信任点。此信任点必须使用命令chain-validation continue <trustpoint-name>引用包含下一级别认证的信任点。
CLI配置(使用2个中间CA的简化示例):
9800(config)#crypto pki trustpoint RootCA
9800(ca-trustpoint)#enrollment terminal
9800(ca-trustpoint)#chain-validation stop
9800(ca-trustpoint)#revocation-check none
9800(ca-trustpoint)#exit
9800(config)#crypto pki authenticate RootCA
-----BEGIN CERTIFICATE-----

-----END CERTIFICATE-----
9800(config)#crypto pki trustpoint Inter2 <<< This is the trustpoint for the 1st intermediate CA (from top of the chain)
9800(ca-trustpoint)#enrollment terminal
9800(ca-trustpoint)#chain-validation continue RootCA <<< This is the trustpoint created above
9800(config)#crypto pki authenticate Inter2
-----BEGIN CERTIFICATE-----

-----END CERTIFICATE-----
9800(config)#crypto pki trustpoint 9800-CSR <<< This is the trustpoint created with the CSR
9800(ca-trustpoint)#chain-validation continue Inter2 <<< This is the trustpoint created above
9800(config)#crypto pki authenticate 9800-CSR
-----BEGIN CERTIFICATE-----

-----END CERTIFICATE-----
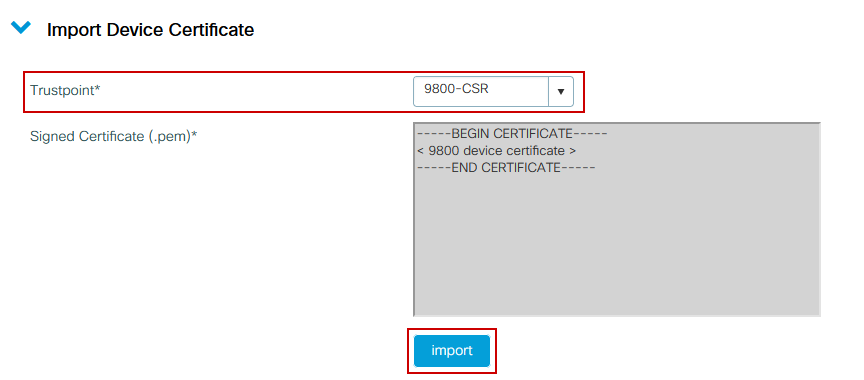
步骤 5:导入9800上的设备签名证书
将签名证书加载到9800 WLC。在同一菜单中展开Import Device Certificate部分。选择先前定义的信任点,并粘贴CA提供的已签名设备证书。验证证书信息后,单击import。
CLI 配置:
9800(config)#crypto pki import 9800-CSR certificate

Enter the base 64 encoded certificate.
End with a blank line or the word "quit" on a line by itself

-----BEGIN CERTIFICATE-----
< 9800 device certificate >
-----END CERTIFICATE-----

% Router Certificate successfully imported
此时,设备证书连同所有CA一起导入9800 WLC,并且证书现在可以使用(GUI访问、WebAuth等)
使用新证书
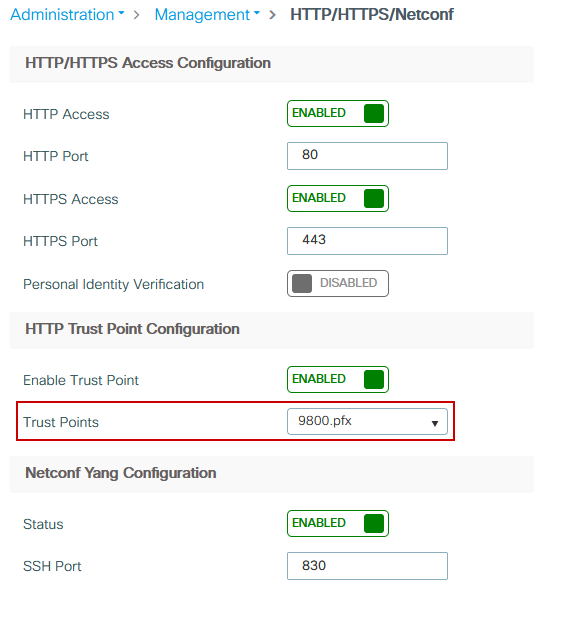
Web管理(GUI访问)
导航到管理>管理> HTTP/HTTPS/Netconf,然后从信任点下拉列表中选择导入的证书。
CLI 配置:
9800(config)#ip http secure-trustpoint 9800.pfx
9800(config)#no ip http secure-server
9800(config)#ip http secure-server
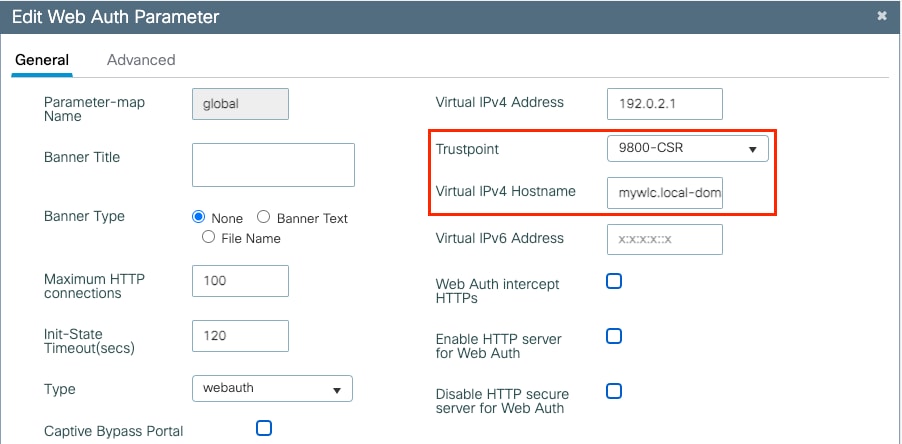
本地Web身份验证
导航到Configuration > Security > Web Auth,选择global参数映射,然后从Trustpoint下拉列表中选择导入的信任点。单击Update & Apply保存更改。确保虚拟IPv4主机名与证书中的公用名匹配。
CLI 配置:
9800(config)#parameter-map type webauth global
9800(config-params-parameter-map)#type webauth
9800(config-params-parameter-map)#virtual-ip ipv4 192.0.2.1 virtual-host mywlc.local-domain
9800(config-params-parameter-map)#trustpoint 9800-CSR
要更新证书使用情况,请重新启动HTTP服务:
9800(config)#no ip http server
9800(config)#ip http server
.
高可用性注意事项
在为状态切换高可用性(HA SSO)配置的9800对上,所有证书在初始批量同步时从主证书复制到辅助证书。这包括私钥在控制器本身上生成的证书,即使RSA密钥配置为不可导出。建立HA对后,所有新安装的证书都会安装在两个控制器上,并且所有证书都会被实时复制。
失败后,以前辅助的、现在处于活动状态的控制器以透明方式使用从主控制器继承的证书。
如何确保Web浏览器信任证书
确保Web浏览器信任证书时,需要考虑以下重要事项:
- 其Common Name(或SAN字段)必须与浏览器访问的URL匹配。
- 必须在有效期内。
- 必须由浏览器信任其根的CA或CA链发出。为此,Web服务器提供的证书必须包含链的所有证书,直到(不一定包括)受客户端浏览器(通常为根CA)信任的证书为止。
- 如果它包含撤销列表,则浏览器需要能够下载这些列表,并且不能列出证书CN。
验证
您可以使用以下命令验证证书配置:
9800#show crypto pki certificate 9800.pfx

Certificate
Status: Available
Certificate Serial Number (hex): 1236
Certificate Usage: General Purpose
Issuer:
cn=Chuu Intermediate CA
ou=Chuu Wireless
o=Chuu Inc
st=CDMX
c=MX
Subject:
Name: alz-9800
e=user@example.com
cn=alz-9800
ou=Cisco Systems
o=Wireless TAC
l=CDMX
st=CDMX
c=MX
Validity Date:
start date: 17:54:45 Pacific Sep 28 2021
end date: 17:54:45 Pacific Sep 26 2031
Associated Trustpoints: 9800.pfx

CA Certificate
Status: Available
Certificate Serial Number (hex): 1000
Certificate Usage: Signature
Issuer:
cn=Chuu Root CA
ou=Chuu Wireless
o=Chuu Inc
l=Iztapalapa
st=CDMX
c=MX
Subject:
cn=Chuu Intermediate CA
ou=Chuu Wireless
o=Chuu Inc
st=CDMX
c=MX
Validity Date:
start date: 05:10:34 Pacific Apr 29 2020
end date: 05:10:34 Pacific Apr 27 2030
Associated Trustpoints: 9800.pfx
9800#show ip http server secure status

HTTP secure server status: Enabled
HTTP secure server port: 443
HTTP secure server ciphersuite: 3des-ede-cbc-sha aes-128-cbc-sha
 aes-256-cbc-sha dhe-aes-128-cbc-sha ecdhe-rsa-3des-ede-cbc-sha
 rsa-aes-cbc-sha2 rsa-aes-gcm-sha2 dhe-aes-cbc-sha2 dhe-aes-gcm-sha2
 ecdhe-rsa-aes-cbc-sha2 ecdhe-rsa-aes-gcm-sha2
HTTP secure server TLS version: TLSv1.2 TLSv1.1 TLSv1.0
HTTP secure server client authentication: Disabled
HTTP secure server trustpoint: 9800.pfx
HTTP secure server active session modules: ALL
您可以在9800上验证证书链。如果设备证书是由中间CA颁发的,而它本身是由根CA颁发的,您有一个信任点,按两个证书的组排列,因此每个级别都有自己的信任点。在本例中,9800 WLC具有9800.pfx以及设备证书(WLC证书)及其颁发CA(中间CA)。 然后是另一个信任点,其根CA发出该中间CA。
9800#show crypto pki certificate 9800.pfx
Certificate
Status: Available
Certificate Serial Number (hex): 1236
Certificate Usage: General Purpose
Issuer:
cn=Chuu Intermediate CA
ou=Chuu Wireless
o=Chuu Inc
st=CDMX
c=MX
Subject:
Name: alz-9800
e=user@example.com
cn=alz-9800
ou=Cisco Systems
o=Wireless TAC
l=CDMX
st=CDMX
c=MX
Validity Date:
start date: 17:54:45 Pacific Sep 28 2021
end date: 17:54:45 Pacific Sep 26 2031
Associated Trustpoints: 9800.pfx

CA Certificate
Status: Available
Certificate Serial Number (hex): 1000
Certificate Usage: Signature
Issuer:
cn=Chuu Root CA
ou=Chuu Wireless
o=Chuu Inc
l=Iztapalapa
st=CDMX
c=MX
Subject:
cn=Chuu Intermediate CA
ou=Chuu Wireless
o=Chuu Inc
st=CDMX
c=MX
Validity Date:
start date: 05:10:34 Pacific Apr 29 2020
end date: 05:10:34 Pacific Apr 27 2030
Associated Trustpoints: 9800.pfx

9800#show crypto pki certificate 9800.pfx-rrr1
CA Certificate
Status: Available
Certificate Serial Number (hex): 00
Certificate Usage: Signature
Issuer:
cn=Chuu Root CA
ou=Chuu Wireless
o=Chuu Inc
l=Iztapalapa
st=CDMX
c=MX
Subject:
cn=Chuu Root CA
ou=Chuu Wireless
o=Chuu Inc
l=Iztapalapa
st=CDMX
c=MX
Validity Date:
start date: 04:58:05 Pacific Apr 29 2020
end date: 04:58:05 Pacific Apr 27 2030
Associated Trustpoints: 9800-CSR 9800.pfx-rrr1
使用OpenSSL进行证书验证
OpenSSL可用于验证证书本身或执行某些转换操作。
要使用OpenSSL显示证书,请执行以下操作:
openssl x509 -in -text
要显示CSR的内容,请执行以下操作:
openssl req -noout -text -in
如果要验证9800 WLC上的终端证书,但希望使用浏览器以外的其他内容,OpenSSL可以执行此操作,并提供大量详细信息。
openssl s_client -showcerts -verify 5 -connect :443
您可以使用9800的webadmin的URL或访客门户的URL(虚拟IP)替换<wlcURL>。 您也可以将IP地址放在此处。它会告诉您接收了什么证书链,但使用IP地址而不是主机名时,证书验证永远不可能是100%正确的。
要查看内容并验证PKCS12(.pfx)证书或证书链:
openssl pkcs12 -info -in
以下是证书链上此命令的示例,其中设备证书由称为“intermediate.com”的中间CA(其自身由称为“root.com”的根CA颁发)颁发给技术支持中心(TAC):
openssl pkcs12 -info -in chainscript2.pfx
Enter Import Password:
MAC Iteration 2048
MAC verified OK
PKCS7 Encrypted data: pbeWithSHA1And40BitRC2-CBC, Iteration 2048
Certificate bag
Bag Attributes
localKeyID: 1D 36 8F C2 4B 18 0B 0D B2 57 A2 55 18 96 7A 8B 57 F9 CD FD
subject=/C=BE/ST=Diegem/L=Diegem/O=Cisco/CN=TAC
issuer=/C=BE/ST=Diegem/O=Cisco/OU=TAC/CN=intermediate.com/emailAddress=int@int.com
-----BEGIN CERTIFICATE-----
< Device certificate >
-----END CERTIFICATE-----
Certificate bag
Bag Attributes: <No Attributes>
subject=/C=BE/ST=Diegem/O=Cisco/OU=TAC/CN=intermediate.com/emailAddress=int@int.com
issuer=/C=BE/ST=Diegem/L=Diegem/O=Cisco/OU=TAC/CN=RootCA.root.com/emailAddress=root@root.com
-----BEGIN CERTIFICATE-----
< Intermediate certificate >
-----END CERTIFICATE-----
Certificate bag
Bag Attributes: <No Attributes>
subject=/C=BE/ST=Diegem/L=Diegem/O=Cisco/OU=TAC/CN=RootCA.root.com/emailAddress=root@root.com
issuer=/C=BE/ST=Diegem/L=Diegem/O=Cisco/OU=TAC/CN=RootCA.root.com/emailAddress=root@root.com
-----BEGIN CERTIFICATE-----
< Root certificate >
-----END CERTIFICATE-----
PKCS7 Data
Shrouded Keybag: pbeWithSHA1And3-KeyTripleDES-CBC, Iteration 2048
Bag Attributes
localKeyID: 1D 36 8F C2 4B 18 0B 0D B2 57 A2 55 18 96 7A 8B 57 F9 CD FD
Key Attributes: <No Attributes>
Enter PEM pass phrase:
Verifying - Enter PEM pass phrase:
-----BEGIN ENCRYPTED PRIVATE KEY-----
< Private key >
-----END ENCRYPTED PRIVATE KEY-----
故障排除
使用此命令进行故障排除。如果在远程会话(SSH或telnet)上完成,则需要terminal monitor来显示输出:
9800#debug crypto pki transactions
成功的场景调试输出
此输出显示在9800上发生成功证书导入时的预期输出。请使用此命令作为参考并确定故障状态:
Sep 28 17:35:23.242: CRYPTO_PKI: Copying pkcs12 from bootflash:9800.pfx
Sep 28 17:35:23.322: CRYPTO_PKI: Creating trustpoint 9800.pfx
Sep 28 17:35:23.322: %PKI-6-TRUSTPOINT_CREATE: Trustpoint: 9800.pfx created succesfully
Sep 28 17:35:23.324: CRYPTO_PKI: examining cert:
Sep 28 17:35:23.324: CRYPTO_PKI: issuerName=cn=Chuu Intermediate CA,ou=Chuu Wireless,o=Chuu Inc,st=CDMX,c=MX
Sep 28 17:35:23.324: CRYPTO_PKI: subjectname=e=user@example.com,cn=alz-9800,ou=Cisco Systems,o=Wireless TAC,l=CDMX,st=CDMX,c=MX
Sep 28 17:35:23.324: CRYPTO_PKI: adding RSA Keypair
Sep 28 17:35:23.324: CRYPTO_PKI: bitValue of ET_KEY_USAGE = 140
Sep 28 17:35:23.324: CRYPTO_PKI: Certificate Key Usage = GENERAL_PURPOSE
Sep 28 17:35:23.324: %CRYPTO_ENGINE-5-KEY_ADDITION: A key named 9800.pfx has been generated or imported by pki-pkcs12
Sep 28 17:35:23.331: CRYPTO_PKI: adding as a router certificate.Public key in cert and stored public key 9800.pfx match

Sep 28 17:35:23.333: CRYPTO_PKI: examining cert:
Sep 28 17:35:23.333: CRYPTO_PKI: issuerName=cn=Chuu Root CA,ou=Chuu Wireless,o=Chuu Inc,l=Iztapalapa,st=CDMX,c=MX
Sep 28 17:35:23.333: CRYPTO_PKI: subjectname=cn=Chuu Intermediate CA,ou=Chuu Wireless,o=Chuu Inc,st=CDMX,c=MX
Sep 28 17:35:23.333: CRYPTO_PKI: no matching private key presents.

[...]

Sep 28 17:35:23.335: CRYPTO_PKI: Setting the key_type as RSA
Sep 28 17:35:23.335: CRYPTO_PKI: Attempting to insert the peer's public key into cache
Sep 28 17:35:23.335: CRYPTO_PKI:Peer's public inserted successfully with key id 21
Sep 28 17:35:23.336: Calling pkiSendCertInstallTrap to send alert
Sep 28 17:35:23.337: CRYPTO_PKI: Deleting cached key having key id 31
Sep 28 17:35:23.337: CRYPTO_PKI: Attempting to insert the peer's public key into cache
Sep 28 17:35:23.337: CRYPTO_PKI:Peer's public inserted successfully with key id 32
Sep 28 17:35:23.338: CRYPTO_PKI: (A0323) Session started - identity selected (9800.pfx)
Sep 28 17:35:23.338: CRYPTO_PKI: Rcvd request to end PKI session A0323.
Sep 28 17:35:23.338: CRYPTO_PKI
alz-9800#: PKI session A0323 has ended. Freeing all resources.
Sep 28 17:35:23.338: CRYPTO_PKI: unlocked trustpoint 9800.pfx, refcount is 0
Sep 28 17:35:23.338: CRYPTO_PKI: Expiring peer's cached key with key id 32Public key in cert and stored public key 9800.pfx match

Sep 28 17:35:23.341: Calling pkiSendCertInstallTrap to send alert
Sep 28 17:35:23.341: CRYPTO_PKI: cert verified and inserted.
Sep 28 17:35:23.402: CRYPTO_PKI: Creating trustpoint 9800.pfx-rrr1
Sep 28 17:35:23.402: %PKI-6-TRUSTPOINT_CREATE: Trustpoint: 9800.pfx-rrr1 created succesfully
Sep 28 17:35:23.403: CRYPTO_PKI: Setting the key_type as RSA
Sep 28 17:35:23.404: CRYPTO_PKI: Attempting to insert the peer's public key into cache
Sep 28 17:35:23.404: CRYPTO_PKI:Peer's public inserted successfully with key id 22
Sep 28 17:35:23.405: Calling pkiSendCertInstallTrap to send alert
Sep 28 17:35:23.406: CRYPTO_PKI: no CRLs present (expected)
Sep 28 17:35:23.406: %PKI-6-PKCS12_IMPORT_SUCCESS: PKCS #12 import in to trustpoint 9800.pfx successfully imported.
尝试导入没有CA的PKCS12证书
如果导入证书并获取错误:“未找到CA证书。”,这意味着.pfx文件不包含整个链或者一个CA不存在。
9800(config)#crypto pki import pkcs12.pfx pkcs12 bootflash:pks12.pfx password
% Importing pkcs12...
Source filename [pks12.pfx]?
Reading file from bootflash:pks12.pfx
% Warning: CA cert is not found. The imported certs might not be usable.
如果运行命令openssl pkcs12 -info -in <path to cert>,并且仅显示具有一个私钥的一个证书,则表示CA不存在。根据经验法则,此命令最好列出整个证书链。如果客户端浏览器已经知道顶部根CA,则不需要包含它。
解决此问题的一种方法是将PKCS12解构为PEM并正确重建链。在下一个示例中,我们有一个只包含设备(WLC)证书及其密钥的.pfx文件。它由中间CA(在PKCS12文件中不存在)发出,而中间CA又由众所周知的根CA签名。
步骤1.将私钥导出出去。
openssl pkcs12 -in -out cert.key -nocerts -nodes
步骤2.将证书导出为PEM。
openssl pkcs12 -in -out certificate.pem -nokeys -clcerts
步骤3.将中间CA证书下载为PEM。
CA的来源取决于其性质,如果它是公共CA,则联机搜索足以查找存储库。否则,CA管理员必须提供Base64格式(.pem)的证书。 如果有多个级别的CA,则将其分组到单个文件中,与选项1导入过程结束时显示的文件类似。
步骤4.从密钥、设备证书和CA证书重建PKCS 12。
openssl pkcs12 -export -out fixedcertchain.pfx -inkey cert.key -in certificate.pem -certfile CA.pem
我们现在有“fixedcertchain.pfx”,可以方便地将其导入Catalyst 9800!
导出您的私钥
如果您迁移到另一个WLC或希望恢复您的WLC,您最终可能会遇到想要导出私钥以便将其移动到其他位置的情况。
#crypto key export rsa pem terminal aes
附注和限制
- Cisco IOS® XE不支持有效期超过2099的CA证书:Cisco Bug ID CSCvp64208
- Cisco IOS® XE不支持SHA256消息摘要PKCS 12捆绑包(支持SHA256证书,但如果PKCS12捆绑包本身使用SHA256签名,则不支持): CSCvz41428。此问题已在17.12.1中解决。
- 如果WLC需要携带用户证书,并且NAC/ISE设备可通过互联网访问(例如,在SD-WAN部署中),则可以看到分段。 证书几乎总是大于1500字节(这意味着会发送多个RADIUS数据包来传输证书消息),如果您在网络路径中有多个不同的MTU,则可能会发生RADIUS数据包本身的过度分段。在这种情况下,我们建议您通过同一路径发送所有WLC流量的UDP数据报,以避免因互联网天气而导致延迟/抖动等问题
 反馈
反馈