简介
本文档介绍如何通过NK9上的CLI为TACACS配置自定义Nexus角色。
先决条件
要求
Cisco 建议您了解以下主题:
使用的组件
本文档中的信息基于以下软件和硬件版本:
- Cisco Nexus9000、NXOS映像文件为:bootflash:///nxos.9.3.5.bin
- 身份服务引擎版本3.2
本文档中的信息都是基于特定实验室环境中的设备编写的。本文档中使用的所有设备最初均采用原始(默认)配置。如果您的网络处于活动状态,请确保您了解所有命令的潜在影响。
背景信息
许可要求
Cisco NX-OS - TACACS+无需许可证。
思科身份服务引擎
对于新的ISE安装,您拥有90天评估期许可证,可以访问所有ISE功能,如果您没有评估许可证,为了使用ISE TACACS功能,您需要设备管理员许可证用于执行身份验证的策略服务器节点。
管理员/帮助台用户在Nexus设备上进行身份验证后,ISE返回所需的Nexus外壳角色。
分配了此角色的用户可以执行基本故障排除并退回某些端口。
获得Nexus角色的TACACS会话必须能够仅使用和运行以下命令和操作:
- 访问配置终端,使其仅执行从1/1-1/21到1/25-1/30的关闭接口和不关闭接口
- ssh
- ssh6
- telnet
- Telnet6
- Traceroute
- Traceroute6
- ping
- Ping6
- enable
配置
网络图
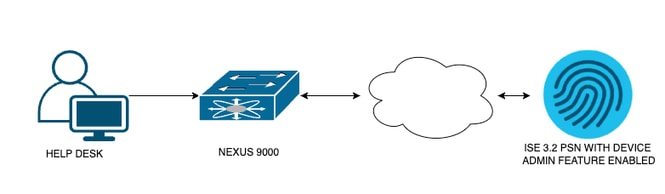 流组件图
流组件图
步骤 1:配置Nexus 9000
1.配置AAA。

警告:启用TACACS身份验证后,Nexus设备停止使用本地身份验证,并开始使用基于AAA服务器的身份验证。
Nexus9000(config)# feature tacacs+
Nexus9000(config)# tacacs-server host <Your ISE IP> key 0 Nexus3xample
Nexus9000(config)# tacacs-server key 0 "Nexus3xample"
Nexus9000(config)# aaa group server tacacs+ IsePsnServers
Nexus9000(config-tacacs+)# server <Your ISE IP>
Nexus9000(config)# aaa authentication login default group IsePsnServers local
2.按照指定的要求配置自定义角色。
Nexus9000(config)# role name helpdesk
Nexus9000(config-role)#   description Can perform basic Toubleshooting and bounce certain  ports
Nexus9000(config-role)# rule 1 permit read
Nexus9000(config-role)# rule 2 permit command enable *
Nexus9000(config-role)# rule 3 permit command ssh *
Nexus9000(config-role)# rule 4 permit command ssh6 *
Nexus9000(config-role)# rule 5 permit command ping *
Nexus9000(config-role)# rule 6 permit command ping6 *
Nexus9000(config-role)# rule 7 permit command telnet *
Nexus9000(config-role)# rule 8 permit command traceroute *
Nexus9000(config-role)# rule 9 permit command traceroute6 *
Nexus9000(config-role)# rule 10 permit command telnet6 *
Nexus9000(config-role)# rule 11 permit command config t ; interface * ; shutdown
Nexus9000(config-role)# rule 12 permit command config t ; interface * ; no shutdown

vlan policy deny
interface policy deny

Nexus9000(config-role-interface)#     permit interface Ethernet1/1
Nexus9000(config-role-interface)#     permit interface Ethernet1/2
Nexus9000(config-role-interface)#     permit interface Ethernet1/3
Nexus9000(config-role-interface)#     permit interface Ethernet1/4
Nexus9000(config-role-interface)#     permit interface Ethernet1/5
Nexus9000(config-role-interface)#     permit interface Ethernet1/6
Nexus9000(config-role-interface)#     permit interface Ethernet1/7
Nexus9000(config-role-interface)#     permit interface Ethernet1/8
Nexus9000(config-role-interface)#     permit interface Ethernet1/8
Nexus9000(config-role-interface)#     permit interface Ethernet1/9
Nexus9000(config-role-interface)#     permit interface Ethernet1/10
Nexus9000(config-role-interface)#     permit interface Ethernet1/11
Nexus9000(config-role-interface)#     permit interface Ethernet1/12
Nexus9000(config-role-interface)#     permit interface Ethernet1/13
Nexus9000(config-role-interface)#     permit interface Ethernet1/14
Nexus9000(config-role-interface)#     permit interface Ethernet1/15
Nexus9000(config-role-interface)#     permit interface Ethernet1/16
Nexus9000(config-role-interface)#     permit interface Ethernet1/17
Nexus9000(config-role-interface)#     permit interface Ethernet1/18
Nexus9000(config-role-interface)#     permit interface Ethernet1/19
Nexus9000(config-role-interface)#     permit interface Ethernet1/20
Nexus9000(config-role-interface)#     permit interface Ethernet1/21
Nexus9000(config-role-interface)#     permit interface Ethernet1/22
Nexus9000(config-role-interface)#     permit interface Ethernet1/25
Nexus9000(config-role-interface)#     permit interface Ethernet1/26
Nexus9000(config-role-interface)#     permit interface Ethernet1/27
Nexus9000(config-role-interface)#     permit interface Ethernet1/28
Nexus9000(config-role-interface)#     permit interface Ethernet1/29
Nexus9000(config-role-interface)#     permit interface Ethernet1/30

Nexus9000# copy running-config startup-config
[########################################] 100%
Copy complete, now saving to disk (please wait)...

Copy complete.
步骤2.配置身份服务引擎3.2
1.配置在Nexus TACACS会话期间使用的身份。
使用ISE本地身份验证。
导航到Administration > Identity Management > Groups选项卡并创建用户需要加入的组,为此演示创建的身份组为iseUsers。
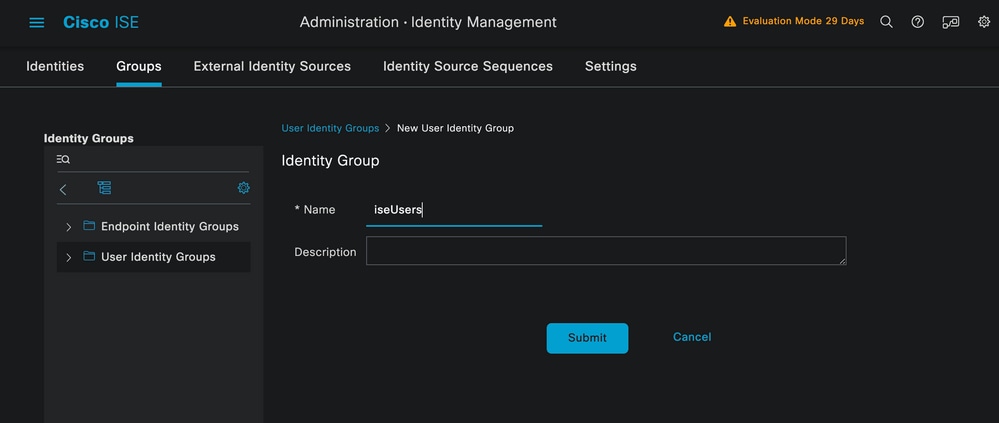 创建用户组
创建用户组
单击Submit按钮。
接下来导航到Administration > Identity Management > Identity选项卡。
单击 Add 按钮。
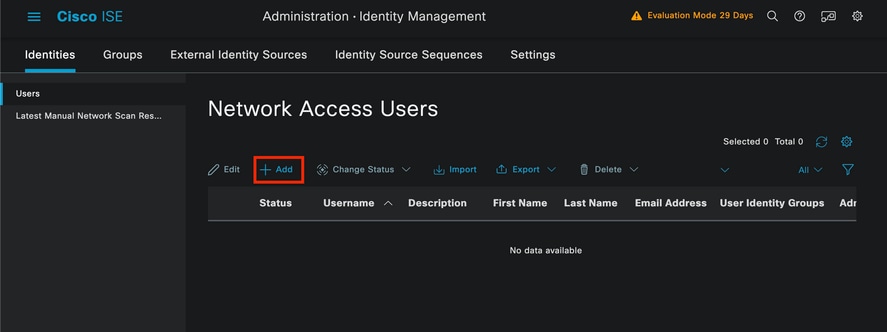 用户创建
用户创建
作为必填字段的一部分,以用户的名称开头,本示例中使用用户名iseiscool。
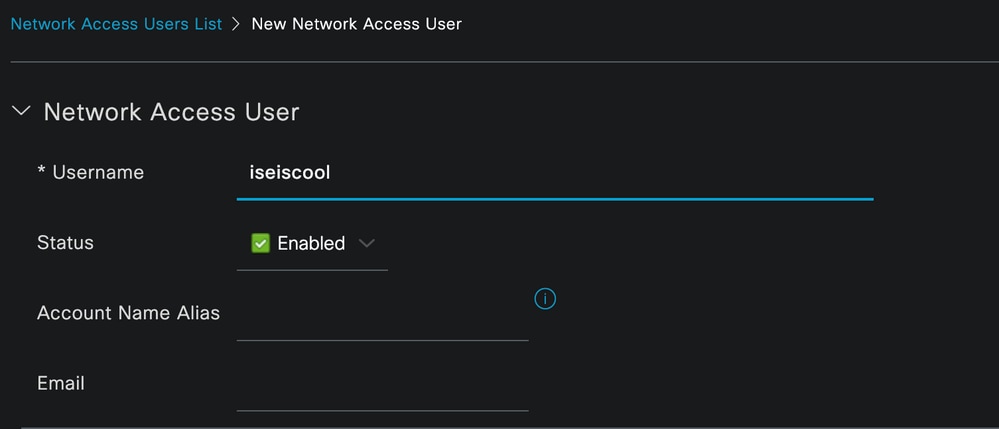 命名用户并创建用户
下一步是为创建的用户名分配密码。VainillaISE97是本演示中使用的密码。
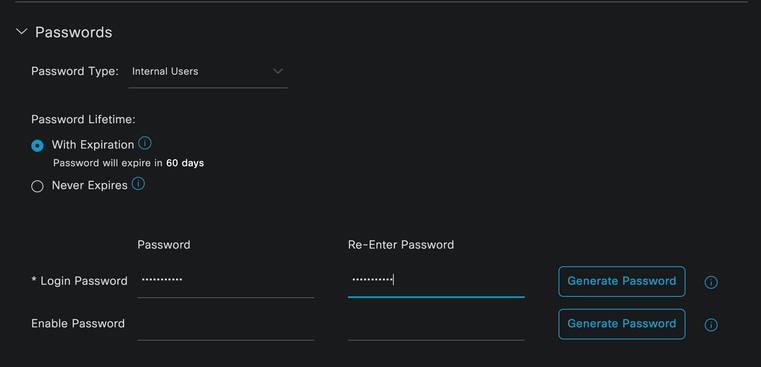 密码指定
密码指定
最后,将用户分配到先前创建的组,在本例中为iseUsers。
 组分配
组分配
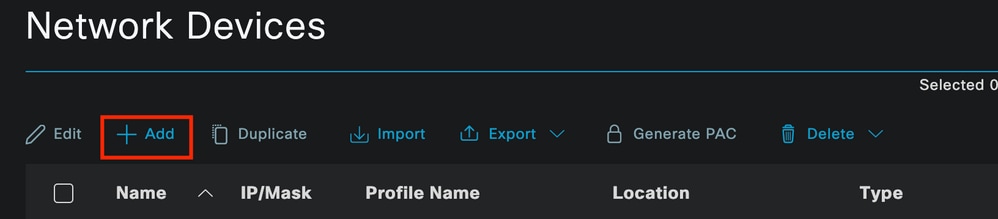
2.配置并添加网络设备。
将NEXUS 9000设备添加到ISE管理>网络资源>网络设备
单击Add按钮开始。
 网络接入设备页面
在表格中输入值,为正在创建的NAD分配名称,并为TACACS对话从NAD联系ISE的IP。
 配置网络设备
下拉选项可保留为空并可省略,这些选项旨在按位置、设备类型和版本对需要进行分类,然后根据这些过滤器更改身份验证流程。
在Administration > Network Resources > Network Devices > Your NAD > TACACS Authentication Settings上,添加在NAD配置下使用的共享密钥。本演示使用Nexus3示例。
 TACACS配置部分
单击Submit按钮保存更改。
3.在ISE上配置TACACS。
再次检查您在Nexus 9k中配置的PSN是否启用了Device Admin选项。
 PSN设备管理功能检查
可以在ISE菜单Administration > System > Deployment > Your PSN > Policy Server section > Enable Device Admin Services下选中此选项。
- 创建TACACS配置文件,如果身份验证成功,它将角色帮助台返回到Nexus设备。
从ISE菜单中,导航到Workcenters > Device Administration > Policy Elements > Results > TACACS Profiles并点击Add按钮。
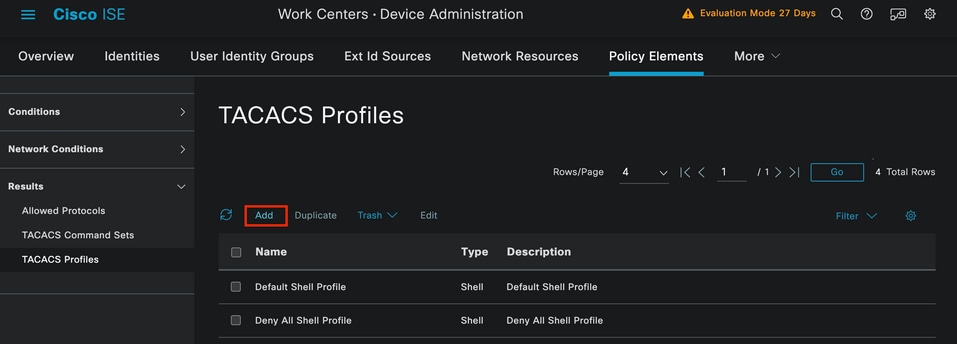 TACACS配置文件
指定Name和(可选)说明。
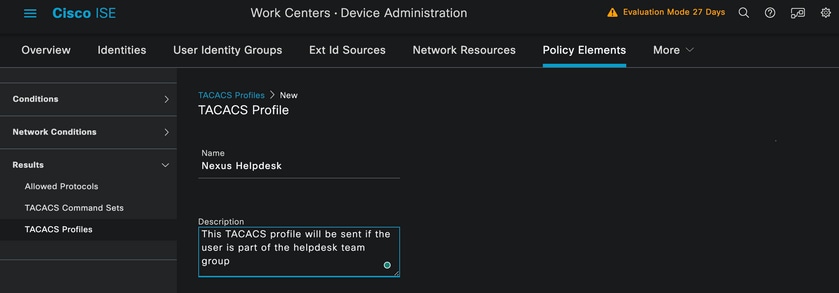 命名Tacacs配置文件
忽略Task Attribute View部分并导航到Raw View部分。
并输入值shell:roles="helpdesk"。
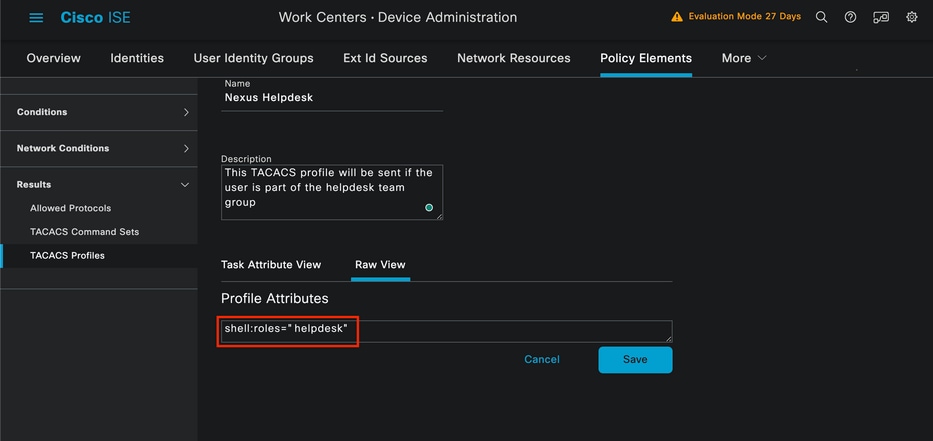 添加配置文件属性
配置包含身份验证策略和授权策略的策略集。
在ISE菜单上,访问Work Centers > Device Administration > Device Admin Policy Sets。
出于演示目的,使用默认策略集。但是,可以创建另一个策略集,其条件与特定方案匹配。
单击行尾的箭头。
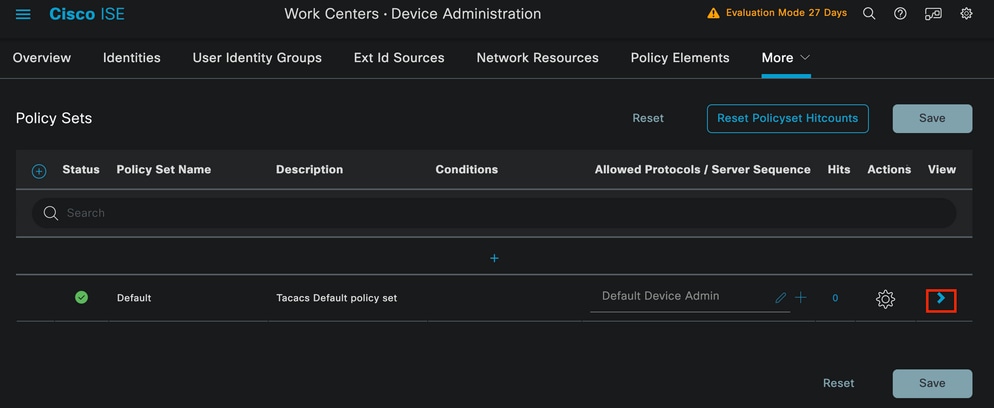 “设备管理策略集”页
进入策略集配置后,向下滚动并展开Authentication Policy部分。
单击Add图标。
对于此配置示例,Name值为Internal Authentication,所选条件为网络设备(Nexus)IP(替换A.B.C.D.)。 此身份验证策略使用内部用户身份库。
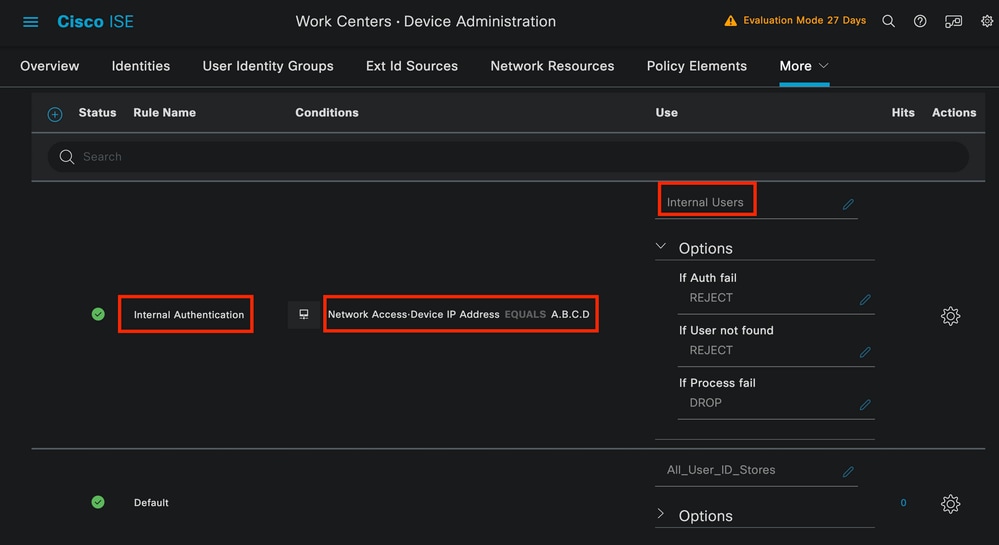 验证策略
验证策略
下面是条件是如何配置的。
选择网络访问>设备IP地址字典属性。
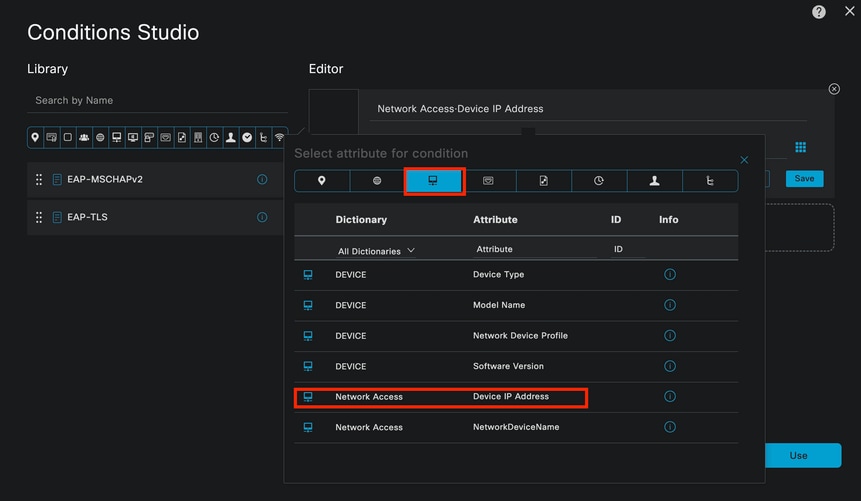 身份验证策略的Condition studio
将<Nexus IP地址>注释替换为正确的IP。
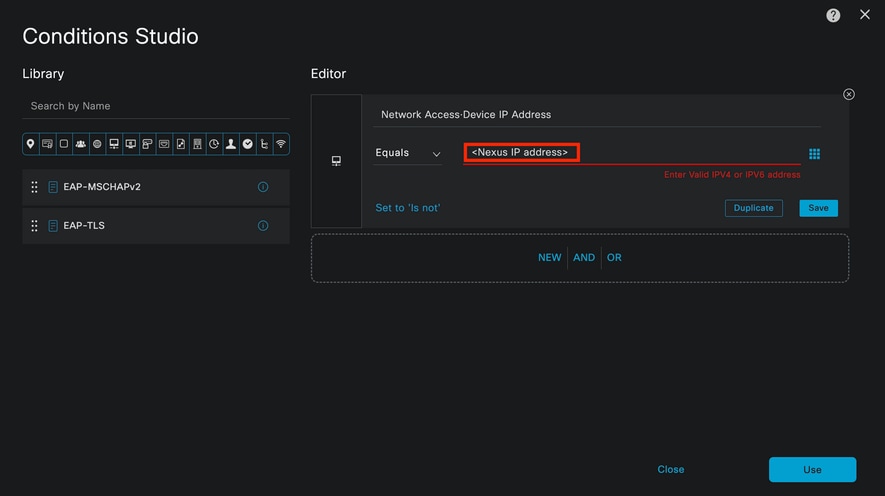 添加IP过滤器
单击Use按钮。
此条件仅由您配置的Nexus设备满足。但是,如果目的是为大量设备启用此条件,请考虑其他条件。
然后导航到授权策略部分并展开它。
点击+(+)图标。
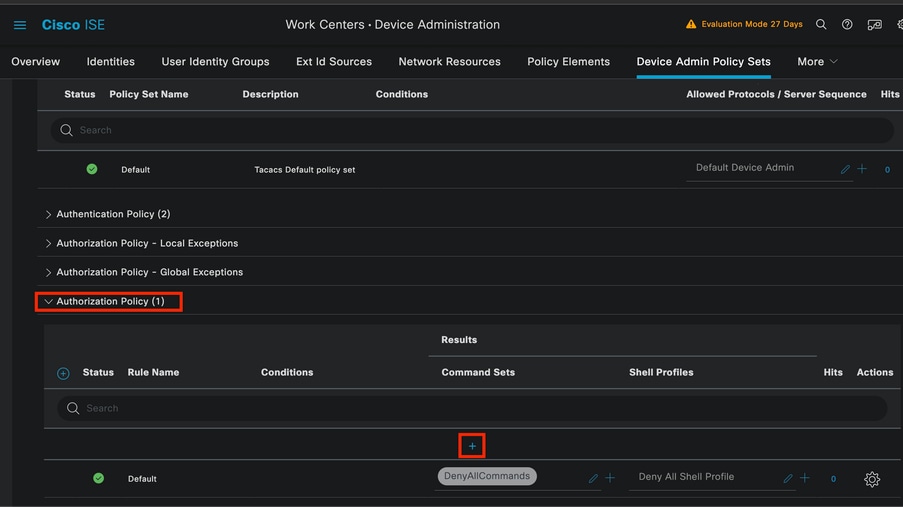 Authorization policy部分
在本示例中,使用NEXUS HELP DESK作为授权策略的名称。
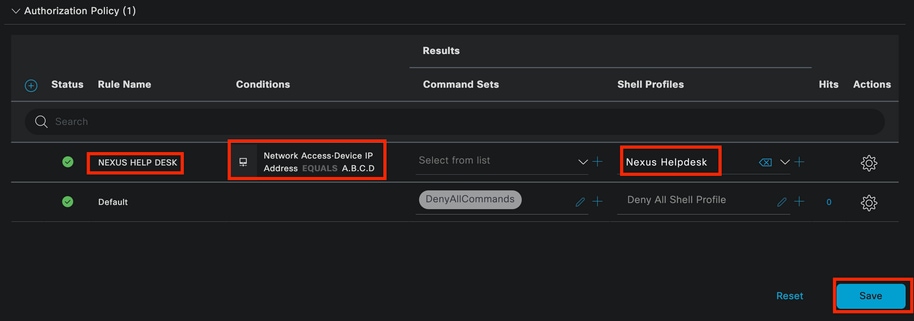 授权策略的Condition studio
身份验证策略中配置的相同条件用于授权策略。
在Shell Profiles列中,选择Nexus Helpdesk之前配置的配置文件。
最后,单击Save按钮。
验证
使用本部分可确认配置能否正常运行。
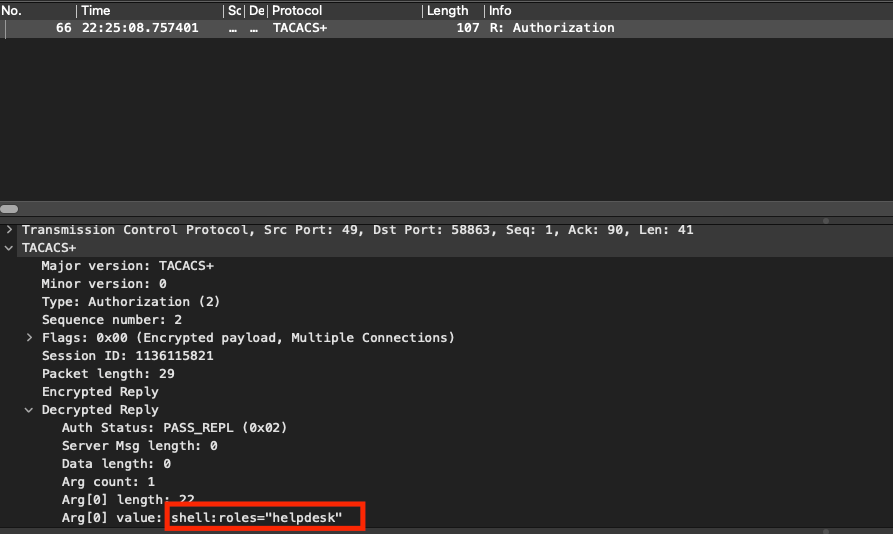
从ISE GUI中,导航到操作(Operations)> TACACS >实时日志(Live Logs)。识别与所用用户名匹配的记录,然后点击授权事件的实时日志详细信息。
 TACACS实时日志
作为此报告包括的详细信息的一部分,可以找到响应部分,在该部分可以查看ISE如何返回值shell:roles="helpdesk"
 实时日志详细信息响应
在Nexus设备上:
Nexus9000 login: iseiscool
Password: VainillaISE97

Nexus9000# conf t
Enter configuration commands, one per line. End with CNTL/Z.
Nexus9000(config)# interface ethernet 1/23
% Interface permission denied

Nexus9000(config)# ?
  interface  Configure interfaces
  show       Show running system information
  end        Go to exec mode
  exit       Exit from command interpreter

Nexus9000(config)# role name test
% Permission denied for the role

Nexus9000(config)#

Nexus9000(config)# interface loopback 0
% Interface permission denied

Nexus9000(config)#
Nexus9000# conf t

Nexus9000(config)# interface ethernet 1/5
Notice that only the commands allowed are listed.
Nexus9000(config-if)# ?

  no        Negate a command or set its defaults
  show      Show running system information
  shutdown  Enable/disable an interface
  end       Go to exec mode
  exit      Exit from command interpreter

Nexus9000(config-if)# cdp
Nexus9000(config-if)# cdp enable
% Permission denied for the role
Nexus9000(config-if)#
故障排除
Nexus9000# ping <您的ISE IP>
PING <Your ISE IP>(<Your ISE IP> 😞 56数据字节
64字节,来自<您的ISE IP>:icmp_seq=0 ttl=59 time=1.22 ms
64字节,来自<您的ISE IP>:icmp_seq=1 ttl=59 time=0.739 ms
64字节,来自<您的ISE IP>:icmp_seq=2 ttl=59 time=0.686 ms
64字节,来自<您的ISE IP>:icmp_seq=3 ttl=59 time=0.71 ms
64字节,来自<您的ISE IP>:icmp_seq=4 ttl=59 time=0.72 ms
- 验证ISE和Nexus设备之间的端口49是否已打开:
Nexus9000# telnet <您的ISE IP> 49
正在尝试<您的ISE IP> ...
已连接到<您的ISE IP>。
转义字符为“^]”。
- 使用以下调试:
debug tacacs+ all
Nexus9000#
Nexus9000# 2024 Apr 19 22:50:44.199329 tacacs:event_loop():调用process_rd_fd_set
2024年4月19日22:50:44.199355 tacacs:process_rd_fd_set:为fd 6呼叫回叫
2024年4月19日22:50:44.199392 tacacs:fsrv didnt使用8421操作码
2024年4月19日22:50:44.199406 tacacs:process_implicit_cfs_session_start:正在进入……
2024年4月19日22:50:44.199414 tacacs:process_implicit_cfs_session_start:退出;我们处于分配禁用状态
2024年4月19日22:50:44.199424 tacacs:process_aaa_tplus_request:输入aaa会话id 0
2024年4月19日22:50:44.199438 tacacs:process_aaa_tplus_request:使用服务器组IsePsnServers检查mgmt0端口的状态
2024年4月19日22:50:44.199451 tacacs:tacacs_global_config(4220):正在输入……
2024年4月19日22:50:44.199466 tacacs:tacacs_global_config(4577):获取_请求……
2024年4月19日22:50:44.208027 tacacs:tacacs_global_config(4701):已恢复全局协议配置操作的返回值:SUCCESS
2024年4月19日22:50:44.208045 tacacs:tacacs_global_config(4716):REQ:num server 0
2024年4月19日22:50:44.208054 tacacs:tacacs_global_config:REQ:num group 1
2024年4月19日22:50:44.208062 tacacs:tacacs_global_config:REQ:num timeout 5
2024年4月19日22:50:44.208070 tacacs:tacacs_global_config:REQ:num deadtime 0
2024年4月19日22:50:44.208078 tacacs:tacacs_global_config:REQ:num encryption_type 7
2024年4月19日22:50:44.208086 tacacs:tacacs_global_config:返回retval 0
2024年4月19日22:50:44.208098 tacacs:process_aaa_tplus_request:group_info填充在aaa_req中,因此使用服务器组IsePsnServers
2024年4月19日22:50:44.208108 tacacs:tacacs_servergroup_config:正在进入服务器组,索引0
2024年4月19日22:50:44.208117 tacacs:tacacs_servergroup_config:GETNEXT_REQ for Protocol server group index:0名称:
2024年4月19日22:50:44.208148 tacacs:tacacs_pss2_move2key:rcode = 40480003 syserr2str =无此类pss密钥
2024年4月19日22:50:44.208160 tacacs:tacacs_pss2_move2key:调用pss2_getkey
2024年4月19日22:50:44.208171 tacacs:tacacs_servergroup_config:GETNEXT_REQ获取协议服务器组索引:2名称:IsePsnServers
2024年4月19日22:50:44.208184 tacacs:tacacs_servergroup_config:已恢复协议组操作的返回值:SUCCESS
2024年4月19日22:50:44.208194 tacacs:tacacs_servergroup_config:返回协议服务器组的reval 0:IsePsnServers
2024年4月19日22:50:44.208210 tacacs:process_aaa_tplus_request:找到组IsePsnServers。相应的vrf为默认值,source-intf为0
2024年4月19日22:50:44.208224 tacacs:process_aaa_tplus_request:检查mgmt0 vrf:management against vrf:default of requested group
2024年4月19日22:50:44.208256 tacacs:process_aaa_tplus_request:mgmt_if 83886080
2024年4月19日22:50:44.208272 tacacs:process_aaa_tplus_request:global_src_intf :0,本地src_intf为0,vrf_name为默认值
2024年4月19日22:50:44.208286 tacacs:create_tplus_req_state_machine(902):输入aaa会话id 0
2024年4月19日22:50:44.208295 tacacs:状态机计数0
2024年4月19日22:50:44.208307 tacacs:init_tplus_req_state_machine:输入aaa会话id 0
2024年4月19日22:50:44.208317 tacacs:init_tplus_req_state_machine(1298):tplus_ctx为NULL,如果是编写和测试,则应该为
2024年4月19日22:50:44.208327 tacacs:tacacs_servergroup_config:正在进入服务器组IsePsnServers,索引0
2024年4月19日22:50:44.208339 tacacs:tacacs_servergroup_config:GET_REQ for Protocol server group index:0 name:IsePsnServers
2024年4月19日22:50:44.208357 tacacs:find_tacacs_servergroup:输入服务器组IsePsnServers
2024年4月19日22:50:44.208372 tacacs:tacacs_pss2_move2key:rcode = 0 syserr2str =成功
2024年4月19日22:50:44.208382 tacacs:find_tacacs_servergroup:正在退出服务器组IsePsnServers索引为2
2024年4月19日22:50:44.208401 tacacs:tacacs_servergroup_config:GET_REQUEST:find_tacacs_servergroup error 0 for Protocol server group IsePsnServers
2024年4月19日22:50:44.208420 tacacs:tacacs_pss2_move2key:rcode = 0 syserr2str =成功
2024年4月19日22:50:44.208433 tacacs:tacacs_servergroup_config:GET_REQ获取协议服务器组索引:2名称:IsePsnServers
2024 A2024 4月19日22:52024 4月19日22:52024 4月19日22:5
Nexus9000#
- 执行数据包捕获。(要查看数据包详细信息,必须更改Wireshark TACACS+首选项,并更新Nexus和ISE使用的共享密钥。)
 TACACS授权数据包
- 验证ISE和Nexus端的共享密钥是否相同。这也可以在Wireshark中检查。
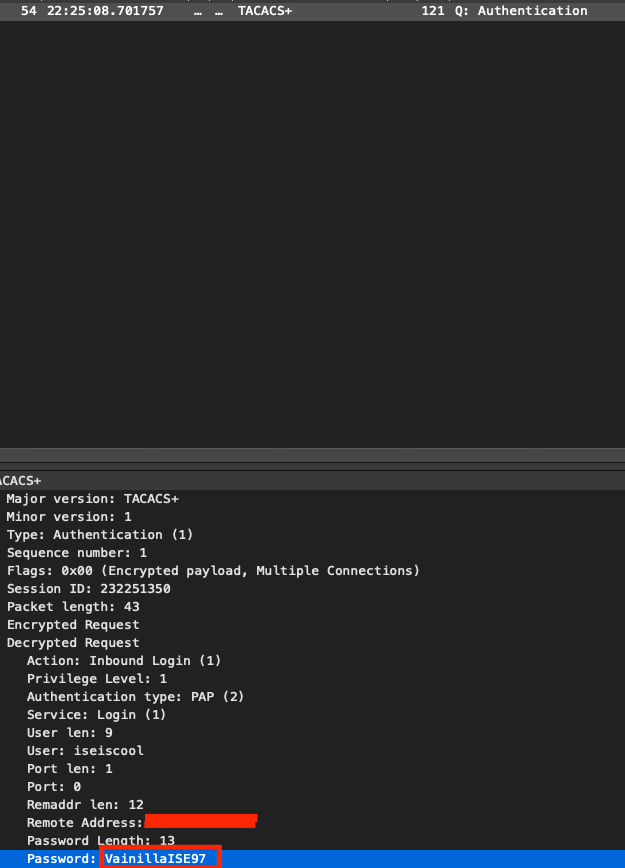 身份验证数据包

 反馈
反馈