简介
本文档介绍在Cisco Catalyst 9000系列交换机上配置和调配零接触调配(ZTP)。
先决条件
要求
Cisco 建议您了解以下主题:
- 交换机上的动态主机配置协议(DHCP)服务器配置
- Python代码基础知识
- HTTP/TFTP服务基础知识
许可证要求
- Network Advantage或Network Essentials许可证必须处于活动状态。
支持的平台
- 运行16.5.1a版本的Catalyst 9300系列交换机
- 运行16.5.1a版本的Catalyst 9500系列交换机
- 运行16.6.2版的Catalyst 9400系列交换机
使用的组件
本文档中的信息基于以下软件和硬件版本:
- Cisco IOS® XE 17.6.4上的Cisco Catalyst 9300交换机
- Cisco Catalyst 3850交换机用作DHCP服务器,配置选项67
- 安装有HTTP服务的终端主机包含Python文件。
本文档中的信息都是基于特定实验室环境中的设备编写的。本文档中使用的所有设备最初均采用原始(默认)配置。如果您的网络处于活动状态,请确保您了解所有命令的潜在影响。
背景信息
零接触调配(ZTP)用于在几分钟内准确调配网络设备,无需任何手动干预。
网络图
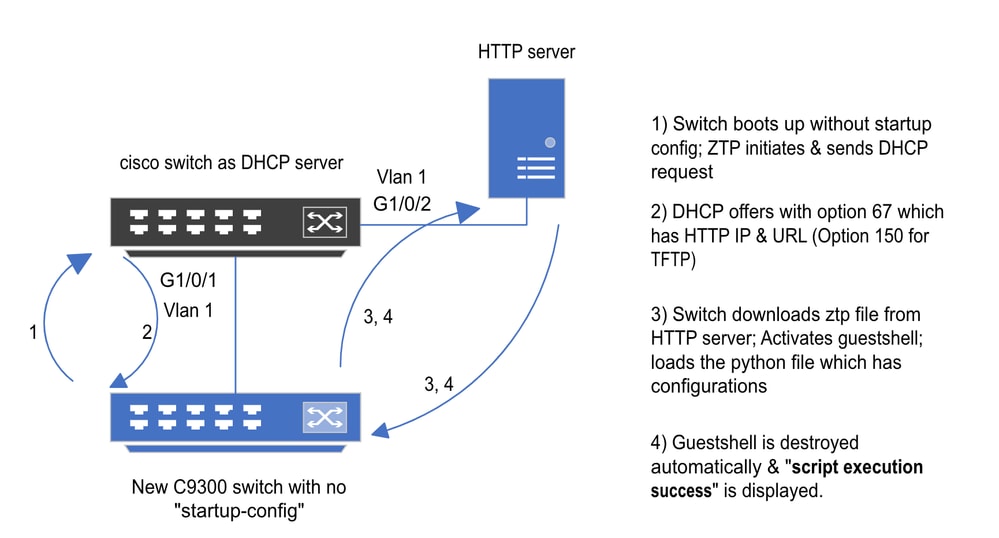 零接触调配基本设置和步骤
ZTP操作(详细步骤)
当将Catalyst 9000系列交换机引入现有网络时,ZTP会自动进行配置,无需启动配置。这无需任何手动干预。详细步骤在此介绍。
步骤1.连接新交换机
将新交换机连接到现有基础设施并打开设备电源。交换机启动时没有启动配置。
步骤2. ZTP启动
交换机自动启动ZTP进程。
步骤3. DHCP请求
交换机发出DHCP发现消息。
步骤4. DHCP响应
DHCP服务器使用包含选项67的提议进行响应,该选项具有HTTP服务器IP和URL。
步骤5. HTTP URL
交换机接收该服务并获取用于自身通信的IP地址。它还会接收HTTP服务器的IP地址和用于下载ZTP.py文件的完整URL。
步骤6.下载
交换机连接到HTTP服务器并下载文ZTP.py件。
步骤7.访客
交换机自动激活guestshell。
步骤8.配置部署
交换机执行Python文件,并且自动应用配置。
步骤9.成功
交换机将销毁guestshell并script execution is a success显示消息。
配置
设置HTTP服务
步骤1.在终端主机中安装HTTP服务(示例Linux)
sudo apt update
sudo apt install apache2
步骤2.创建Python文件ztp_http.py
如果出现任何权限问题chmod 777,请使用为文件授予完全权限。
Python文件包含这些任务的代码:
1. Show命令。
2.环回配置。
3.配置验证。
Python代码:
#Importing cli module
import cli

print "\n\n Running show version \n\n"
cli.executep('show version')

print "\n\n Configure a Loopback Interface \n\n"
cli.configurep(["interface loop 25", "ip address 192.168.0.25 255.255.255.255", "end"])

print "\n\n Running show ip interface brief \n\n"
cli.executep('show ip int brief | i up')

print "\n\n ZTP is success \n\n"
Python文件的位置。
vm: /var/www/html$ ls -l ztp_http.py
-rwxrwxrwx 1 root root 346 Apr 04 14:14 ztp_http.py
此文件必须存储在Linux计算机中的/var/www/html下。
步骤3.检验HTTP服务和侦听端口
使用service命令验证HTTP服务是否已启动并立即运行。
vm: /var/www/html$ sudo service apache2 status
Active: active (running)
检验HTTP服务当前侦听的端口。
vm: /var/www/html$ sudo netstat -anp | grep apache
tcp6 0 :::80 :::* LISTEN 1998/apache2               <<<< Listens at 80
步骤4.端口号的浏览器验证
验证是否可通过Web浏览器下载文件。
1.打开同一台计算机(例如Linux)中的任何浏览器。
2.在搜索栏中输入此URL: localhost:80/ztp_http.py
3.自动下载文件。
设置DHCP服务
步骤1.调配接口配置(新设备)
新交换机应连接到G1/0/1。
enable
configure terminal
interface g1/0/1
description New_9300_switch
switchport
switchport mode access
switchport access vlan 1
步骤2.配置HTTP服务器连接的接口
HTTP服务器(Linux)直接连接到3850交换机(例如,接口G1/0/2)。
enable
configure terminal
interface g1/0/2
description Linux_is_connected_here
switchport
switchport mode access
switchport access vlan 1
步骤3.配置DHCP范围
使用选项67配置DHCP池的示例。
enable
configure terminal
ip dhcp pool ZTP_Pool
network 10.0.0.0 255.255.255.0
default-router 10.0.0.1
option 67 ascii http://10.0.0.2:80/ztp_http.py
end
确认
当前没有可用于此配置的验证过程。
工作控制台日志
No startup-config, starting autoinstall/pnp/ztp...
Autoinstall will terminate if any input is detected on console

--- System Configuration Dialog ---

Would you like to enter the initial configuration dialog? [yes/no]:   <<<< Do not provide any input during this time.
Autoinstall trying DHCPv6 on Vlan1
Autoinstall trying DHCPv4 on Vlan1
Acquired IPv4 address 10.0.0.10 on Interface Vlan1
Received following DHCPv4 options:
bootfile : http://10.0.0.2:80/ztp_http.py
stop Autoip process
OK to enter CLI now...
pnp-discovery can be monitored without entering enable mode
Entering enable mode will stop pnp-discovery
Attempting bootfile http://10.0.0.2:80/ztp_http.py

Loading http://10.0.0.2:80/ztp_http.py
Loading http://10.0.0.2:80/ztp_http.py day0guestshell activated successfully
Current state is: ACTIVATED
day0guestshell started successfully
Current state is: RUNNING
Guestshell enabled successfully


Running show version                           <<<< show command executed


Cisco IOS XE Software, Version 17.06.04
Cisco IOS Software [Bengaluru], Catalyst L3 Switch Software (CAT9K_IOSXE), Version 17.6.4, RELEASE SOFTWARE (fc1)

<snipped>

Model Number : C9300L-48T-4X
System Serial Number : FOC2531LGM8
CLEI Code Number :
Switch Ports Model SW Version SW Image Mode
------ ----- ----- ---------- ---------- ----
* 1 53 C9300L-48T-4X 17.06.04 CAT9K_IOSXE BUNDLE

Configure a Loopback interface                              <<<< configuration

Line 1 SUCCESS: interface loop 25
Line 2 SUCCESS: ip address 192.168.0.25 255.255.255.255
Line 3 SUCCESS: end


Running show ip int brief                                    <<<< Config Verification


Vlan1 10.0.0.10 YES DHCP up up
Vlan4094 192.168.2.1 YES manual up down
GigabitEthernet0/0 unassigned YES unset up up
GigabitEthernet1/0/2 unassigned YES unset up up
GigabitEthernet1/0/3 unassigned YES unset up up
Ap1/0/1 unassigned YES unset up up
Loopback25 192.168.0.25 YES other up up


ZTP is success


Guestshell destroyed successfully
Script execution success!                                   <<<< Success
故障排除
本部分提供的信息可用于对配置进行故障排除。
常见问题
网络上存在另一个DHCP服务器
No startup-config, starting autoinstall/pnp/ztp...
Autoinstall will terminate if any input is detected on console
--- System Configuration Dialog ---
Would you like to enter the initial configuration dialog? [yes/no]:
Autoinstall trying DHCPv6 on Vlan1
Autoinstall trying DHCPv4 on Vlan1
Acquired IPv4 address 192.168.45.117 on Interface Vlan1           <<<< Gets Different IP from another DHCP server.
Received following DHCPv4 options:
hostname : Switch

stop Autoip process
OK to enter CLI now...
pnp-discovery can be monitored without entering enable mode
Entering enable mode will stop pnp-discovery
Guestshell destroyed successfully

stop Autoip process
% Please answer 'yes' or 'no'.
Would you like to enter the initial configuration dialog? [yes/no]: no
Python代码错误
--- System Configuration Dialog ---

Would you like to enter the initial configuration dialog? [yes/no]:
Autoinstall trying DHCPv6 on Vlan1

Autoinstall trying DHCPv4 on Vlan1

Acquired IPv4 address 10.106.37.69 on Interface Vlan1
Received following DHCPv4 options:
bootfile : http://10.106.37.59:80/ztp_http.py

stop Autoip process
OK to enter CLI now...

pnp-discovery can be monitored without entering enable mode

Entering enable mode will stop pnp-discovery

Attempting bootfile http://10.106.37.59:80/ztp_http.py

Loading http://10.106.37.59:80/ztp_http.py
Loading http://10.106.37.59:80/ztp_http.py day0guestshell activated successfully
Current state is: ACTIVATED
day0guestshell started successfully
Current state is: RUNNING
Guestshell enabled successfully
File "/bootflash/guest-share/downloaded_script.py", line 1
print "\n\n Running show version \n\n"
^
SyntaxError: Missing parentheses in call to 'print'. Did you mean print("\n\n Running show version \n\n")?      <<<< Code Error

Guestshell destroyed successfully
Script execution success!
HTTP服务端口号
HTTP服务正在侦听不同的端口(例如8080),但选项67的DHCP配置指向80。
enable
configure terminal
ip dhcp excluded-address 10.0.0.2
ip dhcp pool ZTP_Pool
network 10.0.0.0 255.255.255.0
default-router 10.0.0.1
option 67 ascii http://10.0.0.2:80/ztp_http.py             <<<< Change to 8080
重复 IP 地址
检验DHCP作用域并排除分配给HTTP服务器的IP地址。
enable
configure terminal
ip dhcp excluded-address 10.0.0.2                          <<<< Exclude HTTP server address.
ip dhcp pool ZTP_Pool
network 10.0.0.0 255.255.255.0
default-router 10.0.0.1
option 67 ascii http://10.0.0.2:80/ztp_http.py
验证HTTP服务、停止和重新启动
vm: /var/www/html$ sudo service apache2 stop
vm: /var/www/html$ sudo service apache2 start
vm: /var/www/html$ sudo service apache2 status
数据包详细信息示例
HTTP交换摘要:
10.0.0.10    10.0.0.2    HTTP  183  GET /http_ztp.py HTTP/1.1           <<<< HTTPGETrequest
10.0.0.2     10.0.0.10   HTTP  245  HTTP/1.1 200 OK (text/x-python)     <<<< Response
HTTP响应详细信息:
Hypertext Transfer Protocol
HTTP/1.1 200 OK\r\n
Content-Type: text/x-python\r\n
Content-Length: 20\r\n
Date: Tue, 04 Apr 2023 12:24:02 GMT\r\n
Connection: keep-alive\r\n
Keep-Alive: timeout=5\r\n
\r\n
[HTTP response 1/2]
[Time since request: 0.204568243 seconds]
[Request in frame: 21]
[Next request in frame: 25]
[Next response in frame: 26]
[Request URI: http://10.0.0.2:80/http_ztp.py]                 >>>> URL

 反馈
反馈