300 Series Managed Switch의 SNMP(Simple Network Management Protocol) 알림 필터 및 알림 수신자 구성
목표
SNMP(Simple Network Management Protocol)는 네트워크를 관리하고 모니터링하는 데 사용되는 애플리케이션 레이어 프로토콜입니다.SNMP는 SNMP 관리자에게 네트워크 이벤트를 알리기 위해 알림이라고도 하는 트랩을 사용합니다.SNMP 필터를 정의하려면 MIB(Management Information Base) 트리 또는 OID(Object Identifier)가 사용됩니다.MIB는 SNMP 네트워크 요소를 데이터 객체 목록으로 설명하는 텍스트 파일입니다.MIB 트리는 모든 SNMP 요소를 포함하는 사전 역할을 합니다.SNMP OID는 SNMP 네트워크 내에서 특정 요소를 식별하기 위해 주소 역할을 하는 숫자입니다.Notification Filter(알림 필터) 페이지는 특정 SNMP 알림을 필터링하는 데 사용됩니다.SNMP 필터를 사용하려면 알림 수신자 SNMPv1, v2 및 알림 수신자 SNMPv3 페이지의 수신자에 연결해야 합니다.
이 문서에서는 SNMP 필터를 정의하고 300 Series Managed Switch에서 알림 수신자를 구성하는 방법에 대해 설명합니다.
적용 가능한 디바이스
· SF/SG 300 Series Managed Switch
소프트웨어 버전
•1.3.0.62
알림 필터
1단계. 웹 컨피그레이션 유틸리티에 로그인하고 SNMP > Notification Filter를 선택합니다.Notification Filter 페이지가 열립니다.
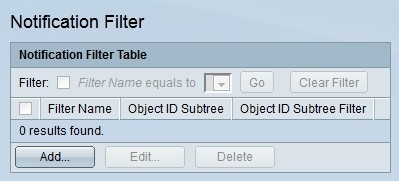
2단계. 추가를 클릭하여 새 알림 필터를 생성합니다.Add Notification Filter 창이 나타납니다.
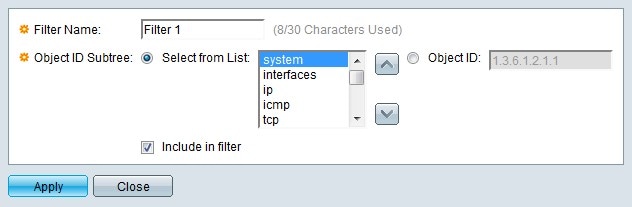
3단계. 필터 이름 필드에 필터 이름을 입력합니다.
4단계. Object ID Subtree(개체 ID 하위 트리) 필드에서 SNMP 필터를 정의할 원하는 방법의 라디오 버튼을 클릭합니다.
· 목록에서 선택 — MIB(Management Information Base) 트리를 사용하여 필터를 정의합니다.선택한 노드의 상위 및 동위 멤버의 레벨로 이동하려면 위로 단추를 누릅니다.노드의 하위 항목으로 이동하려면 Down 버튼을 클릭합니다.동위 멤버 목록에서 필요한 노드를 선택합니다.스크롤 막대를 사용하여 형제 그룹을 탐색합니다.
· 개체 ID — OID(개체 식별자)를 통해 필터를 정의합니다. 필터링할 SNMP 트랩의 OID를 입력합니다.
5단계. 필터에 지정된 MIB를 포함하려면 Include in filter를 선택합니다.
6단계. 적용을 클릭합니다.정의된 필터가 생성됩니다.
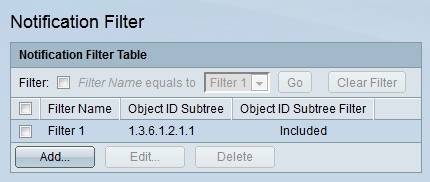
7단계. 필터를 편집하려면 편집할 필터의 확인란을 선택하고 편집을 클릭합니다.
8단계. 필터를 삭제하려면 삭제할 필터의 확인란을 선택하고 삭제를 클릭합니다.
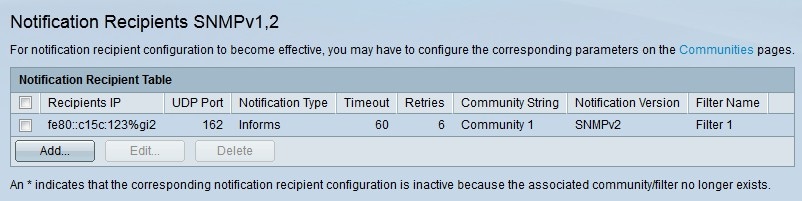
알림 수신자 SNMPv1,2
1단계. 웹 구성 유틸리티에 로그인하고 SNMP > 알림 수신자 SNMPv1,2를 선택합니다. 알림 수신자 SNMPv1, v2 페이지가 열립니다.
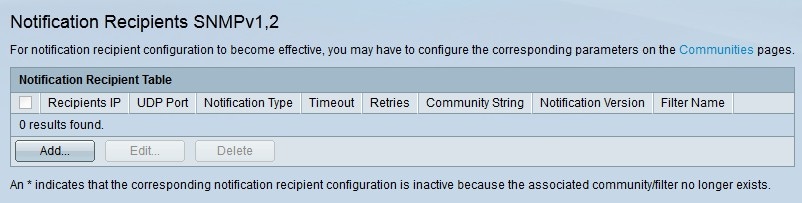
2단계. 추가를 클릭하여 새 알림 수신자를 추가합니다.Add SNMP Notification Recipient 창이 나타납니다.
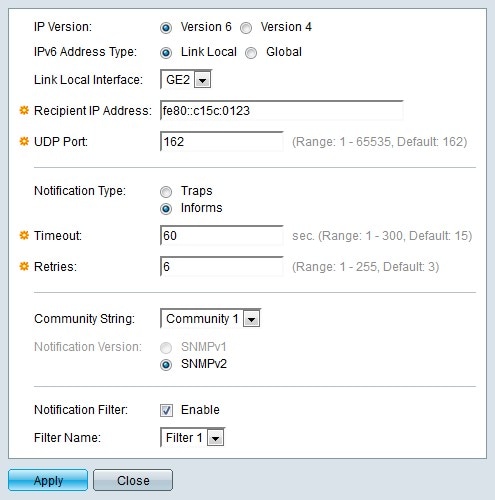
3단계. IP Version(IP 버전) 필드에서 알림 수신자의 원하는 IP 버전에 해당하는 라디오 버튼을 클릭합니다.
4단계. IP 버전이 버전 6인 경우 IPv6 Address Type(IPv6 주소 유형) 필드에서 원하는 IPv6 주소 유형에 해당하는 라디오 버튼을 클릭합니다.
· Link Local — IPv6 주소는 링크 로컬 주소입니다.링크 로컬 주소는 내부 LAN 연결에 사용되며 라우팅할 수 없습니다.링크 로컬 주소의 접두사는 FE80입니다.
· 전역 — IPv6 주소는 전역 주소입니다.전역 주소는 전역적으로 고유하며 라우팅 가능한 유니캐스트 주소입니다.
5단계. IPv6 주소 유형이 링크 로컬인 경우 Link Local Interface 드롭다운 목록에서 IPv6 인터페이스를 선택합니다.
6단계. 알림을 전송할 수신자의 IP 주소를 수신자 IP 주소에 입력합니다.
7단계. UDP Port(UDP 포트) 필드에 수신자 디바이스에서 사용할 포트 번호를 입력합니다.SNMP 알림의 기본 UDP 포트는 UDP 포트 162입니다.
8단계. 알림 유형 필드에서 원하는 알림 유형에 해당하는 라디오 버튼을 클릭합니다.
· 트랩 — 트랩은 수신자에게 전송되는 알림입니다.트랩은 수신자의 승인이 필요하지 않습니다.
· 알림 — 수신자에게 전송되는 알림이지만, 알림을 수신자에게 전송하려면 수신자의 승인이 필요합니다.수신자가 알림에 응답하지 않으면 SNMP 에이전트는 알림을 재전송하려고 시도합니다.
참고:트랩과 알림 모두 알림으로 원하는 경우 두 수신자를 구성합니다.
9단계. 알림 유형이 Inform(알림)으로 설정된 경우 다음 필드를 입력합니다.이러한 필드는 SNMP 관리자로부터 승인을 받지 못한 경우에 적용됩니다.
· 시간 초과 — SNMP 에이전트가 정보를 재전송하기 전에 대기하는 시간을 입력합니다.
· 재시도 — SNMP 에이전트가 알림을 재전송할 횟수를 입력합니다.
10단계. 커뮤니티 문자열 드롭다운 목록에서 수신자에 해당하는 커뮤니티 문자열을 선택합니다.수신자는 구성된 커뮤니티 문자열의 자격 증명과 일치해야 알림을 받을 수 있습니다.
참고:SNMP 커뮤니티에 대한 자세한 내용은 300 Series Managed Switches의 SNMP Communities Configuration을 참조하십시오.
11단계. Notification version(알림 버전) 필드에서 원하는 SNMP 트랩 버전에 해당하는 라디오 버튼을 클릭합니다.이는 수신자가 수신할 수 있는 SNMP 알림의 유형에 따라 선택됩니다.
12단계. 수신자에 대한 알림 필터를 활성화하려면 Notification Filter 필드에서 Enable을 선택합니다.
13단계. [필터 이름] 드롭다운 목록에서 수신자에게 적용할 알림 필터를 선택합니다.
14단계. 적용을 누릅니다.알림 수신자가 구성되었습니다.
15단계. 수신자를 편집하려면 편집할 수신자의 확인란을 선택하고 편집을 클릭합니다.
16단계. 수신자를 삭제하려면 삭제할 수신자의 확인란을 선택하고 삭제를 클릭합니다.
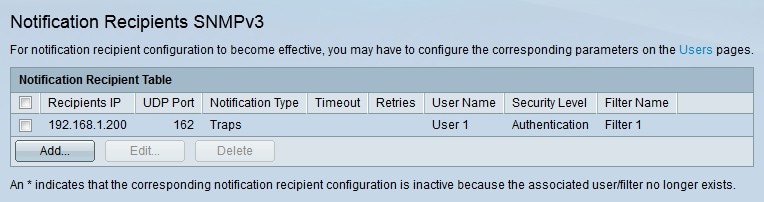
알림 수신자 SNMPv3
1단계. 웹 구성 유틸리티에 로그인하고 SNMP > 알림 수신자 SNMPv3을 선택합니다. 알림 수신자 SNMPv3 페이지가 열립니다.
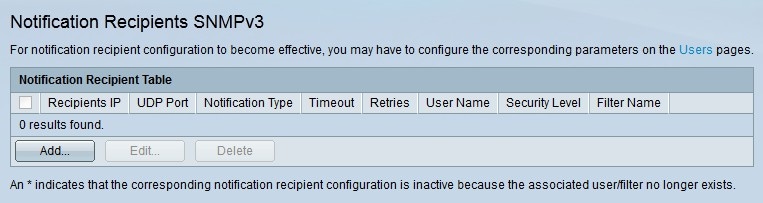
2단계. 추가를 클릭하여 새 알림 수신자를 추가합니다.Add SNMP Notification Recipient 창이 나타납니다.
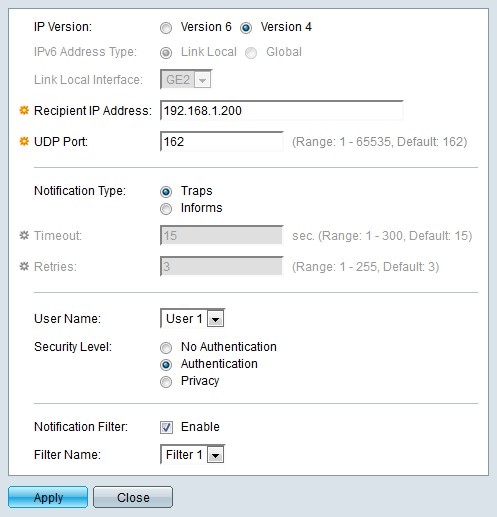
3단계. IP Version(IP 버전) 필드에서 알림 수신자의 원하는 IP 버전에 해당하는 라디오 버튼을 클릭합니다.
4단계. IP 버전이 버전 6인 경우 IPv6 Address Type(IPv6 주소 유형) 필드에서 원하는 IPv6 주소 유형에 해당하는 라디오 버튼을 클릭합니다.
· Link Local — IPv6 주소는 링크 로컬 주소입니다.링크 로컬 주소는 내부 LAN 연결에 사용되며 라우팅할 수 없습니다.링크 로컬 주소의 접두사는 FF80입니다.
· 전역 — IPv6 주소는 전역 주소입니다.전역 주소는 전역적으로 고유하며 라우팅 가능한 유니캐스트 주소입니다.
5단계. IPv6 주소 유형이 링크 로컬인 경우 Link Local Interface 드롭다운 목록에서 IPv6 인터페이스를 선택합니다.
6단계. 알림을 전송할 수신자의 IP 주소를 수신자 IP 주소에 입력합니다.
7단계. UDP Port(UDP 포트) 필드에 수신자 디바이스에서 사용할 포트 번호를 입력합니다.SNMP 알림의 기본 UDP 포트는 UDP 포트 162입니다.
8단계. 알림 유형 필드에서 원하는 알림 유형에 해당하는 라디오 버튼을 클릭합니다.
· 트랩 — 트랩은 수신자에게 전송되는 알림입니다.트랩은 수신자의 승인이 필요하지 않습니다.
· 알림 — 수신자에게 전송되는 알림이지만, 알림을 수신자에게 전송하려면 수신자의 승인이 필요합니다.수신자가 알림에 응답하지 않으면 SNMP 에이전트는 알림을 재전송하려고 시도합니다.
참고:트랩과 알림 모두 알림으로 원하는 경우 두 수신자를 구성합니다.
9단계. 알림 유형이 Inform(알림)으로 설정된 경우 다음 필드를 입력합니다.이러한 필드는 SNMP 관리자로부터 승인을 받지 못한 경우에 적용됩니다.
· 시간 초과 — SNMP 에이전트가 정보를 재전송하기 전에 대기하는 시간을 입력합니다.
· 재시도 — SNMP 에이전트가 알림을 재전송할 횟수를 입력합니다.
10단계. 사용자 드롭다운 목록에서 수신자에 해당하는 사용자를 선택합니다.수신자가 알림을 받으려면 구성된 사용자 이름의 자격 증명과 일치해야 합니다.
참고:SNMP 사용자에 대한 자세한 내용은 300 Series Managed Switches의 SNMP(Simple Network Management Protocol) 사용자 구성을 참조하십시오.
11단계. Security Level(보안 레벨) 필드에서 SNMP 패킷의 원하는 보안 수준에 해당하는 라디오 버튼을 클릭합니다.이러한 옵션의 사용 가능 여부는 SNMP Users 페이지에 있는 사용자 이름의 구성에 따라 달라집니다.
· 인증 없음 — 인증이 필요하지 않으며 SNMP 패킷이 암호화되지 않습니다.
· 인증 — 인증이 필요하지만 SNMP 패킷은 암호화되지 않습니다.
· 프라이버시 — 인증이 필요하며 SNMP 패킷이 암호화됩니다.
12단계. 수신자에 대한 알림 필터를 활성화하려면 Notification Filter 필드에서 Enable을 선택합니다.
13단계. [필터 이름] 드롭다운 목록에서 수신자에게 적용할 알림 필터를 선택합니다.
14단계. 적용을 누릅니다.알림 수신자가 구성되었습니다.
15단계. 수신자를 편집하려면 편집할 수신자의 확인란을 선택하고 편집을 클릭합니다.
16단계. 수신자를 삭제하려면 삭제할 수신자의 확인란을 선택하고 삭제를 클릭합니다.
 피드백
피드백