Simple Network Management Protocol (SNMP) Notification Filter and Notification Recipient Configuration on 300 Series Managed Switches
Available Languages
Objective
Simple Network Management Protocol (SNMP) is an application layer protocol that is used to manage and monitor a network. SNMP uses traps otherwise known as notifications to notify the SNMP manager of network events. To define an SNMP filter, either an Management Information Base (MIB) tree or Object Identifier (OID) is used. An MIB is a text file that describes SNMP network elements as a list of data objects. An MIB tree acts as a dictionary which holds all SNMP elements. An SNMP OID is a number that functions as an address to identify a specific element within an SNMP network. The Notification Filter page is used to filter specific SNMP notifications. To be of use, an SNMP filter must be attached to a recipient on the Notification Recipient SNMPv1, v2 and Notification Recipients SNMPv3 pages.
This article explains how to define an SNMP filter and configure notification recipients on the 300 Series Managed Switches.
Applicable Devices
• SF/SG 300 Series Managed Switches
Software Version
• 1.3.0.62
Notification Filter
Step 1. Log in to the web configuration utility and choose SNMP > Notification Filter. The Notification Filter page opens:
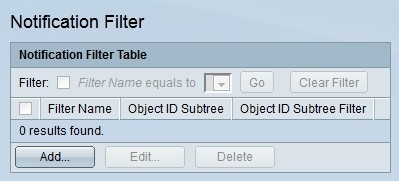
Step 2. Click Add to create a new notification filter. The Add Notification Filter window appears.
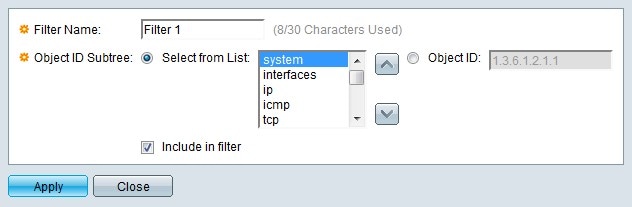
Step 3. Enter a name for the filter in the Filter Name field.
Step 4. Click the radio button of the desired method in which to define the SNMP filter in the Object ID Subtree field.
• Select from List — Define the filter through the use of the Management Information Base (MIB) tree. Click the Up button to navigate to the level of the selected node's parent and siblings. Click the Down button to navigate to the children of the node. Choose the required node from the list of siblings. Use the scroll bar to navigate through the siblings.
• Object ID — Define the filter through Object Identifiers (OIDs). Enter the OID of the SNMP trap that is to be filtered.
Step 5. Check Include in filter to include the specified MIBs in the filter.
Step 6. Click Apply. The defined filter is created.
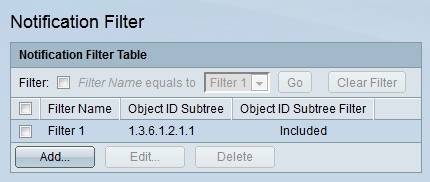
Step 7. To edit a filter, check the check box of the filter you wish to edit and click Edit.
Step 8. To delete a filter, check the check box of the filter you wish to delete and click Delete.
Notification Recipients SNMPv1,2
Step 1. Log in to the web configuration utility and choose SNMP > Notification Recipients SNMPv1,2. The Notification Recipients SNMPv1, v2 page opens:
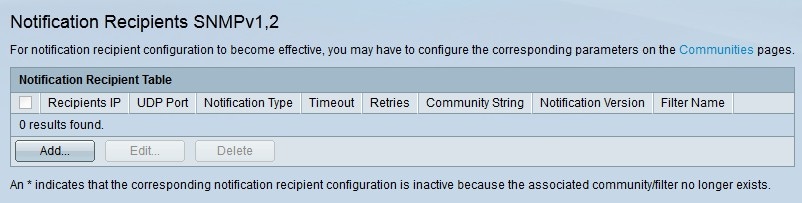
Step 2. Click Add to add a new notification recipient. The Add SNMP Notification Recipient window appears.
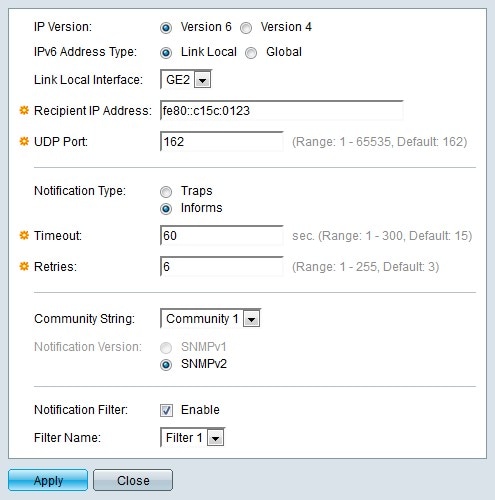
Step 3. Click the radio button that corresponds to the desired IP version of the notification recipient in the IP Version field.
Step 4. If the IP version is Version 6, click the radio button that corresponds to the desired IPv6 address type in the IPv6 Address Type field.
• Link Local — The IPv6 address is a link local address. Link local addresses are used for internal LAN connections and are not routable. The prefix for a link local address is FE80.
• Global — The IPv6 address is a global address. A global address is a unicast address that is globally unique and is routable.
Step 5. If the IPv6 address type is link local, choose an IPv6 interface from the Link Local Interface drop-down list.
Step 6. Enter the IP address of the recipient to which the notifications are to be sent, in the Recipient IP Address.
Step 7. Enter the port number that will be used by the recipient device in the UDP Port field. The default UDP port for SNMP notifications is UDP port 162.
Step 8. Click the radio button that corresponds to the desired notification type in the Notification Type field.
• Traps — Traps are notifications that are sent to the recipient. Traps do not require acknowledgement from the recipient.
• Informs — Informs are notifications that are sent to the recipient, however informs require an acknowledgement from the recipient. If the recipient does not reply to the inform, the SNMP agent will attempt to resend the inform.
Note: Configure two recipients if both traps and informs are desired as notifications.
Step 9. If the notification type is set to Informs, enter the following fields. These fields apply when an acknowledgement is not received from an SNMP manager.
• Timeout — Enter the time the SNMP agent wait before an inform is resent.
• Retries — Enter the number of times the SNMP agent will resend the inform.
Step 10. Choose the community string that corresponds to the recipient from the Community String drop-down list. A recipient must match the credentials of the configured community string to receive notifications.
Note: Refer to the article SNMP Communities Configuration on 300 Series Managed Switches for more information on SNMP communities.
Step 11. Click the radio button that corresponds to desired SNMP trap version in the Notification version field. This is chosen based on the type of SNMP notifications the recipient can receive.
Step 12. Check Enable in the Notification Filter field to enable a notification filter for the recipient.
Step 13. Choose a notification filter that will apply to the recipient from the Filter Name drop-down list.
Step 14. Click Apply. The notification recipient is configured.
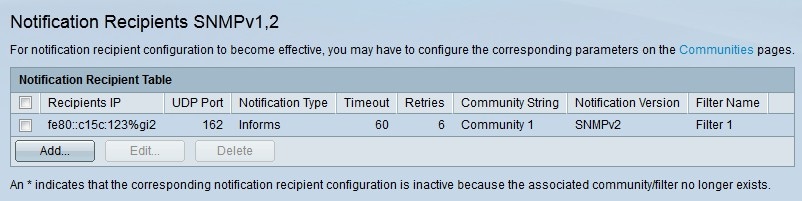
Step 15. To edit a recipient, check the check box of the recipient you wish to edit and click Edit.
Step 16. To delete a recipient, check the check box of the recipient you wish to delete and click Delete.
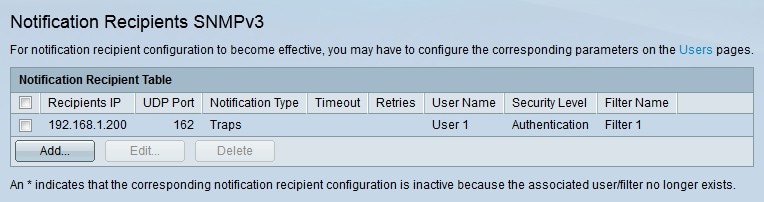
Notification Recipients SNMPv3
Step 1. Log in to the web configuration utility and choose SNMP > Notification Recipients SNMPv3. The Notification Recipients SNMPv3 page opens:
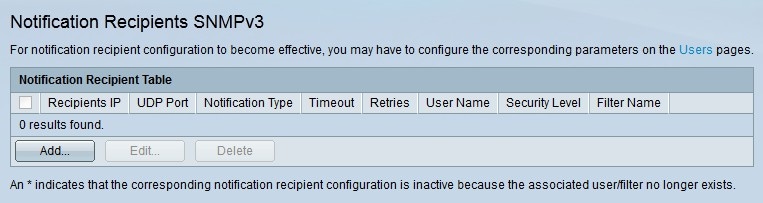
Step 2. Click Add to add a new notification recipient. The Add SNMP Notification Recipient window appears.
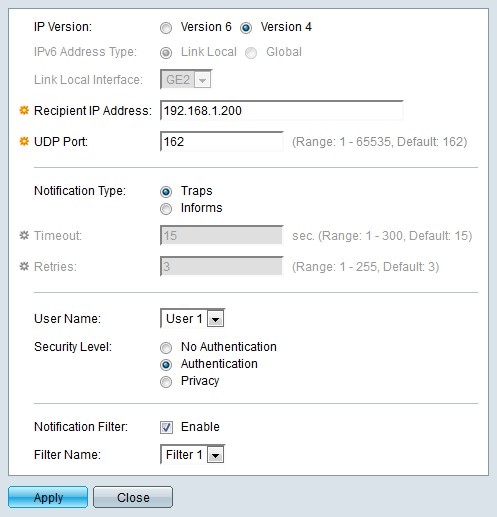
Step 3. Click the radio button that corresponds to the desired IP version of the notification recipient in the IP Version field.
Step 4. If the IP version is Version 6, click the radio button that corresponds to the desired IPv6 address type in the IPv6 Address Type field.
• Link Local — The IPv6 address is a link local address. Link local addresses are used for internal LAN connections and are not routable. The prefix for a link local address is FF80.
• Global — The IPv6 address is a global address. A global address is a unicast address that is globally unique and is routable.
Step 5. If the IPv6 address type is link local, choose an IPv6 interface from the Link Local Interface drop-down list.
Step 6. Enter the IP address of the recipient to which the notifications are to be sent, in the Recipient IP Address.
Step 7. Enter the port number that will be used by the recipient device in the UDP Port field. The default UDP port for SNMP notifications is UDP port 162.
Step 8. Click the radio button that corresponds to the desired notification type in the Notification Type field.
• Traps — Traps are notifications that are sent to the recipient. Traps do not require acknowledgement from the recipient.
• Informs — Informs are notifications that are sent to the recipient, however informs require an acknowledgement from the recipient. If the recipient does not reply to the inform, the SNMP agent will attempt to resend the inform.
Note: Configure two recipients if both traps and informs are desired as notifications.
Step 9. If the notification type is set to Informs, enter the following fields. These fields apply when an acknowledgement is not received from an SNMP manager.
• Timeout — Enter the time the SNMP agent wait before an inform is resent.
• Retries — Enter the number of times the SNMP agent will resend the inform.
Step 10. Choose the user that corresponds to the recipient from the Users drop-down list. The recipient must match the credentials of the configured user name to receive the notifications.
Note: Refer to the article Simple Network Management Protocol (SNMP) User Configuration on 300 Series Managed Switches for more information on SNMP users.
Step 11. Click the radio button that corresponds to desired security level of the SNMP packets in the Security Level field. The availability of these options depends on the configuration of the User Name on the SNMP Users page.
• No Authentication — Authentication is not required and the SNMP packets are not encrypted.
• Authentication — Authentication is required but the SNMP packets are not encrypted.
• Privacy — Authentication is required and the SNMP packets are encrypted.
Step 12. Check Enable in the Notification Filter field to enable a notification filter for the recipient.
Step 13. Choose a notification filter that will apply to the recipient from the Filter Name drop-down list.
Step 14. Click Apply. The notification recipient is configured.
Step 15. To edit a recipient, check the check box of the recipient you wish to edit and click Edit.
Step 16. To delete a recipient, check the check box of the recipient you wish to delete and click Delete.
Revision History
| Revision | Publish Date | Comments |
|---|---|---|
1.0 |
13-Dec-2018
|
Initial Release |
 Feedback