FTD 7.6을 사용하는 Firepower 4200에서 컨테이너(MI 모드)로 변환
다운로드 옵션
편견 없는 언어
본 제품에 대한 문서 세트는 편견 없는 언어를 사용하기 위해 노력합니다. 본 설명서 세트의 목적상, 편견 없는 언어는 나이, 장애, 성별, 인종 정체성, 민족 정체성, 성적 지향성, 사회 경제적 지위 및 교차성에 기초한 차별을 의미하지 않는 언어로 정의됩니다. 제품 소프트웨어의 사용자 인터페이스에서 하드코딩된 언어, RFP 설명서에 기초한 언어 또는 참조된 서드파티 제품에서 사용하는 언어로 인해 설명서에 예외가 있을 수 있습니다. 시스코에서 어떤 방식으로 포용적인 언어를 사용하고 있는지 자세히 알아보세요.
이 번역에 관하여
Cisco는 전 세계 사용자에게 다양한 언어로 지원 콘텐츠를 제공하기 위해 기계 번역 기술과 수작업 번역을 병행하여 이 문서를 번역했습니다. 아무리 품질이 높은 기계 번역이라도 전문 번역가의 번역 결과물만큼 정확하지는 않습니다. Cisco Systems, Inc.는 이 같은 번역에 대해 어떠한 책임도 지지 않으며 항상 원본 영문 문서(링크 제공됨)를 참조할 것을 권장합니다.
목차
소개
이 문서에서는 FTD 7.6이 포함된 Firepower 4200 방화벽 시리즈에서 컨테이너(다중 인스턴스 모드)를 구성하는 방법 및 관련 세부사항에 대해 설명합니다.
사전 요구 사항, 지원되는 플랫폼, 라이센싱
최소 소프트웨어 및 하드웨어 플랫폼


참고: 다중 인스턴스는 어떤 플랫폼에서도 FDM에서 지원되지 않습니다.
라이센싱
- 기능 라이센스는 각 인스턴스에 수동으로 할당되지만, 4200 시리즈 디바이스당 기능당 하나의 라이센스만 사용합니다.
- 예를 들어, 3개의 FTD 인스턴스가 포함된 하나의 4200 Series의 경우, 동일한 FMC에 있는 경우 사용 중인 인스턴스 수에 관계없이 하나의 URL 라이센스만 있으면 됩니다.
- 모든 라이센스는 동일한 FMC에 있는 경우 컨테이너 인스턴스가 아니라 4200 Series 디바이스당 소비됩니다. 따라서 4200 Series 디바이스의 모든 인스턴스에서 라이센스 구현으로 인해 동일한 FMC를 사용하는 것이 좋습니다.
사용되는 구성 요소
이 문서는 특정 소프트웨어 및 하드웨어 버전으로 한정되지 않습니다.
이 문서의 정보는 특정 랩 환경의 디바이스를 토대로 작성되었습니다. 이 문서에 사용된 모든 디바이스는 초기화된(기본) 컨피그레이션으로 시작되었습니다. 현재 네트워크가 작동 중인 경우 모든 명령의 잠재적인 영향을 미리 숙지하시기 바랍니다.
배경 정보
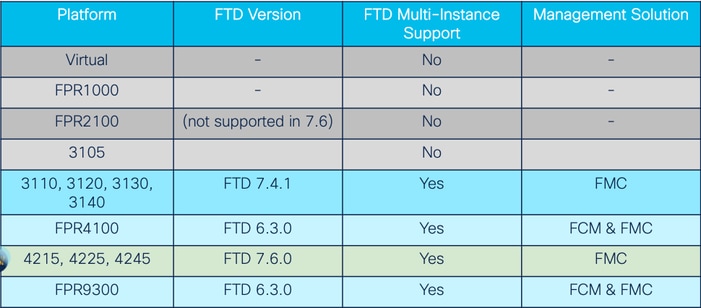
- FTD는 3100 모델(9300 및 4100 Series 포함)에서 이미 MI(Multi-Instance)를 지원하지만 4200 Series는 지원하지 않습니다.
- 4200 모델은 FMC의 기본 모드에서만 지원됩니다.
- 4200의 7.4.x에는 여러 인스턴스를 생성할 수 있는 규정이 없습니다.
- 3100의 다중 인스턴스(MI)는 7.4.1부터 지원됩니다.
- FCM을 사용해야 하는 9300 및 4100 시리즈와 달리 FMC를 사용하여 인스턴스를 만들고 관리할 수 있습니다.
- FXOS는 MI 모드일 때 FMC의 Upgrade Chassis GUI를 통해 업데이트할 수 있습니다.
- MI 모드로 변환하는 작업은 CLI를 통해 수행됩니다.
새로운 기능
- 4200 Series에서 MI 인스턴스를 프로비저닝하고 관리할 수 있습니다.
- FMC - 4200 Series(MI 모드) 및 FTD 인스턴스를 위한 단일 관리 솔루션
- 3100 및 4200 Series 디바이스의 경우 FMC에서 네이티브 디바이스를 MI 모드로 단일 및 대량 변환할 수 있습니다.
- 대상 시장: 엔터프라이즈/대기업 - 인터넷 에지, 데이터 센터
FTD 다중 인스턴스 지원 플랫폼
3100 및 4200 Series의 차이점
- 4200에는 두 개의 관리 인터페이스가 있으므로 하나는 관리에 사용하고 다른 하나는 이벤트에 사용할 수 있습니다.
- Management1/1 및 Management1/2 인터페이스는 모두 모든 FTD 컨테이너 인스턴스에 부트스트랩됩니다.
- 관리 인터페이스 중 하나 또는 둘 다를 MI 모드에서 사용할 수 있습니다.
- 관리 및 이벤트 모두에 대한 관리1/1 또는
- Management1/1은 관리에, Management1/2는 이벤트에 사용할 수 있으며, 이 경우 다음과 같습니다.
- Management 1/2 인터페이스를 사용하여 트래픽을 라우팅하려면 고정 경로를 정의해야 합니다.
- 크기가 클수록 3100보다 4200에서 더 많은 인스턴스를 생성할 수 있습니다.
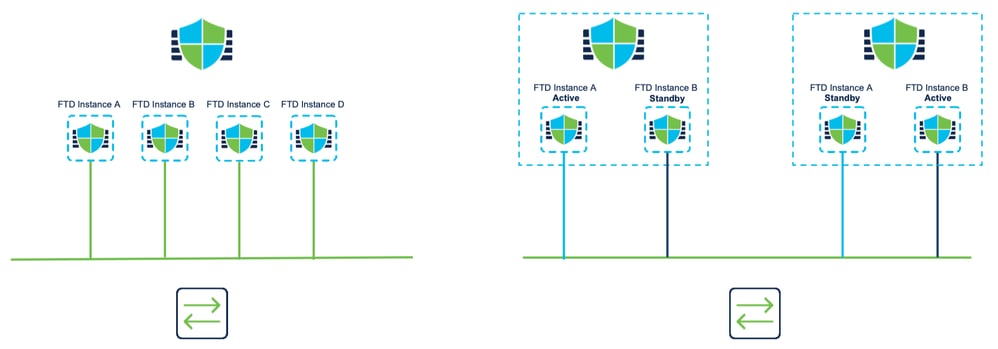
지원되는 구축
- 독립형 FTD 인스턴스로 4200 Series(MI 모드) 관리
- HA FTD 인스턴스로 4200 시리즈(MI 모드) 관리*
참고: FTD-HA의 경우 FPR4100 Series의 경우 기본 노드와 보조 노드가 서로 다른 두 개의 4200 Series(MI 모드) 디바이스에 있어야 합니다. 또한 이 릴리스에서는 MI 클러스터링이 지원되지 않습니다.
기능 설명 및 연습
7.6.0의 다중 인스턴스 컨피그레이션 변경 사항:
- MI 모드의 4200 Series 지원
- FMC의 변경 사항은 3100 Series의 MI 모드 관리와도 관련이 있습니다.
- FMC에서 장치를 기본 모드에서 MI 모드로 변환
- 장치를 MI 모드로 변환할 수 있는지 확인하는 준비 상태 확인
- 변환 후 FMC에서 FTD 인스턴스 자동 등록
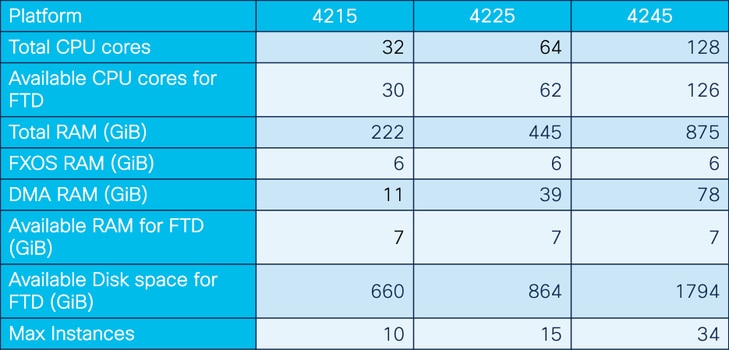
4200 Series 인스턴스 사양
최대 인스턴스 지원
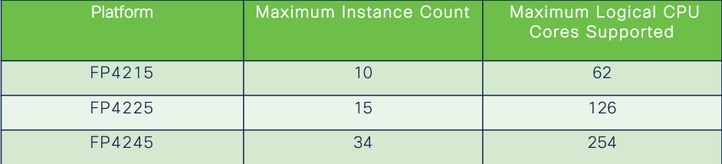
인스턴스 밀도는 두 가지 주요 요인에 의해 결정됩니다.
1. 지정된 플랫폼에 있는 CPU 코어의 양 및 디스크 공간의 양
2. 인스턴스에 프로비저닝할 수 있는 리소스의 수 가장 작은 인스턴스 크기에는 3개의 물리적 CPU(6개의 논리적) 코어와 48GB의 디스크 공간이 필요합니다.
FTD 인스턴스 크기
Lina(데이터 플레인) Snort 코어 할당
|
4215 |
4225 |
4245 |
||||
|
인스턴스 크기 |
데이터 플레인 코어 |
Snort 코어 |
데이터 플레인 코어 |
Snort 코어 |
데이터 플레인 코어 |
Snort 코어 |
|
6 |
2 |
2 |
2 |
2 |
2 |
2 |
|
8 |
2 |
4 |
2 |
4 |
2 |
4 |
|
10 |
4 |
4 |
4 |
4 |
4 |
4 |
|
12 |
4 |
6 |
4 |
6 |
4 |
6 |
|
14 |
6 |
8 |
6 |
6 |
6 |
6 |
|
16 |
6 |
8 |
6 |
6 |
8 |
8 |
|
18 |
8 |
10 |
8 |
8 |
8 |
10 |
|
20 |
8 |
10 |
8 |
8 |
10 |
10 |
|
22 |
10 |
12 |
10 |
10 |
10 |
12 |
|
24 |
12 |
12 |
10 |
10 |
10 |
12 |
|
26 |
12 |
14 |
12 |
12 |
12 |
12 |
|
28 |
14 |
14 |
12 |
14 |
12 |
14 |
|
30 |
14 |
16 |
14 |
14 |
14 |
14 |
|
32 |
14 |
16 |
14 |
16 |
14 |
16 |
|
34 |
16 |
16 |
16 |
16 |
16 |
16 |
|
36 |
16 |
18 |
16 |
18 |
16 |
18 |
|
38 |
18 |
18 |
18 |
18 |
18 |
18 |
|
40 |
18 |
20 |
18 |
20 |
18 |
20 |
|
42 |
20 |
20 |
20 |
20 |
20 |
20 |
|
44 |
20 |
22 |
20 |
22 |
20 |
22 |
|
46 |
22 |
22 |
22 |
22 |
22 |
22 |
|
48 |
22 |
24 |
22 |
24 |
22 |
24 |
|
50 |
24 |
24 |
24 |
24 |
24 |
24 |
|
52 |
24 |
26 |
24 |
26 |
24 |
26 |
|
54 |
26 |
26 |
26 |
26 |
24 |
26 |
|
56 |
26 |
28 |
26 |
28 |
26 |
28 |
|
58 |
28 |
28 |
28 |
28 |
28 |
28 |
|
60 |
28 |
30 |
28 |
39 |
28 |
30 |
|
62 |
30 |
30 |
30 |
30 |
30 |
30 |
|
64 |
30 |
32 |
30 |
32 |
||
|
66 |
30 |
34 |
30 |
34 |
||
|
68 |
32 |
34 |
32 |
34 |
||
|
70 |
32 |
36 |
32 |
36 |
||
|
72 |
34 |
36 |
34 |
36 |
||
|
74 |
34 |
38 |
34 |
38 |
||
|
76 |
36 |
38 |
36 |
38 |
||
|
78 |
36 |
40 |
36 |
40 |
||
|
80 |
38 |
40 |
38 |
40 |
||
|
82 |
38 |
42 |
38 |
42 |
||
|
84 |
40 |
42 |
40 |
42 |
||
|
86 |
40 |
44 |
40 |
44 |
||
|
88 |
42 |
44 |
42 |
44 |
||
|
90 |
42 |
46 |
42 |
46 |
||
|
92 |
44 |
46 |
44 |
46 |
||
|
94 |
44 |
48 |
44 |
48 |
||
|
96 |
46 |
48 |
46 |
48 |
||
|
98 |
46 |
50 |
46 |
50 |
||
|
100 |
48 |
50 |
48 |
50 |
||
|
102 |
48 |
52 |
48 |
52 |
||
|
104 |
50 |
52 |
50 |
52 |
||
|
106 |
50 |
54 |
50 |
54 |
||
|
108 |
52 |
54 |
52 |
54 |
||
|
110 |
52 |
56 |
52 |
56 |
||
|
112 |
54 |
56 |
54 |
56 |
||
|
114 |
54 |
58 |
54 |
58 |
||
|
116 |
56 |
58 |
56 |
58 |
||
|
118 |
56 |
60 |
56 |
60 |
||
|
120 |
58 |
60 |
58 |
60 |
||
|
122 |
58 |
62 |
58 |
62 |
||
|
124 |
60 |
62 |
60 |
62 |
||
|
128 |
60 |
64 |
||||
|
130 |
60 |
66 |
||||
|
132 |
62 |
66 |
||||
|
134 |
62 |
68 |
||||
|
136 |
64 |
68 |
||||
|
138 |
64 |
70 |
||||
|
140 |
66 |
70 |
||||
|
142 |
66 |
72 |
||||
|
144 |
68 |
72 |
||||
|
146 |
68 |
74 |
||||
|
148 |
70 |
74 |
||||
|
150 |
70 |
76 |
||||
|
152 |
72 |
76 |
||||
|
154 |
72 |
78 |
||||
|
156 |
74 |
78 |
||||
|
158 |
74 |
80 |
||||
|
254 |
120 |
130 |
구성
구성 개요
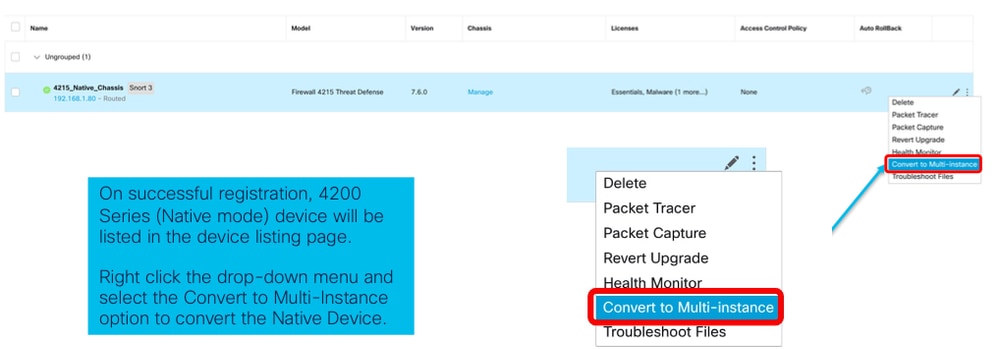
- FMC에서 4200 Series(기본 모드) 디바이스를 등록합니다.
- 새로운 기능! FMC에서 디바이스를 선택하고 Native(기본)에서 MI 모드로 변환합니다.
- 새로운 기능! 변환 후 MI 섀시가 FMC에 자동 등록됩니다.
- 물리적 인터페이스를 업데이트합니다.
- FTD 인스턴스를 생성하고 인터페이스를 할당합니다.
- FMC에서 포트 채널 및 하위 인터페이스를 생성/업데이트/삭제합니다.
- 플랫폼 설정을 구성합니다.
- 디바이스에 컨피그레이션 변경 사항 구축
- FTD 인스턴스가 FMC에 자동으로 등록됩니다.
FMC에서 4200 Series를 다중 인스턴스 모드로 변환
기본적으로 4200은 기본 모드입니다. FMC에서 4200 Series를 다중 인스턴스 모드로 변환하려면 다음을 수행합니다.
- 디바이스에 연결하고 관리자를 생성합니다(이미 문서화).
- 네이티브 디바이스를 FMC에 등록합니다(이미 문서화됨).
- FMC를 사용하여 다중 인스턴스로 변환합니다.
- FMC에서 다중 인스턴스로 변환해야 하는 디바이스를 선택하고 변환을 트리거합니다. 하나 이상의 디바이스를 선택할 수 있습니다.
참고: 기본 모드에서 MI 모드로 전환하면 섀시의 모든 컨피그레이션이 재설정됩니다. MI 모드에서 Native 모드로의 변환은 CLI를 통해 계속 수행됩니다.
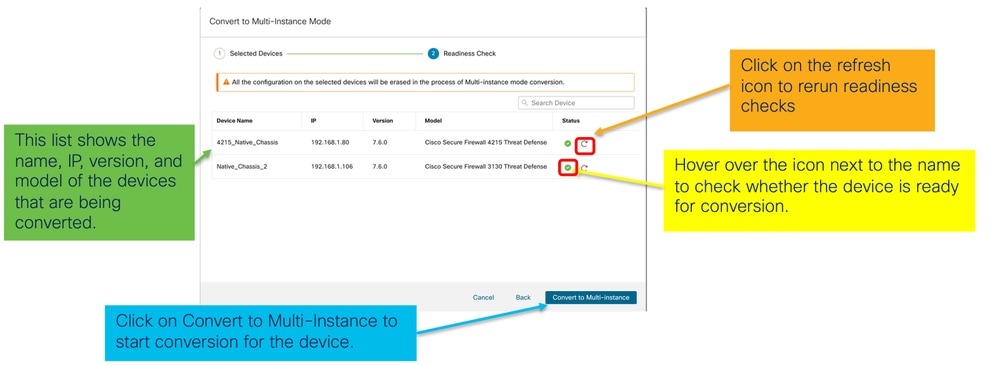
단일 장치 변환
1. 변환을 시작하려면 Devices(디바이스) > Device management(디바이스 관리)로 이동합니다.
2. 선택한 디바이스를 검증하고 Continue(계속)를 클릭합니다.
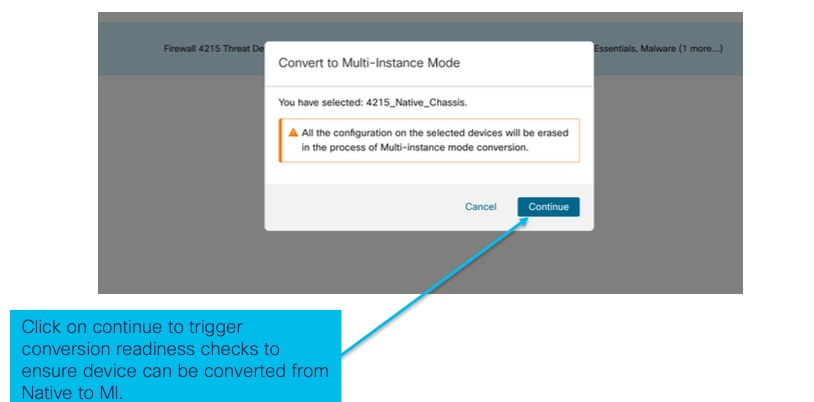 선택한 디바이스 검증
- 준비 상태 점검 및 초기 변환:
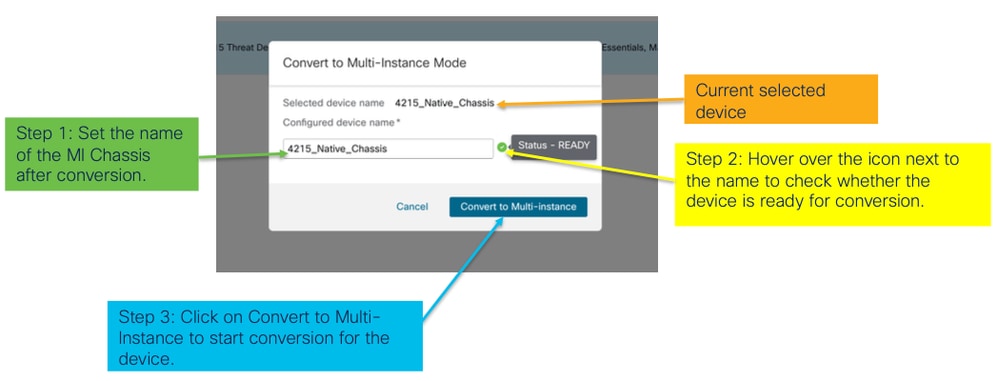 준비도 점검
둘 이상의 장치 변환(대량 변환)
- 장치 선택:
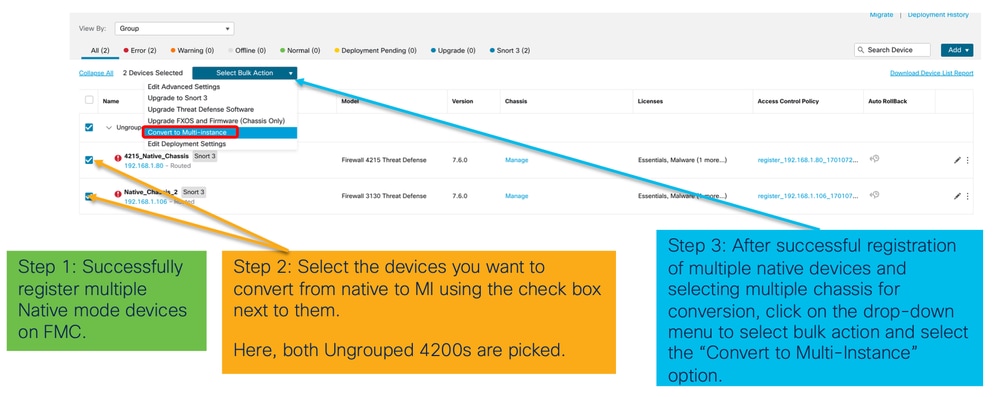
- 선택 확인:
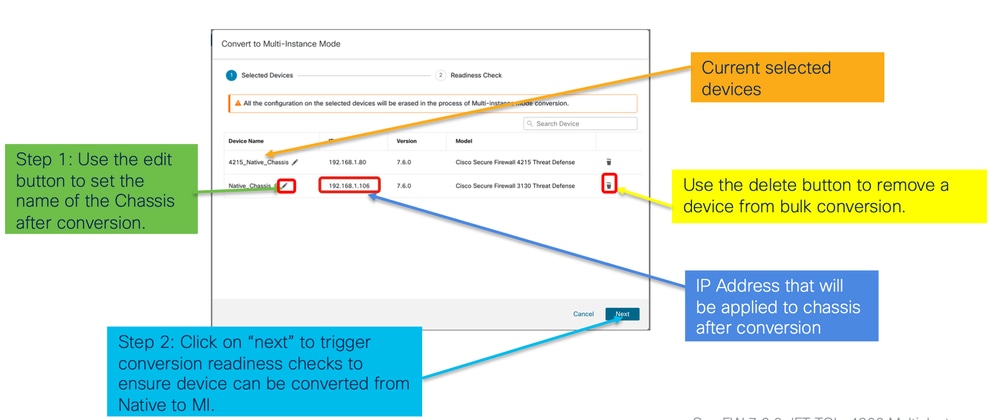
- 준비 상태 확인 및 변환 시작:
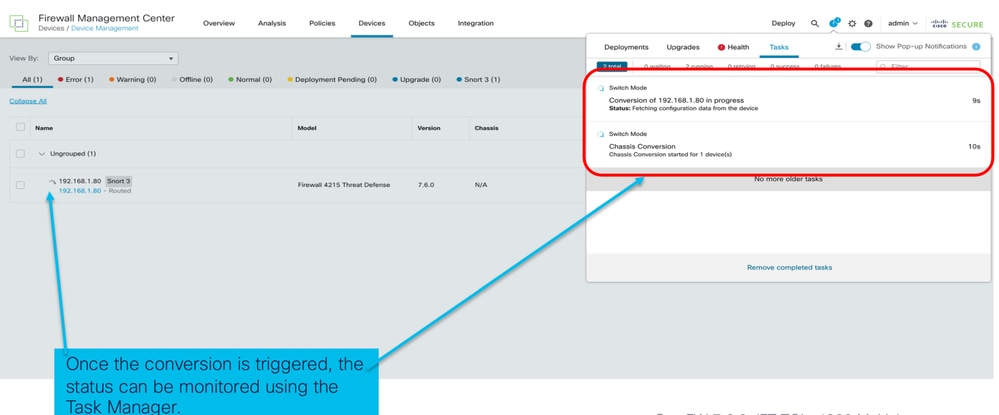
진행 상황 모니터링 및 마무리
- 변환 시작 알림:
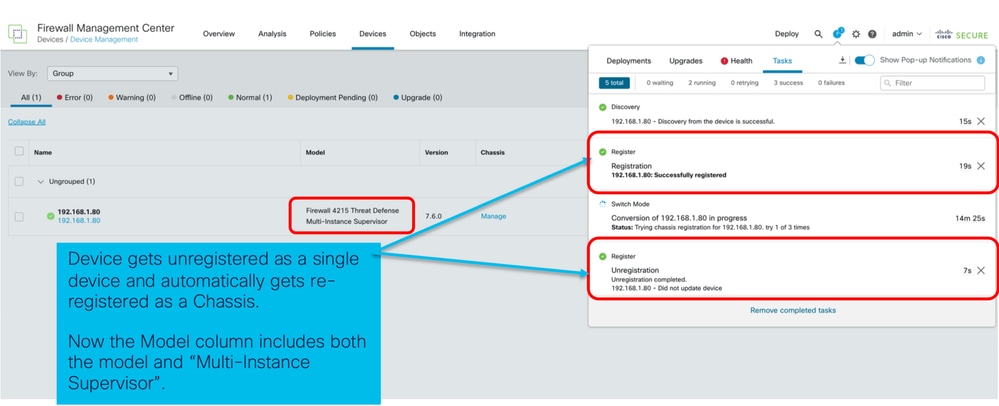
- 섀시 자동 등록:
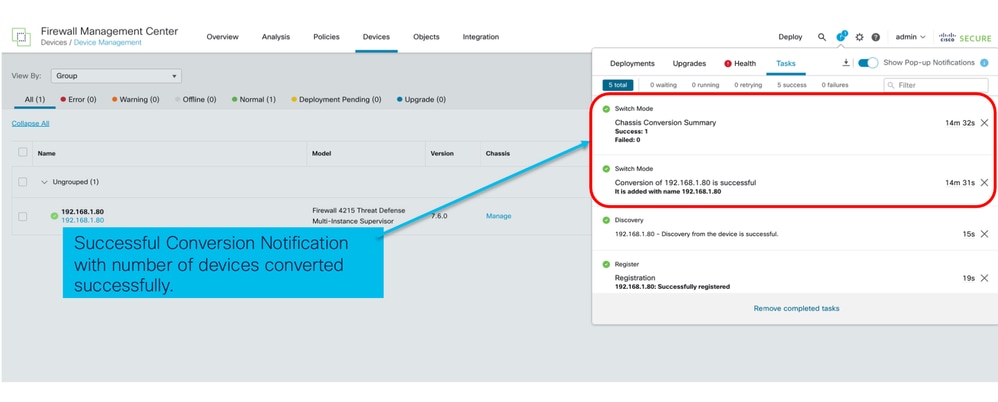
- 변환 후 알림:
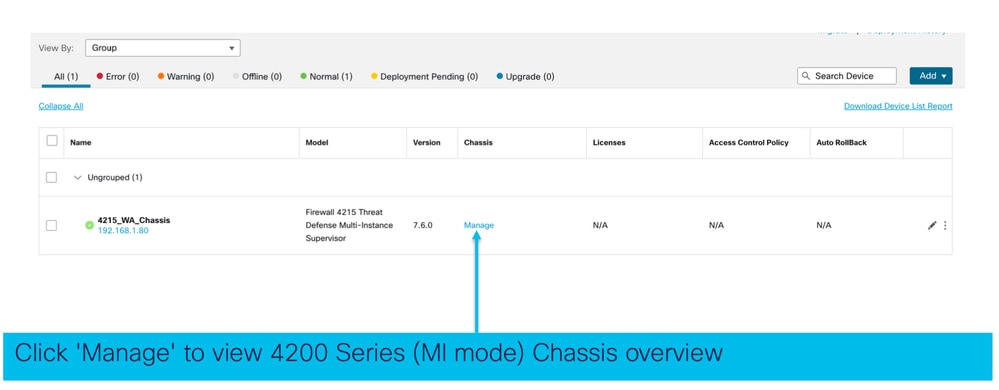
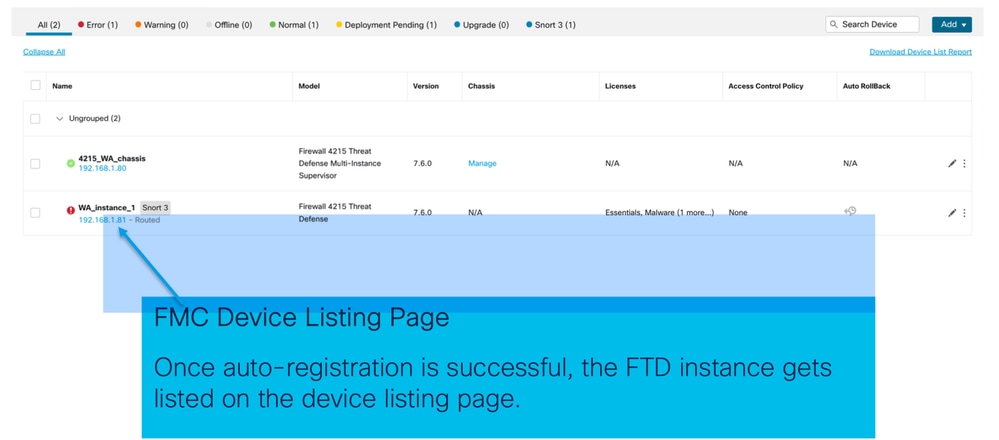
4200 Series(MI 모드) 디바이스를 나열하는 디바이스 관리 페이지 결과:

FMC 섀시 개요 페이지
FMC 섀시 개요 페이지 개요
FMC Chassis Overview(FMC 섀시 개요) 페이지에서는 4200 Series(MI 모드) 디바이스의 전체 요약을 제공합니다. 여기에는 다음이 포함됩니다.
- 사용 가능한 네트워크 모듈을 포함한 디바이스의 그림 후면 패널 보기
- 오류 요약 및 심각도.
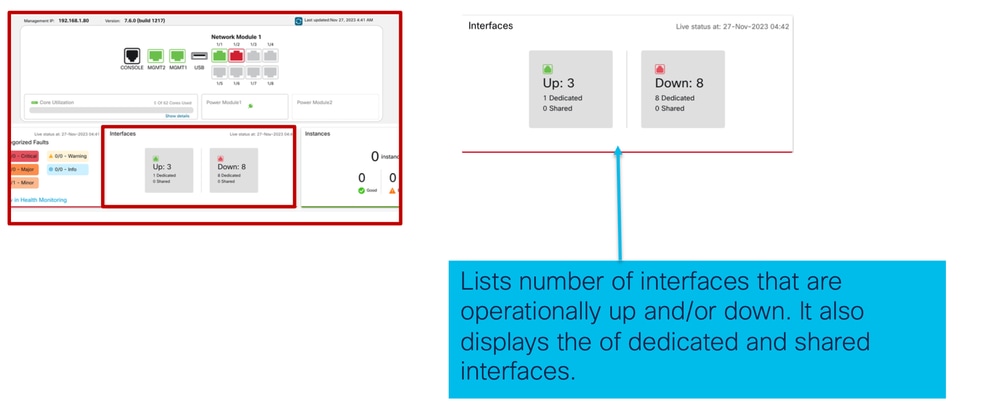
- 인터페이스 요약, 상태
- FTD 인스턴스 요약, 상태
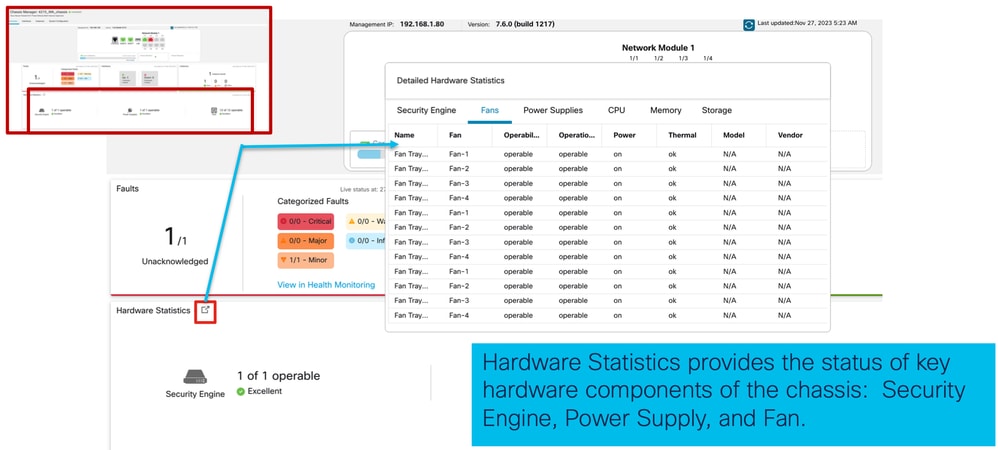
- 하드웨어 통계 - FAN, 전원 공급 장치, 메모리, CPU 사용량, 스토리지 포함.
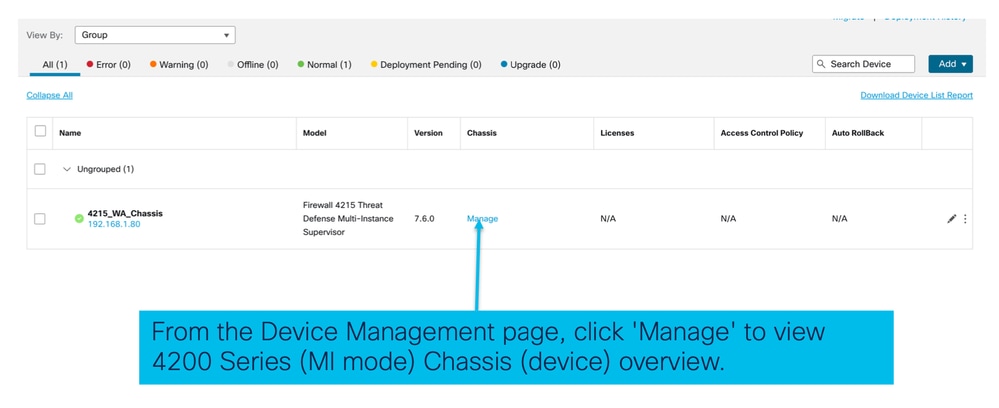
Manage(관리)를 클릭하여 Chassis Overview(섀시 개요)로 이동합니다.
섀시 페이지 요약 탭:

섀시 페이지 요약 탭 섹션
요약 탭에는 섹션이 포함되어 있습니다. 자세한 내용을 보려면 클릭하십시오.
- 후면
- 결함
- 인터페이스
- 인스턴스
- 하드웨어 통계
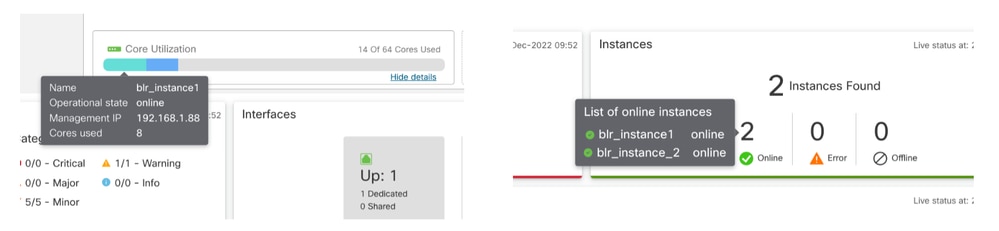
섹션은 이 이미지에 표시된 대로 숫자로 매핑됩니다.
1. 후면도:
2. 결함 섹션
3. 인터페이스 섹션
4. 인스턴스 섹션:
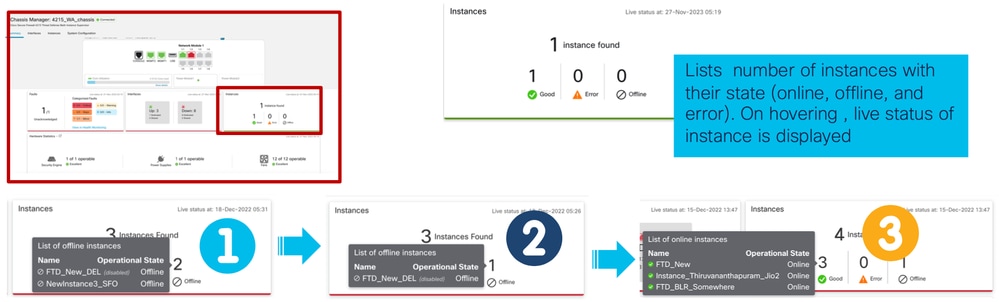
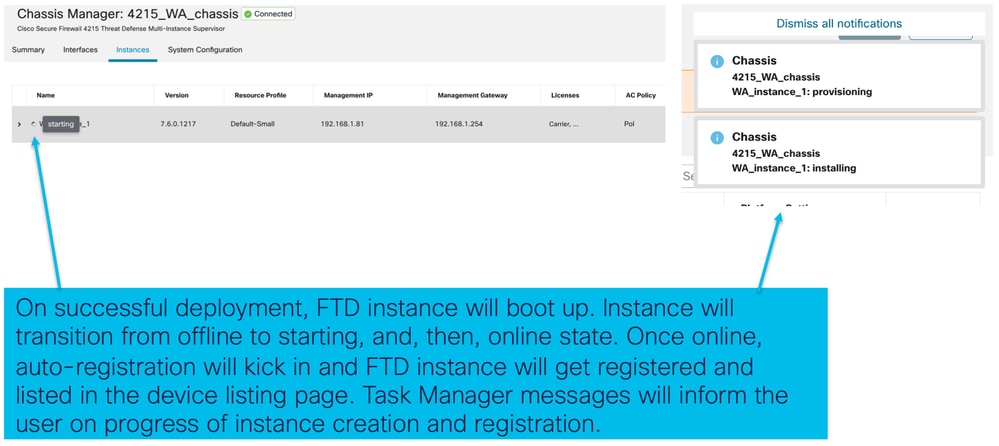
이전 이미지에서 오프라인에서 온라인으로 인스턴스 전환을 보여 줍니다.
- 프로비저닝된 후(1)
- 인스턴스가 온라인 상태가 될 때까지 오프라인 상태입니다(2).
- 중간 상태도 반영됩니다(3).
5. 하드웨어 통계
인터페이스 관리
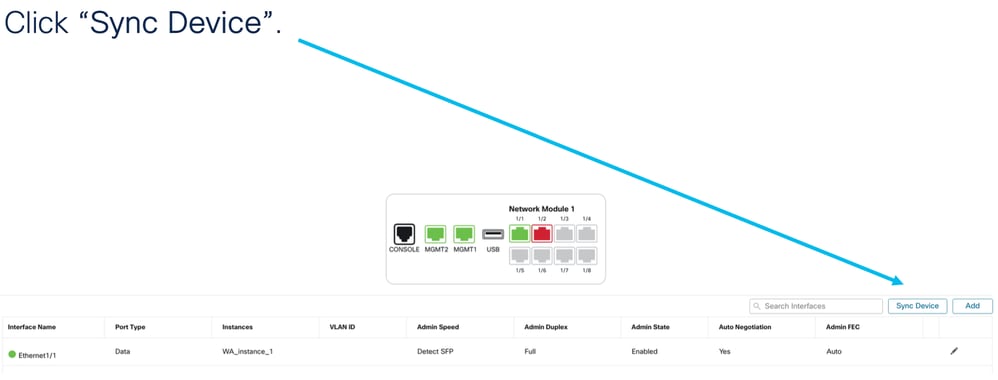
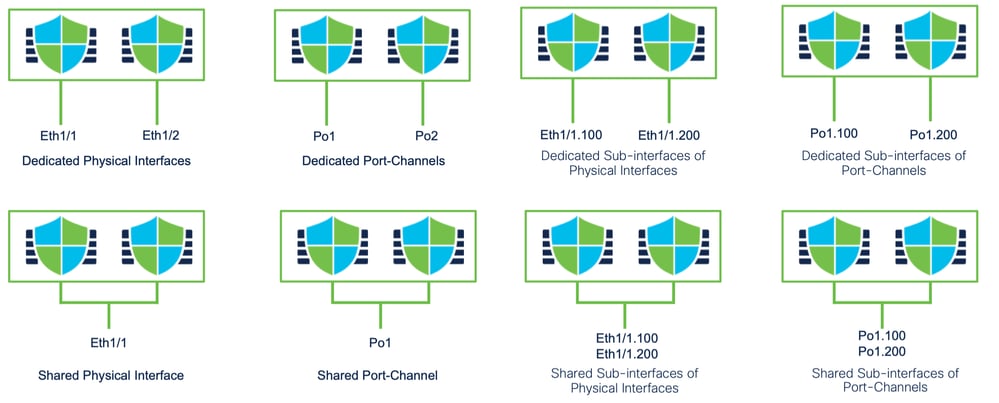
Interfaces 탭에서 지원되는 작업:
- 물리적 인터페이스의 업데이트.
- 하위 인터페이스를 생성/업데이트/삭제합니다.
- EtherChannel 인터페이스 생성/업데이트/삭제
- 인터페이스 컨피그레이션 동기화
- 네트워크 모듈의 OIR.
- 물리적 인터페이스의 중단/조인
인터페이스 탭 요약
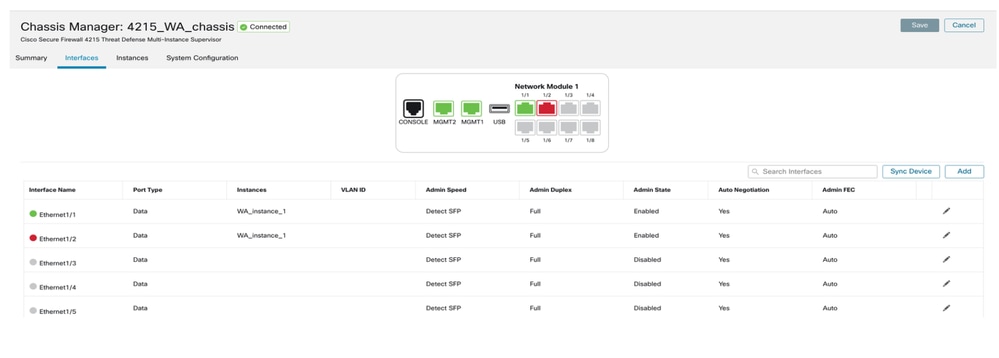
Interfaces 탭의 랜딩 페이지에는 섀시에 대해 관리되는 모든 유형의 인터페이스(예: 물리적 인터페이스, 하위 인터페이스, EtherChannel 및 EtherChannel 하위 인터페이스)가 표시됩니다.
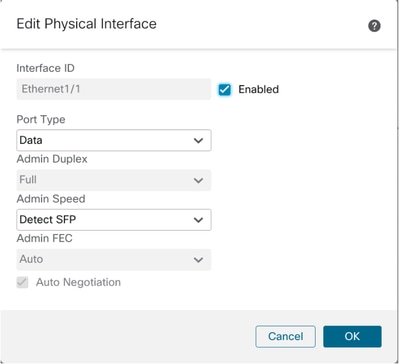
물리적 인터페이스 컨피그레이션 수정
물리적 인터페이스의 다음 특성을 업데이트할 수 있습니다.
- 상태(사용/사용 안 함)
- 포트 유형(데이터 | 데이터 공유)
- 관리 이중
- 관리 속도
- 자동 협상
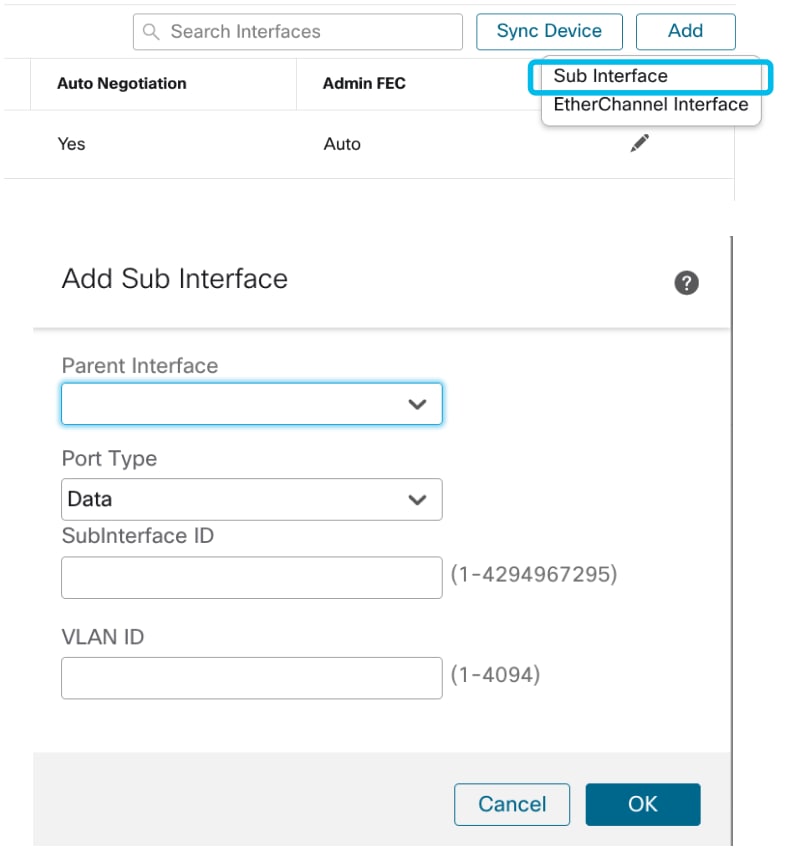
하위 인터페이스 관리
새 인터페이스를 추가하려면 Add(추가) 버튼에서 하위 인터페이스 옵션을 선택합니다.
하위 인터페이스의 이러한 속성은 수정할 수 있습니다.
- 상위 인터페이스
- 포트 유형(데이터/데이터 공유)
- 하위 인터페이스 ID
- VLAN ID
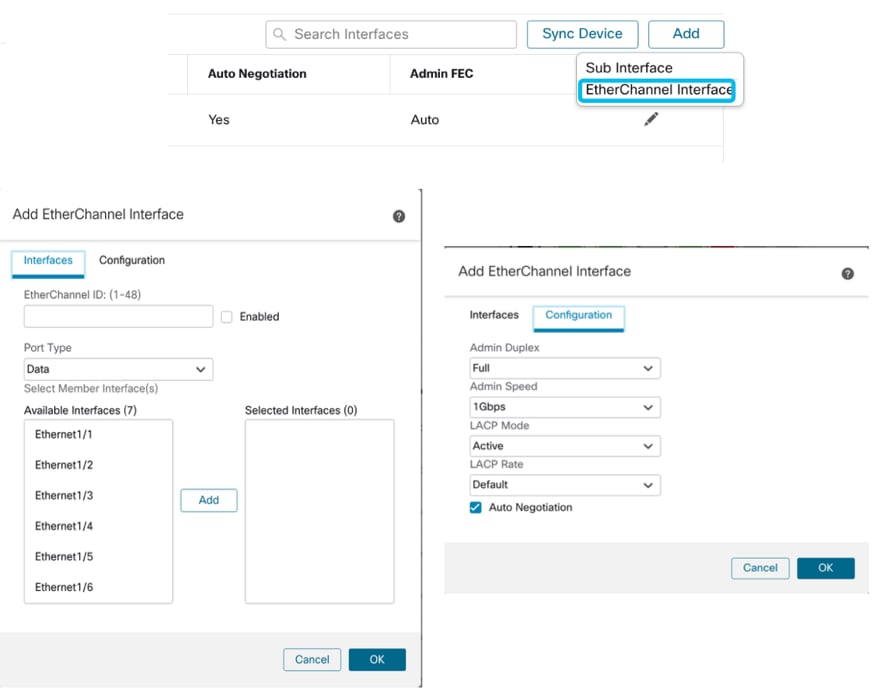
EtherChannel 관리
새 EtherChannel 인터페이스를 생성하려면 Add(추가) 버튼 아래의 "EtherChannel 인터페이스"를 사용합니다.
EtherChannel에 대해 구성할 수 있는 특성은 다음과 같습니다.
- EtherChannel ID
- 포트 유형(데이터/데이터 공유)
- 멤버 인터페이스
- 관리 속도
- 관리 이중
- LACP 모드
- LACP 속도
- 자동 협상
디바이스 컨피그레이션 동기화
FMC 컨피그레이션과 디바이스 컨피그레이션이 동기화되지 않는 경우가 있습니다. 한 가지 경우는 사용자가 netmod를 제거하거나 삽입하는 경우입니다. 이러한 경우 장치를 동기화할 수 있습니다.
Netmod 핫 스왑/브레이크아웃 지원
귀하의 문서에서 사용된 "핫 스왑"은 다른 내부 문서에서는 온라인 삽입 및 제거 또는 OIR이라고 합니다.
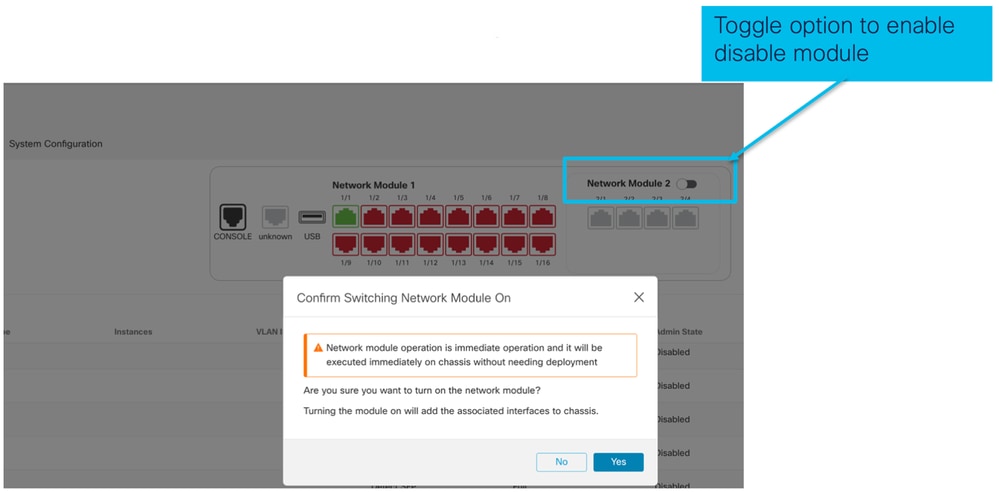
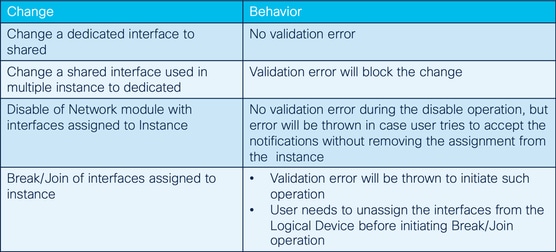
네트워크 모듈의 Enable/Disable이나 인터페이스의 Break 또는 Join 시 즉시 구축이 가능합니다. 다중 인스턴스 모드는 기본 모드의 4200 Series와 동일합니다.
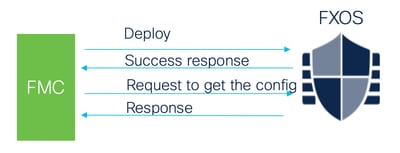
FMC는 수신한 응답을 현재 컨피그레이션과 비교한 다음 사용자가 승인할 수 있도록 인터페이스 변경 알림을 생성합니다.
4200 Native는 EPM Hot Swap 및 Breakout를 지원합니다.
EPM OIR 및 Breakout은 독립형 기본 모드 Secure Firewall 4200 Series 독립형에서 이미 지원됩니다.
4200 Series EPM OIR 및 Breakout FMC 설명서:
OIR: EPM 확인 활성화/비활성화
사용자가 모듈을 활성화하도록 전환하면 실수로 클릭하는 것이 아닌지 확인하는 경고가 표시됩니다.
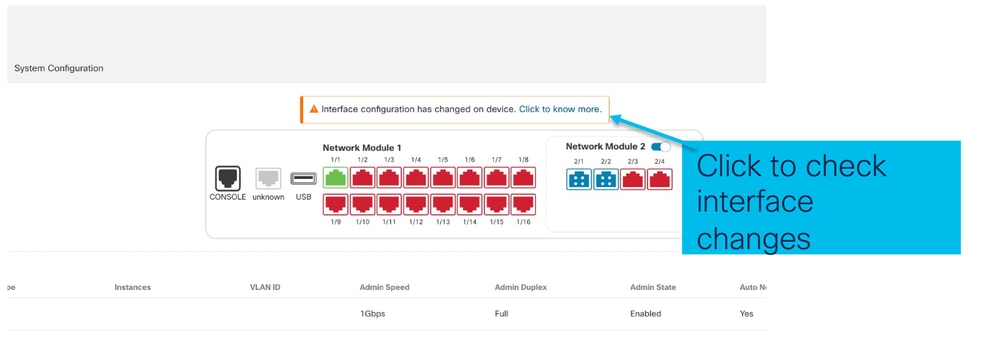
EPM 활성화 완료: 인터페이스 알림 수신
- EPM을 활성화할 경우 새 인터페이스가 디바이스에 연결됩니다.
- FMC는 연결된 인터페이스에 대한 알림을 수신합니다.
- FMC에서 사용자는 변경 사항을 수락해야 합니다.
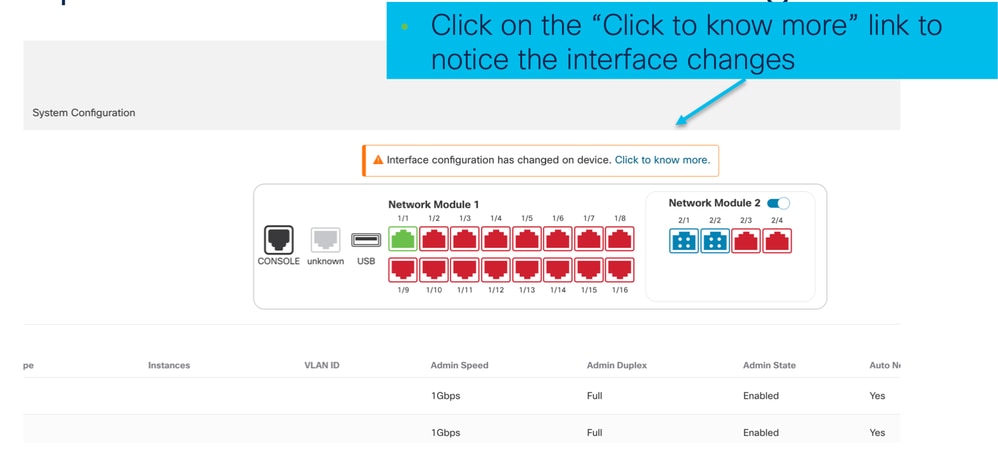
이 스크린샷은 연결된 인터페이스를 표시하는 옵션을 보여줍니다.
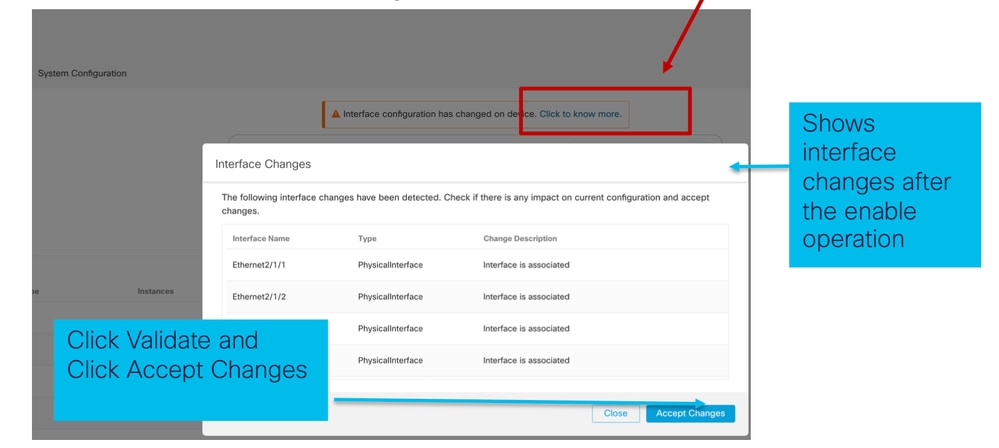
EPM 인터페이스 변경 알림
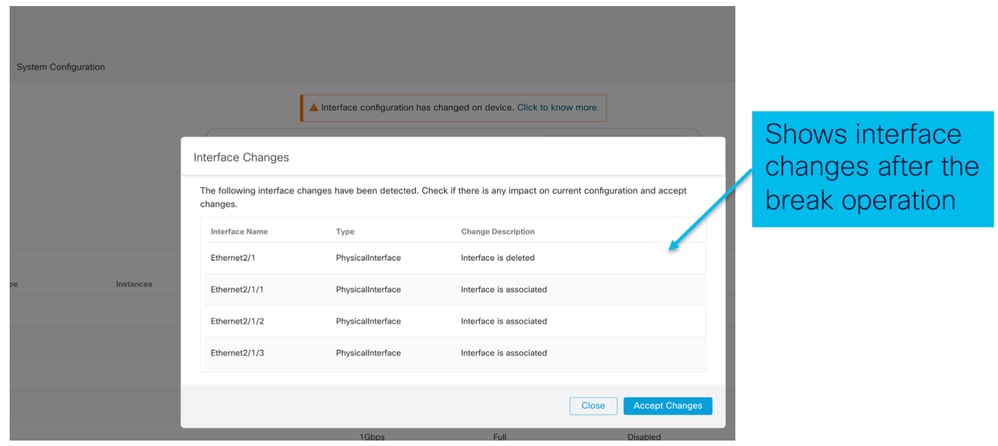
인터페이스 목록 페이지에는 EPM이 활성화될 때 추가되는 인터페이스가 나열됩니다. 자세한 내용을 보려면 Interface Changes(인터페이스 변경 사항) 대화 상자를 클릭합니다.
저장 후 더 이상 사용할 수 없음을 보려면 클릭하십시오.
섀시 페이지의 분할/조인 옵션
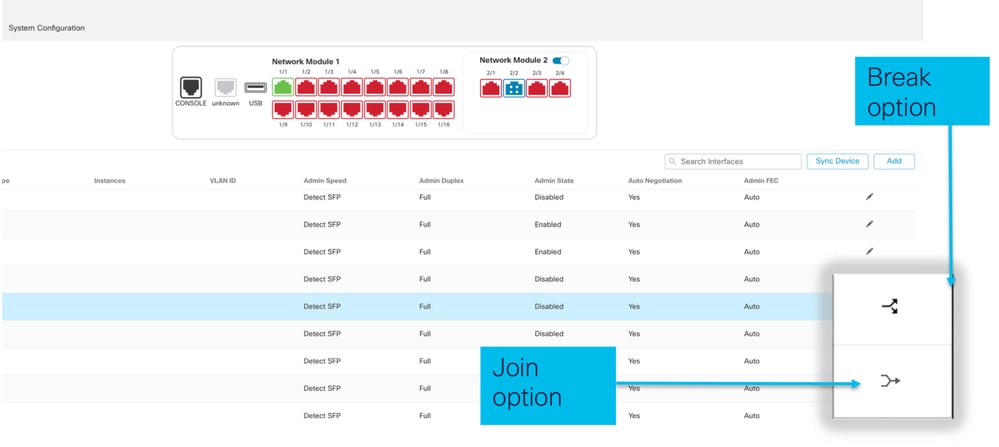
Interface break confirmation wizard open up on break 옵션이 트리거됩니다.

인터페이스 업데이트 알림은 인터페이스 브레이크가 확인된 후 섀시 페이지에 표시됩니다.
Break/Join 이후의 인터페이스 변경
Accept Changes(변경 수락)를 클릭하면 다음 인터페이스가 FMC에서 사용 가능해집니다.
인터페이스 변경이 인스턴스에 미치는 영향
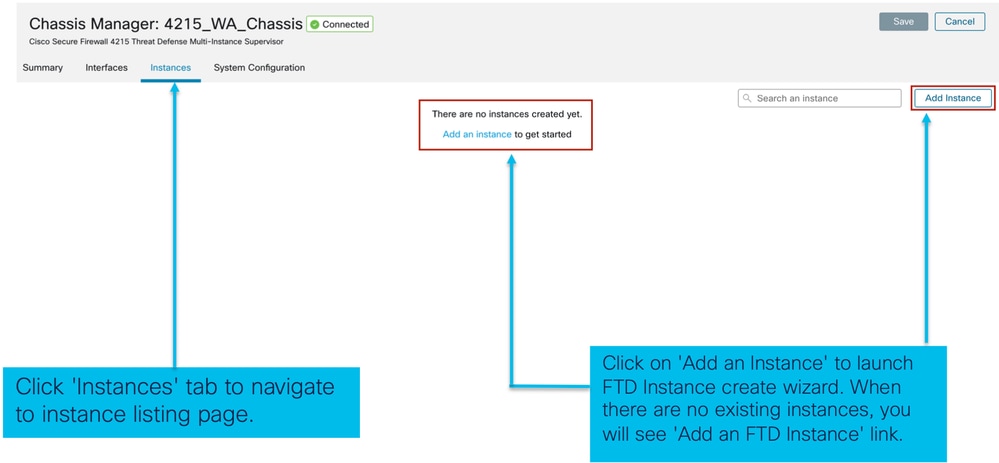
인스턴스 관리
인스턴스 관리를 통해 다음을 수행할 수 있습니다.
- 4200 Series(MI 모드) 디바이스에서 모든 기존 FTD 인스턴스 및 해당 세부사항을 확인합니다.
- 원하는 CPU 코어 및 소프트웨어 버전으로 FTD 인스턴스를 생성/업데이트합니다.
- 기존 FTD 인스턴스를 삭제합니다.
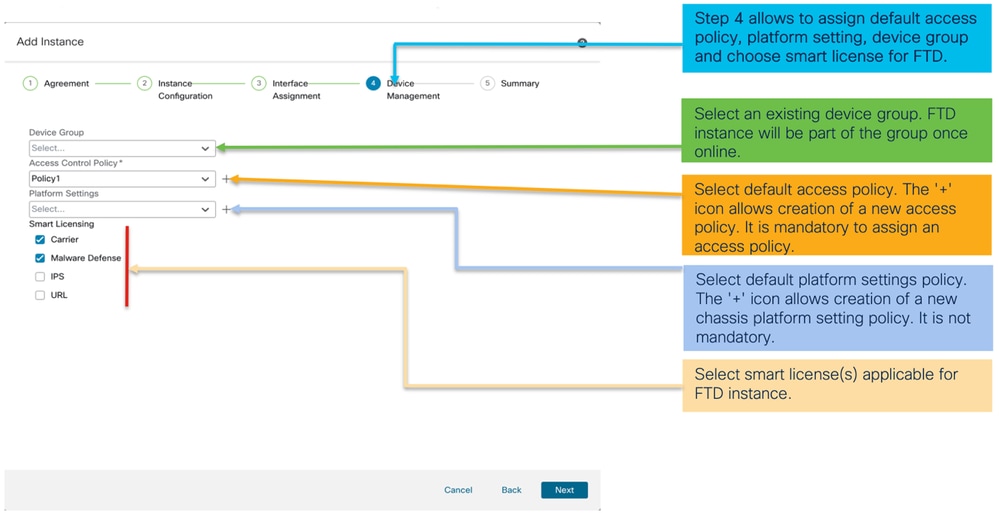
- 사용자가 FTD 정책 - FTD 인스턴스에 대한 액세스 정책 및 플랫폼 설정 정책을 선택할 수 있습니다.
- FTD 인스턴스가 온라인 상태가 되면 FMC에 자동 등록합니다.
인스턴스 생성
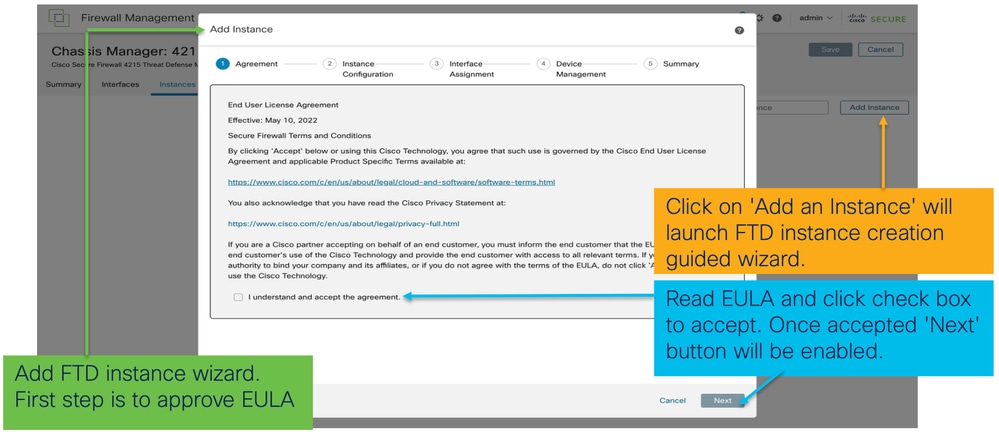
Add Instance(인스턴스 추가)를 클릭하여 마법사를 시작합니다.
1단계. 계약:
2단계.
- 인스턴스 컨피그레이션 기본 사항:
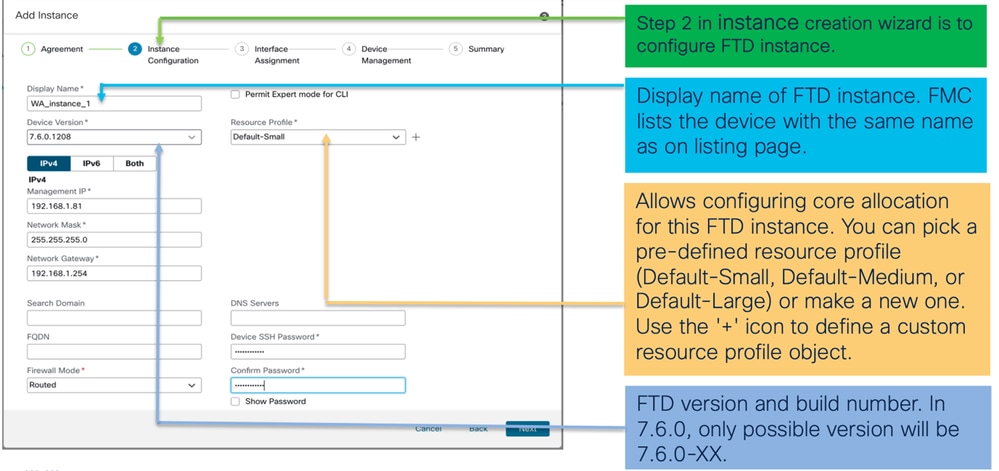
- 인스턴스 구성 IP:

3단계. 인터페이스 지정:

4단계. 장치 관리:
5단계. 요약:
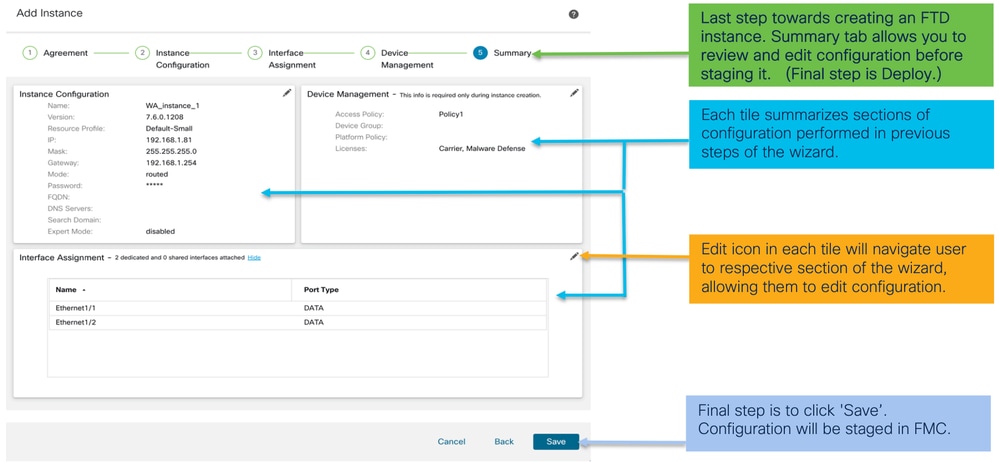
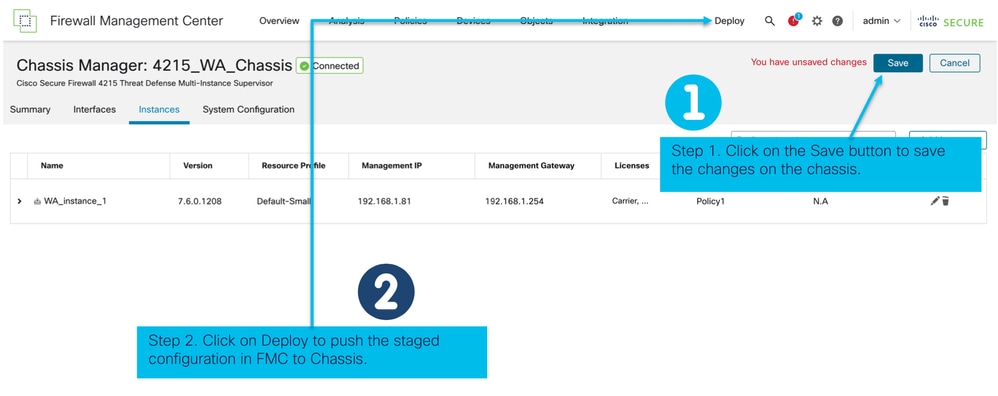
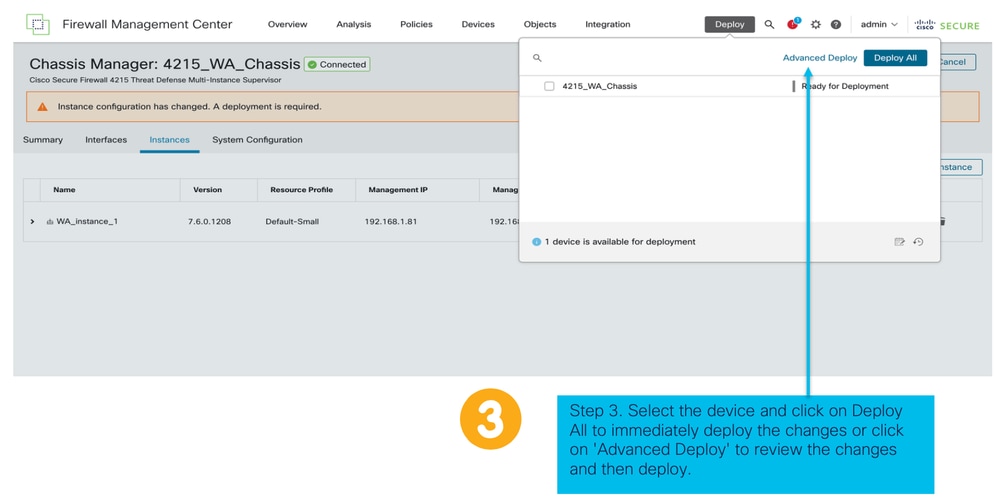
컨피그레이션을 완료하려면 Save and Deploy.
성공적인 구축 후 FTD 인스턴스의 자동 등록:
Management Center에 등록된 인스턴스:
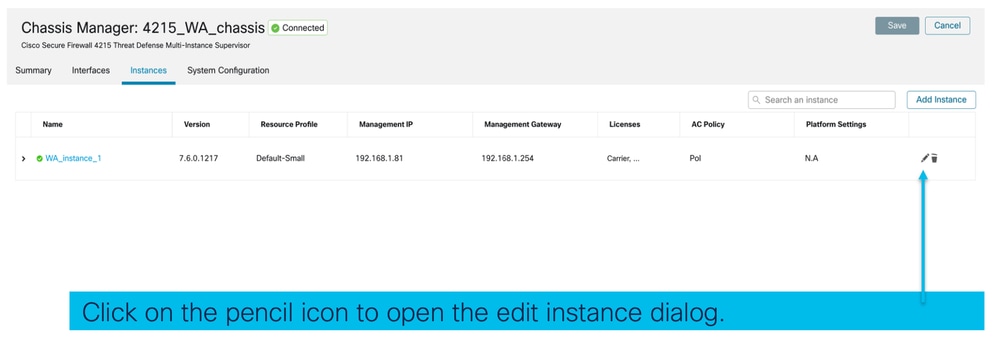
인스턴스 편집
FTD 인스턴스를 수정하려면 연필 아이콘을 클릭합니다.
1단계. FTD 인스턴스 편집:
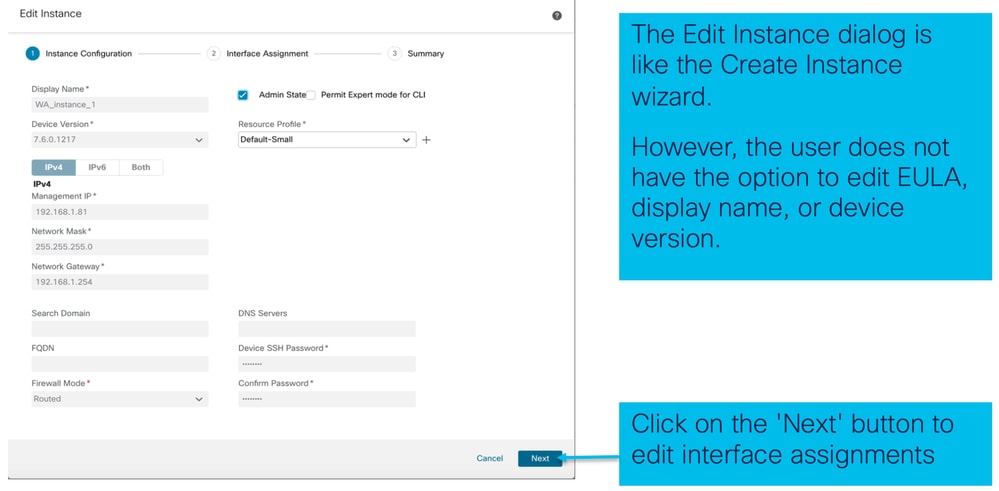
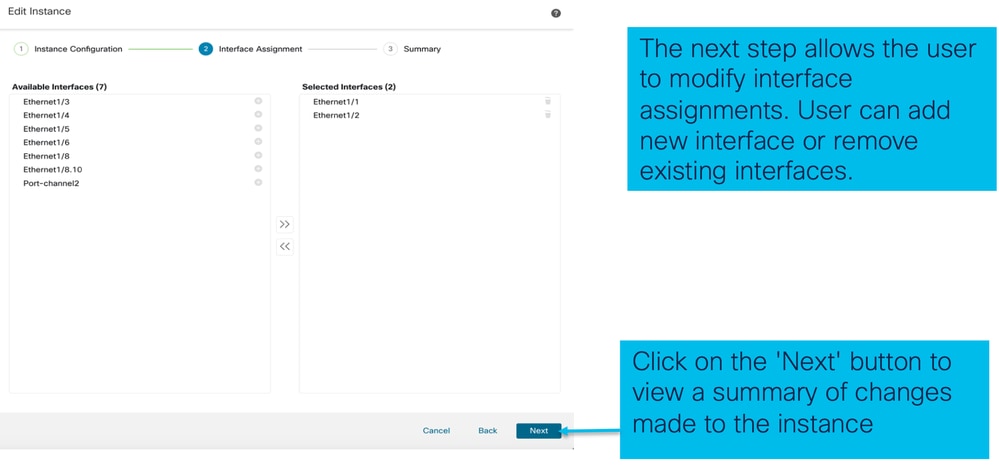
2단계. 인스턴스에 대한 인터페이스 지정을 편집합니다.
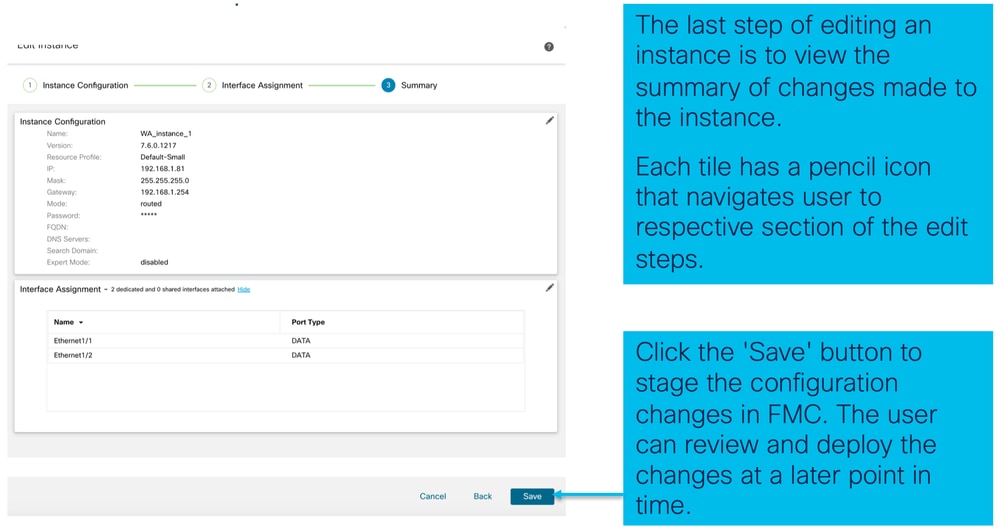
3단계. 인스턴스 편집 요약:
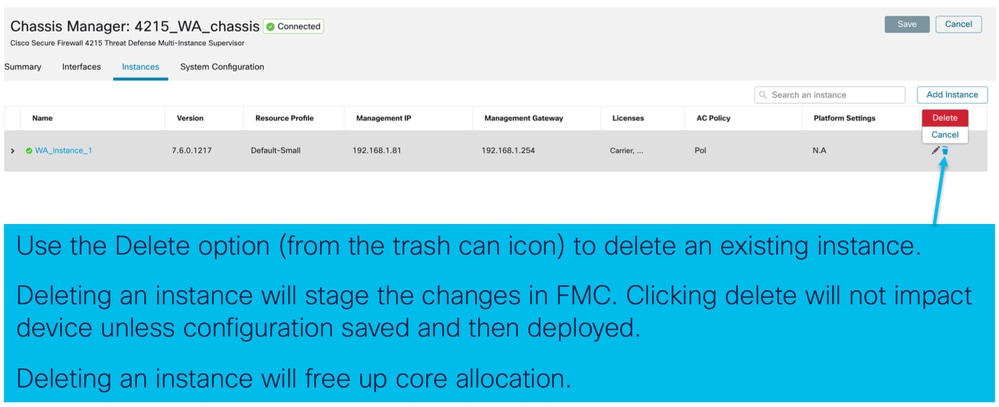
인스턴스 삭제
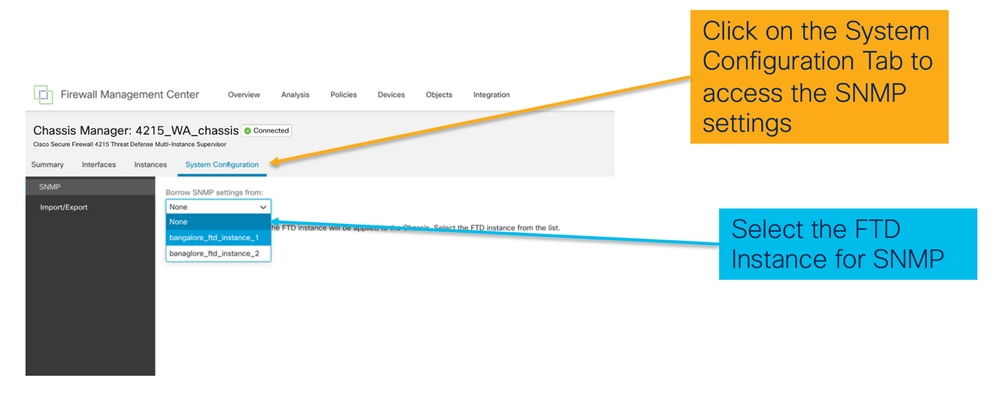
SNMP 컨피그레이션
SNMP 구성을 위한 시스템 구성 탭으로 이동합니다.
섀시 가져오기/내보내기
컨피그레이션 내보내기
Manage Chassis(섀시 관리) > System Configuration(시스템 컨피그레이션) > Import/Export(가져오기/내보내기)로 이동합니다.
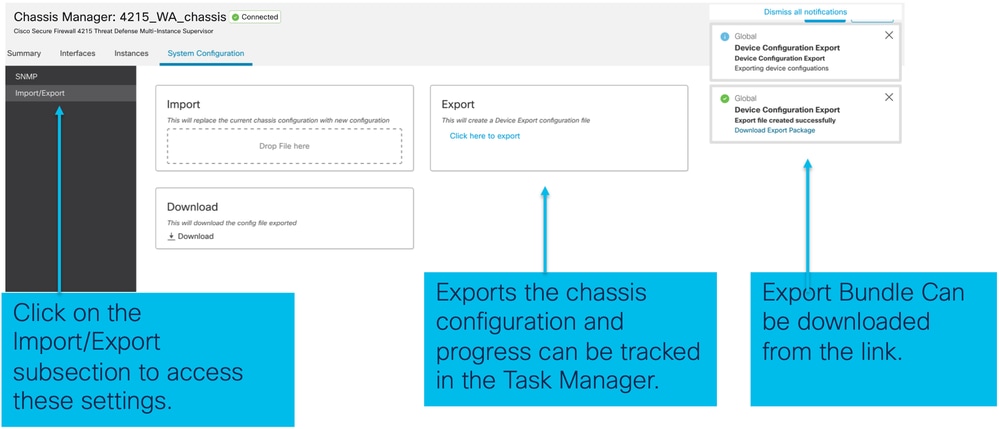
컨피그레이션 가져오기
Manage Chassis(섀시 관리) > System Configuration(시스템 컨피그레이션) > Import/Export(가져오기/내보내기)로 이동합니다.
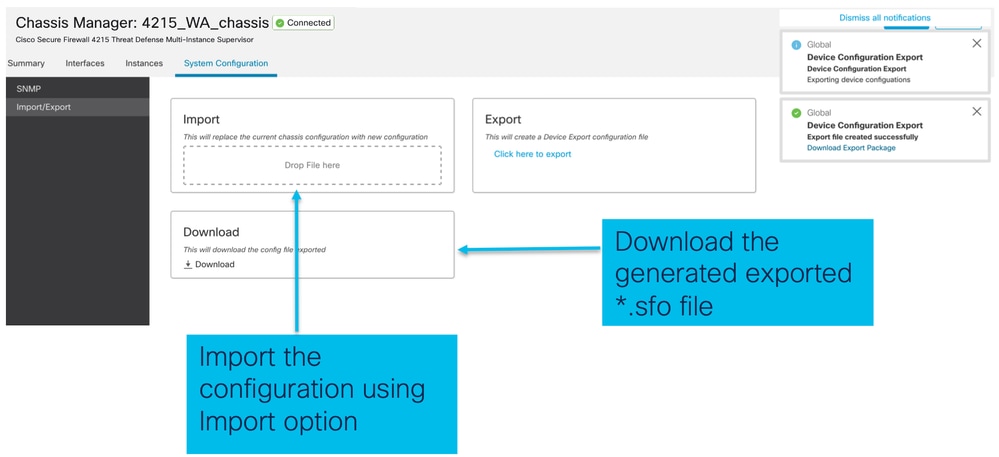
섀시 가져오기/내보내기에 대해 알아야 할 사항
- 섀시의 모든 기존 컨피그레이션은 가져온 파일의 컨피그레이션으로 교체됩니다.
- 구성을 가져오는 플랫폼 소프트웨어 버전은 내보낸 버전과 동일해야 합니다.
- 컨피그레이션을 가져오는 섀시에는 내보내기를 수행할 때 설치된 네트워크 모듈 수가 동일해야 합니다.
- 컨피그레이션을 가져오는 섀시에는 논리적 디바이스에 대해 동일한 애플리케이션 이미지가 설치되어 있어야 합니다.
- 애플리케이션별 컨피그레이션 설정은 내보내지 않습니다. 섀시 컨피그레이션만 내보냅니다.
- FTD 인스턴스 백업은 별도로 수행해야 합니다.
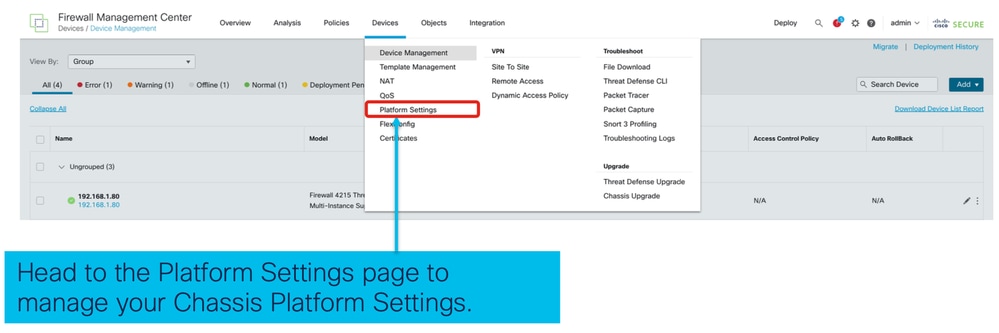
섀시 플랫폼 설정 정책
섀시 플랫폼 설정 정책을 통해 사용자는 다음과 같은 플랫폼별 컨피그레이션을 구성할 수 있습니다.
- 시간 동기화(NTP)
- DNS
- Syslog
- 표준 시간대
- 사용자는 새 "섀시 플랫폼 설정" 정책을 생성하여 여러 4200 Series(MI 모드) 섀시에 할당할 수 있습니다.

팁: 섀시 플랫폼 설정은 섀시에만 적용됩니다. 사용자가 인스턴스에 플랫폼 설정을 적용하려는 경우 Threat Defense 플랫폼 설정 정책을 사용할 수 있습니다.
1. 섀시 플랫폼 설정 정책으로 이동합니다.
2. 섀시 플랫폼 설정 생성:
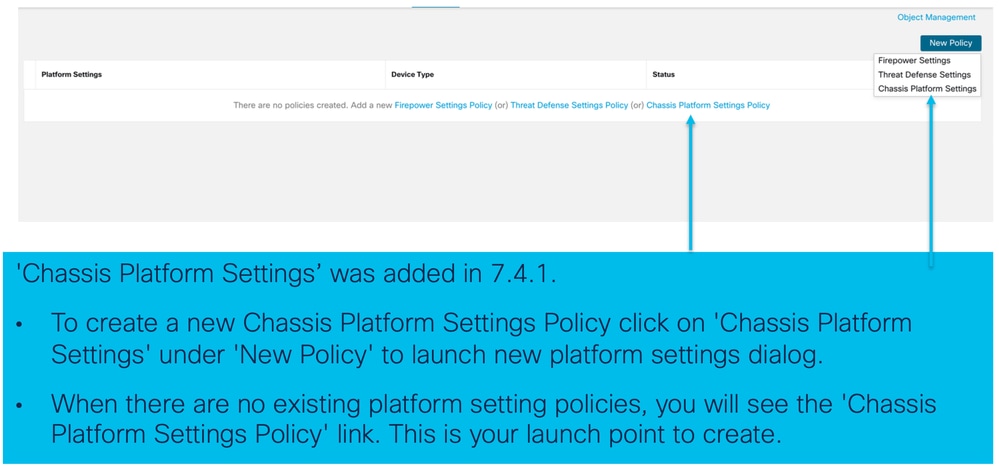
3. 섀시 플랫폼 설정 정책 페이지:
섀시 플랫폼 설정: DNS
섀시 플랫폼 설정 정책의 DNS 섹션 아래에서 DNS 서버 그룹을 활성화하고 추가합니다.
섀시 플랫폼 설정: SSH
- 섀시 플랫폼 설정 정책의 SSH 섹션에서 SSH 서버를 활성화하고 추가합니다.
- SSH 클라이언트 활성화 및 추가:
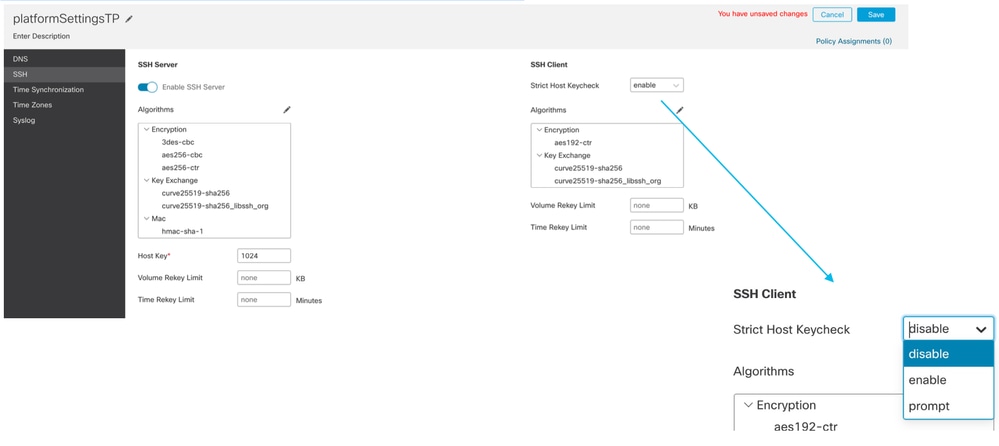
섀시 플랫폼 설정: SSH 액세스 목록
이 탭은 섀시 플랫폼 설정의 SSH 섹션에서 SSH를 활성화한 후에만 표시됩니다.
- SSH 액세스 목록 생성:
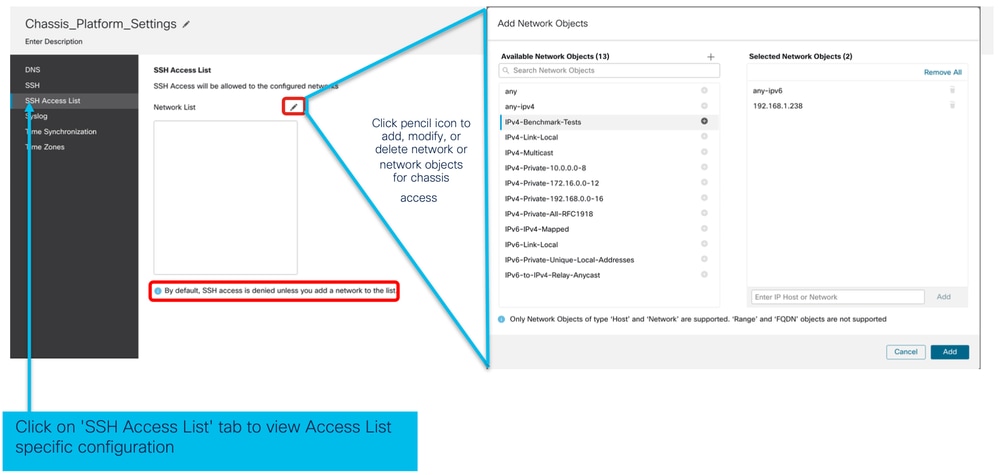
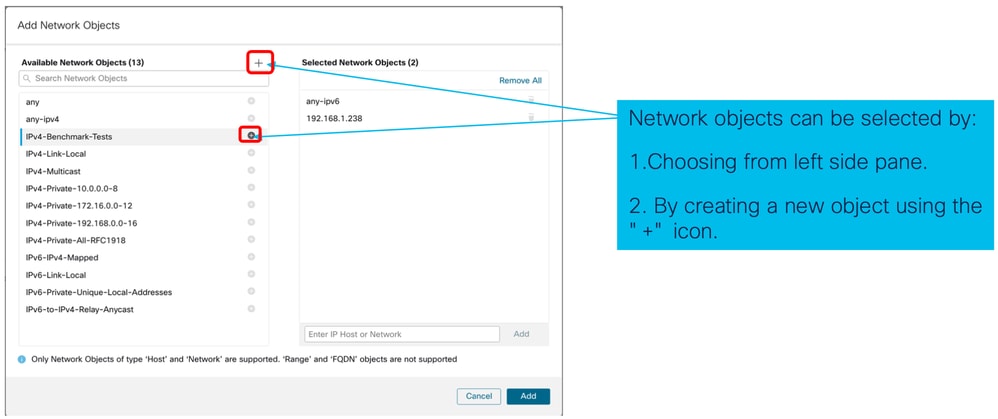
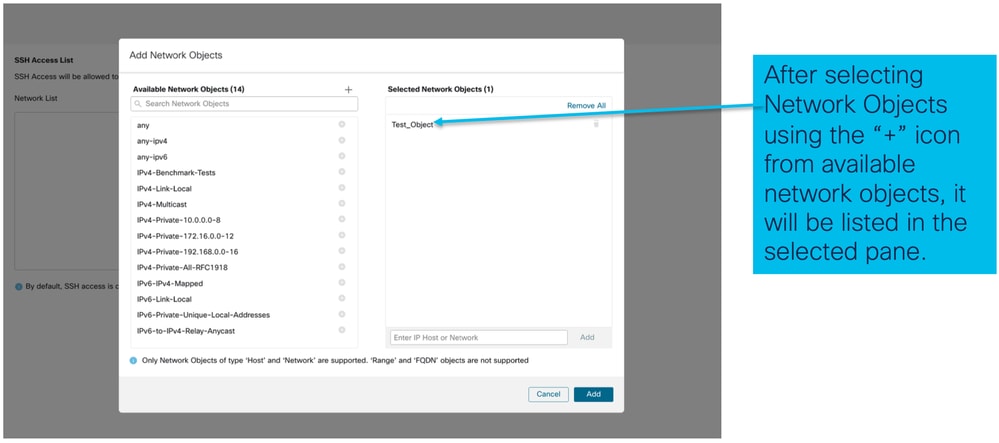
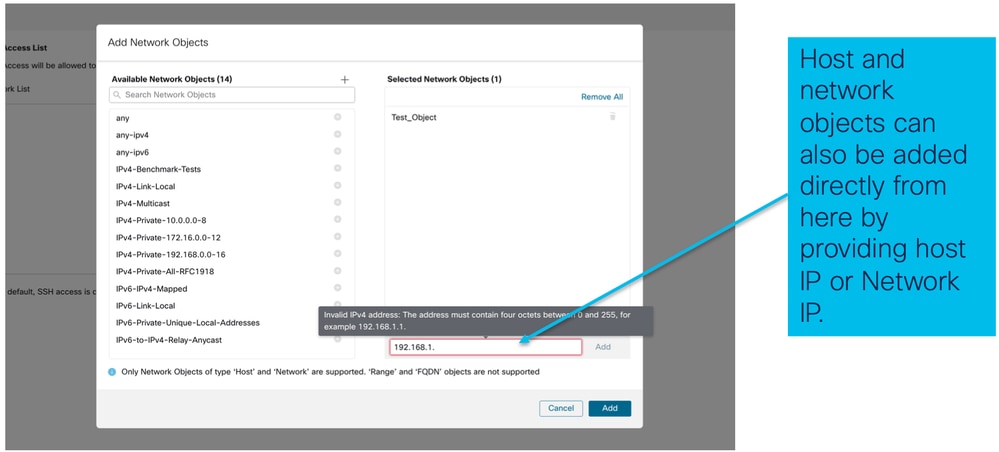
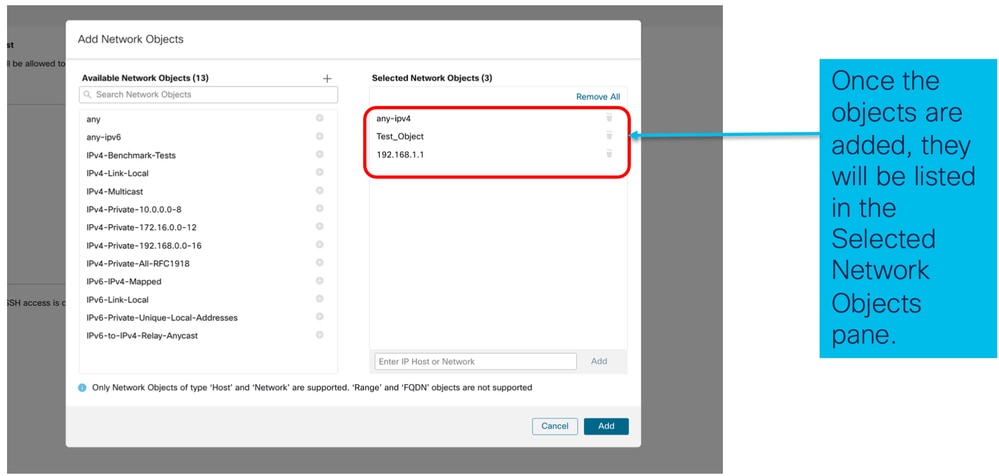
- SSH 액세스 목록에 대한 네트워크 개체 추가:
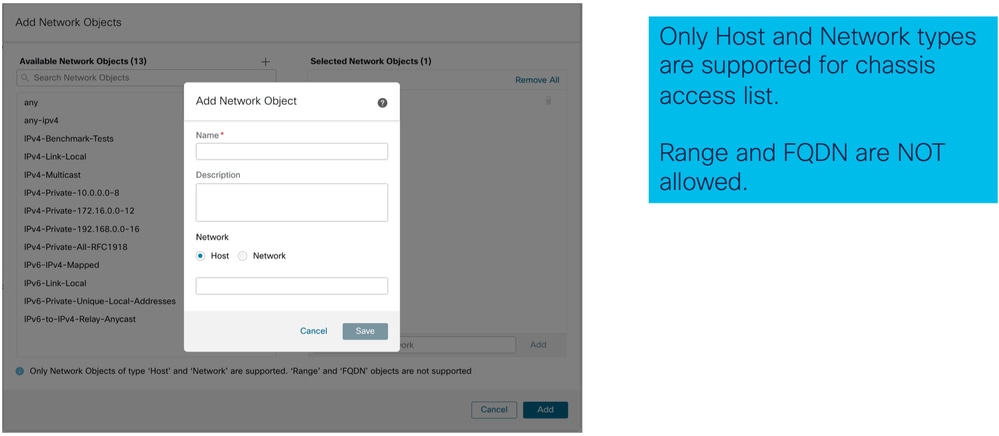
- 새 네트워크 개체 추가:
- 네트워크 개체 보기:
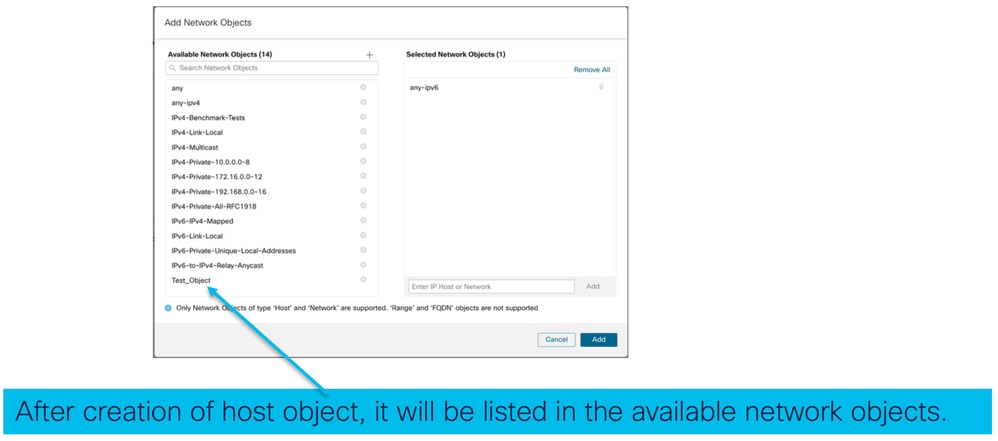
- 네트워크 개체 선택:
- 이 이미지에 표시된 대로 네트워크 객체를 생성할 수 있습니다.
- 추가된 네트워크 개체 보기:
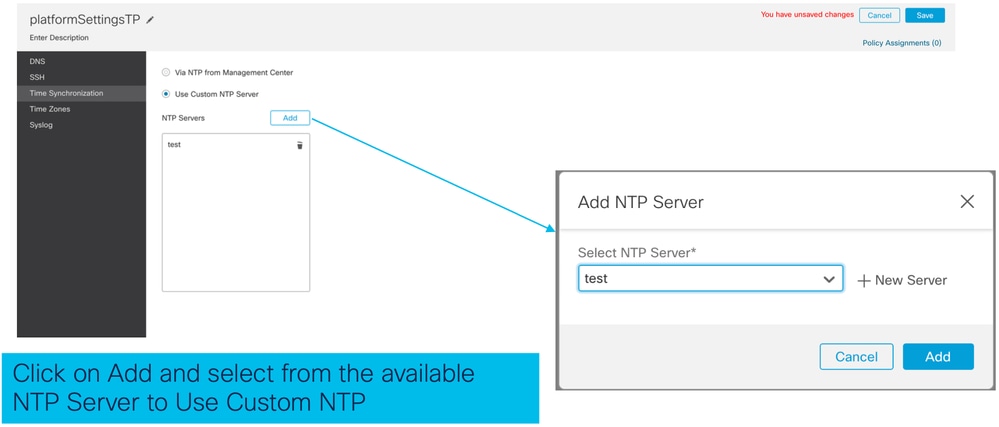
섀시 플랫폼 설정: 시간 동기화
시간 동기화는 다음 두 가지 방법으로 수행할 수 있습니다.
- Management Center에서 NTP를 통해
- 사용자 지정 NTP 서버에서
관리 센터의 NTP에서
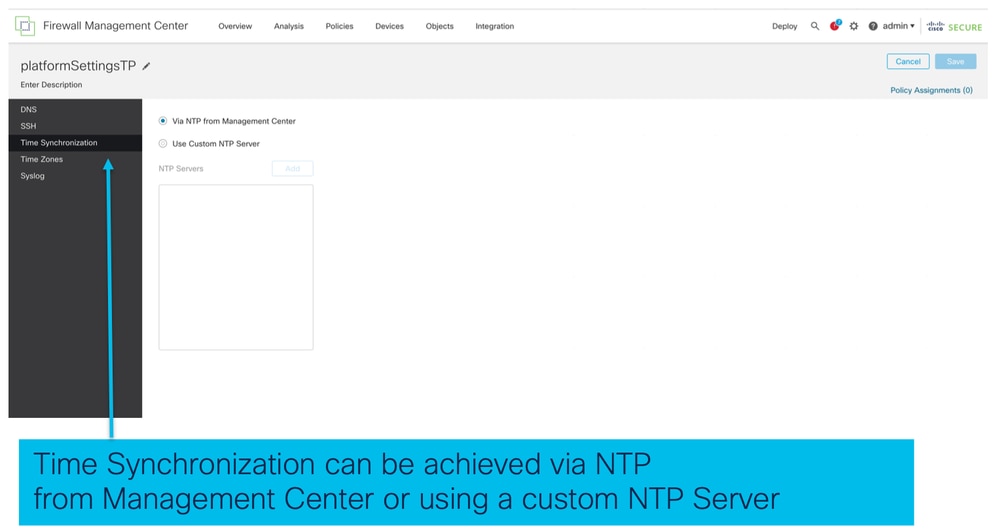
사용자 지정 NTP 서버에서
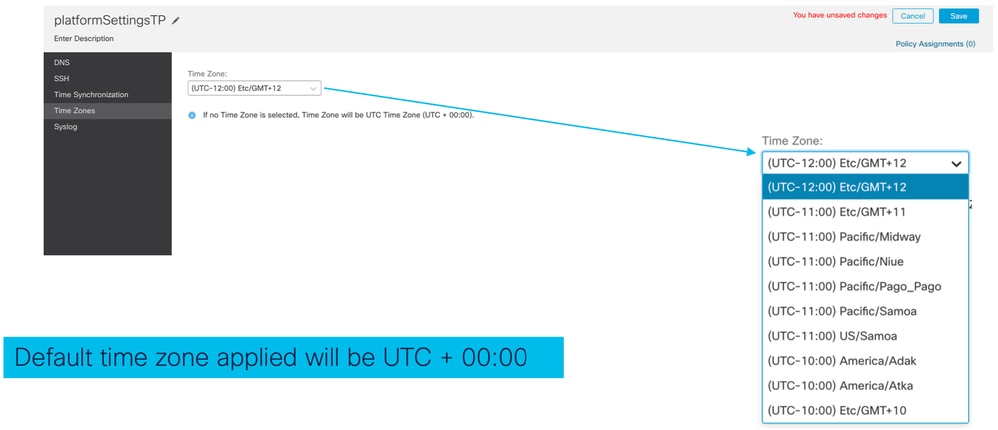
섀시 플랫폼 설정: 표준 시간대
표준 시간대 설정:
섀시 플랫폼 설정: Syslog
- Syslog Local Destinations 탭:
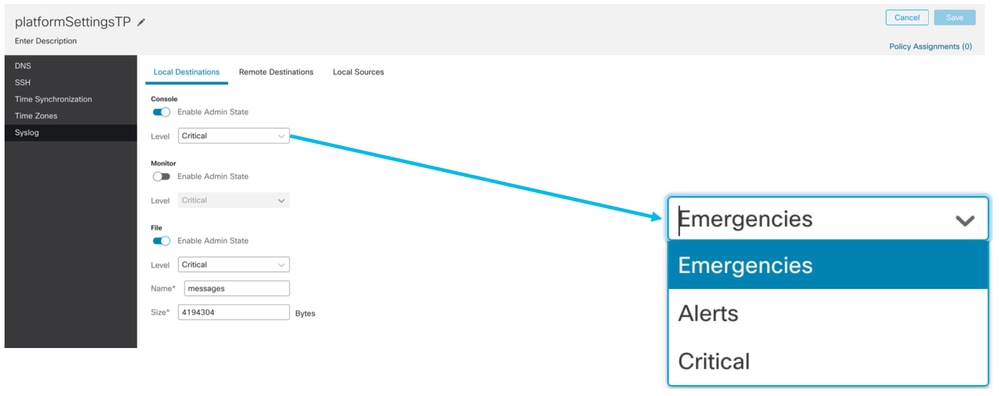
- Syslog Remote Destinations 탭:
- Syslog Local Sources 탭:
섀시 플랫폼 설정: 저장 및 배포
섀시 플랫폼 설정 변경 사항을 저장한 다음 구축:
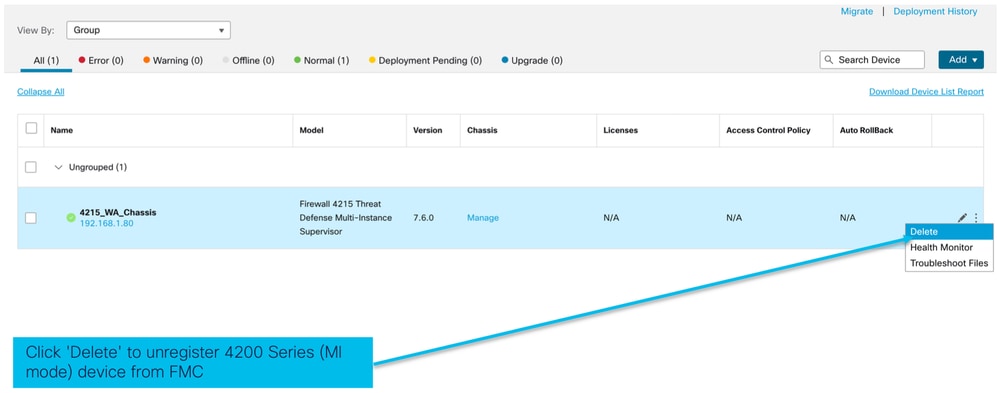
섀시 등록 취소
FMC에서 섀시의 등록을 취소하려면 Devices(디바이스) > Device Management(디바이스 관리) > delete(삭제)로 이동합니다.
다중 인스턴스에서 기본 모드로 변환
현재 FMC는 Native에서 Multi-Instance로의 변환만 지원합니다. 따라서 디바이스를 기본 모드로 다시 변환하려면 사용자가 CLI를 사용해야 합니다.
1단계: FMC에서 섀시의 등록을 취소합니다.
2단계: 이 CLI 명령을 사용하여 4200 Series 디바이스를 기본 모드로 변환할 수 있습니다.
firepower-4215# scope system
firepower-4215 /system # set deploymode native
FMC Rest API
FMC 공용 REST API는 FMC에서 지원되는 모든 작업에 사용할 수 있습니다.
기본-다중 인스턴스 변환을 위한 REST API
기본 디바이스가 다중 인스턴스 변환을 수행할 준비가 되었는지 확인하는 POST API:
/api/fmc_config/v1/domain/{domainUUID}/chassis/fmcmanagedchassis/operational/switchmodereadinesscheck
샘플 POST 요청 JSON:
{
  "devices": [
    {
      "id": "DeviceUUID",
      "type": "Device"
    }
  ],
  "conversionType": "NATIVE_TO_MULTI_INSTANCE"
}
단일 네이티브-멀티-인스턴스 변환을 트리거하는 POST API:
/api/fmc_config/v1/domain/{domainUUID}/chassis/fmcmanagedchassis/operational/switchmode
샘플 POST 요청 JSON:
{
  "items": [
    {
      "id": "",
      "displayName": "Sample_Chassis_Name1"
    }
  ],
  "conversionType": "NATIVE_TO_MULTI_INSTANCE"
}
POST API를 통해 멀티 인스턴스 변환에 대한 대량 네이티브 기능을 트리거합니다.
/api/fmc_config/v1/domain/{domainUUID}/chassis/fmcmanagedchassis/operational/switchmode
샘플 POST 요청 JSON:
{
  "items": [
    {
      "id": "",
      "displayName": "Sample_Chassis_Name1"
    },
    {
      "id": "",
      "displayName": "Sample_Chassis_Name2"
    }
  ],
  "conversionType": "NATIVE_TO_MULTI_INSTANCE"
}
섀시 관리를 위한 REST API
POST 관리 센터에 섀시 추가:
/api/fmc_config/v1/domain/{domainUUID}/chassis/fmcmanagedchassis
모든 섀시 가져오기:
/api/fmc_config/v1/domain/{domainUUID}/chassis/fmcmanagedchassis/
uuid로 특정 섀시 가져오기:
/api/fmc_config/v1/domain/{domainUUID}/chassis/fmcmanagedchassis/{objectId}
uuid로 섀시 삭제:
/api/fmc_config/v1/domain/{domainUUID}/chassis/fmcmanagedchassis/{objectId}
샘플 POST 요청 JSON:
{
  "type": "FMCManagedChassis",
  "chassisName": "CHASSIS123",
  "chassisHostName": "192.168.xx.74",
  "regKey": "*****"
}
Netmod(네트워크 모듈) 관리를 위한 REST API
uuid로 네트워크 모듈 가져오기:
/api/fmc_config/v1/domain/{domainUUID}/chassis/fmcmanagedchassis/{containerUUID}/networkmodules/{objectId}
모든 네트워크 모듈 가져오기:
/api/fmc_config/v1/domain/{domainUUID}/chassis/fmcmanagedchassis/{containerUUID}/networkmodules/
PUT - 기존 네트워크 모듈을 uuid로 수정합니다.
/api/fmc_config/v1/domain/{domainUUID}/chassis/fmcmanagedchassis/{containerUUID}/networkmodules/{objectId}
PUT - FXOS에서 네트워크 모듈 데이터를 검색하고 Management Center를 업데이트합니다.
/api/fmc_config/v1/domain/{domainUUID}/chassis/fmcmanagedchassis/{containerUUID}/operational/syncnetworkmodule
샘플 GET 응답
{
  "metadata": {
    "timestamp": 1688670821060,
    "domain": {
      "name": "Global",
      "id": "e276abec-e0f2-11e3-8169-************",
      "type": "Domain"
    }
  },
  "links": {
    "self": "https://u32c01p10-vrouter.cisco.com:32300/api/fmc_config/v1/domain/e276abec-e0f2-11e3-8169-************/chassis/fmcmanagedchassis/f0f11b69-4229-4025-b0b9-************/networkmodules/0050568A-3F3F-0ed3-0000-0************"
  },
  "id": "0050568A-3F3F-0ed3-0000-************",
  "moduleState": "ENABLED",
  "type": "NetworkModule",
  "description": "Cisco FPR 8X1G 8X10G 1RU Module",
  "model": "FPR-3120",
  "operationState": "ok",
  "numOfPorts": 16,
  "slotId": "1",
  "vendor": "Cisco Systems, Inc.",
  "name": "Network Module 1"
}
인스턴스 관리용 REST API
POST 관리 센터에 섀시 추가:
/api/fmc_config/v1/domain/{domainUUID}/chassis/fmcmanagedchassis/{containerUUID}/logicaldevices
모든 섀시 가져오기:
/api/fmc_config/v1/domain/{domainUUID}/chassis/fmcmanagedchassis/{containerUUID}/logicaldevices
uuid로 특정 인스턴스 가져오기:
/api/fmc_config/v1/domain/{domainUUID}/chassis/fmcmanagedchassis/{containerUUID}/logicaldevices/{objectId}
PUT - uuid로 인스턴스 편집:
/api/fmc_config/v1/domain/{domainUUID}/chassis/fmcmanagedchassis/{containerUUID}/logicaldevices/{objectId}
uuid로 섀시 삭제:
/api/fmc_config/v1/domain/{domainUUID}/chassis/fmcmanagedchassis/{containerUUID}/logicaldevices/{objectId}
샘플 PUT 요청:
{
  "name": "ftd1",
  "operationalState": "string",
  "deviceRegistration": {
    "licenseCaps": [
      "MALWARE",
      "URLFilter",
      "CARRIER",
      "PROTECT"
    ],
    "accessPolicy": {
      "name": "AC Policy name",
      "id": "",
      "type": "AccessPolicy"
    },
    "deviceGroup": {
      "name": "DeviceGroup name",
      "id": "",
      "type": "DeviceGroup"
    }
  },
  "managementBootstrap": {
    "ipv4": {
      "gateway": "192.168.xx.68",
      "ip": "192.168.xx.78",
      "mask": "255.255.255.0"
    },
    "adminState": "enable",
    "firepowerManagerIP": "192.168.xx.32",
    "permitExpertMode": "yes",
    "searchDomain": "string",
    "firewallMode": "Routed",
    "dnsServers": "192.168.xx.123",
    "natId": "natId",
    "registrationKey": "regKey",
    "adminPassword": "adminPwd",
    "fqdn": "fqdn"
  },
  "externalPortLink": [
    {
      "name": "Ethernet1/1",
      "id": "",
      "type": "ChassisInterface"
    },
    {
      "name": "Ethernet2/2.1",
      "id": "",
      "type": "ChassisInterface"
    }
  ],
  "type": "LogicalDevice"
}
SNMP 관리용 REST API
uuid로 SNMP 설정을 가져옵니다.
/api/fmc_config/v1/domain/{domainUUID}/chassis/fmcmanagedchassis/{containerUUID}/snmpsettings/{objectId}
모든 SNMP 설정 가져오기:
/api/fmc_config/v1/domain/{domainUUID}/chassis/fmcmanagedchassis/{containerUUID}/snmpsettings/
PUT - 기존 네트워크 모듈을 uuid로 수정합니다.
/api/fmc_config/v1/domain/{domainUUID}/chassis/fmcmanagedchassis/{containerUUID}/snmpsettings/{objectId}
샘플 GET 응답:
{
  "snmpAdminInstance": {
    "id": "logicalDeviceUuid",
    "type": "LogicalDevice",
    "name": "ftd3"
  },
  "id": "snmpsettingsUUID2",
  "type": "SnmpSetting"
}
요약을 가져올 REST API
이 목록에는 요약을 가져오기 위한 REST API에 대한 자세한 정보가 포함되어 있습니다.
- 결함
- 인스턴스
- 인벤토리
- 인터페이스
- 앱 정보
섀시에 대한 결함 요약 얻기:
/api/fmc_config/v1/domain/{domainUUID}/chassis/fmcmanagedchassis/{containerUUID}/faultsummary
샘플 응답:
{
  "links": {
    "self": "/api/fmc_config/v1/domain/domainUUID/chassis/fmcmanagedchassis/containerUUID/faultsummary?offset=0&limit=25&expanded=true"
  },
  "items": [
    {
      "faultList": [
        {
          "id": 27429,
          "isAcknowledged": "no",
          "cause": "device-registration-pending",
          "gateway": "3::1",
          "ip": "3::2",
          "prefixLength": "33"
        }
      ],
      "managementPort": "Management1",
      "operationalState": "online",
      "adminState": "enabled",
      "deployType": "container"
    }
  ],
  "modifiedTime": "2022-07-05T06:39:25Z",
  "type": "InstanceSummary"
  ],
  "paging": {
    "offset": 0,
    "limit": 25,
    "count": 1,
    "pages": 1
  }
}
섀시에 대한 인스턴스 요약 가져오기:
/api/fmc_config/v1/domain/{domainUUID}/chassis/fmcmanagedchassis/{containerUUID}/instancesummary
샘플 응답:
{
  "links": {
    "self": "/api/fmc_config/v1/domain/domainUUID/chassis/fmcmanagedchassis/containerUUID/instancesummary?offset=0&limit=25&expanded=true"
  },
  "items": [
    {
      "instanceList": [
        {
          "name": "ftdmi2",
          "startupVersion": "7.3.0.1402",
          "coresUsed": 6,
          "ipv4": {
            "gateway": "192.168.xx.68",
            "ip": "192.168.xx.78",
            "mask": "255.255.255.0"
          },
          "ipv6": {
            "gateway": "3::1",
            "ip": "3::2",
            "prefixLength": "33"
          },
          "managementPort": "Management1",
          "operationalState": "online",
          "adminState": "enabled",
          "deployType": "container"
        }
      ],
      "modifiedTime": "2022-07-05T06:39:25Z",
      "type": "InstanceSummary"
    }
  ],
  "paging": {
    "offset": 0,
    "limit": 25,
    "count": 1,
    "pages": 1
  }
}
섀시에 대한 인벤토리 요약 가져오기:
/api/fmc_config/v1/domain/{domainUUID}/chassis/fmcmanagedchassis/{containerUUID}/inventorysummary
샘플 응답:
{
  "links": {
    "self": "/api/fmc_config/v1/domain/domainUUID/chassis/fmcmanagedchassis/containerUUID/inventorysummary?offset=0&limit=25&expanded=true"
  },
  "items": [
    {
      "fanList": [
        {
          "operationalState": "operable",
          "operability": "operable",
          "power": "on",
          "thermalStatus": "ok",
          "module": 1,
          "tray": 1,
          "id": 1,
          "model": "N/A",
          "vendor": "N/A"
        },
        {
          "operationalState": "operable",
          "operability": "operable",
          "power": "on",
          "thermalStatus": "ok",
          "module": 1,
          "tray": 1,
          "id": 2,
          "model": "N/A",
          "vendor": "N/A"
        }
      ],
      "powerSupplyList": [
        {
          "id": 2,
          "operationalState": "operable",
          "operability": "operable",
          "serialNumber": "***********",
          "thermalStatus": "ok",
          "model": "FPR2K-PWR-AC-400",
          "vendor": "Cisco Systems, Inc"
        }
      ],
      "processorList": [
        {
          "id": 1,
          "operationalState": "operable",
          "operability": "operable",
          "vendor": "AuthenticAMD",
          "model": "49 AMD EPYC 7282 16-Core Processor",
          "type": "CPU",
          "thermalStatus": "ok"
        }
      ],
      "securityModuleList": [
        {
          "id": 1,
          "operationalState": "ok",
          "operability": "operable",
          "serialNumber": "***********",
          "vendor": "Cisco Systems, Inc",
          "model": "FPR-3120",
          "availableCores": 24,
          "totalCores": 32
        }
      ],
      "memoryList": [
        {
          "capacity": 65536,
          "id": 1,
          "array": 1,
          "bank": 0,
          "model": "HMAA8GR7AJR4N-XN",
          "operationalState": "operable",
          "operability": "operable",
          "performance": "ok",
          "power": "not-supported",
          "serialNumber": "********",
          "thermalStatus": "ok",
          "vendor": "Hynix"
        }
      ],
      "model": "FPR-3120",
      "availableCores": 24,
      "totalCores": 32
    }
  ],
  "paging": {
    "offset": 0,
    "limit": 25,
    "count": 1,
    "pages": 1
  }
}
섀시에 대한 인터페이스 요약 가져오기:
/api/fmc_config/v1/domain/{domainUUID}/chassis/fmcmanagedchassis/{containerUUID}/interfacesummary
샘플 응답:
{
  "links": {
    "self": "/api/fmc_config/v1/domain/domainUUID/chassis/fmcmanagedchassis/containerUUID/interfacesummary?offset=0&limit=25"
  },
  "items": [
    {
      "interfaceList": [
        {
          "name": "Ethernet1/8",
          "operationalState": "up",
          "adminState": "disabled",
          "portType": "data",
          "operationalSpeed": "10mbps",
          "adminSpeed": "1gbps",
          "adminDuplex": "fullDuplex",
          "autoNegotiation": "yes",
          "mediaType": "rj45",
          "type": "PhysicalInterface"
        },
        {
          "name": "Ethernet1/7",
          "operationalState": "up",
          "adminState": "disabled",
          "portType": "data",
          "operationalSpeed": "1gbps",
          "adminSpeed": "1gbps",
          "adminDuplex": "fullDuplex",
          "autoNegotiation": "yes",
          "mediaType": "rj45",
          "type": "PhysicalInterface"
        },
        {
          "name": "Ethernet1/6",
          "operationalState": "up",
          "adminState": "disabled",
          "portType": "data",
          "operationalSpeed": "1gbps",
          "adminSpeed": "1gbps",
          "adminDuplex": "fullDuplex",
          "autoNegotiation": "yes",
          "mediaType": "rj45",
          "type": "PhysicalInterface"
        },
        {
          "name": "Ethernet1/3",
          "operationalState": "up",
          "adminState": "disabled",
          "portType": "data",
          "operationalSpeed": "1gbps",
          "adminSpeed": "1gbps",
          "adminDuplex": "fullDuplex",
          "autoNegotiation": "yes",
          "mediaType": "rj45",
          "type": "PhysicalInterface"
        },
        {
          "name": "Ethernet1/2",
          "operationalState": "up",
          "adminState": "enabled",
          "portType": "data",
          "operationalSpeed": "1gbps",
          "adminSpeed": "1gbps",
          "adminDuplex": "fullDuplex",
          "autoNegotiation": "yes",
          "mediaType": "rj45",
          "type": "PhysicalInterface"
        },
        {
          "name": "Ethernet1/1",
          "operationalState": "up",
          "adminState": "enabled",
          "portType": "data",
          "operationalSpeed": "1gbps",
          "adminSpeed": "1gbps",
          "adminDuplex": "fullDuplex",
          "autoNegotiation": "yes",
          "mediaType": "rj45",
          "type": "PhysicalInterface"
        },
        {
          "name": "Port-channel48",
          "operationalState": "up",
          "adminState": "enabled",
          "portType": "data",
          "operationalSpeed": "1gbps",
          "adminSpeed": "1gbps",
          "adminDuplex": "fullDuplex",
          "autoNegotiation": "yes",
          "mediaType": "rj45",
          "type": "EtherChannelInterface"
        }
      ],
      "modifiedTime": "2022-07-05T06:39:25Z",
      "type": "InterfaceSummary"
    }
  ],
  "paging": {
    "offset": 0,
    "limit": 25,
    "count": 1,
    "pages": 1
  }
}
섀시에 대한 앱 정보 가져오기:
/api/fmc_config/v1/domain/{domainUUID}/chassis/fmcmanagedchassis/{containerUUID} /inventorysummary
샘플 응답:
{
  "links": {
    "self": "/api/fmc_config/v1/domain/domainUUID/chassis/fmcmanagedchassis/containerUUID/appinfo?offset=0&limit=25&expanded=true"
  },
  "items": [
    {
      "appVersion": "7.4.0.1024",
      "type": "AppInfo"
    },
    {
      "appVersion": "7.4.0.1075",
      "type": "AppInfo"
    }
  ],
  "paging": {
    "offset": 0,
    "limit": 25,
    "count": 1,
    "pages": 1
  }
}
인터페이스 관리를 위한 REST API
이 섹션에서는 인터페이스 컨피그레이션 관리를 위한 REST API에 대해 자세히 설명합니다.
- 인터페이스 컨피그레이션 수정에 사용할 URL
- 인터페이스의 분리/조인에 사용할 URL
- 동기화 장치 구성에 사용할 URL
물리적 인터페이스 업데이트
물리적 인터페이스의 업데이트를 지원하기 위해 이러한 URL이 도입되었습니다.
모든 물리적 인터페이스 가져오기:
/api/fmc_config/v1/domain/{domainUUID}/chassis/fmcmanagedchassis/{containerUUID}/physicalinterfaces
인터페이스 uuid로 특정 물리적 인터페이스를 가져옵니다.
/api/fmc_config/v1/domain/{domainUUID}/chassis/fmcmanagedchassis/{containerUUID}/physicalinterface s/{interfaceUUID}
인터페이스 uuid로 인터페이스 업데이트:
/api/fmc_config/v1/domain/{domainUUID}/chassis/fmcmanagedchassis/{containerUUID}/physicalinterface s/{interfaceUUID}
물리적 인터페이스 모델은 다음과 같습니다.
{
  "metadata": {
    "supportedSpeed": "TEN_GBPS,ONE_GBPS,TWENTY_FIVE_GBPS,DETECT_SFP",
    "mediaType": "sfp",
    "sfpType": "none",
    "isBreakoutCapable": false,
    "isSplitInterface": false,
    "timestamp": 1692344434067,
    "domain": {
      "name": "Global",
      "id": "e276abec-e0f2-11e3-8169-**********",
      "type": "Domain"
    }
  },
  "type": "PhysicalInterface",
  "name": "Ethernet2/2",
  "portType": "DATA",
  "adminState": "DISABLED",
  "hardware": {
    "flowControlSend": "OFF",
    "fecMode": "AUTO",
    "autoNegState": true,
    "speed": "DETECT_SFP",
    "duplex": "FULL"
  },
  "LLDP": {
    "transmit": false,
    "receive": false
  },
  "id": "*************************************"
}
하위 인터페이스 구성
하위 인터페이스 관리를 지원하기 위해 이러한 URL이 도입되었습니다.
모든 하위 인터페이스 가져오기:
/api/fmc_config/v1/domain/{domainUUID}/chassis/fmcmanagedchassis/{containerUUID}/하위 인터페이스
인터페이스 uuid를 기준으로 특정 하위 인터페이스를 가져옵니다.
/api/fmc_config/v1/domain/{domainUUID}/chassis/fmcmanagedchassis/{containerUUID}/subinterfaces/{interfaceUUID}
새 하위 인터페이스를 게시합니다.
/api/fmc_config/v1/domain/{domainUUID}/chassis/fmcmanagedchassis/{containerUUID}/하위 인터페이스
인터페이스 uuid별 인터페이스 업데이트:
/api/fmc_config/v1/domain/{domainUUID}/chassis/fmcmanagedchassis/{containerUUID}/subinterfaces/{interfaceUUID}
인터페이스 uuid를 기준으로 하위 인터페이스를 삭제합니다.
/api/fmc_config/v1/domain/{domainUUID}/chassis/fmcmanagedchassis/{containerUUID}/subinterfaces/{interfaceUUID}
하위 인터페이스 모델은 다음과 같습니다.
{
  "metadata": {
    "isBreakoutCapable": false,
    "isSplitInterface": false,
    "timestamp": 1692536476265,
    "domain": {
      "name": "Global",
      "id": "e276abec-e0f2-11e3-8169-**********",
      "type": "Domain"
    }
  },
  "type": "SubInterface",
  "name": "Ethernet1/3.3",
  "portType": "DATA",
  "subIntfId": 3,
  "parentInterface": {
    "type": "PhysicalInterface",
    "id": "00505686-9A51-0ed3-0000-**********",
    "name": "Ethernet1/3"
  },
  "vlanId": 3,
  "id": "*************************************"
}
EtherChannel 인터페이스 구성
etherchannel EtherChannel 인터페이스의 관리를 지원하기 위해 이러한 URL이 도입되었습니다.
모든 etherchannel 인터페이스를 가져옵니다.
/api/fmc_config/v1/domain/{domainUUID}/chassis/fmcmanagedchassis/{containerUUID}/etherchannelinterfaces/{interfaceUUID}
인터페이스 uuid로 특정 etherchannel 인터페이스를 가져옵니다.
/api/fmc_config/v1/domain/{domainUUID}/chassis/fmcmanagedchassis/{containerUUID}/etherchannelinterfaces/{interfaceUUID}
새 etherchannel 인터페이스를 POST합니다.
/api/fmc_config/v1/domain/{domainUUID}/chassis/fmcmanagedchassis/{containerUUID}/etherchannel인터페이스
인터페이스 uuid별 인터페이스 업데이트:
/api/fmc_config/v1/domain/{domainUUID}/chassis/fmcmanagedchassis/{containerUUID}/etherchannelinterfaces/{interfaceUUID}
인터페이스 uuid로 etherchannel 인터페이스를 삭제합니다.
/api/fmc_config/v1/domain/{domainUUID}/chassis/fmcmanagedchassis/{containerUUID}/etherchannelinterfaces/{interfaceUUID}
EtherChannel 인터페이스 모델은 다음과 같습니다.
{
  "metadata": {
    "supportedSpeed": "HUNDRED_MBPS,TEN_MBPS,ONE_GBPS",
    "timestamp": 1692536640172,
    "domain": {
      "name": "Global",
      "id": "e276abec-e0f2-11e3-8169-**********",
      "type": "Domain"
    }
  },
  "type": "EtherChannelInterface",
  "name": "Port-channel45",
  "portType": "DATA",
  "etherChannelId": 45,
  "selectedInterfaces": [
    {
      "type": "PhysicalInterface",
      "id": "00505686-9A51-0ed3-0000-**********",
      "name": "Ethernet1/4"
    },
    {
      "type": "PhysicalInterface",
      "id": "00505686-9A51-0ed3-0000-**********",
      "name": "Ethernet1/5"
    }
  ],
  "lacpMode": "ON",
  "lacpRate": "FAST",
  "adminState": "DISABLED",
  "hardware": {
    "flowControlSend": "OFF",
    "autoNegState": true,
    "speed": "ONE_GBPS",
    "duplex": "FULL"
  },
  "LLDP": {
    "transmit": true,
    "receive": true
  },
  "id": "00505686-9A51-0ed3-0000-**********"
}
REST API Break/Join 인터페이스
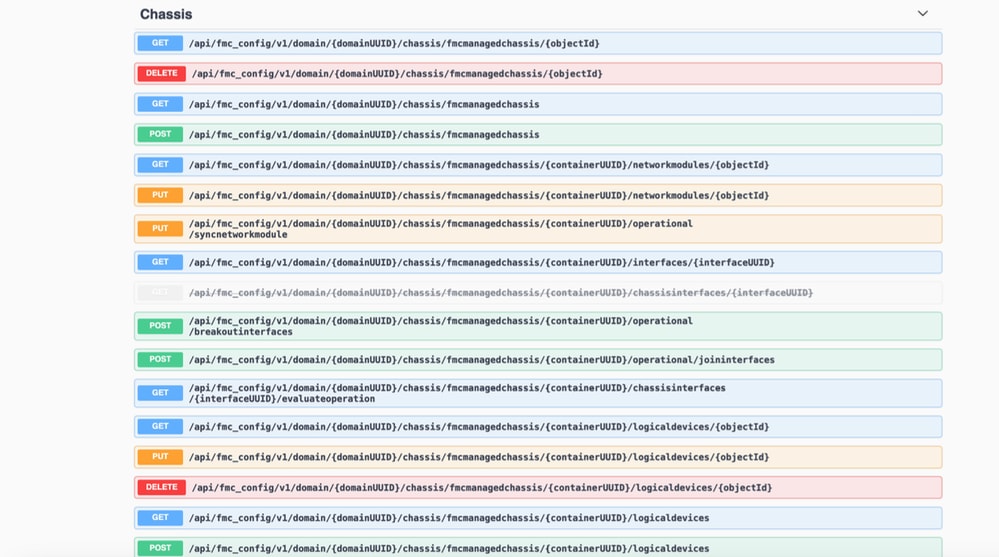
4200 Series에서 인터페이스의 브레이크아웃/조인을 지원하기 위해 다음 URL을 사용할 수 있습니다.
다운로드:
/api/fmc_config/v1/domain/{domainUUID}/chassis/fmcmanagedchassis/{containerUUID}/chassinterfaces/{interfaceUUID}/evaluateoperation
인터페이스에 대한 중단/조인의 가능성을 평가합니다.
POST:
/api/fmc_config/v1/domain/{domainUUID}/chassis/fmcmanagedchassis/{containerUUID}/operational/breakoutinterfaces
인터페이스 끊기
POST:
/api/fmc_config/v1/domain/{domainUUID}/chassis/fmcmanagedchassis/{containerUUID}/operational/joininterfaces
끊어진 인터페이스 집합을 조인합니다.
인터페이스 브레이크에 대한 REST 흐름
1. fmcmanagedchassis 엔드포인트를 사용하여 FMC 관리 섀시 장치(4200)를 찾습니다.
/api/fmc_config/v1/domain/{domainUUID}/chassis/fmcmanagedchassis 가져오기
각 디바이스의 ID, 이름, 모델 등의 세부사항과 함께 FMC 관리 섀시 디바이스 목록을 멀티 인스턴스 디바이스와 함께 반환합니다. "MULTIINSTANCE" 디바이스를 선택합니다.
샘플 응답:
{
  "id": "fcaa9ca4-85e5-4bb0-b049-**********",
  "type": "FMCManagedChassis",
  "chassisName": "192.168.0.75",
  "chassisMode": "MULTIINSTANCE",
  "links": {
    "self": "https://u32c01p06-vrouter.cisco.com:22512/api/fmc_config/v1/domain/e276abec-e0f2-11e3-8169-**********/chassis/fmcmanagedchassis/fcaa9ca4-85e5-4bb0-b049-**********"
  }
}
2. 인터페이스가 인터페이스/물리적 인터페이스 끝점을 사용하여 브레이크아웃이 가능한지 확인합니다.
"isBreakoutCapable"이 true이고 mediaType이 QSFP인 경우에만 분할 영역이 가능합니다.
/api/fmc_config/v1/domain/{domainUUID}/chassis/fmcmanagedchassis/{containerUUID}/interfaces 가져오기
샘플 응답:
{
  "metadata": {
    "supportedSpeed": "FORTY_GBPS,DETECT_SFP",  >>>>>>>>>
    "mediaType": "qsfp",                        >>>>>>>>>
    "sfpType": "none",
    "isBreakoutCapable": true,                  >>>>>>>>>
    "breakoutFactor": "4",                      >>>>>>>>>
    "isSplitInterface": false,
    "timestamp": 1692344434067,
    "domain": {
      "name": "Global",
      "id": "e276abec-e0f2-11e3-8169-**********",
      "type": "Domain"
    }
  },
  "type": "PhysicalInterface",
  "name": "Ethernet2/4",
  "portType": "DATA",
  "adminState": "DISABLED",
  "hardware": {
    "flowControlSend": "OFF",
    "fecMode": "AUTO",
    "autoNegState": true,
    "speed": "DETECT_SFP",
    "duplex": "FULL"
  },
  "LLDP": {
    "transmit": false,
    "receive": false
  },
  "id": "00505686-9A51-0ed3-0000-**********"
}
3. 인터페이스에서 평가 작업 끝점을 사용하여 중단 작업의 가능성을 평가합니다.
/api/fmc_config/v1/domain/{domainUUID}/chassis/fmcmanagedchassis/{containerUUID}/chassinterfaces/{interfaceUUID}/evaluateoperation 가져오기
응답에 경고/오류가 없으면 사용자는 중단 작업을 수행할 수 있습니다.
샘플 응답:
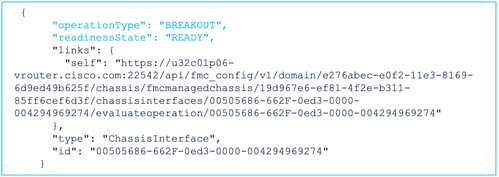
응답에 오류가 있는 경우 사용자는 중단 작업을 수행할 수 없습니다.
{
  "operationType": "BREAKOUT",
  "interfaceUsages": [
    {
      "conflictType": "Interface usage on instance(s)",
      "severity": "ERROR",              >>>>>>>>>
      "description": "Interface Ethernet2/4 can not be split. Remove it from instances [FTD1] and try again.\n"
    }
  ],
  "readinessState": "NOT_READY",        >>>>>>>>>
  "links": {
    "self": "https://u32c01p06-vrouter.cisco.com:22542/api/fmc_config/v1/domain/e276abec-e0f2-11e3-8169-**********/chassis/fmcmanagedchassis/19d967e6-ef81-4f2e-b311-**********/chassisinterfaces/00505686-662F-0ed3-0000-004294969274/evaluateoperation/00505686-662F-0ed3-0000-**********"
  },
  "type": "ChassisInterface",
  "id": "00505686-662F-0ed3-0000-**********"
}
4. 인터페이스가 브레이크아웃을 지원하고 준비 상태가 "READY"이면 브레이크아웃 인터페이스 끝점을 사용하여 인터페이스를 중단합니다.
POST /api/fmc_config/v1/domain/{domainUUID}/chassis/fmcmanagedchassis/{containerUUID}/operational/breakoutinterfaces
요청:
{
  "targetInterfaces": [
    {
      "id": "***************ed3-0000-004294969276",
      "metadata": {
        "type": "PhysicalInterface"
      }
    }
  ],
  "type": "BreakoutInterface"
}
응답:
{
  "id": "4294969716",
  "type": "TaskStatus",
  "links": {
    "self": "https://u32c01p06-vrouter.cisco.com:22542/api/fmc_config/v1/domain/e276abec-e0f2-11e3-8169-**********/job/taskstatuses/4294969716"
  },
  "taskType": "DEVICE_DEPLOYMENT",
  "message": "Deployment status for ************************************: SUCCEEDED",
  "status": "Interface notification received"
}
5. 중단 응답에 있는 태스크 ID를 사용하여 태스크 완료를 추적합니다. Task Status를 "Interface Notification received"로 설정합니다.
/api/fmc_config/v1/domain/{domainUUID}/job/taskstatuses/{objectId} 가져오기
{
  "metadata": {
    "task": {
      "id": "4294969699",
      "links": {
        "self": "https://u32c01p06-vrouter.cisco.com:22542/api/fmc_config/v1/domain/e276abec-e0f2-11e3-8169-**********/job/taskstatuses/4294969699"
      }
    }
  },
  "targetInterfaces": [
    {
      "id": "00505686-662F-0ed3-0000-**********",
      "type": "PhysicalInterface"
    }
  ],
  "type": "BreakoutInterface"
}

{
  "id": "4294969716",
  "type": "TaskStatus",
  "links": {
    "self": "https://u32c01p06-vrouter.cisco.com:22542/api/fmc_config/v1/domain/e276abec-e0f2-11e3-8169-**********/job/taskstatuses/4294969716"
  },
  "taskType": "DEVICE_DEPLOYMENT",
  "message": "Deployment status for ************************************: SUCCEEDED",
  "status": "Interface notification received"
}
6. chassinterfaceevents 끝점을 사용하여 인터페이스 변경 내용을 가져옵니다.
/api/fmc_config/v1/domain/{domainUUID}/chassis/ fmcmanagedchassis/{containerUUID}/chassinterfaceevents 가져오기
샘플 응답:
[
  {
    "change": "Interface is deleted",
    "type": "PhysicalInterface",
    "state": "DISASSOCIATED",
    "name": "Ethernet2/3"
  },
  {
    "change": "Interface is associated",
    "type": "PhysicalInterface",
    "state": "ASSOCIATED",
    "name": "Ethernet2/3/2"
  },
  {
    "change": "Interface is associated",
    "type": "PhysicalInterface",
    "state": "ASSOCIATED",
    "name": "Ethernet2/3/3"
  },
  {
    "change": "Interface is associated",
    "type": "PhysicalInterface",
    "state": "ASSOCIATED",
    "name": "Ethernet2/3/4"
  }
]
7. 인터페이스 알림이 수신되지 않으면 chassinterfaceevents 끝점을 사용하여 장치를 동기화하고 보류 중인 변경 내용이 있는지 확인합니다.
POST /api/fmc_config/v1/domain/{domainUUID}/devices/devicerecords/{containerUUID}/ chassinterfaceevents
요청:
{
  "action": "SYNC_WITH_DEVICE"
}
응답:
{
  "action": "SYNC_WITH_DEVICE",
  "hasPendingChanges": true
}
8. 알림을 받으면 chassinterfaceevents 끝점을 사용하여 변경 내용을 수락합니다.
POST /api/fmc_config/v1/domain/{domainUUID}/devices/devicerecords/{containerUUID}/ chassinterfaceevents
요청:
{
   "action":"ACCEPT_CHANGES"
}
9. 모든 섀시 인터페이스를 가져오고 인터페이스 끝점을 사용하여 스플릿(깨진) 인터페이스를 찾습니다.
/api/fmc_config/v1/domain/{domainUUID}/chassis/fmcmanagedchassis/{containerUUID}/interfaces 가져오기
하나의 40G 인터페이스(예: eth2/2)는 4x10G 인터페이스(eth2/2/1, eth2/2/2, eth2/2/3 및 eth2/2/4)로 분할됩니다.
인터페이스 조인을 위한 REST 흐름
1. 인터페이스/물리적 인터페이스 끝점을 사용하여 인터페이스가 끊어졌는지 확인합니다.
"isSplitInterface"가 true이고 mediaType이 SFP인 경우에만 조인 작업이 가능합니다.
/api/fmc_config/v1/domain/{domainUUID}/chassis/fmcmanagedchassis/{containerUUID}/interfaces 가져오기
{
  "metadata": {
    "supportedSpeed": "TEN_GBPS,DETECT_SFP",
    "mediaType": "sfp",
    "sfpType": "none",
    "isBreakoutCapable": false,
    "breakoutFactor": "4",
    "isSplitInterface": true,
    "timestamp": 1692541554935,
    "domain": {
      "name": "Global",
      "id": "e276abec-e0f2-11e3-8169-**********",
      "type": "Domain"
    }
  },
  "type": "PhysicalInterface",
  "name": "Ethernet2/3/4",
  "portType": "DATA",
  "adminState": "DISABLED",
  "LLDP": {
    "transmit": false,
    "receive": false
  },
  "hardware": {
    "flowControlSend": "OFF",
    "speed": "DETECT_SFP",
    "duplex": "FULL",
    "fecMode": "AUTO",
    "autoNegState": true
  },
  "id": "00505686-662F-0ed3-0001-**********"
}
2. 4개의 스플릿 인터페이스 중 하나에서 평가작업 끝점을 사용하여 조인 작업의 실행 가능성을 평가합니다.
/api/fmc_config/v1/domain/{domainUUID}/chassis/fmcmanagedchassis/{containerUUID}/ch assinterfaces/{interfaceUUID}/evaluateoperation 가져오기
- 응답에 경고/오류가 없는 경우 사용자는 Join 작업을 수행할 수 있습니다.
{
  "operationType": "JOIN",
  "readinessState": "READY",
  "links": {
    "self": "https://u32c01p06-vrouter.cisco.com:22542/api/fmc_config/v1/domain/e276abec-e0f2-11e3-8169-**********/chassis/fmcmanagedchassis/19d967e6-ef81-4f2e-b311-**********/chassisinterfaces/00505686-662F-0ed3-0001-**********/evaluateoperation/00505686-662F-0ed3-0001-**********"
  },
  "type": "ChassisInterface",
  "id": "00505686-662F-0ed*******************"
}- 응답에 오류가 있는 경우 사용자는 조인 작업을 수행할 수 없습니다.
{
  "operationType": "JOIN",
  "interfaceUsages": [
    {
      "conflictType": "Interface used in EtherChannel Configuration",
      "severity": "ERROR",
      "description": "Interface (Ethernet2/3/4) referred to in Ether Channel Interface (Port-channel32) configurations will be impacted due to the JOIN operation."
    }
  ],
  "readinessState": "NOT_READY",
  "links": {
    "self": "https://u32c01p06-vrouter.cisco.com:22542/api/fmc_config/v1/domain/e276abec-e0f2-11e3-8169-*********/chassis/fmcmanagedchassis/19d967e6-ef81-4f2e-b311-********/chassisinterfaces/00505686-662F-0ed3-0001-692539698200/evaluateoperation/00505686-662F-0ed3-0001-***********"
  },
  "type": "ChassisInterface",
  "id": "00505686-662F-0ed*******************"
}
3. 인터페이스가 손상되었고 준비 상태가 "READY"인 경우 joininterfaces 엔드포인트를 사용하여 인터페이스에 조인합니다. Interface_uuid는 4개의 중단된 인터페이스 중 하나의 id일 수 있습니다.
POST/api/fmc_config/v1/domain/{domainUUID}/chassis/fmcmanagedchassis/{containerUUID}/operational/joininterfaces
요청:
{
  "targetInterfaces": [
    {
      "id": "***************ed3-0001-692539698200",
      "type": "PhysicalInterface"
    }
  ],
  "type": "JoinInterface"
}
응답:
{
  "metadata": {
    "task": {
      "id": "4294970217",
      "links": {
        "self": "/api/fmc_config/v1/domain/e27"***************-8169-6d9ed49b625f/job/taskstatuses/4294970217"
      }
    }
  },
  "targetInterfaces": [
    {
      "id": "***************ed3-0001-692539698200",
      "type": "PhysicalInterface"
    },
    {
      "id": "***************ed3-0001-692539698201",
      "type": "PhysicalInterface"
    },
    {
      "id": "***************ed3-0001-692539698202",
      "type": "PhysicalInterface"
    },
    {
      "id": "***************ed3-0001-692539698203",
      "type": "PhysicalInterface"
    }
  ],
  "type": "JoinInterface"
}
4. 가입 응답에서 태스크 ID를 사용하여 태스크 완료를 추적합니다. Task Status를 "Interface Notification received"로 설정합니다.
/api/fmc_config/v1/domain/{domainUUID}/job/taskstatuses/{objectId} 가져오기
응답:
{
  "id": "4294970237",
  "type": "TaskStatus",
  "links": {
    "self": "https://u32c01p06-vrouter.cisco.com:22542/api/fmc_config/v1/domain/e276abec-e0f2-11e3-8169-6d9ed49b625f/job/taskstatuses/4294970237"
  },
  "taskType": "SSP_EPM_OIR",
  "message": "Deployment status for 19d967e6-xxxx-xxxx-xxxx-85ff6cef6d3f: SUCCEEDED",
  "status": "Interface notification received"
}
5. chassinterfaceevents 끝점을 사용하여 인터페이스 변경 내용을 가져옵니다.
/api/fmc_config/v1/domain/{domainUUID}/devices/devicerecords/{containerUUID}/chassinterfaceevents 가져오기
응답:
[
  {
    "change": "Interface is associated",
    "type": "PhysicalInterface",
    "state": "ASSOCIATED",
    "name": "Ethernet2/3"
  },
  {
    "change": "Interface is deleted",
    "type": "PhysicalInterface",
    "state": "DISASSOCIATED",
    "name": "Ethernet2/3/1"
  },
  {
    "change": "Interface is deleted",
    "type": "PhysicalInterface",
    "state": "DISASSOCIATED",
    "name": "Ethernet2/3/2"
  },
  {
    "change": "Interface is deleted",
    "type": "PhysicalInterface",
    "state": "DISASSOCIATED",
    "name": "Ethernet2/3/3"
  },
  {
    "change": "Interface is deleted",
    "type": "PhysicalInterface",
    "state": "DISASSOCIATED",
    "name": "Ethernet2/3/4"
  }
]
6. 인터페이스 알림이 수신되지 않으면 chassinterfaceevents 끝점을 사용하여 장치를 동기화하고 보류 중인 변경 내용이 있는지 확인합니다.
POST /api/fmc_config/v1/domain/{domainUUID}/devicerecords/{containerUUID}/chassinterfaceevents
요청:
{
   "action":"SYNC_WITH_DEVICE"
}
응답:
{
   "action":"SYNC_WITH_DEVICE",
   "hasPendingChanges":true
}
7. 알림을 수신하면 chassinterfaceevents 끝점을 사용하여 변경 내용을 수락합니다.
POST /api/fmc_config/v1/domain/{domainUUID}/devices/devicerecords/{containerUUID}/chassinterfac 이벤트
요청:
{
   "action":"ACCEPT_CHANGES"
}
8. 모든 섀시 인터페이스를 가져오고 인터페이스 끝점을 사용하여 연결된 인터페이스와 다른 인터페이스를 찾습니다.
/api/fmc_config/v1/domain/{domainUUID}/chassis/fmcmanagedchassis/{containerUUID}/interfaces 가져오기
Say Join이 eth2/2/1과 같은 10G 인터페이스에서 시작된 경우 응답에서 40G 인터페이스 eth2/2를 사용할 수 있습니다.
디바이스 REST API 동기화
네트워크 모듈 및 인터페이스의 동기화를 지원하기 위해 이러한 URL이 도입되었습니다.
POST:
/api/fmc_config/v1/domain/{domainUUID}/chassis/fmcmanagedchassis/{containerUUID}/chassisinterface 이벤트
페이로드 포함
{"작업": "SYNC_WITH_DEVICE"} - > 동기화 트리거
{"작업": "ACCEPT_CHANGES"} - > 변경 내용 수락
다운로드:
/api/fmc_config/v1/domain/{domainUUID}/chassis/fmcmanagedchassis/{containerUUID}/chassisinterface 이벤트
생성된 변경 이벤트를 나열합니다.
문제 해결/진단
FXOS 로깅
등록이 실패할 경우 이러한 FXOS CLI를 사용하여 sftunnel, sfipproxy 프로세스가 작동 중인지 확인할 수 있습니다.
firepower# connect local-mgmt
firepower-4215(local-mgmt)# show processes | include sftunnel grep: (standard input): binary file matches
3323 root 20 0 80328 2024 1544 S 0.0 0.0 0:11.53 /opt/cisco/sftunnel/sfipproxy -d –f /etc/sf/sfipproxy.conf
22066 root 20 0 376880 7140 5944 S 0.0 0.0 0:41.18 /opt/cisco/sftunnel/sftunnel -d -f /etc/sf/sftunnel.conf
CLI에 터미널 콘솔을 사용하는 경우 다음 CLI를 사용하여 터미널 너비를 적절한 값으로 설정하여 show 프로세스의 출력이 잘리지 않는지 확인합니다.
firepower-4215(local-mgmt)# terminal width 100 SFTunnel 프로세스가 실행 중이지만 등록이 실패하는 경우 이러한 명령을 사용하여 잠재적 실패 원인을 찾을 수 있습니다.
/opt/cisco/platform/logs/sfmessages의 syslog 메시지를 보기 위해 connect local-mgmt에서 FXOS에 새 CLI를 도입했습니다.
firepower# connect local-mgmt
firepower(local-mgmt)# tail-mgmt-log sfmessages

Dec 9 18:31:17 firepower Ipc [30483]: add ep: 1,0x5613aa0e2fe8 total = 1
Dec 9 18:31:17 firepower Ipc [30483]: add ep: 1,0x5613aa0ec528 total = 2
Dec 9 18:31:17 firepower Ipc [30483]: add ep: 1,0x5613aa0f5ea8 total = 3
Dec 9 18:31:18 firepower SF-IMS[12621]: [12625] sftunneld:SYNC_PROC [INFO] Change in directory /var/sf/sync detected (0 vs 1670610348)
FMC 로깅
- 디바이스 등록이 실패하면 이 위치에서 usmsharedsvcs.log 및 vmsharedsvcs.log를 찾은 다음 "CHASSIS DISCOVERY" 또는 "NATIVE_TO_MULTI_INSTANCE" 문자열을 찾아 잠재적 실패 원인을 찾습니다.
- 또한 SFTunnel 문제에 대해서는 /var/log/action_queue.log 및 /var/sf/messages를 참조하십시오.
- /var/opt/CSCOpx/MDC/log/operation/usmsharedsvcs.log /var/opt/CSCOpx/MDC/log/operation/vmssharedsvcs.log
- 섀시 자동 등록이 실패할 경우 usmsharedsvcs.log 및 vmsharedsvcs.log를 찾은 다음 "CHASSIS DISCOVERY" 및 "NATIVE_TO_MULTI_INSTANCE" 문자열을 찾아 잠재적 실패 원인을 찾습니다.
- 인스턴스 자동 등록이 실패할 경우 usmsharedsvcs.log 및 vmsharedsvcs.log를 찾은 다음 "MI_FTD_INSTANCE_AUTO_REGISTRATION" 문자열을 찾아 잠재적 실패 원인을 찾습니다.
- 디바이스에서 구축 오류가 발생한 경우 Deploy(구축) -> Deployment History(구축 기록) -> Click on the failed deployment(실패한 구축) -> Open Transcript(기록 열기)로 이동합니다. 이 파일에는 실패 사유가 포함되어 있습니다.
섀시 문제 해결
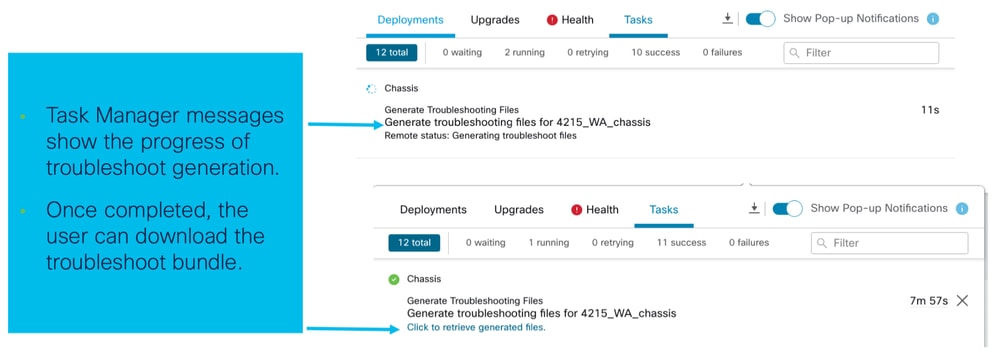
FMC는 디바이스 관리 페이지에서 FPRM(Generation of Chassis Troubleshoot)을 지원합니다.
- FTD 장치와 마찬가지로 섀시 장치에 사용할 수 있는 문제 해결 옵션이 있습니다. 이 옵션은 섀시 문제 해결을 생성하고 사용자가 FMC에서 문제 해결 번들을 다운로드할 수 있도록 합니다.
- 섀시에서 "show tech-support form" 번들을 수집합니다.

섀시 문제 해결 옵션 및 생성:

섀시 문제 해결 진행 및 다운로드:
트러블슈팅 연습의 샘플 문제
FMC에서 섀시 장애 자동 등록
문제/장애: FMC에서 섀시 자동 등록에 실패했습니다.
예상 결과:
- FMC에서 변환이 시작되면 FMC에 등록이 취소되고 자동 등록됩니다.
실제 결과:
- 섀시 자동 등록 실패
문제 해결
1. 수표 변환:
- FMC에서 변환이 트리거되었는지 확인합니다.
- 디바이스에 로그인하고 디바이스가 컨테이너 모드로 변환되었는지 확인합니다.
- 명령을 실행하여 디바이스가 변환되었는지 확인합니다.
firepower# scope sys
firepower /system # show
Systems:
Name Mode Deploy Mode System IP Address System IPv6 Address
---------- ----------- ----------- ----------------- -------------------
firepower Stand Alone Container 192.168.xx.xx ::
2. 장치 관리자 확인:
- 장치 관리자가 올바르게 설정되었는지 확인합니다.
firepower# show device-manager
    Device manager:
        Name: manager
        Hostname: 10.10.xx.xx
        NAT id: 3ab4bb1a-d723-11ee-a694-89055xxxxxxx
        Registration Status: Completed
        Error Msg:
- 확인할 로그:
3.1. /var/opt/CSCOpx/MDC/log/operation/vmssharedsvcs.log 및 /var/opt/CSCOpx/MDC/log/operation/usmsharedsvcs.log으로 이동합니다.
3.2. 파일에서 "NATIVE_TO_MI_CONVERSION" 및 "CHASSIS DISCOVERY" 키워드를 검색하여 실패 이유를 찾습니다.
FMC에서 인스턴스 자동 등록
문제/장애: FMC에서 인스턴스 자동 등록에 실패했습니다.
예상 결과:
- 인스턴스가 FMC에서 프로비저닝되면 FMC에 자동으로 등록됩니다.
실제 결과:
- 인스턴스 자동 등록 실패
문제 해결
- 인스턴스 생성 후 배포가 트리거되었는지 확인합니다.
- 구축이 완료되지 않은 경우 디바이스에 변경 사항을 구축해야 합니다.
- 구축에 장애가 있는 경우 Deployment History(구축 기록) -> Click on Transcript(트랜스크립트)를 진행합니다. 실패 이유를 확인하고, 수정한 후 배포를 다시 시도하십시오.
- 인스턴스가 설치되어 있고 작동 상태가 온라인인지 확인합니다. 섀시의 요약 페이지를 사용하여 인스턴스 프로비저닝의 상태를 확인할 수 있습니다.
- 다음 명령을 사용하여 SFTunnel이 인스턴스 FTD에서 작동 및 실행 중인지 확인합니다.
ps -ef | grep -i "sftunnel”- SFTunnel이 실행되고 있지 않으면 restart 명령을 실행해 보십시오.
pmtool restartById sftunnel- /var/opt/CSCOpx/MDC/log/operation/vmssharedsvcs.log 및 /var/opt/CSCOpx/MDC/log/operation/usmsharedsvcs.log으로 이동합니다.
- 파일에서 "MI_FTD_INSTANCE_AUTO_REGISTRATION" 키워드를 검색하여 실패 원인을 찾습니다.
FMC의 기본 디바이스 등록
문제/장애: 장치를 다시 기본 모드로 전환한 후 FMC에서 기본 장치 등록에 실패했습니다.
- 사용자가 섀시(MI 모드)를 다시 기본 모드로 변환하지만 FMC에서 섀시를 삭제하지 않는 경우 디바이스는 FMC에서 오프라인 상태가 됩니다.
- 사용자가 이 네이티브 디바이스를 FMC에 다시 등록하려고 하면 등록이 실패합니다.
문제 해결
- 디바이스를 다시 기본 모드로 변환하기 전에 FMC에서 섀시 항목이 삭제되었는지 확인합니다.
- 항목이 삭제되면 네이티브 디바이스를 FMC에 다시 등록해 보십시오.
유용한 참조
- 공유 인터페이스에 대한 정보:
- Cisco 지원 사이트의 3100 Multi-Instance 페이지:
인터페이스 옵션 및 고가용성
인터페이스 옵션
독립형 또는 고가용성
이중 관리 인터페이스 활용
- 기본 모드의 4200과 마찬가지로, 두 물리적 관리 포트는 관리 트래픽에 대한 인터페이스 이중화를 지원하거나 관리 및 이벤트에 대한 별도의 인터페이스를 지원하기 위해 제공됩니다.
- 9300 및 4100 디바이스와 4200 Series에는 이중 관리 인터페이스가 있습니다. 두 번째 관리 인터페이스인 Management 1/2는 이벤트에 사용하기 위한 것입니다.
- 멀티 인스턴스("컨테이너"라고도 함) 모드에서는 각 인스턴스의 Threat Defense CLI에서 이 인터페이스를 구성할 수 있습니다. 각 인스턴스에 대해 동일한 네트워크의 IP 주소를 할당합니다.
- 컨테이너 모드에서는 각 FTD 인스턴스에 Management 1/1 및 Management 1/2 인터페이스가 모두 자동으로 할당됩니다.
- 두 번째 관리 인터페이스는 기본적으로 비활성화되어 있습니다.
- FMC를 사용하여 Management1/2를 구성할 수 없습니다. FTD CLISH(9300/4100)를 통해 구성해야 합니다. 반대로, FXOS CLI에서 수행됩니다.) 원하는 IP 주소 유형, 주소, 서브넷 및 고정 경로와 함께 이 명령을 사용합니다.
configure network ipv4 manual 192.168.0.xx 255.255.255.0 192.168.0.1 management1 개정 이력
| 개정 | 게시 날짜 | 의견 |
|---|---|---|
1.0 |
29-Oct-2024
|
최초 릴리스 |
 피드백
피드백