Microsoft Intune을 사용하여 Cisco Secure Endpoint Secure Client 배포

목차
소개
이 문서에서는 Microsoft Intune을 사용하여 Cisco Secure Endpoint 또는 Secure Client를 배포하는 프로세스에 대해 간략하게 설명합니다.
배경
이 문서에서는 Secure Endpoint/Secure Client 설치 관리자에서 Microsoft Intune 지원 앱을 만든 다음 Microsoft Intune 관리 센터를 사용하여 배포하는 데 사용하는 단계를 자세히 설명합니다. 특히, 이 프로세스에는 Intune Win32 콘텐츠 준비 도구를 통해 Cisco Secure Endpoint 설치 관리자를 Win32 응용 프로그램으로 패키징하는 작업과 Intune을 통해 앱을 구성 및 배포하는 작업이 포함됩니다.
설정
보안 엔드포인트 구축
1단계. Cisco Secure Endpoint Installer 다운로드
-
지역에 따라 해당 보안 엔드포인트 포털에 로그인합니다.
2. 관리 탭으로 이동하여 커넥터 다운로드를 선택합니다.
3. 커넥터가 등록할 보안 엔드포인트 그룹을 선택합니다.
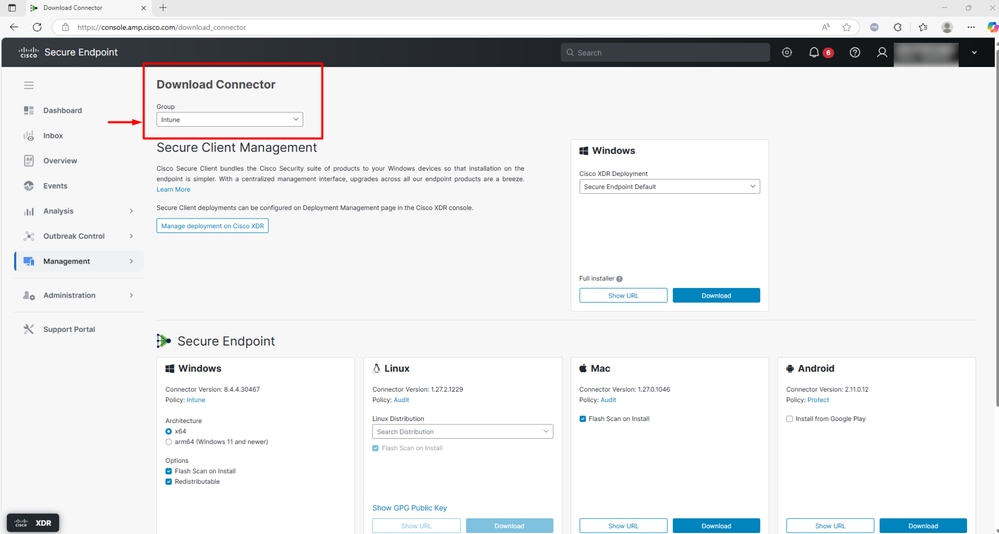
4. download(다운로드)를 선택하면 EXE 설치 프로그램이 로컬로 다운로드됩니다.
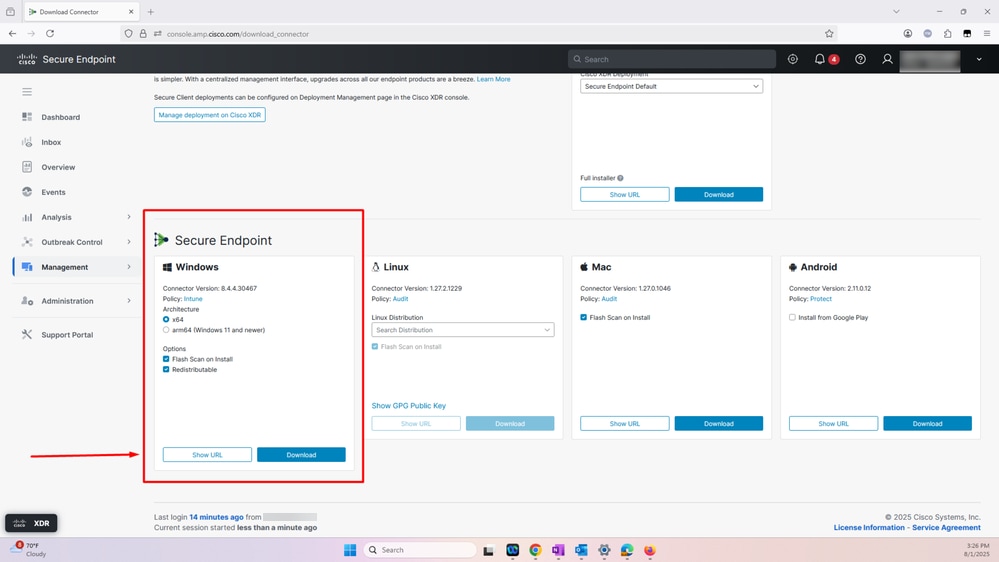
2단계. Win32 콘텐츠 준비 도구를 사용하여 Intune 파일 준비
Win32 콘텐츠 준비 도구는 IT 관리자가 Microsoft Intune을 통해 배포할 Win32 응용 프로그램(기존 Windows 데스크톱 앱용)을 준비하는 데 도움이 되도록 Microsoft Intune에서 제공하는 유틸리티입니다. 이 도구는 Win32 응용 프로그램 설치 관리자(예: .exe, .msi 및 관련 파일)를 Intune을 통해 이러한 앱을 배포하는 데 필요한 .intunewin 파일 형식으로 변환합니다.
Intune 파일을 준비하려면 다음을 수행합니다.
- Github에서 Win32 Content Prep Tool을 다운로드합니다.
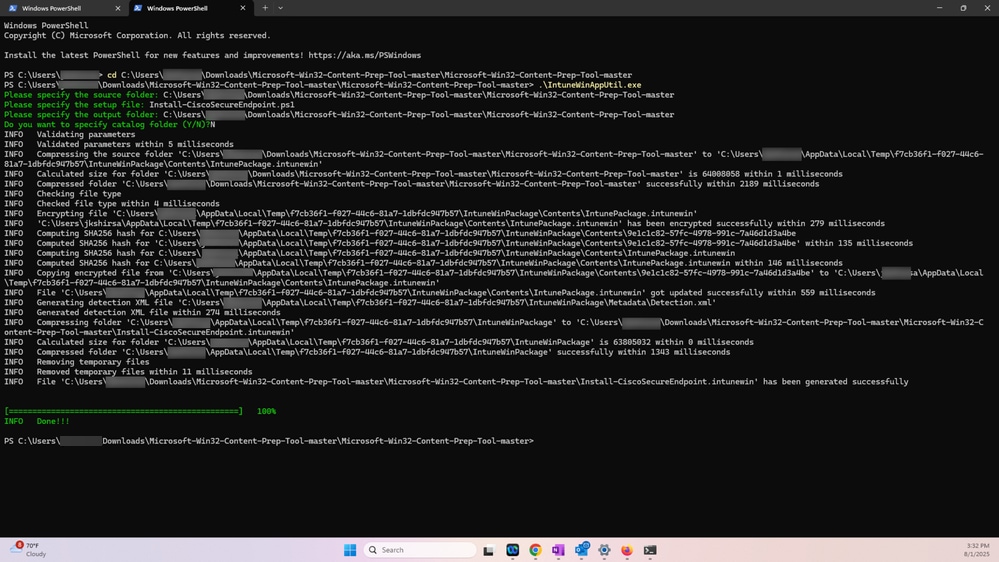
2. IntuneWinAppUtil.exe를 실행합니다.
3. 다음 단계에서는 1단계에서 다운로드한 Cisco Secure Endpoint 실행 파일과 설치 powershell 스크립트(Install-CiscoSecureEndpoint.ps1)가 포함된 폴더로 디렉터리를 변경합니다.
4. 설치 파일의 스크립트 파일 이름인 Install-CiscoSecureEndpoint.ps1을 지정합니다.
5. 다음 단계에서 Intunewin 파일을 생성해야 할 폴더를 지정합니다.
6. 카탈로그를 지정하라는 프롬프트가 표시되면 N을 입력합니다.
7. Intunewin 파일은 스크린샷과 같이 생성됩니다.
3단계. Secure Endpoint IntuneWin 파일을 Microsoft Intune 관리 센터에 업로드합니다.
- Microsoft Intune Admin Center에 로그인합니다.
2. Microsoft Intune 관리 센터에서 Windows 앱으로 이동하여 앱 유형 - Win32를 선택하고 스크린샷에 표시된 다음 두 가지 작업을 선택합니다.
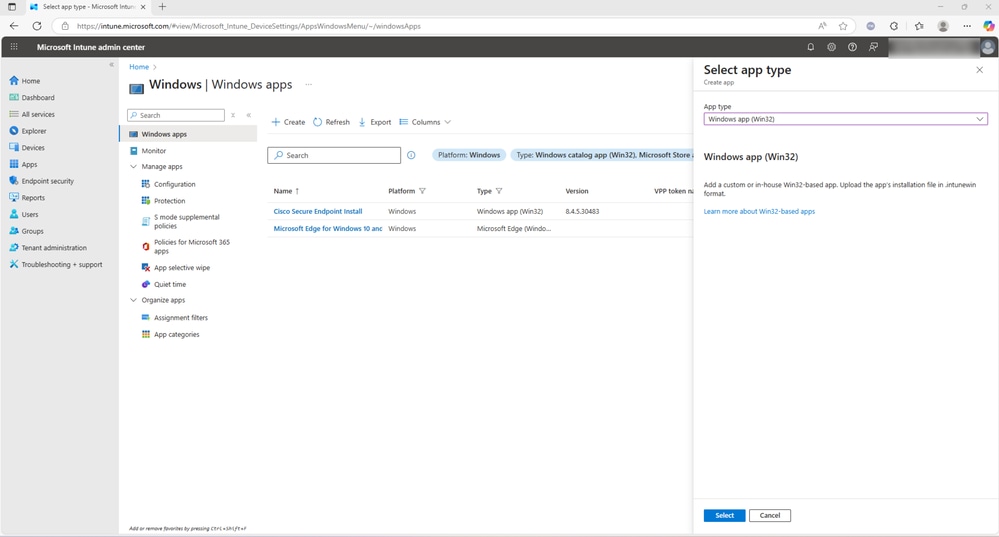
3. 다음 단계에서 2단계에서 생성한 Secure Endpoint Intunewin 파일을 업로드하고 확인을 선택합니다.
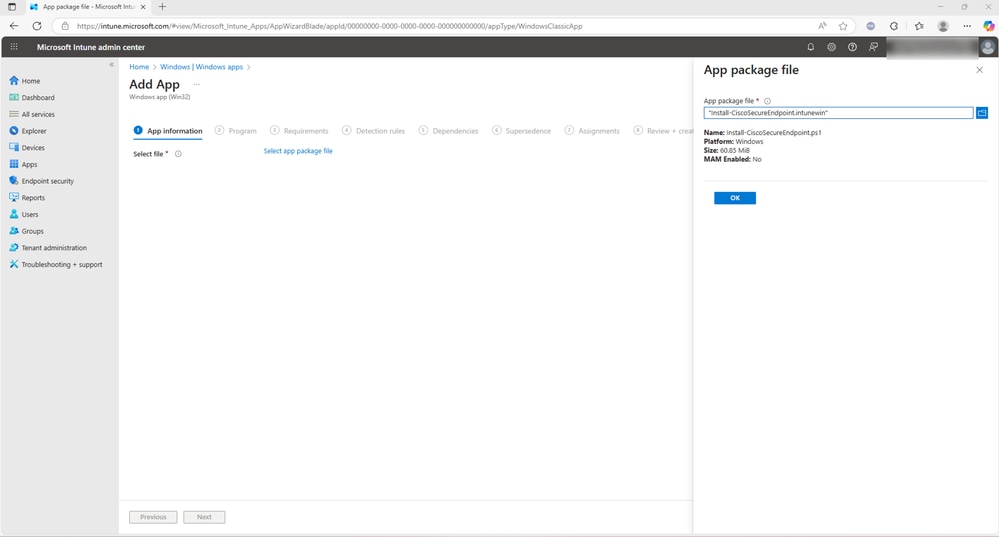
4. 확인을 선택한 후 스크린샷에 표시된 정보를 입력합니다. 각 탭에서 선택 필드를 비워 두고 다음을 클릭할 수 있습니다.
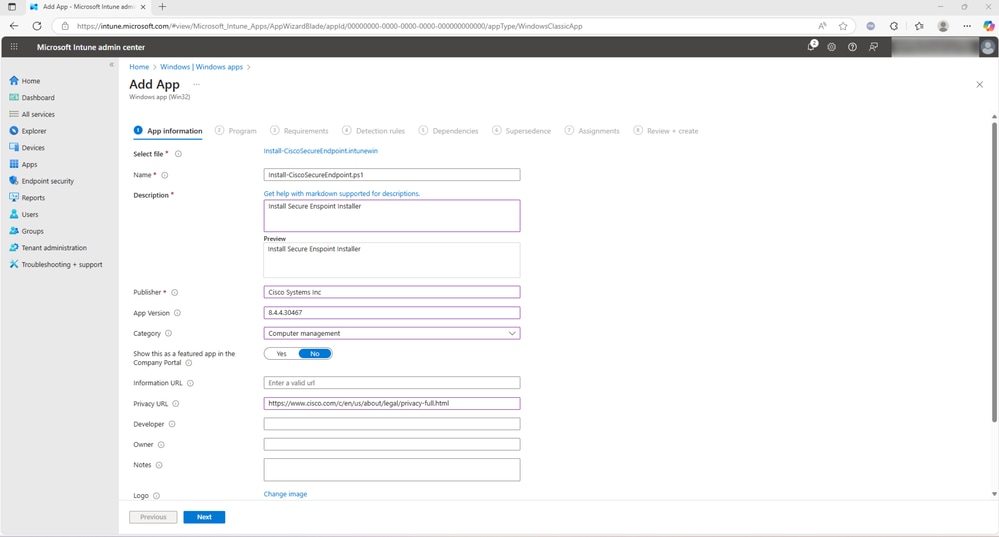
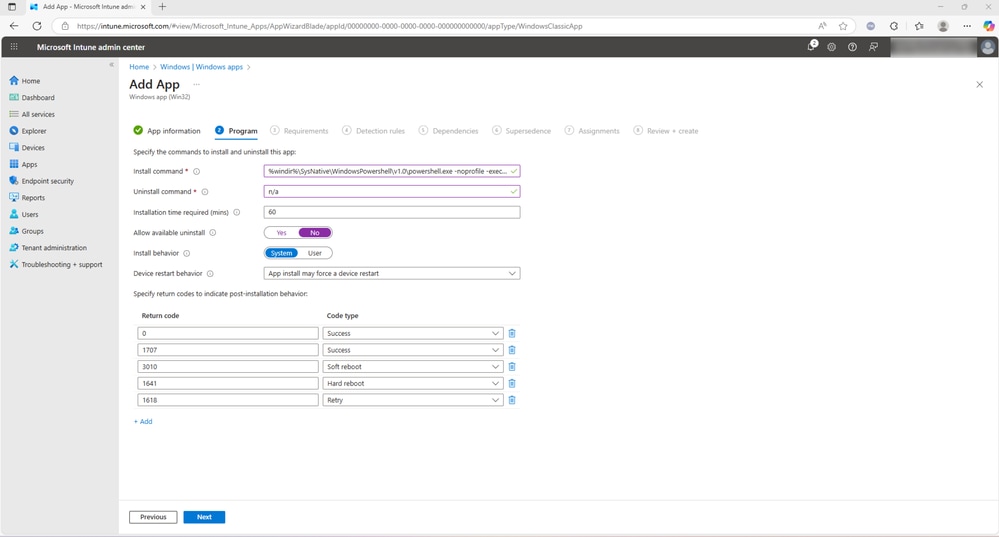
5. Install 명령을 실행합니다.
%windir%\SysNative\WindowsPowershell\v1.0\powershell.exe -noprofile -executionpolicy Bypass -file .\Install-CiscoSecureEndpoint.ps1
참고: 제시된 코드는 예이며 모든 코드를 이 설치 관리자에 대한 설치 명령으로 사용할 수 있습니다.
6. 제거를 해당 없음으로 입력하고 설치 시간을 60으로 입력합니다(선택 사항). Allow available uninstall(사용 가능한 제거 허용)을 No(아니요)로 설정하고 Install behavior as System(시스템으로 설치 동작)을 선택합니다. 다음을 선택하기 전에 추가 세부 사항을 추가합니다.
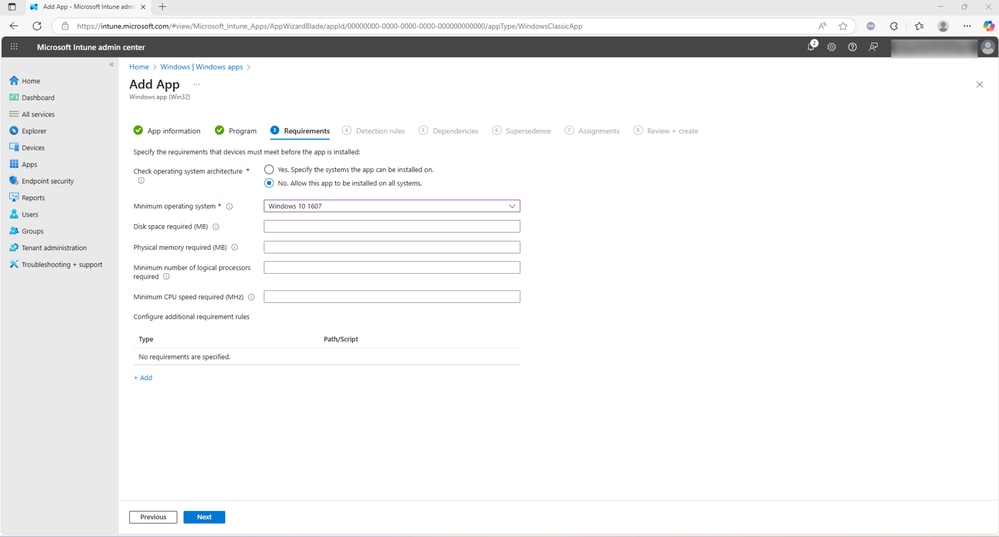
7. 요구 사항 탭에서 아니오를 선택합니다. 이 앱을 모든 시스템에 설치할 수 있도록 허용하고 최소 운영 체제를 선택합니다. 원하는 경우 선택 필드를 입력하고 다음을 선택합니다.
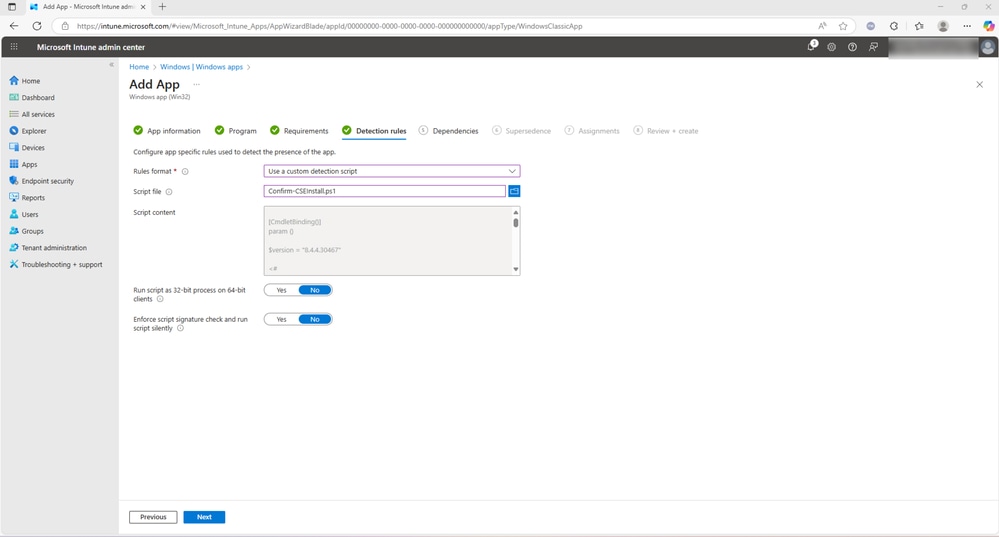
8. Detection Rules(탐지 규칙) 탭에서 rules format(규칙 형식) 드롭다운 메뉴는 두 가지 옵션, Manually configure detection rules(탐지 규칙 수동 구성) 및 Use a custom detection script(사용자 지정 탐지 스크립트 사용)를 제공합니다. 구축 요구 사항에 따라 두 옵션 중 하나를 선택할 수 있습니다.
9. 수동으로 탐지 규칙 구성을 선택할 때 MSI, 파일 또는 레지스트리와 같은 규칙 유형을 정의하여 응용 프로그램의 존재를 탐지할 수 있습니다. 이 문서에서는 대체 옵션인 사용자 지정 탐지 스크립트 사용이 선택되었습니다.
10. Confirm-CSEInstall.ps1이라는 PowerShell 스크립트는 Cisco Secure Endpoint의 성공적인 설치를 확인하는 데 사용됩니다(이 문서의 하단에 나열됨).
11. 계속하려면 다음을 선택합니다.
참고: 사용자 환경 및 탐지 기준에 맞게 특별히 이 구축 프로세스에 대한 맞춤형 탐지 스크립트를 생성할 수 있습니다.
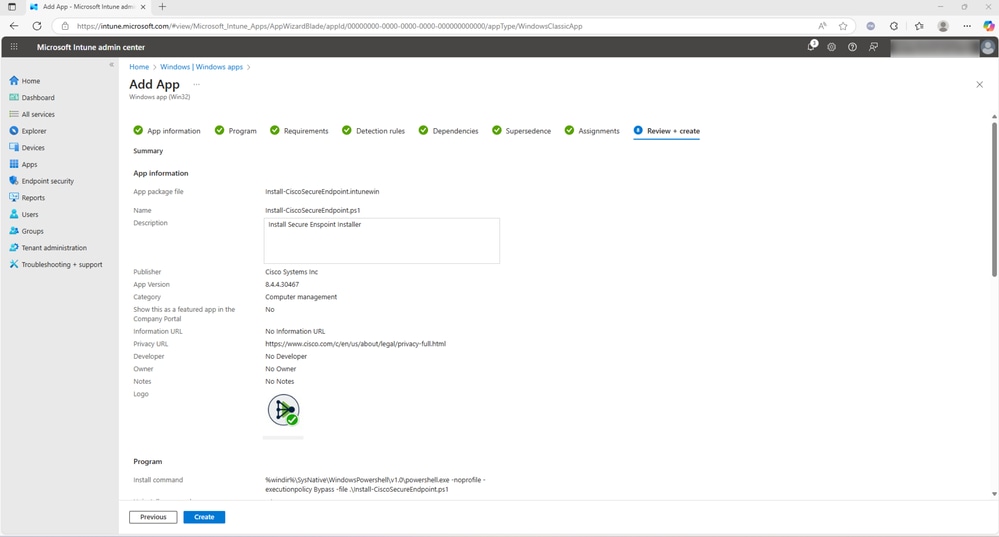
12. (다음 몇 개의 탭은 선택 사항) 종속성을 구성할 필요가 없습니다. 응용 프로그램을 필수 그룹에 지정하고 검토 + 생성을 선택합니다.
보안 클라이언트 구축
1단계. Cisco Secure Client 전체 구축 다운로드
- 지역에 따라 XDR 또는 Secure Client Cloud Management 콘솔에 로그인합니다.
2. 새 배포를 만들고 배포 유형에 따라 전체 설치 프로그램 또는 네트워크 설치 프로그램을 선택합니다.
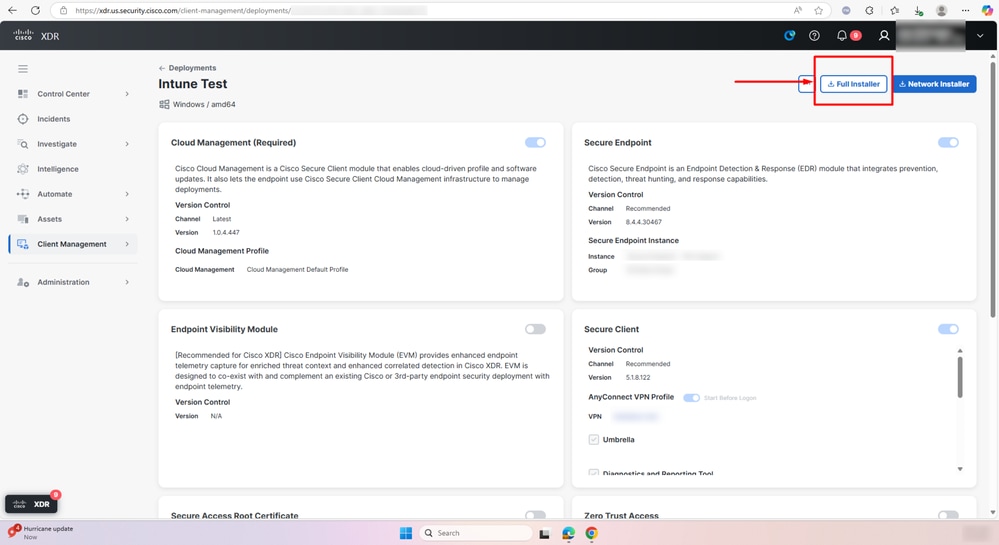
3. csc-deploy-full-Intune Test.exe가 스크린샷과 같이 다운로드됩니다.
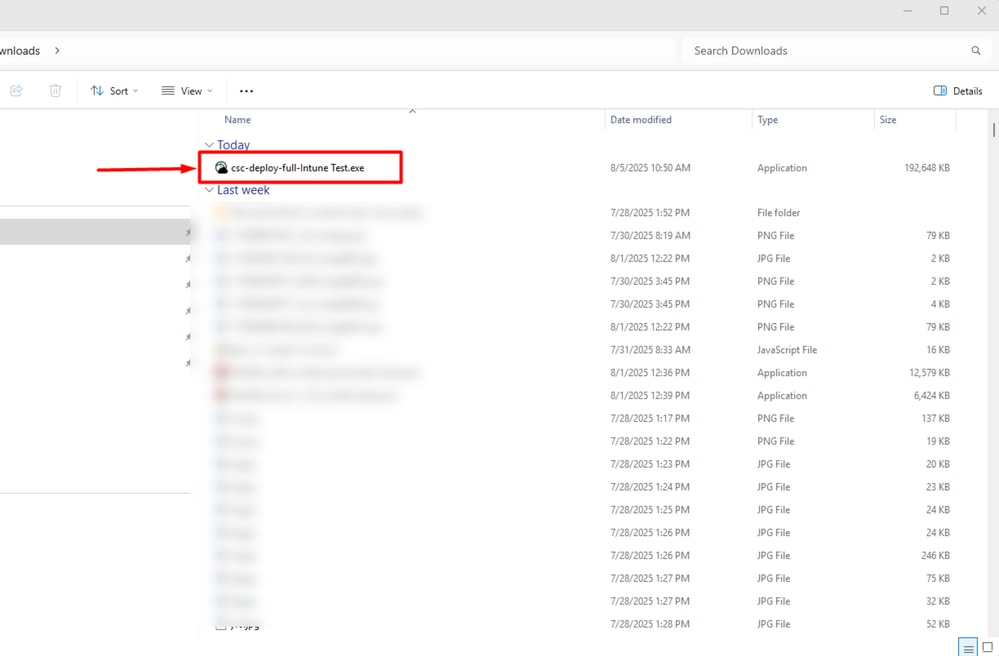
2단계. 2단계와 동일한 절차로 Intune 파일 준비: csc-deploy-full-Intune Test.intunewin 파일을 만듭니다.
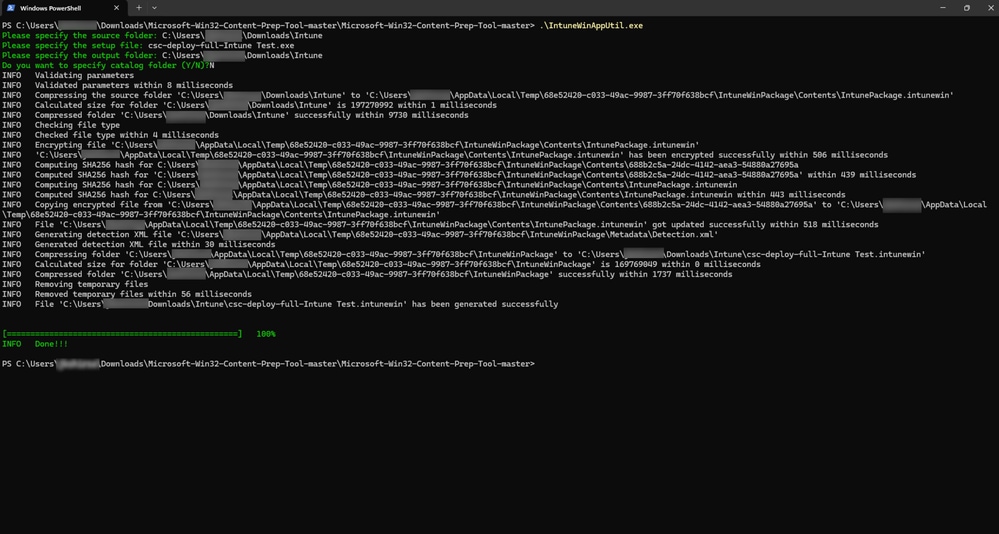
- 이전 스크린샷 단계에서는 csc-deploy-full-Intune Test.intunewin 파일을 생성합니다.
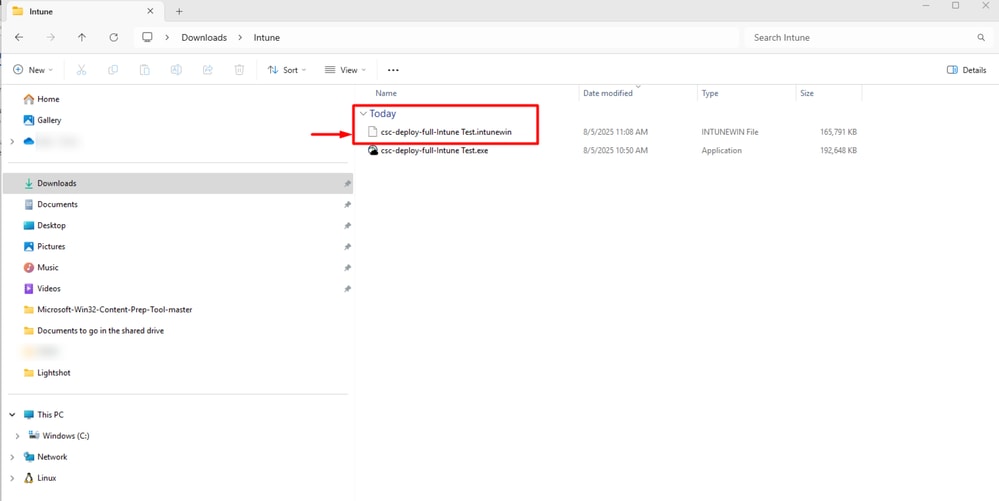
3단계. csc-deploy-full-intune Test.intune 파일을 1단계에서 Microsoft Intune Admin Center로 업로드합니다.
이렇게 하면 Intune을 사용하여 Cisco Secure Endpoint를 구축하는 프로세스가 완료됩니다.

주의: 이 설치 스크립트는 Intune Converter를 사용하는 설치 프로그램 및 이 가이드의 3단계에서 언급한 명령줄에 참조된 PS 스크립트의 정확한 이름과 결합되어 Intune의 다음 위치에 배치되어야 합니다.
Add App(앱 추가) > Program(프로그램) > Install Command(설치 명령).
참고: 다음 섹션의 스크립트는 이 가이드를 작성하기 위해 랩 환경에서 사용되는 데모용 작업 샘플입니다. 적절한 테스트 후 있는 그대로 사용하거나 원하는 대로 수정할 수 있습니다.
CiscoSecureEndpoint.ps1 설치 스크립트
[CmdletBinding()]
param ()

$cse_exe =
$version =

if ($PSCommandPath -eq $null) {
    function GetPSCommandPath() {
        return $MyInvocation.PSCommandPath;
    }
    $PSCommandPath = GetPSCommandPath
}

$script = [pscustomobject]@{
    "Path" = Split-Path $PSCommandPath -Parent
    "Name" = Split-Path $PSCommandPath -Leaf
}

Set-Location -Path $script.Path

$cse_installer = [IO.Path]::Combine($script.Path, $cse_exe)
$csc_installer_args = "/R /S"

<#
    Cannot use -wait for 'Cisco Secure Endpoint' and therefore cannot get the exit code to return.
    Using -wait, returns varied results, instead use Get-Process and while loop to wait for installation to complete.
#>
$install = Start-Process -WorkingDirectory "$($script.Path)" -FilePath "${cse_installer}" -ArgumentList "${csc_installer_args}" -PassThru -NoNewWindow

while (Get-Process "$($cse_exe -replace '.exe', '')" -ErrorAction SilentlyContinue)
{
    Start-Sleep -Seconds 10
}
Install-CiscoXDRDeployment.ps1 스크립트
$exeName =
$exePath = Join-Path -Path $PSScriptRoot -ChildPath $exeName

if (-not (Test-Path $exePath)) {
    Write-Error "Executable not found: $exePath"
    exit 1
}

# Use silent mode – the most commonly documented switch for Cisco XDR / Secure Client installers
$arguments = "-q"   # or try "--quiet" if -q fails in your specific build

try {
    $process = Start-Process -FilePath $exePath -ArgumentList $arguments -NoNewWindow -Wait -PassThru

    if ($process.ExitCode -eq 0) {
        Write-Output "Cisco XDR installation completed successfully (exit code 0)."
        exit 0
    } else {
        Write-Error "Installation failed with exit code: $($process.ExitCode)"
        exit $process.ExitCode
    }
}
catch {
    Write-Error "Exception during installation: $_"
    exit 1
}
Confirm-CSEInstall.ps1 스크립트

팁: 선택 사항: Intune 관리 포털에서 수동으로 구성된 탐지 규칙을 사용할 수 있습니다.
[CmdletBinding()]
param ()

$version =

<#
    https://learn.microsoft.com/en-us/intune/intune-service/apps/apps-win32-add#step-4-detection-rules
    The app gets detected when the script both returns a 0 value exit code and writes a string value to STDOUT

    The Intune agent checks the results from the script. It reads the values written by the script to the STDOUT stream,
    the standard error (STDERR) stream, and the exit code. If the script exits with a nonzero value, the script fails and
    the application detection status isn't installed. If the exit code is zero and STDOUT has data, the application
    detection status is installed.
#>

$cse = Get-ItemProperty HKLM:\Software\Microsoft\Windows\CurrentVersion\Uninstall\*, HKLM:\SOFTWARE\Wow6432Node\Microsoft\Windows\CurrentVersion\Uninstall\* -ErrorAction SilentlyContinue | Where-Object { $_ -like "*Immunet Protect*" } | Where-Object { $_.DisplayName -like "*Cisco Secure Endpoint*" }
if ($cse | Where-Object { [System.Version] $_.DisplayVersion -ge [System.Version] "${version}" })
{
    Write-Host "Installed"
    exit 0
}

exit 1
참고: 이전 스크립트는 교육용으로만 사용되며 Cisco TAC에서 지원하지 않습니다. 각 환경은 서로 다른 규칙이나 정책에 따라 달라질 수 있으며 적절한 테스트를 수행해야 합니다. 서드파티 배포 도구의 문제 해결은 최선의 노력으로 처리되며 포털 또는 관리 대상 스테이션에서 모두 Intune 로그를 검토하는 것으로 시작해야 합니다.
개정 이력
| 개정 | 게시 날짜 | 의견 |
|---|---|---|
2.0 |
25-Aug-2026
|
제목, 맞춤법, 문법, 가독성을 위해 별도의 섹션에 삽입된 가로 줄, 업데이트된 대체 텍스트 및 CCW 알림 |
1.0 |
12-Aug-2025
|
최초 릴리스 |
 피드백
피드백