ISE에서 저장소 구성
소개
이 문서에서는 ISE(Identity Services Engine)에서 리포지토리를 구성하는 방법에 대해 설명합니다.
사전 요구 사항
요구 사항
다음 주제에 대한 지식을 보유하고 있으면 유용합니다.
- ISE(Identity Services Engine)에 대한 기본 지식
- FTP(File Transfer Protocol) 서버 및 SFTP(SSH File Transfer Protocol) 서버에 대한 기본 지식
사용되는 구성 요소
이 문서의 정보는 다음 소프트웨어 및 하드웨어 버전을 기반으로 합니다.
- Cisco Identity Service Engine 버전 3.x
- 작동하는 FTP 서버 및 SFTP 서버
이 문서의 정보는 특정 랩 환경의 디바이스를 토대로 작성되었습니다. 이 문서에 사용된 모든 디바이스는 초기화된(기본) 컨피그레이션으로 시작되었습니다. 현재 네트워크가 작동 중인 경우 모든 명령의 잠재적인 영향을 미리 숙지하시기 바랍니다.
배경 정보
Cisco에서는 관리 포털을 통해 리포지토리를 생성하고 삭제할 수 있습니다. 다음과 같은 유형의 저장소를 생성할 수 있습니다.
- 디스크
- FTP
- SFTP
- NFS
- CD-롬
- HTTP
- HTTPS
ISE 리포지토리는 ISE의 GUI 및 CLI에서 구성할 수 있으며 다음 용도로 사용할 수 있습니다.
- ISE 컨피그레이션 및 운영 데이터의 백업 및 복원
- ISE 노드 업그레이드
- 패치 설치
- ISE에서 데이터(보고서) 내보내기
- ISE 노드에서 지원 번들 내보내기
설정
crypto host_key add host <서버의 ip 주소> 명령을 구축의 모든 서버에 추가해야 합니다.
FTP 저장소 구성
GUI에서 FTP 저장소 구성
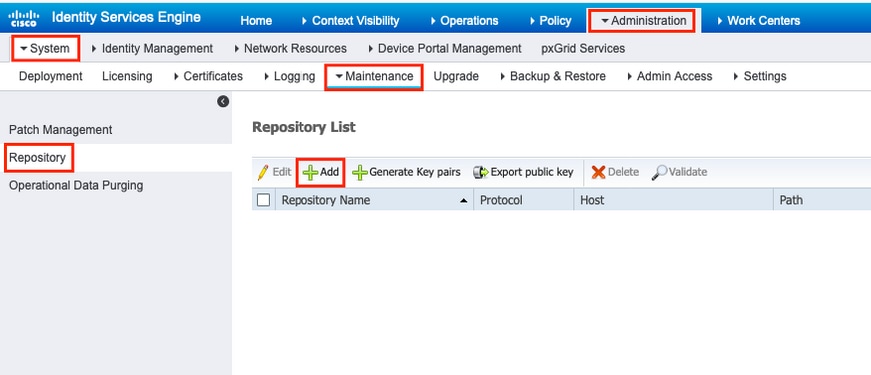
1단계. ISE에서 리포지토리를 구성하려면 ISE GUI에 로그인하고 로Administration > System > Maintenance > Repository이동합니다. 그런 다음 그림과 같이 을 클릭합니다Add.
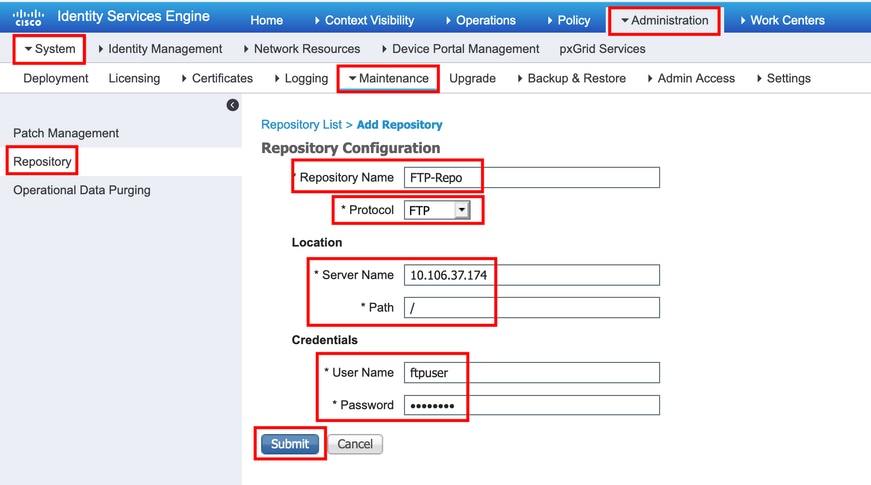
2단계. 프로토콜Repository Name을FTP입력하고 선택합니다. 그런 다음Server Name, Path, User Name을 입력하고Password. 이미지에 표시된 대로 을 클릭합니다Submit.
CLI에서 FTP 저장소 구성
SSH를 통해 ISE 노드의 CLI에 로그인하고 다음 명령을 실행합니다.
ise/admin# ise/admin# configure terminal Enter configuration commands, one per line. End with CNTL/Z. ise/admin(config)# repository FTP-Repo ise/admin(config-Repository)# url ftp://10.127.197.145/ ise/adminconfig-Repository)# userpassword plain ise/admin(config-Repository)# exit ise/admin(config)# exit ise/admin#
SFTP 저장소 구성
GUI에서 SFTP 저장소 구성
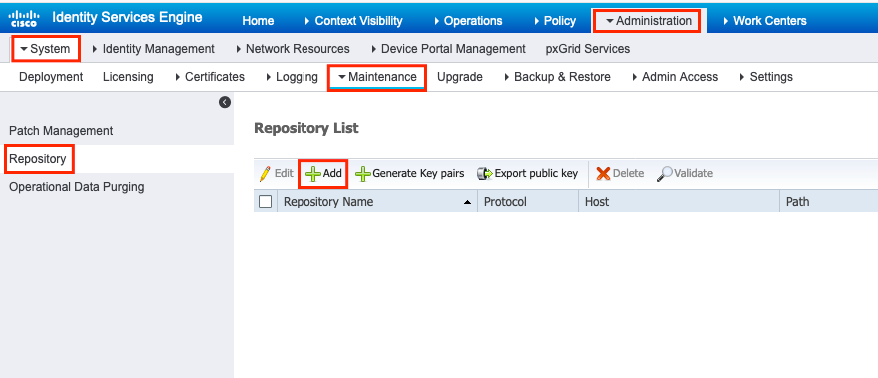
1단계. ISE에서 저장소를 구성하려면 ISE GUI에 로그인하고 로 이동합니다Administration > System > Maintenance > Repository. 그런 다음 그림과 같이 을 클릭합니다Add.
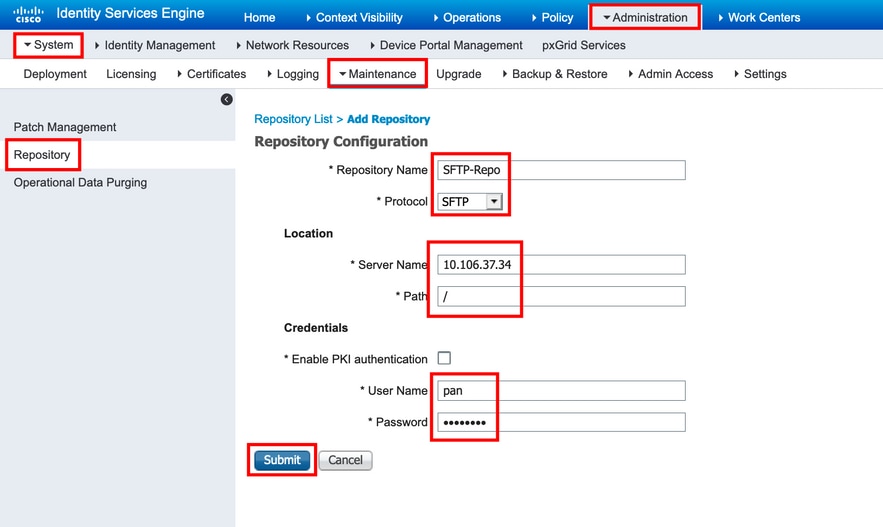
2단계. 프로토콜Repository Name을SFTP입력하고 선택합니다. 그런 다음Server Name, Path, User NamePassword이미지에 표시된 대로 를 입력하고Submit를 클릭합니다.
3단계. 클릭Submit후 팝업 메시지가 나타납니다. 이미지에 표시된 대로 CLI를 사용하여 SFTP 서버의 host_key를 추가하라는 메시지가 표시됩니다.
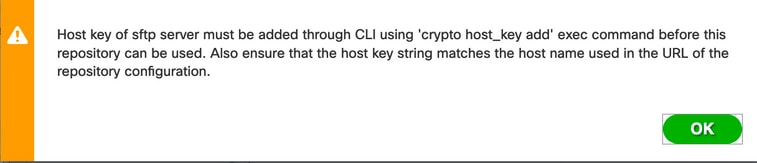
4단계. SSH를 통해 ISE 노드의 CLI에 로그인하고 명령을 사용하여 호스트 키를crypto host_key add host 추가합니다.
ise/admin# crypto host_key add host 10.76.112.35
host key fingerprint added
Operating in CiscoSSL FIPS mode

# Host 10.76.112.35 found: line 1
10.76.112.35 RSA SHA256:exFnNITDhafaNPFr35x6kC1pR0iTP6xS+LBmtIXPfnk
ise/admin#
CLI에서 SFTP 리포지토리 구성
SSH를 통해 ISE 노드의 CLI에 로그인하고 다음 명령을 실행합니다.
ise/admin# ise/admin# configure terminal Enter configuration commands, one per line. End with CNTL/Z. ise/admin(config)# repository SFTP-Repo ise/admin(config-Repository)# url sftp://10.76.112.35/ ise/adminconfig-Repository)# userpassword plain ise/admin(config-Repository)# exit ise/admin(config)# exit ise/admin#
NFS 저장소 구성
GUI에서 NFS 저장소 구성
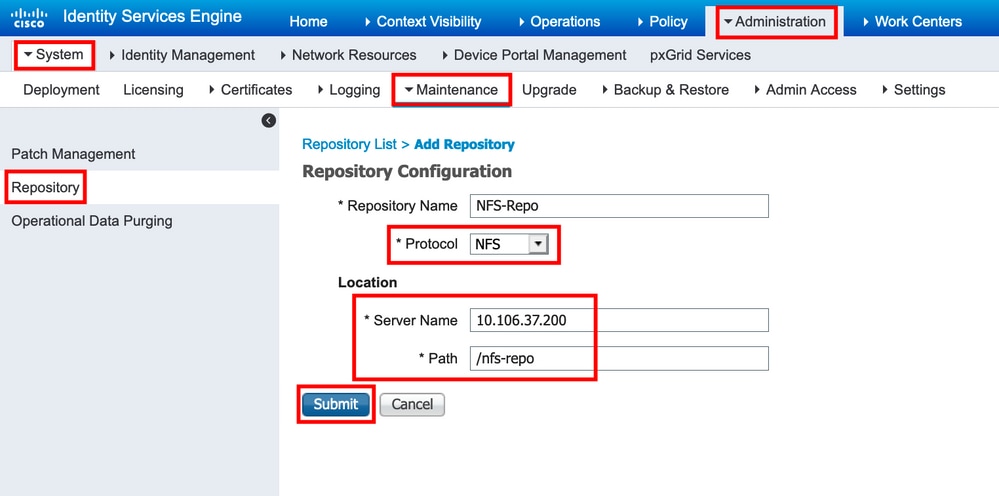
1단계. ISE에서 리포지토리를 구성하려면 ISE GUI에 로그인하고 로 이동합니다Administration > System > Maintenance > Repository. 그런 다음 그림과 같이 Add(추가)를 클릭합니다.

2단계. 프로토콜Repository Name을NFS입력하고 선택합니다. 그런 다음 Server Name 을 입력하고Path. 이미지에 표시된 대로 클릭합니다Submit.
CLI에서 NFS 저장소 구성
SSH를 통해 ISE 노드의 CLI에 로그인하고 다음 명령을 실행합니다.
ise/admin#

ise/admin# configure terminal
Enter configuration commands, one per line. End with CNTL/Z.
ise/admin(config)# repository NFS-Repo
ise/admin(config-Repository)#  url nfs://10.127.197.145:/nfs-repo
ise/admin(config-Repository)# exit
ise/admin(config)# exit
ise/admin#
ISE 로컬 저장소 구성
GUI에서 로컬 저장소 구성
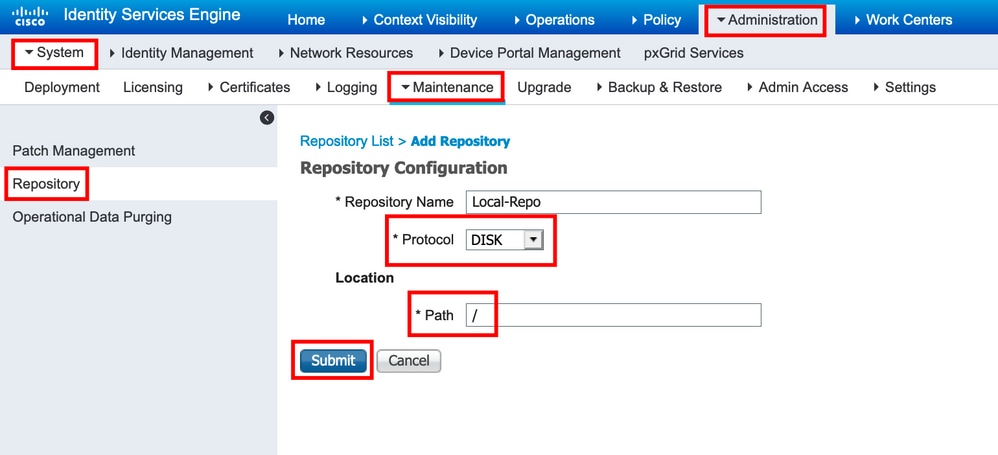
1단계. ISE에서 저장소를 구성하려면 ISE GUI에 로그인하고 로 이동합니다Administration > System > Maintenance > Repository. 그런 다음 그림과 같이 을 클릭합니다Add.

2단계. 프로토콜Repository Name을DISK입력하고 선택합니다. 그런 다음 를Path입력하고 이미지에 표시된 대로 클릭합니다Submit.
CLI에서 로컬 저장소 구성
SSH를 통해 ISE 노드의 CLI에 로그인하고 다음 명령을 실행합니다.
ise/admin#

ise/admin# configure terminal
Enter configuration commands, one per line. End with CNTL/Z.
ise/admin(config)# repository Local-Repo
ise/admin(config-Repository)# url disk:/
ise/admin(config-Repository)# exit
ise/admin(config)# exit
ise/admin#
다음을 확인합니다.
ISE 서버의 GUI 및 CLI에서 리포지토리를 확인할 수 있습니다.
GUI로 확인
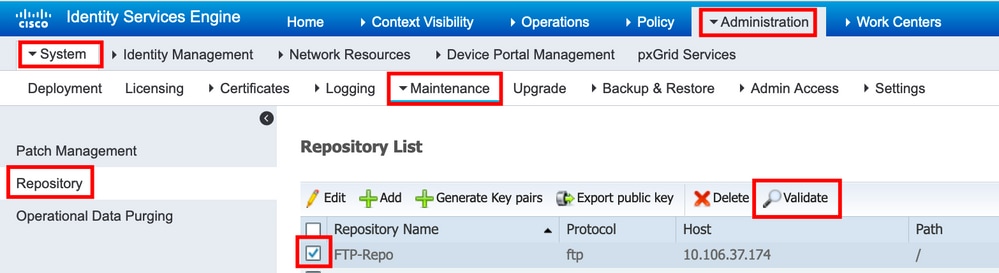
GUI를 사용하여 리포지토리를 검증하려면 그림에 표시된 대로Administration > System > Maintenance > Repository로 이동하여 리포지토리를 선택한 다음 을 클릭합니다Validate.
를 클릭한Validate후에는 이미지에 표시된 Repository validated successfully 것처럼 GUI에서 응답을 받아야 합니다.

파일 관리
저장소에서 ISE 로컬 디스크로 파일을 전송하는 단계:
저장소 이름 -> 테스트
파일 이름—> test.txt
| ise-pri/admin#show repository 테스트 test.txt ise-pri/admin#copy 리포지토리 테스트 파일 test.txt ? 가능한 완료: <WORD> URL 입력(로컬의 경우 디스크:/경로 사용)(최대 크기 - 2048) ise-pri/admin#copy 리포지토리 테스트 파일 test.txt 디스크:/ ise-pri/admin# ise-pri/admin# ise-pri/admin# ise-pri/admin#dir 디스크:/ 디스크 디렉터리:/ 2024년 11월 09일 07:01:23 corefileanalysis/ 2024년 11월 09일 04:54:58 corefiles/ 4096 2024년 11월 9일 05:20:24 CSD-config-backup/ 2024년 12월 19일 10시 33분 44초/ 1647 Nov 09 2024 14:13:33 rpm_install.log 0 Nov 09 2024 14:12:39 rpm_uninstall.log 137289 2024년 11월 15일 05:52:09 SecondaryMNTlog.txt 0 Dec 19 2024 18:49:33 test.txt 23505 2024년 11월 9일 04:57:22 upgraderpms.log 디스크 사용량: 파일 시스템 사용된 총 57675014144바이트 201842233344바이트 사용 가능 273484009472바이트 사용 가능 |
저장소에서 파일을 삭제하는 단계:
| ise-pri/admin#delete disk:/test.txt 디스크 디렉터리:/ 2024년 11월 09일 07:01:23 corefileanalysis/ 디스크 사용량: 파일 시스템 |
GUI에서 localdisk에 파일을 업로드하는 단계.
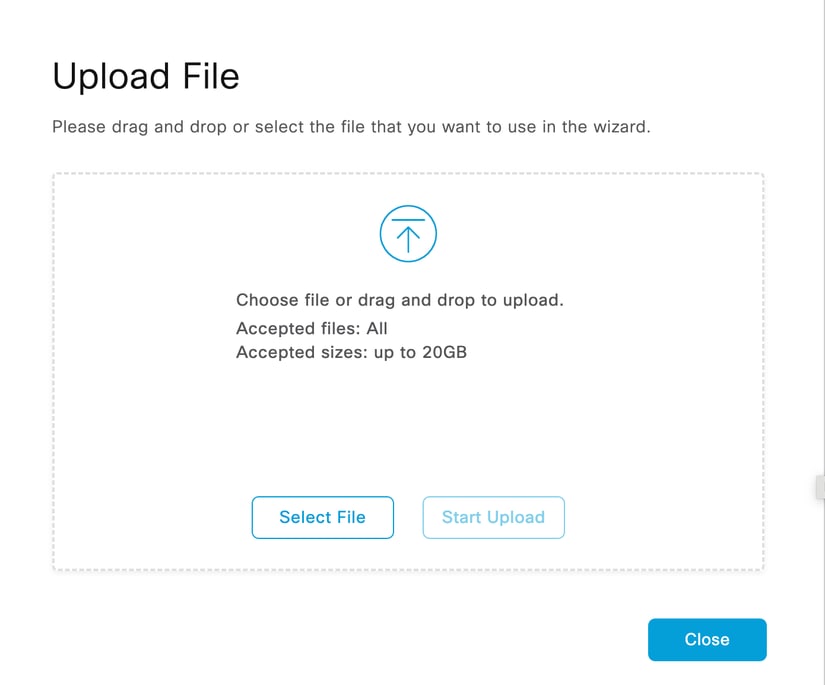
Administration > System > Maintenance > Localdisk Management로 이동합니다. 노드를 선택합니다.
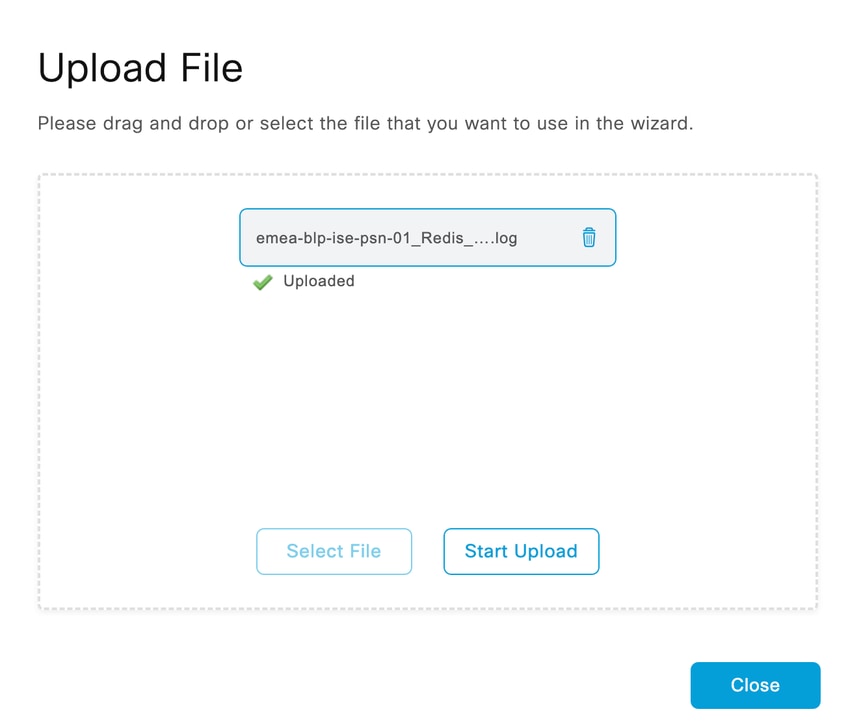
Upload(업로드)를 클릭하고 다음과 같이 마법사에서 사용할 파일을 선택합니다.
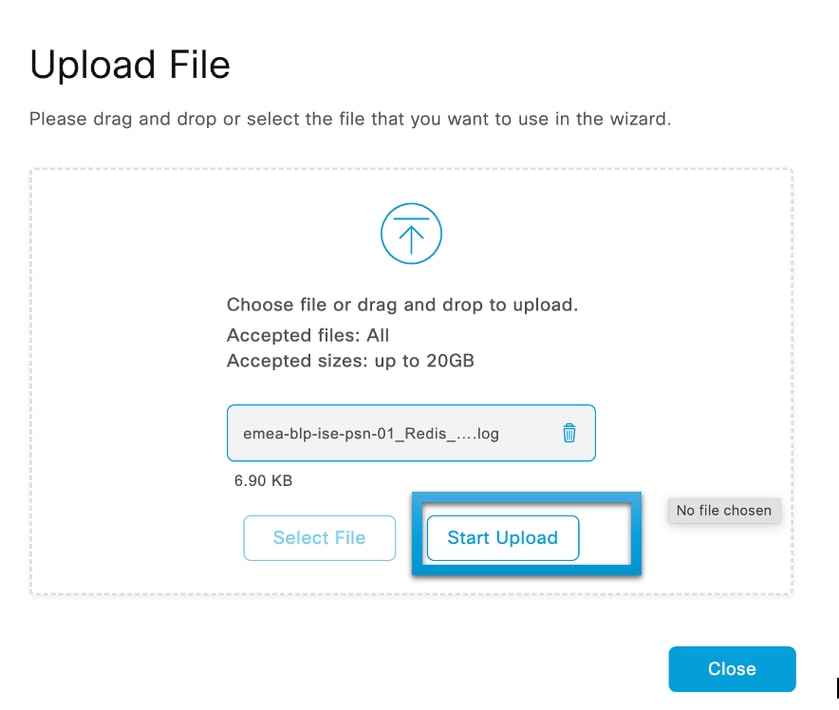
Start Upload(업로드 시작)를 클릭하여 다음과 같이 파일을 업로드합니다.
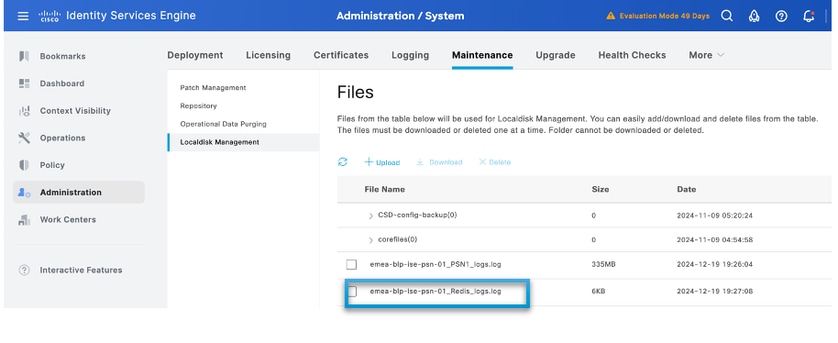
다음과 같이 노드의 localdisk에서 파일을 볼 수 있습니다.
CLI로 확인
CLI에서 리포지토리를 검증하려면 SSH를 통해 ISE 노드에 로그인하고 명령을show repository 실행합니다. 명령의 출력에는 저장소에 있는 파일이 나열됩니다.
ise/admin#
ise/admin# show repository FTP-Repo
Config-Backup-CFG10-200307-1043.tar.gpg
ise/admin#
문제 해결
ISE의 리포지토리를 디버깅하려면 다음 디버그를 사용합니다.
ise-1/pan# debug copy 7
ise-1/pan# debug transfer 7
ise-1/pan#
ise-1/pan# 6 [25683]:[info] transfer: cars_xfer.c[220] [system]: ftp dir of repository FTP-Repo requested
7 [25683]:[debug] transfer: cars_xfer_util.c[2017] [system]: ftp get dir for repos FTP-Repo
7 [25683]:[debug] transfer: cars_xfer_util.c[2029] [system]: initializing curl
7 [25683]:[debug] transfer: cars_xfer_util.c[2040] [system]: full url is ftp://10.127.197.145/ISE/
7 [25683]:[debug] transfer: cars_xfer_util.c[1928] [system]: initializing curl
7 [25683]:[debug] transfer: cars_xfer_util.c[1941] [system]: full url is ftp://10.127.197.145/ISE/Config-Backup-CFG10-200307-1043.tar.gpg
7 [25683]:[debug] transfer: cars_xfer_util.c[1962] [system]: res: 0
7 [25683]:[debug] transfer: cars_xfer_util.c[1966] [system]: res: 0-----filetime Config-Backup-CFG10-200307-1043.tar.gpg: Fri Dec  19 10:55:39 2024
7 [25683]:[debug] transfer: cars_xfer_util.c[1972] [system]: filetime Config-Backup-CFG10-200307-1043.tar.gpg:Fri Dec 19 10:55:39 2024
7 [25683]:[debug] transfer: cars_xfer_util.c[1976] [system]: filesize Config-Backup-CFG10-200307-1043.tar.gpg: 181943580 bytes
6 [25683]:[info] transfer: cars_xfer.c[130] [system]: ftp copy out of /opt/backup/backup-Config-Backup-1587433372/Config-Backup-CFG10-200421-0712.tar.gpg requested
6 [25683]:[info] transfer: cars_xfer_util.c[787] [system]: curl version: libcurl/7.29.0 OpenSSL/1.0.2s zlib/1.2.7 libidn/1.28 libssh2/1.4.2
7 [25683]:[debug] transfer: cars_xfer_util.c[799] [system]: full url is ftp://10.127.197.145/ISE/Config-Backup-CFG10-200421-0712.tar.gpg
디버깅은 다음 그림과 같이 비활성화됩니다.
ise-1/pan#
ise-1/pan# no debug copy 7
ise-1/pan# no debug transfer 7
ise-1/pan#
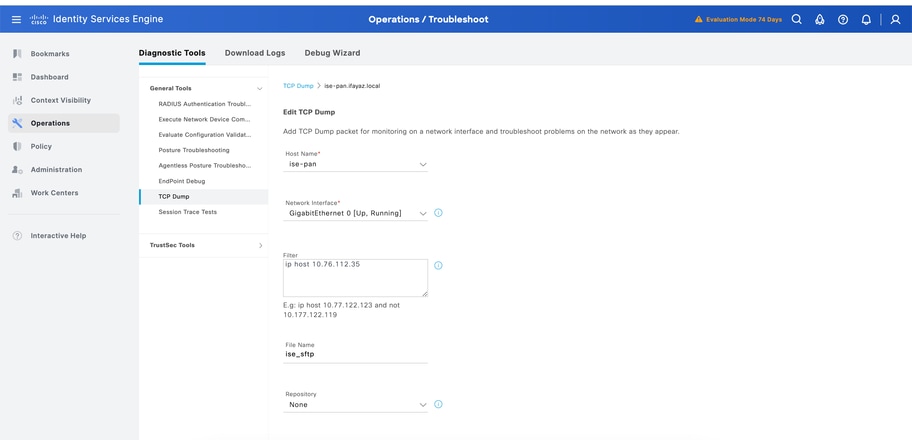
ISE와 구성된 리포지토리 서버 간에 적절한 통신이 이루어지도록 하려면 ISE GUI에서 패킷 캡처를 설정합니다.
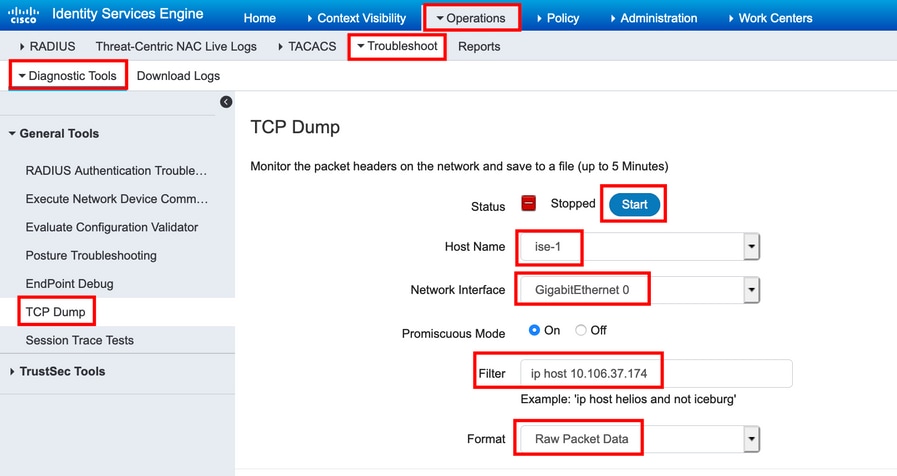
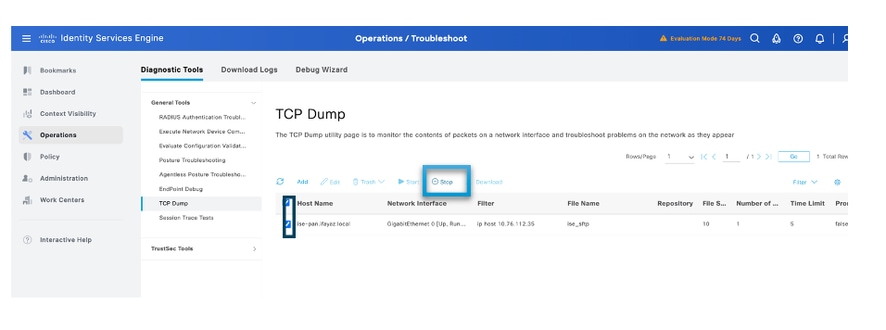
- Operations(운영) > Troubleshoot(문제 해결) > Diagnostic tools(진단 도구) > TCP Dump(TCP 덤프)로 이동합니다.
- Filter(필터)에 적절한 값을 입력하고 Format(형식)을 선택합니다.
- 시작을 클릭합니다.
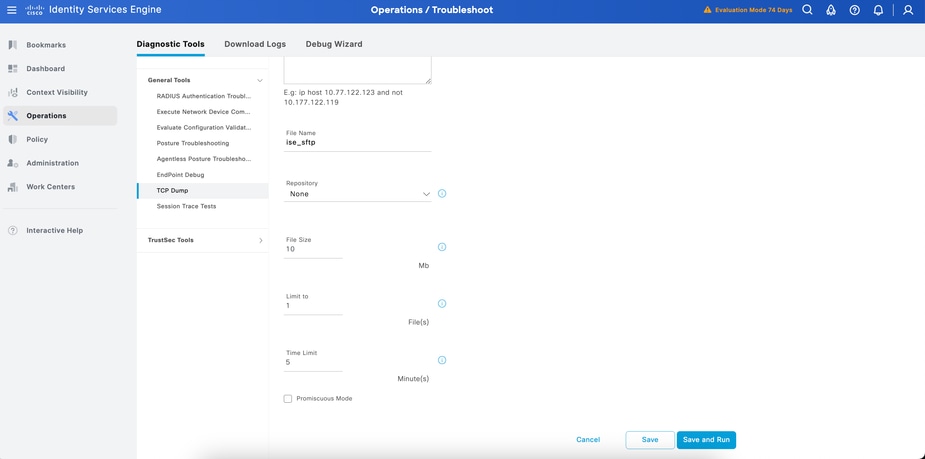
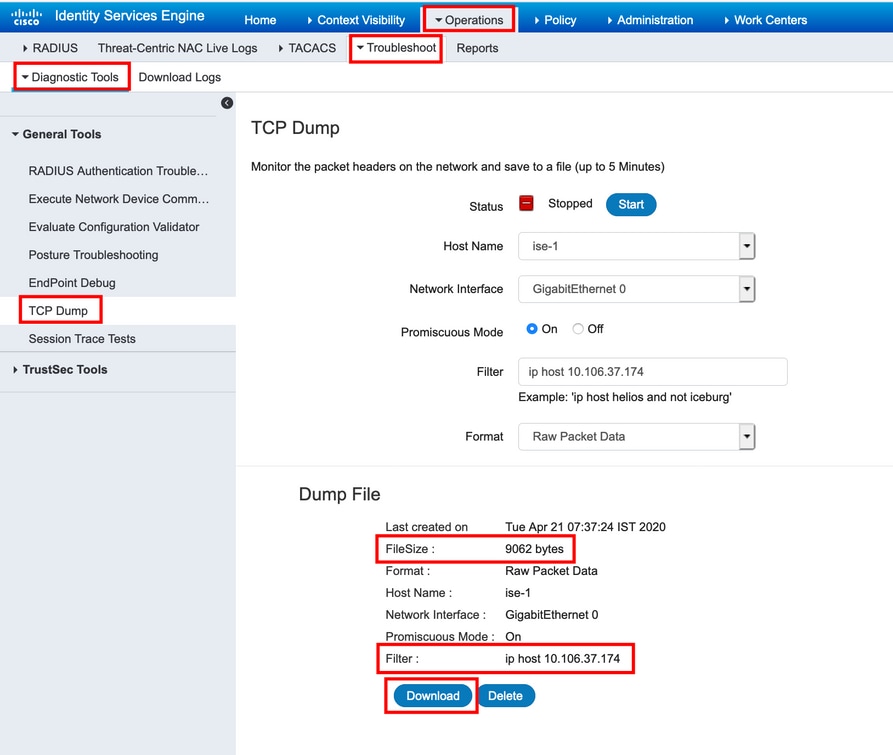
테스트해야 할 저장소에 대한 일부 트래픽을 트리거하려면 로 Administration > System > Maintenance > Repository이동하여 저장소를 선택한 다음 을 클릭합니다Validate. 그런 다음 그림과 Operations > Troubleshoot > Diagnostic tools > TCP Dump같이 패킷 캡처로 이동하여Stop클릭하고 다운로드합니다.
개정 이력
| 개정 | 게시 날짜 | 의견 |
|---|---|---|
7.0 |
04-Jun-2026
|
서식 지정 |
6.0 |
08-Sep-2025
|
일부 스타일 문제가 업데이트되어 crypto_key에 대한 추가 부분을 모든 서버에 추가해야 합니다. |
5.0 |
23-Jul-2025
|
대체 텍스트를 추가했습니다.
업데이트된 기계 번역, 스타일 요구 사항 및 서식. |
4.0 |
25-Jul-2024
|
요구 사항을 충족하도록 서식을 업데이트했습니다.
텍스트 선명도를 높이고 대체 텍스트를 제목 대/소문자로 변경했습니다. |
3.0 |
13-Jun-2023
|
요구 사항을 충족하도록 서식을 업데이트했습니다.
대체 텍스트에 명확성을 제공했습니다. |
2.0 |
20-May-2022
|
Troubleshoot(문제 해결) 섹션을 업데이트했습니다. 일관성과 명확성을 위해 편집되었습니다. |
1.0 |
24-Mar-2020
|
최초 릴리스 |
 피드백
피드백