Cisco UCS Server Configuration Utility, Release 3.1(2)
偏向のない言語
この製品のマニュアルセットは、偏向のない言語を使用するように配慮されています。このマニュアルセットでの偏向のない言語とは、年齢、障害、性別、人種的アイデンティティ、民族的アイデンティティ、性的指向、社会経済的地位、およびインターセクショナリティに基づく差別を意味しない言語として定義されています。製品ソフトウェアのユーザーインターフェイスにハードコードされている言語、RFP のドキュメントに基づいて使用されている言語、または参照されているサードパーティ製品で使用されている言語によりドキュメントに例外が存在する場合があります。シスコのインクルーシブランゲージに対する取り組みの詳細は、こちらをご覧ください。
翻訳について
このドキュメントは、米国シスコ発行ドキュメントの参考和訳です。リンク情報につきましては、日本語版掲載時点で、英語版にアップデートがあり、リンク先のページが移動/変更されている場合がありますことをご了承ください。あくまでも参考和訳となりますので、正式な内容については米国サイトのドキュメントを参照ください。
- Updated:
- 2017年6月24日
章のタイトル: UCS-SCU ユーザ インターフェイスの概要
目次
- UCS-SCU ユーザ インターフェイスの概要
- ライセンス契約
- UCS-SCU グラフィカル ユーザ インターフェイスの概要
- ネットワークの設定
- サーバ ヘルス チェックの実行
- ログの保存
- サーバ スナップショットの使用
- Cisco Flexible Flash へのイメージの更新
- cisco.com からの更新
- ネットワークからの更新
- サーバの再起動
この章の内容は、次のとおりです。
- ライセンス契約
- UCS-SCU グラフィカル ユーザ インターフェイスの概要
- ネットワークの設定
- サーバ ヘルス チェックの実行
- ログの保存
- サーバ スナップショットの使用
- Cisco Flexible Flash へのイメージの更新
- サーバの再起動
ライセンス契約
UCS-SCU が起動したら、最初のインターフェイスは、エンド ユーザ ライセンス契約です。 [I Accept] を選択して [Next] をクリックし、このライセンスに同意します。
UCS-SCU グラフィカル ユーザ インターフェイスの概要
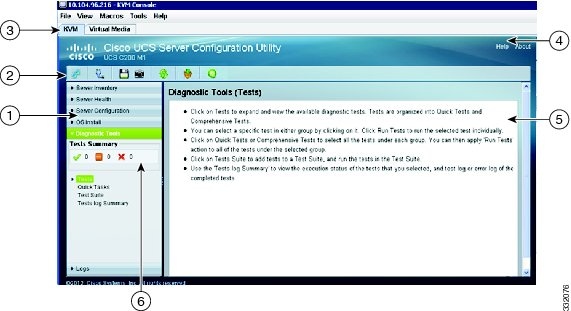
1 |
[Navigation] ペイン |
2 |
ツールバー |
3 |
タブ |
4 |
Help |
5 |
[Content] ペイン |
6 |
[Tests Summary] ペイン |
[Navigation] ペイン |
UCS-SCU のユーザ インターフェイスの左側に表示されます。 すべてのナビゲーション ペインの要素の詳細については、表 3-2 を参照してください。 |
ツールバー |
左上隅に表示され、一連のアイコンがあります。 すべてのツールバー アイコンの説明については、表 3-3 を参照してください。 |
タブ |
UCS-SCU の次のオプションがあります。 |
Help |
表示されたページの状況依存ヘルプを表示するアプリケーションのウィンドウを開きます。 |
[Content] ペイン |
GUI の右側に表示されます。 [Navigation] ペインで選択したタブに応じて、異なるページがコンテンツ ペインに表示されます。 |
[Tests Summary] ペイン |
合格したテストの詳細、キュー内のテスト、テストの失敗が表示されます。 診断ツールが選択されている場合にだけ表示されます。 |
Server Inventory |
サーバの情報およびインベントリを表示します。 次のページへのリンクがあります。 サーバ インベントリに関する詳細については、第 4 章「サーバ インベントリの表示」を参照してください。 |
Server Health |
CPU、メモリ、電源、ファン、ストレージ、PCI デバイス、BIOS、および CIMC などのサーバのサブシステムの状態を表示します。 サーバ ヘルスに関する詳細については、第 5 章「サーバ ヘルスの表示」を参照してください。 |
Server Configuration |
BIOS のブート順を設定し、サーバの接続されたハード ドライブの RAID ボリュームを設定します。 次のページへのリンクがあります。 サーバ設定の詳細については、第 8 章「ブート順と RAID レベルの設定」を参照してください。 |
OS Install |
完全な無人モードで RHEL、SLES、Windows オペレーティング システムをインストールします。 すべてのオンボード コンポーネントの最新のドライバが、オペレーティング システムのインストール時に Tools and Drivers CD またはその他のサポートされている場所から追加されます。 OS のインストールの詳細については、第 6 章「オペレーティング システムのインストール」を参照してください。 |
Diagnostic Tools |
サーバ障害を検出するために、さまざまな種類の診断テストを実行できます。 診断ツールの詳細については、第 7 章「診断ツール」を参照してください。 |
Logs |
サーバのシステム ログおよびシステム イベント ログが表示されます。 次のページへのリンクがあります。 ログの詳細については、第 9 章「ログの表示」を参照してください。 |
| ツールバー アイコン | 名前 | 機能 |
|---|---|---|
|
Network Configuration |
IP アドレス、DNS、サブネット マスク、および Cisco.com の資格情報を設定します。 |
|
Probe Server |
ヘルス チェックを行います |
|
Save Logs |
USB にログを保存します |
|
Server Snapshot |
サーバのその時点のインベントリを取得できます。 |
|
Refresh |
サポートされている場合、コンテンツ領域を更新します。 |
|
Update |
UCS-SCU、OS のドライバ、および Host Upgrade Utility の最新バージョンをダウンロードできます。 |
|
Reboot |
サーバを再起動します。 |


ネットワークの設定
UCS-SCU のネットワーク設定では、IP の詳細、プロキシの詳細、シスコの資格情報などを指定することで、ネットワークを設定することができます。 これは一度だけ実行するプロセスであり、ネットワークを設定しない場合、次の手順の実行中に設定するように求められます。
- Cisco Flexible Flash にイメージを更新するとき。 (Cisco Flexible Flash へのイメージの更新の項を参照)。
- オペレーティング システムのインストール時に、ネットワーク共有または cisco.com からドライバをダウンロードするとき。 (インストール ドライバの項を参照)。
ネットワークを設定するには、次の手順を実行します。
| ステップ 1 |
ツールバーの [Network Configuration] ボタンをクリックします。 [Network Configuration] ダイアログボックスが表示されます。 |
| ステップ 2 |
[Network Configuration] ダイアログボックスで、次の手順を実行します。
|
| ステップ 3 | 設定を保存するには、[Configure] をクリックします。 |
サーバ ヘルス チェックの実行
Probe Server 機能では、サーバ サブシステムのヘルス チェックを実行できます。 [Probe Server] アイコンをクリックすると、サーバ ヘルス チェックが開始されます。
ヘルス チェックの結果を表示するには、ナビゲーション ペインの [Server Health] タブをクリックします。
ログの保存
Save Logs 機能を使用してログ ファイルを保存できます。 Save Logs を使用する前に、ログ ファイルを保存するための USB フラッシュ ドライブまたは vMedia を挿入する必要があります。
サーバ スナップショットの使用
UCS SCU のユーザ インターフェイスで Server Snapshot 機能を使用して、サーバのその時点のインベントリを取得できます。 この機能では、特定の期間内のサーバのインベントリまたはコンポーネントを比較することができます。 サーバのスナップショットを開始する前に、サーバに USB フラッシュ ドライブが接続されていることを確認します。 フラッシュ ドライブが使用できないと、サーバ スナップショットで作成されたログ ファイルは保存されません。
サーバ スナップショットを開始すると、UCS SCU はサーバ コンポーネントに関する情報を取得し、サーバの状態を判断するために一連のクイック テストを実行します。 サーバ スナップショットの取得には約 20 分かかる可能性があります。 サーバ スナップショット処理が完了すると、ログ ファイルが指定した USB フラッシュ ドライブに保存されます。 ワードパッドなどの任意のエディタでこのログ ファイルを開くことができます。 期間ごとのサーバ インベントリを比較できるように、これらのログ ファイルを特定の場所に保管することをお勧めします。 複数のログ ファイルがある場合、サーバ インベントリの違いを表示するために、インターネットから入手した比較ツールを使用できます。
サーバのスナップショットを取得するには、次の手順を実行します。
サーバのクイック テストの実行中に、サーバのスナップショット機能は、サーバ コンポーネントがテストに合格したか失敗したかのみを判断できます。 コンポーネントがクイック テストに合格しない理由は特定できません。 サーバ スナップショット処理のログ ファイルの表示中に、サーバ コンポーネントがクイック テストに合格しなかったことに気づいた場合は、Diagnostics Tools の下にあるクイック テスト ログを確認してください。
 (注) |
Diagnostics Tools の詳細については、第 7 章「診断ツールの概要」を参照してください。 |
サーバ スナップショット処理のログ ファイルには次の情報が含まれます。
Cisco Flexible Flash へのイメージの更新
UCS-SCU、オペレーティング システムのドライバ、および Host Upgrade Utility(HUU)の最新バージョンをダウンロードするために UCS-SCU GUI を使用できます。 これらのイメージは、それぞれのパーティション上のシステムの SD カードに書き込むことができます。
UCS-SCU GUI を使用して Cisco Flexible Flash にイメージを更新するには、次の手順を実行します。
| ステップ 1 |
ツールバーの [Update] アイコンをクリックします。 [Cisco Flex Flash Software Update] ダイアログボックスが表示され、パーティションのリストを表示します。 |
| ステップ 2 |
リストの [Cisco Server Configuration Utility] を選択します。 次のいずれかの方法を使用して SD カードにイメージを更新できます。 |
| ステップ 3 |
[Apply] をクリックして、イメージを適用します。 [Cisco Flex Flash Software Update] ダイアログボックスが表示され、テーブルがイメージのバージョンで更新されます。 |
| ステップ 4 | 残りのパーティションに対してステップ 1 からステップ 4 を繰り返します。 |
cisco.com からの更新
cisco.com からの Cisco Flexible Flash にイメージを更新するには、次の手順を実行します。
| ステップ 1 |
[Cisco.com] をクリックします。 ネットワークまたはユーザ資格情報が設定されていない場合は、[Network Configuration] ダイアログボックスが表示されます。 設定されている場合、[Select Updates] ダイアログボックスが表示されます。 ネットワークを設定する必要がある場合は、ステップ 2 に進みます。 ネットワークを設定する必要がない場合は、ステップ 3 に進みます。 |
| ステップ 2 | [Network Configuration] ダイアログボックスで、次の手順を実行します。 |
| ステップ 3 | 表示される [Select Updates] ダイアログボックスで、ISO イメージの必要なバージョンを選択します。 |
| ステップ 4 | [OK] をクリックします。 |
ネットワークからの更新
ネットワークから Cisco Flexible Flash にイメージを更新するには、次の手順を実行します。
| ステップ 1 |
ネットワークを [From Network] をクリックします。 ネットワークまたはユーザ資格情報が設定されていない場合は、[Network Configuration] ダイアログボックスが表示されます。 設定されている場合、[Network Location] ダイアログボックスが表示されます。 ネットワークを設定する必要がある場合は、ステップ 2 に進みます。 ネットワークを設定する必要がない場合は、ステップ 3 に進みます。 |
| ステップ 2 | [Network Configuration] ダイアログボックスで、ネットワークを設定するには、IP アドレスを入力します。 ネットワークの設定の詳細については、3-5 ページの検索「ネットワークの設定」を参照してください。 |
| ステップ 3 |
表示された [Network Location] ダイアログボックスで、次の手順を実行します。
選択したファイルが [Network Location] ダイアログボックスのパッケージ名として表示されます。 |
| ステップ 4 | [OK] をクリックします。 |
サーバの再起動
サーバを再起動するには、次の手順を実行します。
| ステップ 1 |
ツールバーの [Reboot] アイコンをクリックします。 [Reboot] ダイアログボックスが表示されます。 |
| ステップ 2 |
[Yes] をクリックして再起動します。 サーバが再起動し、UCS-SCU GUI が再表示されます。 |