シームレス MPLS の設定

シームレス MPLS に関する情報

次の項では、シームレス MPLS について説明します。

シームレス MPLS の概要

シームレス MPLS は、複数のネットワークを単一の MPLS ドメインに統合するための、非常に柔軟でスケーラブルなアーキテクチャを提供します。これは、既存の既知のプロトコルに基づいています。

大規模な MPLS ネットワークでは、ネットワークのさまざまな部分に複数のタイプのプラットフォームとサービスを配置できます。このようなネットワークは、通常、コアエリアと集約エリアなどのエリアに分割され、各エリアに異なる内部ゲートウェイプロトコル(IGP)があります。あるエリアの IGP プレフィックスを別のエリアに配布することはできません。IGP プレフィックスを配布できない場合、エンドツーエンドのラベルスイッチパス(LSP)は確立できません。これは、ネットワークの拡張性に影響します。

シームレス MPLS では、エンドツーエンド LSP を確立することで、拡張性が向上します。シームレス MPLS は、プロバイダーエッジ(PE)ルータのループバックプレフィックスを転送するために、IGP ではなくボーダー ゲートウェイ プロトコル(BGP)を使用します。BGP は、プレフィックスをエンドツーエンドで配布します。これにより、あるドメインの IGP プレフィックスを別のドメインにインストールする必要がなくなります。

シームレス MPLS は、サービスプレーンとトランスポートプレーンの分離を導入し、エンドツーエンドのサービスに依存しないトランスポートを提供します。これにより、ネットワーク トランスポート ノードでサービス固有の設定が不要になります。

シームレス MPLS のアーキテクチャ
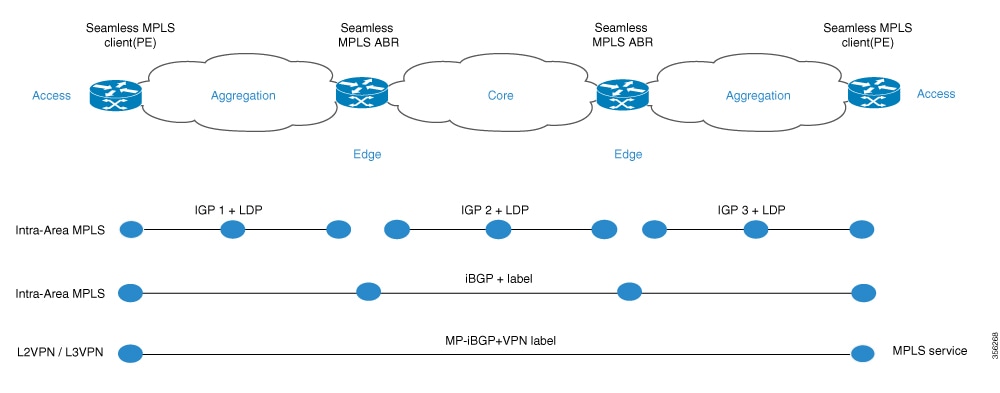
図は、3 つの異なるエリア(1 つのコアエリアと 2 つの集約エリア)があるネットワークを示しています。各エリアでは独自の IGP が実行され、エリア境界ルータ(ABR)ではエリア間の再配布は行われません。エンドツーエンド MPLS LSP を提供するためには、BGP を使用する必要があります。BGP は、ドメイン全体にラベルを付けて PE ルータのループバックをアドバタイズし、エンドツーエンド LSP を提供します。BGP は PE と ABR の間に導入されます。

シームレス MPLS は、BGP を使用してエンドツーエンド MPLS LSP を提供します。BGP は PE と ABR の間に導入されます。BGP は IPv4 プレフィックスとラベルを送信します。BGP は、ドメイン全体にラベルを付けて PE ルータのループバックをアドバタイズし、エンドツーエンド LSP を提供します。

ネットワークで IGP を使用する場合、プレフィックスのネクストホップアドレスは PE ルータのループバックプレフィックスです。このプレフィックスは、ネットワークの他の部分で使用されている IGP には認識されません。ネクストホップアドレスは、IGP プレフィックスへの再帰には使用できません。これを回避するために、プレフィックスは BGP で伝送されます。ABR はルートリフレクタ(RR)として設定されます。RR は、反映された iBGP プレフィックスの場合でも、ネクストホップを RR 自体に設定するように設定されます。

次の 2 つのシナリオが考えられます。

  • ABR は、ABR によってネットワークの集約部分にアドバタイズされる(BGP によって反映される)プレフィックスのネクストホップを ABR 自体に設定しません。ABR は、コア IGP から集約 IGP に ABR のループバックプレフィックスを再配布する必要があります。(コアからの)ABR ループバックプレフィックスのみを集約部分にアドバタイズする必要があります。リモート集約部分からの PE ルータのループバックプレフィックスは不要です。

  • ABR は、ABR によって集約部分にアドバタイズされた(BGP によって反映された)プレフィックスのネクストホップを ABR 自体に設定します。このため、ABR は ABR のループバックプレフィックスをコア IGP から集約 IGP に再配布する必要はありません。

いずれのシナリオでも、ABR は、ABR によってネットワークの集約部分からコア部分にアドバタイズされた(BGP によって反映された)プレフィックスのネクストホップを ABR 自体に設定します。

シームレス MPLS の設定方法

次の項では、シームレス MPLS の設定方法について説明します。

PE ルータでのシームレス MPLS の設定

次の手順を使用して、PE ルータでシームレス MPLS を設定できます。

手順の概要

  1. enable
  2. configure terminal
  3. interface loopback slot/port
  4. ip address ip-address subnet-mask
  5. interface ethernet slot/port
  6. no ip address
  7. xconnect peer-ip-address vcid encapsulation mpls
  8. router ospf process-id
  9. network ip-address wild-mask area area-id
  10. network ip-address wild-mask area area-id
  11. router bgp autonomous-system-number
  12. bgp log neighbor changes
  13. address-family ipv4
  14. network network-number mask network-mask
  15. no bgp default ipv4 unicast
  16. no bgp default route-target filter
  17. neighbor ip-address remote-as autonomous-system-number
  18. neighbor ip-address update-source interface-type interface-number ]
  19. neighbor ip-addresssend-label

手順の詳細

  コマンドまたはアクション 目的

ステップ 1

enable

例:


Device> enable

特権 EXEC モードを有効にします。

  • パスワードを入力します(要求された場合)。

ステップ 2

configure terminal

例:


Device# configure terminal

グローバル コンフィギュレーション モードを開始します。

ステップ 3

interface loopback slot/port

例:

Device(config-if)# interface Loopback0

ループバック インターフェイスを設定し、インターフェイス コンフィギュレーション モードを開始します。

ステップ 4

ip address ip-address subnet-mask

例:

Device(config-if)ip address 10.100.1.4 255.255.255.255

インターフェイスの IP アドレスを入力します。

ステップ 5

interface ethernet slot/port

例:

Device(config-if)# interface Ethernet1/0

イーサネット インターフェイスを設定し、インターフェイス コンフィギュレーション モードを開始します。

ステップ 6

no ip address

例:

Device(config-if)# no ip address

IP アドレス定義を削除します。

ステップ 7

xconnect peer-ip-address vcid encapsulation mpls

例:

Device(config-if)# xconnect 10.100.1.5 100 encapsulation mpls

カプセル化するためのトンネリング方式として MPLS を指定します。

ステップ 8

router ospf process-id

例:

Device(config)# router ospf 2

OSPF ルーティング プロセスを設定します。

ステップ 9

network ip-address wild-mask area area-id

例:

Device(config-router)# network 10.2.0.0 0.0.255.255 area 0

OSPF を実行するインターフェイスを定義し、それらのインターフェイスに対するエリア ID を定義します。

ステップ 10

network ip-address wild-mask area area-id

例:

Device(config-router)# network 10.100.1.4 0.0.0.0 area 0

OSPF を実行するインターフェイスを定義し、それらのインターフェイスに対するエリア ID を定義します。

ステップ 11

router bgp autonomous-system-number

例:

Device(config)# router bgp 1

BGP ルーティング プロセスを設定します。

ステップ 12

bgp log neighbor changes

例:

Device(config-router)# bgp log neighbor changes

BGP ネイバー リセットのロギングを有効にします。

ステップ 13

address-family ipv4

例:

Device(config-router)# address-family ipv4

アドレス ファミリ コンフィギュレーション モードを開始します。

ステップ 14

network network-number mask network-mask

例:

Device(config-router-af)# network 10.100.1.4 mask 255.255.255.255

BGP およびマルチプロトコル BGP ルーティングプロセスによってアドバタイズされるネットワークを指定します。

ステップ 15

no bgp default ipv4 unicast

例:

Device(config-router-af)# no bgp default ipv4 unicast

ピアリングセッションを確立するためのデフォルトの IPv4 ユニキャスト アドレス ファミリを無効にします。

ステップ 16

no bgp default route-target filter

例:

Device(config-router-af)# no bgp default route-target filter

BGP の route-target コミュニティフィルタリングを無効にします。

ステップ 17

neighbor ip-address remote-as autonomous-system-number

例:

Device(config-router-af)# neighbor 10.100.1.1 remote-as 1

BGP ネイバー テーブルまたはマルチプロトコル BGP ネイバー テーブルにエントリを追加します。

ステップ 18

neighbor ip-address update-source interface-type interface-number ]

例:

Device(config-router-af)# neighbor 10.100.1.1 update-source Loopback0

BGP セッションが、TCP 接続の動作インターフェイスを使用できるようにします。

ステップ 19

neighbor ip-addresssend-label

例:

Device(config-router-af)# neighbor 10.100.1.1 send-label

BGP ルートとともに MPLS ラベルをネイバー BGP ルータに送信できるように BGP ルータを設定します。

ルートリフレクタでのシームレス MPLS の設定

次の手順を使用して、ルートリフレクタでシームレス MPLS を設定できます。

手順の概要

  1. enable
  2. configure terminal
  3. interface loopback slot/port
  4. ip address ip-address subnet-mask
  5. router ospf process-id
  6. network ip-address wild-mask area area-id
  7. network ip-address wild-mask area area-id
  8. exit
  9. router ospf process-id
  10. redistribute ospf instance-tag route-map map-name
  11. network ip-address wild-mask area area-id
  12. exit
  13. router bgp autonomous-system-number
  14. bgp log neighbor changes
  15. address-family ipv4
  16. neighbor ip-address remote-as autonomous-system-number
  17. neighbor ip-address update-source interface-type interface-number ]
  18. neighbor ip-addressnext-hop-self all
  19. neighbor ip-addresssend-label
  20. neighbor ip-address remote-as autonomous-system-number
  21. neighbor ip-address update-source interface-type interface-number ]
  22. neighbor ip-addressroute-reflector-client
  23. neighbor ip-addressnext-hop-self all
  24. neighbor ip-addresssend-label
  25. exit
  26. ip prefix-list name seq number permit prefix
  27. route-map name permit sequence-number
  28. match ip address prefix-list prefix-list-name

手順の詳細

  コマンドまたはアクション 目的

ステップ 1

enable

例:


Device> enable

特権 EXEC モードを有効にします。

  • パスワードを入力します(要求された場合)。

ステップ 2

configure terminal

例:


Device# configure terminal

グローバル コンフィギュレーション モードを開始します。

ステップ 3

interface loopback slot/port

例:

Device(config-if)# interface Loopback0

ループバック インターフェイスを設定し、インターフェイス コンフィギュレーション モードを開始します。

ステップ 4

ip address ip-address subnet-mask

例:

Device(config-if)# ip address 10.100.1.1 255.255.255.255

インターフェイスの IP アドレスを入力します。

ステップ 5

router ospf process-id

例:

Device(config)# router ospf 1

OSPF ルーティング プロセスを設定します。

ステップ 6

network ip-address wild-mask area area-id

例:

Device(config-router)# network 10.1.0.0 0.0.255.255 area 0

OSPF を実行するインターフェイスを定義し、それらのインターフェイスに対するエリア ID を定義します。

ステップ 7

network ip-address wild-mask area area-id

例:

Device(config-router)# 10.100.1.1 0.0.0.0 area 0

OSPF を実行するインターフェイスを定義し、それらのインターフェイスに対するエリア ID を定義します。

ステップ 8

exit

例:

Device(config-router)#exit

コンフィギュレーション モードを終了します。

ステップ 9

router ospf process-id

例:

Device(config)# router ospf 2

OSPF ルーティング プロセスを設定します。

ステップ 10

redistribute ospf instance-tag route-map map-name

例:

Device(config-router)# redistribute ospf 1 subnets match internal route-map ospf1-into-ospf2

1 つのルーティングドメインから OSPF にルートを注入します。

ステップ 11

network ip-address wild-mask area area-id

例:

Device(config-router)# network 10.2.0.0 0.0.255.255 area 0

OSPF を実行するインターフェイスを定義し、それらのインターフェイスに対するエリア ID を定義します。

ステップ 12

exit

例:

Device(config-router)#exit

コンフィギュレーション モードを終了します。

ステップ 13

router bgp autonomous-system-number

例:

Device(config)# router bgp 1

BGP ルーティング プロセスを設定します。

ステップ 14

bgp log neighbor changes

例:

Device(config-router)# bgp log neighbor changes

BGP ネイバー リセットのロギングを有効にします。

ステップ 15

address-family ipv4

例:

Device(config-router)# address family ipv4

アドレス ファミリ コンフィギュレーション モードを開始します。

ステップ 16

neighbor ip-address remote-as autonomous-system-number

例:

Device(config-route-af)# neighbor 10.100.1.2 remote-as 1

BGP ネイバー テーブルまたはマルチプロトコル BGP ネイバー テーブルにエントリを追加します。

ステップ 17

neighbor ip-address update-source interface-type interface-number ]

例:

Device(config-router-af)# neighbor 10.100.1.2 update-source Loopback0

BGP セッションが、TCP 接続の動作インターフェイスを使用できるようにします。

ステップ 18

neighbor ip-addressnext-hop-self all

例:

Device(config-router-af)# neighbor 10.100.1.2 next-hop-self all

ルータを BGP スピーキングネイバーまたはピアグループのネクストホップとして設定します。

ステップ 19

neighbor ip-addresssend-label

例:

Device(config-router-af)# neighbor 10.100.1.2  send-label

BGP ルートとともに MPLS ラベルをネイバー BGP ルータに送信できるように BGP ルータを設定します。

ステップ 20

neighbor ip-address remote-as autonomous-system-number

例:

Device(config-router-af)# neighbor 10.100.1.4 remote-as 1

BGP ネイバー テーブルまたはマルチプロトコル BGP ネイバー テーブルにエントリを追加します。

ステップ 21

neighbor ip-address update-source interface-type interface-number ]

例:

Device(config-router-af)# neighbor 10.100.1.4 update-source Loopback0

BGP セッションが、TCP 接続の動作インターフェイスを使用できるようにします。

ステップ 22

neighbor ip-addressroute-reflector-client

例:

Device(config_router-af)# neighbor 10.100.1.4 route-reflector-client

ルータを BGP ルートリフレクタとして設定し、指定したネイバーをそのクライアントとして設定します。

ステップ 23

neighbor ip-addressnext-hop-self all

例:

Device(config-router-af)# neighbor 10.100.1.4 next-hop-self all

ルータを BGP スピーキングネイバーまたはピアグループのネクストホップとして設定します。

ステップ 24

neighbor ip-addresssend-label

例:

Device(config-router-af)# neighbor 10.100.1.4 send-label

BGP ルートとともに MPLS ラベルをネイバー BGP ルータに送信できるように BGP ルータを設定します。

ステップ 25

exit

例:

Device(config-router)#exit

コンフィギュレーション モードを終了します。

ステップ 26

ip prefix-list name seq number permit prefix

例:

Device(config)# ip prefix-list prefix-list-ospf1-into-ospf2 seq 5 permit 10.100.1.1/32

IP パケットまたはルートと照合するプレフィックスリストを作成します。

ステップ 27

route-map name permit sequence-number

例:

Device(config)# route-map ospf1-into-ospf2 permit 10

ルート マップのエントリを作成します。ルートマップ コンフィギュレーション モードを開始します。

ステップ 28

match ip address prefix-list prefix-list-name

例:

Device(config-route-map)# match ip address prefix-list prefix-list-ospf1-into-ospf2

プレフィックスリストで許可された宛先 IP ネットワーク番号アドレスを含むルートを配布します。

シームレス MPLS の設定例

次の項に、シームレス MPLS の設定例を示します。

例:PE ルータ 1 でのシームレス MPLS の設定

次に、PE ルータ 1 でシームレス MPLS を設定する例を示します。

Device(config-if)#interface Loopback0
 Device(config-if)#ip address 10.100.1.4 255.255.255.255
!
Device(config-if)# interface Ethernet1/0
Device(config-if)# no ip address
Device(config-if)# xconnect 10.100.1.5 100 encapsulation mpls
!
Device(config)# router ospf 2
Device(config-router)# network 10.2.0.0 0.0.255.255 area 0
Device(config-router)# network 10.100.1.4 0.0.0.0 area 0
!
Device(config)#router bgp 1
Device(config-router)# bgp log-neighbor-changes
Device(config-router)# address family ipv4
Device(config-router-af)# network 10.100.1.4 mask 255.255.255.255
Device(config-router-af)# no bgp default ipv4 unicast
Device(config-router-af)# no bgp default route-target filter
Device(config-router-af)# neighbor 10.100.1.1 remote-as 1
Device(config-router-af)# neighbor 10.100.1.1 update-source Loopback0
Device(config-router-af)# neighbor 10.100.1.1 send-label

例:ルートリフレクタ 1 でのシームレス MPLS の設定

次に、ルートリフレクタ 1 にシームレス MPLS を設定する例を示します。

Device(cofig-if)# interface Loopback0
Device(cofig-if)# ip address 10.100.1.1 255.255.255.255
Device(config)# router ospf 1
Device(config-router)# network 10.1.0.0 0.0.255.255 area 0
Device(config-router)# network 10.100.1.1 0.0.0.0 area 0
!
Device(config)# router ospf 2
Device(config-router)# redistribute ospf 1 subnets match internal route-map ospf1-into-ospf2
Device(config-router)# network 10.2.0.0 0.0.255.255 area 0
!
Device(config)# router bgp 1
Device(config-router)# bgp log-neighbor-changes
Device(config-router)# address family ipv4
Device(config-router-af)# neighbor 10.100.1.2 remote-as 1
Device(config-router-af)# neighbor 10.100.1.2 update-source Loopback0
Device(config-router-af)# neighbor 10.100.1.2 next-hop-self all
Device(config-router-af)# neighbor 10.100.1.2 send-label
Device(config-router-af)# neighbor 10.100.1.4 remote-as 1
Device(config-router-af)# neighbor 10.100.1.4 update-source Loopback0
Device(config-router-af)# neighbor 10.100.1.4 route-reflector-client
Device(config-router-af)# neighbor 10.100.1.4 next-hop-self all
Device(config-router-af)# neighbor 10.100.1.4 send-label

Device(config)# ip prefix-list prefix-list-ospf1-into-ospf2 seq 5 permit 10.100.1.1/32

Device(config)# route-map ospf1-into-ospf2 permit 10
Device(conifg-route-mao)# match ip address prefix-list prefix-list-ospf1-into-ospf2

例:PE ルータ 2 でのシームレス MPLS の設定

次に、PE ルータ 2 でシームレス MPLS を設定する例を示します。

Device(config-if)#interface Loopback0
 Device(config-if)#ip address 10.100.1.5 255.255.255.255
!
Device(config-if)# interface Ethernet1/0
Device(config-if)# no ip address
Device(config-if)# xconnect 10.100.1.4 100 encapsulation mpls
!
Device(config)# router ospf 3
Device(config-router)# network 10.3.0.0 0.0.255.255 area 0
Device(config-router)# network 10.100.1.5 0.0.0.0 area 0
!
Device(config)#router bgp 1
Device(config-router)# bgp log-neighbor-changes
Device(config-router)# address family ipv4
Device(config-router-af)# network 10.100.1.5 mask 255.255.255.255
Device(config-router-af)# no bgp default ipv4 unicast
Device(config-router-af)# no bgp default route-target filter
Device(config-router-af)# neighbor 10.100.1.2 remote-as 1
Device(config-router-af)# neighbor 10.100.1.2 update-source Loopback0
Device(config-router-af)# neighbor 10.100.1.2 send-label

例:ルートリフレクタ 2 でのシームレス MPLS の設定

次に、ルートリフレクタ 2 にシームレス MPLS を設定する例を示します。

Device(cofig-if)# interface Loopback0
Device(cofig-if)# ip address 10.100.1.2 255.255.255.255
Device(config)# router ospf 1
Device(config-router)# network 10.1.0.0 0.0.255.255 area 0
Device(config-router)# network 10.100.1.2 0.0.0.0 area 0
!
Device(config)# router ospf 3
Device(config-router)# redistribute ospf 1 subnets match internal route-map ospf1-into-ospf3
Device(config-router)# network 10.3.0.0 0.0.255.255 area 0
!
Device(config)# router bgp 1
Device(config-router)# bgp log-neighbor-changes
Device(config-router)# address family ipv4
Device(config-router-af)# neighbor 10.100.1.1 remote-as 1
Device(config-router-af)# neighbor 10.100.1.1 update-source Loopback0
Device(config-router-af)# neighbor 10.100.1.1 next-hop-self all
Device(config-router-af)# neighbor 10.100.1.1  send-label
Device(config-router-af)# neighbor 10.100.1.5 remote-as 1
Device(config-router-af)# neighbor 10.100.1.5 update-source Loopback0
Device(config-router-af)# neighbor 10.100.1.5 route-reflector-client
Device(config-router-af)# neighbor 10.100.1.5 next-hop-self all
Device(config-router-af)# neighbor 10.100.1.5 send-label

Device(config)# ip prefix-list prefix-list-ospf1-into-ospf3 seq 5 permit 10.100.1.1/32

Device(config)# route-map ospf1-into-ospf3 permit 10
Device(conifg-route-mao)# match ip address prefix-list prefix-list-ospf1-into-ospf3

シームレス MPLS の機能履歴

次の表に、このモジュールで説明する機能のリリースおよび関連情報を示します。

これらの機能は、特に明記されていない限り、導入されたリリース以降のすべてのリリースで使用できます。

リリース

機能

機能情報

Cisco IOS XE Gibraltar 16.12.1

シームレスな MPLS

シームレス MPLS は、複数のネットワークを単一の MPLS ドメインに統合するための、非常に柔軟でスケーラブルなアーキテクチャを提供します。これは、既存の既知のプロトコルに基づいています。

Cisco Feature Navigator を使用すると、プラットフォームおよびソフトウェアイメージのサポート情報を検索できます。Cisco Feature Navigator には、http://www.cisco.com/go/cfn [英語] からアクセスします。