- このマニュアルについて
- Cisco Service Control の概要
- システムの概要
- トラフィック処理の概要
- 使用する 前に
- Network Navigator の使用方法
- Service Configuration Editor の使用方法
- Service Configuration Editor の使用方法: トラフィックの分類
- Service Configuration Editor の使用方法: トラフィックのアカウンティングとレポート
- Service Configuration Editor の使用方法: トラフィックの制御
- Service Configuration Editor の使用方法: その他のオプション
- Subscriber Manager の GUI ツールの使用 方法
- Signature Editor の使用方法
- その他の管理ツールおよびインターフェイス
Cisco Service Control Application for Broadband ユーザ ガイド
偏向のない言語
この製品のマニュアルセットは、偏向のない言語を使用するように配慮されています。このマニュアルセットでの偏向のない言語とは、年齢、障害、性別、人種的アイデンティティ、民族的アイデンティティ、性的指向、社会経済的地位、およびインターセクショナリティに基づく差別を意味しない言語として定義されています。製品ソフトウェアのユーザーインターフェイスにハードコードされている言語、RFP のドキュメントに基づいて使用されている言語、または参照されているサードパーティ製品で使用されている言語によりドキュメントに例外が存在する場合があります。シスコのインクルーシブランゲージに対する取り組みの詳細は、こちらをご覧ください。
翻訳について
このドキュメントは、米国シスコ発行ドキュメントの参考和訳です。リンク情報につきましては、日本語版掲載時点で、英語版にアップデートがあり、リンク先のページが移動/変更されている場合がありますことをご了承ください。あくまでも参考和訳となりますので、正式な内容については米国サイトのドキュメントを参照ください。
- Updated:
- 2017年6月5日
章のタイトル: Service Configuration Editor の使用方法: トラフィックの制御
Service Configuration Editor の使用方法:トラフィックの制御
はじめに
Service Control Engine(SCE)プラットフォームのトラフィック制御機能と Cisco Service Control Application for Broadband(SCA BB)は、トラフィック フローの制限と優先順位付けのために使用されます。トラフィックの制御は、フローのサービス、サブスクライバのパッケージ、サブスクライバのクォータ状態などのパラメータに基づいて行われます。
•![]() 「帯域幅の管理」
「帯域幅の管理」
•![]() 「規則の管理」
「規則の管理」
帯域幅の管理
アップストリーム インターフェイスとダウンストリーム インターフェイスには、それぞれ 1 つずつデフォルト グローバル コントローラが割り当てられています。これ以外にも、グローバル コントローラを追加できます。
サービス コンフィギュレーションには、最大で 1024 のアップストリーム グローバル コントローラと 1024 のダウンストリーム グローバル コントローラ(デフォルト グローバル コントローラを含む)を設定できます。
グローバル コントローラの定義が完了すると、パッケージにサブスクライバ BW Controller(BWC; BW コントローラ)を追加し、これらのサブスクライバ BWC を異なるグローバル コントローラにマッピングすることが可能になります。

グローバル帯域幅の管理
デフォルトでは、アップストリーム インターフェイスとダウンストリーム インターフェイスには、リンク トラフィック全体を制御するデフォルト グローバル コントローラが 1 つずつ割り当てられています。各インターフェイスに最大 1023 のグローバル コントローラを追加し、各グローバル コントローラに合計リンク制限の最大帯域幅を個別に割り当てることができます。
各インターフェイスに対して、帯域幅合計リンク制限を、SCE プラットフォームの物理容量よりも小さい値に個別に定義することもできます。IP ストリーム上で SCE プラットフォームの隣に位置するデバイスの BandWidth(BW; 帯域幅)容量が制限されている場合、この制限を他のデバイスで任意に適用する代わりに、ポリシーアウェア方式を使用して SCE プラットフォームで適用できます。
グローバル コントローラ設定の表示

(注) グローバル コントローラ帯域幅は、レイヤ 1 ボリュームに基づいています
(SCA BB のアカウンティング、レポート、およびサブスクライバ帯域幅制御は、レイヤ 3 ボリュームに基づいています)。
ステップ 1![]() [Policies] タブで [Global Policy] をクリックします。
[Policies] タブで [Global Policy] をクリックします。
[Global Bandwidth Settings] ダイアログボックスが右の規則ペインに表示されます(図 9-1)。
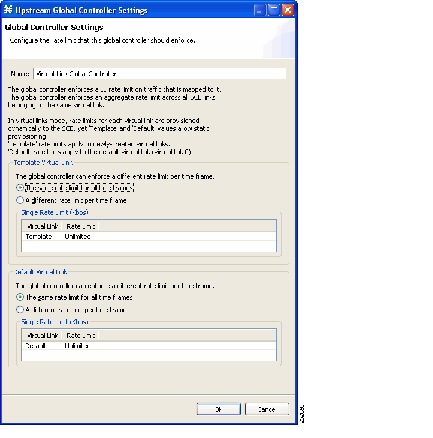
図 9-1 [Global Bandwidth Settings]

[Global Controllers] タブの上部にある 2 つのチェックボックスは、デュアルリンク システムだけで使用します(「グローバル コントローラの定義」を参照)。
ペインの主要部は、アップストリームのグローバル コントローラを一覧表示する [Upstream] 領域と、ダウンストリームのグローバル コントローラを一覧表示する [Downstream] 領域からなります。各リストは次の 2 つのカラムで構成されています。
•![]() [Upstream] または [Downstream]:グローバル コントローラ、帯域幅コントローラ、およびサービス規則の階層が表示されます。各グローバル コントローラには帯域幅コントローラが対応付けられており、グローバル コントローラの子として一覧表示されます。各帯域幅コントローラにはサービス規則が対応付けられており、帯域幅コントローラの子として一覧表示されます。
[Upstream] または [Downstream]:グローバル コントローラ、帯域幅コントローラ、およびサービス規則の階層が表示されます。各グローバル コントローラには帯域幅コントローラが対応付けられており、グローバル コントローラの子として一覧表示されます。各帯域幅コントローラにはサービス規則が対応付けられており、帯域幅コントローラの子として一覧表示されます。
•![]() [Policy Description]:グローバル コントローラ、帯域幅コントローラ、またはサービス規則の詳細が、対応するカラムに要約されています。グローバル コントローラの詳細が含まれる行には、このグローバル コントローラに許容される最大帯域幅の値が表示されます。
[Policy Description]:グローバル コントローラ、帯域幅コントローラ、またはサービス規則の詳細が、対応するカラムに要約されています。グローバル コントローラの詳細が含まれる行には、このグローバル コントローラに許容される最大帯域幅の値が表示されます。
各グローバル コントローラでは、デフォルト カレンダーによって定義される 4 つの時間枠に対し、それぞれ異なる最大帯域幅の値を設定できます(「カレンダーの管理」を参照)。
–![]() このフィールドが 1 つの値の場合、このグローバル コントローラの最大帯域幅は定数です。
このフィールドが 1 つの値の場合、このグローバル コントローラの最大帯域幅は定数です。
–![]() 時間枠ごとに最大帯域幅が異なる場合、それぞれの時間枠の最大帯域幅が、カンマで区切られて表示されます(図 9-2)。
時間枠ごとに最大帯域幅が異なる場合、それぞれの時間枠の最大帯域幅が、カンマで区切られて表示されます(図 9-2)。

–![]() 2 つの時間枠の最大帯域幅が同じである場合、同じ値は繰り返して表示されません(図 9-3) (したがって、 40,,,100 の場合、最初の 3 つの時間枠は最大帯域幅が合計リンク制限の 40% で、4 つめの時間枠は最大帯域幅が合計リンク制限と等しいことを意味します)。
2 つの時間枠の最大帯域幅が同じである場合、同じ値は繰り返して表示されません(図 9-3) (したがって、 40,,,100 の場合、最初の 3 つの時間枠は最大帯域幅が合計リンク制限の 40% で、4 つめの時間枠は最大帯域幅が合計リンク制限と等しいことを意味します)。

各インターフェイスの領域([Upstream] または [Downstream])の上に、合計リンク制限が表示されます(図 9-4)。

グローバル コントローラのフィルタリング
ステップ 1![]() [Policies] タブで [Global Policy] をクリックします。
[Policies] タブで [Global Policy] をクリックします。
[Global Bandwidth Settings] が右の規則ペインに表示されます。
ステップ 2![]() [Configure Filters] をクリックします。
[Configure Filters] をクリックします。
[Filter View] ダイアログボックスが表示されます(図 9-5)。
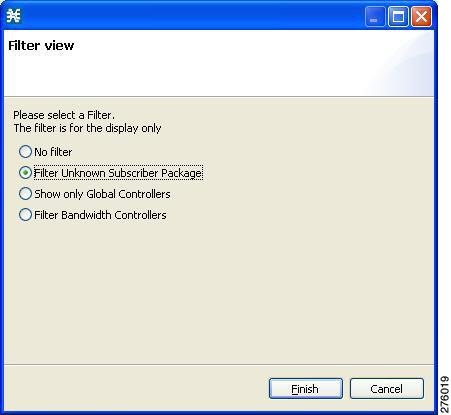
ステップ 3![]() 次のフィルタ オプション ボタンをいずれか 1 つ選択します。
次のフィルタ オプション ボタンをいずれか 1 つ選択します。
•![]() [Filter Unknown Subscriber Package]
[Filter Unknown Subscriber Package]
•![]() [Show only Global Controllers]
[Show only Global Controllers]
合計リンク制限の編集
SCE プラットフォームを通過する合計帯域幅を制限できます。
たとえば、IP ストリーム上で SCE プラットフォームの隣に位置するデバイスの BW 容量が限られている場合、他のデバイスの容量に合わせて、SCE プラットフォームを通過する帯域幅を制限できます。
アップストリーム トラフィックとダウンストリーム トラフィックの合計リンク制限は、別々に定義されます。
ステップ 1![]() [Policies] タブで [Global Policy] をクリックします。
[Policies] タブで [Global Policy] をクリックします。
[Global Bandwidth Settings] ダイアログボックスが右の規則ペインに表示されます。
ステップ 2![]() [Upstream] または [Downstream] セクションで、[Edit Rate Limit] をクリックします(図 9-6)。
[Upstream] または [Downstream] セクションで、[Edit Rate Limit] をクリックします(図 9-6)。
(注) 図 9-6 の表示内容は、グローバル コントローラのモード設定により異なります。
図 9-6 [SCE Upstream Links - Total Rate Limit]
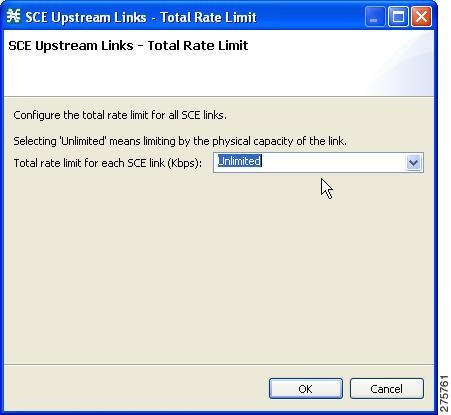
ステップ 3![]() [Total rate limit for each SCE link (Kbps)] フィールドで、合計レート制限を選択します。
[Total rate limit for each SCE link (Kbps)] フィールドで、合計レート制限を選択します。
[Global Controller Settings] ダイアログボックスが閉じます。
グローバル コントローラの追加
サービス コンフィギュレーションには、最大で 1023 のアップストリーム グローバル コントローラと 1023 のダウンストリーム グローバル コントローラを追加できます。
ステップ 1![]() [Policies] タブで [Global Policy] をクリックします。
[Policies] タブで [Global Policy] をクリックします。
[Global Bandwidth Settings] ダイアログボックスが右の規則ペインに表示されます。
ステップ 2![]() 目的のインターフェイスの領域([Upstream] または [Downstream])上で、
目的のインターフェイスの領域([Upstream] または [Downstream])上で、 ([Add])をクリックします。
[Select addition mode] ダイアログボックスが表示されます(図 9-7)。
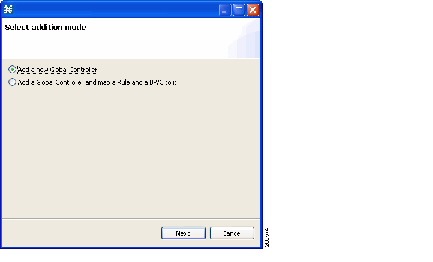
ステップ 3![]() 新しいグローバル コントローラを追加するには、[Add a new Global Controller] オプション ボタンを選択します。
新しいグローバル コントローラを追加するには、[Add a new Global Controller] オプション ボタンを選択します。
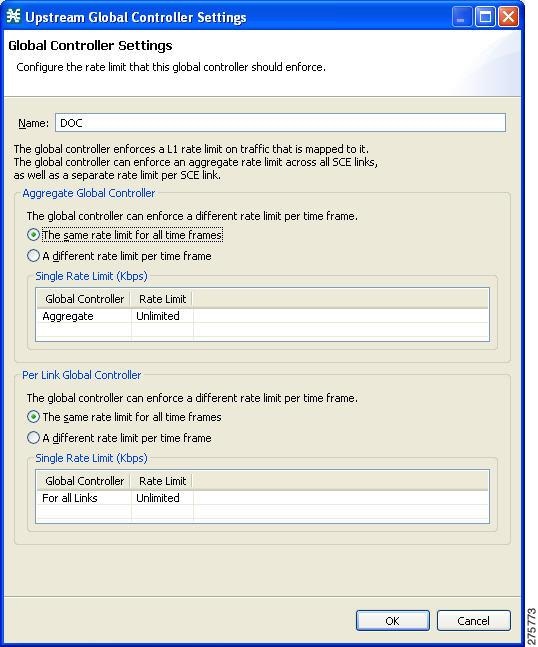
[Global Controller Settings] ダイアログボックスが表示されます(図 9-8)。
(注) 図 9-8 の表示内容は、グローバル コントローラのモード設定により異なります。
図 9-8 [Upstream Global Controller Settings]
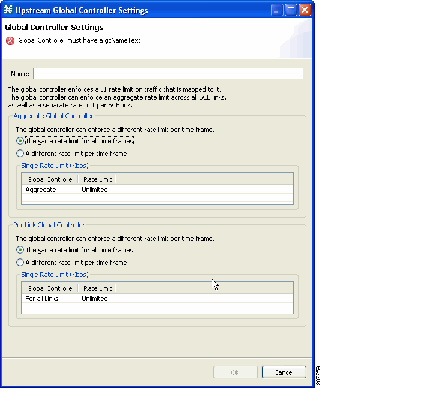
ステップ 5![]() [Name] フィールドにわかりやすい名前を入力します。
[Name] フィールドにわかりやすい名前を入力します。
ステップ 6![]() グローバル コントローラの最大帯域幅を編集するには、「グローバル コントローラの最大帯域幅の設定」のセクションの手順を実行します。
グローバル コントローラの最大帯域幅を編集するには、「グローバル コントローラの最大帯域幅の設定」のセクションの手順を実行します。
[Global Controller Settings] ダイアログボックスが閉じます。
グローバル コントローラの最大帯域幅の設定
グローバル コントローラを通過する最大帯域幅を編集できます。
各リンクと、全リンクの集約 BW に対し、異なる値を設定できます。
ステップ 1![]() [Policies] タブで [Global Policy] をクリックします。
[Policies] タブで [Global Policy] をクリックします。
[Global Bandwidth Settings] ダイアログボックスが右の規則ペインに表示されます。
[Global Controller Settings] ダイアログボックスが表示されます(図 9-9)。
(注) 図 9-9 の表示内容は、グローバル コントローラのモード設定により異なります。
図 9-9 [Upstream Global Controller Settings]
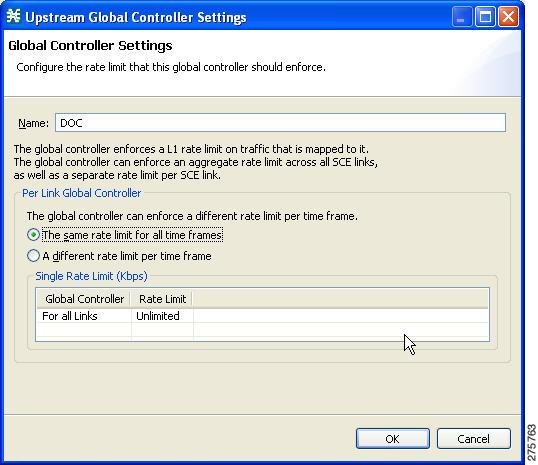
ステップ 4![]() このグローバル コントローラを通過する最大帯域幅制限に単一の値を設定します。
このグローバル コントローラを通過する最大帯域幅制限に単一の値を設定します。
•![]() [The same rate limit for all time frames] オプション ボタンを選択し、目的とする最大帯域幅の値を [Single Rate Limit (Kbps)] フィールドに Kbps 単位で入力します。
[The same rate limit for all time frames] オプション ボタンを選択し、目的とする最大帯域幅の値を [Single Rate Limit (Kbps)] フィールドに Kbps 単位で入力します。
ステップ 5![]() このグローバル コントローラを通過する最大帯域幅制限を設定し、時間枠に応じて変化させます。
このグローバル コントローラを通過する最大帯域幅制限を設定し、時間枠に応じて変化させます。
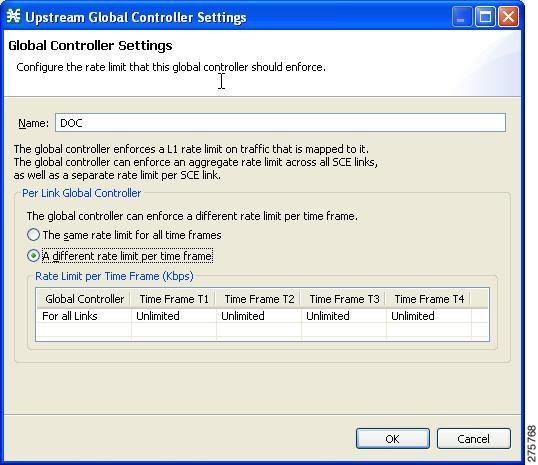
•![]() [A different rate limit per time frame] オプション ボタンを選択し、各時間枠の目的とする値を入力します(図 9-10)。
[A different rate limit per time frame] オプション ボタンを選択し、各時間枠の目的とする値を入力します(図 9-10)。
(注) 図 9-10 の表示内容は、グローバル コントローラのモード設定により異なります。
図 9-10 [Upstream Global Controller Settings]
(注) これらの値が、デフォルト カレンダーの時間枠に適用されます。
[Policy Description] カラムの値は、新しい帯域幅制限を反映して変化します。
ステップ 7![]() その他のグローバル コントローラに対してステップ 2 ~ステップ 6 を繰り返します。
その他のグローバル コントローラに対してステップ 2 ~ステップ 6 を繰り返します。
グローバル コントローラの削除
使用していないグローバル コントローラは、いつでも削除できます。デフォルト グローバル コントローラおよび合計リンク制限は削除できません。
ステップ 1![]() [Policies] タブで [Global Policy] をクリックします。
[Policies] タブで [Global Policy] をクリックします。
[Global Bandwidth Settings] ダイアログボックスが表示されます。
(注) 指定したグローバル コントローラがサブスクライバ BWC で使用されている場合(「パッケージ サブスクライバ BWC の編集」を参照)、グローバル コントローラを削除できないことを示すメッセージが表示されます。グローバル コントローラは、すべてのサブスクライバ BWC の割り当てを解除するまで、削除できません。
[Global Bandwidth Settings] ダイアログボックスが閉じます。
グローバル コントローラの定義
ここでは、デュアルリンク システムおよびマルチギガビット イーサネット システムでグローバル コントローラを定義する方法について説明します。
いずれのシステムでも、同じレートを使用して各リンクを個別に定義したり、異なるレートを使用して各リンクを個別に定義したりすることができます。
あるいは、全リンクの集約として、またはリンクごとの個々の制御の集約として、帯域幅制限を適用することもできます。
1.![]() すべてのリンクに同じレートを使用して、各リンクを個別に制御する。
すべてのリンクに同じレートを使用して、各リンクを個別に制御する。
2.![]() リンクごとに異なるレートを使用して、各リンクを個別に制御する。
リンクごとに異なるレートを使用して、各リンクを個別に制御する。
3.![]() リンクを全体的に制御し、リンクごとの最大レートを全リンクで同じにする。
リンクを全体的に制御し、リンクごとの最大レートを全リンクで同じにする。
4.![]() リンクを全体的に制御し、リンクごとに異なる最大レートを適用する。
リンクを全体的に制御し、リンクごとに異なる最大レートを適用する。
(注) 仮想リンク モードがイネーブルになっている場合、帯域幅制限はすべてのリンクの合計に対して適用されます。
(注) 無効なリンクのグローバル コントローラ帯域幅を変更しようとすると、ポリシーの適用中に次のようなエラー メッセージが表示されます。
「Invalid value set on Link ID 6 for upstream GC 'Default Global Controller'.Link ID 6 does not exist.Available Link IDs: 1, 2, 3, 4」
グローバル コントローラ設定の各編集ダイアログは、次の操作でアクティブにすることができます(図 9-11)。
•![]() グローバル ポリシー設定の右側のメイン パネルにあるグローバル コントローラ テーブル画面で、グローバル コントローラの行をダブルクリックします。
グローバル ポリシー設定の右側のメイン パネルにあるグローバル コントローラ テーブル画面で、グローバル コントローラの行をダブルクリックします。
•![]() グローバル ポリシー設定の右側のメインパネルの右上にある編集ボタンをクリックします。
グローバル ポリシー設定の右側のメインパネルの右上にある編集ボタンをクリックします。
(注) アップストリームとダウンストリームのいずれの GC でも動作は同じです。
•![]() 「全リンクに同一レートを使用するグローバル コントローラ帯域幅制限の設定」
「全リンクに同一レートを使用するグローバル コントローラ帯域幅制限の設定」
•![]() 「リンクごとに異なるレートを使用するグローバル コントローラ帯域幅制限の設定」
「リンクごとに異なるレートを使用するグローバル コントローラ帯域幅制限の設定」
•![]() 「各リンクに同一レートを使用し、グローバル コントローラ帯域幅制限を全リンクの合計として設定する方法」
「各リンクに同一レートを使用し、グローバル コントローラ帯域幅制限を全リンクの合計として設定する方法」
全リンクに同一レートを使用するグローバル コントローラ帯域幅制限の設定
すべてのリンクに同じレートを使用してグローバル コントローラを設定するには、次の手順を実行します。
ステップ 1![]() [Policies] タブで [Global Policy] をクリックします。
[Policies] タブで [Global Policy] をクリックします。
[Global Bandwidth Settings] ダイアログボックスが右の規則ペインに表示されます。
ステップ 2![]() 「グローバル コントローラの追加」の説明に従って、グローバル コントローラを追加します。
「グローバル コントローラの追加」の説明に従って、グローバル コントローラを追加します。
ステップ 3![]() [Edit Preferences] をクリックします。
[Edit Preferences] をクリックします。
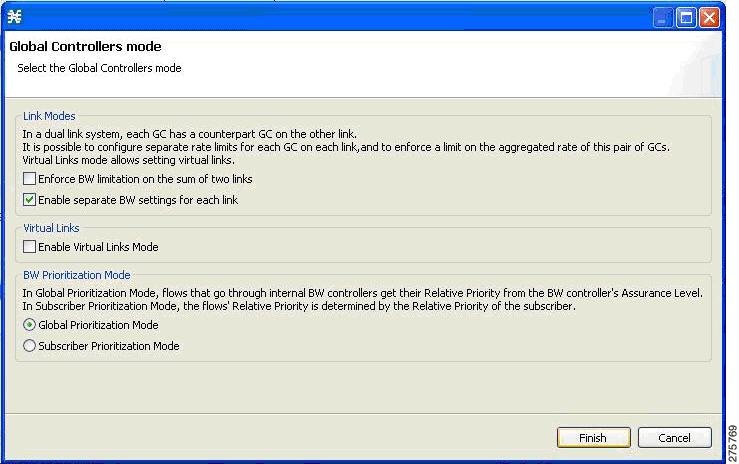
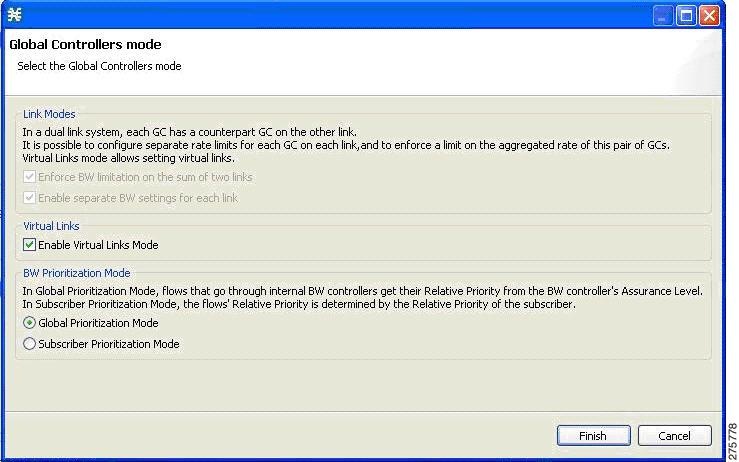
[Global Controllers mode] ダイアログボックスが表示されます(図 9-12)。
図 9-12 [Global Controllers mode]

ステップ 4![]() [Link Modes] のチェックボックスがオフになっていることを確認します。
[Link Modes] のチェックボックスがオフになっていることを確認します。
[Global Controllers mode] ダイアログボックスが閉じます。
ステップ 6![]() [Policies] タブで [Global Policy] をクリックします。
[Policies] タブで [Global Policy] をクリックします。
[Global Bandwidth Settings] ダイアログボックスが右の規則ペインに表示されます。
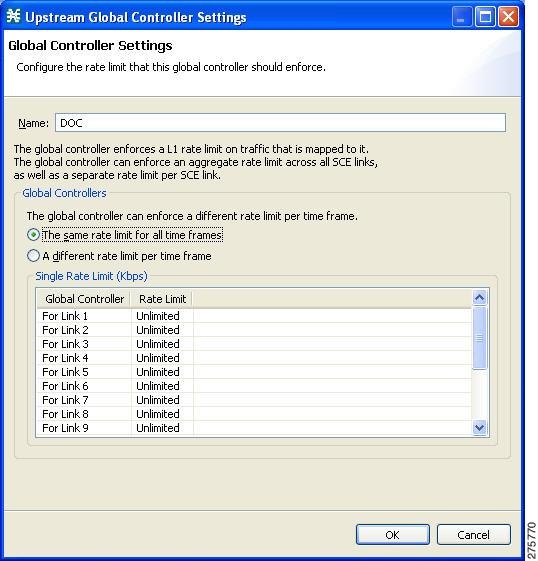
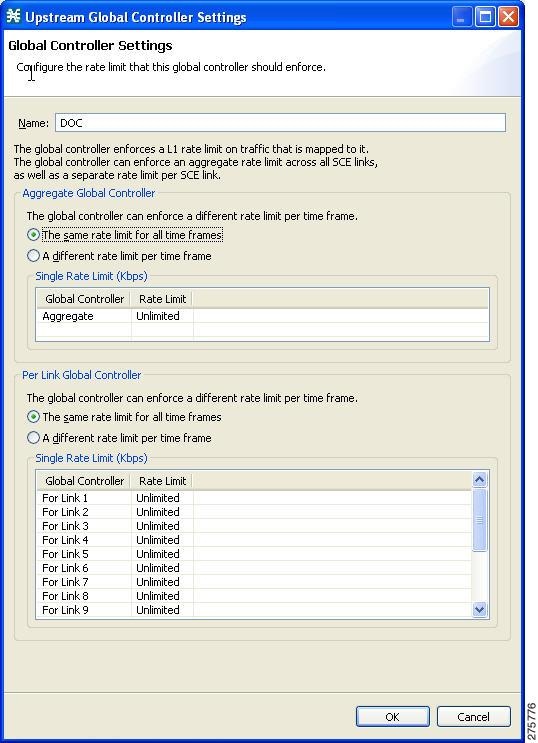
[Global Controller Settings] ダイアログボックスが表示されます(図 9-13)。
図 9-13 [Upstream Global Controller Settings]

(注) すべての時間枠のレート制限を同じにする場合は、ステップ 9 を実行します。すべての時間枠のレート制限を時間枠ごとに変える場合は、ステップ 10 を実行します。
ステップ 9![]() このグローバル コントローラを通過する最大帯域幅制限に単一の値を設定します。
このグローバル コントローラを通過する最大帯域幅制限に単一の値を設定します。
a.![]() [The same rate limit for all time frames] オプション ボタンを選択します。
[The same rate limit for all time frames] オプション ボタンを選択します。
b.![]() [Rate limit for the Per Link Global Controller (in Kbps)] フィールドに、目的とする最大帯域幅の値を Kbps 単位で入力します。
[Rate limit for the Per Link Global Controller (in Kbps)] フィールドに、目的とする最大帯域幅の値を Kbps 単位で入力します。
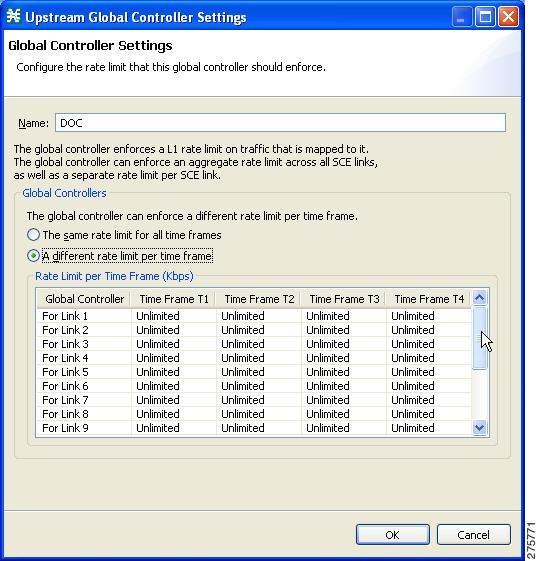
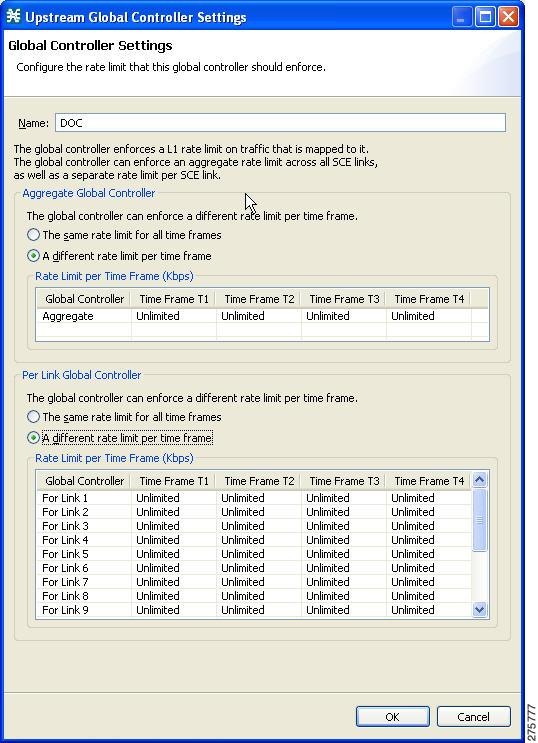
ステップ 10![]() このグローバル コントローラを通過する最大帯域幅制限を設定し、時間枠に応じて変化させます。
このグローバル コントローラを通過する最大帯域幅制限を設定し、時間枠に応じて変化させます。
a.![]() [A different rate limit per time frame] オプション ボタンを選択します。
[A different rate limit per time frame] オプション ボタンを選択します。
b.![]() 各時間枠で目的とする値を入力します(図 9-14)。
各時間枠で目的とする値を入力します(図 9-14)。
図 9-14 [Upstream Global Controller Settings]
リンクごとに異なるレートを使用するグローバル コントローラ帯域幅制限の設定
リンクごとに異なるレートを使用してグローバル コントローラを設定するには、次の手順を実行します。
ステップ 1![]() [Policies] タブで [Global Policy] をクリックします。
[Policies] タブで [Global Policy] をクリックします。
[Global Bandwidth Settings] ダイアログボックスが右の規則ペインに表示されます。
ステップ 2![]() 「グローバル コントローラの追加」の説明に従って、グローバル コントローラを追加します。
「グローバル コントローラの追加」の説明に従って、グローバル コントローラを追加します。
ステップ 3![]() [Edit Preferences] をクリックします。
[Edit Preferences] をクリックします。
[Global Controllers mode] ダイアログボックスが表示されます(図 9-15)。
図 9-15 [Global Controllers mode]
ステップ 4![]() [Enable separate BW setting for each link] チェックボックスをオンにします。
[Enable separate BW setting for each link] チェックボックスをオンにします。
[Global Controllers mode] ダイアログボックスが閉じます。
ステップ 6![]() [Policies] タブで [Global Policy] をクリックします。
[Policies] タブで [Global Policy] をクリックします。
[Global Bandwidth Settings] ダイアログボックスが右の規則ペインに表示されます。
[Global Controller Settings] ダイアログボックスが表示されます(図 9-16)。
図 9-16 [Downstream Global Controller Settings]
(注) すべての時間枠のレート制限を同じにする場合は、ステップ 9 を実行します。すべての時間枠のレート制限を時間枠ごとに変える場合は、ステップ 10 を実行します。
ステップ 9![]() 各リンクについて、このグローバル コントローラを通過する最大帯域幅制限に単一の値を設定します。
各リンクについて、このグローバル コントローラを通過する最大帯域幅制限に単一の値を設定します。
a.![]() [The same rate limit for all time frames] オプション ボタンを選択します。
[The same rate limit for all time frames] オプション ボタンを選択します。
b.![]() [Rate limit for the Per Link Global Controller (in Kbps)] フィールドに、目的とする最大帯域幅の値を Kbps 単位で入力します。
[Rate limit for the Per Link Global Controller (in Kbps)] フィールドに、目的とする最大帯域幅の値を Kbps 単位で入力します。
ステップ 10![]() 各リンクについて、このグローバル コントローラを通過する最大帯域幅制限を設定し、時間枠に応じて変化させます。
各リンクについて、このグローバル コントローラを通過する最大帯域幅制限を設定し、時間枠に応じて変化させます。
a.![]() [A different rate limit per time frame] オプション ボタンを選択します。
[A different rate limit per time frame] オプション ボタンを選択します。
b.![]() 各時間枠で目的とする値を入力します(図 9-17)。
各時間枠で目的とする値を入力します(図 9-17)。
図 9-17 [Upstream Global Controller Settings]
各リンクに同一レートを使用し、グローバル コントローラ帯域幅制限を全リンクの合計として設定する方法
このリンク制御モードでは、最大帯域幅制限が全リンクの合計として設定されます。このモードで GC を作成すると、リンクの集約グローバル コントローラを設定したうえで、リンクごとの最大レートを設定できます。このモードでは、全リンクの合計に帯域幅制限を適用し、リンクを全体的に制御したうえで、リンクごとの最大レートをすべてのリンクで同じにすることができます。
各リンクに同じレートを使用し、グローバル コントローラを全リンクの合計として設定するには、次の手順を実行します。
ステップ 1![]() [Policies] タブで [Global Policy] をクリックします。
[Policies] タブで [Global Policy] をクリックします。
[Global Bandwidth Settings] ダイアログボックスが右の規則ペインに表示されます。
ステップ 2![]() 「グローバル コントローラの追加」の説明に従って、グローバル コントローラを追加します。
「グローバル コントローラの追加」の説明に従って、グローバル コントローラを追加します。
ステップ 3![]() [Edit Preferences] をクリックします。
[Edit Preferences] をクリックします。
[Global Controllers mode] ダイアログボックスが表示されます(図 9-18)。
図 9-18 [Global Controllers mode]
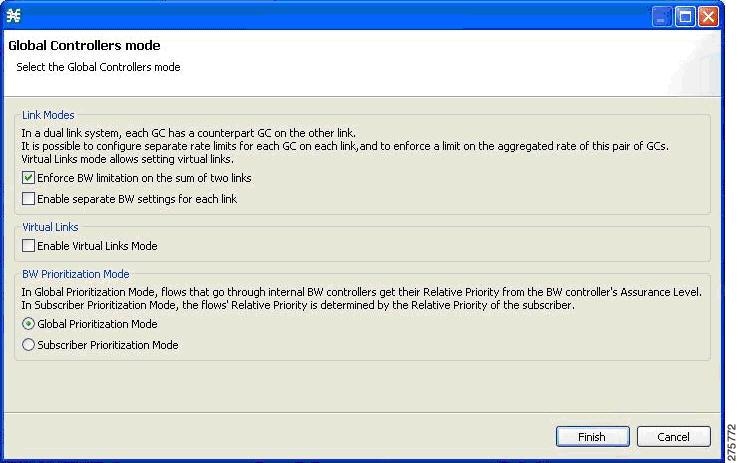
ステップ 4![]() [Enforce BW limitation on the sum of the links] チェックボックスをオンにします。
[Enforce BW limitation on the sum of the links] チェックボックスをオンにします。
[Global Controllers mode] ダイアログボックスが閉じます。
ステップ 6![]() [Policies] タブで [Global Policy] をクリックします。
[Policies] タブで [Global Policy] をクリックします。
[Global Bandwidth Settings] ダイアログボックスが右の規則ペインに表示されます。
[Global Controller Settings] ダイアログボックスが表示されます(図 9-19)。
図 9-19 [Upstream Global Controller Settings]
(注) すべての時間枠のレート制限を同じにする場合は、ステップ 9 を実行します。すべての時間枠のレート制限を時間枠ごとに変える場合は、ステップ 10 を実行します。
ステップ 9![]() このグローバル コントローラを通過する最大帯域幅制限に単一の値を設定します。
このグローバル コントローラを通過する最大帯域幅制限に単一の値を設定します。
a.![]() [Aggregate Global Controller] タブの [The same rate limit for all time frames] オプション ボタンを選択します。
[Aggregate Global Controller] タブの [The same rate limit for all time frames] オプション ボタンを選択します。
b.![]() [Rate limit for the Per Link Global Controller (in Kbps)] フィールドに、目的とする最大帯域幅の値を Kbps 単位で入力します。
[Rate limit for the Per Link Global Controller (in Kbps)] フィールドに、目的とする最大帯域幅の値を Kbps 単位で入力します。
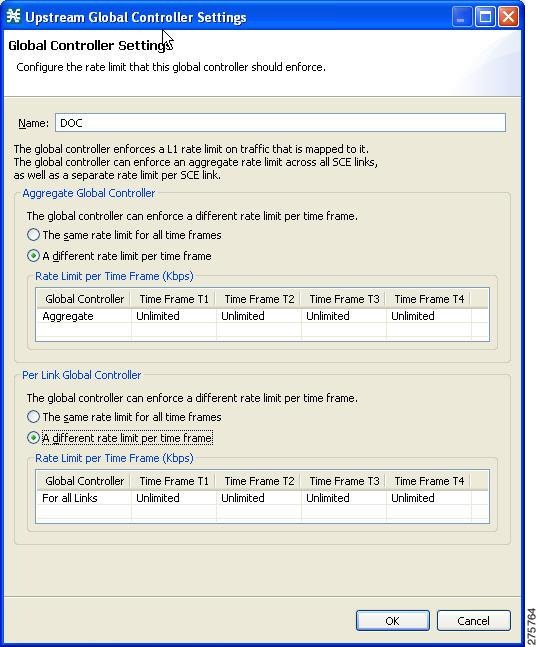
ステップ 10![]() このグローバル コントローラを通過する最大帯域幅制限を設定し、時間枠に応じて変化させます。
このグローバル コントローラを通過する最大帯域幅制限を設定し、時間枠に応じて変化させます。
a.![]() [Aggregate Global Controller] タブの [A different rate limit per time frame] オプション ボタンを選択します。
[Aggregate Global Controller] タブの [A different rate limit per time frame] オプション ボタンを選択します。
b.![]() 各時間枠で目的とする値を入力します(図 9-20)。
各時間枠で目的とする値を入力します(図 9-20)。
図 9-20 [Upstream Global Controller Settings]

リンクごとに異なるレートを使用し、グローバル コントローラ帯域幅制限を全リンクの合計として設定する方法
このリンク制御モードでは、最大帯域幅はリンクの合計ですが、帯域幅は、全リンクの最大帯域幅に達するまでリンクごとに設定できます。このモードで GC を作成すると、リンクの集約グローバル コントローラを設定したうえで、リンクごとに帯域幅制限を指定できます。このモードは、SCE が複数のエッジ デバイスのサーバとして動作しており、2 つの規則を適用する場合、つまり、1 つの集約的規則をすべてのリンクにまとめて適用し、もう 1 つの規則を個々のリンクに適用する場合に使用されます。このモードでは、全リンクの合計に帯域幅制限を適用し、個別の帯域幅設定をリンクごとにイネーブルにすることができます。リンクを全体的に制御し、リンクごとに異なる最大レートを設定できます。
リンクごとに異なるレートを使用し、グローバル コントローラを全リンクの合計として設定するには、次の手順を実行します。
ステップ 1![]() [Policies] タブで [Global Policy] をクリックします。
[Policies] タブで [Global Policy] をクリックします。
[Global Bandwidth Settings] ダイアログボックスが右の規則ペインに表示されます。
ステップ 2![]() 「グローバル コントローラの追加」の説明に従って、グローバル コントローラを追加します。
「グローバル コントローラの追加」の説明に従って、グローバル コントローラを追加します。
ステップ 3![]() [Edit Preferences] をクリックします。
[Edit Preferences] をクリックします。
[Global Controllers mode] ダイアログボックスが表示されます(図 9-21)。
図 9-21 [Global Controllers mode]
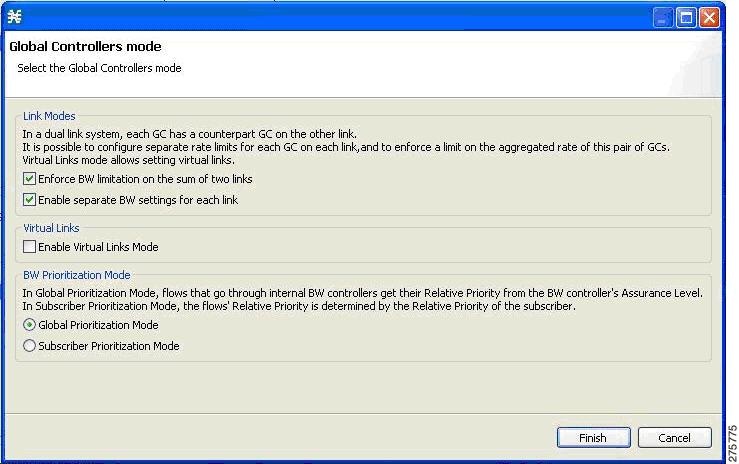
ステップ 4![]() [Enforce BW limitation on the sum of the links] および [Enable separate BW setting for each link] チェックボックスを選択します。
[Enforce BW limitation on the sum of the links] および [Enable separate BW setting for each link] チェックボックスを選択します。
[Global Controllers mode] ダイアログボックスが閉じます。
ステップ 6![]() [Policies] タブで [Global Policy] をクリックします。
[Policies] タブで [Global Policy] をクリックします。
[Global Bandwidth Settings] ダイアログボックスが右の規則ペインに表示されます。
[Global Controller Settings] ダイアログボックスが表示されます(図 9-22)。
図 9-22 [Upstream Global Controller Settings]
(注) すべての時間枠のレート制限を同じにする場合は、ステップ 9 を実行します。すべての時間枠のレート制限を時間枠ごとに変える場合は、ステップ 10 を実行します。
ステップ 9![]() このグローバル コントローラを通過する最大帯域幅制限に単一の値を設定します。
このグローバル コントローラを通過する最大帯域幅制限に単一の値を設定します。
a.![]() [Per Link Global Controller] タブの [The same rate limit for all time frames] オプション ボタンを選択します。
[Per Link Global Controller] タブの [The same rate limit for all time frames] オプション ボタンを選択します。
b.![]() [Rate limit for the Link 1 (in Kbps)] フィールドに、目的とする最大帯域幅の値を Kbps 単位で入力します。
[Rate limit for the Link 1 (in Kbps)] フィールドに、目的とする最大帯域幅の値を Kbps 単位で入力します。
ステップ 10![]() このグローバル コントローラを通過する最大帯域幅制限を設定し、時間枠に応じて変化させます。
このグローバル コントローラを通過する最大帯域幅制限を設定し、時間枠に応じて変化させます。
a.![]() [Per Link Global Controller] タブの [A different rate limit per time frame] オプション ボタンを選択します。
[Per Link Global Controller] タブの [A different rate limit per time frame] オプション ボタンを選択します。
c.![]() 各リンクに対してステップ 10b を繰り返します(図 9-23)。
各リンクに対してステップ 10b を繰り返します(図 9-23)。
図 9-23 [Downstream Global Controller Settings]
仮想リンクのグローバル コントローラ帯域幅の設定
このモードでは、設定済みのレート テンプレートとデフォルト レートを使用して各リンクを個別に制御できます。テンプレートのレート制限は、新しく作成される仮想リンクに適用されます。デフォルトのレート制限は、デフォルトの仮想リンク(仮想リンク 0)に適用されます。
仮想リンクにグローバル コントローラを設定するには、次の手順を実行します。
ステップ 1![]() [Policies] タブで [Global Policy] をクリックします。
[Policies] タブで [Global Policy] をクリックします。
[Global Bandwidth Settings] ダイアログボックスが右の規則ペインに表示されます。
ステップ 2![]() 「グローバル コントローラの追加」の説明に従って、グローバル コントローラを追加します。
「グローバル コントローラの追加」の説明に従って、グローバル コントローラを追加します。
ステップ 3![]() [Edit Preferences] をクリックします。
[Edit Preferences] をクリックします。
[Global Controllers mode] ダイアログボックスが表示されます(図 9-24)。
図 9-24 [Global Controllers mode]
ステップ 4![]() [Enable Virtual Links Mode] チェックボックスをオンにします。
[Enable Virtual Links Mode] チェックボックスをオンにします。
[Global Controllers mode] ダイアログボックスが閉じます。
ステップ 6![]() [Policies] タブで [Global Policy] をクリックします。
[Policies] タブで [Global Policy] をクリックします。
[Global Bandwidth Settings] ダイアログボックスが右の規則ペインに表示されます。
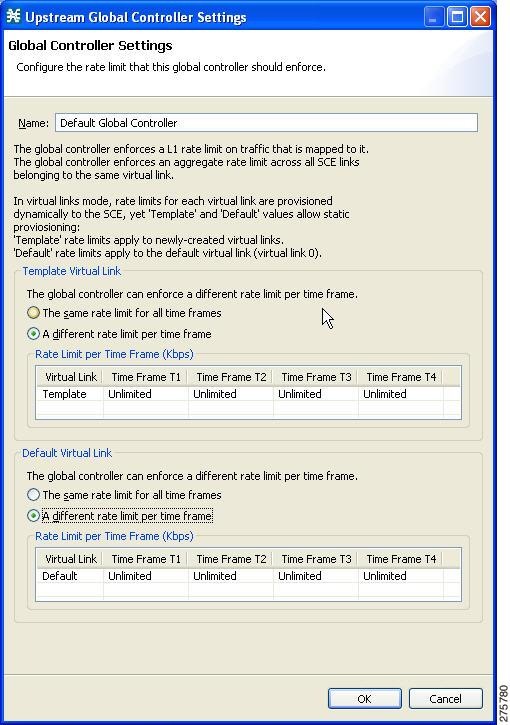
[Global Controller Settings] ダイアログボックスが表示されます(図 9-25)。
図 9-25 [Upstream Global Controller Settings]

(注) [Template Virtual Link] ですべての時間枠のレート制限を同じにする場合は、ステップ 9 を実行します。[Template Virtual Link] ですべての時間枠のレート制限を時間枠ごとに変える場合は、ステップ 10 を実行します。
ステップ 9![]() このグローバル コントローラを通過する最大帯域幅制限に単一の値を設定します。
このグローバル コントローラを通過する最大帯域幅制限に単一の値を設定します。
a.![]() [Template Virtual Link] タブの [The same rate limit for all time frames] オプション ボタンを選択します。
[Template Virtual Link] タブの [The same rate limit for all time frames] オプション ボタンを選択します。
b.![]() [Rate limit for the Link 1 (in Kbps)] フィールドに、目的とする最大帯域幅の値を Kbps 単位で入力します。
[Rate limit for the Link 1 (in Kbps)] フィールドに、目的とする最大帯域幅の値を Kbps 単位で入力します。
ステップ 10![]() このグローバル コントローラを通過する最大帯域幅制限を設定し、時間枠に応じて変化させます。
このグローバル コントローラを通過する最大帯域幅制限を設定し、時間枠に応じて変化させます。
a.![]() [Template Virtual Link] タブの [A different rate limit per time frame] オプション ボタンを選択します。
[Template Virtual Link] タブの [A different rate limit per time frame] オプション ボタンを選択します。
(注) [Default Virtual Link] ですべての時間枠のレート制限を同じにする場合は、ステップ 11 を実行します。[Default Virtual Link] ですべての時間枠のレート制限を時間枠ごとに変える場合は、ステップ 12 を実行します。
ステップ 11![]() このグローバル コントローラを通過する最大帯域幅制限に単一の値を設定します。
このグローバル コントローラを通過する最大帯域幅制限に単一の値を設定します。
a.![]() [Default Virtual Link] タブの [The same rate limit for all time frames] オプション ボタンを選択します。
[Default Virtual Link] タブの [The same rate limit for all time frames] オプション ボタンを選択します。
b.![]() [Rate limit for the Link 1 (in Kbps)] フィールドに、目的とする最大帯域幅の値を Kbps 単位で入力します。
[Rate limit for the Link 1 (in Kbps)] フィールドに、目的とする最大帯域幅の値を Kbps 単位で入力します。
ステップ 12![]() このグローバル コントローラを通過する最大帯域幅制限を設定し、時間枠に応じて変化させます。
このグローバル コントローラを通過する最大帯域幅制限を設定し、時間枠に応じて変化させます。
a.![]() [Default Virtual Link] タブの [A different rate limit per time frame] オプション ボタンを選択します。
[Default Virtual Link] タブの [A different rate limit per time frame] オプション ボタンを選択します。
b.![]() 各時間枠で目的とする値を入力します(図 9-26)。
各時間枠で目的とする値を入力します(図 9-26)。
図 9-26 [Upstream Global Controller Settings]
サブスクライバ帯域幅の管理
グローバル コントローラの定義が完了すると、パッケージにサブスクライバ BWC を追加し、これらのサブスクライバ BWC を異なるグローバル コントローラにマッピングすることが可能になります。
サブスクライバ BWC では、アップストリームまたはダウンストリーム フローのサブスクライバ帯域幅消費を制御します。サービスまたはサービス グループのトラフィック フローが集約された帯域幅の制御と測定が行えます。
各パッケージには、各サービスのパッケージ サブスクライバごとに利用可能な帯域幅を決定する独自の BWC セットがあります。
2 つのプライマリ BWC(1 つはアップストリーム トラフィック用、もう 1 つはダウンストリーム トラフィック用)を使用すると、Committed Information Rate(CIR; 認定情報レート)、Peak Information Rate(PIR; 最大情報レート)、およびサブスクライバの相対的なプライオリティ設定に応じて、特定のサブスクライバに帯域幅を割り当てることができます。これらのパラメータの設定は可能ですが、プライマリ BWC の削除はできません。
アップストリーム トラフィック用とダウンストリーム トラフィック用の 2 つのデフォルト BWC があります。デフォルトでは、すべてのサービスはこれらの 2 つの BWC のいずれかにマッピングされます。BWC メカニズムは、CIR、PIR、および Assurance Level(AL)に基づいて、デフォルト BWC の割合制御内で割合のサブパーティショニングを制御します。これらのパラメータの設定は可能ですが、デフォルト BWC の削除はできません。
パッケージごとに最大 32 のユーザ定義 BWC を追加できます。
•![]() サブスクライバ BWC は、サブスクライバ別のサービス レベルで動作します。サブスクライバ BWC は、BWC に設定された CIR、PIR、グローバル コントローラ、および Assurance Level(AL)に基づいて、各サブスクライバのサービスに帯域幅を割り当てます。各規則は、サービスのフローといずれかの BWC とのリンクを定義します(フローがブロックされていない場合)。「規則のためのフローごとのアクションの定義」を参照してください。
サブスクライバ BWC は、サブスクライバ別のサービス レベルで動作します。サブスクライバ BWC は、BWC に設定された CIR、PIR、グローバル コントローラ、および Assurance Level(AL)に基づいて、各サブスクライバのサービスに帯域幅を割り当てます。各規則は、サービスのフローといずれかの BWC とのリンクを定義します(フローがブロックされていない場合)。「規則のためのフローごとのアクションの定義」を参照してください。
•![]() エキストラ BWC はサブスクライバ レベルでも動作します。エキストラ BWC(CIR、PIR、グローバル コントローラ、および AL に基づく)は、プライマリ BWC に含まれないサービスに割り当てることができます。ビデオ会議のように、頻繁に使用されるわけではないが厳格な帯域幅要件を持つサービスが該当します。エキストラ BWC は単一サービス(サービス グループ)を制御する BWC です。BWC がエキストラ BWC から帯域幅を借りたり、その逆を行うことはできません。
エキストラ BWC はサブスクライバ レベルでも動作します。エキストラ BWC(CIR、PIR、グローバル コントローラ、および AL に基づく)は、プライマリ BWC に含まれないサービスに割り当てることができます。ビデオ会議のように、頻繁に使用されるわけではないが厳格な帯域幅要件を持つサービスが該当します。エキストラ BWC は単一サービス(サービス グループ)を制御する BWC です。BWC がエキストラ BWC から帯域幅を借りたり、その逆を行うことはできません。
ユーザ定義 BWC は、ダウンストリーム トラフィックまたはアップストリーム トラフィックを制御します。
サブスクライバ BWC パラメータ
[Package Settings] ダイアログボックスの [Subscriber BW Controllers] タブには、次の設定パラメータがあります。
•![]() [CIR (L3 Kbps)]:BWC で制御されるトラフィックに設定する必要がある最小帯域幅
[CIR (L3 Kbps)]:BWC で制御されるトラフィックに設定する必要がある最小帯域幅
•![]() [PIR (L3 Kbps)]:BWC で制御されるトラフィックに許容される最大帯域幅
[PIR (L3 Kbps)]:BWC で制御されるトラフィックに許容される最大帯域幅
(注) サブスクライバ BWC の帯域幅は、16 Kbps の細かさで設定できます。
たとえば、64 Kbps の帯域幅を指定した場合、帯域幅はこの値で安定します。
70 Kbps を指定した場合、帯域幅は安定せず 64 ~ 80 Kbps の間で変動します。
•![]() [Global Controller]:現在の BWC を対応付けるグローバル コントローラ。グローバル コントローラは、帯域幅制御メカニズムに含まれる仮想キューです。同様の帯域幅制御プロパティを持つトラフィックを、同じグローバル コントローラに誘導します。
[Global Controller]:現在の BWC を対応付けるグローバル コントローラ。グローバル コントローラは、帯域幅制御メカニズムに含まれる仮想キューです。同様の帯域幅制御プロパティを持つトラフィックを、同じグローバル コントローラに誘導します。
•![]() [AL]:輻輳増加時に BW が PIR から CIR に低下する速度、または輻輳緩和時に BW が CIR から PIR に増大する速度。AL が小さい場合よりも、AL の値が大きい方が、帯域幅が大きくなります。最小の保証値は 1、最大の保証値は Persistent(永続的)です。
[AL]:輻輳増加時に BW が PIR から CIR に低下する速度、または輻輳緩和時に BW が CIR から PIR に増大する速度。AL が小さい場合よりも、AL の値が大きい方が、帯域幅が大きくなります。最小の保証値は 1、最大の保証値は Persistent(永続的)です。
AL が 10(永続的)の場合、合計回線レートが維持できない場合を除いて、関連する CIR を下回ることはありません。
•![]() [Subscriber relative priority]:サブスクライバのプライマリ BWC に設定される AL。他のパッケージのサブスクライバと帯域幅を競合している場合に、すべてのサブスクライバ トラフィックに設定される保証値を決定します。最小の値は 1、最大の値は 10 です。
[Subscriber relative priority]:サブスクライバのプライマリ BWC に設定される AL。他のパッケージのサブスクライバと帯域幅を競合している場合に、すべてのサブスクライバ トラフィックに設定される保証値を決定します。最小の値は 1、最大の値は 10 です。
(注) サブスクライバ帯域幅制御(およびアカウンティングとレポート)は、レイヤ 3 ボリュームに基づいています。
グローバル コントローラ帯域幅は、レイヤ 1 ボリュームに基づいています。
パッケージ サブスクライバ BWC の編集
ステップ 1![]() [Policies] タブで [Global Policy] をクリックします。
[Policies] タブで [Global Policy] をクリックします。
[Global Bandwidth Settings] ダイアログボックスが右の規則ペインに表示されます。
ステップ 2![]() 右の規則ペインで BWC を選択し、
右の規則ペインで BWC を選択し、 ([Edit])をクリックします。
[Package Settings] ダイアログボックスが表示されます。
ステップ 3![]() [Package Settings] ダイアログボックスで、[Subscriber BW Controllers] タブをクリックします。
[Package Settings] ダイアログボックスで、[Subscriber BW Controllers] タブをクリックします。
[Subscriber BW Controllers] タブが開きます(図 9-27)。
図 9-27 [Subscriber BW Controllers] タブ
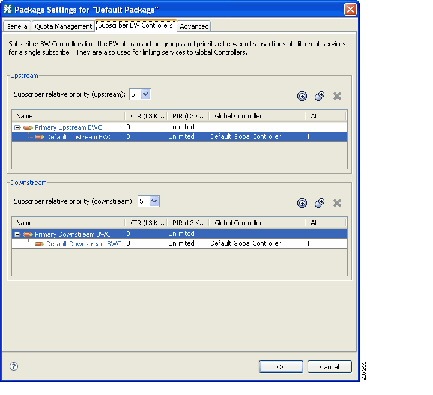
ステップ 4![]() ダイアログボックスの [Upstream] 領域で、アップストリームの帯域幅制御の要件を設定します。
ダイアログボックスの [Upstream] 領域で、アップストリームの帯域幅制御の要件を設定します。
a.![]() [Subscriber relative priority] ドロップダウン リストから値を選択します。
[Subscriber relative priority] ドロップダウン リストから値を選択します。
b.![]() Primary Upstream BWC のパラメータを設定します。
Primary Upstream BWC のパラメータを設定します。
–![]() [CIR] フィールドに、BWC CIR を Kbps 単位で入力します。
[CIR] フィールドに、BWC CIR を Kbps 単位で入力します。
–![]() [PIR] フィールドで、ドロップダウン リストから [Unlimited] を選択するか、BWC PIR を Kbps 単位で入力します。
[PIR] フィールドで、ドロップダウン リストから [Unlimited] を選択するか、BWC PIR を Kbps 単位で入力します。
c.![]() パッケージに BWC を追加するには、BWC を 1 つ追加するたびに
パッケージに BWC を追加するには、BWC を 1 つ追加するたびに  ([Add a sub BW Controller])を 1 回クリックします。
d.![]() パッケージにエキストラ BWC を追加するには、BWC を 1 つ追加するごとに
パッケージにエキストラ BWC を追加するには、BWC を 1 つ追加するごとに  ([Add an extra BW Controller])を 1 回クリックします。
e.![]() 各 BWC(プライマリ BWC およびデフォルト BWC を含む)のパラメータを設定します。
各 BWC(プライマリ BWC およびデフォルト BWC を含む)のパラメータを設定します。
–![]() (オプション)[Name] フィールドに、各 BWC のわかりやすい名前を入力します (プライマリ BWC とデフォルト BWC の名前は変更できません)。
(オプション)[Name] フィールドに、各 BWC のわかりやすい名前を入力します (プライマリ BWC とデフォルト BWC の名前は変更できません)。
–![]() [CIR] フィールドに、BWC CIR の値を Kbps 単位で入力します。
[CIR] フィールドに、BWC CIR の値を Kbps 単位で入力します。
–![]() [PIR] フィールドで、ドロップダウン リストから [Unlimited] を選択するか、BWC PIR の値を Kbps 単位で入力します。
[PIR] フィールドで、ドロップダウン リストから [Unlimited] を選択するか、BWC PIR の値を Kbps 単位で入力します。
–![]() 現在の BWC を対応付けるグローバル コントローラを設定するには、次の手順を実行します。
現在の BWC を対応付けるグローバル コントローラを設定するには、次の手順を実行します。
BWC の [Global Controller] セルをクリックし、表示される [Browse] ボタンをクリックします。
[Select a Global Controller] ダイアログボックスが表示されます(図 9-28)。
図 9-28 [Select a Global Controller]
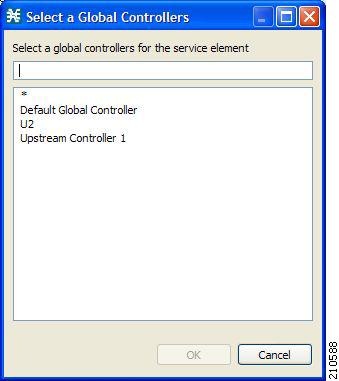
–![]() グローバル コントローラを選択し、[OK] をクリックします。
グローバル コントローラを選択し、[OK] をクリックします。
ステップ 5![]() ダイアログボックスの [Downstream] 領域でステップ 4 を実行し、ダウンストリームの帯域幅制御を設定します。
ダイアログボックスの [Downstream] 領域でステップ 4 を実行し、ダウンストリームの帯域幅制御を設定します。
[Package Settings] ダイアログボックスが閉じます。
帯域幅の管理:実践例
ここでは、グローバル コントローラとサブスクライバ BWC の設定を組み合わせた効果的な帯域幅制御の実現方法と、実践例について説明します。
合計帯域幅制御の設定
問題が発生しやすいサービスと、それぞれに設定する必要がある最大合計帯域幅の値を確定します。問題が発生しにくいサービスやパッケージは設定する必要がありません。これは、デフォルト グローバル コントローラに組み込むことができます。
ステップ 2![]() パッケージのサブスクライバ BWC を設定します。
パッケージのサブスクライバ BWC を設定します。
a.![]() 制限するアップストリームまたはダウンストリームのトラフィック タイプごとにサブスクライバ BWC を追加して、CIR および PIR を適切に設定します。
制限するアップストリームまたはダウンストリームのトラフィック タイプごとにサブスクライバ BWC を追加して、CIR および PIR を適切に設定します。
b.![]() 各サブスクライバ BWC に対して、適切なグローバル コントローラを選択します。
各サブスクライバ BWC に対して、適切なグローバル コントローラを選択します。
ステップ 3![]() 独自の BWC を持つ各サービスに対して規則を作成し、適切なアップストリームおよびダウンストリーム BWC を選択します。
独自の BWC を持つ各サービスに対して規則を作成し、適切なアップストリームおよびダウンストリーム BWC を選択します。
例:Console を使用した P2P およびストリーミング トラフィックの制限
(注) この例は、トラフィック フローが双方向であることを前提としています。したがって、アップストリーム コントローラまたはダウンストリーム コントローラだけが必要であると判断できます。
(注) P2P Traffic Optimization ウィザードでは、デバイスの簡単なモデルの作成とデバイスへの接続が可能です。また、P2P トラフィックを所定の帯域幅に制限することもできます (「P2P Traffic Optimization ウィザードの使用方法」 を参照)。
ステップ 1![]() [Policies] タブで [Global Policy] をクリックします。
[Policies] タブで [Global Policy] をクリックします。
[Global Bandwidth Settings] ダイアログボックスが右の規則ペインに表示されます。
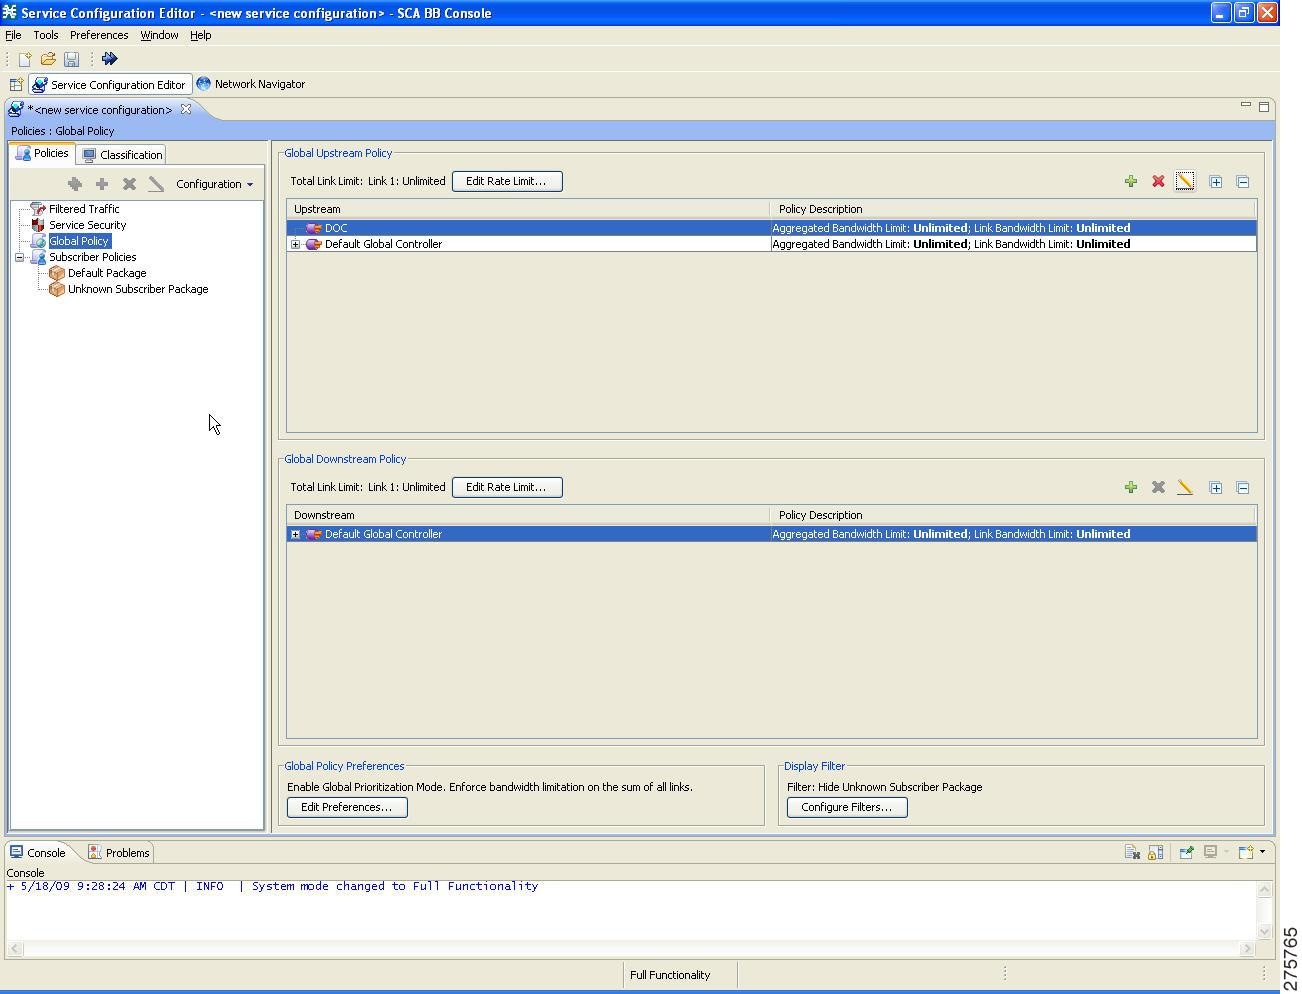
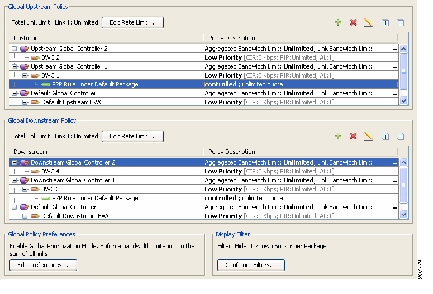
ステップ 2![]() 2 つのアップストリーム グローバル コントローラと 2 つのダウンストリーム グローバル コントローラを追加し、それぞれのグローバル コントローラに目的とする帯域幅を割り当てます(図 9-29)。
2 つのアップストリーム グローバル コントローラと 2 つのダウンストリーム グローバル コントローラを追加し、それぞれのグローバル コントローラに目的とする帯域幅を割り当てます(図 9-29)。
図 9-29 [Global Bandwidth Settings]
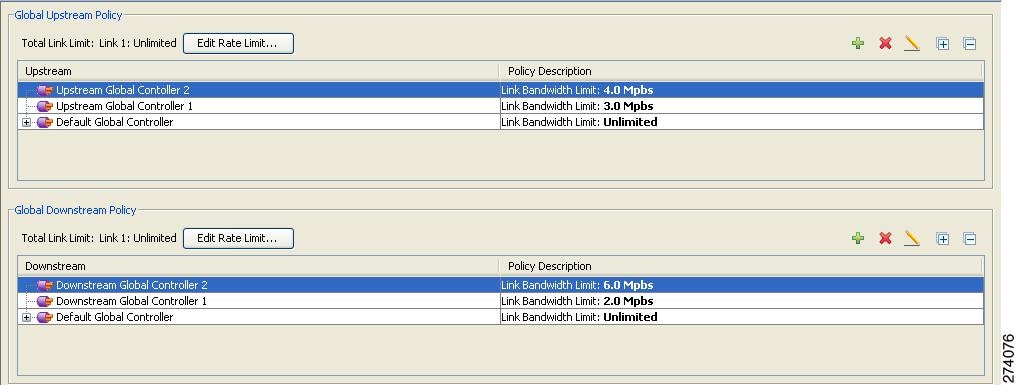
(ここでは、P2P トラフィックには Upstream Controller 1 および Downstream Controller 1、ストリーミング トラフィックには Upstream Controller 2 および Downstream Controller 2 が使用されます。)
ステップ 3![]() [Package Settings] ダイアログボックス(図 9-30)で、2 つのアップストリーム BWC と 2 つのダウンストリーム BWC を追加し、適切なグローバル コントローラにそれらをマッピングし、パラメータ(CIR、PIR、AL)を設定します。
[Package Settings] ダイアログボックス(図 9-30)で、2 つのアップストリーム BWC と 2 つのダウンストリーム BWC を追加し、適切なグローバル コントローラにそれらをマッピングし、パラメータ(CIR、PIR、AL)を設定します。
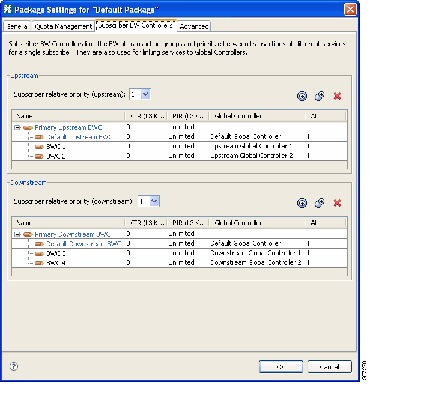
(ここでは、BWC1 はアップストリーム P2P トラフィック用、BWC3 はダウンストリーム P2P トラフィック用です。BWC2 はアップストリーム ストリーミング トラフィック用、BWC4 はダウンストリーム ストリーミング トラフィック用です)
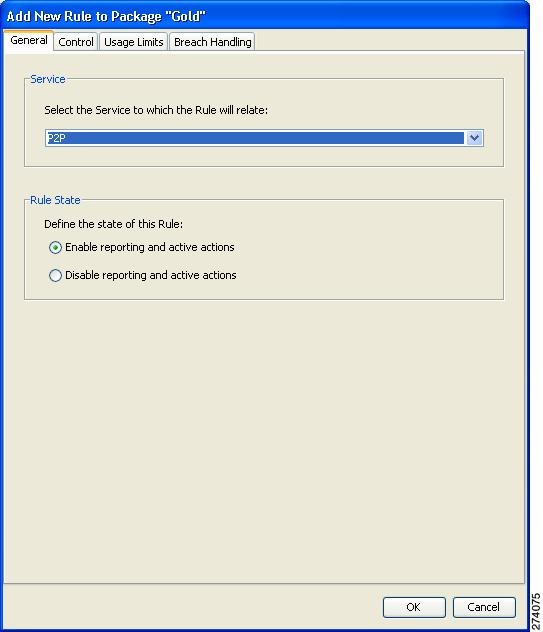
ステップ 4![]() P2P サービスの規則を追加します(図 9-31)。
P2P サービスの規則を追加します(図 9-31)。
図 9-31 [Add New Rule to Package]
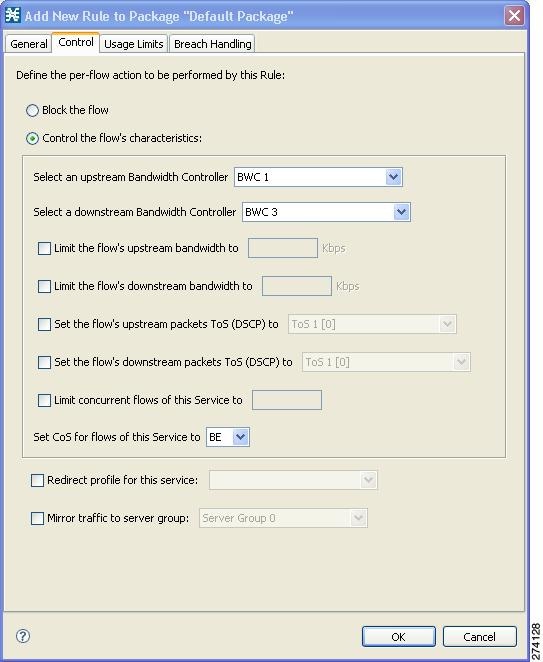
ステップ 5![]() [Control] タブ(図 9-32)で、アップストリーム BWC として BWC 1 を、ダウンストリーム BWC として BWC 3 を割り当てます。
[Control] タブ(図 9-32)で、アップストリーム BWC として BWC 1 を、ダウンストリーム BWC として BWC 3 を割り当てます。
ステップ 6![]() ストリーミング サービスに対してステップ 4 およびステップ 5 を実行します(アップストリーム BWC には BWC 2 を、ダウンストリーム BWC には BWC 4 を使用)。
ストリーミング サービスに対してステップ 4 およびステップ 5 を実行します(アップストリーム BWC には BWC 2 を、ダウンストリーム BWC には BWC 4 を使用)。
これらのサービスを使用するすべてのサブスクライバのトラフィックは、これらのキューに対する仮想キュー合計に加算されます。これらのキューがどれだけ「埋まっている」かに応じて、プロトコルに対してサブスクライバが使用できる帯域幅は変動します。
ステップ 7![]() [Global Policy] をクリックし、GC、BWC、および規則の階層を表示します(図 9-33)。
[Global Policy] をクリックし、GC、BWC、および規則の階層を表示します(図 9-33)。
ウィザードを使用した規則、帯域幅コントローラ、およびグローバル コントローラの設定
[Global Policy] ウィンドウから、規則、BWC、および GC をまとめて設定できます。
ステップ 1![]() [Policies] タブで [Global Policy] をクリックします。
[Policies] タブで [Global Policy] をクリックします。
[Global Bandwidth Settings] が右の規則ペインに表示されます。
ステップ 2![]() 目的のインターフェイスの領域([Upstream] または [Downstream])上で、 ([Add])をクリックします。
目的のインターフェイスの領域([Upstream] または [Downstream])上で、 ([Add])をクリックします。
[Select addition mode] ダイアログボックスが表示されます。
ステップ 3![]() [Add a Global Controller and map a Rule and BWC to it] オプション ボタンを選択します。
[Add a Global Controller and map a Rule and BWC to it] オプション ボタンを選択します。
[GC Selection] ダイアログボックスが表示されます(図 9-34)。
図 9-34 [Upstream GC Selection]
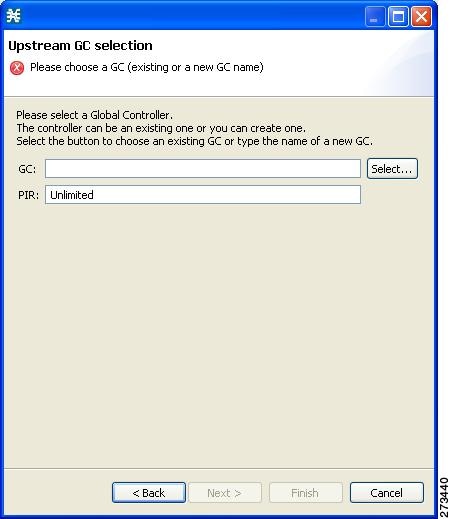
ステップ 5![]() [GC] フィールドに新しい GC 名を入力するか、[Select] をクリックして既存の GC を選択します。
[GC] フィールドに新しい GC 名を入力するか、[Select] をクリックして既存の GC を選択します。
ステップ 6![]() (オプション)[PIR] フィールドに、このグローバル コントローラを通過する最大帯域幅制限を Kbps 単位で入力します。
(オプション)[PIR] フィールドに、このグローバル コントローラを通過する最大帯域幅制限を Kbps 単位で入力します。
[Service and Packages selection] ダイアログボックスが表示されます(図 9-35)。
図 9-35 [Upstream Service and Packages Selection]
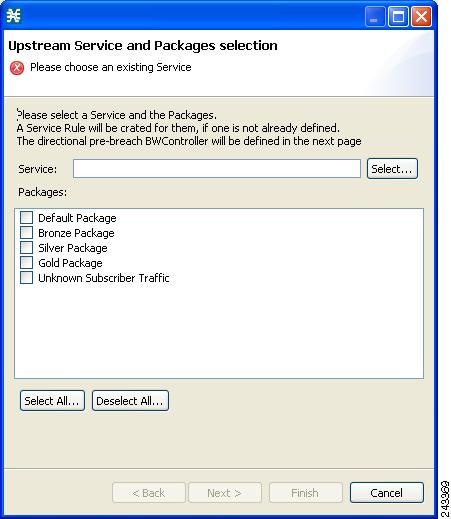
ステップ 8![]() [Service] フィールドで既存のサービスを選択します。
[Service] フィールドで既存のサービスを選択します。
ステップ 9![]() [Packages] セクションで、規則を適用するパッケージを 1 つ以上選択します。
[Packages] セクションで、規則を適用するパッケージを 1 つ以上選択します。
サービスに対応する規則がない場合は、規則を作成します。選択したパッケージに新規または既存の規則が適用されます。
[BWC selection] ダイアログボックスが表示されます(図 9-36)。
図 9-36 [Upstream BWC Selection]

ステップ 11![]() 新しい BWC 名を入力するか、[Select] をクリックして既存の BWC を選択します。
新しい BWC 名を入力するか、[Select] をクリックして既存の BWC を選択します。
BW 管理優先順位モードの設定
相対プライオリティは、内部 BWC(iBWC)が、帯域幅について他の iBWC と競合する場合に取得する保証レベルです。
iBWC を通過するフローの相対プライオリティは、次のモードのいずれかの相対プライオリティにより決定されます。
•![]() iBWC:Global Prioritization Mode
iBWC:Global Prioritization Mode
•![]() サブスクライバ:Subscriber Prioritization Mode
サブスクライバ:Subscriber Prioritization Mode
ステップ 1![]() [Policies] タブで [Global Policy] をクリックします。
[Policies] タブで [Global Policy] をクリックします。
[Global Bandwidth Settings] が右の規則ペインに表示されます。
ステップ 2![]() [Edit Preferences] をクリックします。
[Edit Preferences] をクリックします。
[Global Controllers mode] ダイアログボックスが表示されます(図 9-37)。
図 9-37 [Global Controllers mode]
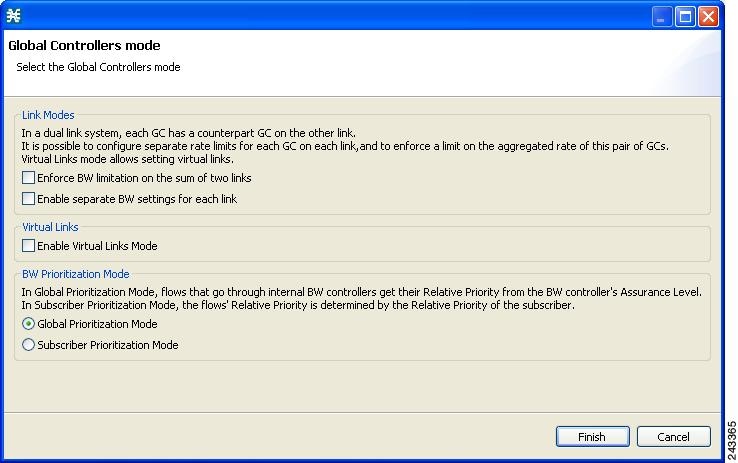
ステップ 3![]() [BW Prioritization Mode] のオプション ボタンをいずれか 1 つ選択します。
[BW Prioritization Mode] のオプション ボタンをいずれか 1 つ選択します。
•![]() [Global Prioritization Mode]
[Global Prioritization Mode]
•![]() [Subscriber Prioritization Mode]
[Subscriber Prioritization Mode]
仮想リンクの管理
仮想リンク モードでは、テンプレート帯域幅コントローラがパッケージに定義されます。実際の帯域幅パラメータはサブスクライバがシステムにログインしたときに割り当てられますが、サブスクライバのパッケージ(テンプレート コントローラが定義されている)、およびサブスクライバに割り当てられた物理リンクに応じて異なります。
仮想リンク モードがイネーブルになっている各サービス コンフィギュレーションには、それぞれデフォルトのアップストリーム仮想リンクが 1 つとデフォルトのダウンストリーム仮想リンクが 1 つあります。アップストリーム インターフェイスとダウンストリーム インターフェイスには、それぞれ 1 つずつデフォルトのテンプレート グローバル コントローラが割り当てられています。
このほかにも、テンプレート グローバル コントローラを追加できます。仮想リンクを追加、削除、修正するには Command-Line Interface(CLI; コマンドライン インターフェイス)を使用します。
サービス コンフィギュレーションには、最大で 1024 のアップストリーム グローバル コントローラと 1024 のダウンストリーム グローバル コントローラ(デフォルト グローバル コントローラを含む)を設定できます。仮想リンクの最大数は、方向性を持つテンプレート グローバル コントローラの数により制限されます。テンプレート グローバル コントローラの数に仮想リンクの数を乗じた値は、1024 を超えることができません。
DOCSIS 3.0 ダウンストリーム ボンディングをサポートするためには、ワイドバンド チャネルに対して 2 つのレベルから成る仮想リンク階層を作成します。ワイドバンド チャネルは、入力信号強度の変動に関係なく一定の出力信号を提供する Aggregate Global Control(AGC)に関連付けられます。ワイドバンド チャネルは、2 つのレベルから成る階層で 3 つの AGC に関連付けられます。階層の下位レベルでは、ワイドバンドのすべての 3.0 モデムが 1 つの AGC に集約され、その他の AGC には従来のモデムと 3.0 モデムの両方が含まれます。階層の上位レベルの AGC は、ワイドバンド チャネルの集約帯域幅を制限するために使用されます。
DOCSIS 3.0 ソリューションのサポートの詳細については、『 Cisco Service Control for Managing Remote Cable MSO Links Solution Guide 』を参照してください。
仮想リンク グローバル コントローラの管理の詳細については、「仮想リンク グローバル コントローラの管理」を参照してください。
(注) 仮想リンク モードでポリシーを適用する際、新しいテンプレートに現在適用されているテンプレートとは異なる数のグローバル コントローラが含まれている場合は、[Reset all Virtual Links to Template Rate Limits] を選択する必要があります。これを選択しない場合、適用を実行すると、次のようなエラー メッセージが表示されます。
「Template Upstream Virtual Link differ from the one in the SCE - cannot apply without the force template virtual link option.」
仮想リンク モードでサービス コンフィギュレーションを設定する手順の概要を次に示します。手順は他のサービス コンフィギュレーションを設定する場合と同様ですが、CLI を使用して仮想リンクを追加する必要があります。
2.![]() [Global Bandwidth Settings] ダイアログボックスを開き、[Enable Virtual Links Mode] チェックボックスをオンにします。
[Global Bandwidth Settings] ダイアログボックスを開き、[Enable Virtual Links Mode] チェックボックスをオンにします。
サブスクライバ BW コントローラをパッケージに追加し、該当するグローバル コントローラと関連付けます。
デフォルト グローバル コントローラの帯域幅の値は設定されていますが、他のすべてのグローバル コントローラの値はテンプレートなので設定されていません。
各仮想リンクは、テンプレート グローバル コントローラ設定の PIR 値を持つグローバル コントローラのセットを取得します。
必要に応じて、CLI を使用してグローバル コントローラの PIR 値を変更します。
7.![]() サブスクライバを SCE プラットフォームに導入します。アップストリームとダウンストリームの仮想リンクを、サブスクライバとパッケージに関連付けます。
サブスクライバを SCE プラットフォームに導入します。アップストリームとダウンストリームの仮想リンクを、サブスクライバとパッケージに関連付けます。
8.![]() サブスクライバの各フローの規則解決は、サブスクライバのパッケージと仮想リンクのグローバル コントローラ設定に従います。
サブスクライバの各フローの規則解決は、サブスクライバのパッケージと仮想リンクのグローバル コントローラ設定に従います。
Collection Manager 仮想リンク名ユーティリティ
Collection Manager(CM)には、仮想リンクの名前を管理するためのコマンドライン ユーティリティが含まれています。
CM の仮想リンク名ユーティリティの詳細については、『 Cisco Service Control Management Suite Collection Manager User Guide 』の「Managing the Collection Manager」にある「Managing Virtual Links」を参照してください。
仮想リンク モードのイネーブル化
仮想リンクを使用するには、仮想リンク モードをイネーブルにする必要があります。
ステップ 1![]() [Policies] タブで [Global Policy] をクリックします。
[Policies] タブで [Global Policy] をクリックします。
[Global Bandwidth Settings] が右の規則ペインに表示されます。
ステップ 2![]() [Edit Preferences] をクリックします。
[Edit Preferences] をクリックします。
[Global Controllers mode] ダイアログボックスが表示されます。
図 9-38 [Global Controllers mode]
ステップ 3![]() [Enable Virtual Links Mode] チェックボックスをオンにします。
[Enable Virtual Links Mode] チェックボックスをオンにします。
(注) すでにグローバル コントローラを追加していた場合や、非対称ルーティング分類モードを選択していた場合は、警告メッセージが表示されます。続行する場合は、[OK] をクリックします。
[Virtual Links Global Controllers] タブが開きます。
[Global Bandwidth Settings] ダイアログボックスが閉じます。
仮想リンク グローバル コントローラ設定の表示
(注) グローバル コントローラ帯域幅は、レイヤ 1 ボリュームに基づいています
(SCA BB のアカウンティング、レポート、およびサブスクライバ帯域幅制御は、レイヤ 3 ボリュームに基づいています)。
ステップ 1![]() [Policies] タブで [Global Policy] をクリックします。
[Policies] タブで [Global Policy] をクリックします。
[Global Bandwidth Settings] が右の規則ペインに表示されます。
すべてのグローバル コントローラが使用できる最大帯域幅は、[Global Bandwidth Settings] の上部に次のように表示されます。
•![]() [Total Link Upstream Bandwidth Limit: Link 1]
[Total Link Upstream Bandwidth Limit: Link 1]
•![]() [Total Link Downstream Bandwidth Limit: Link 1]
[Total Link Downstream Bandwidth Limit: Link 1]
ステップ 2![]() グローバル コントローラを選択し、 ([Edit])をクリックします。
グローバル コントローラを選択し、 ([Edit])をクリックします。
[Global Controller Settings] ダイアログボックスが表示されます(図 9-39)。
図 9-39 [Upstream Global Controller Settings]
このダイアログボックスで定義されるグローバル コントローラの値は、[Global Bandwidth Settings] に表示される値により異なります。たとえば、[Total Link Upstream Bandwidth Limit: Link 1] の値が 10 Mbps の場合、アップストリームのデフォルト グローバル コントローラの値は 10 Mbps を超えることができません。
[Name] フィールドには、グローバル コントローラに割り当てられた一意の名前が表示されます。Controller 1、Controller 2 などの名前が自動的に割り当てられます。
•![]() [Template Virtual Link]:すべての時間枠または各時間枠について、作成された仮想リンクのグローバル コントローラに許容される合計リンク制限のデフォルト最大値
[Template Virtual Link]:すべての時間枠または各時間枠について、作成された仮想リンクのグローバル コントローラに許容される合計リンク制限のデフォルト最大値
•![]() [Default Virtual Link]:すべての時間枠または各時間枠について、デフォルト仮想リンクのグローバル コントローラに許容される合計リンク制限の最大値
[Default Virtual Link]:すべての時間枠または各時間枠について、デフォルト仮想リンクのグローバル コントローラに許容される合計リンク制限の最大値
[Global Bandwidth Settings] ダイアログボックスが閉じます。
仮想リンク グローバル コントローラの管理
仮想リンク グローバル コントローラは、通常のグローバル コントローラと同じ方法で追加、編集、および削除ができます。詳細については、次のセクションを参照してください。
仮想リンクの合計リンク制限の編集
アップストリーム トラフィックとダウンストリーム トラフィックの合計リンク制限は、別々に定義されます。
仮想リンク モードでは、帯域幅制限は全リンクの合計に対して適用されます。
ステップ 1![]() [Policies] タブで [Global Policy] をクリックします。
[Policies] タブで [Global Policy] をクリックします。
[Global Bandwidth Settings] ダイアログボックスが右の規則ペインに表示されます。
ステップ 2![]() [Upstream] または [Downstream] セクションで、[Edit Rate Limit] をクリックします。
[Upstream] または [Downstream] セクションで、[Edit Rate Limit] をクリックします。
[Total Rate Limit] ダイアログボックスが表示されます。
ステップ 3![]() [Total Rate Limit for each SCE link (Kbps)] フィールドで、プラットフォームを通過する SCE プラットフォーム容量の最大帯域幅を入力するか、Unlimited と入力します。
[Total Rate Limit for each SCE link (Kbps)] フィールドで、プラットフォームを通過する SCE プラットフォーム容量の最大帯域幅を入力するか、Unlimited と入力します。
[Total Rate Limit] ダイアログボックスが閉じます。
[Total Link Bandwidth Limit: Link 1] フィールドがアップデートされます。
CLI コマンドを使用した仮想リンクの管理
SCE プラットフォームの CLI を使用して、仮想リンクの設定、イネーブル化、およびディセーブル化を行うことができます。SCE プラットフォーム CLI の詳細については、『 Cisco SCE8000 CLI Command Reference 』を参照してください。
•![]() 仮想リンクの管理には、次の CLI コマンドを使用します。
仮想リンクの管理には、次の CLI コマンドを使用します。
これらのコマンドは、ライン インターフェイス コンフィギュレーション コマンドです。これらのコマンドの実行については、「ライン インターフェイス コンフィギュレーション モードの開始方法」を参照してください。
•![]() サブスクライバの仮想リンク インデックスを設定するには、次の CLI コマンドを使用します。
サブスクライバの仮想リンク インデックスを設定するには、次の CLI コマンドを使用します。
このコマンドは、ライン インターフェイス コンフィギュレーション コマンドです。このコマンドの実行については、「ライン インターフェイス コンフィギュレーション モードの開始方法」を参照してください。
•![]() 仮想リンクの状態をモニタするには、EXEC モードで次の CLI コマンドを使用します。
仮想リンクの状態をモニタするには、EXEC モードで次の CLI コマンドを使用します。
仮想リンクの CLI コマンド
表 9-1 で、仮想リンクの CLI コマンドについて説明します。
ライン インターフェイス コンフィギュレーション モードの開始方法
ステップ 1![]() SCE プラットフォームの CLI プロンプト
SCE プラットフォームの CLI プロンプト (SCE#) で configure と入力します。
ステップ 3![]() interface LineCard 0 を入力します。
interface LineCard 0 を入力します。
パッケージの管理
パッケージとは、サブスクライバ ポリシーを記述したものです。パッケージは規則の集合であり、規則が関連するサービスにマッピングされているフローが発生した場合のシステムの反応が定義されています。最初にサービスを定義してから(「サービスの管理」を参照)、パッケージの追加と定義を行うことを推奨します。
SCAS BB のサービス コンフィギュレーションには、削除できないルート パッケージである「デフォルト パッケージ」が含まれています。
他のパッケージが割り当てられなかった場合、または存在しないパッケージが割り当てられた場合は、サブスクライバがデフォルト パッケージにマッピングされます。
サービス コンフィギュレーションには、最大で 5000 のパッケージを設定できます。
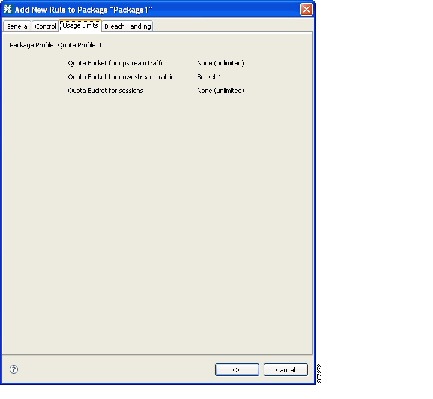
パッケージのパラメータ
–![]() [Description]:(オプション)パッケージの説明
[Description]:(オプション)パッケージの説明
–![]() [Quota Management Mode]:サブスクライバ クォータが外部クォータ マネージャによって管理されるか、または SCA BB によって定期的に補充されるかを指定します。
[Quota Management Mode]:サブスクライバ クォータが外部クォータ マネージャによって管理されるか、または SCA BB によって定期的に補充されるかを指定します。
–![]() [Aggregation Period Type]:クォータが定期的に補充される場合に使用されるクォータ集約時間。
[Aggregation Period Type]:クォータが定期的に補充される場合に使用されるクォータ集約時間。
–![]() [Quota Buckets]:クォータ管理に使用される 16 のリソース バケット。
[Quota Buckets]:クォータ管理に使用される 16 のリソース バケット。
•![]() Subscriber BW Controllers パラメータ:
Subscriber BW Controllers パラメータ:
–![]() [Subscriber relative priority]:ネットワーク輻輳時にパケットのサブスクライバに割り当てられる相対プライオリティ。
[Subscriber relative priority]:ネットワーク輻輳時にパケットのサブスクライバに割り当てられる相対プライオリティ。
アップストリーム フローとダウンストリーム フローには、それぞれ別のプライオリティが定義されます。
–![]() [Subscriber Bandwidth Controllers]:パッケージに属しているサービスで利用できる CW Controller(BWC)のリスト。各 BWC には、グローバル コントローラへのマッピングなど、各種パラメータが定義されています。
[Subscriber Bandwidth Controllers]:パッケージに属しているサービスで利用できる CW Controller(BWC)のリスト。各 BWC には、グローバル コントローラへのマッピングなど、各種パラメータが定義されています。
アップストリーム フローとダウンストリーム フローには、それぞれ別の BWC が定義されます。
–![]() [Package Index]:システムがパッケージを識別するための一意の番号 (パッケージ名を変更しても、SCE プラットフォームの動作には影響しません)。パッケージ インデックスのデフォルト値がシステムによって割り当てられます。この値は変更しないでください。
[Package Index]:システムがパッケージを識別するための一意の番号 (パッケージ名を変更しても、SCE プラットフォームの動作には影響しません)。パッケージ インデックスのデフォルト値がシステムによって割り当てられます。この値は変更しないでください。
–![]() [Parent Package]:パッケージ階層内で 1 つ上の階層にあるパッケージ。親パッケージは、複数のパッケージが使用カウンタを共有する場合に重要となります。デフォルト パッケージはパッケージ階層の基本となるパッケージで、親を持ちません。
[Parent Package]:パッケージ階層内で 1 つ上の階層にあるパッケージ。親パッケージは、複数のパッケージが使用カウンタを共有する場合に重要となります。デフォルト パッケージはパッケージ階層の基本となるパッケージで、親を持ちません。
–![]() [Package Usage Counters]:各パッケージの総使用量に関するデータを生成するためにシステムによって使用されます。パッケージでは、専用のパッケージ使用カウンタまたは、親パッケージのパッケージ使用カウンタを使用できます。
[Package Usage Counters]:各パッケージの総使用量に関するデータを生成するためにシステムによって使用されます。パッケージでは、専用のパッケージ使用カウンタまたは、親パッケージのパッケージ使用カウンタを使用できます。
–![]() システムによって割り当てられた名前(パッケージ名に基づいて作成)。
システムによって割り当てられた名前(パッケージ名に基づいて作成)。
(注) カウンタが複数のパッケージに適用されている場合、パッケージ使用カウンタ名にアスタリスクが追加されます。
–![]() 一意のカウンタ インデックス:カウンタ インデックスのデフォルト値がシステムによって割り当てられます。この値は変更しないでください。
一意のカウンタ インデックス:カウンタ インデックスのデフォルト値がシステムによって割り当てられます。この値は変更しないでください。
–![]() [Calendar]:パッケージのタイムベース規則の基礎として使用されるカレンダー。
[Calendar]:パッケージのタイムベース規則の基礎として使用されるカレンダー。
–![]() [VAS Traffic Forwarding Table]:パッケージで使用されるフォワーディング テーブル。
[VAS Traffic Forwarding Table]:パッケージで使用されるフォワーディング テーブル。
これらのパラメータは、新しいパッケージを追加するときに定義されます(「パッケージの追加」を参照)。パラメータの修正はいつでもできます(「パッケージの編集」を参照)。
パッケージの表示
既存のパッケージの階層ツリーを表示し、選択したパッケージに対して特定の規則が定義されたサービスのリストを確認できます。
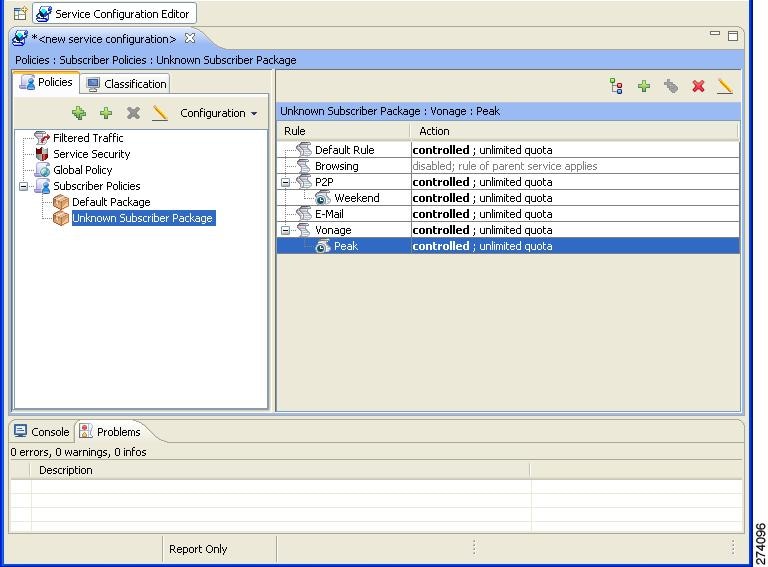
ステップ 1![]() 現在のサービス コンフィギュレーションで、[Policies] タブをクリックします(図 9-40)。
現在のサービス コンフィギュレーションで、[Policies] タブをクリックします(図 9-40)。

(注) パッケージの詳細情報を表示するには、[Package Settings] ダイアログボックスを開きます(「パッケージの編集」を参照)。
ステップ 2![]() パッケージの規則を表示するには、階層内のパッケージをクリックします。
パッケージの規則を表示するには、階層内のパッケージをクリックします。
このパッケージの規則のリストが右の規則ペインに表示されます(図 9-41)。
図 9-41 Service Configuration Editor
パッケージの追加
Console のインストール時に、デフォルト パッケージがあらかじめ定義されます。サービス コンフィギュレーションには、新しいパッケージを追加できます。ただし、1 つのサービス コンフィギュレーションにつき、設定可能なパッケージは最大 5000 です。
新しいパッケージを追加したら、パッケージの規則を定義できます(「パッケージへの規則の追加」を参照)。
ステップ 1![]() [Policies] タブで、パッケージ ツリーからパッケージを選択します。このパッケージは、追加するパッケージの親になります。
[Policies] タブで、パッケージ ツリーからパッケージを選択します。このパッケージは、追加するパッケージの親になります。
ステップ 2![]() [Policies] タブで、 ([Add Package])をクリックします。
[Policies] タブで、 ([Add Package])をクリックします。
[Package Settings] ダイアログボックスが表示されます(図 9-42)。
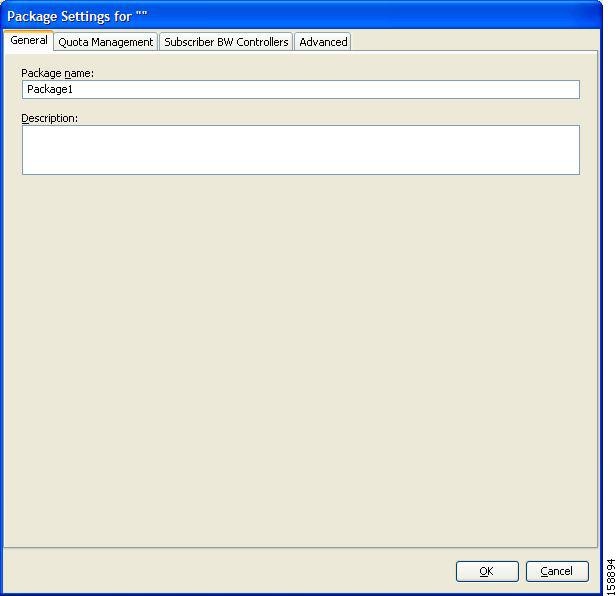
ステップ 3![]() [Package name] フィールドに、パッケージに関連する一意の名前を入力します。
[Package name] フィールドに、パッケージに関連する一意の名前を入力します。
ステップ 4![]() (オプション)[Description] フィールドに、パッケージに関するわかりやすい説明を入力します。
(オプション)[Description] フィールドに、パッケージに関するわかりやすい説明を入力します。
ステップ 5![]() [Advanced] タブのパラメータを設定するには、次のセクションのステップを実行します。
[Advanced] タブのパラメータを設定するには、次のセクションのステップを実行します。
[Package Settings] ダイアログボックスが閉じます。
新しいパッケージが、パッケージ ツリーで選択されたパッケージの子として追加され、選択されたパッケージとなります。デフォルト サービス規則が右の規則ペインに表示されます。
デフォルト サービス規則を編集し、パッケージに新しい規則を追加する方法については、「規則の管理」を参照してください。
次の作業
[Quota Management] タブのパラメータを設定するには、「パッケージのクォータ管理設定の編集」を参照してください。
[Subscriber BW Controllers] タブのパラメータを設定するには、「パッケージ サブスクライバ BWC の編集」を参照してください。
高度なパッケージ オプションの設定
パッケージのインデックスの変更、専用の使用カウンタの指定、またはパッケージのカレンダーの選択を行うには、[Advanced] タブを使用します。
ステップ 1![]() [Package Settings] ダイアログボックスで、[Advanced] タブをクリックします。
[Package Settings] ダイアログボックスで、[Advanced] タブをクリックします。
[Advanced] タブが開きます(図 9-43)。
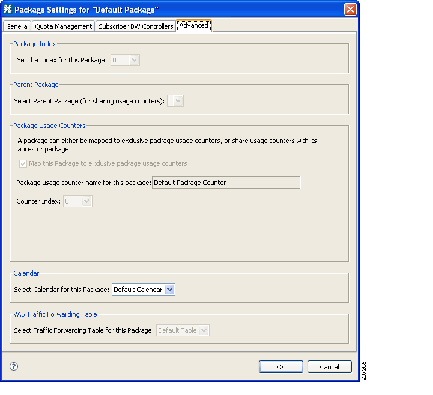
ステップ 2![]() このパッケージのパッケージ インデックスを変更するには、[Set the Index for this Package] ドロップダウン リストでパッケージ インデックスを選択します。
このパッケージのパッケージ インデックスを変更するには、[Set the Index for this Package] ドロップダウン リストでパッケージ インデックスを選択します。
(注) インデックスのデフォルト値がシステムによって割り当てられます。パッケージに特定のインデックス値を割り当てる必要がある場合以外は、この値を修正しないでください。
ステップ 3![]() このパッケージに別の親パッケージを定義するには、[Select Parent Package] ドロップダウン リストで目的の親を選択します。
このパッケージに別の親パッケージを定義するには、[Select Parent Package] ドロップダウン リストで目的の親を選択します。
ステップ 4![]() デフォルトでは、新しいパッケージでは専用の使用カウンタが使用されます。親パッケージの使用カウンタを共有するには、[Map this Service to exclusive package usage counters] チェックボックスをオフにします。
デフォルトでは、新しいパッケージでは専用の使用カウンタが使用されます。親パッケージの使用カウンタを共有するには、[Map this Service to exclusive package usage counters] チェックボックスをオフにします。
このパッケージの読み取り専用パッケージ使用カウンタの名前が、選択内容を反映して変更されます。
[Counter Index] ドロップダウン リストがグレー表示になります。
ステップ 5![]() カウンタ インデックスを変更するには(専用のパッケージ使用カウンタを使用している場合)、[Counter Index] ドロップダウン リストでインデックスの値を選択します。
カウンタ インデックスを変更するには(専用のパッケージ使用カウンタを使用している場合)、[Counter Index] ドロップダウン リストでインデックスの値を選択します。
(注) インデックスのデフォルト値がシステムによって割り当てられます。この値は変更しないでください。
ステップ 6![]() (カレンダーの時間枠をタイムベース規則に使用するために)このパッケージにカレンダーを定義するには、[Select Calendar for this Package] ドロップダウン リストで目的のカレンダーを選択します。
(カレンダーの時間枠をタイムベース規則に使用するために)このパッケージにカレンダーを定義するには、[Select Calendar for this Package] ドロップダウン リストで目的のカレンダーを選択します。
ステップ 7![]() このパッケージに Value Added Service(VAS)トラフィック フォワーディング テーブルを設定するには、[Select Traffic Forwarding Table for this Package] ドロップダウン リストで目的のトラフィック フォワーディング テーブルを選択します。
このパッケージに Value Added Service(VAS)トラフィック フォワーディング テーブルを設定するには、[Select Traffic Forwarding Table for this Package] ドロップダウン リストで目的のトラフィック フォワーディング テーブルを選択します。
(注) VAS トラフィック フォワーディングがディセーブル(デフォルト)の場合、ドロップダウン リストはグレー表示になります。VAS トラフィック フォワーディングを有効にするには、「VAS トラフィック フォワーディングの有効化」を参照してください。
[Package Settings] ダイアログボックスが閉じます。
新しいパッケージが、選択した親パッケージの子として追加され、選択されたパッケージとなります。デフォルト サービス規則が右の規則ペインに表示されます。
デフォルト サービス規則を編集し、パッケージに新しい規則を追加する方法については、「規則の管理」を参照してください。
パッケージの複製
既存パッケージの複製は、既存パッケージに類似した新しいパッケージを作成する場合に便利です。パッケージを複製してから変更する方が、パッケージを最初から定義するよりも短時間で実行できます。
複製されたパッケージは、パッケージ ツリーの元のパッケージと同じレベルに追加されます。
ステップ 1![]() [Policies] タブで、パッケージ ツリーからパッケージを選択します。
[Policies] タブで、パッケージ ツリーからパッケージを選択します。
ステップ 2![]() [Policies] タブで、
[Policies] タブで、 ([Duplicate Package])をクリックします。
元のパッケージと同じ属性を持つ重複パッケージが作成されます。新しいパッケージの名前は、選択したパッケージの名前のあとに「(1)」(パッケージを複数回複製した場合は「(2)」など)を付加したものになります。
ステップ 3![]() パッケージのパラメータを修正します(「パッケージの編集」を参照)。
パッケージのパラメータを修正します(「パッケージの編集」を参照)。
パッケージの編集
パッケージのパラメータは、(デフォルト パッケージも含めて)いつでも修正できます。
ステップ 1![]() [Policies] タブで、パッケージ ツリーからパッケージを選択します。
[Policies] タブで、パッケージ ツリーからパッケージを選択します。
ステップ 2![]() [Policies] タブで、 ([Edit Package])をクリックします。
[Policies] タブで、 ([Edit Package])をクリックします。
[Package Settings] ダイアログボックスが表示されます。
ステップ 3![]() [Package Name] フィールドに、パッケージの新しい名前を入力します。
[Package Name] フィールドに、パッケージの新しい名前を入力します。
ステップ 4![]() [Description] フィールドに、パッケージの新しい説明を入力します。
[Description] フィールドに、パッケージの新しい説明を入力します。
ステップ 5![]() (オプション)クォータ管理の設定を変更します。「パッケージのクォータ管理設定の編集」を参照してください。
(オプション)クォータ管理の設定を変更します。「パッケージのクォータ管理設定の編集」を参照してください。
ステップ 6![]() (オプション)帯域幅制御の設定を変更します。「パッケージ サブスクライバ BWC の編集」を参照してください。
(オプション)帯域幅制御の設定を変更します。「パッケージ サブスクライバ BWC の編集」を参照してください。
ステップ 7![]() 高度な設定を変更するには、[Advanced] タブをクリックします。
高度な設定を変更するには、[Advanced] タブをクリックします。
a.![]() このパッケージのパッケージ インデックスを変更するには、[Set the Index for this Package] ドロップダウン リストでパッケージ インデックスを選択します。
このパッケージのパッケージ インデックスを変更するには、[Set the Index for this Package] ドロップダウン リストでパッケージ インデックスを選択します。
(注) カウンタ インデックスのデフォルト値がシステムによって割り当てられます。パッケージに特定のインデックス値を割り当てる必要がある場合以外は、この値を修正しないでください。
b.![]() このパッケージの親パッケージを変更するには、[Select Parent Package] ドロップダウン リストで目的の親を選択します。
このパッケージの親パッケージを変更するには、[Select Parent Package] ドロップダウン リストで目的の親を選択します。
c.![]() 親パッケージの使用カウンタを共有するには、[Map this Service to exclusive package usage counters] チェックボックスをオフにします。
親パッケージの使用カウンタを共有するには、[Map this Service to exclusive package usage counters] チェックボックスをオフにします。
このパッケージの読み取り専用パッケージ使用カウンタの名前が、選択内容を反映して変更されます。
[Counter Index] ドロップダウン リストがグレー表示になります。
d.![]() 専用のパッケージ使用カウンタを使用するには、[Map this Service to exclusive package usage counters] チェックボックスをオンにします。
専用のパッケージ使用カウンタを使用するには、[Map this Service to exclusive package usage counters] チェックボックスをオンにします。
このパッケージの読み取り専用パッケージ使用カウンタの名前が、選択内容を反映して変更されます。
[Counter Index] ドロップダウン リストがグレー表示になります。
e.![]() カウンタ インデックスを変更するには(専用のパッケージ使用カウンタを使用している場合)、[Counter Index] ドロップダウン リストでインデックスの値を選択します。
カウンタ インデックスを変更するには(専用のパッケージ使用カウンタを使用している場合)、[Counter Index] ドロップダウン リストでインデックスの値を選択します。
(注) カウンタ インデックスのデフォルト値がシステムによって割り当てられます。この値は変更しないでください。
f.![]() このパッケージで使用するカレンダーを変更するには、[Select Calendar for this Package] ドロップダウン リストで目的のカレンダーを選択します。
このパッケージで使用するカレンダーを変更するには、[Select Calendar for this Package] ドロップダウン リストで目的のカレンダーを選択します。
g.![]() このパッケージの VAS トラフィック フォワーディング テーブルを変更するには、[Select Traffic Forwarding Table for this Package] ドロップダウン リストで目的のトラフィック フォワーディング テーブルを選択します。
このパッケージの VAS トラフィック フォワーディング テーブルを変更するには、[Select Traffic Forwarding Table for this Package] ドロップダウン リストで目的のトラフィック フォワーディング テーブルを選択します。
(注) VAS トラフィック フォワーディングがディセーブル(デフォルト)の場合、ドロップダウン リストはグレー表示になります。VAS トラフィック フォワーディングを有効にするには、「VAS トラフィック フォワーディングの有効化」を参照してください。
[Package Settings] ダイアログボックスが閉じます。
パッケージの削除
ユーザ定義パッケージは削除できます。デフォルト パッケージは削除できません。
ステップ 1![]() [Policies] タブで、パッケージ ツリーからパッケージを選択します。
[Policies] タブで、パッケージ ツリーからパッケージを選択します。
ステップ 2![]() [Policies] タブで、
[Policies] タブで、 ([Delete Package])をクリックします。
[Package Warning] メッセージが表示されます(図 9-44)。
パッケージが削除され、パッケージ ツリーに表示されなくなります。
規則の管理
サービスと基本パッケージの定義が完了すると、パッケージの規則を定義できるようになります。
•![]() フロー パケットの Differentiated Service Code Point(DSCP; Diffserv コード ポイント)Type of Service(ToS)値の変更
フロー パケットの Differentiated Service Code Point(DSCP; Diffserv コード ポイント)Type of Service(ToS)値の変更
通常、規則は常に適用されます。柔軟な設定を行うため、1 週間を 4 つの時間枠に分割できます。各時間枠に対して、サブ規則(タイムベース規則)を定義できます。
•![]() 「規則の階層」
「規則の階層」
•![]() 「規則の編集」
「規則の編集」
•![]() 「規則の削除」
「規則の削除」
デフォルト サービス規則
規則の階層
SCE プラットフォームは、最も固有性の高い規則をフローに適用します。
たとえば、E メールと POP3 の規則を定義すると、POP3 サービスにマッピングされたフローは POP3 の規則に従って処理され、SMTP サービスまたは IMAP サービスにマッピングされたフローは、E メールの規則に従って処理されます。そのため、たとえば POP3 には独自の使用制限が適用され、SMTP と IMAP は使用制限を共有することになります。
(注) 子サービスに規則を追加すると、親規則の設定は新しい規則にコピーされません。新しい規則は、デフォルト値で始まります。
子サービスにも適用される規則は、 で示されます。子サービスに適用されない規則は、
 で示されます。
タイムベース規則は、関連規則の子として示されます。タイムベース規則のアイコンは、規則が子サービスに適用される場合にも示されます( または
または  )。
)。
「規則が影響するサービスの表示」も参照してください。
パッケージの規則の表示
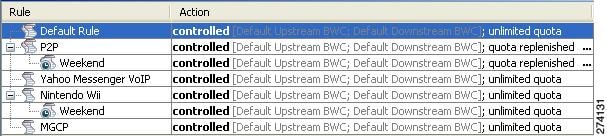
各規則のリストには、アイコン、規則が適用されるサービスまたはサービス グループの名前、規則がイネーブルかディセーブルか、規則の簡単な説明が表示されます。
ステップ 1![]() [Policies] タブで、パッケージ ツリーからパッケージを選択します。
[Policies] タブで、パッケージ ツリーからパッケージを選択します。
このパッケージに定義された規則のリストが右の規則ペインに表示されます(図 9-45)。
図 9-45 Service Configuration Editor
次の作業
規則の詳細情報を表示するには、[Edit Rule for Service] ダイアログボックスを開きます(「規則の編集」を参照)。
タイムベース規則の詳細情報を表示するには、[Edit Time-Based Rule for Service] ダイアログボックスを開きます(「タイムベース規則の編集」を参照)。
パッケージへの規則の追加
デフォルト サービス規則は、すべてのパッケージに割り当てられます。パッケージに規則を追加することができます。
タイムベース規則の追加方法については、「規則へのタイムベース規則の追加」を参照してください。
ステップ 1![]() [Policies] タブで、パッケージ ツリーからパッケージを選択します。
[Policies] タブで、パッケージ ツリーからパッケージを選択します。
ステップ 2![]() 右の規則ペインで、 ([Add Rule])をクリックします。
右の規則ペインで、 ([Add Rule])をクリックします。
[Add New Rule to Package] ダイアログボックスが表示されます(図 9-46)。
図 9-46 [Add New Rule to Package]
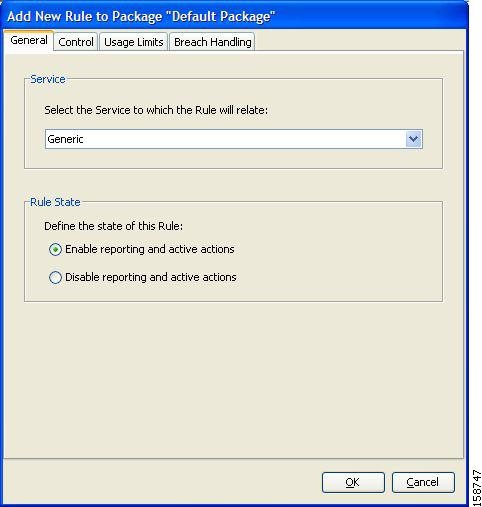
ステップ 3![]() [Add New Rule to Package] ダイアログボックスの [Service] 領域で、[Select the Service to Which the Rule Relates] ドロップダウン リストからサービスを選択します。
[Add New Rule to Package] ダイアログボックスの [Service] 領域で、[Select the Service to Which the Rule Relates] ドロップダウン リストからサービスを選択します。
(注) このパッケージに対してすでに規則が定義されているサービスは、グレー表示になります。
ステップ 4![]() [Rule State] 領域で、[Define the state of this Rule] のオプション ボタンをいずれか 1 つ選択します。
[Rule State] 領域で、[Define the state of this Rule] のオプション ボタンをいずれか 1 つ選択します。
•![]() [Enable reporting and active actions]
[Enable reporting and active actions]
•![]() [Disable reporting and active actions]
[Disable reporting and active actions]
(注) 規則のイネーブルとディセーブルは、いつでも切り替えができます(「規則の編集」を参照)。
ステップ 5![]() (オプション)この規則のトラフィック フローごとの動作を設定するには、「規則のためのフローごとのアクションの定義」のセクションの手順を実行します。
(オプション)この規則のトラフィック フローごとの動作を設定するには、「規則のためのフローごとのアクションの定義」のセクションの手順を実行します。
[Add New Rule to Package] ダイアログボックスが閉じます。
新しい規則が規則のリストに追加され、右の規則ペインに表示されます。
次の作業
使用制限と違反処理は、クォータ管理の一部です(「クォータの管理」を参照)。
•![]() [Usage Limits] タブのパラメータを設定するには、「規則のためのクォータ バケットの選択」を参照してください。
[Usage Limits] タブのパラメータを設定するには、「規則のためのクォータ バケットの選択」を参照してください。
•![]() [Breach Handling] タブのパラメータを設定するには、「規則のための違反処理パラメータの編集」を参照してください。
[Breach Handling] タブのパラメータを設定するには、「規則のための違反処理パラメータの編集」を参照してください。
規則のためのフローごとのアクションの定義
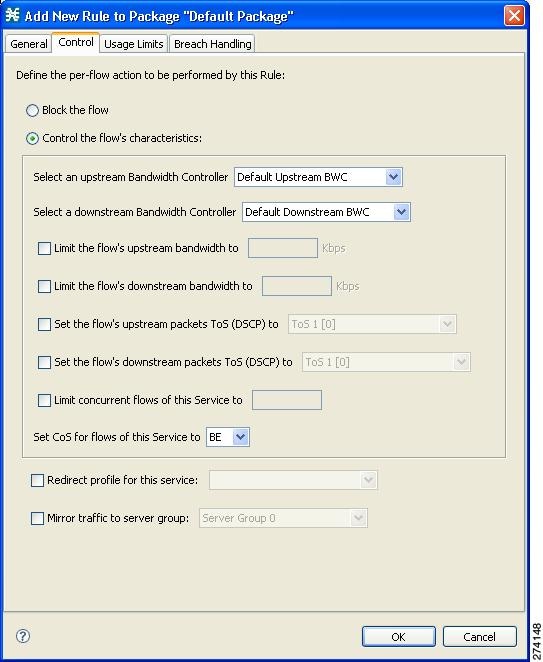
[Add New Rule to Package] ダイアログボックスの [Control] タブを使用すると、現在のサービスにマッピングされているセッションに、トラフィック フローごとの動作を設定できます。
ステップ 1![]() [Add New Rule to Package] ダイアログボックスで、[Control] タブをクリックします。
[Add New Rule to Package] ダイアログボックスで、[Control] タブをクリックします。
[Control] タブが開きます(図 9-47)。
この規則のサービスにマッピングされているフローを制御するには、ステップ 3 に進みます。
ステップ 2![]() この規則のサービスにマッピングされているフローをブロックするには、[Block the flow] オプション ボタンを選択し、ステップ 12
この規則のサービスにマッピングされているフローをブロックするには、[Block the flow] オプション ボタンを選択し、ステップ 12![]() に進みます。
に進みます。
ステップ 3![]() [Control the flow's characteristics] オプション ボタンを選択します。
[Control the flow's characteristics] オプション ボタンを選択します。
[Flow Characteristic] 領域のオプションが使用可能になります。
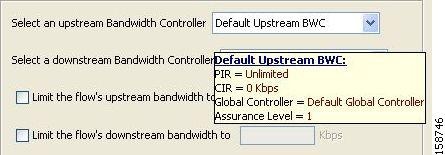
ステップ 4![]() アップストリームの [Bandwidth Controller] ドロップダウン リストで、アップストリーム BWC を選択します。これにより、選択した BWC の特性に基づいて、この規則にマッピングされたすべての同時フローの帯域幅測定が設定されます。
アップストリームの [Bandwidth Controller] ドロップダウン リストで、アップストリーム BWC を選択します。これにより、選択した BWC の特性に基づいて、この規則にマッピングされたすべての同時フローの帯域幅測定が設定されます。
このドロップダウン リストの BWC は、パッケージの作成時または編集時に定義されます。
マウスをドロップダウン リスト上に合わせると、ツールチップ(図 9-48)に、選択した BWC のプロパティ(Peak Information Rate(PIR; 最大情報レート)、Committed Information Rate(CIR; 認定情報レート)、グローバル コントローラ、Assurance Level)が表示されます。
ステップ 5![]() ダウンストリームの [Bandwidth Controller] ドロップダウン リストで、ダウンストリーム BWC を選択します。
ダウンストリームの [Bandwidth Controller] ドロップダウン リストで、ダウンストリーム BWC を選択します。
ステップ 6![]() (オプション)フローごとのアップストリーム帯域幅制限を設定するには、[Limit the flow's upstream bandwidth] チェックボックスをオンにし、[Kbps] フィールドに値を入力します。
(オプション)フローごとのアップストリーム帯域幅制限を設定するには、[Limit the flow's upstream bandwidth] チェックボックスをオンにし、[Kbps] フィールドに値を入力します。
(注) フローごとの帯域幅は、1 Kbps ~ 57 Mbps の細かさで設定できます。
ステップ 7![]() (オプション)フローごとのダウンストリーム帯域幅制限を設定するには、[Limit the flow's downstream bandwidth] チェックボックスをオンにし、[Kbps] フィールドに値を入力します。
(オプション)フローごとのダウンストリーム帯域幅制限を設定するには、[Limit the flow's downstream bandwidth] チェックボックスをオンにし、[Kbps] フィールドに値を入力します。
ステップ 8![]() (オプション)アップストリーム フローの全パケットの DSCP ToS マーカーを変更するには、[Set the flow's upstream packets ToS (DSCP) to] チェックボックスをオンにし、ドロップダウン リストから値を選択します(図 9-49)。
(オプション)アップストリーム フローの全パケットの DSCP ToS マーカーを変更するには、[Set the flow's upstream packets ToS (DSCP) to] チェックボックスをオンにし、ドロップダウン リストから値を選択します(図 9-49)。
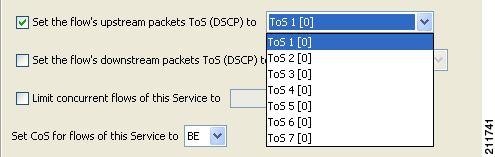
ステップ 9![]() (オプション)ダウンストリーム フローの全パケットの DSCP ToS マーカーを変更するには、[Set the flow's downstream packets ToS (DSCP) to] チェックボックスをオンにし、ドロップダウン リストから値を選択します。
(オプション)ダウンストリーム フローの全パケットの DSCP ToS マーカーを変更するには、[Set the flow's downstream packets ToS (DSCP) to] チェックボックスをオンにし、ドロップダウン リストから値を選択します。
ステップ 10![]() (オプション)サブスクライバに許容される(この規則にマッピングされた)同時フローの最大数を設定するには、[Limit concurrent flows of this Service] チェックボックスをオンにし、関連フィールドに値を入力します。
(オプション)サブスクライバに許容される(この規則にマッピングされた)同時フローの最大数を設定するには、[Limit concurrent flows of this Service] チェックボックスをオンにし、関連フィールドに値を入力します。
ステップ 11![]() [Set CoS for flows of this Service] ドロップダウン リストで、Class of Service(CoS; サービス クラス)を選択します。
[Set CoS for flows of this Service] ドロップダウン リストで、Class of Service(CoS; サービス クラス)を選択します。
ステップ 12![]() (オプション)サブスクライバのリダイレクションをイネーブルにするには、[Redirect profile for this service] チェックボックスをオンにし、ドロップダウン リストからリダイレクト プロファイルを選択します。
(オプション)サブスクライバのリダイレクションをイネーブルにするには、[Redirect profile for this service] チェックボックスをオンにし、ドロップダウン リストからリダイレクト プロファイルを選択します。
ステップ 13![]() (オプション)トラフィック ミラーリング をイネーブルにするには、[Mirror traffic to server group] チェックボックスをオンにし、ドロップダウン リストからサーバ グループを選択します。
(オプション)トラフィック ミラーリング をイネーブルにするには、[Mirror traffic to server group] チェックボックスをオンにし、ドロップダウン リストからサーバ グループを選択します。
(注) [Mirror traffic to server group] チェックボックスがイネーブルになるのは、[VAS Settings] ダイアログボックスで [Traffic Mirroring] がイネーブルの場合だけです。
[Add New Rule to Package] ダイアログボックスが閉じます。
新しい規則が規則のリストに追加され、右の規則ペインに表示されます。
規則の編集
(注) デフォルト サービス規則は、ディセーブルにできません。
(注) [Edit Rule for Service] ダイアログボックスのタブは、基本的に [Add New Rule to Package] ダイアログボックスのタブと同じです。ただし、[General] タブは異なり、規則が適用されたサービスは変更できません。
ステップ 1![]() [Policies] タブで、パッケージ ツリーからパッケージを選択します。
[Policies] タブで、パッケージ ツリーからパッケージを選択します。
[Edit Rule for Service] ダイアログボックスが表示されます(図 9-50)。
図 9-50 [Edit Rule for Service]
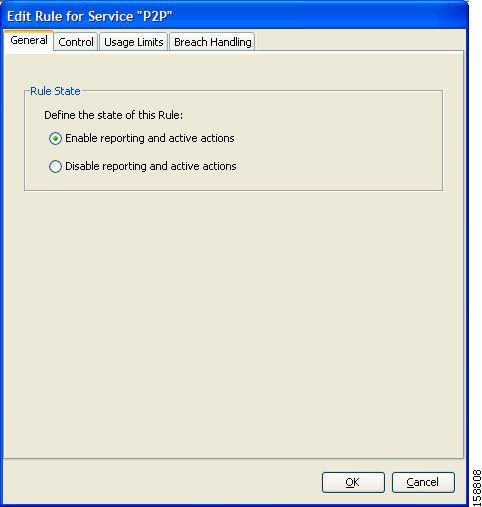
ステップ 4![]() [Rule State] 領域で、[Define the state of this Rule] のオプション ボタンをいずれか 1 つ選択します。
[Rule State] 領域で、[Define the state of this Rule] のオプション ボタンをいずれか 1 つ選択します。
•![]() [Enable reporting and active actions]
[Enable reporting and active actions]
•![]() [Disable reporting and active actions]
[Disable reporting and active actions]
b.![]() 「規則のためのフローごとのアクションの定義」の手順に従います。
「規則のためのフローごとのアクションの定義」の手順に従います。
b.![]() 「規則のためのクォータ バケットの選択」の手順に従います。
「規則のためのクォータ バケットの選択」の手順に従います。
ステップ 7![]() クォータで違反が発生したときの動作を定義します。
クォータで違反が発生したときの動作を定義します。
a.![]() [Breach Handling] タブをクリックします。
[Breach Handling] タブをクリックします。
b.![]() 「規則のための違反処理パラメータの編集」の手順に従います。
「規則のための違反処理パラメータの編集」の手順に従います。
[Edit Rule for Service] ダイアログボックスが閉じます。
規則の削除
ユーザ定義規則は削除できます。デフォルト サービス規則は削除できません。
(注) 規則は、プロファイルを保持したままディセーブルにできます(「規則の編集」のステップ 4 を参照)。このため、あとから規則を再度イネーブルにするとき、パラメータを設定しなおす必要がありません。デフォルト サービス規則は、ディセーブルにできません。
ステップ 1![]() [Policies] タブで、パッケージ ツリーからパッケージを選択します。
[Policies] タブで、パッケージ ツリーからパッケージを選択します。
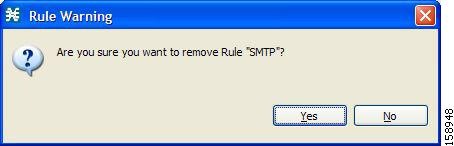
ステップ 3![]() 規則ペインで、 ([Delete Rule])をクリックします。
規則ペインで、 ([Delete Rule])をクリックします。
[Rule Warning] メッセージが表示されます(図 9-51)。
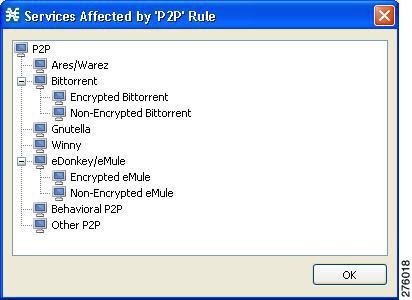
規則が影響するサービスの表示
サービスは、別のサービスの子として定義できます(親サービスはサービス グループ)。子サービスに独自の規則を定義するまで、子サービスには親サービスの規則が適用されます。サービスの子に影響する規則は、図 9-52 の P2P 規則および FTP 規則のように、規則リスト内で異なるアイコンによって示されます。

(注) デフォルト サービス規則は、特定の規則が定義されていないすべてのサービスに適用されます。
ステップ 1![]() [Network Traffic] タブの右の規則ペインで規則を選択し、
[Network Traffic] タブの右の規則ペインで規則を選択し、 ([Show All Services Affected By This Rule])をクリックします。
[Services Affected] ダイアログボックスが表示されます(図 9-53)。
[Services Affected] ダイアログボックスが閉じます。
タイムベース規則の管理
Console を使用して、1 週間を 4 つの時間枠に分割できます(「カレンダーの管理」を参照)。タイムベース規則とは、1 つの時間枠に適用される規則です。
規則には、タイムベース規則を追加できます。時間枠に対してタイムベース規則が定義されていない場合、親規則が適用されます。
異なる時間枠に同様の規則を適用する必要がある場合があります。タイムベース規則を追加するとき、親規則の設定を新しいタイムベース規則にコピーし、必要な変更を行うことができます。親規則に対してそれ以降に行った変更は、タイムベース規則には影響しません。
規則へのタイムベース規則の追加
規則にタイムベース規則を追加すると、特定の時間枠にだけ適用可能な代替規則パラメータを指定できます。時間枠に対してタイムベース規則が定義されていない場合、親規則が適用されます。
•![]() タイムベース規則を追加するとき、最初は、パラメータには親規則に定義された値が設定されます。親規則に対してそれ以降に行った変更は、タイムベース規則には反映されません。
タイムベース規則を追加するとき、最初は、パラメータには親規則に定義された値が設定されます。親規則に対してそれ以降に行った変更は、タイムベース規則には反映されません。
•![]() [Add New Time-Based Rule] ダイアログボックスのタブは、基本的に [Add New Rule to Package] ダイアログボックスのタブと同じです。ただし、[General] タブは異なります。[Add New Rule to Package] ダイアログボックスではサービスを選択し、[Add New Time-Based Rule] ダイアログボックスでは時間枠を選択します。
[Add New Time-Based Rule] ダイアログボックスのタブは、基本的に [Add New Rule to Package] ダイアログボックスのタブと同じです。ただし、[General] タブは異なります。[Add New Rule to Package] ダイアログボックスではサービスを選択し、[Add New Time-Based Rule] ダイアログボックスでは時間枠を選択します。
タイムベース規則が子サービスに影響をおよぼすサービスは、図 9-54 に示す P2P 規則の Weekend タイムベース規則のように、規則リスト内で異なるアイコンによって示されます。
ステップ 1![]() [Policies] タブで、パッケージ ツリーからパッケージを選択します。
[Policies] タブで、パッケージ ツリーからパッケージを選択します。
ステップ 3![]()
 ([Add Time-Based Rule])をクリックします。
[Add New Time-Based Rule] ダイアログボックスが表示されます(図 9-55)。
図 9-55 [Add New Time-Based Rule]
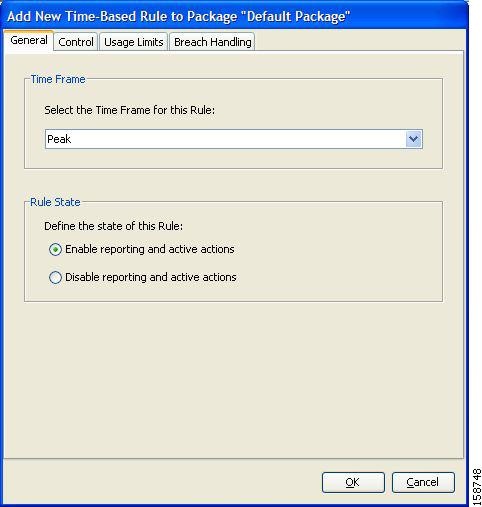
ステップ 4![]() [Time Frame] 領域の [Select the Time Frame for this Rule] ドロップダウン リストで、4 つの時間枠の中から 1 つを選択します。
[Time Frame] 領域の [Select the Time Frame for this Rule] ドロップダウン リストで、4 つの時間枠の中から 1 つを選択します。
ステップ 5![]() [Rule State] 領域で、[Define the state of this Rule] のオプション ボタンをいずれか 1 つ選択します。
[Rule State] 領域で、[Define the state of this Rule] のオプション ボタンをいずれか 1 つ選択します。
•![]() [Enable reporting and active actions]
[Enable reporting and active actions]
•![]() [Disable reporting and active actions]
[Disable reporting and active actions]
b.![]() 「規則のためのフローごとのアクションの定義」の手順に従います。
「規則のためのフローごとのアクションの定義」の手順に従います。
b.![]() 「規則のためのクォータ バケットの選択」の手順に従います。
「規則のためのクォータ バケットの選択」の手順に従います。
ステップ 8![]() クォータで違反が発生したときの動作を定義します。
クォータで違反が発生したときの動作を定義します。
a.![]() [Breach Handling] タブをクリックします。
[Breach Handling] タブをクリックします。
b.![]() 「規則のための違反処理パラメータの編集」の手順に従います。
「規則のための違反処理パラメータの編集」の手順に従います。
[Add New Time-Based Rule] ダイアログボックスが閉じます。
新しいタイムベース規則が、規則の子として規則ペインに表示されます。
タイムベース規則の編集
(注) [Edit Time-Based Rule for Service] ダイアログボックスのタブは、基本的に [Add New Time-Based Rule] ダイアログボックスのタブと同じです。ただし、[General] タブは異なります。規則が適用されている時間枠は変更できません。
ステップ 1![]() [Policies] タブで、パッケージ ツリーからパッケージを選択します。
[Policies] タブで、パッケージ ツリーからパッケージを選択します。
ステップ 2![]() 右の規則ペインで、タイムベース規則を選択します。
右の規則ペインで、タイムベース規則を選択します。
[Edit Time-Based Rule for Service] ダイアログボックスが表示されます(図 9-56)。
図 9-56 [Edit Time-Based Rule for Service]
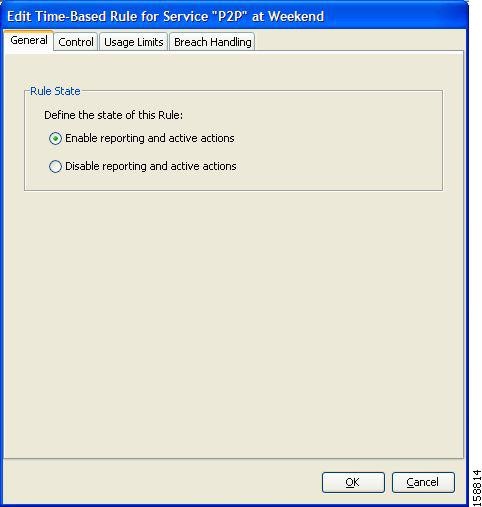
ステップ 4![]() [Rule State] 領域で、[Define the state of this Rule] のオプション ボタンをいずれか 1 つ選択します。
[Rule State] 領域で、[Define the state of this Rule] のオプション ボタンをいずれか 1 つ選択します。
•![]() [Enable reporting and active actions]
[Enable reporting and active actions]
•![]() [Disable reporting and active actions]
[Disable reporting and active actions]
b.![]() 「規則のためのフローごとのアクションの定義」の手順に従います。
「規則のためのフローごとのアクションの定義」の手順に従います。
b.![]() 「規則のためのクォータ バケットの選択」の手順に従います。
「規則のためのクォータ バケットの選択」の手順に従います。
ステップ 7![]() クォータで違反が発生したときの動作を定義します。
クォータで違反が発生したときの動作を定義します。
a.![]() [Breach Handling] タブをクリックします。
[Breach Handling] タブをクリックします。
b.![]() 「規則のための違反処理パラメータの編集」の手順に従います。
「規則のための違反処理パラメータの編集」の手順に従います。
[Edit Time-Based Rule for Service] ダイアログボックスが閉じます。
タイムベース規則の削除
(注) 規則は、プロファイルを保持したままディセーブルにできます(「タイムベース規則の編集」を参照)。このため、あとから規則を再度イネーブルにするとき、パラメータを設定しなおす必要がありません。
ステップ 1![]() [Policies] タブで、パッケージ ツリーからパッケージを選択します。
[Policies] タブで、パッケージ ツリーからパッケージを選択します。
ステップ 2![]() 右の規則ペインで、タイムベース規則を選択します。
右の規則ペインで、タイムベース規則を選択します。
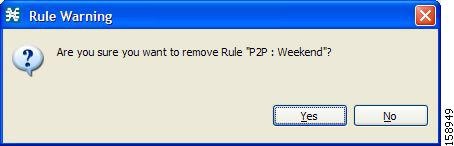
ステップ 3![]() 規則ペインで、 ([Delete Rule])をクリックします。
規則ペインで、 ([Delete Rule])をクリックします。
[Rule Warning] メッセージが表示されます(図 9-57)。
カレンダーの管理
カレンダーを使用して、1 週間を 4 つの時間枠に分割できます。
カレンダーの設定が完了すると、カレンダーを使用するパッケージにタイムベース規則を追加できるようになります。タイムベース規則とは、1 つの時間枠だけに適用される規則です。タイムベース規則を使用すると、特定の時間にだけ適用される規則パラメータを設定できます。たとえば、ピーク、オフピーク、夜間、週末用にそれぞれ異なる規則を定義する必要がある場合もあるでしょう。
各サービス コンフィギュレーションには、1 つのデフォルト カレンダーが組み込まれています。さらに、異なる時間枠を設定した 9 つのカレンダーを追加できます。パッケージごとに異なるカレンダーを使用できます。カスタマーが複数の時間帯に分散しているようなサービス プロバイダーの場合、1 時間ずつ時間をずらしてカレンダーを設定することにより、複数のカレンダーを使用することもできます。
•![]() 「時間枠の設定」
「時間枠の設定」
ステップ 1![]() 左ペインの [Policies] タブで、[Configuration] > [Weekly Calendars] の順に選択します。
左ペインの [Policies] タブで、[Configuration] > [Weekly Calendars] の順に選択します。
[Calendar Settings] ダイアログボックスが表示されます(図 9-58)。
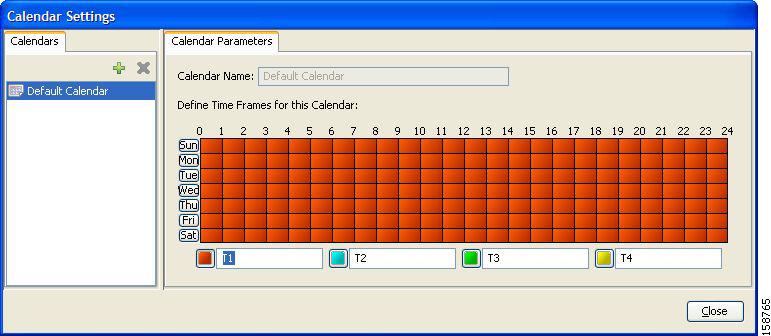
[Calendars] タブに、既存のカレンダーのリストが表示されます。リスト内のカレンダーをクリックすると、その時間枠設定が表示されます。
選択したカレンダーの時間枠が、[Calendar Parameters] タブに表示され、設定されます。
[Calendar Settings] ダイアログボックスが閉じます。
各サービス コンフィギュレーションには、1 つのデフォルト カレンダーが組み込まれています。さらに、最大 9 つのカレンダーを追加できます。
ステップ 1![]() 左ペインの [Policies] タブで、[Configuration] > [Weekly Calendars] の順に選択します。
左ペインの [Policies] タブで、[Configuration] > [Weekly Calendars] の順に選択します。
[Calendar Settings] ダイアログボックスが表示されます。
ステップ 2![]() [Calendar] タブで、 ([Add])をクリックします。
[Calendar] タブで、 ([Add])をクリックします。
Calendar (1) という名前の新しいカレンダーが追加されます。
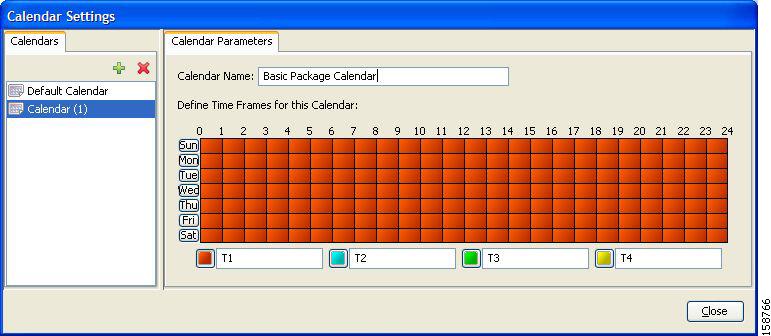
ステップ 3![]() [Calendar Parameters] タブ(図 9-59)で [Calendar Name] フィールドをクリックし、このカレンダーの名前を入力します。
[Calendar Parameters] タブ(図 9-59)で [Calendar Name] フィールドをクリックし、このカレンダーの名前を入力します。
図 9-59 [Calendar Parameters] タブ
[Calendar Settings] ダイアログボックスが閉じ、新しいカレンダー名が保存されます。
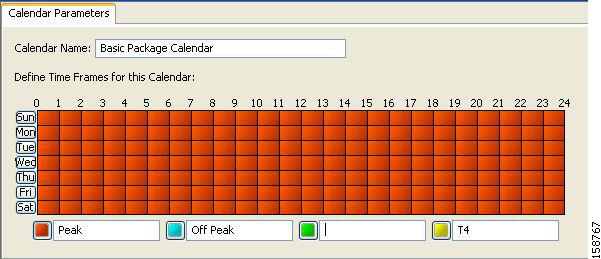
デフォルトでは、時間枠名は T1、T2、T3、および T4 です。これらの名前は、いつでも変更できます。たとえば、時間枠に Peak、OffPeak、Night、Weekend という名前を付けることもできます。
(注) カレンダーごとに異なる時間枠を設定できますが、時間枠の名前はすべてのカレンダーで共通です。1 つのカレンダーの設定時に名前を変更すると、他のカレンダーについても名前が変更されます。
ステップ 1![]() 左ペインの [Policies] タブで、[Configuration] > [Weekly Calendars] の順に選択します。
左ペインの [Policies] タブで、[Configuration] > [Weekly Calendars] の順に選択します。
[Calendar Settings] ダイアログボックスが表示されます。
[Calendar Parameters] タブ(図 9-60)のグリッドの下で、カラー表示された正方形の横にあるフィールドに、4 つの時間枠がそれぞれ表示されます。
ステップ 2![]() [Time Frame Name] フィールドをクリックして、時間枠の新しい名前を入力します。
[Time Frame Name] フィールドをクリックして、時間枠の新しい名前を入力します。
図 9-60 [Calendar Parameters] タブ
ステップ 3![]() 他の 3 つの時間枠についても、ステップ 2 を繰り返します。
他の 3 つの時間枠についても、ステップ 2 を繰り返します。
[Calendar Settings] ダイアログボックスが閉じ、時間枠の変更後の名前が保存されます。
ユーザが追加したカレンダーは削除できます。デフォルト カレンダーは削除できません。
(注) パッケージで使用されているカレンダーは削除できません (カレンダーを選択したとき、[Delete] アイコンはグレー表示になっています)。このようなカレンダーを削除するには、まず、削除するカレンダーを使用しているそれぞれのパッケージに対し、別のカレンダーを選択する必要があります。
パッケージに関連付けられているカレンダーの変更については、「高度なパッケージ オプションの設定」を参照してください。
ステップ 1![]() 左ペインの [Policies] タブで、[Configuration] > [Weekly Calendars] の順に選択します。
左ペインの [Policies] タブで、[Configuration] > [Weekly Calendars] の順に選択します。
[Calendar Settings] ダイアログボックスが表示されます。
ステップ 2![]() [Calendar] タブでカレンダーを選択し、 ([Delete])をクリックします。
[Calendar] タブでカレンダーを選択し、 ([Delete])をクリックします。
[Calendar Removal Confirmation] メッセージが表示されます(図 9-61)。
図 9-61 [Calendar Removal Confirmation]
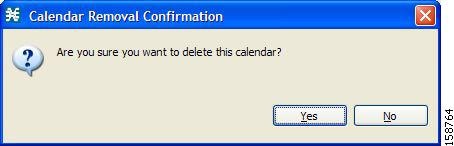
[Calendar Settings] ダイアログボックスが閉じます。
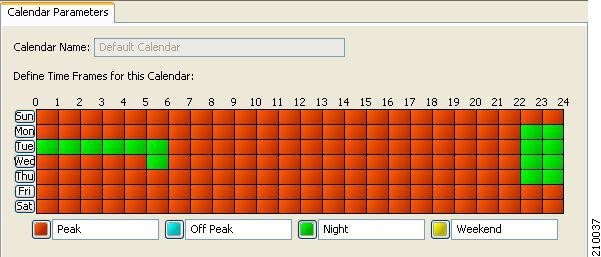
デフォルトでは、1 週間のすべての時間が 1 つの時間枠に属しています。Console を使用して、1 週間の 168(24 × 7)時間を 1 時間ごとに、4 つの時間枠のいずれかに割り当てることができます。この時間枠により、時間帯による差別化サービスを提供したり、サービスに制約を課したりできます。
ステップ 1![]() 左ペインの [Policies] タブで、[Configuration] > [Weekly Calendars] の順に選択します。
左ペインの [Policies] タブで、[Configuration] > [Weekly Calendars] の順に選択します。
[Calendar Settings] ダイアログボックスが表示されます。
ステップ 2![]() [Calendars] タブで、設定するカレンダーを選択します。
[Calendars] タブで、設定するカレンダーを選択します。
[Calendar Parameters] タブに、選択したカレンダーの [Define Time Frames for this Calendar] グリッドが表示されます。このグリッドは 1 週間を表し、24 時間×7 日の形式で配置されます。各セルが 1 時間に相当します。
グリッドの下の、カラーのボタンの隣に、各時間枠の名前が表示されます。
ステップ 4![]() 選択した時間枠に設定する時間のセルを、グリッド内で選択します。
選択した時間枠に設定する時間のセルを、グリッド内で選択します。
セルのグループを選択するには、マウス ボタンを押したまま複数のセルをドラッグします(図 9-62)。
図 9-62 [Calendar Parameters] タブ
変更内容は、変更時にサービス コンフィギュレーションに書き込まれます。
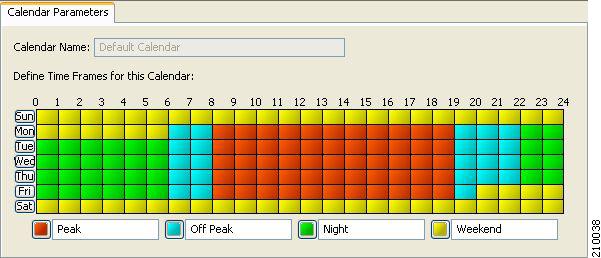
ステップ 5![]() グリッド全体がマッピングされるまで、他の時間枠について、ステップ 3 および 4 を実行します。
グリッド全体がマッピングされるまで、他の時間枠について、ステップ 3 および 4 を実行します。
1 週間が 4 つの時間枠にマッピングできました。図 9-63 に、時間の分割例を示します。
[Calendar Settings] ダイアログボックスが閉じます。
DSCP ToS マーカー値の管理
SCA BB では、フィルタ規則(「フィルタ規則の追加」のステップ 11 を参照)またはサービス規則(「規則のためのフローごとのアクションの定義」のステップ 10 および 11、「規則のための違反処理パラメータの編集」のステップ 9 を参照)と一致するフロー パケットの DSCP ToS マーカーの値を変更できます。
SCA BB は、7 種類の ToS マーカー クラスをサポートしています。各クラスに特定の値を割り当て、それをフロー パケットに適用できます。
(注) 3.1.5 よりも前の SCA BB リリースで DSCP マーキングを使用していた場合、古いサービス コンフィギュレーションを変換するには、サービス コンフィギュレーションを再設定し、旧リリースと同じネットワーク動作を取得する必要があります。
DSCP ToS マーキング
DSCP ToS マーキングは、ネットワーク要素間のフローのタイプとプライオリティを通知する手段として IP ネットワークで使用されます。
デフォルトのマーキング オプションでは、パケットはマークされません。分類では、確定のためにいくつかのパケットを必要とする場合があります。したがって、ToS マーキングがイネーブルの場合は、最初のいくつかのパケットがデフォルト オプションのままで処理されるためにマークされない可能性があることに注意が必要です。
ステップ 1![]() 左ペインの [Policies] タブで、[Configuration] > [ToS Marking Settings] の順に選択します。
左ペインの [Policies] タブで、[Configuration] > [ToS Marking Settings] の順に選択します。
[ToS Marking Settings] ダイアログボックスが表示されます(図 9-64)。
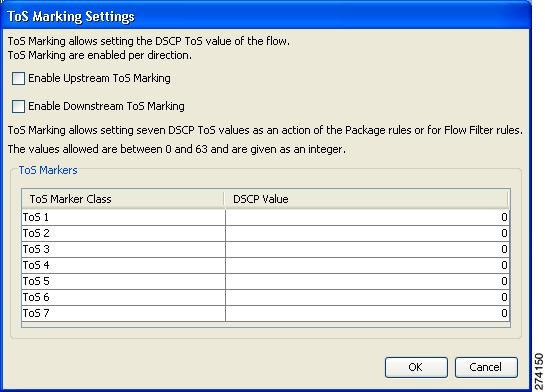
ステップ 2![]() (オプション)アップストリーム フローの DSCP ToS マーキングをイネーブルにするには、[Enable Upstream ToS Marking] チェックボックスをオンにします。
(オプション)アップストリーム フローの DSCP ToS マーキングをイネーブルにするには、[Enable Upstream ToS Marking] チェックボックスをオンにします。
アップストリーム ToS マーキングがディセーブルの場合、フィルタ規則およびサービス規則の設定は上書きされます。
ステップ 3![]() (オプション)ダウンストリーム フローの DSCP ToS マーキングをイネーブルにするには、[Enable Downstream ToS Marking] チェックボックスをオンにします。
(オプション)ダウンストリーム フローの DSCP ToS マーキングをイネーブルにするには、[Enable Downstream ToS Marking] チェックボックスをオンにします。
ダウンストリーム ToS マーキングがディセーブルの場合、フィルタ規則およびサービス規則の設定は上書きされます。
ステップ 4![]() ToS マーカー クラスに一意の名前を付けます。
ToS マーカー クラスに一意の名前を付けます。
(注) ToS マーカー クラスにはデフォルトの名前を使用できますが、わかりやすい名前を付けることを推奨します。
(注) フィルタ規則とサービス規則を定義する際、ToS マーカー クラスの名前と値が「名前 [値]」の形式でドロップダウン リストに表示されます。たとえば、「ToS 1 [23]」や「My P2P ToS [1]」のようになります。
[ToS Marking Settings] ダイアログボックスが閉じます。
クォータの管理
クォータ プロファイルの追加方法
新しいプロファイルを追加および定義したり、既存のプロファイルを編集したりすることができます。また、最大 16 個の新しいバケットを追加できます。
パッケージに対応付けられるクォータ バケットの定義も行います。規則では、クォータ バケットに基づいて、特定のサービス グループの消費制限を設定できます(「規則のためのクォータ バケットの選択」を参照)。
ステップ 1![]() 左ペインの [Policies] タブで、[Configuration] > [Policies] > [Quota Settings] の順に選択します。
左ペインの [Policies] タブで、[Configuration] > [Policies] > [Quota Settings] の順に選択します。
[Quota Profile Editor] ダイアログボックスが表示されます(図 9-65)。
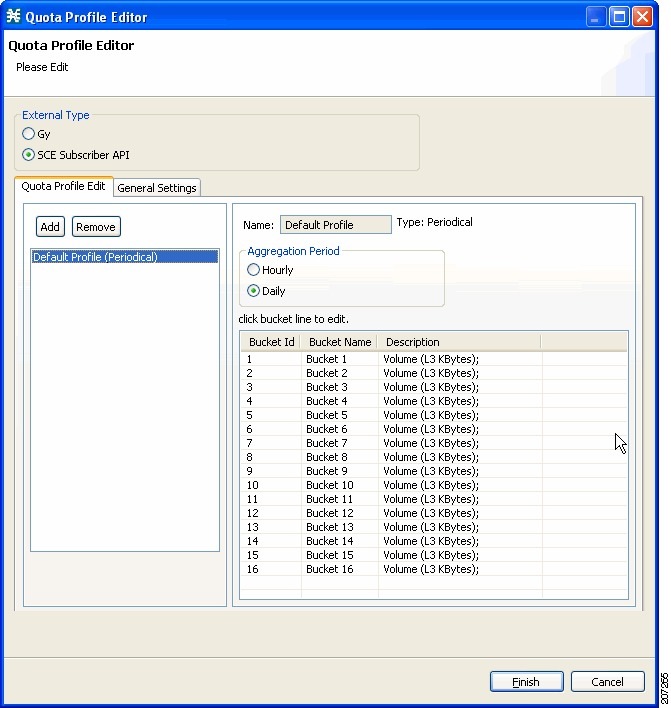
ステップ 2![]() [External Type] のオプション ボタンをいずれか 1 つ選択します。
[External Type] のオプション ボタンをいずれか 1 つ選択します。
•![]() [Gy]:Gy クォータ モデルにより、Gy インターフェイス アダプタを外部クォータ管理に使用できるようになります。詳細については、『 Cisco Service Control Mobile Solution Guide 』を参照してください。
[Gy]:Gy クォータ モデルにより、Gy インターフェイス アダプタを外部クォータ管理に使用できるようになります。詳細については、『 Cisco Service Control Mobile Solution Guide 』を参照してください。
•![]() [SCE Subscriber API]:Subscriber API により、サブスクライバ プロビジョニングのために外部アプリケーション(ポリシー サーバ)から SCE に直接接続できるようになります。詳細については、『 Cisco SCMS SCE Subscriber API Programmer Guide 』を参照してください。
[SCE Subscriber API]:Subscriber API により、サブスクライバ プロビジョニングのために外部アプリケーション(ポリシー サーバ)から SCE に直接接続できるようになります。詳細については、『 Cisco SCMS SCE Subscriber API Programmer Guide 』を参照してください。
(注) 定期的なクォータ管理を使用すると、すべてのサブスクライバのクォータが同時に補充されることのないようにクォータの補充を分散できます (「クォータ補充の分散」を参照)。
ステップ 3![]() [Periodical] クォータ プロファイルの場合は、[Aggregation Period] オプション ボタンのいずれかを選択して、パッケージのクォータを更新するタイミングを指定します。
[Periodical] クォータ プロファイルの場合は、[Aggregation Period] オプション ボタンのいずれかを選択して、パッケージのクォータを更新するタイミングを指定します。
ステップ 4![]() [Quota Profile Edit] タブで、[Add] をクリックします。
[Quota Profile Edit] タブで、[Add] をクリックします。
[Add Quota Profile] ダイアログボックスが表示されます(図 9-66)。
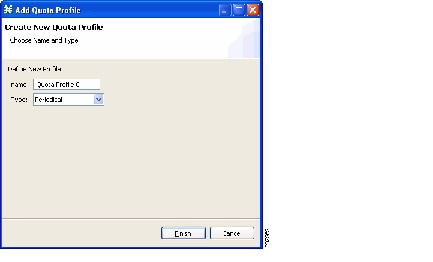
ステップ 5![]() 新しいクォータ プロファイルの一意の名前を [Name] フィールドに入力します。
新しいクォータ プロファイルの一意の名前を [Name] フィールドに入力します。
ステップ 6![]() ドロップダウン リストから、該当するタイプを選択します。
ドロップダウン リストから、該当するタイプを選択します。
[Add Quota Profile] ウィンドウが閉じます。
新しいプロファイルがプロファイルのリストに追加され、左の [Quota Profile Edit] ペインに表示されます。
クォータ プロファイルの編集方法
プロファイルを編集してバケット プロファイルを更新できます。
(注) デフォルト プロファイルは編集することも削除することもできません。
ステップ 1![]() 左ペインの [Policies] タブで、[Configuration] > [Policies] > [Quota Settings] の順に選択します。
左ペインの [Policies] タブで、[Configuration] > [Policies] > [Quota Settings] の順に選択します。
[Quota Profile Editor] ダイアログボックスが表示されます(図 9-65)。
ステップ 2![]() プロファイル ツリーからクォータ プロファイルを選択します。
プロファイル ツリーからクォータ プロファイルを選択します。
選択したプロファイルに対して定義されているすべてのバケットが右ペインに一覧表示されます。
ステップ 3![]() 右ペインで、バケット行をダブルクリックします。
右ペインで、バケット行をダブルクリックします。
[Quota Bucket Editor] ウィンドウが表示されます(図 9-67)。
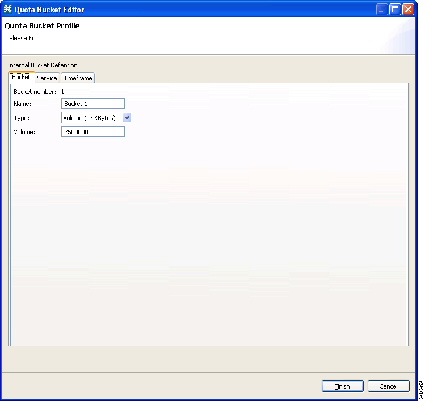
ステップ 4![]() [Name]、[Type]、および [Volume] を変更します。
[Name]、[Type]、および [Volume] を変更します。
(注) バケットにはデフォルトの名前を使用できますが、わかりやすい名前の入力を推奨します。
ステップ 5![]() サービスをクォータ プロファイルに関連付けるには、[Service] タブをクリックします(図 9-68)。
サービスをクォータ プロファイルに関連付けるには、[Service] タブをクリックします(図 9-68)。
図 9-68 [Quota Bucket Editor]:[Service]

ステップ 6![]() [Non Attached Service] ペインからサービスを選択し、右側の [Attached Service] ペインに移動します。
[Non Attached Service] ペインからサービスを選択し、右側の [Attached Service] ペインに移動します。
選択したサービスはそのサブ サービスとともに移動されます(図 9-69)。
図 9-69 [Quota Bucket Editor]:[Attached Service]

バケット タイプに基づいて、次のタブからサービスを選択できます。
ステップ 7![]() 各時間枠をクォータ プロファイルに関連付けるには、[Timeframe] タブをクリックします(図 9-70)。
各時間枠をクォータ プロファイルに関連付けるには、[Timeframe] タブをクリックします(図 9-70)。
図 9-70 [Quota Bucket Editor]:[Timeframe]
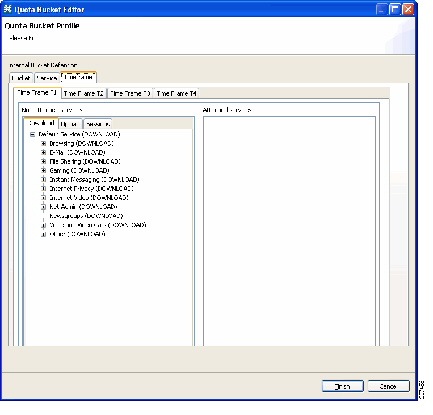
ステップ 8![]() [Non Attached Service] ペインからサービスを選択し、右側の [Attached Service] ペインに移動します。
[Non Attached Service] ペインからサービスを選択し、右側の [Attached Service] ペインに移動します。
バケット タイプに基づいて、次のタブからサービスを選択できます。
ステップ 10![]() [Finish] をクリックします。[Quota Profile Editor] が閉じます。
[Finish] をクリックします。[Quota Profile Editor] が閉じます。
次の作業
規則を関連付けるサービスを選択するには、「パッケージへの規則の追加」を参照してください。
クォータ プロファイルの削除方法
ステップ 1![]() 左ペインの [Policies] タブで、[Configuration] > [Policies] > [Quota Settings] の順に選択します。
左ペインの [Policies] タブで、[Configuration] > [Policies] > [Quota Settings] の順に選択します。
[Quota Profile Editor] ダイアログボックスが表示されます(図 9-65)。
ステップ 2![]() プロファイル ツリーからクォータ プロファイルを選択します。
プロファイル ツリーからクォータ プロファイルを選択します。
[Quota Profile Editor] ダイアログボックスが閉じます。
パッケージのクォータ管理設定の編集
クォータ補充の分散
定期的なクォータ管理を使用してサブスクライバ クォータが補充される場合、デフォルトではすべてのサブスクライバのクォータが同時に補充されます。クォータの補充を均等化する場合には、クォータの補充時間を分散させることができます。
この機能をアクティブにするには、[Systems Settings] ダイアログボックスの [Advanced Options] タブで、[Length of the time frame for quota replenish scatter (minutes)] プロパティにゼロ以外の値を入力します(「詳細サービス コンフィギュレーション オプションの管理」を参照)。デフォルトではこのプロパティにゼロの値が入っており、すべてのクォータが同時に補充されます。
各サブスクライバのクォータの補充は、クォータ補充の分散時間枠内でランダムに行われますが、補充イベント自体はクォータ集約時間の前後に均等に分割されます。
分散時間枠とクォータ集約時間の長さを同一にすると最良の効果が得られ、補充イベントが完全に均等化されます (クォータ補充時間より大きな値は入力しないでください)。したがって、クォータ補充時間が 1 時間ごとの場合は、分散を 60 分に設定します。
クォータ補充の分散機能は、他のすべてのクォータ管理パラメータから独立しています。
ステップ 1![]() [Policies] タブで、パッケージ ツリーからパッケージを選択し、 ([Edit Package])をクリックします。
[Policies] タブで、パッケージ ツリーからパッケージを選択し、 ([Edit Package])をクリックします。
[Package Settings] ダイアログボックスが表示されます。
ステップ 2![]() [Package Settings] ダイアログボックスで、[Quota Management] タブをクリックします。
[Package Settings] ダイアログボックスで、[Quota Management] タブをクリックします。
[Quota Management] タブが開きます(図 9-71)。
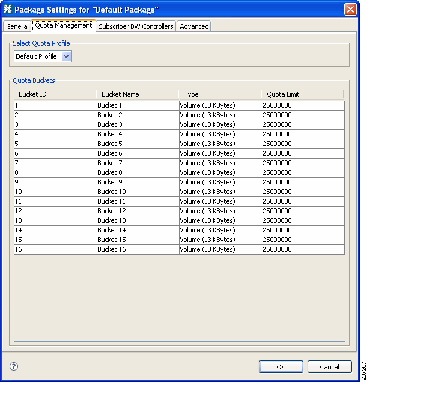
ステップ 3![]() ドロップダウン リストから、対象のクォータ プロファイルを選択します。
ドロップダウン リストから、対象のクォータ プロファイルを選択します。
[Package Settings] ダイアログボックスが閉じます。
規則のためのクォータ バケットの選択
規則にマッピングされたフローで使用するクォータ バケットを選択します。クォータ バケットは、パッケージのセットアップ時に定義されます(「パッケージのクォータ管理設定の編集」を参照)。規則に適したクォータ バケットがない場合は、パッケージに新しいクォータ バケットを追加するか、または既存バケットを編集する必要があります。
ステップ 1![]() [Network Traffic] タブで、パッケージ ツリーからパッケージを選択します。
[Network Traffic] タブで、パッケージ ツリーからパッケージを選択します。
ステップ 2![]() 右の規則ペインで、 ([Add Rule])をクリックします。
右の規則ペインで、 ([Add Rule])をクリックします。
[Add New Rule to Package] ダイアログボックスが表示されます(図 9-72)。
図 9-72 [Add New Rule to Package]
ステップ 3![]() [Service] 領域で、[Select the Service to Which the Rule Relates] ドロップダウン リストからサービスを選択します。
[Service] 領域で、[Select the Service to Which the Rule Relates] ドロップダウン リストからサービスを選択します。
ステップ 4![]() [Usage Limits] タブをクリックします(図 9-73)。
[Usage Limits] タブをクリックします(図 9-73)。
ステップ 5![]() [Usage Limits] タブには、パッケージ プロファイルの詳細が表示されます。
[Usage Limits] タブには、パッケージ プロファイルの詳細が表示されます。
規則に対して選択されたクォータ バケットが表示されます。クォータ プロファイルへのサービスの追加の詳細については、「クォータ プロファイルの編集方法」のステップ 5 を参照してください。
[Edit Rule for Services] ダイアログボックスが閉じます。
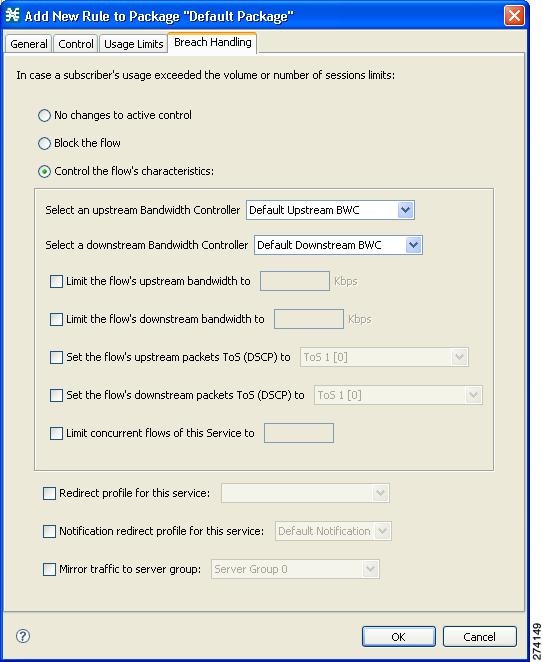
規則のための違反処理パラメータの編集
集約ボリューム制限や合計セッション数制限を超過した場合の SCE プラットフォームの動作を定義できます。サブスクライバがクォータを超過した場合に、サブスクライバへの通知を行うこともできます。
違反処理パラメータ
[Edit Rule for Service Settings] ダイアログボックスの [Breach Handling] タブの設定パラメータを次に示します。
•![]() クォータで違反が発生した場合に、この規則に属するフローのアクションを決定します。
クォータで違反が発生した場合に、この規則に属するフローのアクションを決定します。
–![]() [No changes to active control]:クォータで違反が発生したとき、この規則にマッピングされているフローは影響を受けません。SCA BB では、このオプションが選択されている場合でも、Quota Breach RDR を生成できます(「Quota RDR の管理方法」を参照)。
[No changes to active control]:クォータで違反が発生したとき、この規則にマッピングされているフローは影響を受けません。SCA BB では、このオプションが選択されている場合でも、Quota Breach RDR を生成できます(「Quota RDR の管理方法」を参照)。
–![]() [Block the flow]:クォータで違反が発生したとき、この規則にマッピングされているフローはブロックされます。
[Block the flow]:クォータで違反が発生したとき、この規則にマッピングされているフローはブロックされます。
[Redirect to]:指定のプロトコル依存 URL にフローがリダイレクトされます。開かれる Web ページに、リダイレクションの理由が表示されます。URL のリダイレクション セットは、[System Settings] ダイアログボックスで定義されます (「リダイレクション URL セットの追加」を参照)。リダイレクションをサポートしているプロトコル タイプは、HTTP、HTTP Streaming、および RTSP の 3 つだけです。単方向分類が有効になっている場合、リダイレクションはサポートされません。
–![]() [Control the flow characteristics]:クォータで違反が発生したとき、この規則にマッピングされているフローの動作が変化します。
[Control the flow characteristics]:クォータで違反が発生したとき、この規則にマッピングされているフローの動作が変化します。
[Select an upstream Bandwidth Controller]:この規則のトラフィック フローを特定のアップストリーム BW コントローラ(BWC)にマッピングします。これにより、選択した BWC の特性に基づいて、この規則にマッピングされたすべての同時フローの帯域幅測定が設定されます。
[Select a downstream Bandwidth Controller]:上のオプションと基本的な機能は同じですが、ダウンストリーム フロー用です。
[Limit the flow's upstream bandwidth]:フローごとのアップストリーム帯域幅制限を設定します(この規則のサービスにマッピングされたフロー用)。
[Limit the flow's downstream bandwidth]:フローごとのダウンストリーム帯域幅制限を設定します。
[Set the flow's upstream packets ToS]:アップストリーム フローの全パケットの DSCP ToS マーカーを設定します。
[Set the flow's downstream packets ToS]:ダウンストリーム フローの全パケットの DSCP ToS マーカーを設定します。
[Limit concurrent flows of this Service]:サブスクライバに許容される(この規則にマッピングされた)同時フローの最大数を設定します。
•![]() [Activate a Subscriber Redirect]:サブスクライバがクォータ制限を超過した場合に、サブスクライバ リダイレクトをアクティブにします。
[Activate a Subscriber Redirect]:サブスクライバがクォータ制限を超過した場合に、サブスクライバ リダイレクトをアクティブにします。
•![]() [Activate a Subscriber Notification]:サブスクライバがクォータ制限を超過した場合に、サブスクライバ通知をアクティブにします。たとえば、この通知によりサブスクライバにクォータ違反状態を伝達し、追加クォータの取得方法を示すことができます。
[Activate a Subscriber Notification]:サブスクライバがクォータ制限を超過した場合に、サブスクライバ通知をアクティブにします。たとえば、この通知によりサブスクライバにクォータ違反状態を伝達し、追加クォータの取得方法を示すことができます。
(注) 単方向分類が有効になっている場合、サブスクライバ通知はサポートされません。
サブスクライバ通知の定義方法については、「サブスクライバ通知の管理」を参照してください。
•![]() [Activate Traffic Mirroring]:サブスクライバがクォータ制限を超過した場合に、トラフィック ミラーリングをアクティブにします。
[Activate Traffic Mirroring]:サブスクライバがクォータ制限を超過した場合に、トラフィック ミラーリングをアクティブにします。
ステップ 1![]() [Policies] タブで、パッケージ ツリーからパッケージを選択します。
[Policies] タブで、パッケージ ツリーからパッケージを選択します。
[Edit Rule for Service] ダイアログボックスが表示されます。
ステップ 4![]() [Breach Handling] タブをクリックします。
[Breach Handling] タブをクリックします。
[Breach Handling] タブが開きます(図 9-74)。
ステップ 5![]() クォータの違反が発生した場合のフローの動作を設定します。
クォータの違反が発生した場合のフローの動作を設定します。
•![]() クォータの違反が発生した場合にフローをブロックするには、ステップ 6 に進みます。
クォータの違反が発生した場合にフローをブロックするには、ステップ 6 に進みます。
•![]() クォータの違反が発生した場合にフローの特性を変更するには、ステップ 10 に進みます。
クォータの違反が発生した場合にフローの特性を変更するには、ステップ 10 に進みます。
•![]() クォータの違反が発生した場合もフローの動作を変更しないようにするには、[No changes to active control] オプション ボタンを選択し、ステップ 11 に進みます。
クォータの違反が発生した場合もフローの動作を変更しないようにするには、[No changes to active control] オプション ボタンを選択し、ステップ 11 に進みます。
ステップ 6![]() フローをブロックするには、[Block the flow] オプション ボタンを選択します。
フローをブロックするには、[Block the flow] オプション ボタンを選択します。
[Control the flow's characteristics] オプション ボタンを選択します。
[Flow Characteristic] 領域のオプションがイネーブルになります。
•![]() アップストリームの [Bandwidth Controller] ドロップダウン リストで、アップストリーム BWC を選択します。
アップストリームの [Bandwidth Controller] ドロップダウン リストで、アップストリーム BWC を選択します。
このドロップダウン リストの BWC は、パッケージの作成時または編集時に定義されます。
マウスをドロップダウン リスト上に合わせると、ツールチップに、選択した BWC のプロパティ(Peak Information Rate(PIR)、Committed Information Rate(CIR)、Global Controller、Assurance Level)が表示されます。
•![]() ダウンストリームの [Bandwidth Controller] ドロップダウン リストで、ダウンストリーム BWC を選択します。
ダウンストリームの [Bandwidth Controller] ドロップダウン リストで、ダウンストリーム BWC を選択します。
•![]() (オプション)[Limit the flow's upstream bandwidth] チェックボックスをオンにして、[Kbps] フィールドに値を入力します。
(オプション)[Limit the flow's upstream bandwidth] チェックボックスをオンにして、[Kbps] フィールドに値を入力します。
•![]() (オプション)[Limit the flow's downstream bandwidth] チェックボックスをオンにして、[Kbps] フィールドに値を入力します。
(オプション)[Limit the flow's downstream bandwidth] チェックボックスをオンにして、[Kbps] フィールドに値を入力します。
•![]() (オプション)[Set the flow's upstream packets ToS (DSCP) to] チェックボックスをオンにして、ドロップダウン リストから値を選択します。
(オプション)[Set the flow's upstream packets ToS (DSCP) to] チェックボックスをオンにして、ドロップダウン リストから値を選択します。
•![]() (オプション)[Set the flow's downstream packets ToS (DSCP) to] チェックボックスをオンにして、ドロップダウン リストから値を選択します。
(オプション)[Set the flow's downstream packets ToS (DSCP) to] チェックボックスをオンにして、ドロップダウン リストから値を選択します。
•![]() (オプション)[Limit concurrent flows of this Service] チェックボックスをオンにして、関連フィールドに値を入力します。
(オプション)[Limit concurrent flows of this Service] チェックボックスをオンにして、関連フィールドに値を入力します。
ステップ 9![]() (オプション)サブスクライバのリダイレクトをイネーブルにするには、チェックボックスをオンにして、ドロップダウン リストからリダイレクト プロファイルを選択します。
(オプション)サブスクライバのリダイレクトをイネーブルにするには、チェックボックスをオンにして、ドロップダウン リストからリダイレクト プロファイルを選択します。
ステップ 10![]() (オプション)サブスクライバ通知をイネーブルにするには、[Notification redirect profile for this service] チェックボックスをオンにし、ドロップダウン リストから通知リダイレクト プロファイルを選択します。
(オプション)サブスクライバ通知をイネーブルにするには、[Notification redirect profile for this service] チェックボックスをオンにし、ドロップダウン リストから通知リダイレクト プロファイルを選択します。
(注) サブスクライバ通知は、3 つの違反処理オプションに追加してアクティブにできます。
(注) 単方向分類が有効になっている場合、サブスクライバ通知はサポートされません。単方向分類が有効になっているときに [Activate a Subscriber Notification] チェックボックスをオンにしようとすると、[Rule Error] メッセージが表示されます。
ステップ 12![]() (オプション)サーバ グループへのミラー トラフィックをイネーブルにするには、[Mirror traffic to server group] チェックボックスをオンにし、ミラー トラフィックの送信先となるサーバ グループを選択します。
(オプション)サーバ グループへのミラー トラフィックをイネーブルにするには、[Mirror traffic to server group] チェックボックスをオンにし、ミラー トラフィックの送信先となるサーバ グループを選択します。
(注) [Mirror traffic to server group] チェックボックスがイネーブルになるのは、[VAS Settings] ダイアログボックスで [Traffic Mirroring] がイネーブルの場合だけです。
[Edit Rule for Service] ダイアログボックスが閉じます。
例:階層型サブスクライバ サービスの作成
SCA BB Console を使用して、階層型サブスクライバ サービス実装できます。このようなサービスの定義は無限にあるため、このセクションでは、価値提案の説明で概説されている 2 つの階層の定義方法について説明します。2 つの階層は次のように定義されます。
–![]() 1 週間の帯域幅は 4.2 GB (1 日 600 MB の制限に相当)に制限
1 週間の帯域幅は 4.2 GB (1 日 600 MB の制限に相当)に制限
–![]() E メールおよびブラウジング サービスは 256 Kbps に制限
E メールおよびブラウジング サービスは 256 Kbps に制限
–![]() 音声およびビデオ ストリーミング サービスは 64 Kbps に制限
音声およびビデオ ストリーミング サービスは 64 Kbps に制限
–![]() 1 週間の帯域幅は 5.6 GB (1 日 800 MB の制限に相当)に制限
1 週間の帯域幅は 5.6 GB (1 日 800 MB の制限に相当)に制限
–![]() 音声およびビデオ ストリーミング サービスは 128 Kbps に制限
音声およびビデオ ストリーミング サービスは 128 Kbps に制限
次の手順は、「シルバー」と「ゴールド」のいずれのパッケージにも適用されます。
ステップ 1![]() 「パッケージの追加」の説明に従って新規パッケージを作成します。
「パッケージの追加」の説明に従って新規パッケージを作成します。
ステップ 2![]() 定期的(内部)クォータ管理をイネーブルにします。
定期的(内部)クォータ管理をイネーブルにします。
b.![]() クォータ制限を目的の値に設定し、クォータ バケットにわかりやすい名前を付けます。
クォータ制限を目的の値に設定し、クォータ バケットにわかりやすい名前を付けます。
詳細については、「パッケージのクォータ管理設定の編集」を参照してください。
ステップ 3![]() 必須サービス用の帯域幅コントローラを追加し、PIR を目的のレートに設定します。
必須サービス用の帯域幅コントローラを追加し、PIR を目的のレートに設定します。
(注) 帯域幅が制限されている各サービスには、サブ帯域幅コントローラが必要です。これは、エキストラ帯域幅コントローラではなく、プライマリ帯域幅コントローラの子です。
詳細については、「パッケージ サブスクライバ BWC の編集」を参照してください。
ステップ 4![]() 帯域幅が制限されている各サービスについて、パッケージに規則を追加します。
帯域幅が制限されている各サービスについて、パッケージに規則を追加します。
詳細については、「パッケージへの規則の追加」を参照してください。
ステップ 5![]() 関連サービスに対し、帯域幅コントローラでフローの特性を制御する規則を設定します。
関連サービスに対し、帯域幅コントローラでフローの特性を制御する規則を設定します。
詳細については、「規則のためのフローごとのアクションの定義」を参照してください。
ステップ 6![]() ステップ 2 で定義した、クォータ バケットを使用するパッケージに使用制限を設定します。
ステップ 2 で定義した、クォータ バケットを使用するパッケージに使用制限を設定します。
詳細については、「規則のためのクォータ バケットの選択」を参照してください。
サブスクライバが未知のトラフィック
フィルタ規則と一致しないトラフィック フロー(「トラフィック フローのフィルタリング」を参照)は、SCE プラットフォームが処理します。SCE プラットフォームでは、このトラフィック フローと係わりのあるサブスクライバの識別を試みます。SCE プラットフォームの内部データベースにトラフィック フローの IP アドレスまたは VLAN タグで特定できるサブスクライバがないかどうかを確認します。該当するサブスクライバが存在しない場合は、トラフィック フローを Unknown Subscriber Traffic カテゴリにマッピングします。
Unknown Subscriber Traffic カテゴリは、[Network Traffic] タブのツリーに含まれていますが、パッケージ階層の一部ではありません。Unknown Subscriber Traffic カテゴリは削除できません。
(注) サブスクライバが未知のトラフィック同士は、互いに区別できません。したがって、サブスクライバ BWC を使用してサブスクライバごとの使用制限や、サブスクライバ レベルの調整は設定できません。サブスクライバ BWC は、選択したサービスをグローバル コントローラにリンクする目的でのみ使用できます。
Unknown Subscriber Traffic カテゴリは、次のパラメータを持つパッケージと同様に機能します。
•![]() [Package Name]:Unknown Subscriber Traffic
[Package Name]:Unknown Subscriber Traffic
–![]() [Counter Name]:Unknown Subscriber Traffic Counter
[Counter Name]:Unknown Subscriber Traffic Counter
•![]() Unknown Subscriber Traffic パッケージ設定の編集
Unknown Subscriber Traffic パッケージ設定の編集
–![]() エキストラ BWC の追加(「パッケージ サブスクライバ BWC の編集」を参照)
エキストラ BWC の追加(「パッケージ サブスクライバ BWC の編集」を参照)
–![]() カレンダーの選択(「高度なパッケージ オプションの設定」を参照)
カレンダーの選択(「高度なパッケージ オプションの設定」を参照)
•![]() Unknown Subscriber Traffic カテゴリのデフォルト サービス規則の編集
Unknown Subscriber Traffic カテゴリのデフォルト サービス規則の編集
–![]() 規則状態の変更(「規則の編集」を参照)
規則状態の変更(「規則の編集」を参照)
–![]() 規則のためのフローごとのアクションの変更(「規則のためのフローごとのアクションの定義」を参照)
規則のためのフローごとのアクションの変更(「規則のためのフローごとのアクションの定義」を参照)
•![]() Unknown Subscriber Traffic パッケージへの規則の追加
Unknown Subscriber Traffic パッケージへの規則の追加
–![]() 規則の追加(「パッケージへの規則の追加」を参照)、編集(「規則の編集」を参照)、および削除(「規則の削除」を参照)
規則の追加(「パッケージへの規則の追加」を参照)、編集(「規則の編集」を参照)、および削除(「規則の削除」を参照)
–![]() タイムベース規則の追加(「規則へのタイムベース規則の追加」を参照)、編集(「タイムベース規則の編集」を参照)、および削除(「タイムベース規則の削除」を参照)
タイムベース規則の追加(「規則へのタイムベース規則の追加」を参照)、編集(「タイムベース規則の編集」を参照)、および削除(「タイムベース規則の削除」を参照)
 フィードバック