Procedimiento para volver a crear imágenes de los nodos del panel de Cisco Nexus mediante un servidor HTTP
Opciones de descarga
-
ePub (635.8 KB)
Visualice en diferentes aplicaciones en iPhone, iPad, Android, Sony Reader o Windows Phone -
Mobi (Kindle) (441.5 KB)
Visualice en dispositivo Kindle o aplicación Kindle en múltiples dispositivos
Lenguaje no discriminatorio
El conjunto de documentos para este producto aspira al uso de un lenguaje no discriminatorio. A los fines de esta documentación, "no discriminatorio" se refiere al lenguaje que no implica discriminación por motivos de edad, discapacidad, género, identidad de raza, identidad étnica, orientación sexual, nivel socioeconómico e interseccionalidad. Puede haber excepciones en la documentación debido al lenguaje que se encuentra ya en las interfaces de usuario del software del producto, el lenguaje utilizado en función de la documentación de la RFP o el lenguaje utilizado por un producto de terceros al que se hace referencia. Obtenga más información sobre cómo Cisco utiliza el lenguaje inclusivo.
Acerca de esta traducción
Cisco ha traducido este documento combinando la traducción automática y los recursos humanos a fin de ofrecer a nuestros usuarios en todo el mundo contenido en su propio idioma. Tenga en cuenta que incluso la mejor traducción automática podría no ser tan precisa como la proporcionada por un traductor profesional. Cisco Systems, Inc. no asume ninguna responsabilidad por la precisión de estas traducciones y recomienda remitirse siempre al documento original escrito en inglés (insertar vínculo URL).
Introducción
Este documento describe el procedimiento para recrear imágenes de los nodos del panel de Cisco Nexus mediante un servidor HTTP, y ofrece una guía clara paso a paso para garantizar la recrear imágenes de nodos estandarizadas y eficaces mediante la implementación de imágenes alojadas en HTTP de forma remota.
Prerequisites
- Cisco Integrated Management Controller (CIMC) debe configurarse con una dirección IP OOB.
- Consulte las notas de la versión del panel de Nexus y confirme la imagen del software del panel de Nexus que debe volver a crear.
- Obtenga la imagen del software en software.cisco.com.
- Confirme que la suma de comprobación MD5 de la imagen coincida con la publicada en Cisco.com.
- Cargue la imagen del panel de Nexus en el servidor HTTP.
- El servidor HTTP debe ser accesible desde la interfaz de administración de CIMC. Esta disponibilidad se puede verificar mediante la GUI o CLI de CIMC.
Componentes Utilizados
Este documento no tiene restricciones específicas en cuanto a versiones de software y de hardware.
La información que contiene este documento se creó a partir de los dispositivos en un ambiente de laboratorio específico. Todos los dispositivos que se utilizan en este documento se pusieron en funcionamiento con una configuración verificada (predeterminada). Si tiene una red en vivo, asegúrese de entender el posible impacto de cualquier comando.
Antecedentes
Cuando se produce un error en un nodo del panel de Cisco Nexus (debido a daños en el sistema, actualizaciones no admitidas o una GUI inaccesible), los administradores pueden volver a crear imágenes del nodo mediante una ISO alojada en un servidor HTTP. El proceso implica la descarga de la ISO del panel de Nexus, su alojamiento en un servidor web y el uso de CIMC (Cisco Integrated Management Controller) para asignar y arrancar la ISO a través de HTTP. Esto permite la recuperación o reinstalación eficaz y remota de nodos como parte de la restauración de clústeres.
Solución
Para realizar la recreación de imágenes ND a través de un servidor HTTP, se deben realizar los siguientes pasos:
Paso 1.Descargue el firmware del sitio web de Cisco.
Abra software.cisco.com/download.
Paso 2. Acceda a la interfaz del panel de control de Nexus y seleccione la versión de software adecuada (por ejemplo, 3.2(2m)) en las opciones de versión disponibles.
Por ejemplo:
Paso 3. Copie la imagen ISO del software del panel de control de Nexus en el servidor HTTP.
Ejemplo: http://x.x.x.x/iso/
Paso 4. SSH/Consola a Cisco Integrated Management Controller.
- Desde una ventana de terminal, inicie sesión en la consola CIMC.
# ssh admin@cimc_ip
Donde cimc_ip es la dirección IP de CIMC.
Por ejemplo:
# ssh admin@x.x.x.x
admin@x.x.x.x's password:
system#
- Cambie el alcance a medio virtual:
system# scope vmedia
system /vmedia #
-
Asigne la imagen .iso al servidor HTTP.
system /vmedia # map-www volume_name http://http_server_ip_and_path iso_file_name
Where:
-
volume_name es el nombre del volumen.
-
http_server_ip_and_path es la dirección IP del servidor HTTP y la ruta de acceso a la ubicación del archivo .iso.
-
iso_filename es el nombre del archivo .iso.
Por ejemplo:
Nota: Hay espacio entre http_server_ip_and_path y iso_filename.
system /vmedia # map-www apic http://x.x.x.x/iso/ nd-dk9.3.2.2m.iso
Server username: admin
Server password:
Confirm password:
Nota: Introduzca las credenciales y pulse Intro.
-
Compruebe el estado de asignación:
 system /vmedia # show mappings detail

The Map-Status must be shown as OK.

For Example:

system /vmedia # show mappings detail
Volume apic:
    Map-Status: OK
    Drive-Type: CD
    Remote-Share: http://x.x.x.x/iso/

    Remote-File:nd-dk9.3.2.2m.iso
    Mount-Type: www
    Mount-Options: noauto,username=admin,password=********3
    system /vmedia #
Si la asignación falla o se produce un error durante la asignación, puede utilizar el comando unmap para quitar la asignación existente y, a continuación, volver a intentar la asignación.
Server # scope vmedia
Server /vmedia # show mappings
Volume  Map-status   Drive-type     remote-share        remote-file                mount-type
------  ----------  ------------  ------------------- -------------------        -----------
Huu     OK           removable    http://x.x.x.x/ rhel-server-6.1-x86_6.iso      www
Server /vmedia # unmap Huu
Server /vmedia # show mappings
Volume  Map-status   Drive-type     remote-share        remote-file                mount-type
------  ----------  ------------  ------------------- -------------------        -----------
-
Conéctese a SOL para supervisar el proceso de instalación:
system /vmedia # connect host
CISCO Serial Over LAN:
Press Ctrl+x to Exit the session
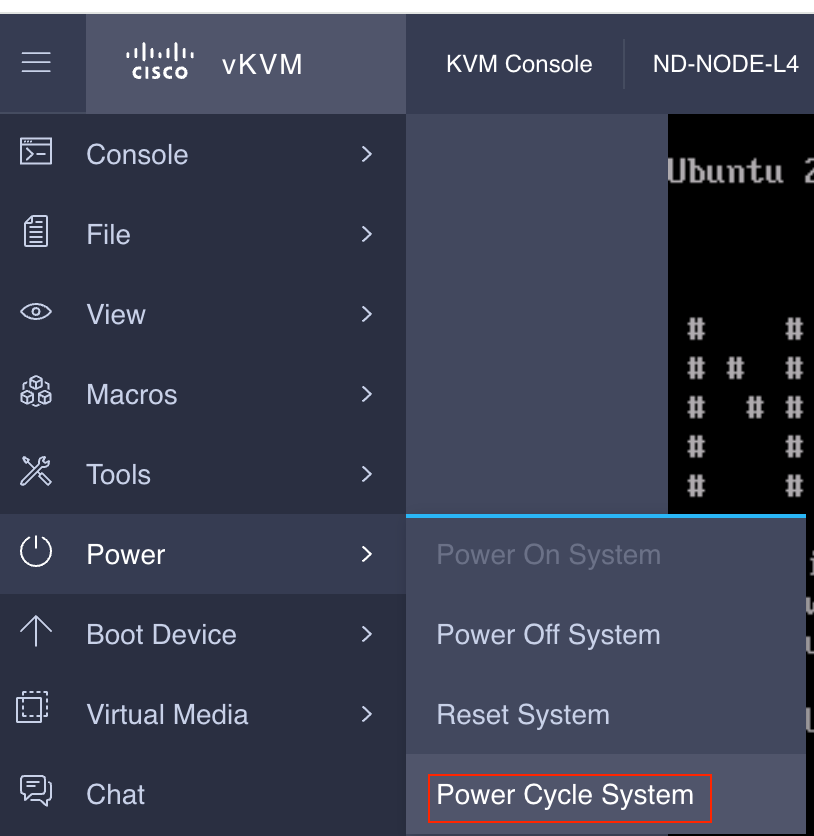
Paso 5. Apague y encienda la consola KVM de la GUI de CIMC.
Choose Power > Power Cycle System (cold boot) to power cycle the controller.
Desde la consola SOL: Observe la pantalla durante el proceso de arranque y prepárese para presionar F6 en el momento apropiado para ingresar al menú de selección de arranque.
Por ejemplo:
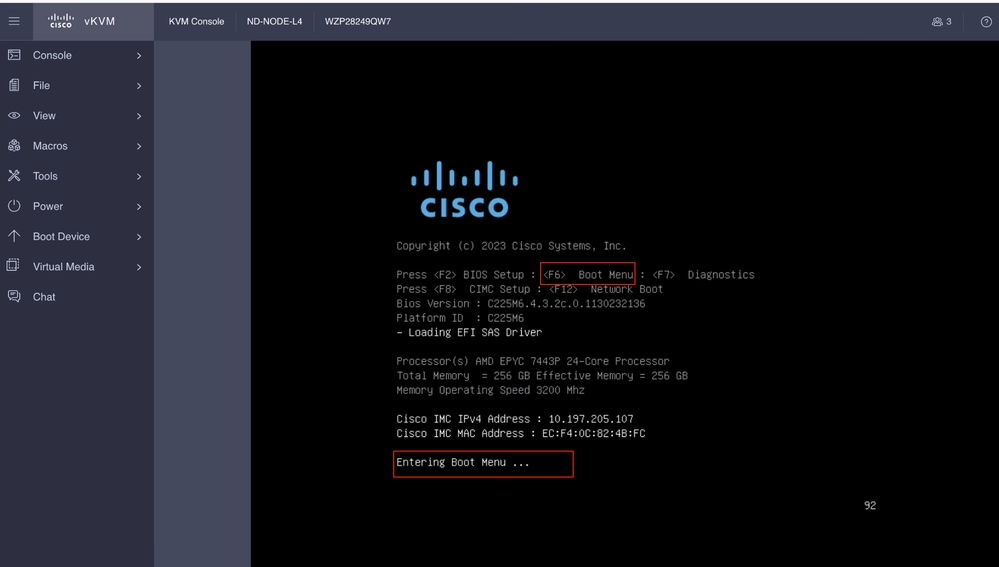
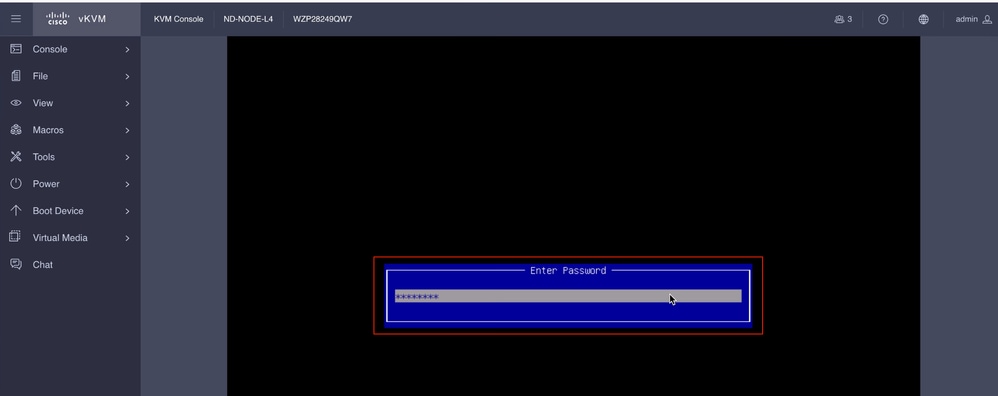
También puede tener que introducir la contraseña del BIOS. La contraseña predeterminada es password.
En el menú de selección de arranque, seleccione la opción vDVD2.00 asignada por Cisco CIMC como dispositivo de arranque único.
Paso 6. Vuelva a CLI de CIMC y supervise el resultado de Connect Host.
Supervise la CLI de CIMC cuando aparezca el mensaje Para acelerar la instalación, introduzca la url de Cisco en los próximos diez minutos y, a continuación, introduzca la URL del servidor http con la imagen del panel de Nexus.
Boot000A* UEFI: Cisco CIMC-Mapped vDVD2.00 PciRoot(0x1)/Pci(0x8,0x1)/Pci(0x0,0x3)/USB(1,0)/USB(2,0)/Unit(3)/CDROM(1,0x35,0x5597ed)..BO'
+ return 1
+ '[' -n '' ']'
++ mount
++ grep /run/install/repo
++ cut -f 1 -d ' '
++ tr -d '[:digit:]'
++ true
+ usbdevice=
+ mkdir /mnt/usbdata
+ '[' -n '' ']'
+ '[' true = true ']'
+ read_iso_url
+ dmesg --console-off
+ true
+ echo 'To speed up the install, enter iso url. Type '\''skip'\'' to use local media:'
To speed up the install, enter iso url. Type 'skip' to use local media:
+ echo ' Either http://server/path/to/file or nfs:server:/path/to/file are supported'
Either http://server/path/to/file or nfs:server:/path/to/file are supported
+ read -r -p '? ' url

 http://x.x.x.x197.204.4/iso/DCApps/ND/nd-dk9.3.2.1i.iso << Enter the http server details  >>
+ '[' http://x.x.x.x197.204.4/iso/DCApps/ND/nd-dk9.3.2.1i.iso = skip ']'
+ '[' http://x.x.x.x197.204.4/iso/DCApps/ND/nd-dk9.3.2.1i.iso = '' ']'
+ '[' http = nfs: ']'
+ echo http://x.x.x.x197.204.4/iso/DCApps/ND/nd-dk9.3.2.1i.iso
+ grep -q '\[.*\]'
++ awk -F '/|:' '{print $4}'
+ urlip=x.x.x.x197.204.4
+ '[' -z x.x.x.x197.204.4 ']'
+ break
+ dmesg --console-on
+ '[' -n http://x.x.x.x197.204.4/iso/DCApps/ND/nd-dk9.3.2.1i.iso ']'
+ '[' http://x.x.x.x197.204.4/iso/DCApps/ND/nd-dk9.3.2.1i.iso '!=' skip ']'
+ dmesg --console-of
Paso 7. Después de ingresar la URL HTTP, el proceso de inicio continuará.
Nota: Seleccione la opción static (estática). Se le pedirá que introduzca el nombre de la interfaz, la dirección IP de gestión y la gateway.
+ set +e
+ configured=0
+ interface=none
+ addr=none
+ gw=none
+ '[' 0 -eq 0 ']'
+ echo 'Configuring network interface'
Configuring network interface
+ echo 'type static, dhcp, bash for a shell to configure networking, or url to re-enter the url: '
type static, dhcp, bash for a shell to configure networking, or url to re-enter the url:
+ read -p '? ' ntype
? static << Enter the static  to configure the networking >>
+ case $ntype in
+ configure_static
+ '[' none '!=' none ']'
Nota: Después de escribir la estática, aparecerá una lista en la interfaz CIMC, seleccione la interfaz correcta. si seleccionó la interfaz incorrecta, la pérdida de paquetes será del 100% y luego después de tres intentos fallidos de ping , se le pedirá nuevamente que seleccione la interfaz correcta hasta que la pérdida de paquetes sea 0 si no es consciente de la interfaz, seleccione la interfaz all uno por uno.
Por ejemplo
+ echo 'Available interfaces'
Available interfaces
+ ls -l /sys/class/net
total 0
lrwxrwxrwx 1 root root 0 Aug 12 03:53 eno5 -> ../../devices/pci0000:40/0000:40:03.1/0000:46:00.0/0000:47:01.0/0000:49:00.0/0000:4a:00.0/0000:4b:00.0/net/eno5
lrwxrwxrwx 1 root root 0 Aug 12 03:53 eno6 -> ../../devices/pci0000:40/0000:40:03.1/0000:46:00.0/0000:47:01.0/0000:49:00.0/0000:4a:00.0/0000:4b:00.1/net/eno6
lrwxrwxrwx 1 root root 0 Aug 12 03:53 enp1s0f0 -> ../../devices/pci0000:00/0000:00:01.1/0000:01:00.0/net/enp1s0f0
lrwxrwxrwx 1 root root 0 Aug 12 03:53 enp1s0f1 -> ../../devices/pci0000:00/0000:00:01.1/0000:01:00.1/net/enp1s0f1
lrwxrwxrwx 1 root root 0 Aug 12 03:51 lo -> ../../devices/virtual/net/lo
+ read -p 'Interface to configure: ' interface
Interface to configure: enp1s0f0        <<  select the correct interface   >>
+ read -p 'address: ' addr
Nota: ND-NODE-L4 requiere nombres de interfaz en el formato enp1s0fX, donde X es un identificador numérico. SE-NODE-G2 requiere el formato enoX, donde X es un número.
Paso 8. Comprobación correcta de la interfaz.
Después de ingresar a la interfaz, intentará hacer ping al servidor http y si la interfaz seleccionada es correcta, la pérdida de paquetes debe ser 0% y comenzar a recuperar la imagen del servidor http.
Por ejemplo: Después de ingresar a la interfaz correcta con pérdida de paquetes al 0%.
Interface to configure: enp1s0f0
+ read -p 'address: ' addr
address: x.x.x.x/24
+ read -p 'gateway: ' gw
gateway:x.x.x.x
+ ip addr add x.x.x.x/24 dev enp1s0f0
+ ip link set enp1s0f0 up
+ ip route add default via x.x.x.x
++ seq 1 6
+ for count in $(seq 1 6)
+ ping -c 1 x.x.x.x
PING x.x.x.x (x.x.x.x): 56 data bytes

---x.x.x.x ping statistics ---
1 packets transmitted, 0 packets received, 100% packet loss
+ sleep 20
+ for count in $(seq 1 6)
+ ping -c x.x.x.x
PING x.x.x.x (x.x.x.x): 56 data bytes
64 bytes from x.x.x.x : seq=0 ttl=63 time=0.512 ms

---x.x.x.x ping statistics ---
1 packets transmitted, 1 packets received, 0% packet loss
round-trip min/avg/max = 0.512/0.512/0.512 ms
+ configured=1
+ break
+ '[' 1 -eq 0 ']'
+ set -e
+ tmpiso=/tmp/cdrom.iso
+ echo 'Fetching http://x.x.x.x/iso/DCApps/ND/nd-dk9.3.2.2f.iso to /tmp/cdrom.iso'
Fetching http://x.x.x.x/iso/DCApps/ND/nd-dk9.3.2.2f.iso to /tmp/cdrom.iso >> started fetching the apic image from HTTP server
+ '[' http = nfs: ']'
+ download http://x.x.x.x/iso/DCApps/ND/nd-dk9.3.2.2f.iso /tmp/cdrom.iso
+ local url=http://x.x.x.x/iso/DCApps/ND/nd-dk9.3.2.2f.iso dest=/tmp/cdrom.iso tries=5
+ wget --server-response --no-check-certificate --tries=5 --progress=dot:mega --read-timeout=60 --output-document=/tmp/cdrom.iso.tmp http://x.x.x.x197.204.4/iso/DCApps/ND/nd-dk9.3.2.2f.iso
--2025-08-12 09:39:08-- http://x.x.x.x197.204.4/iso/DCApps/ND/nd-dk9.3.2.2f.iso
Connecting to x.x.x.x:80... connected.
HTTP request sent, awaiting response...
HTTP/1.1 200 OK
Date: Tue, 12 Aug 2025 09:39:09 GMT
Server: Apache/2.4.6 (CentOS) OpenSSL/1.0.2k-fips mod_wsgi/3.4 Python/2.7.5
Last-Modified: Tue, 10 Jun 2025 06:51:41 GMT
ETag: "2c66bd000-6373220f3b940"
Accept-Ranges: bytes
Content-Length: 11918888960
Keep-Alive: timeout=5, max=100
Connection: Keep-Alive
Content-Type: application/octet-stream
Length: 11918888960 (11G) [application/octet-stream]
Saving to: '/tmp/cdrom.iso.tmp'
Si seleccionó la interfaz incorrecta, la pérdida de paquetes será del 100% y luego de tres intentos fallidos de ping, se le pedirá nuevamente que seleccione la interfaz correcta.
Por ejemplo: Después de ingresar a la interfaz incorrecta con pérdida de paquetes al 100%.
+ read -p 'Interface to configure: ' interface
Interface to configure: enp11s0
+ read -p 'address: ' addr
address: x.x.x.x/24
+ read -p 'gateway: ' gw
gateway: x.x.x.x
+ ip addr add x.x.x.x/24 dev enp11s0
+ ip link set enp11s0 up
+ ip route add default via x.x.x.x
++ seq 1 2
+ for count in '$(seq 1 2)'
+ ping -c 1 x.x.x.x
PING x.x.x.x (x.x.x.x) 56(84) bytes of data.
From x.x.x.x icmp_seq=1 Destination Host Unreachable

--- x.x.x.x ping statistics ---
1 packets transmitted, 0 received, +1 errors, 100% packet loss, time 0ms

+ sleep 20
+ for count in '$(seq 1 2)'
+ ping -c 1 x.x.x.x
PING x.x.x.x (x.x.x.x) 56(84) bytes of data.
From x.x.x.x icmp_seq=1 Destination Host Unreachable

--- x.x.x.x ping statistics ---
1 packets transmitted, 0 received, +1 errors, 100% packet loss, time 0ms

+ sleep 20
+ '[' 0 -eq 0 ']'
+ echo 'Configuring network interface'
Configuring network interface
+ echo 'type static, dhcp, bash for a shell to configure networking, or url to re-enter the url: ' <>
type static, dhcp, bash for a shell to configure networking, or url to re-enter the url:
+ read -p '? ' ntype
?
Mantenga Monitor en la CLI de CIMC y espere aproximadamente 40-50 min , obtendrá la siguiente salida en la cli.
+ log 'Shutting down Atomix Installer'
+ echo 'Shutting down Atomix Installer'
Shutting down Atomix Installer
+ log 'reboot: Power down'
+ echo 'reboot: Power down'
reboot: Power down
+ sleep 5
+ poweroff
+ ec[  533.195532] sysrq: Emergency Sync
ho s
[  533.195563] sysrq: Emergency Sync
[  533.212106] sysrq: Emergency Sync
[  533.212117] sysrq: Emergency Remount R/O
[  533.212189] sysrq: Power Off
[  533.212226] kvm: exiting hardware virtualization
[  533.213874] EXT4-fs (sdf1): re-mounted. Opts: (null). Quota mode: none.
[  533.215431] sd 1:0:0:0: [sdf] Synchronizing SCSI cache
[  533.215749] EXT4-fs (dm-3): re-mounted. Opts: (null). Quota mode: none.
[  533.216395] EXT4-fs (dm-1): re-mounted. Opts: (null). Quota mode: none.
[  533.217221] EXT4-fs (sdf6): re-mounted. Opts: (null). Quota mode: none.
[  533.217689] EXT4-fs (sdf4): re-mounted. Opts: (null). Quota mode: none.
[  533.218965] Emergency Remount complete
[  533.218997] Emergency Sync complete
[  533.218997] Emergency Sync complete
[  533.219002] Emergency Sync complete
[  533.359024] sd 1:0:0:0: [sdf] Stopping disk
+ echo s
+ echo s
+ echo u
+ echo o
+ log 'Nap time'
+ echo 'Nap time'
Nap time
+ true
+ sleep 60
[  535.571545] megaraid_sas 0000:41:00.0: megasas_disable_intr_fusion is called outbound_intr_mask:0x40000009
[  535.692202] ACPI: PM: Preparing to enter system sleep state S5
[  535.706849] reboot: Power down
Paso 9. Salir de SOL después de apagarse
Espere hasta que vea el mensaje de apagado en la consola SOL, luego salga de SOL presionando Ctrl y x (Ctrl+x) e inicie sesión en CIMC nuevamente y cambie el alcance nuevamente.
(i) Change the scope to virtual media again:
system# scope vmedia
system /vmedia #
(ii) Unmap the .iso image that you mapped in 2.c:
 system /vmedia # unmap volume_name
 At the Save mapping prompt, enter yes if you want to save the mapping or no if you do not want to save the mapping. For example:
 system /vmedia # unmap apic
 Save mapping? Enther 'yes' or 'no' to confirm (CTRL-C to cancel) → yes
 system /vmedia #
(iii) Connect back to SOL again:
 system /vmedia #  connect host
Después de apagarlo, debe volver a encender el sistema con el KVM y, a continuación, continuar con los siguientes pasos.
Paso x.x.x.x de configuración del primer arranque
[  274.210045] nd_bootstrap.sh[2628]:   INFO[0174] bootDisk: found disk=/dev/sdf bootPart=/dev/sdf4 espPart=/dev/sdf3
[  274.224041] nd_bootstrap.sh[2628]:   INFO[0174] boot devices/filesystems have been mounted
[  274.236038] nd_bootstrap.sh[2628]:   INFO[0174] |12231-start| ["expand-stub.bash" "/boot/efi/EFI/atx-current/kernel.efi"]
[  274.251228] nd_bootstrap.sh[2628]:   INFO[0174] |12231-out  | 21870+1 records in
[  274.262061] nd_bootstrap.sh[2628]:   INFO[0174] |12231-out  | 21870+1 records out
[  274.272065] nd_bootstrap.sh[2628]:   INFO[0174] |12231-out  | 11197856 bytes (11 MB, 11 MiB) copied, 0.0716082 s, 156 MB/s
[  274.287060] nd_bootstrap.sh[2628]:   INFO[0174] |12231-out  | 0+1 records in
[  274.297060] nd_bootstrap.sh[2628]:   INFO[0174] |12231-out  | 0+1 records out
[  274.307049] nd_bootstrap.sh[2628]:   INFO[0174] |12231-out  | 187 bytes copied, 7.2325e-05 s, 2.6 MB/s
[  274.566030] nd_bootstrap.sh[2628]:   INFO[0175] |12231-out  | 102375+1 records in
[  274.576055] nd_bootstrap.sh[2628]:   INFO[0175] |12231-out  | 102375+1 records out
[  274.588059] nd_bootstrap.sh[2628]:   INFO[0175] |12231-out  | 52416297 bytes (52 MB, 50 MiB) copied, 0.329377 s, 159 MB/s
[  274.604075] nd_bootstrap.sh[2628]:   INFO[0175] |12231-out  | 0+1 records in
[  OK  ] Finished atomix-boot-setup.
[  274.615055] nd_bootstrap.sh[2628]:   INFO[0175] |12231-out  | 0+1 records out
Starting Initial cloud-init job (pre-networking)...
[  274.634046] nd_bootstrap.sh[2628]:   INFO[0175] |12231-out  | 82 bytes copied, 9.4287e-05 s, 870 kB/s
[  274.656064] nd_bootstrap.sh[2628]:   INFO[0175] |12231-exit | rc=0
[  274.666047] nd_bootstrap.sh[2628]:   INFO[0175] Boot()                    duration=175321
[  274.837851] cloud-init[12253]: Cloud-init v. 24.1.3-0ubuntu1~22.04.5 running 'init-local' at Tue, 12 Aug 2025 09:53:39 +0000. Up 274.82 seconds.
Press any key to run first-boot setup on this console...
Starting Nexus Dashboard setup utility
Welcome to Nexus Dashboard 3.2.2f
Press Enter to manually bootstrap your first master node..
Paso 11. Configuración de la contraseña de administrador y la red de gestión de la interfaz de gestión del panel de Nexus
Starting Nexus Dashboard setup utility
Welcome to Nexus Dashboard 3.2.2f
Press Enter to manually bootstrap your first master node...

Admin Password:
Reenter Admin Password:
Management Network:
  IP Address/Mask: x.x.x.x/24
  Gateway: x.x.x.x
Vuelva a introducir la configuración (s/N): N
System configured successfully
Initializing System on first boot. Please wait..
[  OK  ] Listening on Network Service Netlink Socket.
[  OK  ] Finished Initial cloud-init job (pre-networking).
[  OK  ] Reached target Preparation for Network.
         Starting Network Configuration...
[  OK  ] Started Network Configuration.
[  OK  ] Reached target Network.
Starting Wait for Network to be Configured...
Paso 12. El nodo de panel de Nexus está listo para el inicio de sesión. Puede iniciar sesión en la GUI de ND mediante la IP de la interfaz de gestión para el resto de la configuración
Desde la consola:
Ubuntu 22.04.4 LTS localhost ttyS0
# # #### # # # # ##### ##### # ##### # # ##### ### # ##### #####
# # # # # # # # # # # # # # # # # # # # # # # # # #
# # # ### # # # ##### # # ##### ##### ##### ##### # # ##### ##### # #
# # # # # # # # # # # # # # # # # # # # # # # # #
# # #### # # #### ##### ##### # # ##### # # ##### ### # # # # #####
System initialized successfully
[ 564.309561] cloud-init[12560]: Cloud-init v. 24.1.3-0ubuntu1~22.04.5 running 'modules:final' at Tue, 12 Aug 2025 09:58:28 +0000. Up 564.27 seconds.
ci-info: no authorized SSH keys fingerprints found for user ubuntu.
<14>Aug 12 09:58:29 cloud-init: #############################################################
<14>Aug 12 09:58:29 cloud-init: -----BEGIN SSH HOST KEY FINGERPRINTS-----
<14>Aug 12 09:58:29 cloud-init: 256 SHA256:vKu7Zj3MAP+vFOXaeW14HClEhAwrSpA9AqcUC4SZVlU root@localhost (ECDSA)
<14>Aug 12 09:58:29 cloud-init: 256 SHA256:I7eiUnQq6pZsoFPy+UxIUQ66jQOgHyG4zGuF6cAtSl0 root@localhost (ED25519)
<14>Aug 12 09:58:29 cloud-init: 3072 SHA256:SvodRIEgWzEAaQQdH2rlw0qLziBbv0e88VAGkt/ox14 root@localhost (RSA)
<14>Aug 12 09:58:29 cloud-init: -----END SSH HOST KEY FINGERPRINTS-----
<14>Aug 12 09:58:29 cloud-init: #############################################################
-----BEGIN SSH HOST KEY KEYS-----
ecdsa-sha2-nistp256 AAAAE2VjZHNhLXNoYTItbmlzdHAyNTYAAAAIbmlzdHAyNTYAAABBBBf9S1BXcR48cWcIKhvfjLGYufJgycGIf1Yx8OpRsk4e1I+y80J/x5dfX90h+3cwt9kjH8IubMpleK66mlW+xd0= root@localhost
ssh-ed25519 AAAAC3NzaC1lZDI1NTE5AAAAIGWTN7hoB2/dYSVA0gpV88FWh2iRD2hwJ2LMryhhhQHg root@localhost
ssh-rsa AAAAB3NzaC1yc2EAAAADAQABAAABgQCeM+In/dciDwCKEPLV/97oIA5pHHRBRf0Lij5NcUwzYAf9q/m/lUsdzv2zVYc4WAJd8uX9ZxDAGa9D358Tvxh/lKzBKqNQpQdAjyby6IGGui+UK9Mq1RVxoUkFtIIJ97IzaBoR9ScnucMXpu5mp5OAjws+VrUhKk1XNFAui1QgW507I0Xk+2AaR/W0rwJCQRsHx3orDxCwJkDQDiQQAf/SrvSnuAe/8pSuCuvscqPjZeIF7LnJ6dAms0XXrhbxRQ8c4q/Ud6RL2sKjinlZPfqsbVFSpjbJ9m4jtXvuGE5llyJbS1FcU8DsFbkY6HH9JQru49iXcd5mKt7fyPg0ypp7Hl+2g07mEcYlEMBXxNZw+HqNW27xp0ZkRfWO+Zl2t0s6DjM0LHWqV0wZLYqqBTlQIkhf2irM6mr7s2bVAcvEsuZzG9d7uY8aC/CR5GwkgKW8s4oI7m56ccdRPHV0qQFXnBybBToUInmIK+1fxtaUXYbQbQ83wxNOvG7O55gDsws= root@localhost
-----END SSH HOST KEY KEYS-----
[ 564.364630] cloud-init[12560]: Cloud-init v. 24.1.3-0ubuntu1~22.04.5 finished at Tue, 12 Aug 2025 09:58:29 +0000. Datasource DataSourceAtomix [sources=/var/lib/cloud/seed/atomix][dsmode=net]. Up 564.36 seconds
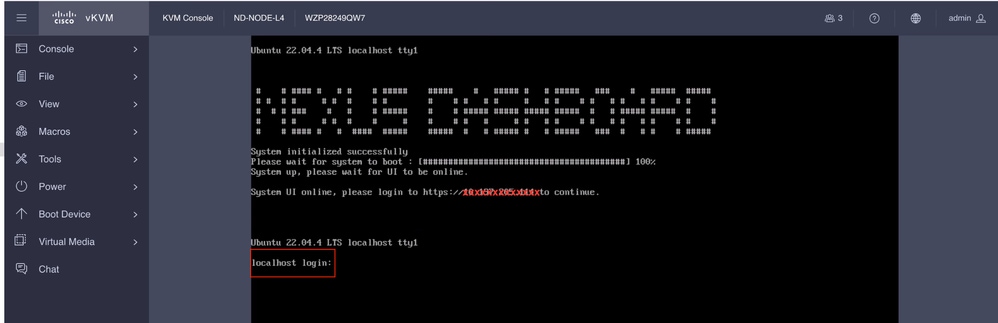
Please wait for system to boot : [########################################] 100%
System up, please wait for UI to be online.
System UI online, please login to https://x.x.x.x to continue. << Access the Nexus Dashboard GUI via this URL >>
Ubuntu 22.04.4 LTS localhost ttyS0
localhost login:
Desde KVM:
Historial de revisiones
| Revisión | Fecha de publicación | Comentarios |
|---|---|---|
1.0 |
29-Aug-2025
|
Versión inicial |
Con la colaboración de ingenieros de Cisco
- Shivam TripathiTAC
 Comentarios
Contacte a Cisco
- Abrir un caso de soporte

- (Requiere un Cisco Service Contract)