- Preface
- Chapter 1 - Product Overview
- Chapter 2 - Preparing for Installation
- Chapter 3 - Installing the Client Adapter
- Chapter 4 - Using the Profile Manager
- Chapter 5 - Configuring the Client Adapter
- Chapter 6 - Using EAP Authentication
- Chapter 7 - Performing Diagnostics
- Chapter 8 - Using the Aironet Client Monitor (ACM)
- Chapter 9 - Routine Procedures
- Chapter 10 - Troubleshooting
- Appendix A - Technical Specifications
- Appendix B - Translated Safety Warnings
- Appendix C - Declarations of Conformity and Regulatory Information
- Appendix D - Channels, Power Levels, and Antenna Gains
- Appendix E - Configuring the Client Adapter through the Windows XP Operating System
- Appendix F - Performing a Site Survey
- Glossary
- Index
Cisco Aironet 340, 350, and CB20A Wireless LAN Client Adapters Installation and Configuration Guide for Windows, OL-1394-08
Bias-Free Language
The documentation set for this product strives to use bias-free language. For the purposes of this documentation set, bias-free is defined as language that does not imply discrimination based on age, disability, gender, racial identity, ethnic identity, sexual orientation, socioeconomic status, and intersectionality. Exceptions may be present in the documentation due to language that is hardcoded in the user interfaces of the product software, language used based on RFP documentation, or language that is used by a referenced third-party product. Learn more about how Cisco is using Inclusive Language.
- Updated:
- May 4, 2007
Chapter: Chapter 3 - Installing the Client Adapter
Installing the Client Adapter
This chapter provides instructions for installing the client adapter's firmware, driver, utilities, and security modules.
The following topics are covered in this chapter:
•![]() Installing or Upgrading the Client Adapter Software
Installing or Upgrading the Client Adapter Software
•![]() Deciding How to Configure Your Client Adapter (Windows XP Only)
Deciding How to Configure Your Client Adapter (Windows XP Only)
•![]() Selecting Among Several Installed Client Adapters
Selecting Among Several Installed Client Adapters
Installing or Upgrading the Client Adapter Software
This section enables you to install or upgrade Cisco Aironet client adapter firmware, drivers,
utilities, and security modules from a self-extracting executable file named Win-Client-802.11a-b-Ins-Wizard-vxx.exe, where xx represents the version number.
Follow the instructions below to install or upgrade client adapter software on a computer running Windows 98, 98 SE, 2000, Me, or XP. If your computer is running Windows NT, follow the instructions on page page 14.


Note ![]() Install Wizard version 1.3 or later and its software components are not supported for use with Cisco Aironet 340 series client adapters or Windows 98, 98 SE, NT, and Me.
Install Wizard version 1.3 or later and its software components are not supported for use with Cisco Aironet 340 series client adapters or Windows 98, 98 SE, NT, and Me.
Note ![]() If you are installing or upgrading to versions of client adapter software that do not use the Install Wizard file, refer to version OL-1394-04 of this manual for installation, configuration, and operation instructions.
If you are installing or upgrading to versions of client adapter software that do not use the Install Wizard file, refer to version OL-1394-04 of this manual for installation, configuration, and operation instructions.
Note ![]() If you experience any problems during installation, refer to Chapter 10, for a list of installation error messages.
If you experience any problems during installation, refer to Chapter 10, for a list of installation error messages.
Installing or Upgrading the Client Adapter Software on Windows 98, 98 SE, 2000, Me, or XP
Follow these steps to install or upgrade client adapter software components on a computer running Windows 98, 98 SE, 2000, Me, or XP.
Note ![]() Install Wizard version 1.3 or later and its software components are not supported for use with Cisco Aironet 340 series client adapters or Windows 98, 98 SE, NT, and Me.
Install Wizard version 1.3 or later and its software components are not supported for use with Cisco Aironet 340 series client adapters or Windows 98, 98 SE, NT, and Me.
Note ![]() Windows Me and XP come with a driver that is installed automatically the first time you insert a PC, LM, or PCI card. Follow the procedure below to upgrade this driver to the latest one available.
Windows Me and XP come with a driver that is installed automatically the first time you insert a PC, LM, or PCI card. Follow the procedure below to upgrade this driver to the latest one available.
Step 1 ![]() Use your computer's web browser to access the following URL:
Use your computer's web browser to access the following URL:
http://www.cisco.com/public/sw-center/sw-wireless.shtml
Step 2 ![]() Choose Option #2: Aironet Wireless Software Display Tables.
Choose Option #2: Aironet Wireless Software Display Tables.
Note ![]() You can download software from the Software Selector tool instead of the display tables. To do so, choose Option #1: Aironet Wireless Software Selector, follow the instructions on the screen, and go to Step 6.
You can download software from the Software Selector tool instead of the display tables. To do so, choose Option #1: Aironet Wireless Software Selector, follow the instructions on the screen, and go to Step 6.
Step 3 ![]() Click Cisco Aironet Wireless LAN Client Adapters.
Click Cisco Aironet Wireless LAN Client Adapters.
Step 4 ![]() Under Aironet Client Adapter Installation Wizard (For Windows), click 802.11a/b (CB20A, 350 Series, 340 Series).
Under Aironet Client Adapter Installation Wizard (For Windows), click 802.11a/b (CB20A, 350 Series, 340 Series).
Step 5 ![]() Click the Install Wizard file with the latest version number.
Click the Install Wizard file with the latest version number.
Step 6 ![]() Complete the encryption authorization form; then read and accept the terms and conditions of the Software License Agreement.
Complete the encryption authorization form; then read and accept the terms and conditions of the Software License Agreement.
Step 7 ![]() Click the file again to download it.
Click the file again to download it.
Step 8 ![]() Save the file to your computer's hard drive.
Save the file to your computer's hard drive.
Step 9 ![]() Follow the instructions in Chapter 9 to insert the client adapter into your computer, if it is not already inserted. The instructions are different for PC cards, PC-Cardbus cards, and PCI cards.
Follow the instructions in Chapter 9 to insert the client adapter into your computer, if it is not already inserted. The instructions are different for PC cards, PC-Cardbus cards, and PCI cards.
Step 10 ![]() If a driver is not currently installed for your client adapter, the Found New Hardware Wizard screen appears. Click Cancel.
If a driver is not currently installed for your client adapter, the Found New Hardware Wizard screen appears. Click Cancel.
Step 11 ![]() Find the Install Wizard file using Windows Explorer, double-click it, and extract its files to a folder.
Find the Install Wizard file using Windows Explorer, double-click it, and extract its files to a folder.
Note ![]() To extract the files, click Browse on the WinZip Self-Extractor screen, choose the folder in which you want the files to be placed, and click OK and Unzip. After the files are extracted, click OK to close the screen.
To extract the files, click Browse on the WinZip Self-Extractor screen, choose the folder in which you want the files to be placed, and click OK and Unzip. After the files are extracted, click OK to close the screen.
Step 12 ![]() Close Windows Explorer. The Cisco Aironet Wireless LAN Client Adapter Installation Wizard screen appears (see Figure 3-1).
Close Windows Explorer. The Cisco Aironet Wireless LAN Client Adapter Installation Wizard screen appears (see Figure 3-1).
Figure 3-1 Cisco Aironet Wireless LAN Client Adapter Installation Wizard Screen
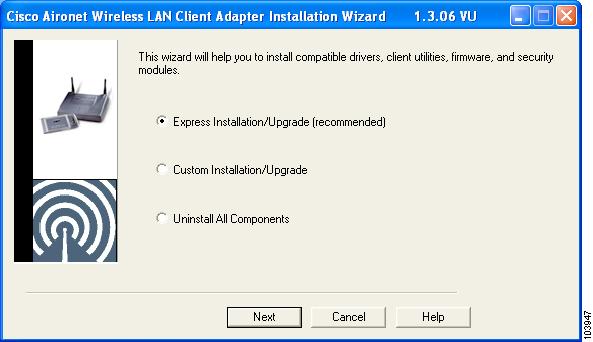
Step 13 ![]() Choose one of the following options on the Cisco Aironet Wireless LAN Client Adapter Installation Wizard screen and click Next:
Choose one of the following options on the Cisco Aironet Wireless LAN Client Adapter Installation Wizard screen and click Next:
Note ![]() To ensure compatibility among software components, Cisco recommends that you perform an express installation. If you perform a custom installation, Cisco recommends that you install all components.
To ensure compatibility among software components, Cisco recommends that you perform an express installation. If you perform a custom installation, Cisco recommends that you install all components.
•![]() Express Installation/Upgrade (recommended)—Silently installs the client adapter firmware, drivers, client utilities, and security modules using the default values listed in Table 3-1.
Express Installation/Upgrade (recommended)—Silently installs the client adapter firmware, drivers, client utilities, and security modules using the default values listed in Table 3-1.
•![]() Custom Installation/Upgrade—Enables you to specify which software components are installed and to change the default values of certain parameters.
Custom Installation/Upgrade—Enables you to specify which software components are installed and to change the default values of certain parameters.
Step 14 ![]() If a message appears indicating that you may be required to restart your computer at the end of the installation process, click OK.
If a message appears indicating that you may be required to restart your computer at the end of the installation process, click OK.
Note ![]() If you click Cancel, the installation process terminates.
If you click Cancel, the installation process terminates.
Step 15 ![]() If you chose an express installation, go to Step 17. If you chose a custom installation, the Custom Installation screen appears (see Figure 3-2).
If you chose an express installation, go to Step 17. If you chose a custom installation, the Custom Installation screen appears (see Figure 3-2).
Figure 3-2 Custom Installation Screen
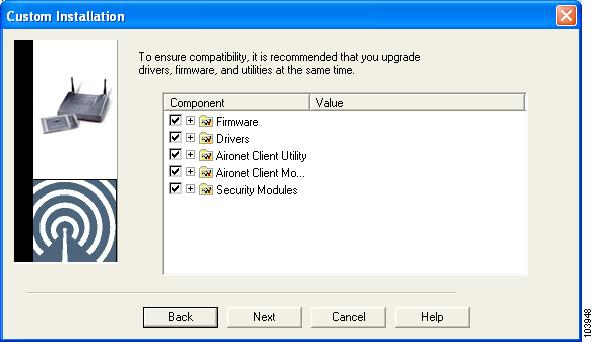
Step 16 ![]() Follow these steps to make selections on this screen.
Follow these steps to make selections on this screen.
a. ![]() Make sure a check mark appears beside every software component that you want to install. For every component that is checked, the Install Wizard will install its version of that component. Every component that is not checked will remain as it currently is on your system.
Make sure a check mark appears beside every software component that you want to install. For every component that is checked, the Install Wizard will install its version of that component. Every component that is not checked will remain as it currently is on your system.
Note ![]() Click the + sign beside the Security Modules option to reveal the available security components.
Click the + sign beside the Security Modules option to reveal the available security components.
Note ![]() Some components are dependent on others. Therefore, when you select or deselect these components, the settings of other components may change. A dependency notice appears when this occurs.
Some components are dependent on others. Therefore, when you select or deselect these components, the settings of other components may change. A dependency notice appears when this occurs.
b. ![]() Click the + sign beside each component to view additional parameters. The current value of each parameter appears in the Value field.
Click the + sign beside each component to view additional parameters. The current value of each parameter appears in the Value field.
c. ![]() To change the value of any parameter, click its current value in the Value field. A screen appears that lets you change the existing value.
To change the value of any parameter, click its current value in the Value field. A screen appears that lets you change the existing value.
d. ![]() Enter or choose a new value and click OK. Table 3-1 describes each component and its parameters and lists any default value.
Enter or choose a new value and click OK. Table 3-1 describes each component and its parameters and lists any default value.
|
|
|
|
|---|---|---|
Firmware |
Installs the firmware version included in the Install Wizard file. Default: Checked |
|
Disable Firmware Checking |
The Disable Firmware Checking parameter affects the firmware that is bundled with the driver, not the firmware that is included in the Install Wizard. This parameter controls whether the driver (whenever it loads) installs the firmware with which it is bundled. Note Options: Yes or No Default: Yes |
|
|
|
|
|
Yes |
Prevents the driver from installing the firmware with which it is bundled, enabling the client adapter to retain its current firmware version. |
|
No |
Causes the driver to install the firmware with which it is bundled if that firmware is newer than the firmware that is currently installed in the client adapter. |
|
Note Note |
||
Drivers |
Installs the driver version included in the Install Wizard file. Default: Checked |
|
Set Quiet Mode? |
Specifies whether the client becomes quiet (to passively scan or listen) when its associated access point is turned off. In quiet mode, the client generates radio frequency energy only in direct response to an access point transmission. When the access point is turned back on, it starts sending beacons, which the client hears and can now respond to. This parameter applies to individual cards rather than profiles. It can be set differently for different cards and remains in effect across ACU sessions and computer reboots. Options: Yes or No Default: No Note Note |
|
Aironet Client Utility |
Installs the ACU version included in the Install Wizard file. Default: Checked |
|
Installation Path |
Determines the path where the ACU software will be installed. You can change the default by entering a new path. Default: C:\Program Files\Cisco Systems\Aironet Client Utility |
|
Program Folder |
Determines the program folder where the ACU software will be installed. You can change the default by entering a new folder name. Default: Cisco Systems |
|
Place Icon on Desktop |
Causes the installation program to add an ACU icon to your computer's desktop to provide quick access to the utility. Options: Yes or No Default: Yes |
|
Allow Non-Administrator Users to Save Settings to the Registry |
Enables users without administrative rights to modify profiles in ACU and save them to the registry on computers running Windows 2000 or XP. Options: Yes or No Default: Yes Note |
|
Aironet Client Monitor |
Installs the ACM version included in the Install Wizard file. Default: Checked |
|
Installation Path |
Determines the path where the ACM software will be installed. You can change the default by entering a new path. Default: C:\Program Files\Cisco Systems\Aironet Client Monitor |
|
Program Folder |
Determines the program folder where the ACM software will be installed. You can change the default by entering a new folder name. Default: Cisco Systems |
|
Auto Start |
Determines whether ACM starts automatically every time Windows boots. Options: Yes or No Default: Yes Note |
|
Start After Install |
Determines whether ACM starts automatically after ACM is installed. Options: Yes or No Default: Yes Note |
|
Program Feature Overrides |
Determines which ACM components are enabled. If any components are not selected now and you later want to use them, you must run this installation program again and enable them. Components: See the table below Options per component: Enable or Disable Default per component: Enable |
|
|
|
|
|
About Box (Help) |
Displays the ACM version number and enables you to access the online help. |
|
Exit Program |
Closes ACM for all client adapters. |
|
Launch Aironet Client Utility |
Activates ACU, if it is installed. |
|
Troubleshooting |
Activates the troubleshooting utility, which enables you to identify and resolve configuration and association problems with your client adapter. |
|
Preferences |
Enables you to determine when ACM runs and to choose the options that appear on the ACM pop-up menu. |
|
Turn Radio On/Off |
Turns the client adapter's radio on or off. |
|
Reauthenticate |
Forces your client adapter to try to reauthenticate using the username and password of the current profile. |
|
Select Profile |
Enables you to select the active profile for your client adapter. |
|
Auto Profile Selection |
Causes the client adapter's driver to automatically select a profile from the list of profiles that were set up in ACU to be included in auto profile selection. |
|
Other Configuration Application |
Enables an application other than ACU to configure the client adapter. |
|
Show Connection Status |
Provides information on the current status of your client adapter. |
|
Menu Options (Defaults) |
Determines which options are displayed on the ACM pop-up menu. Menu options: About Box (Help), Exit Program, Launch Aironet Client Utility, Troubleshooting, Turn Radio On/Off, Reauthenticate, Select Profile, Show Connection Status Options per menu option: Show or Hide Default per menu option: Show |
|
Security Modules |
||
LEAP |
Installs the LEAP supplicant included in the Install Wizard file. Installing the LEAP supplicant enables you to create a profile in ACU that uses LEAP authentication. If this option is not selected now and you later want to create a profile that uses LEAP, you must run this installation program again and choose this option. Default: Checked Note Note Note |
|
Allow Saved LEAP User Name and Password |
Enables you to create a profile in ACU that uses a saved (rather than temporary) username and password for LEAP authentication. When such a profile is used, the saved username and password are used to start the LEAP authentication process, and you are not prompted to enter them. Options: Yes or No Default: Yes |
|
EAP-SIM |
Installs the EAP-SIM supplicant included in the Install Wizard file. Installing the EAP-SIM supplicant enables the client to support EAP-SIM authentication. If this option is not selected now and you later want to use EAP-SIM, you must run this installation program again and choose this option. Default: Unchecked Note Note Note |
|
PEAP |
Installs the PEAP supplicant included in the Install Wizard file. Installing the PEAP supplicant enables the client to support PEAP authentication. If this option is not selected now and you later want to use PEAP, you must run this installation program again and choose this option. Default: Unchecked Note Note Note |
|
EAP-FAST |
Installs the EAP-FAST supplicant included in the Install Wizard file. Installing the EAP-FAST supplicant enables you to create a profile in ACU that uses EAP-FAST authentication. If this option is not selected now and you later want to create a profile that uses EAP-FAST, you must run this installation program again and choose this option. Default: Checked Note Note Note |
|
Allow Saved EAP-FAST User Name and Password |
Enables you to create a profile in ACU that uses a saved (rather than temporary) username and password for EAP-FAST authentication. When such a profile is used, the saved username and password are used to start the EAP-FAST authentication process, and you are not prompted to enter them. Options: Yes or No Default: Yes Note |
|
Allow Auto-Provisioning? |
Enables a protected access credentials (PAC) file to be obtained automatically as needed (for instance, when a PAC expires, when the client adapter accesses a different server, when the EAP-FAST username cannot be matched to a previously provisioned PAC, etc.). Options: Yes or No Default: Yes Note Note |
|
e. ![]() When you are finished making selections, click Next.
When you are finished making selections, click Next.
Step 17 ![]() The installation process begins, and you are notified as each component is installed. Perform one of the following:
The installation process begins, and you are notified as each component is installed. Perform one of the following:
•![]() If a message appears asking if you wish to reboot now, click Yes.
If a message appears asking if you wish to reboot now, click Yes.
Note ![]() To ensure that your client adapter software is installed properly, Cisco recommends that you click Yes to reboot your computer now.
To ensure that your client adapter software is installed properly, Cisco recommends that you click Yes to reboot your computer now.
•![]() If a message appears indicating that the system is about to reboot, click OK and allow your computer to restart.
If a message appears indicating that the system is about to reboot, click OK and allow your computer to restart.
•![]() If the following message appears, click OK and then reboot your computer: "The installation will complete and applications will be installed when a wireless LAN client adapter is inserted. If an adapter is already inserted, remove and reinsert the adapter or reboot the machine."
If the following message appears, click OK and then reboot your computer: "The installation will complete and applications will be installed when a wireless LAN client adapter is inserted. If an adapter is already inserted, remove and reinsert the adapter or reboot the machine."
The Found New Hardware screen appears. Depending on your computer's operating system, you may have to click Next. The driver and other software components are installed. Then an ACM icon appears in the Windows system tray (unless you changed the default value during installation). Perform one of the following:
–![]() If a message appears asking if you wish to reboot now, click Yes.
If a message appears asking if you wish to reboot now, click Yes.
Note ![]() To ensure that your client adapter software is installed properly, Cisco recommends that you click Yes to reboot your computer now.
To ensure that your client adapter software is installed properly, Cisco recommends that you click Yes to reboot your computer now.
–![]() If a message appears indicating that the system is about to reboot, click OK and allow your computer to restart.
If a message appears indicating that the system is about to reboot, click OK and allow your computer to restart.
Step 18 ![]() If you want to install a second client adapter, allow your computer to reboot completely; then insert the second adapter into your computer. Depending on your computer's operating system, one of the following scenarios occurs:
If you want to install a second client adapter, allow your computer to reboot completely; then insert the second adapter into your computer. Depending on your computer's operating system, one of the following scenarios occurs:
•![]() The Found New Hardware Wizard screen appears. Depending on your computer's operating system, you may have to click Next. The driver and other software components are installed, and another ACM icon appears in the Windows system tray. Click Yes or OK when a message appears about rebooting your computer.
The Found New Hardware Wizard screen appears. Depending on your computer's operating system, you may have to click Next. The driver and other software components are installed, and another ACM icon appears in the Windows system tray. Click Yes or OK when a message appears about rebooting your computer.
Note ![]() To ensure that your client adapter software is installed properly, Cisco recommends that you reboot your computer now.
To ensure that your client adapter software is installed properly, Cisco recommends that you reboot your computer now.
•![]() The driver and other software components are installed, and another ACM icon appears in the Windows system tray. Click Yes or OK when a message appears about rebooting your computer.
The driver and other software components are installed, and another ACM icon appears in the Windows system tray. Click Yes or OK when a message appears about rebooting your computer.
Note ![]() To ensure that your client adapter software is installed properly, Cisco recommends that you reboot your computer now.
To ensure that your client adapter software is installed properly, Cisco recommends that you reboot your computer now.
Step 19 ![]() If your network setup does not include a DHCP server and you plan to use TCP/IP, follow these steps for your operating system. If you have more than one client adapter installed, repeat this step for each adapter.
If your network setup does not include a DHCP server and you plan to use TCP/IP, follow these steps for your operating system. If you have more than one client adapter installed, repeat this step for each adapter.
•![]() Windows 98, 98 SE, and Me—Double-click My Computer, Control Panel, and Network. Click TCP/IP > Cisco Systems Wireless LAN Adapter. Click Properties, click Specify an IP address, and enter the IP address, subnet mask, and default gateway address of your computer (which can be obtained from your system administrator). Click OK. In the Network window, click OK.
Windows 98, 98 SE, and Me—Double-click My Computer, Control Panel, and Network. Click TCP/IP > Cisco Systems Wireless LAN Adapter. Click Properties, click Specify an IP address, and enter the IP address, subnet mask, and default gateway address of your computer (which can be obtained from your system administrator). Click OK. In the Network window, click OK.
•![]() Windows 2000—Double-click My Computer, Control Panel, and Network and Dial-up Connections. Right-click Local Area Connection x (where x represents the number of the connection). Click Properties, Internet Protocol (TCP/IP), and Properties. Click Use the following IP address and enter the IP address, subnet mask, and default gateway address of your computer (which can be obtained from your system administrator). Click OK. In the Local Area Connection Properties window, click OK.
Windows 2000—Double-click My Computer, Control Panel, and Network and Dial-up Connections. Right-click Local Area Connection x (where x represents the number of the connection). Click Properties, Internet Protocol (TCP/IP), and Properties. Click Use the following IP address and enter the IP address, subnet mask, and default gateway address of your computer (which can be obtained from your system administrator). Click OK. In the Local Area Connection Properties window, click OK.
•![]() Windows XP—Right-click Wireless Network Connection and click Properties. Click Internet Protocol (TCP/IP) and click Properties. Click Use the following IP address and enter the IP address, subnet mask, and default gateway address of your computer (which can be obtained from your system administrator). Click OK
Windows XP—Right-click Wireless Network Connection and click Properties. Click Internet Protocol (TCP/IP) and click Properties. Click Use the following IP address and enter the IP address, subnet mask, and default gateway address of your computer (which can be obtained from your system administrator). Click OK
Step 20 ![]() If you are prompted to restart your computer, click Yes.
If you are prompted to restart your computer, click Yes.
Step 21 ![]() Go to the "Verifying Installation" section to determine if the installation was successful. After you verify installation, go to Chapter 4, if you want to create profiles for your client adapter.
Go to the "Verifying Installation" section to determine if the installation was successful. After you verify installation, go to Chapter 4, if you want to create profiles for your client adapter.
Installing or Upgrading the Client Adapter Software on Windows NT
Follow these steps to install or upgrade client adapter software components on a computer running Windows NT.
Note ![]() Install Wizard version 1.3 or later and its software components are not supported for use with Cisco Aironet 340 series client adapters or Windows 98, 98 SE, NT, and Me.
Install Wizard version 1.3 or later and its software components are not supported for use with Cisco Aironet 340 series client adapters or Windows 98, 98 SE, NT, and Me.
Note ![]() PC-Cardbus cards are not supported for use with Windows NT.
PC-Cardbus cards are not supported for use with Windows NT.
Note ![]() This procedure requires that your computer has Windows NT Service Pack 6 or later.
This procedure requires that your computer has Windows NT Service Pack 6 or later.
Step 1 ![]() Use your computer's web browser to access the following URL:
Use your computer's web browser to access the following URL:
http://www.cisco.com/public/sw-center/sw-wireless.shtml
Step 2 ![]() Choose Option #2: Aironet Wireless Software Display Tables.
Choose Option #2: Aironet Wireless Software Display Tables.
Note ![]() You can download software from the Software Selector tool instead of the display tables. To do so, choose Option #1: Aironet Wireless Software Selector, follow the instructions on the screen, and go to Step 6.
You can download software from the Software Selector tool instead of the display tables. To do so, choose Option #1: Aironet Wireless Software Selector, follow the instructions on the screen, and go to Step 6.
Step 3 ![]() Click Cisco Aironet Wireless LAN Client Adapters.
Click Cisco Aironet Wireless LAN Client Adapters.
Step 4 ![]() Under Aironet Client Adapter Installation Wizard (For Windows), click 802.11a/b (CB20A, 350 Series, 340 Series).
Under Aironet Client Adapter Installation Wizard (For Windows), click 802.11a/b (CB20A, 350 Series, 340 Series).
Step 5 ![]() Click the Install Wizard file with the latest version number.
Click the Install Wizard file with the latest version number.
Step 6 ![]() Read and accept the terms and conditions of the Software License Agreement.
Read and accept the terms and conditions of the Software License Agreement.
Step 7 ![]() Click the file again to download it.
Click the file again to download it.
Step 8 ![]() Save the file to your computer's hard drive.
Save the file to your computer's hard drive.
Step 9 ![]() If you are installing a PC or LM card, follow these steps to obtain an available interrupt request (IRQ):
If you are installing a PC or LM card, follow these steps to obtain an available interrupt request (IRQ):
a. ![]() Click Start > Programs > Administrative Tools > Windows NT Diagnostics.
Click Start > Programs > Administrative Tools > Windows NT Diagnostics.
b. ![]() Click the Resources tab.
Click the Resources tab.
c. ![]() Click the IRQ button.
Click the IRQ button.
d. ![]() The used IRQs are listed in numerical order along the left side of the Resources window. Write down the number of an IRQ that is not being used. You will need this IRQ for Step 20.
The used IRQs are listed in numerical order along the left side of the Resources window. Write down the number of an IRQ that is not being used. You will need this IRQ for Step 20.
Step 10 ![]() If you are installing a PC or LM card, double-click My Computer, Control Panel, and Devices. Scroll down and choose Pcmcia. Click Startup, Automatic, and OK.
If you are installing a PC or LM card, double-click My Computer, Control Panel, and Devices. Scroll down and choose Pcmcia. Click Startup, Automatic, and OK.
Step 11 ![]() Follow the instructions in Chapter 9 to insert the client adapter into your computer if it is not already inserted. The instructions are different for PC cards and PCI cards.
Follow the instructions in Chapter 9 to insert the client adapter into your computer if it is not already inserted. The instructions are different for PC cards and PCI cards.
Step 12 ![]() If the Windows NT Wizard screen appears, click Exit.
If the Windows NT Wizard screen appears, click Exit.
Step 13 ![]() Find the Install Wizard file using Windows Explorer, double-click it, and extract its files to a folder.
Find the Install Wizard file using Windows Explorer, double-click it, and extract its files to a folder.
Note ![]() To extract the files, click Browse on the WinZip Self-Extractor screen, choose the folder in which you want the files to be placed, and click OK and Unzip. After the files are extracted, click OK to close the screen.
To extract the files, click Browse on the WinZip Self-Extractor screen, choose the folder in which you want the files to be placed, and click OK and Unzip. After the files are extracted, click OK to close the screen.
Step 14 ![]() Close Windows Explorer. The Cisco Aironet Wireless LAN Client Adapter Installation Wizard screen appears (see Figure 3-3).
Close Windows Explorer. The Cisco Aironet Wireless LAN Client Adapter Installation Wizard screen appears (see Figure 3-3).
Figure 3-3 Cisco Aironet Wireless LAN Client Adapter Installation Wizard Screen
Step 15 ![]() Choose one of the following options and click Next:
Choose one of the following options and click Next:
Note ![]() To ensure compatibility among software components, Cisco recommends that you perform an express installation. If you perform a custom installation, Cisco recommends that you install all components.
To ensure compatibility among software components, Cisco recommends that you perform an express installation. If you perform a custom installation, Cisco recommends that you install all components.
•![]() Express Installation/Upgrade (recommended)—Silently installs the client adapter firmware, drivers, client utilities, and security modules using the default values listed in Table 3-2.
Express Installation/Upgrade (recommended)—Silently installs the client adapter firmware, drivers, client utilities, and security modules using the default values listed in Table 3-2.
•![]() Custom Installation/Upgrade—Enables you to specify which software components are installed and to change the default values of certain parameters.
Custom Installation/Upgrade—Enables you to specify which software components are installed and to change the default values of certain parameters.
Step 16 ![]() A screen appears with a list of available drivers. Choose the driver that corresponds to your client adapter type and click Next.
A screen appears with a list of available drivers. Choose the driver that corresponds to your client adapter type and click Next.
Note ![]() You must choose a driver even if one is not being installed.
You must choose a driver even if one is not being installed.
Step 17 ![]() If you chose an express installation, go to Step 19. If you chose a custom installation, the Custom Installation screen appears (see Figure 3-4).
If you chose an express installation, go to Step 19. If you chose a custom installation, the Custom Installation screen appears (see Figure 3-4).
Figure 3-4 Custom Installation Screen
Step 18 ![]() Follow these steps to make selections on this screen.
Follow these steps to make selections on this screen.
a. ![]() Make sure a check mark appears beside every software component that you want to install. For every component that is checked, the Install Wizard will install its version of that component. Every component that is not checked will remain as it is on your system.
Make sure a check mark appears beside every software component that you want to install. For every component that is checked, the Install Wizard will install its version of that component. Every component that is not checked will remain as it is on your system.
Note ![]() Click the + sign beside the Security Modules option to reveal the available security components.
Click the + sign beside the Security Modules option to reveal the available security components.
Note ![]() Some components are dependent on others. Therefore, when you select or deselect these components, the settings of other components may change. A dependency notice appears when this occurs.
Some components are dependent on others. Therefore, when you select or deselect these components, the settings of other components may change. A dependency notice appears when this occurs.
b. ![]() Click the + sign beside each component to view additional parameters. The current value of each parameter appears in the Value field.
Click the + sign beside each component to view additional parameters. The current value of each parameter appears in the Value field.
c. ![]() To change the value of any parameter, click its current value in the Value field. A screen appears that lets you change the existing value.
To change the value of any parameter, click its current value in the Value field. A screen appears that lets you change the existing value.
d. ![]() Enter or choose a new value and click OK. Table 3-2 describes each component and its parameters and lists any default value.
Enter or choose a new value and click OK. Table 3-2 describes each component and its parameters and lists any default value.
|
|
|
|
|---|---|---|
Firmware |
Installs the firmware version included in the Install Wizard file. Default: Checked |
|
Disable Firmware Checking |
The Disable Firmware Checking parameter affects the firmware that is bundled with the driver, not the firmware that is included in the Install Wizard. This parameter controls whether the driver (whenever it loads) installs the firmware with which it is bundled. Note Options: Yes or No Default: Yes |
|
|
|
|
|
Yes |
Prevents the driver from installing the firmware with which it is bundled, enabling the client adapter to retain its current firmware version. |
|
No |
Causes the driver to install the firmware with which it is bundled if that firmware is newer than the firmware that is currently installed in the client adapter. |
|
Note Note |
||
Drivers |
Installs the driver version included in the Install Wizard file. Default: Checked |
|
Set Quiet Mode? |
Specifies whether the client becomes quiet (to passively scan or listen) when its associated access point is turned off. In quiet mode, the client generates radio frequency energy only in direct response to an access point transmission. When the access point is turned back on, it starts sending beacons, which the client hears and can now respond to. This parameter applies to individual cards rather than profiles. It can be set differently for different cards and remains in effect across ACU sessions and computer reboots. Options: Yes or No Default: No Note Note |
|
Aironet Client Utility |
Installs the ACU version included in the Install Wizard file. Default: Checked |
|
Installation Path |
Determines the path where the ACU software will be installed. You can change the default by entering a new path. Default: C:\Program Files\Cisco Systems\Aironet Client Utility |
|
Program Folder |
Determines the program folder where the ACU software will be installed. You can change the default by entering a new folder name. Default: Cisco Systems |
|
Place Icon on Desktop |
Causes the installation program to add an ACU icon to your computer's desktop to provide quick access to the utility. Options: Yes or No Default: Yes |
|
Allow Non-Administrator Users to Save Settings to the Registry |
Enables users without administrative rights to modify profiles in ACU and save them to the registry. Options: Yes or No Default: Yes |
|
Aironet Client Monitor |
Installs the ACM version included in the Install Wizard file. Default: Checked |
|
Installation Path |
Determines the path where the ACM software will be installed. You can change the default by entering a new path. Default: C:\Program Files\Cisco Systems\Aironet Client Monitor |
|
Program Folder |
Determines the program folder where the ACM software will be installed. You can change the default by entering a new folder name. Default: Cisco Systems |
|
Auto Start |
Determines whether ACM starts automatically every time Windows boots. Options: Yes or No Default: Yes |
|
Start After Install |
Determines whether ACM starts automatically after ACM is installed. Options: Yes or No Default: Yes |
|
Program Feature Overrides |
Determines which ACM components are enabled. If any components are not selected now and you later want to use them, you must run this installation program again and enable them. Components: See the table below Options per component: Enable or Disable Default per component: Enable |
|
|
|
|
|
About Box (Help) |
Displays the ACM version number and enables you to access the online help. |
|
Exit Program |
Closes ACM for all client adapters. |
|
Launch Aironet Client Utility |
Activates ACU, if it is installed. |
|
Troubleshooting |
Activates the troubleshooting utility, which enables you to identify and resolve configuration and association problems with your client adapter. |
|
Preferences |
Enables you to determine when ACM runs and to choose the options that appear on the ACM pop-up menu. |
|
Turn Radio On/Off |
Turns the client adapter's radio on or off. |
|
Reauthenticate |
Forces your client adapter to try to reauthenticate using the username and password of the current profile. |
|
Select Profile |
Enables you to select the active profile for your client adapter. |
|
Auto Profile Selection |
Causes the client adapter's driver to automatically select a profile from the list of profiles that were set up in ACU to be included in auto profile selection. |
|
Other Configuration Application |
Enables an application other than ACU to configure the client adapter. |
|
Show Connection Status |
Provides information on the current status of your client adapter. |
|
Menu Options (Defaults) |
Determines which options are displayed on the ACM pop-up menu. Menu options: About Box (Help), Exit Program, Launch Aironet Client Utility, Troubleshooting, Turn Radio On/Off, Reauthenticate, Select Profile, Show Connection Status Options per menu option: Show or Hide Default per menu option: Show |
|
Security Modules |
||
LEAP |
Installs the LEAP supplicant included in the Install Wizard file. Installing the LEAP supplicant enables you to create a profile in ACU that uses LEAP authentication. If this option is not selected now and you later want to create a profile that uses LEAP, you must run this installation program again and choose this option. Default: Checked Note |
|
Allow Saved LEAP User Name and Password |
Enables you to create a profile in ACU that uses a saved (rather than temporary) username and password for LEAP authentication. When such a profile is used, the saved username and password are used to start the LEAP authentication process, and you are not prompted to enter them. Options: Yes or No Default: Yes |
|
EAP-SIM |
Installs the EAP-SIM supplicant included in the Install Wizard file. Installing the EAP-SIM supplicant enables the client to support EAP-SIM authentication. If this option is not selected now and you later want to use EAP-SIM, you must run this installation program again and choose this option. Default: Unchecked Note Note |
|
PEAP |
Installs the PEAP supplicant included in the Install Wizard file. Installing the PEAP supplicant enables the client to support PEAP authentication. If this option is not selected now and you later want to use PEAP, you must run this installation program again and choose this option. Default: Unchecked Note |
|
Note ![]() Even though you can choose the EAP-FAST, Allow Saved EAP-FAST User Name and Password, and Allow Auto-Provisioning? parameters, the EAP-FAST supplicant is installed and can be enabled only on computers running Windows 2000 or XP.
Even though you can choose the EAP-FAST, Allow Saved EAP-FAST User Name and Password, and Allow Auto-Provisioning? parameters, the EAP-FAST supplicant is installed and can be enabled only on computers running Windows 2000 or XP.
e. ![]() When you are finished making selections, click Next.
When you are finished making selections, click Next.
Step 19 ![]() The wizard starts to copy files, and the Cisco Aironet Wireless LAN Adapter Setup screen appears (see Figure 3-5).
The wizard starts to copy files, and the Cisco Aironet Wireless LAN Adapter Setup screen appears (see Figure 3-5).
Figure 3-5 Cisco Aironet Wireless LAN Adapter Setup Screen

Step 20 ![]() If you are installing a PC or LM card, click Interrupt in the Property list and an unused interrupt (from Step 9) in the Value field and click OK. If you are installing a PCI or mini PCI card, click OK.
If you are installing a PC or LM card, click Interrupt in the Property list and an unused interrupt (from Step 9) in the Value field and click OK. If you are installing a PCI or mini PCI card, click OK.
Step 21 ![]() Messages appear as binding configurations are stored. Then the Microsoft TCP/IP Properties screen appears (see Figure 3-6).
Messages appear as binding configurations are stored. Then the Microsoft TCP/IP Properties screen appears (see Figure 3-6).
Figure 3-6 Microsoft TCP/IP Properties Screen
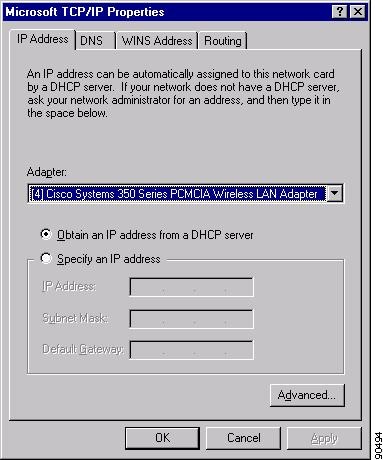
Step 22 ![]() On the IP Address tab, find and choose the client adapter that you are installing under Adapter.
On the IP Address tab, find and choose the client adapter that you are installing under Adapter.
Step 23 ![]() Perform one of the following:
Perform one of the following:
•![]() If your network setup includes a DHCP server, click Obtain an IP address from a DHCP server. When asked if you want to enable DHCP, click Yes and OK.
If your network setup includes a DHCP server, click Obtain an IP address from a DHCP server. When asked if you want to enable DHCP, click Yes and OK.
•![]() If your network setup does not include a DHCP server and you plan to use TCP/IP, click Specify an IP address and enter the IP address, subnet mask, and default gateway address of your computer (which can be obtained from your system administrator). Click OK.
If your network setup does not include a DHCP server and you plan to use TCP/IP, click Specify an IP address and enter the IP address, subnet mask, and default gateway address of your computer (which can be obtained from your system administrator). Click OK.
The installation process begins, and you are notified as each component is installed.
Step 24 ![]() Windows NT must be rebooted in order for your changes to take effect. Click Yes when a message appears asking if you wish to reboot now.
Windows NT must be rebooted in order for your changes to take effect. Click Yes when a message appears asking if you wish to reboot now.
Step 25 ![]() If you want to install a second client adapter, allow your computer to completely reboot; then repeat the steps in this section for the second adapter.
If you want to install a second client adapter, allow your computer to completely reboot; then repeat the steps in this section for the second adapter.
Note ![]() In Step 13, find the Install Wizard files using Windows Explorer. Then double-click the IWSetup.exe file.
In Step 13, find the Install Wizard files using Windows Explorer. Then double-click the IWSetup.exe file.
Step 26 ![]() Go to the "Verifying Installation" section below to determine if the installation was successful. After you verify installation, go to Chapter 4, if you want to create profiles for your client adapter.
Go to the "Verifying Installation" section below to determine if the installation was successful. After you verify installation, go to Chapter 4, if you want to create profiles for your client adapter.
Verifying Installation
To verify that you have properly installed the client adapter software, check the client adapter's LEDs. If the installation was successful, the client adapter's green LED blinks.
Note ![]() If your installation was unsuccessful or you experienced problems during or after installation, refer to Chapter 10 for a list of installation error messages and troubleshooting information.
If your installation was unsuccessful or you experienced problems during or after installation, refer to Chapter 10 for a list of installation error messages and troubleshooting information.
Now that your client adapter is properly installed, you are ready to go to Chapter 4, to create profiles for your client adapter, unless you are running Windows XP or have more than one client adapter installed.
•![]() If you are running Windows XP, go to the "Deciding How to Configure Your Client Adapter (Windows XP Only)" section below.
If you are running Windows XP, go to the "Deciding How to Configure Your Client Adapter (Windows XP Only)" section below.
•![]() If you have more than one client adapter installed, go to the "Selecting Among Several Installed Client Adapters" section.
If you have more than one client adapter installed, go to the "Selecting Among Several Installed Client Adapters" section.
Deciding How to Configure Your Client Adapter
(Windows XP Only)
Windows XP is the only operating system that enables you to configure your client adapter without using ACU. Therefore, if your computer is running Windows XP, you must decide whether to configure your client adapter through Windows XP or ACU. To help you with your decision, Table 3-3 compares the Windows XP and ACU client adapter features.
Perform one of the following:
•![]() If you are planning to configure your client adapter through ACU instead of through Windows XP, follow these steps:
If you are planning to configure your client adapter through ACU instead of through Windows XP, follow these steps:
a. ![]() Double-click My Computer, Control Panel, and Network Connections.
Double-click My Computer, Control Panel, and Network Connections.
b. ![]() Right-click Wireless Network Connection and click Properties.
Right-click Wireless Network Connection and click Properties.
c. ![]() Click the Wireless Networks tab and uncheck the Use Windows to configure my wireless network settings check box.
Click the Wireless Networks tab and uncheck the Use Windows to configure my wireless network settings check box.
d. ![]() Follow the instructions in Chapter 4 and Chapter 5 to configure your client adapter through ACU.
Follow the instructions in Chapter 4 and Chapter 5 to configure your client adapter through ACU.
•![]() If you are planning to configure your client adapter through Windows XP instead of through ACU, go to Appendix E, and follow the instructions there.
If you are planning to configure your client adapter through Windows XP instead of through ACU, go to Appendix E, and follow the instructions there.
•![]() If you are planning to configure your client adapter through Windows XP but you want to use ACU's diagnostic tools, go to Appendix E, to configure the adapter through Windows XP; then follow the instructions in Chapter 7 to use ACU's diagnostic tools.
If you are planning to configure your client adapter through Windows XP but you want to use ACU's diagnostic tools, go to Appendix E, to configure the adapter through Windows XP; then follow the instructions in Chapter 7 to use ACU's diagnostic tools.
Selecting Among Several Installed Client Adapters
If more than one client adapter is installed in your computer, follow the instructions below to specify the one for which you want to set up profiles in ACU.
Step 1 ![]() Double-click the Aironet Client Utility (ACU) icon on your desktop or double-click My Computer > Control Panel > Aironet Client Utility to open ACU. The Select A Wireless LAN Adapter Card screen appears (see Figure 3-7).
Double-click the Aironet Client Utility (ACU) icon on your desktop or double-click My Computer > Control Panel > Aironet Client Utility to open ACU. The Select A Wireless LAN Adapter Card screen appears (see Figure 3-7).
Note ![]() The Select A Wireless LAN Adapter Card screen appears when you start ACU if more than one card is inserted in your computer or no cards are inserted but more than one card is installed.
The Select A Wireless LAN Adapter Card screen appears when you start ACU if more than one card is inserted in your computer or no cards are inserted but more than one card is installed.
Figure 3-7 Select A Wireless LAN Adapter Card Screen
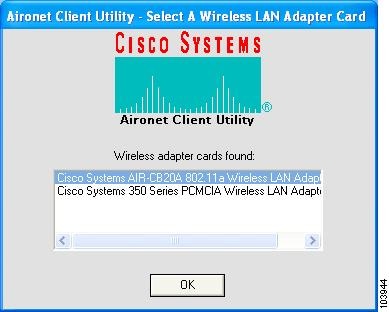
Step 2 ![]() Choose the card you wish to configure from the list of available cards and click OK.
Choose the card you wish to configure from the list of available cards and click OK.
Step 3 ![]() Go to Chapter 4, to create profiles for this card.
Go to Chapter 4, to create profiles for this card.
 Feedback