Table Of Contents
Understanding QoS for Wireless LANs
QoS for Wireless LANs Versus QoS on Wired LANs
Impact of QoS on a Wireless LAN
Configuring QoS Using the Web-Browser Interface
Adjusting Radio Access Category Definitions
CW-min and CW-max Settings for Point-to-Point and Point-to-Multipoint Bridge Links
Giving Priority to Voice Traffic
Giving Priority to Video Traffic
Configuring QoS
This chapter describes how to configure quality of service (QoS) on your access point/bridge. With this feature, you can provide preferential treatment to certain traffic at the expense of others. Without QoS, the access point/bridge offers best-effort service to each packet, regardless of the packet contents or size. It sends the packets without any assurance of reliability, delay bounds, or throughput.
Note For complete syntax and usage information for the commands used in this chapter, refer to the Cisco IOS Command Reference for Cisco Aironet Access Points and Bridges for this release.
This chapter consists of these sections:
•Understanding QoS for Wireless LANs
Understanding QoS for Wireless LANs
Typically, networks operate on a best-effort delivery basis, which means that all traffic has equal priority and an equal chance of being delivered in a timely manner. When congestion occurs, all traffic has an equal chance of being dropped.
When you configure QoS on the access point/bridge, you can select specific network traffic, prioritize it, and use congestion-management and congestion-avoidance techniques to provide preferential treatment. Implementing QoS in your wireless LAN makes network performance more predictable and bandwidth utilization more effective.
When you configure QoS, you create QoS policies and apply the policies to the VLAN configured on your access point/bridge. If you do not use VLANs on your network, you can apply your QoS policies to the access point/bridge's Ethernet and radio ports.
QoS for Wireless LANs Versus QoS on Wired LANs
The QoS implementation for wireless LANs differs from QoS implementations on other Cisco devices. With QoS enabled, access point/bridges perform the following:
•They do not classify packets; they prioritize packets based on DSCP value, client type (such as a wireless phone), or the priority value in the 802.1q or 802.1p tag.
•They do not match packets using ACL; they use only MQC class-map for matching clauses.
•They do not construct internal DSCP values; they only support mapping by assigning IP DSCP, Precedence, or Protocol values to Layer 2 COS values.
•They carry out EDCF like queuing on the radio egress port only.
•They do only FIFO queueing on the Ethernet egress port.
•They support only 802.1Q/P tagged packets. access point/bridges do not support ISL.
•They support only MQC policy-map set cos action.
Impact of QoS on a Wireless LAN
Wireless LAN QoS features are a subset of the proposed 802.11e draft. QoS on wireless LANs provides prioritization of traffic from the access point/bridge over the WLAN based on traffic classification.
Just as in other media, you might not notice the effects of QoS on a lightly loaded wireless LAN. The benefits of QoS become more obvious as the load on the wireless LAN increases, keeping the latency, jitter, and loss for selected traffic types within an acceptable range.
QoS on the wireless LAN focuses on downstream prioritization from the access point/bridge. These are the effects of QoS on access point/bridge traffic:
•The radio downstream flow is traffic transmitted out the access point/bridge radio to another access point/bridge. This traffic is the main focus for QoS on a wireless LAN.
•The Ethernet downstream flow is traffic sent from a switch or a router to the Ethernet port on the access point/bridge. If QoS is enabled on the switch or router, the switch or router might prioritize and rate-limit traffic to the access point/bridge.
•The Ethernet upstream flow is traffic sent from the access point/bridge Ethernet port to a switch or router on the wired LAN. The access point/bridge does not prioritize traffic that it sends to the wired LAN based on traffic classification.
Precedence of QoS Settings
When you enable QoS, the access point/bridge queues packets based on the Layer 2 class of service value for each packet. The access point/bridge applies QoS policies in this order:
1. Packets already classified—When the access point/bridge receives packets from a QoS-enabled switch or router that has already classified the packets with non-zero 802.1Q/P user_priority values, the access point/bridge uses that classification and does not apply other QoS policy rules to the packets. An existing classification takes precedence over all other policies on the access point/bridge.
2. Policies you create on the access point/bridge—QoS Policies that you create and apply to VLANs or to the access point/bridge interfaces are second in precedence after previously classified packets.
3. Default classification for all packets on VLAN—If you set a default classification for all packets on a VLAN, that policy is third in the precedence list.
Note Because client devices cannot associate to the access point/bridge, the QoS element for wireless phones setting is not supported on the access point/bridge.
Configuring QoS
QoS is disabled by default. This section describes how to configure QoS on your access point/bridge. It contains this configuration information:
•Configuring QoS Using the Web-Browser Interface
•Adjusting Radio Access Category Definitions
Configuration Guidelines
Before configuring QoS on your access point/bridge, you should be aware of this information:
•The most important guideline in QoS deployment is to be familiar with the traffic on your wireless LAN. If you know the applications used by wireless client devices, the applications' sensitivity to delay, and the amount of traffic associated with the applications, you can configure QoS to improve performance.
•QoS does not create additional bandwidth for your wireless LAN; it helps control the allocation of bandwidth. If you have plenty of bandwidth on your wireless LAN, you might not need to configure QoS.
Configuring QoS Using the Web-Browser Interface
This section describes configuring QoS using the web-browser interface.
For a list of IOS commands for configuring QoS using the CLI, consult the Cisco IOS Command Reference for Cisco Aironet Access Points and Bridges. Follow these steps to browse to the command reference:
1. Click this link to browse to the Cisco Support page:
http://www.cisco.com/cisco/web/support/index.html
2. Follow this path to the product, document, and chapter:
Products & Solutions > Wireless > All Wireless Products > Cisco Aironet 1300 Series > Technical Documentation > Command References > Cisco IOS Command Reference for Cisco Aironet Access Points and Bridges, 12.x(xx)JAFollow these steps to configure QoS:
Step 1 If you use VLANs on your wireless LAN, make sure the necessary VLAN is configured on your access point/bridge before configuring QoS.
Step 2 Click Services in the task menu on the left side of any page in the web-browser interface. When the list of Services expands, click QoS. The QoS Policies page appears. Figure 14-1 shows the QoS Policies page.
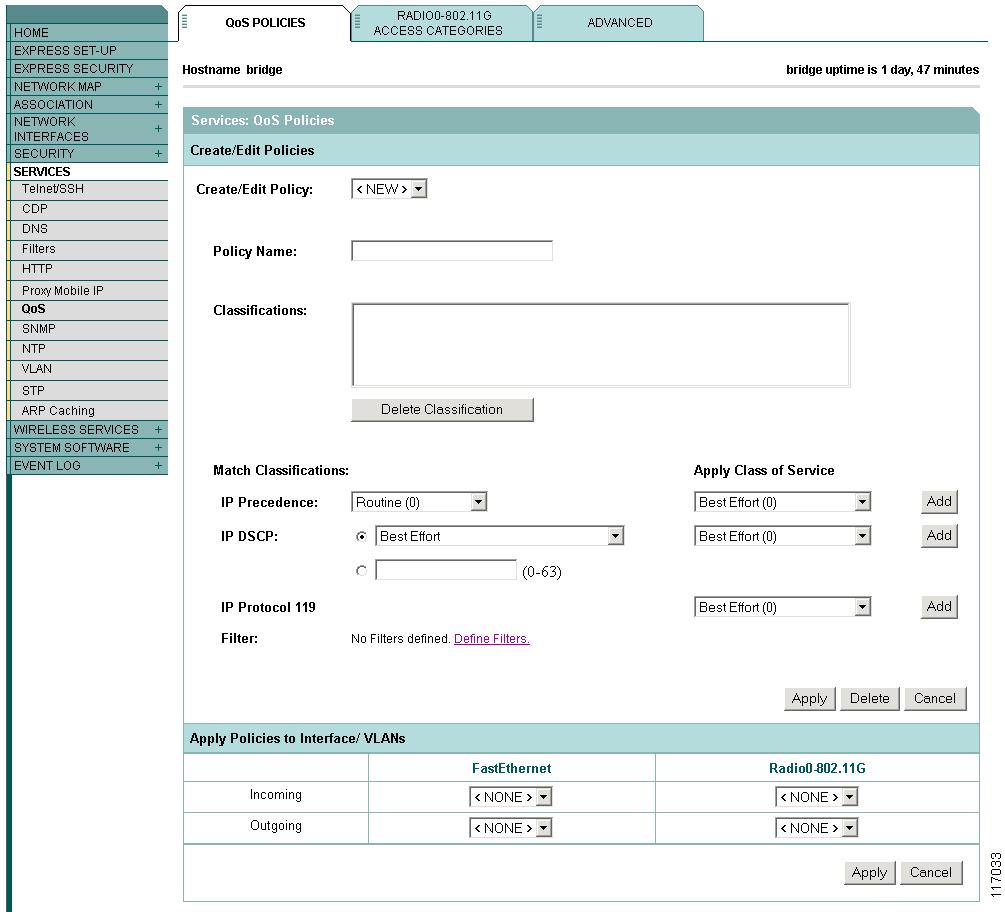
Figure 14-1 QoS Policies Page
Step 3 With <NEW> selected in the Create/Edit Policy field, type a name for the QoS policy in the Policy Name entry field. The name can contain up to 25 alphanumeric characters. Do not include spaces in the policy name.
Step 4 If the packets that you need to prioritize contain IP precedence information in the IP header TOS field, select an IP precedence classification from the IP Precedence drop-down menu. Menu selections include:
•Routine (0)
•Priority (1)
•Immediate (2)
•Flash (3)
•Flash Override (4)
•Critic/CCP (5)
•Internet Control (6)
•Network Control (7)
Step 5 Use the Apply Class of Service drop-down menu to select the class of service that the access point/bridge will apply to packets of the type that you selected from the IP Precedence menu. The access point/bridge matches your IP Precedence selection with your class of service selection. Settings in the Apply Class of Service menu include:
•Best Effort (0)
•Background (1)
•Spare (2)
•Excellent (3)
•Control Lead (4)
•Video <100ms Latency (5)
•Voice <10ms Latency (6)
•Network Control (7)
Step 6 Click the Add button beside the Class of Service menu for IP Precedence. The classification appears in the Classifications field. To delete a classification, select it and click the Delete button beside the Classifications field.
Step 7 If the packets that you need to prioritize contain IP DSCP precedence information in the IP header TOS field, select an IP DSCP classification from the IP DSCP drop-down menu. Menu selections include:
•Best Effort
•Assured Forwarding — Class 1 Low
•Assured Forwarding — Class 1 Medium
•Assured Forwarding — Class 1 High
•Assured Forwarding — Class 2 Low
•Assured Forwarding — Class 2 Medium
•Assured Forwarding — Class 2 High
•Assured Forwarding — Class 3 Low
•Assured Forwarding — Class 3 Medium
•Assured Forwarding — Class 3 High
•Assured Forwarding — Class 4 Low
•Assured Forwarding — Class 4 Medium
•Assured Forwarding — Class 4 High
•Class Selector 1
•Class Selector 2
•Class Selector 3
•Class Selector 4
•Class Selector 5
•Class Selector 6
•Class Selector 7
•Expedited Forwarding
Step 8 Use the Apply Class of Service drop-down menu to select the class of service that the access point/bridge will apply to packets of the type that you selected from the IP DSCP menu. The access point/bridge matches your IP DSCP selection with your class of service selection.
Step 9 Click the Add button beside the Class of Service menu for IP DSCP. The classification appears in the Classifications field.
Step 10 If you need to assign a priority to filtered packets, use the Filter drop-down menu to select a Filter to include in the policy. (If no filters are defined on the access point/bridge, a link to the Apply Filters page appears instead of the Filter drop-down menu.) For example, you could assign a high priority to a MAC address filter that includes the MAC addresses of IP phones.
Note The access list you use in QoS does not affect the access point/bridge's packet forwarding decisions.
Step 11 Use the Apply Class of Service drop-down menu to select the class of service that the access point/bridge will apply to packets that match the filter that you selected from the Filter menu. The access point/bridge matches your filter selection with your class of service selection.
Step 12 Click the Add button beside the Class of Service menu for Filter. The classification appears in the Classifications field.
Step 13 If you want to set a default classification for all packets on a VLAN, use the Apply Class of Service drop-down menu to select the class of service that the access point/bridge will apply to all packets on a VLAN. The access point/bridge matches all packets with your class of service selection.
Step 14 Click the Add button beside the Class of Service menu for Default classification for packets on the VLAN. The classification appears in the Classifications field.
Step 15 When you finish adding classifications to the policy, click the Apply button under the Apply Class of Service drop-down menus. To cancel the policy and reset all fields to defaults, click the Cancel button under the Apply Class of Service drop-down menus. To delete the entire policy, click the Delete button under the Apply Class of Service drop-down menus.
Step 16 Use the Apply Policies to Interface/VLANs drop-down menus to apply policies to the access point/bridge Ethernet and radio ports. If VLANs are configured on the access point/bridge, drop-down menus for each VLAN's virtual ports appear in this section. If VLANs are not configured on the access point/bridge, drop-down menus for each interface appear.
Step 17 Click the Apply button at the bottom of the page to apply the policies to the access point/bridge ports.
Adjusting Radio Access Category Definitions
The access point/bridge uses the radio access category definitions to calculate backoff times for each packet. As a rule, high-priority packets have short backoff times.
The default values in the Min and Max Contention Window fields and in the Slot Time fields are based on settings recommended in IEEE Draft Standard 802.11e. For detailed information on these values, consult that standard.
We strongly recommend that you use the default settings on the Radio Traffic Access Categories page, or that you use the settings described in section x. Changing these values can lead to unexpected blockages of traffic on your wireless LAN, and the blockages might be difficult to diagnose. If you change these values and find that you need to reset them to defaults, use the default settings listed in Table 14-1.
The values listed in Table 14-1 are to the power of 2. The access point/bridge computes Contention Window values with this equation:
CW = 2 ** X minus 1
where X is the value from Table 14-1.
Figure 14-2 shows the Radio 802.11G Access Categories page.
Figure 14-2 Radio 802.11G Access Categories Page
CW-min and CW-max Settings for Point-to-Point and Point-to-Multipoint Bridge Links
For best performance on your bridge links, adjust the CW-min and CW-max contention window settings according to the values listed in Table 14-2. The default settings, CW-min 3 and CW-max 10, are best for point-to-point links. However, for point-to-multipoint links, you should adjust the settings depending on the number of non-root bridges that associate to the root bridge.
Note If packet concatenation is enabled, you need to adjust the CW-min and CW-max settings only for traffic class 0. Concatenation is enabled by default.
Beginning in privileged EXEC mode, follow these steps to adjust the CW-min and CW-max settings:
Command PurposeStep 1
configure terminal
Enter global configuration mode.
Step 2
interface dot11radio 0
Enter interface configuration mode for the radio interface.
Step 3
traffic class { cw-min number }
{ cw-max number }
{ fixed-slot number }Assign CW-min, CW-max, and fixed-slot settings to a traffic class. Use the values in Table 14-2 to enter settings that provide the best performance for your network configuration.
Note If packet concatenation is enabled, you need to adjust the CW-min and CW-max settings only for traffic class 0. Concatenation is enabled by default.
Step 4
end
Return to privileged EXEC mode.
Step 5
copy running-config startup-config
(Optional) Save your entries in the configuration file.
Use the no form of the command to reset the setting to defaults.
QoS Configuration Examples
These sections describe two common uses for QoS:
•Giving Priority to Voice Traffic
•Giving Priority to Video Traffic
Giving Priority to Voice Traffic
This section demonstrates how you can apply a QoS policy to your wireless network's voice VLAN to give priority to wireless phone traffic.
In this example, the network administrator creates a policy named voice_policy that applies voice class of service to traffic from Spectralink phones (protocol 119 packets). The user applies the voice_policy to the incoming and outgoing radio ports and to the outgoing Ethernet port for VLAN 77. Figure 14-3 shows the administrator's QoS Policies page.
Figure 14-3 QoS Policies Page for Voice Example
Giving Priority to Video Traffic
This section demonstrates how you could apply a QoS policy to a VLAN on your network dedicated to video traffic.
In this example, the network administrator creates a policy named video_policy that applies video class of service to video traffic. The user applies the video_policy to the incoming and outgoing radio ports and to the outgoing Ethernet port for VLAN 87. Figure 14-4 shows the administrator's QoS Policies page.
Figure 14-4 QoS Policies Page for Video Example