-
null
Bias-Free Language
The documentation set for this product strives to use bias-free language. For the purposes of this documentation set, bias-free is defined as language that does not imply discrimination based on age, disability, gender, racial identity, ethnic identity, sexual orientation, socioeconomic status, and intersectionality. Exceptions may be present in the documentation due to language that is hardcoded in the user interfaces of the product software, language used based on RFP documentation, or language that is used by a referenced third-party product. Learn more about how Cisco is using Inclusive Language.
Chapter: Configuring Access Point Groups
Configuring Access Point Groups
Finding Feature Information
Your software release may not support all the features documented in this module. For the latest feature information and caveats, see the release notes for your platform and software release. To find information about the features documented in this module, and to see a list of the releases in which each feature is supported, see the Feature Information Table at the end of this document.
Use Cisco Feature Navigator to find information about platform support and Cisco software image support. To access Cisco Feature Navigator, go to http://www.cisco.com/go/cfn. An account on Cisco.com is not required.
Prerequisites for Configuring AP Groups
- The required access control list (ACL) must be defined on the router that serves the VLAN or subnet.
- Multicast traffic is supported with access point group VLANs. However, if the client roams from one access point to another, the client might stop receiving multicast traffic, unless IGMP snooping is enabled.
Restrictions for Configuring Access Point Groups
- Suppose that the interface mapping for a WLAN in the AP group table is the same as the WLAN interface. If the WLAN interface is changed, the interface mapping for the WLAN in the AP group table also changes to the new WLAN interface. Suppose that the interface mapping for a WLAN in the AP group table is different from the one defined for the WLAN. If the WLAN interface is changed, then the interface mapping for the WLAN in the AP group table does not change to the new WLAN interface.
- If you clear the configuration on the switch, all of the access point groups disappear except for the default access point group “default-group,” which is created automatically.
- The default access point group can have up to 16 WLANs associated with it. The WLAN IDs for the default access point group must be less than or equal to 16. If a WLAN with an ID greater than 16 is created in the default access point group, the WLAN SSID will not be broadcasted. All WLAN IDs in the default access point group must have an ID that is less than or equal to 16. WLANs with IDs greater than 16 can be assigned to custom access point groups.
Information About Access Point Groups
After you create up to 512 WLANs on the switch, you can selectively publish them (using access point groups) to different access points to better manage your wireless network. In a typical deployment, all users on a WLAN are mapped to a single interface on the switch. Therefore, all users that are associated with that WLAN are on the same subnet or VLAN. However, you can choose to distribute the load among several interfaces or to a group of users based on specific criteria such as individual departments (such as Marketing) by creating access point groups. Additionally, these access point groups can be configured in separate VLANs to simplify network administration.
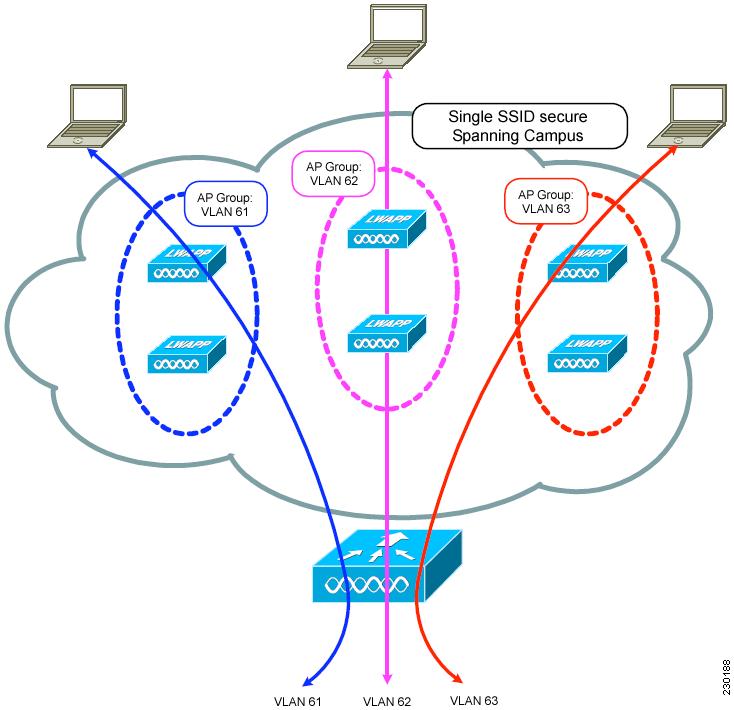
In the figure, three configured dynamic interfaces are mapped to three different VLANs (VLAN 61, VLAN 62, and VLAN 63). Three access point groups are defined, and each is a member of a different VLAN, but all are members of the same SSID. A client within the wireless SSID is assigned an IP address from the VLAN subnet on which its access point is a member. For example, any user that associates with an access point that is a member of access point group VLAN 61 is assigned an IP address from that subnet.
In the figure, the switch internally treats roaming between access points as a Layer 3 roaming event. In this way, WLAN clients maintain their original IP addresses.
After all access points have joined the switch, you can create access point groups and assign up to 16 WLANs to each group. Each access point advertises only the enabled WLANs that belong to its access point group. The access point does not advertise disabled WLANs in its access point group or WLANs that belong to another group.
How to Configure Access Point Groups
Creating Access Point Groups
You must have administrator privileges to perform this operation.
1. configure terminal
2. ap group ap-group-name
3. wlan wlan-name
4. (Optional) vlan vlan-name
5. end
DETAILED STEPS
This example shows how to create an AP group:
Switch# configure terminal
Switch(config-apgroup)# ap group test-ap-group-16
Switch(config-wlan-apgroup)# wlan test-ap-group-16
Switch(config-wlan-apgroup)# vlan VLAN1300
Assigning an Access Point to an AP Group
You must have administrator privileges to perform this operation.
1. ap name ap-name ap-group-name ap-group
DETAILED STEPS
Viewing Access Point Group
You must have administrator privileges to perform this operation.
1. show ap groups [extended ]
DETAILED STEPS
Additional References
Related Documents
| Related Topic | Document Title |
|---|---|
| WLAN commands | WLAN Command Reference, Cisco IOS XE Release 3SE (Catalyst 3850 Switches) |
| Lightweight Access Point configuration | Lightweight Access Point Configuration Guide, Cisco IOS XE Release 3SE (Catalyst 3850 Switches) |
| Lightweight Access Point commands | Lightweight Access Point Command Reference, Cisco IOS XE Release 3SE (Catalyst 3850 Switches) |
Error Message Decoder
| Description | Link |
|---|---|
| To help you research and resolve system error messages in this release, use the Error Message Decoder tool. |
https://www.cisco.com/cgi-bin/Support/Errordecoder/index.cgi |
MIBs
| MIB | MIBs Link |
|---|---|
| All supported MIBs for this release. | To locate and download MIBs for selected platforms, Cisco IOS releases, and feature sets, use Cisco MIB Locator found at the following URL: |
Technical Assistance
| Description | Link |
|---|---|
| The Cisco Support website provides extensive online resources, including documentation and tools for troubleshooting and resolving technical issues with Cisco products and technologies. To receive security and technical information about your products, you can subscribe to various services, such as the Product Alert Tool (accessed from Field Notices), the Cisco Technical Services Newsletter, and Really Simple Syndication (RSS) Feeds. Access to most tools on the Cisco Support website requires a Cisco.com user ID and password. |
Feature History and Information for Access Point Groups
This table lists the features in this modules and provides links to specific configuration information.
| Feature Name | Release | Feature Information |
|---|---|---|
| AP Groups | Cisco IOS XE 3.2SE | This feature was introduced. |
 Feedback