Overview
This installation guide contains the latest information about installing the Cisco Industrial Network Director (IND) application on a Microsoft Windows Operating System (OS) and details accessing the application after installation.
System Requirements
The following table shows the system requirements to run IND.
|
Desktop Requirements |
Minimum Requirement |
||
|---|---|---|---|
|
Windows Operating System (OS) |
Windows 10 Windows Server Support:
|
||
|
Browser |
Chrome: Version 50.0.2661.75 or 53.0.2785.116 Firefox: 55.0.3, 57.0.4, 63.0.3 or above |
||
|
RAM |
8 GB |
||
|
CPU |
Quad-Core 1.8 GHz |
||
|
Storage |
50 GB |
Before You Begin
Before a new installation or an upgrade of IND software:
Procedure
|
Step 1 |
Make sure you use the same user account for installation and upgrade. |
|
Step 2 |
Ensure that the computer name is not set to more than 15 characters as recommended for Windows. |
|
Step 3 |
Make sure you do not manually abrupt the rollback process in the middle of its execution. Such action could leave the system in an inconsistent state. |
|
Step 4 |
Make sure that your password policy permits the initial password that will be set for postgres user. The password pattern will be: Ind$<16 digit alpha numeric characters ><computer name> |
|
Step 5 |
Make sure the postgres Windows user account created by the installer is not denied “Log on as a service” privilege by your administrator. To verify that the postrgres Windows user account has not been denied, “Log on as a service” privilege, open Local Security Policy and open Local Security Settings\Local Policies\User Rights Assignment and confirm that the postgres user or Users group is not added to the: “Deny log on as a service” list. |
Before You Install the IND Software Package
Before you install the IND software package:
-
Ensure that the Windows services management console is closed.
-
Close any command prompt, notepad or application with any open IND file and folder.
-
Ensure that the Windows machine on which the IND software is installed does not get powered-off abruptly. An abrupt loss of power to the Windows machine might lead to loss of files required for IND to function and require IND to be re-installed. As a precaution, schedule periodic backup tasks after you install IND, so that the data can be restored, should a new installation of IND be required.
 Note |
Refer to the Settings > Backup section of Dashboard Help in IND after installation successfully completes to get details on how to schedule periodic upgrade backup tasks. |
Additionally, refer to the Restore Database Backup section of this document on how to restore an earlier IND backup.
-
Make sure that the postgres Windows user account created by the installer is not denied the “Log on as a service” privilege by your administrator.
-
No other FTP server is running and listening on port 21.
-
No other instance of PostgreSQL is installed on port 5432 or any other port on the system.
-
The host name of the Windows machine must start with a letter of the alphabet (A-Z or a-z). You may use special characters within your password such as (0-9), a minus sign (-) and period (.) as well as alpha characters.
The following ports are open for inbound traffic on the firewall:
TCP ports:
-
21 - FTP active port for ODM file transfer in regular mode
-
8088 - HTTP for PnP
-
8443 - HTTPs for Web UI and PnP
-
50000-50050 - FTP passive ports for ODM file transfer in regular mode
UDP port:
-
30162 - SNMP traps
The following ports are open for outbound traffic on the firewall:
TCP ports:
-
443 - HTTPS for WSMA/JSON-RPC in secure node
-
80 - HTTP for WSMA/JSON-RPC in regular mode
-
22 - SSH/SCP in secure mode
-
23 - Telnet in regular mode
-
44818 - CIP
-
102 - PROFINET
-
502 - ModBus
-
4840 - OPC -UA
-
139 - NetBios TCP/IP
-
1812 - RADIUS
UDP ports:
-
161 - SNMP
-
67 - DHCP server if the IND PnP DHCP helper is being used
-
2222 - CIP
-
34964 - PROFINET
-
4840 - OPC-UA
The following ports are open for both inbound and outbound traffic on the firewall:
TCP ports:
-
8910 - HTTPs for pxGrid
-
47808 - BacNet
Note |
The above listed ports are default ports. If any of the above ports are customized as part of the installation or in the access profile, then the corresponding ports should be open in the firewall. |
-
The Windows services management console is closed.
-
Close any command prompt, notepad or application with any open IND file and folder.
When You Employ PnP in Your Network
PnP requires that you start and run an NTP server in the network either on a separate Windows server or on the laptop or desktop where IND is installed.
-
When you run the NTP server on a separate Windows server in the network (distinct from the IND server), ensure that the NTP service is up and running at all times.
-
When running an IE1000 switch in your network, you must also add the NTP server IP address in the DHCP Option 43 field to be able to support PnP.
-
When you run the NTP server on the IND server (laptop or desktop), perform the following steps to start Windows Time Service and ensure that it is running all the time:
-
Go to the Start button and click on Search program and files.
-
Type services.msc.
-
Locate Windows Time, observe the current status and open to make changes.
-
Set the Startup type to Automatic.
-
New Installation
Please review all content in this section before installing the IND application.
IND 1.11.0 supports English, French, German, Japanese and Spanish-Latin America languages within the Cisco Industrial Network Director user interface.
IND 1.11.1 supports English within the Cisco Industrial Network Director user interface.
IND 1.11.2 supports English, French, German, Japanese and Spanish-Latin America languages within the Cisco Industrial Network Director user interface.
IND 1.11.2 supports English, French, German, Japanese and Spanish-Latin America languages within the Cisco Industrial Network Director user interface.
IND 1.11.3 supports English, French, German, Japanese and Spanish-Latin America languages within the Cisco Industrial Network Director user interface.
Procedure
|
Step 1 |
Download the Cisco Industrial Network Director (IND) software package from Cisco.com to your system from the Cisco Download Software page: https://software.cisco.com/download/navigator by following the path below to IND software:Products > Cloud and Systems Management > IoT Management and Automation > Cisco Industrial Network Director |
||||
|
Step 2 |
Click the Downloads link (or downward arrow that appears) to download the IND installer file: (for example, ind-1.11.x-xxx.installer.exe). |
||||
|
Step 3 |
Double-click the downloaded installer file (for example ind-1.11.x-xxx.installer.exe ) and click on Yes for User Account control prompt to allow the installer.exe to install on your system. |
||||
|
Step 4 |
At the Language Selection window that appears, the Language option is selected by default. Select your desired language, if it differs from the default language and click OK. |
||||
|
Step 5 |
At the Setup Wizard screen that appears, click Next. |
||||
|
Step 6 |
At the License Agreement screen, click the I accept the agreement radio button, and then click Next. |
||||
|
Step 7 |
At the Installation Directory screen, click Next to confirm the destination directory. You may specify your own directory or accept the default directory defined in the install script.
|
||||
|
Step 8 |
After you select the directory, the next screen allows you to customize the install to adapt to available memory resources, if necessary. There are two options: Regular Profile (default) and Micro Profile (for a low memory system).
See the following example: 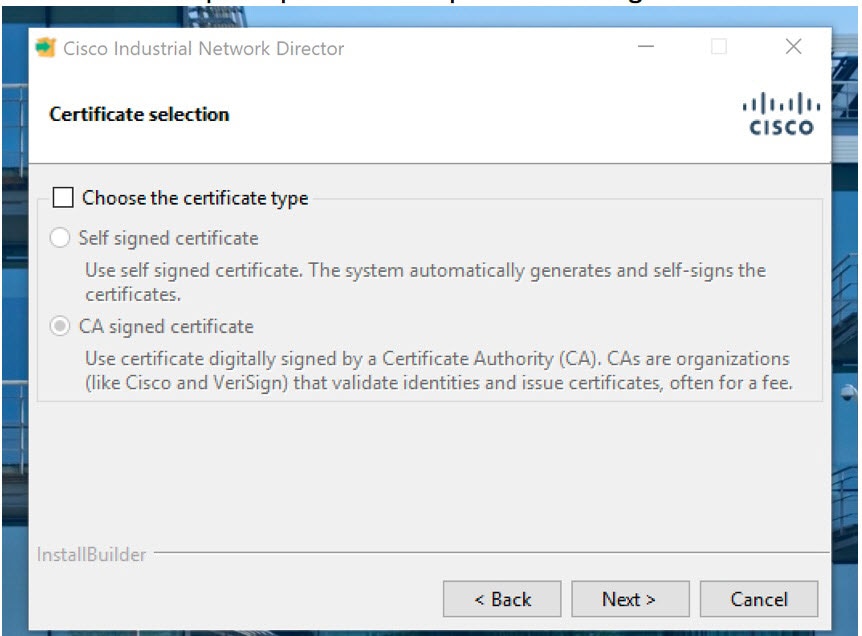
To select the CA certificate option, select the box next to that option. Then select one of the Certificate types (PKCS or PEM format). A screen specific to the selected certificate appears. PKCS12/PFX File Format:
PEM/CER/DER File Format:
|
||||
|
Step 9 |
Click Next to complete the Certification selection. |
||||
|
Step 10 |
Once you have selected the Self-signed option, click Next and the installation will proceed. |
||||
|
Step 11 |
At the Ready to Install screen, click Next to begin installation of the IND application on your system.
The installer detects for port 8088 as well. If the installer detects that the port is already is in use, a pop-up window appears asking you to re-enter a new available port value. During IND installation, a postgres file is installed. If the IND installation process attempts to overwrite an existing third-party postgres file, a popup window appears alerting you to the conflict. Additionally, you are instructed to remove that existing postgres file to allow the IND installation to continue. During IND installation, an indeterminate progress popup displays until all IND Services initialize and are ready and accessible. Please wait for the initialization progress popup to complete. Depending on your PC configuration, IND Services may take up to 8 minutes to initialize.
Be sure to capture this information before you select Finish and exit the screen. |
Upgrade an Existing IND Application
To upgrade to IND 1.11.0 from IND 1.10.0 or to upgrade from 1.11.0 to 1.11.x, do the following:
Procedure
|
Step 1 |
Download the Cisco Industrial Network Director (IND) software package from Cisco.com to your system from the Cisco Download Software page: https://software.cisco.com/download/homeby following the path below to IND software: Products > Cloud and Systems Management > IoT Management and Automation > Industrial Network Director. Select the required 11.11.x software release the Industrial Network Director software page. |
||||||
|
Step 2 |
Click the download link for the required 1.11.x software release to download the IND installer file: (for example ind-1.11.0-xxx-installer.exe). |
||||||
|
Step 3 |
Double-click the downloaded installer file (for example ind-11.0-xxx.installer.exe) and click Yes for User Account control prompt to allow the installer.exe to install on your system. |
||||||
|
Step 4 |
At the Language Selection window that appears, a default language appears in the drop-down menu. The default language will be the same language that you selected at the original install. Click OK. |
||||||
|
Step 5 |
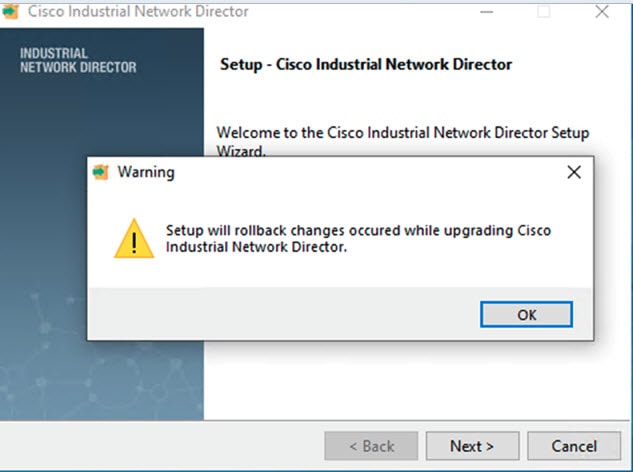
A pop up window appears, asking you to confirm that you want to upgrade your current IND application to a new version.
|
||||||
|
Step 6 |
At the Setup Wizard screen that appears, click Next. |
||||||
|
Step 7 |
At the License Agreement page, click the I accept the agreement radio button; and, then click Next. |
||||||
|
Step 8 |
At the Ready to Install screen, click Next to begin installation of the IND application on your system or for upgrades you can choose the Customize option with an option for system profile selection. After the upgrade, the same system profile you selected during the initial install will be applicable.
|
Canceling a New IND Installation or An Upgrade
-
A new installation or an upgrade will be automatically canceled if the installer encounters an error during installation.
-
When a new installation or an upgrade is canceled either automatically due to an error, the installer will automatically rollback the changes done, so that the system is brought back to the same state that it was at before a new installation or an upgrade was initiated. If the installation was canceled due to an error, the installer will display the error, before commencing the rollback.
Additional Notes About Stopping a New or Upgrade Installation
-
The installer must be allowed to complete the rollback without any interruption to avoid leaving the application in an inconsistent state.
-
After the rollback of an unsuccessful new installation, the installation directory and the services, if any were created, will be removed.
-
After the rollback of an unsuccessful upgrade, IND Services will restart and it may take up to 8 minutes to reinitialize depending on your PC configuration. The IND application can then be accessed using the same URL as before.
Uninstall an Existing IND Application
On your system, do the following:
-
From the Windows system, go to the Control Panel and choose Programs > Uninstall a Program > Programs and Features.
-
In the window that appears, double-click Cisco Industrial Network Director.
-
In the uninstall confirmation dialog box, click Yes. A window appears showing removal of the files. When the uninstall completes, a dialog box appears confirming completion.
Information About Removal of Old Postgres User Profile Folders
The installer will remove the postgres user profile folders, those that are no longer in use, after a new install, upgrade or uninstall. If the installer is unable to delete a particular folder due to it being locked by the OS process, it will be marked for deletion and will be deleted upon the next reboot of the system.
The default location of the postgres user profile folders is C:\Users.
Note |
The presence of these old postgres user profile folders will not impact the functionality of IND. |
Logging in to Cisco IND Application
IND is a server application and it can be accessed by any client machine that has connectivity to the system on which IND is installed.
Chrome and Firefox are supported browsers. See System Requirements.
Before You Begin
After an initial install or upgrade, a Setup complete screen displays a check box to launch Cisco Industrial Network Director. Click Finish to launch the IND Login URL using the default browser of the system on which IND is installed.
Procedure
|
Step 1 |
On the client machine, open your browser window. |
|
Step 2 |
Enter the URL <https://a.b.c.d:portNum> provided at the end of the IND install, where <a.b.c.d> is the IP address of the system where IND was installed. By default, portNum is 8443. If the 8443 value is not available during install, you can enter any available port number. |
|
Step 3 |
At the login window that appears, enter the initial Login and Password values provided at completion of the application install. 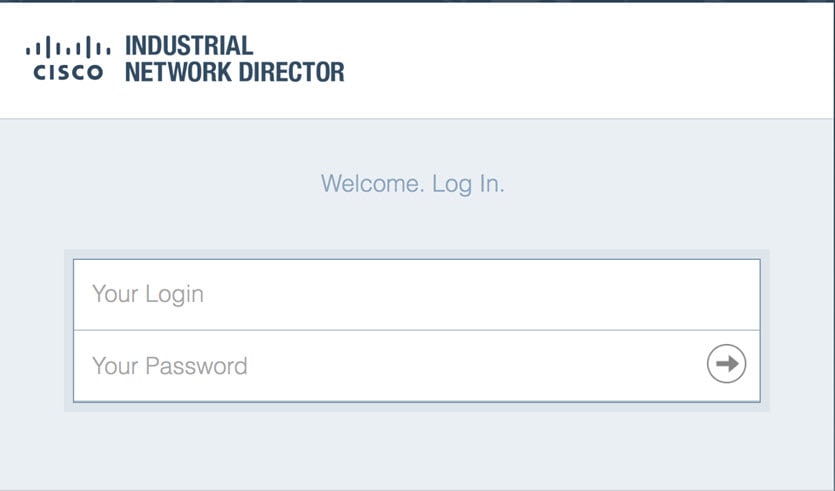
|
|
Step 4 |
Click the arrow in the Your Password field. A window appears requesting you to define a new password. |
|
Step 5 |
After you define a new password, the application automatically logs you out. You must reenter your login and password to reenter the application. |
|
Step 6 |
When IND opens, the Operate > Dashboard for the Groups Root page appears. There are four summary areas within that page: Alarms, Assets, Traffic Utilization, and Port Counts. 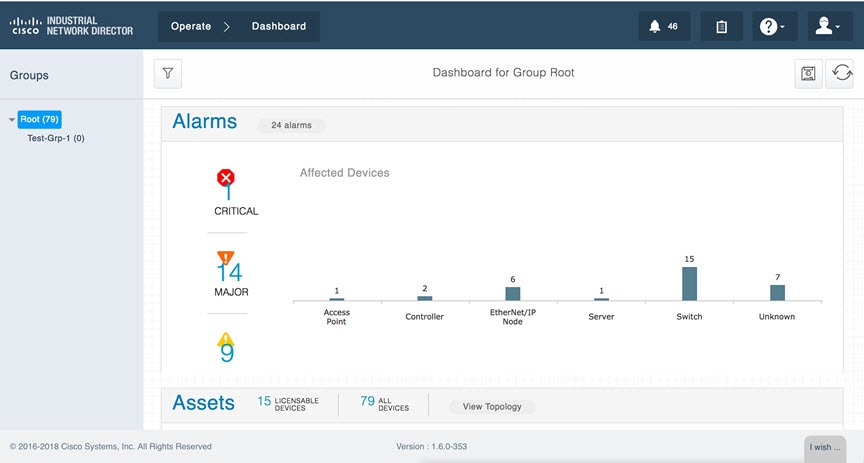 |
|
Step 7 |
To set up the system:
|
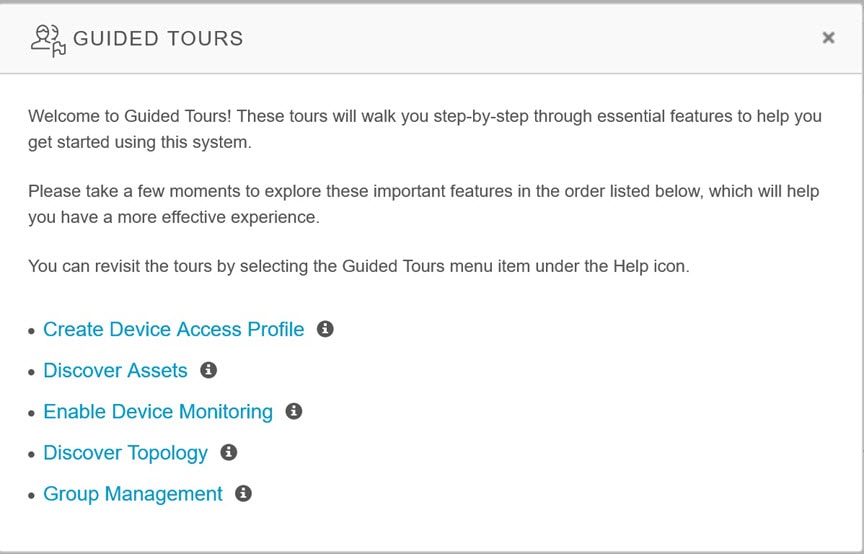
Accessing IND Online Help
Industrial Network Director has online documentation that you can access from the IND application itself.
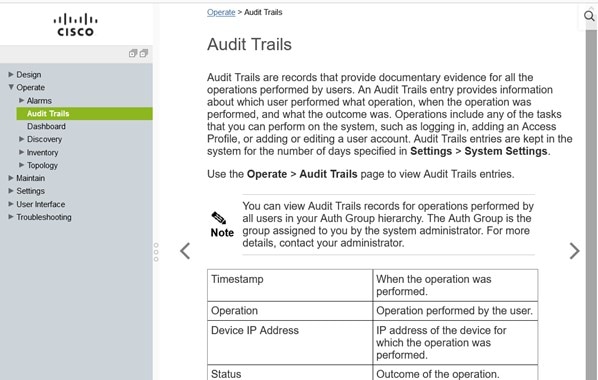
To access the online help, after you log in to IND, click on the ? icon in the top right of the IND window. IND displays the related online help topic for the IND page in a new window of your browser. For example, if you are on the Dashboard page, IND displays online help for the Dashboard page. If you are on the Audit Trails page, IND displays online help for Audit Trails, and so on.

You can use the navigation menu in the left pane of the online help window to navigate to other topics in the online help.
Supported Utilities
IND supports the following three utilities:
Reset System Admin Password
As a System Admin, you can reset the password when you are locked out of IND because you have either forgotten your credentials or your credentials have expired.
Before You Begin
To reset the System Admin password, you as System Admin must have administrative rights to the Windows location where the Cisco Industrial Network Director is installed:
C:\Program Files\Cisco\Cisco Industrial Network Director\bin <--- default location
Procedure
-
Run the ind-resetpassword.exe utility to reset the IND System Admin password.
-
In the password change dialog box that appears, click Next.
-
In the Reset System Admin Password dialog box that appears, enter your new password in both the Enter Password and Confirm Password fields. See the note below for password requirements. Click Next.
-
In the confirmation dialog box that appears to confirm password update, click Save to accept the password update.
Note |
For guidelines on creating IND passwords, click the i icon next to the New Password field. A dialog box with password requirements appears. |
Reset Database Password
During the install, the IND application automatically generates a random password, which is not accessible to the user.
If you need to access the database, you must reset the IND database password. Additionally, you must have administrative rights to the window in which the application runs.
To reset the database password:
Procedure
-
Run the ind-resetdatabasepassword.exe utility. A window appears asking you to confirm that you want to reset the database password.
-
To stop the reset of the database password, click No and close the window.
-
To continue with the database password reset, click Yes. A Reset Database Password utility window appears.
-
Click Next >. A window displays and prompts you to enter the new password and then confirm the entry.
-
Click Yes to continue the Restore Tool. To cancel the reset, click Cancel. Click No to stop the Restore activity.
Restore Database Backup
To restore an IND database from a previous IND backup, you must have administrative rights to the Windows location where the IND application is installed.
Procedure
-
Run the ind-restore.exe utility to restore an IND database from a previous IND database backup. A dialog box appears noting that when IND restarts, any date currently present on IND will be overwritten.
-
Click Yes to continue the Restore Tool. Click No to stop the Restore activity.
-
Enter the location of the Database Backup file in the Backup File dialog box that appears. Click Next.
The following validations will be done on the file path that you provide for the Backup File:
-
Does the file path exist and is it a valid IND backup file?
-
Is the backup compatible with the IND version running currently?
A backup is considered incompatible if the IND version currently running supports a greater number of PIDs than the last backup version.
Once all validations complete, data from the backup will be restored to the database and IND will restart.
 Feedback