- New and Changed Information
- Overview
- Configuring Authentication, Authorization, and Accounting
- Configuring RADIUS
- Configuring TACACS+
- Configuring SSH and Telnet
- Configuring PKI
- Configuring Access Control Lists
- Configuring DHCP Snooping
- Configuring Dynamic ARP Inspection
- Configuring Unicast RPF
- Configuring Control Plane Policing
- Index
Cisco Nexus 3000 Series NX-OS Security Configuration Guide, Release 6.x
Bias-Free Language
The documentation set for this product strives to use bias-free language. For the purposes of this documentation set, bias-free is defined as language that does not imply discrimination based on age, disability, gender, racial identity, ethnic identity, sexual orientation, socioeconomic status, and intersectionality. Exceptions may be present in the documentation due to language that is hardcoded in the user interfaces of the product software, language used based on RFP documentation, or language that is used by a referenced third-party product. Learn more about how Cisco is using Inclusive Language.
- Updated:
- September 17, 2014
Chapter: Configuring PKI
- Information About PKI
- CAs and Digital Certificates
- Trust Model, Trust Points, and Identity CAs
- RSA Key Pairs and Identity Certificates
- Multiple Trusted CA Support
- PKI Enrollment Support
- Manual Enrollment Using Cut-and-Paste
- Multiple RSA Key Pair and Identity CA Support
- Peer Certificate Verification
- Certificate Revocation Checking
- Import and Export Support for Certificates and Associated Key Pairs
- Licensing Requirements for PKI
- Guidelines and Limitations for PKI
- Default Settings for PKI
- Configuring CAs and Digital Certificates
- Configuring the Hostname and IP Domain Name
- Generating an RSA Key Pair
- Creating a Trust Point CA Association
- Authenticating the CA
- Configuring Certificate Revocation Checking Methods
- Generating Certificate Requests
- Installing Identity Certificates
- Ensuring Trust Point Configurations Persist Across Reboots
- Exporting Identity Information in PKCS 12 Format
- Importing Identity Information in PKCS 12 Format
- Configuring a CRL
- Deleting Certificates from the CA Configuration
- Deleting RSA Key Pairs from a Cisco NX-OS Device
- Verifying the PKI Configuration
- Configuration Examples for PKI
Configuring PKI
This chapter contains the following sections:
- Information About PKI
- Licensing Requirements for PKI
- Guidelines and Limitations for PKI
- Default Settings for PKI
- Configuring CAs and Digital Certificates
- Verifying the PKI Configuration
- Configuration Examples for PKI
Information About PKI
This section provides information about PKI.
- CAs and Digital Certificates
- Trust Model, Trust Points, and Identity CAs
- RSA Key Pairs and Identity Certificates
- Multiple Trusted CA Support
- PKI Enrollment Support
- Manual Enrollment Using Cut-and-Paste
- Multiple RSA Key Pair and Identity CA Support
- Peer Certificate Verification
- Certificate Revocation Checking
- Import and Export Support for Certificates and Associated Key Pairs
CAs and Digital Certificates
Certificate authorities (CAs) manage certificate requests and issue certificates to participating entities such as hosts, network devices, or users. The CAs provide centralized key management for the participating entities.
Digital signatures, based on public key cryptography, digitally authenticate devices and individual users. In public key cryptography, such as the RSA encryption system, each device or user has a key pair that contains both a private key and a public key. The private key is kept secret and is known only to the owning device or user only. However, the public key is known to everybody. Anything encrypted with one of the keys can be decrypted with the other. A signature is formed when data is encrypted with a sender’s private key. The receiver verifies the signature by decrypting the message with the sender’s public key. This process relies on the receiver having a copy of the sender’s public key and knowing with a high degree of certainty that it really does belong to the sender and not to someone pretending to be the sender.
Digital certificates link the digital signature to the sender. A digital certificate contains information to identify a user or device, such as the name, serial number, company, department, or IP address. It also contains a copy of the entity’s public key. The CA that signs the certificate is a third party that the receiver explicitly trusts to validate identities and to create digital certificates.
To validate the signature of the CA, the receiver must first know the CA’s public key. Typically, this process is handled out of band or through an operation done at installation. For instance, most web browsers are configured with the public keys of several CAs by default.
Trust Model, Trust Points, and Identity CAs
The PKI trust model is hierarchical with multiple configurable trusted CAs. You can configure each participating device with a list of trusted CAs so that a peer certificate obtained during the security protocol exchanges can be authenticated if it was issued by one of the locally trusted CAs. The Cisco NX-OS software locally stores the self-signed root certificate of the trusted CA (or certificate chain for a subordinate CA). The process of securely obtaining a trusted CA’s root certificate (or the entire chain in the case of a subordinate CA) and storing it locally is called CA authentication.
The information about a trusted CA that you have configured is called the trust point and the CA itself is called a trust point CA. This information consists of a CA certificate (or certificate chain in case of a subordinate CA) and certificate revocation checking information.
The Cisco NX-OS device can also enroll with a trust point to obtain an identity certificate to associate with a key pair. This trust point is called an identity CA.
RSA Key Pairs and Identity Certificates
You can obtain an identity certificate by generating one or more RSA key pairs and associating each RSA key pair with a trust point CA where the Cisco NX-OS device intends to enroll. The Cisco NX-OS device needs only one identity per CA, which consists of one key pair and one identity certificate per CA.
The Cisco NX-OS software allows you to generate RSA key pairs with a configurable key size (or modulus). The default key size is 512. You can also configure an RSA key-pair label. The default key label is the device fully qualified domain name (FQDN).
The following list summarizes the relationship between trust points, RSA key pairs, and identity certificates:
-
A trust point corresponds to a specific CA that the Cisco NX-OS device trusts for peer certificate verification for any application (such as SSH).
-
A Cisco NX-OS device can have many trust points and all applications on the device can trust a peer certificate issued by any of the trust point CAs.
-
A trust point is not restricted to a specific application.
-
A Cisco NX-OS device enrolls with the CA that corresponds to the trust point to obtain an identity certificate. You can enroll your device with multiple trust points which means that you can obtain a separate identity certificate from each trust point. The identity certificates are used by applications depending upon the purposes specified in the certificate by the issuing CA. The purpose of a certificate is stored in the certificate as a certificate extension.
-
When enrolling with a trust point, you must specify an RSA key pair to be certified. This key pair must be generated and associated to the trust point before generating the enrollment request. The association between the trust point, key pair, and identity certificate is valid until it is explicitly removed by deleting the certificate, key pair, or trust point.
-
The subject name in the identity certificate is the fully qualified domain name for the Cisco NX-OS device.
-
You can generate one or more RSA key pairs on a device and each can be associated to one or more trust points. But no more than one key pair can be associated to a trust point, which means only one identity certificate is allowed from a CA.
-
If the Cisco NX-OS device obtains multiple identity certificates (each from a distinct CA), the certificate that an application selects to use in a security protocol exchange with a peer is application specific.
-
You do not need to designate one or more trust points for an application. Any application can use any certificate issued by any trust point as long as the certificate purpose satisfies the application requirements.
-
You do not need more than one identity certificate from a trust point or more than one key pair to be associated to a trust point. A CA certifies a given identity (or name) only once and does not issue multiple certificates with the same name. If you need more than one identity certificate for a CA and if the CA allows multiple certificates with the same names, you must define another trust point for the same CA, associate another key pair to it, and have it certified.
Multiple Trusted CA Support
The Cisco NX-OS device can trust multiple CAs by configuring multiple trust points and associating each with a distinct CA. With multiple trusted CAs, you do not have to enroll a device with the specific CA that issued the certificate to a peer. Instead, you can configure the device with multiple trusted CAs that the peer trusts. The Cisco NX-OS device can then use a configured trusted CA to verify certificates received from a peer that were not issued by the same CA defined in the identity of the peer device.
PKI Enrollment Support
Enrollment is the process of obtaining an identity certificate for the device that is used for applications like SSH. It occurs between the device that requests the certificate and the certificate authority.
The Cisco NX-OS device performs the following steps when performing the PKI enrollment process:
-
Generates an RSA private and public key pair on the device.
-
Generates a certificate request in standard format and forwards it to the CA.
 Note | The CA administrator may be required to manually approve the enrollment request at the CA server, when the request is received by the CA. |
Manual Enrollment Using Cut-and-Paste
The Cisco NX-OS software supports certificate retrieval and enrollment using manual cut-and-paste. Cut-and-paste enrollment means that you must cut and paste the certificate requests and resulting certificates between the device and the CA.
You must perform the following steps when using cut and paste in the manual enrollment process:
-
Create an enrollment certificate request, which the Cisco NX-OS device displays in base64-encoded text form.
-
Cut and paste the encoded certificate request text in an e-mail or in a web form and send it to the CA.
-
Receive the issued certificate (in base64-encoded text form) from the CA in an e-mail or in a web browser download.
-
Cut and paste the issued certificate to the device using the certificate import facility.
Multiple RSA Key Pair and Identity CA Support
Multiple identity CAs enable the device to enroll with more than one trust point, which results in multiple identity certificates, each from a distinct CA. With this feature, the Cisco NX-OS device can participate in SSH and other applications with many peers using certificates issued by CAs that are acceptable to those peers.
The multiple RSA key-pair feature allows the device to maintain a distinct key pair for each CA with which it is enrolled. It can match policy requirements for each CA without conflicting with the requirements specified by the other CAs, such as the key length. The device can generate multiple RSA key pairs and associate each key pair with a distinct trust point. Thereafter, when enrolling with a trust point, the associated key pair is used to construct the certificate request.
Peer Certificate Verification
The PKI support on a Cisco NX-OS device can verify peer certificates. The Cisco NX-OS software verifies certificates received from peers during security exchanges for applications, such as SSH. The applications verify the validity of the peer certificates. The Cisco NX-OS software performs the following steps when verifying peer certificates:
-
Verifies that the peer certificate is issued by one of the locally trusted CAs.
-
Verifies that the peer certificate is valid (not expired) with respect to current time.
-
Verifies that the peer certificate is not yet revoked by the issuing CA.
For revocation checking, the Cisco NX-OS software supports the certificate revocation list (CRL). A trust point CA can use this method to verify that the peer certificate has not been revoked.
Certificate Revocation Checking
The Cisco NX-OS software can check the revocation status of CA certificates. The applications can use the revocation checking mechanisms in the order that you specify. The choices are CRL, none, or a combination of these methods.
CRL Support
The CAs maintain certificate revocation lists (CRLs) to provide information about certificates revoked prior to their expiration dates. The CAs publish the CRLs in a repository and provide the download public URL in all issued certificates. A client verifying a peer’s certificate can obtain the latest CRL from the issuing CA and use it to determine if the certificate has been revoked. A client can cache the CRLs of some or all of its trusted CAs locally and use them later if necessary until the CRLs expire.
The Cisco NX-OS software allows the manual configuration of predownloaded CRLs for the trust points, and then caches them in the device bootflash (cert-store). During the verification of a peer certificate, the Cisco NX-OS software checks the CRL from the issuing CA only if the CRL has already been cached locally and the revocation checking is configured to use the CRL. Otherwise, the Cisco NX-OS software does not perform CRL checking and considers the certificate to be not revoked unless you have configured other revocation checking methods.
Import and Export Support for Certificates and Associated Key Pairs
As part of the CA authentication and enrollment process, the subordinate CA certificate (or certificate chain) and identity certificates can be imported in standard PEM (base64) format.
The complete identity information in a trust point can be exported to a file in the password-protected PKCS#12 standard format. It can be later imported to the same device (for example, after a system crash) or to a replacement device. The information in a PKCS#12 file consists of the RSA key pair, the identity certificate, and the CA certificate (or chain).
Licensing Requirements for PKI
The following table shows the licensing requirements for this feature:
|
Product |
License Requirement |
|---|---|
|
Cisco NX-OS |
The PKI feature requires no license. Any feature not included in a license package is bundled with the Cisco NX-OS system images and is provided at no extra charge to you. For an explanation of the Cisco NX-OS licensing scheme, see the Cisco NX-OS Licensing Guide. |
Guidelines and Limitations for PKI
PKI has the following configuration guidelines and limitations:
-
The maximum number of key pairs you can configure on a Cisco NX-OS device is 16.
The maximum number of trust points you can declare on a Cisco NX-OS device is 16.
The maximum number of identify certificates you can configure on a Cisco NX-OS device is 16.
The maximum number of certificates in a CA certificate chain is 10.
The maximum number of trust points you can authenticate to a specific CA is 10.
Configuration rollbacks do not support the PKI configuration.
The Cisco NX-OS software does not support OSCP.
Note | If you are familiar with the Cisco IOS CLI, be aware that the Cisco NX-OS commands for this feature might differ from the Cisco IOS commands that you would use. |
Default Settings for PKI
|
Parameters |
Default |
|---|---|
|
Trust point |
None |
|
RSA key pair |
None |
|
RSA key-pair label |
Device FQDN |
|
RSA key-pair modulus |
512 |
|
RSA key-pair exportable |
Enabled |
|
Revocation check method |
CRL |
Cert-store for certificate authentication |
local |
Configuring CAs and Digital Certificates
This section describes the tasks that you must perform to allow CAs and digital certificates on your Cisco NX-OS device to interoperate.
- Configuring the Hostname and IP Domain Name
- Generating an RSA Key Pair
- Creating a Trust Point CA Association
- Authenticating the CA
- Configuring Certificate Revocation Checking Methods
- Generating Certificate Requests
- Installing Identity Certificates
- Ensuring Trust Point Configurations Persist Across Reboots
- Exporting Identity Information in PKCS 12 Format
- Importing Identity Information in PKCS 12 Format
- Configuring a CRL
- Deleting Certificates from the CA Configuration
- Deleting RSA Key Pairs from a Cisco NX-OS Device
Configuring the Hostname and IP Domain Name
You must configure the hostname and IP domain name of the device if you have not yet configured them because the Cisco NX-OS software uses the fully qualified domain name (FQDN) of the device as the subject in the identity certificate. Also, the Cisco NX-OS software uses the device FQDN as a default key label when you do not specify a label during key-pair generation. For example, a certificate named DeviceA.example.com is based on a device hostname of DeviceA and a device IP domain name of example.com.
 Caution | Changing the hostname or IP domain name after generating the certificate can invalidate the certificate. |
Generating an RSA Key Pair
You can generate an RSA key pairs to sign and/or encrypt and decrypt the security payload during security protocol exchanges for applications. You must generate the RSA key pair before you can obtain a certificate for your device.
Creating a Trust Point CA Association
You must associate the Cisco NX-OS device with a trust point CA.
Generate the RSA key pair.
| Command or Action | Purpose | |||
|---|---|---|---|---|
| Step 1 |
configure terminal
Example: switch# configure terminal switch(config)# |
Enters global configuration mode. | ||
| Step 2 |
crypto ca trustpoint
name
Example: switch(config)# crypto ca trustpoint admin-ca switch(config-trustpoint)# |
Declares a trust point CA that the device should trust and enters trust point configuration mode.
| ||
| Step 3 |
enrollment terminal
Example: switch(config-trustpoint)# enrollment terminal |
Enables manual cut-and-paste certificate enrollment. The default is enabled.
| ||
| Step 4 |
rsakeypair
label
Example: switch(config-trustpoint)# rsakeypair SwitchA |
Specifies the label of the RSA key pair to associate to this trust point for enrollment.
| ||
| Step 5 |
exit Example: switch(config-trustpoint)# exit switch(config)# |
Exits trust point configuration mode. | ||
| Step 6 |
show crypto ca trustpoints
Example: switch(config)# show crypto ca trustpoints | (Optional)
Displays trust point information. | ||
| Step 7 |
copy running-config startup-config
Example: switch(config)# copy running-config startup-config | (Optional)
Copies the running configuration to the startup configuration. |
Authenticating the CA
The configuration process of trusting a CA is complete only when the CA is authenticated to the Cisco NX-OS device. You must authenticate your Cisco NX-OS device to the CA by obtaining the self-signed certificate of the CA in PEM format, which contains the public key of the CA. Because the certificate of the CA is self-signed (the CA signs its own certificate) the public key of the CA should be manually authenticated by contacting the CA administrator to compare the fingerprint of the CA certificate.
Note | The CA that you are authenticating is not a self-signed CA when it is a subordinate CA to another CA, which itself may be a subordinate to yet another CA, and so on, finally ending in a self-signed CA. This type of CA certificate is called the CA certificate chain of the CA being authenticated. In this case, you must input the full list of the CA certificates of all the CAs in the certification chain during the CA authentication. The maximum number of certificates in a CA certificate chain is 10. |
Create an association with the CA.
Obtain the CA certificate or CA certificate chain.
| Command or Action | Purpose | |||
|---|---|---|---|---|
| Step 1 |
configure terminal
Example: switch# configure terminal switch(config)# |
Enters global configuration mode. | ||
| Step 2 |
crypto ca authenticate
name
Example: switch(config)# crypto ca authenticate admin-ca input (cut & paste) CA certificate (chain) in PEM format; end the input with a line containing only END OF INPUT : -----BEGIN CERTIFICATE----- MIIC4jCCAoygAwIBAgIQBWDSiay0GZRPSRIljK0ZejANBgkqhkiG9w0BAQUFADCB kDEgMB4GCSqGSIb3DQEJARYRYW1hbmRrZUBjaXNjby5jb20xCzAJBgNVBAYTAklO MRIwEAYDVQQIEwlLYXJuYXRha2ExEjAQBgNVBAcTCUJhbmdhbG9yZTEOMAwGA1UE ChMFQ2lzY28xEzARBgNVBAsTCm5ldHN0b3JhZ2UxEjAQBgNVBAMTCUFwYXJuYSBD QTAeFw0wNTA1MDMyMjQ2MzdaFw0wNzA1MDMyMjU1MTdaMIGQMSAwHgYJKoZIhvcN AQkBFhFhbWFuZGtlQGNpc2NvLmNvbTELMAkGA1UEBhMCSU4xEjAQBgNVBAgTCUth cm5hdGFrYTESMBAGA1UEBxMJQmFuZ2Fsb3JlMQ4wDAYDVQQKEwVDaXNjbzETMBEG A1UECxMKbmV0c3RvcmFnZTESMBAGA1UEAxMJQXBhcm5hIENBMFwwDQYJKoZIhvcN AQEBBQADSwAwSAJBAMW/7b3+DXJPANBsIHHzluNccNM87ypyzwuoSNZXOMpeRXXI OzyBAgiXT2ASFuUOwQ1iDM8rO/41jf8RxvYKvysCAwEAAaOBvzCBvDALBgNVHQ8E BAMCAcYwDwYDVR0TAQH/BAUwAwEB/zAdBgNVHQ4EFgQUJyjyRoMbrCNMRU2OyRhQ GgsWbHEwawYDVR0fBGQwYjAuoCygKoYoaHR0cDovL3NzZS0wOC9DZXJ0RW5yb2xs L0FwYXJuYSUyMENBLmNybDAwoC6gLIYqZmlsZTovL1xcc3NlLTA4XENlcnRFbnJv bGxcQXBhcm5hJTIwQ0EuY3JsMBAGCSsGAQQBgjcVAQQDAgEAMA0GCSqGSIb3DQEB BQUAA0EAHv6UQ+8nE399Tww+KaGr0g0NIJaqNgLh0AFcT0rEyuyt/WYGPzksF9Ea NBG7E0oN66zex0EOEfG1Vs6mXp1//w== -----END CERTIFICATE----- END OF INPUT Fingerprint(s): MD5 Fingerprint=65:84:9A:27:D5:71:03:33:9C:12:23:92:38:6F:78:12 Do you accept this certificate? [yes/no]: yes |
Prompts you to cut and paste the certificate of the CA. Use the same name that you used when declaring the CA. The maximum number of trust points that you can authenticate to a specific CA is 10.
| ||
| Step 3 |
exit Example: switch(config)# exit switch# |
Exits configuration mode. | ||
| Step 4 |
show crypto ca trustpoints
Example: switch# show crypto ca trustpoints | (Optional)
Displays the trust point CA information. | ||
| Step 5 |
copy running-config startup-config
Example: switch# copy running-config startup-config | (Optional)
Copies the running configuration to the startup configuration. |
Configuring Certificate Revocation Checking Methods
During security exchanges with a client (for example, an SSH user), the Cisco NX-OS device performs the certificate verification of the peer certificate sent by the client. The verification process may involve certificate revocation status checking.
You can configure the device to check the CRL downloaded from the CA. Downloading the CRL and checking locally does not generate traffic in your network. However, certificates can be revoked between downloads and your device would not be aware of the revocation.
Authenticate the CA.
Ensure that you have configured the CRL if you want to use CRL checking.
| Command or Action | Purpose | |
|---|---|---|
| Step 1 |
configure terminal
Example: switch# configure terminal switch(config)# |
Enters global configuration mode. |
| Step 2 |
crypto ca trustpoint
name
Example: switch(config)# crypto ca trustpoint admin-ca switch(config-trustpoint)# |
Specifies a trust point CA and enters trust point configuration mode. |
| Step 3 |
revocation-check {crl [none] | none}
Example: switch(config-trustpoint)# revocation-check none |
Configures the certificate revocation checking methods. The default method is crl. The Cisco NX-OS software uses the certificate revocation methods in the order that you specify. |
| Step 4 |
exit
Example: switch(config-trustpoint)# exit switch(config)# |
Exits trust point configuration mode. |
| Step 5 |
show crypto ca trustpoints
Example: switch(config)# show crypto ca trustpoints | (Optional)
Displays the trust point CA information. |
| Step 6 |
copy running-config startup-config
Example: switch(config)# copy running-config startup-config | (Optional)
Copies the running configuration to the startup configuration. |
Generating Certificate Requests
You must generate a request to obtain identity certificates from the associated trust point CA for each of your device’s RSA key pairs. You must then cut and paste the displayed request into an e-mail or in a website form for the CA.
Create an association with the CA.
Obtain the CA certificate or CA certificate chain.
| Command or Action | Purpose | |||
|---|---|---|---|---|
| Step 1 |
configure terminal
Example: switch# configure terminal switch(config)# |
Enters global configuration mode. | ||
| Step 2 |
crypto ca enroll
name
Example: switch(config)# crypto ca enroll admin-ca Create the certificate request .. Create a challenge password. You will need to verbally provide this password to the CA Administrator in order to revoke your certificate. For security reasons your password will not be saved in the configuration. Please make a note of it. Password:nbv123 The subject name in the certificate will be: DeviceA.cisco.com Include the switch serial number in the subject name? [yes/no]: no Include an IP address in the subject name [yes/no]: yes ip address:172.22.31.162 The certificate request will be displayed... -----BEGIN CERTIFICATE REQUEST----- MIIBqzCCARQCAQAwHDEaMBgGA1UEAxMRVmVnYXMtMS5jaXNjby5jb20wgZ8wDQYJ KoZIhvcNAQEBBQADgY0AMIGJAoGBAL8Y1UAJ2NC7jUJ1DVaSMqNIgJ2kt8rl4lKY 0JC6ManNy4qxk8VeMXZSiLJ4JgTzKWdxbLDkTTysnjuCXGvjb+wj0hEhv/y51T9y P2NJJ8ornqShrvFZgC7ysN/PyMwKcgzhbVpj+rargZvHtGJ91XTq4WoVkSCzXv8S VqyH0vEvAgMBAAGgTzAVBgkqhkiG9w0BCQcxCBMGbmJ2MTIzMDYGCSqGSIb3DQEJ DjEpMCcwJQYDVR0RAQH/BBswGYIRVmVnYXMtMS5jaXNjby5jb22HBKwWH6IwDQYJ KoZIhvcNAQEEBQADgYEAkT60KER6Qo8nj0sDXZVHSfJZh6K6JtDz3Gkd99GlFWgt PftrNcWUE/pw6HayfQl2T3ecgNwel2d15133YBF2bktExiI6Ul88nTOjglXMjja8 8a23bNDpNsM8rklwA6hWkrVL8NUZEFJxqbjfngPNTZacJCUS6ZqKCMetbKytUx0= -----END CERTIFICATE REQUEST----- |
Generates a certificate request for an authenticated CA.
| ||
| Step 3 |
exit
Example: switch(config-trustpoint)# exit switch(config)# |
Exits trust point configuration mode. | ||
| Step 4 |
show crypto ca certificates
Example: switch(config)# show crypto ca certificates | (Optional)
Displays the CA certificates. | ||
| Step 5 |
copy running-config startup-config
Example: switch(config)# copy running-config startup-config | (Optional)
Copies the running configuration to the startup configuration. |
Installing Identity Certificates
You can receive the identity certificate from the CA by e-mail or through a web browser in base64 encoded text form. You must install the identity certificate from the CA by cutting and pasting the encoded text.
Create an association with the CA.
Obtain the CA certificate or CA certificate chain.
| Command or Action | Purpose | |
|---|---|---|
| Step 1 |
configure terminal
Example: switch# configure terminal switch(config)# |
Enters global configuration mode. |
| Step 2 |
crypto ca import
name
certificate
Example: switch(config)# crypto ca import admin-ca certificate input (cut & paste) certificate in PEM format: -----BEGIN CERTIFICATE----- MIIEADCCA6qgAwIBAgIKCjOOoQAAAAAAdDANBgkqhkiG9w0BAQUFADCBkDEgMB4G CSqGSIb3DQEJARYRYW1hbmRrZUBjaXNjby5jb20xCzAJBgNVBAYTAklOMRIwEAYD VQQIEwlLYXJuYXRha2ExEjAQBgNVBAcTCUJhbmdhbG9yZTEOMAwGA1UEChMFQ2lz Y28xEzARBgNVBAsTCm5ldHN0b3JhZ2UxEjAQBgNVBAMTCUFwYXJuYSBDQTAeFw0w NTExMTIwMzAyNDBaFw0wNjExMTIwMzEyNDBaMBwxGjAYBgNVBAMTEVZlZ2FzLTEu Y2lzY28uY29tMIGfMA0GCSqGSIb3DQEBAQUAA4GNADCBiQKBgQC/GNVACdjQu41C dQ1WkjKjSICdpLfK5eJSmNCQujGpzcuKsZPFXjF2UoiyeCYE8ylncWyw5E08rJ47 glxr42/sI9IRIb/8udU/cj9jSSfKK56koa7xWYAu8rDfz8jMCnIM4W1aY/q2q4Gb x7RifdV06uFqFZEgs17/Elash9LxLwIDAQABo4ICEzCCAg8wJQYDVR0RAQH/BBsw GYIRVmVnYXMtMS5jaXNjby5jb22HBKwWH6IwHQYDVR0OBBYEFKCLi+2sspWEfgrR bhWmlVyo9jngMIHMBgNVHSMEgcQwgcGAFCco8kaDG6wjTEVNjskYUBoLFmxxoYGW pIGTMIGQMSAwHgYJKoZIhvcNAQkBFhFhbWFuZGtlQGNpc2NvLmNvbTELMAkGA1UE BhMCSU4xEjAQBgNVBAgTCUthcm5hdGFrYTESMBAGA1UEBxMJQmFuZ2Fsb3JlMQ4w DAYDVQQKEwVDaXNjbzETMBEGA1UECxMKbmV0c3RvcmFnZTESMBAGA1UEAxMJQXBh cm5hIENBghAFYNKJrLQZlE9JEiWMrRl6MGsGA1UdHwRkMGIwLqAsoCqGKGh0dHA6 Ly9zc2UtMDgvQ2VydEVucm9sbC9BcGFybmElMjBDQS5jcmwwMKAuoCyGKmZpbGU6 Ly9cXHNzZS0wOFxDZXJ0RW5yb2xsXEFwYXJuYSUyMENBLmNybDCBigYIKwYBBQUH AQEEfjB8MDsGCCsGAQUFBzAChi9odHRwOi8vc3NlLTA4L0NlcnRFbnJvbGwvc3Nl LTA4X0FwYXJuYSUyMENBLmNydDA9BggrBgEFBQcwAoYxZmlsZTovL1xcc3NlLTA4 XENlcnRFbnJvbGxcc3NlLTA4X0FwYXJuYSUyMENBLmNydDANBgkqhkiG9w0BAQUF AANBADbGBGsbe7GNLh9xeOTWBNbm24U69ZSuDDcOcUZUUTgrpnTqVpPyejtsyflw E36cIZu4WsExREqxbTk8ycx7V5o= -----END CERTIFICATE----- |
Prompts you to cut and paste the identity certificate for the CA named admin-ca. The maximum number of identify certificates that you can configure on a device is 16. |
| Step 3 |
exit
Example: switch(config)# exit switch# |
Exits configuration mode. |
| Step 4 |
show crypto ca certificates
Example: switch# show crypto ca certificates | (Optional)
Displays the CA certificates. |
| Step 5 |
copy running-config startup-config
Example: switch# copy running-config startup-config | (Optional)
Copies the running configuration to the startup configuration. |
Ensuring Trust Point Configurations Persist Across Reboots
You can ensure that the trustpoint configuration persists across Cisco NX-OS device reboots.
The trust point configuration is a normal Cisco NX-OS device configuration that persists across system reboots only if you copy it explicitly to the startup configuration. The certificates, key pairs, and CRL associated with a trust point are automatically persistent if you have already copied the trust point configuration in the startup configuration. Conversely, if the trust point configuration is not copied to the startup configuration, the certificates, key pairs, and CRL associated with it are not persistent since they require the corresponding trust point configuration after a reboot. Always copy the running configuration to the startup configuration to ensure that the configured certificates, key pairs, and CRLs are persistent. Also, save the running configuration after deleting a certificate or key pair to ensure that the deletions permanent.
The certificates and CRL associated with a trust point automatically become persistent when imported (that is, without explicitly copying to the startup configuration) if the specific trust point is already saved in startup configuration.
We recommend that you create a password-protected backup of the identity certificates and save it to an external server.
Note | Copying the configuration to an external server does include the certificates and key pairs. |
Exporting Identity Information in PKCS 12 Format
You can export the identity certificate along with the RSA key pair and CA certificate (or the entire chain in the case of a subordinate CA) of a trust point to a PKCS#12 file for backup purposes. You can import the certificate and RSA key pair to recover from a system crash on your device or when you replace the supervisor modules.
Note | You can use only the bootflash:filename format when specifying the export URL. |
Authenticate the CA.
Install an identity certificate.
| Command or Action | Purpose | |
|---|---|---|
| Step 1 |
configure terminal
Example: switch# configure terminal switch(config)# |
Enters global configuration mode. |
| Step 2 |
crypto ca export
name
pkcs12 bootflash:filename
password
Example: switch(config)# crypto ca export admin-ca pkcs12 bootflash:adminid.p12 nbv123 |
Exports the identity certificate and associated key pair and CA certificates for a trust point CA. The password is alphanumeric, case sensitive, and has a maximum length of 128 characters. |
| Step 3 |
exit
Example: switch(config)# exit switch# |
Exits configuration mode. |
| Step 4 |
copy booflash:filename
scheme://server/ [url
/]filename
Example: switch# copy bootflash:adminid.p12 tftp:adminid.p12 |
Copies the PKCS#12 format file to a remote server. For the scheme argument, you can enter tftp:, ftp:, scp:, or sftp:. The server argument is the address or name of the remote server, and the url argument is the path to the source file on the remote server. The server, url, and filename arguments are case sensitive. |
Importing Identity Information in PKCS 12 Format
You can import the certificate and RSA key pair to recover from a system crash on your device or when you replace the supervisor modules.
Note | You can use only the bootflash:filename format when specifying the import URL. |
Ensure that the trust point is empty by checking that no RSA key pair is associated with it and no CA is associated with the trust point using CA authentication.
| Command or Action | Purpose | |
|---|---|---|
| Step 1 |
copy
scheme://
server/[url
/]filename
bootflash:filename
Example: switch# copy tftp:adminid.p12 bootflash:adminid.p12 |
Copies the PKCS#12 format file from the remote server. For the scheme argument, you can enter tftp:, ftp:, scp:, or sftp:. The server argument is the address or name of the remote server, and the url argument is the path to the source file on the remote server. The server, url, and filename arguments are case sensitive. |
| Step 2 |
configure terminal
Example: switch# configure terminal switch(config)# |
Enters global configuration mode. |
| Step 3 |
crypto ca import
name
pksc12 bootflash:filename
Example: switch(config)# crypto ca import admin-ca pkcs12 bootflash:adminid.p12 nbv123 |
Imports the identity certificate and associated key pair and CA certificates for trust point CA. |
| Step 4 |
exit
Example: switch(config)# exit switch# |
Exits configuration mode. |
| Step 5 |
show crypto ca certificates
Example: switch# show crypto ca certificates | (Optional)
Displays the CA certificates. |
| Step 6 |
copy running-config startup-config
Example: switch# copy running-config startup-config | (Optional)
Copies the running configuration to the startup configuration. |
Configuring a CRL
You can manually configure CRLs that you have downloaded from the trust points. The Cisco NX-OS software caches the CRLs in the device bootflash (cert-store). During the verification of a peer certificate, the Cisco NX-OS software checks the CRL from the issuing CA only if you have downloaded the CRL to the device and you have configured certificate revocation checking to use the CRL.
Ensure that you have enabled certificate revocation checking.
| Command or Action | Purpose | |
|---|---|---|
| Step 1 |
copy
scheme:[//server/[url
/]]filename
bootflash:filename
Example: switch# copy tftp:adminca.crl bootflash:adminca.crl |
Downloads the CRL from a remote server. For the scheme argument, you can enter tftp:, ftp:, scp:, or sftp:. The server argument is the address or name of the remote server, and the url argument is the path to the source file on the remote server. The server, url, and filename arguments are case sensitive. |
| Step 2 |
configure terminal
Example: switch# configure terminal switch(config)# |
Enters global configuration mode. |
| Step 3 |
crypto ca crl request
name
bootflash:filename
Example: switch(config)# crypto ca crl request admin-ca bootflash:adminca.crl |
Configures or replaces the current CRL with the one specified in the file. |
| Step 4 |
exit
Example: switch(config)# exit switch# |
Exits configuration mode. |
| Step 5 |
show crypto ca crl
name
Example: switch# show crypto ca crl admin-ca | (Optional)
Displays the CA CRL information. |
| Step 6 |
copy running-config startup-config
Example: switch# copy running-config startup-config | (Optional)
Copies the running configuration to the startup configuration. |
Deleting Certificates from the CA Configuration
You can delete the identity certificates and CA certificates that are configured in a trust point. You must first delete the identity certificate, followed by the CA certificates. After deleting the identity certificate, you can disassociate the RSA key pair from a trust point. You must delete certificates to remove expired or revoked certificates, certificates that have compromised (or suspected to be compromised) key pairs, or CAs that are no longer trusted.
| Command or Action | Purpose | |
|---|---|---|
| Step 1 |
configure terminal
Example: switch# configure terminal switch(config)# |
Enters global configuration mode. |
| Step 2 |
crypto ca trustpoint
name
Example: switch(config)# crypto ca trustpoint admin-ca switch(config-trustpoint)# |
Specifies a trust point CA and enters trust point configuration mode. |
| Step 3 |
delete ca-certificate
Example: switch(config-trustpoint)# delete ca-certificate |
Deletes the CA certificate or certificate chain. |
| Step 4 |
delete certificate [force]
Example: switch(config-trustpoint)# delete certificate |
Deletes the identity certificate. You must use the force option if the identity certificate you want to delete is the last certificate in a certificate chain or only identity certificate in the device. This requirement ensures that you do not mistakenly delete the last certificate in a certificate chain or only the identity certificate and leave the applications (such as SSH) without a certificate to use. |
| Step 5 |
exit
Example: switch(config-trustpoint)# exit switch(config)# |
Exits trust point configuration mode. |
| Step 6 |
show crypto ca certificates [name]
Example: switch(config)# show crypto ca certificates admin-ca | (Optional)
Displays the CA certificate information. |
| Step 7 |
copy running-config startup-config
Example: switch(config)# copy running-config startup-config | (Optional)
Copies the running configuration to the startup configuration. |
Deleting RSA Key Pairs from a Cisco NX-OS Device
You can delete the RSA key pairs from a Cisco NX-OS device if you believe the RSA key pairs were compromised in some way and should no longer be used.
Note | After you delete RSA key pairs from a device, ask the CA administrator to revoke your device’s certificates at the CA. You must supply the challenge password that you created when you originally requested the certificates. |
| Command or Action | Purpose | |
|---|---|---|
| Step 1 |
configure terminal
Example: switch# configure terminal switch(config)# |
Enters global configuration mode. |
| Step 2 |
crypto key zeroize rsa
label
Example: switch(config)# crypto key zeroize rsa MyKey |
Deletes the RSA key pair. |
| Step 3 |
exit
Example: switch(config)# exit switch# |
Exits configuration mode. |
| Step 4 |
show crypto key mypubkey rsa
Example: switch# show crypto key mypubkey rsa | (Optional)
Displays the RSA key pair configuration. |
| Step 5 |
copy running-config startup-config
Example: switch# copy running-config startup-config | (Optional)
Copies the running configuration to the startup configuration. |
Verifying the PKI Configuration
To display PKI configuration information, perform one of the following tasks:
|
Command |
Purpose |
|---|---|
|
show crypto key mypubkey rsa |
Displays information about the RSA public keys generated on the Cisco NX-OS device. |
|
show crypto ca certificates |
Displays information about CA and identity certificates. |
|
show crypto ca crl |
Displays information about CA CRLs. |
show crypto ca certstore |
Displays the cert-store configuration. |
show crypto ca remote-certstore |
Displays the remote cert-store configuration. |
show crypto certificatemap |
Displays the certificate mapping filters. |
show crypto ssh-auth-map |
Displays the mapping filters configured for SSH authorization. |
|
show crypto ca trustpoints |
Displays information about CA trust points. |
Configuration Examples for PKI
This section shows examples of the tasks that you can use to configure certificates and CRLs on Cisco NX-OS devices using a Microsoft Windows Certificate server.
Note | You can use any type of certificate server to generate digital certificates. You are not limited to using the Microsoft Windows Certificate server. |
- Configuring Certificates on a Cisco NX-OS Device
- Downloading a CA Certificate
- Requesting an Identity Certificate
- Revoking a Certificate
- Generating and Publishing the CRL
- Downloading the CRL
- Importing the CRL
Configuring Certificates on a Cisco NX-OS Device
To configure certificates on a Cisco NX-OS device, follow these steps:
| Step 1 |
Configure the device FQDN.
switch# configure terminal Enter configuration commands, one per line. End with CNTL/Z. switch(config)# hostname Device-1 Device-1(config)# |
| Step 2 |
Configure the DNS domain name for the device.
Device-1(config)# ip domain-name cisco.com |
| Step 3 |
Create a trust point.
Device-1(config)# crypto ca trustpoint myCA Device-1(config-trustpoint)# exit Device-1(config)# show crypto ca trustpoints trustpoint: myCA; key: revokation methods: crl |
| Step 4 |
Create an RSA key pair for the device.
Device-1(config)# crypto key generate rsa label myKey exportable modulus 1024 Device-1(config)# show crypto key mypubkey rsa key label: myKey key size: 1024 exportable: yes |
| Step 5 |
Associate the RSA key pair to the trust point.
Device-1(config)# crypto ca trustpoint myCA Device-1(config-trustpoint)# rsakeypair myKey Device-1(config-trustpoint)# exit Device-1(config)# show crypto ca trustpoints trustpoint: myCA; key: myKey revokation methods: crl |
| Step 6 | Download the CA certificate from the Microsoft Certificate Service web interface. |
| Step 7 |
Authenticate the CA that you want to enroll to the trust point.
Device-1(config)# crypto ca authenticate myCA input (cut & paste) CA certificate (chain) in PEM format; end the input with a line containing only END OF INPUT : -----BEGIN CERTIFICATE----- MIIC4jCCAoygAwIBAgIQBWDSiay0GZRPSRIljK0ZejANBgkqhkiG9w0BAQUFADCB kDEgMB4GCSqGSIb3DQEJARYRYW1hbmRrZUBjaXNjby5jb20xCzAJBgNVBAYTAklO MRIwEAYDVQQIEwlLYXJuYXRha2ExEjAQBgNVBAcTCUJhbmdhbG9yZTEOMAwGA1UE ChMFQ2lzY28xEzARBgNVBAsTCm5ldHN0b3JhZ2UxEjAQBgNVBAMTCUFwYXJuYSBD QTAeFw0wNTA1MDMyMjQ2MzdaFw0wNzA1MDMyMjU1MTdaMIGQMSAwHgYJKoZIhvcN AQkBFhFhbWFuZGtlQGNpc2NvLmNvbTELMAkGA1UEBhMCSU4xEjAQBgNVBAgTCUth cm5hdGFrYTESMBAGA1UEBxMJQmFuZ2Fsb3JlMQ4wDAYDVQQKEwVDaXNjbzETMBEG A1UECxMKbmV0c3RvcmFnZTESMBAGA1UEAxMJQXBhcm5hIENBMFwwDQYJKoZIhvcN AQEBBQADSwAwSAJBAMW/7b3+DXJPANBsIHHzluNccNM87ypyzwuoSNZXOMpeRXXI OzyBAgiXT2ASFuUOwQ1iDM8rO/41jf8RxvYKvysCAwEAAaOBvzCBvDALBgNVHQ8E BAMCAcYwDwYDVR0TAQH/BAUwAwEB/zAdBgNVHQ4EFgQUJyjyRoMbrCNMRU2OyRhQ GgsWbHEwawYDVR0fBGQwYjAuoCygKoYoaHR0cDovL3NzZS0wOC9DZXJ0RW5yb2xs L0FwYXJuYSUyMENBLmNybDAwoC6gLIYqZmlsZTovL1xcc3NlLTA4XENlcnRFbnJv bGxcQXBhcm5hJTIwQ0EuY3JsMBAGCSsGAQQBgjcVAQQDAgEAMA0GCSqGSIb3DQEB BQUAA0EAHv6UQ+8nE399Tww+KaGr0g0NIJaqNgLh0AFcT0rEyuyt/WYGPzksF9Ea NBG7E0oN66zex0EOEfG1Vs6mXp1//w== -----END CERTIFICATE----- END OF INPUT Fingerprint(s): MD5 Fingerprint=65:84:9A:27:D5:71:03:33:9C:12:23:92:38:6F:78:12 Do you accept this certificate? [yes/no]:y Device-1(config)# show crypto ca certificates Trustpoint: myCA CA certificate 0: subject= /emailAddress=admin@yourcompany.com/C=IN/ST=Karnataka/ L=Bangalore/O=Yourcompany/OU=netstorage/CN=Aparna CA issuer= /emailAddress=admin@yourcompany.com/C=IN/ST=Karnataka/ L=Bangalore/O=Yourcompany/OU=netstorage/CN=Aparna CA serial=0560D289ACB419944F4912258CAD197A notBefore=May 3 22:46:37 2005 GMT notAfter=May 3 22:55:17 2007 GMT MD5 Fingerprint=65:84:9A:27:D5:71:03:33:9C:12:23:92:38:6F:78:12 purposes: sslserver sslclient ike |
| Step 8 |
Generate a request certificate to use to enroll with a trust point.
Device-1(config)# crypto ca enroll myCA Create the certificate request .. Create a challenge password. You will need to verbally provide this password to the CA Administrator in order to revoke your certificate. For security reasons your password will not be saved in the configuration. Please make a note of it. Password: nbv123 The subject name in the certificate will be: Device-1.cisco.com Include the switch serial number in the subject name? [yes/no]: no Include an IP address in the subject name [yes/no]: yes ip address: 10.10.1.1 The certificate request will be displayed... -----BEGIN CERTIFICATE REQUEST----- MIIBqzCCARQCAQAwHDEaMBgGA1UEAxMRVmVnYXMtMS5jaXNjby5jb20wgZ8wDQYJ KoZIhvcNAQEBBQADgY0AMIGJAoGBAL8Y1UAJ2NC7jUJ1DVaSMqNIgJ2kt8rl4lKY 0JC6ManNy4qxk8VeMXZSiLJ4JgTzKWdxbLDkTTysnjuCXGvjb+wj0hEhv/y51T9y P2NJJ8ornqShrvFZgC7ysN/PyMwKcgzhbVpj+rargZvHtGJ91XTq4WoVkSCzXv8S VqyH0vEvAgMBAAGgTzAVBgkqhkiG9w0BCQcxCBMGbmJ2MTIzMDYGCSqGSIb3DQEJ DjEpMCcwJQYDVR0RAQH/BBswGYIRVmVnYXMtMS5jaXNjby5jb22HBKwWH6IwDQYJ KoZIhvcNAQEEBQADgYEAkT60KER6Qo8nj0sDXZVHSfJZh6K6JtDz3Gkd99GlFWgt PftrNcWUE/pw6HayfQl2T3ecgNwel2d15133YBF2bktExiI6Ul88nTOjglXMjja8 8a23bNDpNsM8rklwA6hWkrVL8NUZEFJxqbjfngPNTZacJCUS6ZqKCMetbKytUx0= -----END CERTIFICATE REQUEST----- |
| Step 9 | Request an identity certificate from the Microsoft Certificate Service web interface. |
| Step 10 |
Import the identity certificate.
Device-1(config)# crypto ca import myCA certificate input (cut & paste) certificate in PEM format: -----BEGIN CERTIFICATE----- MIIEADCCA6qgAwIBAgIKCjOOoQAAAAAAdDANBgkqhkiG9w0BAQUFADCBkDEgMB4G CSqGSIb3DQEJARYRYW1hbmRrZUBjaXNjby5jb20xCzAJBgNVBAYTAklOMRIwEAYD VQQIEwlLYXJuYXRha2ExEjAQBgNVBAcTCUJhbmdhbG9yZTEOMAwGA1UEChMFQ2lz Y28xEzARBgNVBAsTCm5ldHN0b3JhZ2UxEjAQBgNVBAMTCUFwYXJuYSBDQTAeFw0w NTExMTIwMzAyNDBaFw0wNjExMTIwMzEyNDBaMBwxGjAYBgNVBAMTEVZlZ2FzLTEu Y2lzY28uY29tMIGfMA0GCSqGSIb3DQEBAQUAA4GNADCBiQKBgQC/GNVACdjQu41C dQ1WkjKjSICdpLfK5eJSmNCQujGpzcuKsZPFXjF2UoiyeCYE8ylncWyw5E08rJ47 glxr42/sI9IRIb/8udU/cj9jSSfKK56koa7xWYAu8rDfz8jMCnIM4W1aY/q2q4Gb x7RifdV06uFqFZEgs17/Elash9LxLwIDAQABo4ICEzCCAg8wJQYDVR0RAQH/BBsw GYIRVmVnYXMtMS5jaXNjby5jb22HBKwWH6IwHQYDVR0OBBYEFKCLi+2sspWEfgrR bhWmlVyo9jngMIHMBgNVHSMEgcQwgcGAFCco8kaDG6wjTEVNjskYUBoLFmxxoYGW pIGTMIGQMSAwHgYJKoZIhvcNAQkBFhFhbWFuZGtlQGNpc2NvLmNvbTELMAkGA1UE BhMCSU4xEjAQBgNVBAgTCUthcm5hdGFrYTESMBAGA1UEBxMJQmFuZ2Fsb3JlMQ4w DAYDVQQKEwVDaXNjbzETMBEGA1UECxMKbmV0c3RvcmFnZTESMBAGA1UEAxMJQXBh cm5hIENBghAFYNKJrLQZlE9JEiWMrRl6MGsGA1UdHwRkMGIwLqAsoCqGKGh0dHA6 Ly9zc2UtMDgvQ2VydEVucm9sbC9BcGFybmElMjBDQS5jcmwwMKAuoCyGKmZpbGU6 Ly9cXHNzZS0wOFxDZXJ0RW5yb2xsXEFwYXJuYSUyMENBLmNybDCBigYIKwYBBQUH AQEEfjB8MDsGCCsGAQUFBzAChi9odHRwOi8vc3NlLTA4L0NlcnRFbnJvbGwvc3Nl LTA4X0FwYXJuYSUyMENBLmNydDA9BggrBgEFBQcwAoYxZmlsZTovL1xcc3NlLTA4 XENlcnRFbnJvbGxcc3NlLTA4X0FwYXJuYSUyMENBLmNydDANBgkqhkiG9w0BAQUF AANBADbGBGsbe7GNLh9xeOTWBNbm24U69ZSuDDcOcUZUUTgrpnTqVpPyejtsyflw E36cIZu4WsExREqxbTk8ycx7V5o= -----END CERTIFICATE----- Device-1(config)# exit Device-1# |
| Step 11 | Verify the certificate configuration. |
| Step 12 | Save the certificate configuration to the startup configuration. |
Downloading a CA Certificate
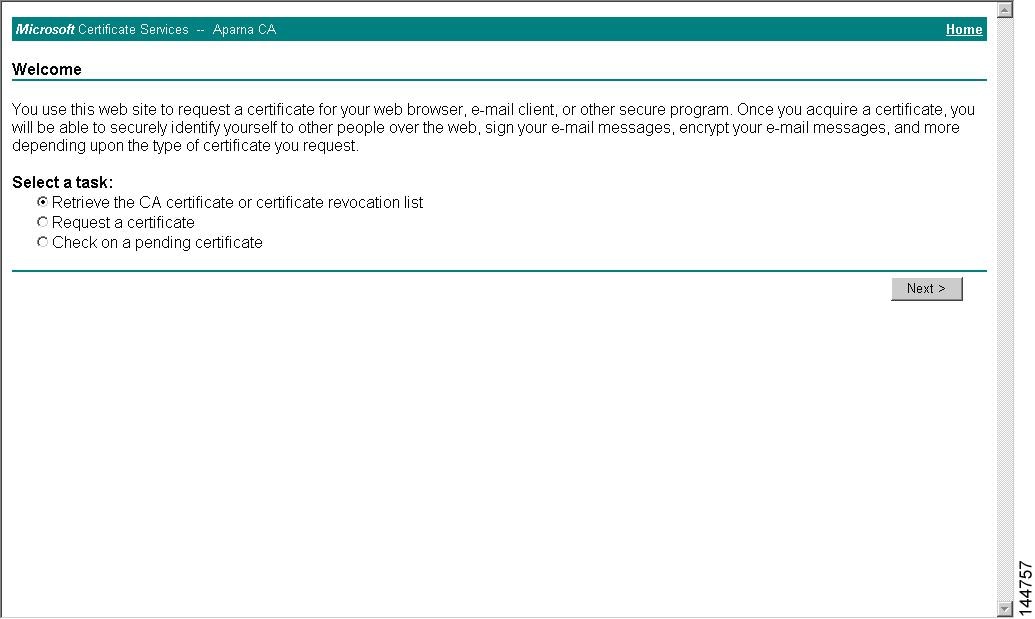
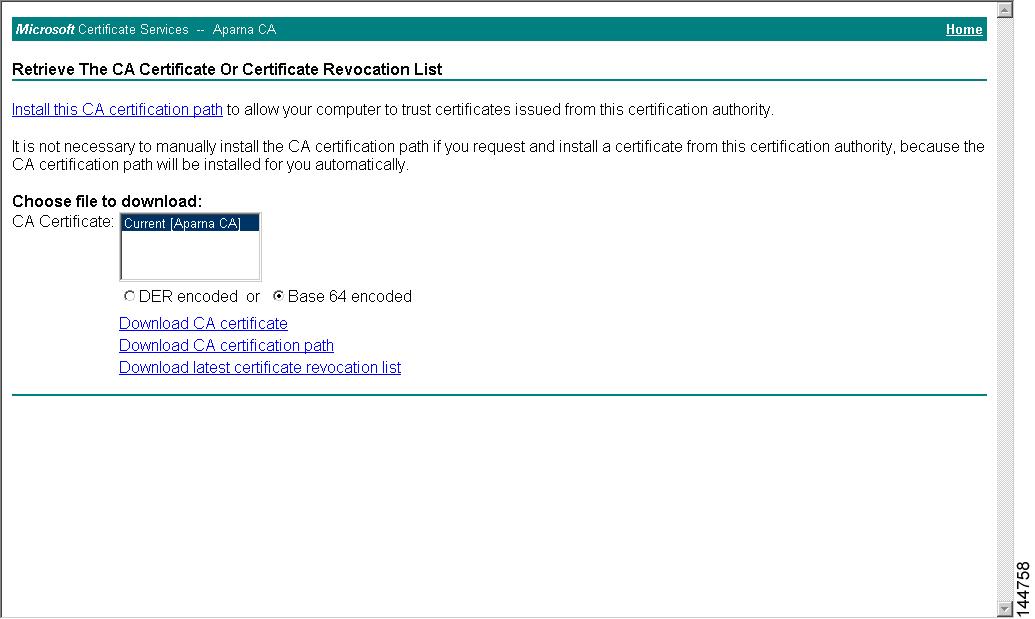
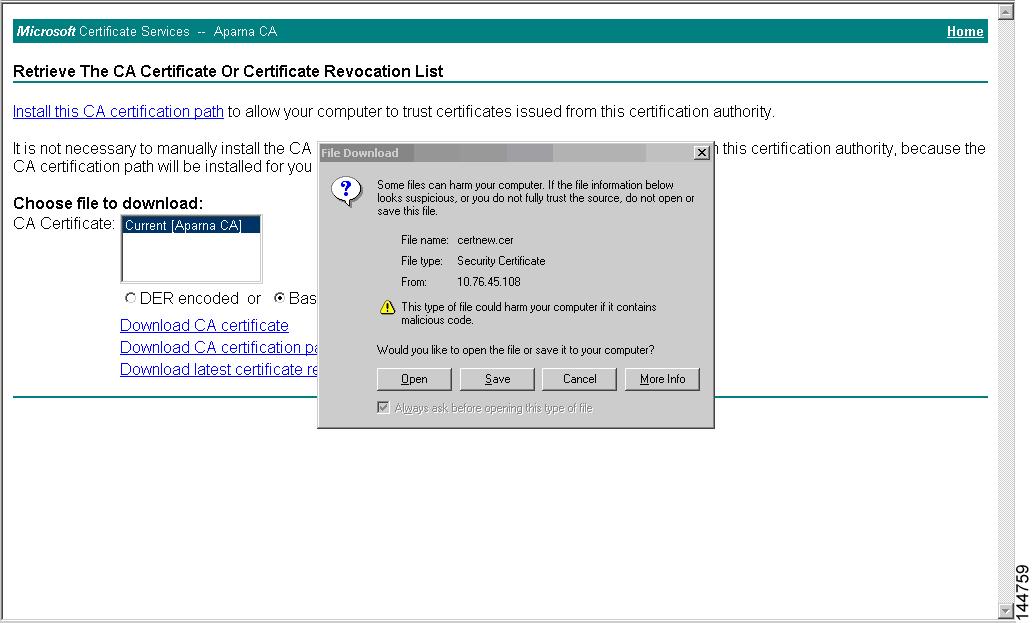
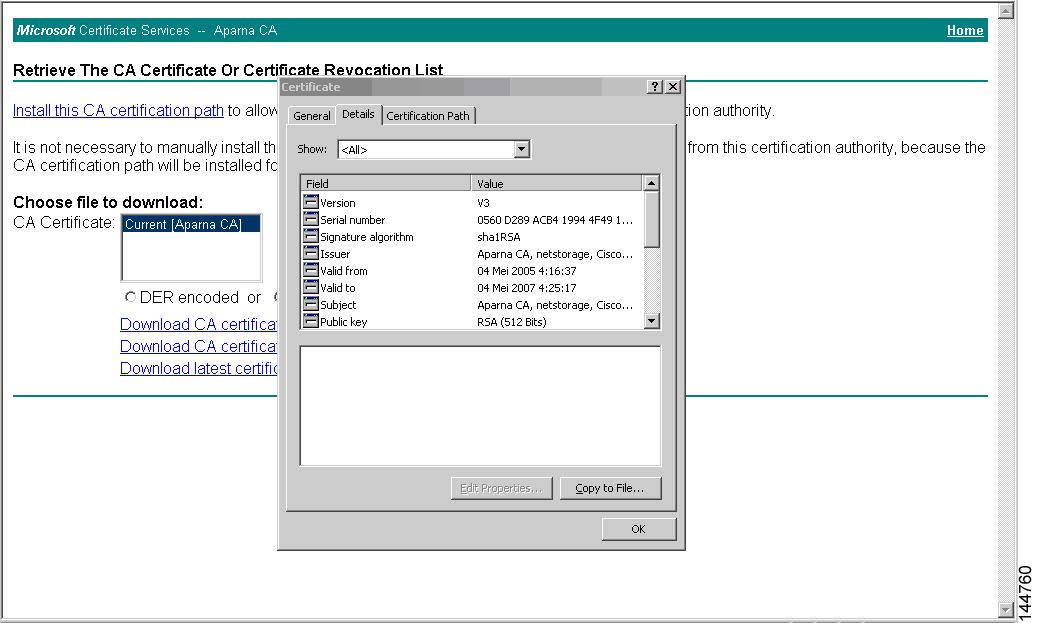
To download a CA certificate from the Microsoft Certificate Services web interface, follow these steps:
| Step 1 |
From the Microsoft Certificate Services web interface, click Retrieve the CA certificate or certificate revocation task and click Next.
 |
| Step 2 |
From the display list, choose the CA certificate file to download from the displayed list. Then click Base 64 encoded and click Download CA certificate.
 |
| Step 3 |
Click Open in the File Download dialog box.
 |
| Step 4 |
In the Certificate dialog box, click Copy to File and click OK.
 |
| Step 5 |
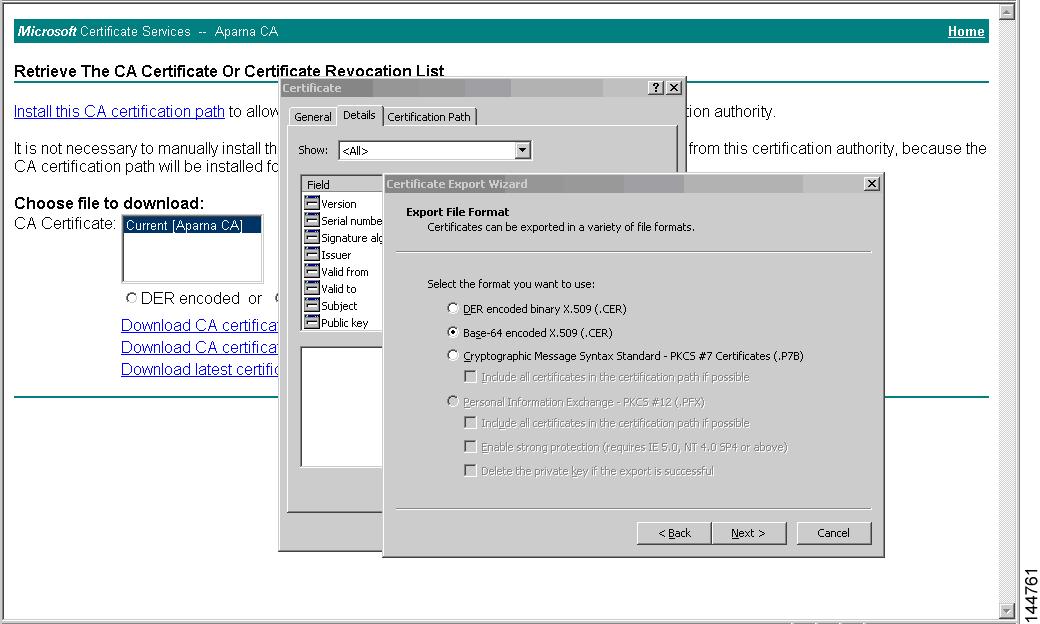
From the Certificate Export Wizard dialog box, choose the Base-64 encoded X.509 (CER) and click Next.
 |
| Step 6 | In the File name: text box on the Certificate Export Wizard dialog box, enter the destination file name and click Next. |
| Step 7 | In the Certificate Export Wizard dialog box, click Finish. |
| Step 8 |
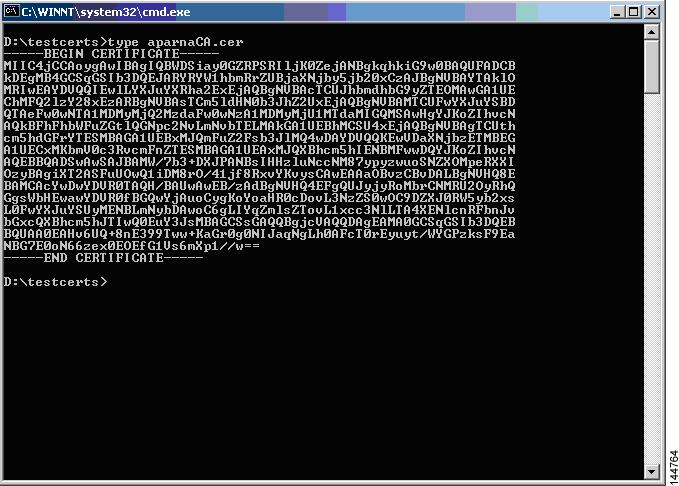
Enter the Microsoft Windows type command to display the CA certificate stored in Base-64 (PEM) format.
 |
Requesting an Identity Certificate
To request an identify certificate from a Microsoft Certificate server using a PKCS#12 certificate signing request (CRS), follow these steps:
| Step 1 |
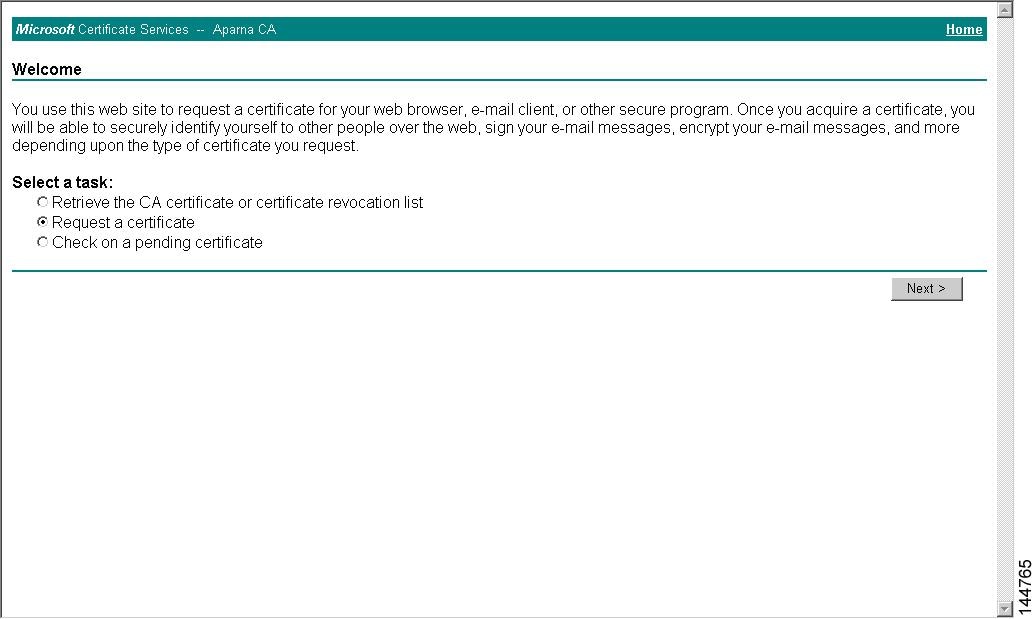
From the Microsoft Certificate Services web interface, click Request a certificate and click Next.
 |
| Step 2 |
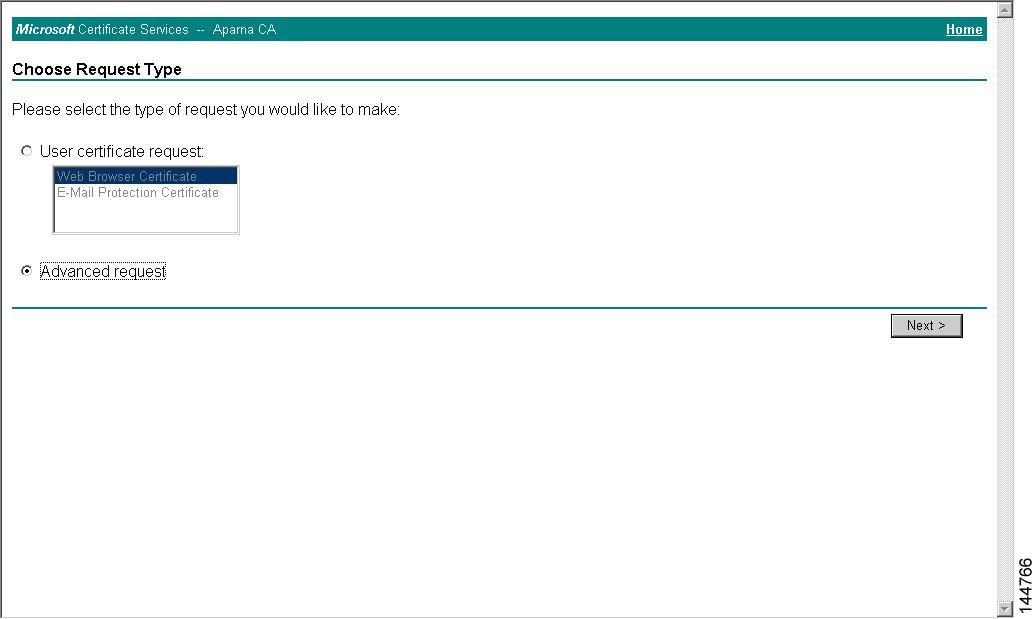
Click Advanced request and click Next.
 |
| Step 3 |
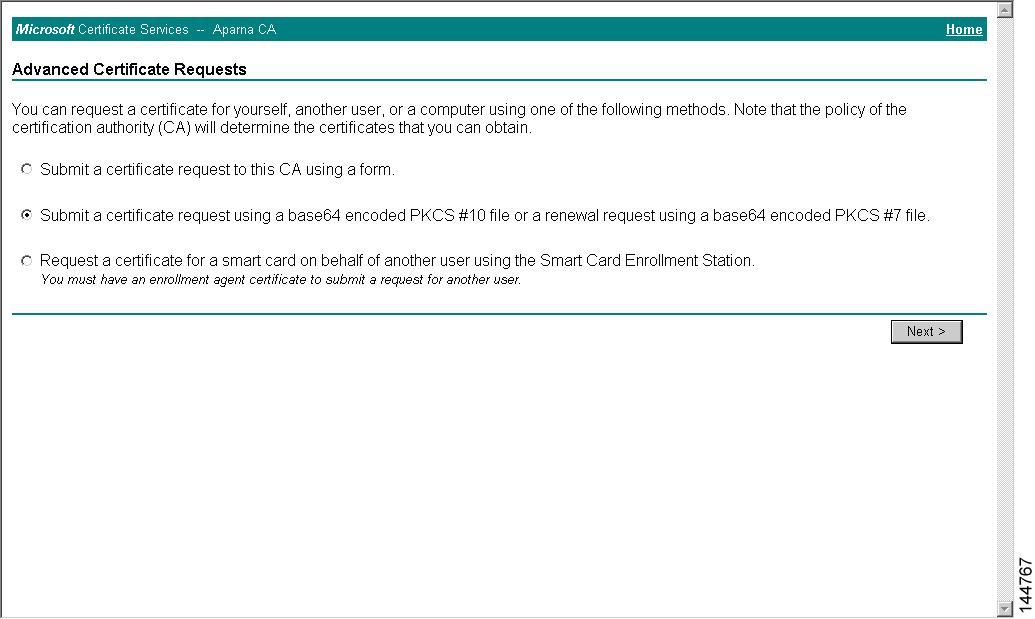
Click Submit a certificate request using a base64 encoded PKCS#10 file or a renewal request using a base64 encoded PKCS#7 file and click Next.
 |
| Step 4 |
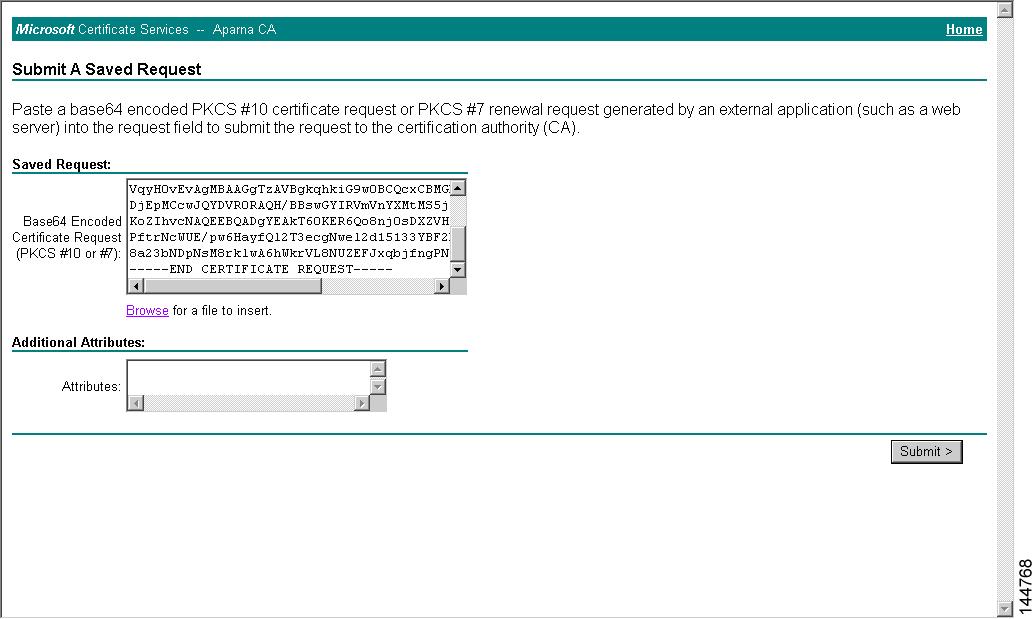
In the Saved Request text box, paste the base64 PKCS#10 certificate request and click Next. The certificate request is copied from the Cisco NX-OS device console.
 |
| Step 5 |
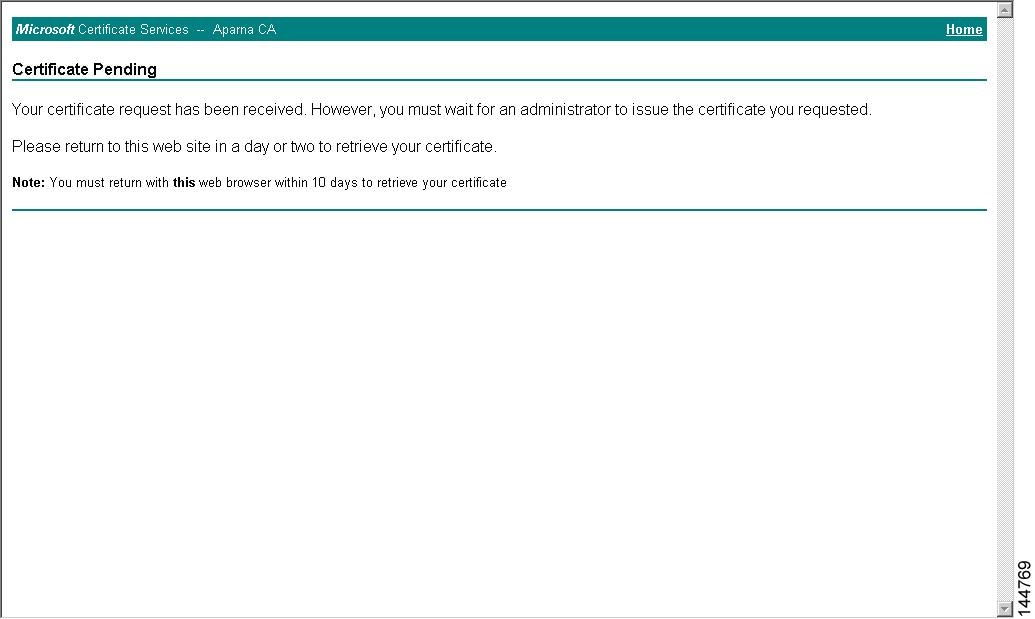
Wait one or two days until the certificate is issued by the CA administrator.
 |
| Step 6 |
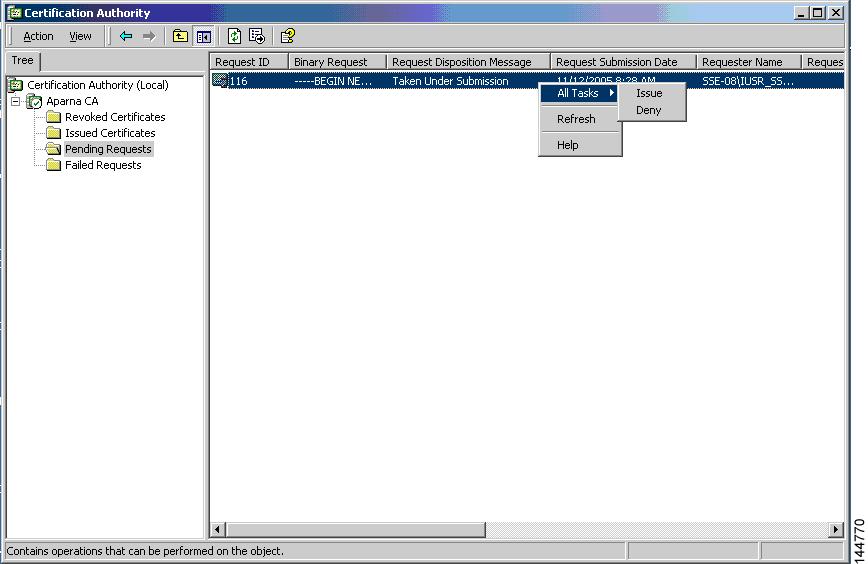
Note that the CA administrator approves the certificate request.
 |
| Step 7 |
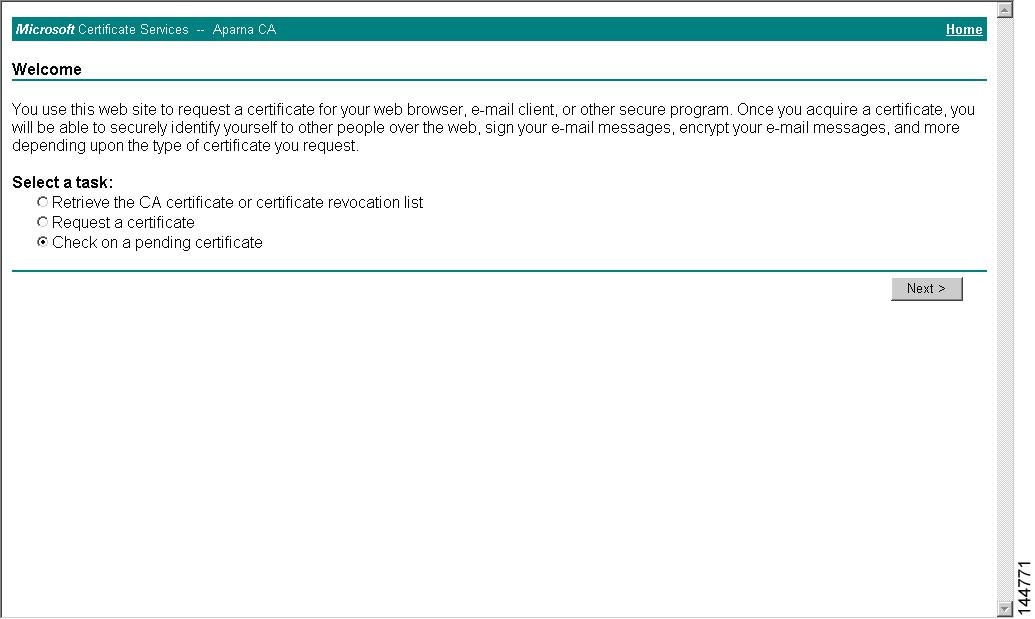
From the Microsoft Certificate Services web interface, click Check on a pending certificate and click Next.
 |
| Step 8 |
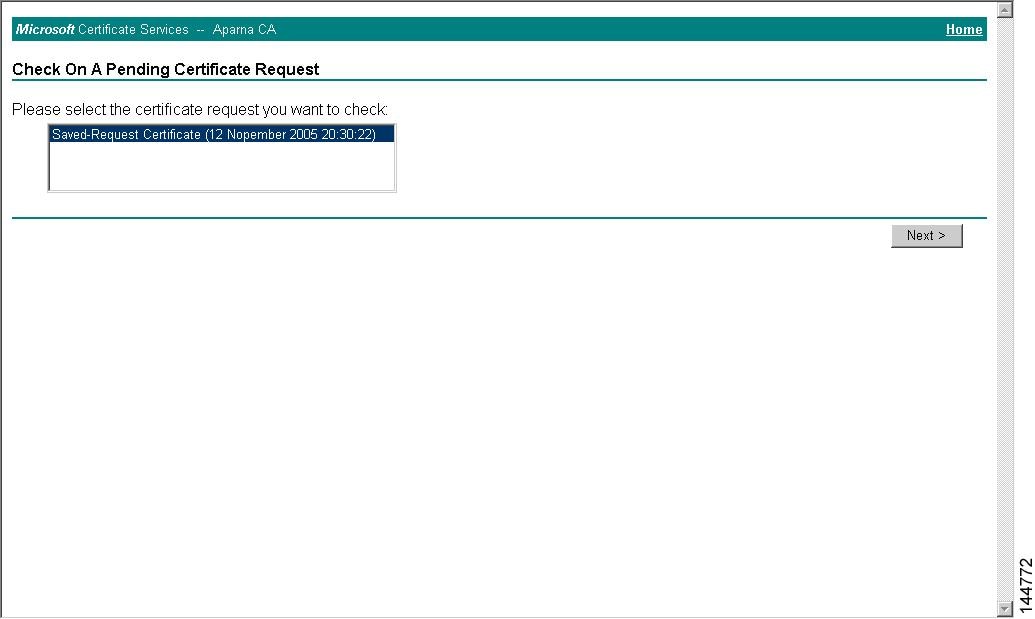
Choose the certificate request that you want to check and click Next.
 |
| Step 9 |
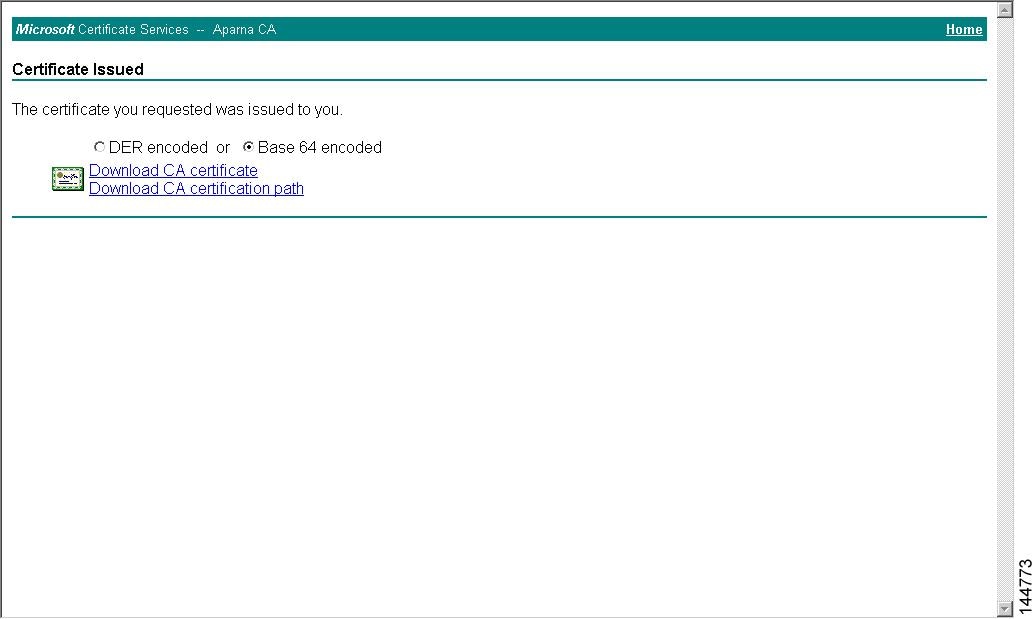
Click Base 64 encoded and click Download CA certificate.
 |
| Step 10 |
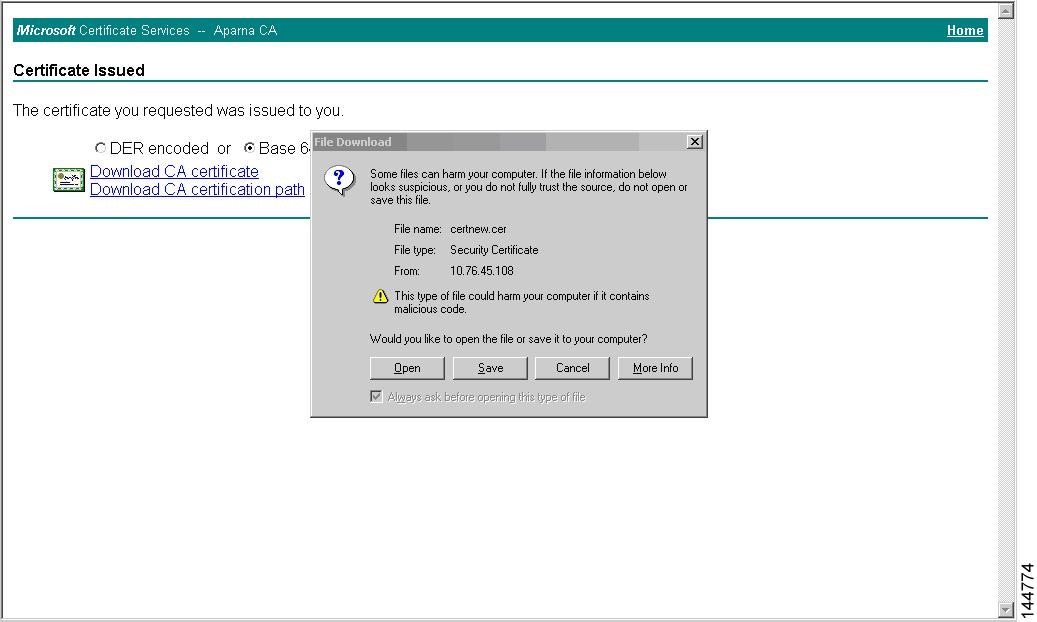
In the File Download dialog box, click Open.
 |
| Step 11 |
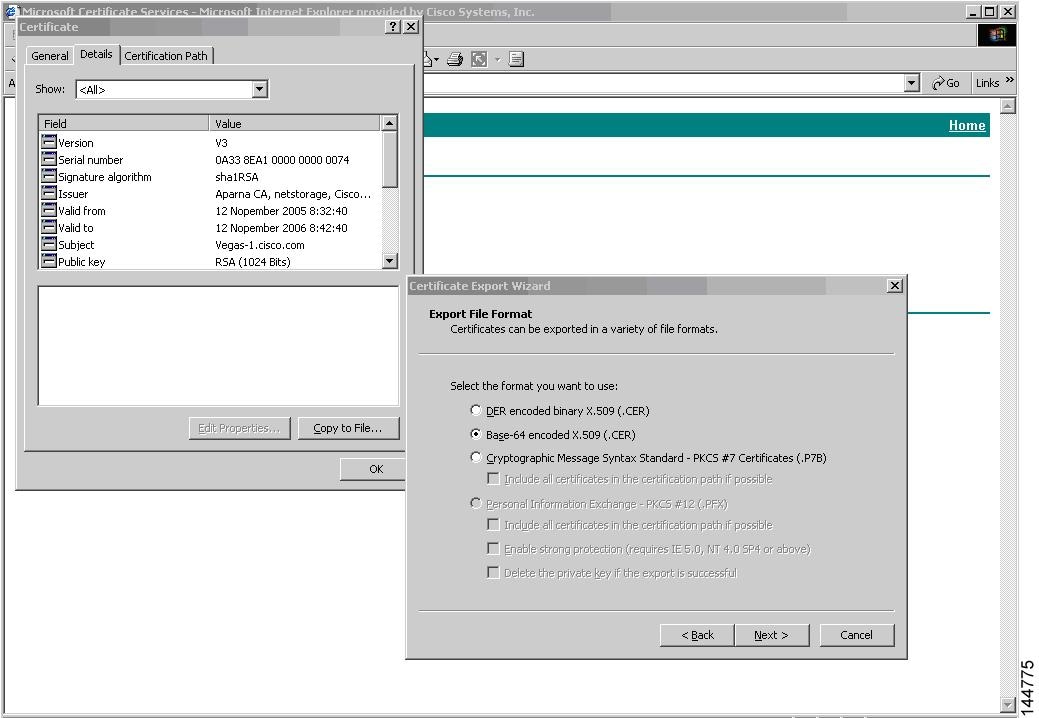
In the Certificate box, click Details tab and click Copy to File.... In the Certificate Export Dialog box, click Base-64 encoded X.509 (.CER), and click Next.
 |
| Step 12 |
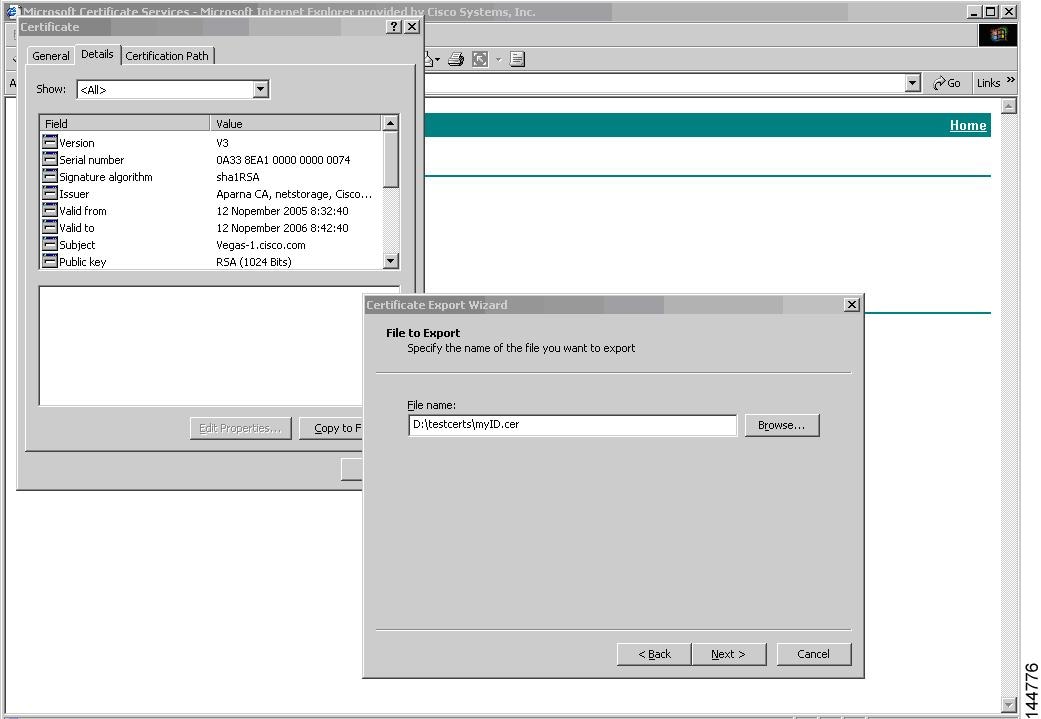
In the File name: text box on the Certificate Export Wizard dialog box, enter the destination file name and click Next.
 |
| Step 13 |
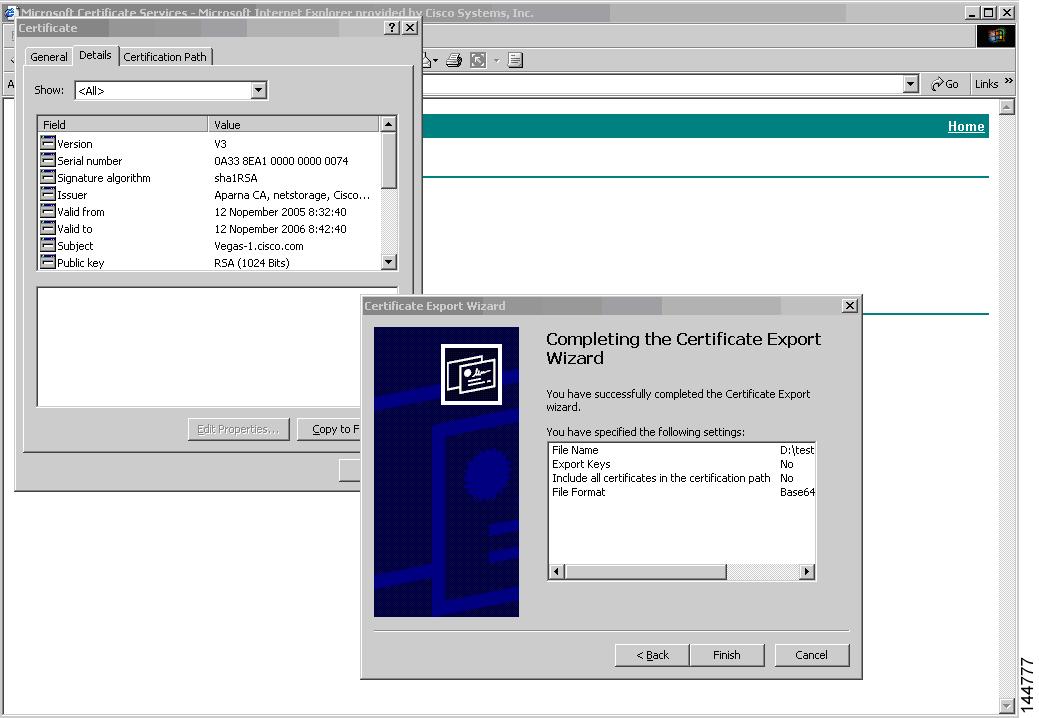
Click Finish.
 |
| Step 14 |
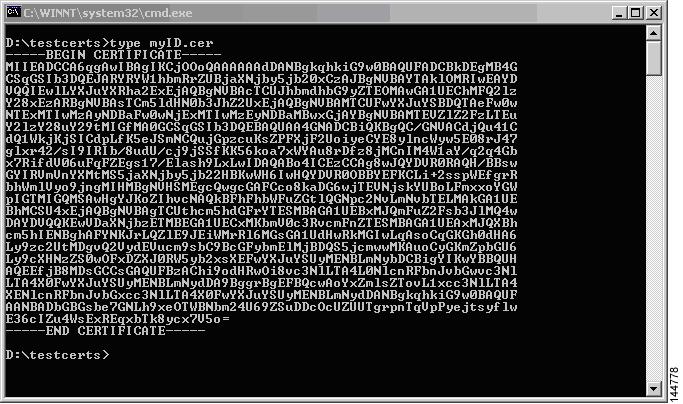
Enter the Microsoft Windows type command to display the identity certificate in base64-encoded format.
 |
Revoking a Certificate
To revoke a certificate using the Microsoft CA administrator program, follow these steps:
| Step 1 | From the Certification Authority tree, click Issued Certificates folder. From the list, right-click the certificate that you want to revoke. |
| Step 2 |
Choose All Tasks > Revoke Certificate. 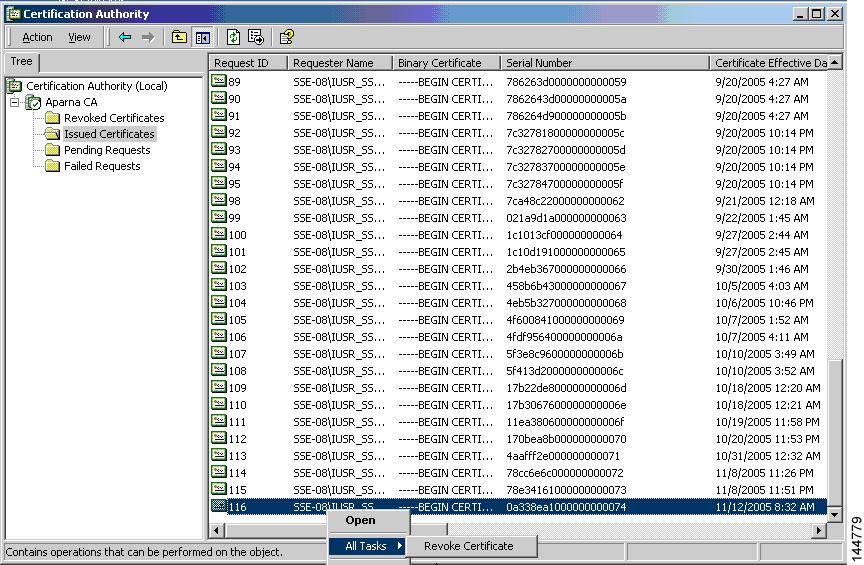 |
| Step 3 |
From the Reason code drop-down list, choose a reason for the revocation and click Yes. 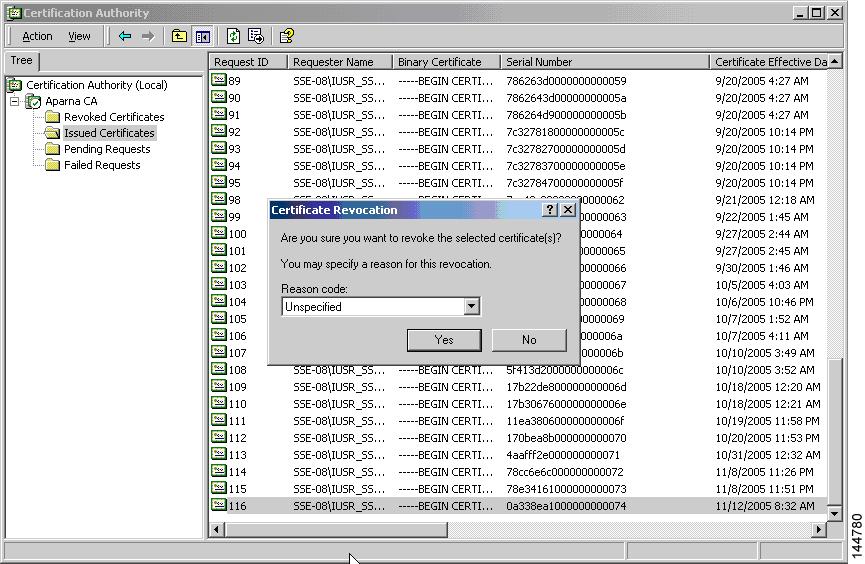 |
| Step 4 |
Click the Revoked Certificates folder to list and verify the certificate revocation.
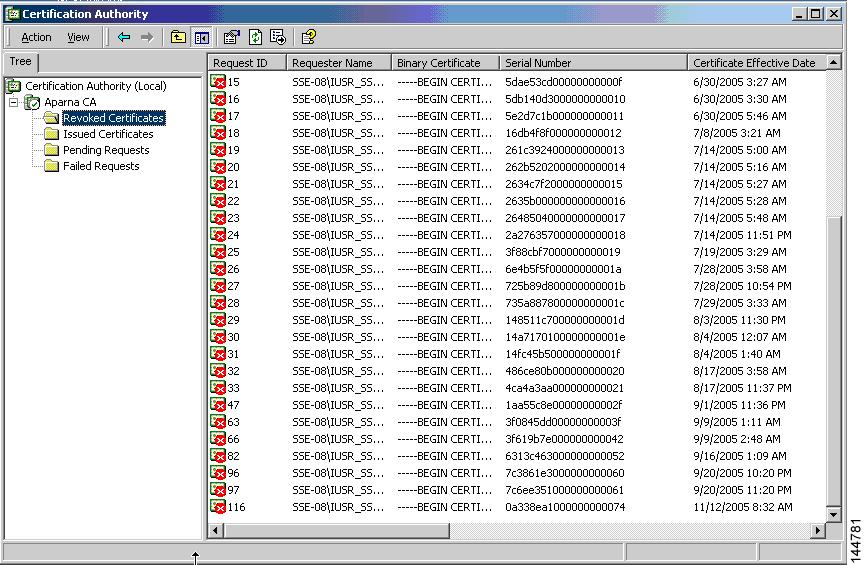 |
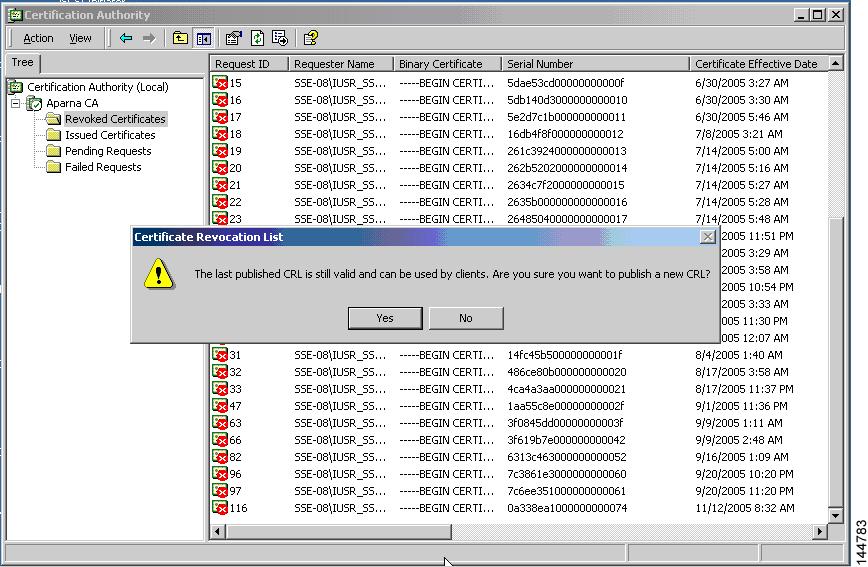
Generating and Publishing the CRL
To generate and publish the CRL using the Microsoft CA administrator program, follow these steps:
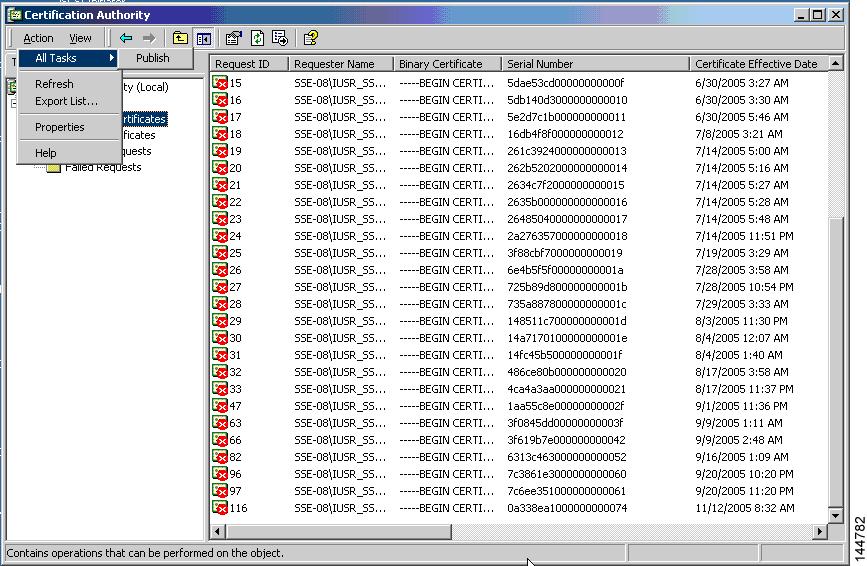
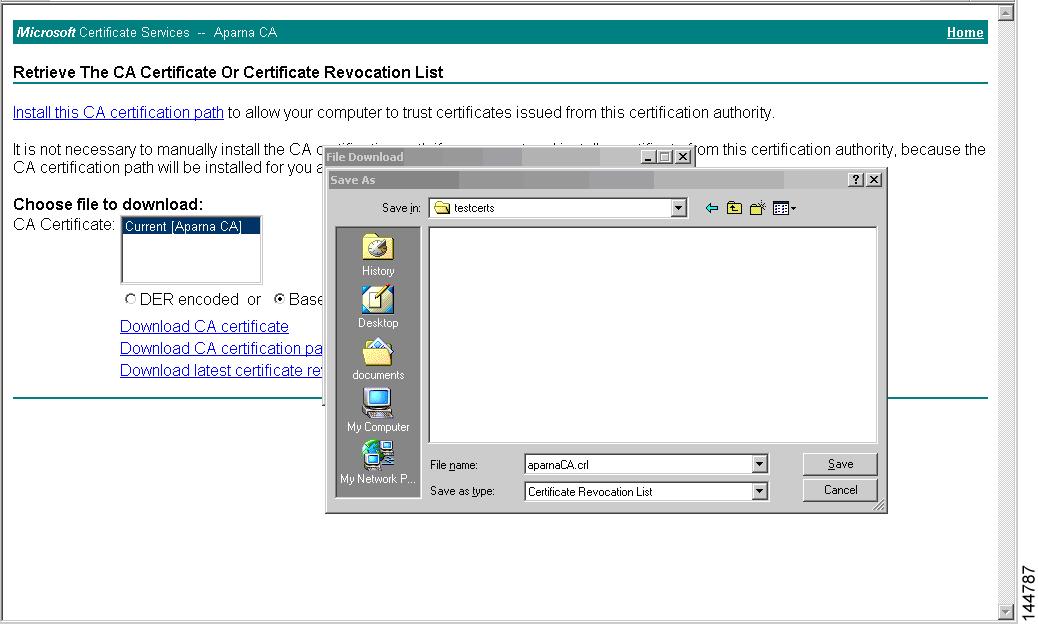
Downloading the CRL
To download the CRL from the Microsoft CA website, follow these steps:
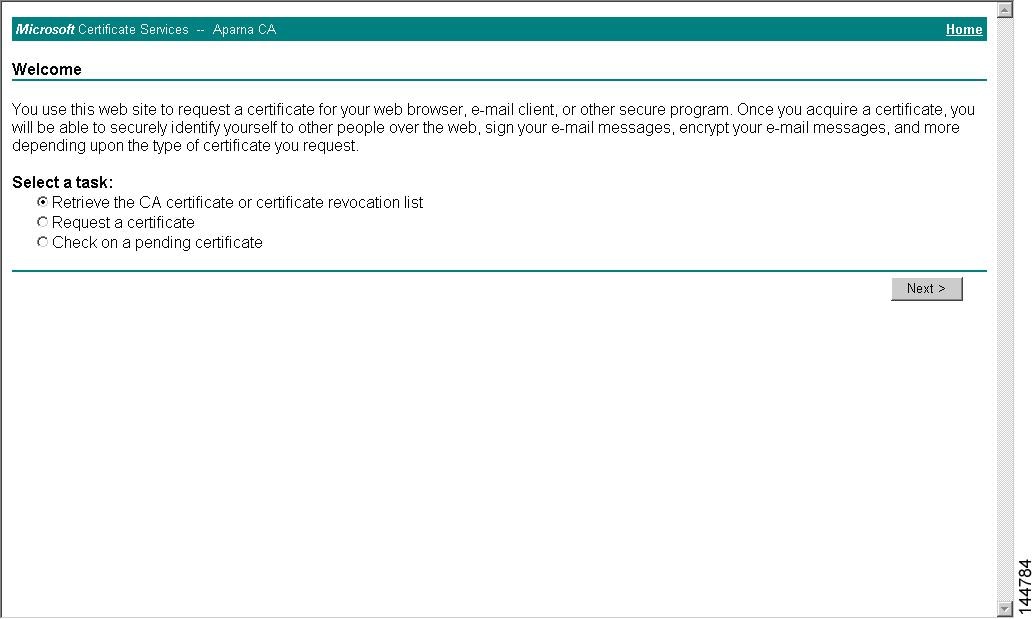
| Step 1 |
From the Microsoft Certificate Services web interface, click Retrieve the CA certificate or certificate revocation list and click Next.
 |
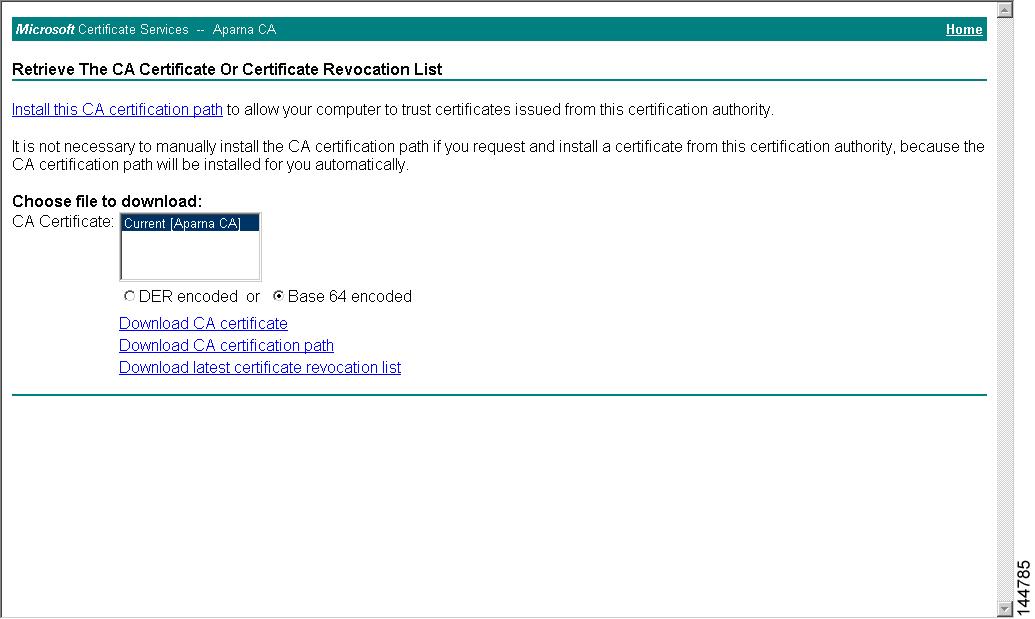
| Step 2 |
Click Download latest certificate revocation list.
 |
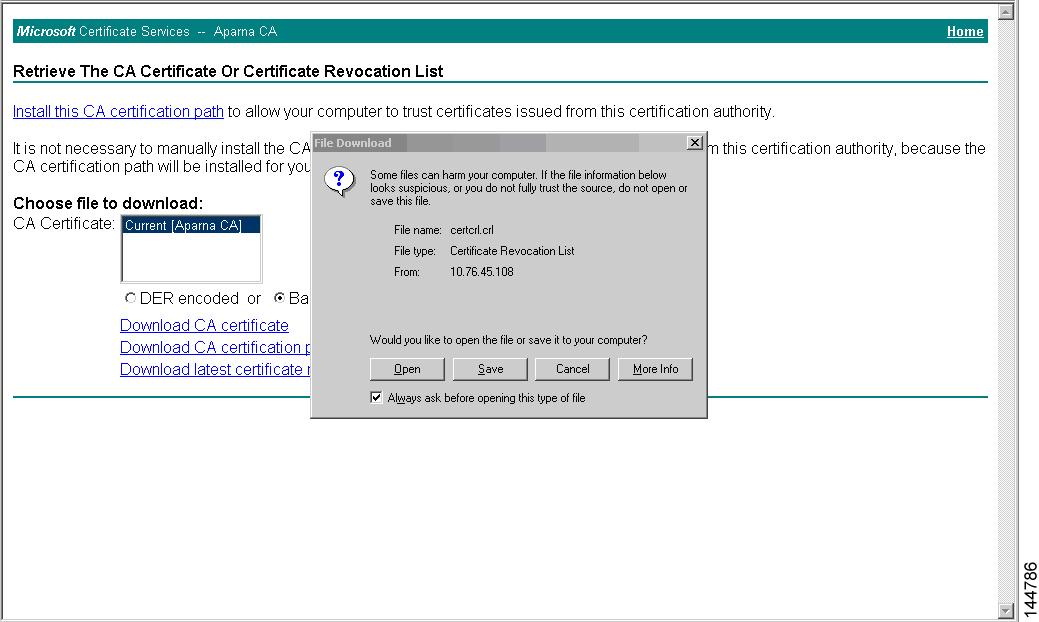
| Step 3 |
In the File Download dialog box, click Save.
 |
| Step 4 |
In the Save As dialog box, enter the destination file name and click Save.
 |
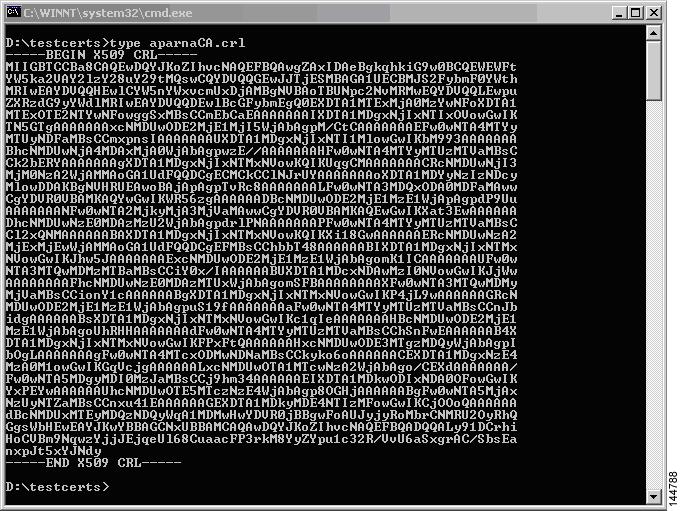
| Step 5 |
Enter the Microsoft Windows type command to display the CRL.
 |
Importing the CRL
To import the CRL to the trust point corresponding to the CA, follow these steps:
| Step 1 |
Copy the CRL file to the Cisco NX-OS device bootflash. Device-1# copy tftp:apranaCA.crl bootflash:aparnaCA.crl | ||
| Step 2 |
Configure the CRL. Device-1# configure terminal Device-1(config)# crypto ca crl request myCA bootflash:aparnaCA.crl Device-1(config)# | ||
| Step 3 |
Display the contents of the CRL.
Device-1(config)# show crypto ca crl myCA
Trustpoint: myCA
CRL:
Certificate Revocation List (CRL):
        Version 2 (0x1)
        Signature Algorithm: sha1WithRSAEncryption
        Issuer: /emailAddress=admin@yourcompany.com/C=IN/ST=Karnatak
Yourcompany/OU=netstorage/CN=Aparna CA
        Last Update: Nov 12 04:36:04 2005 GMT
        Next Update: Nov 19 16:56:04 2005 GMT
        CRL extensions:
            X509v3 Authority Key Identifier:
            keyid:27:28:F2:46:83:1B:AC:23:4C:45:4D:8E:C9:18:50:1
            1.3.6.1.4.1.311.21.1:
                ...
Revoked Certificates:
    Serial Number: 611B09A1000000000002
        Revocation Date: Aug 16 21:52:19 2005 GMT
Serial Number: 4CDE464E000000000003
        Revocation Date: Aug 16 21:52:29 2005 GMT
    Serial Number: 4CFC2B42000000000004
        Revocation Date: Aug 16 21:52:41 2005 GMT
    Serial Number: 6C699EC2000000000005
        Revocation Date: Aug 16 21:52:52 2005 GMT
    Serial Number: 6CCF7DDC000000000006
        Revocation Date: Jun  8 00:12:04 2005 GMT
    Serial Number: 70CC4FFF000000000007
        Revocation Date: Aug 16 21:53:15 2005 GMT
    Serial Number: 4D9B1116000000000008
        Revocation Date: Aug 16 21:53:15 2005 GMT
    Serial Number: 52A80230000000000009
        Revocation Date: Jun 27 23:47:06 2005 GMT
        CRL entry extensions:
            X509v3 CRL Reason Code:
            CA Compromise
Serial Number: 5349AD4600000000000A
        Revocation Date: Jun 27 23:47:22 2005 GMT
        CRL entry extensions:
            X509v3 CRL Reason Code:
            CA Compromise
Serial Number: 53BD173C00000000000B
        Revocation Date: Jul  4 18:04:01 2005 GMT
        CRL entry extensions:
            X509v3 CRL Reason Code:
            Certificate Hold
Serial Number: 591E7ACE00000000000C
        Revocation Date: Aug 16 21:53:15 2005 GMT
    Serial Number: 5D3FD52E00000000000D
        Revocation Date: Jun 29 22:07:25 2005 GMT
        CRL entry extensions:
            X509v3 CRL Reason Code:
            Key Compromise
Serial Number: 5DAB771300000000000E
        Revocation Date: Jul 14 00:33:56 2005 GMT
    Serial Number: 5DAE53CD00000000000F
        Revocation Date: Aug 16 21:53:15 2005 GMT
    Serial Number: 5DB140D3000000000010
        Revocation Date: Aug 16 21:53:15 2005 GMT
    Serial Number: 5E2D7C1B000000000011
        Revocation Date: Jul  6 21:12:10 2005 GMT
        CRL entry extensions:
            X509v3 CRL Reason Code:
            Cessation Of Operation
Serial Number: 16DB4F8F000000000012
        Revocation Date: Aug 16 21:53:15 2005 GMT
    Serial Number: 261C3924000000000013
        Revocation Date: Aug 16 21:53:15 2005 GMT
    Serial Number: 262B5202000000000014
        Revocation Date: Jul 14 00:33:10 2005 GMT
    Serial Number: 2634C7F2000000000015
        Revocation Date: Jul 14 00:32:45 2005 GMT
    Serial Number: 2635B000000000000016
        Revocation Date: Jul 14 00:31:51 2005 GMT
    Serial Number: 26485040000000000017
        Revocation Date: Jul 14 00:32:25 2005 GMT
    Serial Number: 2A276357000000000018
Revocation Date: Aug 16 21:53:15 2005 GMT
    Serial Number: 3F88CBF7000000000019
        Revocation Date: Aug 16 21:53:15 2005 GMT
    Serial Number: 6E4B5F5F00000000001A
        Revocation Date: Aug 16 21:53:15 2005 GMT
    Serial Number: 725B89D800000000001B
        Revocation Date: Aug 16 21:53:15 2005 GMT
    Serial Number: 735A887800000000001C
        Revocation Date: Aug 16 21:53:15 2005 GMT
    Serial Number: 148511C700000000001D
        Revocation Date: Aug 16 21:53:15 2005 GMT
    Serial Number: 14A7170100000000001E
        Revocation Date: Aug 16 21:53:15 2005 GMT
    Serial Number: 14FC45B500000000001F
        Revocation Date: Aug 17 18:30:42 2005 GMT
    Serial Number: 486CE80B000000000020
        Revocation Date: Aug 17 18:30:43 2005 GMT
    Serial Number: 4CA4A3AA000000000021
        Revocation Date: Aug 17 18:30:43 2005 GMT
    Serial Number: 1AA55C8E00000000002F
        Revocation Date: Sep  5 17:07:06 2005 GMT
    Serial Number: 3F0845DD00000000003F
        Revocation Date: Sep  8 20:24:32 2005 GMT
    Serial Number: 3F619B7E000000000042
        Revocation Date: Sep  8 21:40:48 2005 GMT
    Serial Number: 6313C463000000000052
        Revocation Date: Sep 19 17:37:18 2005 GMT
    Serial Number: 7C3861E3000000000060
        Revocation Date: Sep 20 17:52:56 2005 GMT
    Serial Number: 7C6EE351000000000061
        Revocation Date: Sep 20 18:52:30 2005 GMT
    Serial Number: 0A338EA1000000000074   <-- Revoked identity certificate
        Revocation Date: Nov 12 04:34:42 2005 GMT
    Signature Algorithm: sha1WithRSAEncryption
        0b:cb:dd:43:0a:b8:62:1e:80:95:06:6f:4d:ab:0c:d8:8e:32:
        44:8e:a7:94:97:af:02:b9:a6:9c:14:fd:eb:90:cf:18:c9:96:
        29:bb:57:37:d9:1f:d5:bd:4e:9a:4b:18:2b:00:2f:d2:6e:c1:
        1a:9f:1a:49:b7:9c:58:24:d7:72
|
 Feedback