Cisco APIC and IGMP Snoop Layer 2 Multicast Configuration
Available Languages
Contents
- New and Changed
- About Cisco APIC and IGMP Snooping
- How IGMP Snooping is Implemented in the ACI Fabric
- Virtualization Support
- The APIC IGMP Snooping Function, IGMPv1, IGMPv2, and the Fast Leave Feature
- The APIC IGMP Snooping Function and IGMPv3
- Cisco APIC and the IGMP Snooping Querier Function
- Prerequisites for IGMP Snooping in APIC
- Guidelines and Limitations for the APIC IGMP Snooping Function
- Configuring and Assigning an IGMP Snoop Policy
- Configuring and Assigning an IGMP Snoop Policy to a Bridge Domain in the Advanced GUI
- Configuring an IGMP Snoop Policy Using the Advanced GUI
- Assigning an IGMP Snoop Policy to a Bridge Domain Using the Advanced GUI
- Configuring and Assigning an IGMP Snoop Policy to a Bridge Domain using the NX-OS Style CLI
- Configuring and Assigning an IGMP Snoop Policy to a Bridge Domain using the REST API
- Enabling IGMP Snoop Static Port Groups
- Enabling IGMP Layer 2 Multicast on Static Ports in the Advanced GUI
- Enabling IGMP Layer 2 Multicast on Static Ports in the NX-OS Style CLI
- Enabling IGMP Layer 2 Multicast on Static Ports Using the REST API
- Enabling IGMP Snoop Access Groups
- Enabling Group Access to IGMP Layer 2 Multicast in the GUI
- Enabling Group Access to IGMP Layer 2 Multicast using the NX-OS Style CLI
- Enabling Group Access to IGMP Layer 2 Multicast using REST API
- EPG Static Port Deployment
- Deploying an EPG on a Specific Port with APIC Using the GUI
- Deploying an EPG on a Specific Port with APIC Using the NX-OS Style CLI
- Deploying an EPG on a Specific Port with APIC Using the REST API
New and Changed
About Cisco APIC and IGMP Snooping
IGMP snooping is the process of listening to Internet Group Management Protocol (IGMP) network traffic. The feature allows a network switch to listen in on the IGMP conversation between hosts and routers and filter multicasts links that do not need them, thus controlling which ports receive specific multicast traffic.
Cisco APIC provides support for the full IGMP snooping feature included on a traditional switch such as the N9000 standalone.
Policy-based IGMP snooping configuration per bridge domain
APIC enables you to configure a policy in which you enable, disable, or customize the properties of IGMP Snooping on a per bridge-domain basis. You can then apply that policy to one or multiple bridge domains.
Static port group implementation
IGMP static port grouping enables you to pre-provision ports, already statically-assigned to an application EPG, as the switch ports to receive and process IGMP multicast traffic. This pre-provisioning prevents the join latency which normally occurs when the IGMP snooping stack learns ports dynamically.
Static group membership can be pre-provisioned only on static ports (also called, static-binding ports) assigned to an application EPG.
Access group configuration for application EPGs
An “access-group” is used to control what streams can be joined behind a given port.
An access-group configuration can be applied on interfaces that are statically assigned to an application EPG in order to ensure that the configuration can be applied on ports that will actually belong to the that EPG.
Only Route-map-based access groups are allowed.
How IGMP Snooping is Implemented in the ACI Fabric
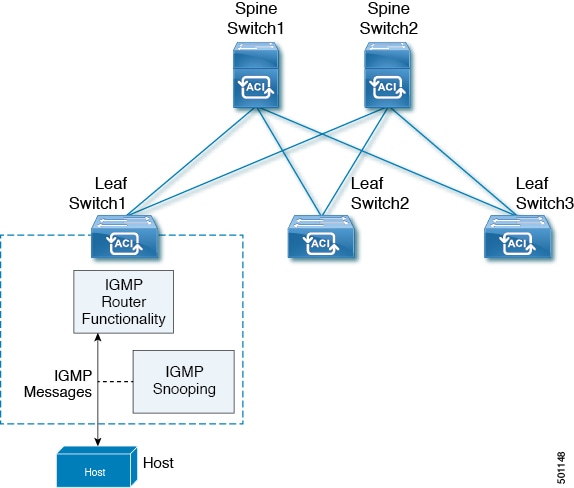
IGMP snooping software examines Layer 2 IP multicast traffic within a bridge domain to discover the ports where interested receivers reside. Using the port information, IGMP snooping can reduce bandwidth consumption in a multi-access bridge domain environment to avoid flooding the entire bridge domain. By default, IGMP snooping is enabled on the bridge domain.
This figure shows the IGMP routing functions and IGMP snooping functions both contained on an ACI leaf switch with connectivity to a host. The IGMP snooping feature snoops the IGMP membership reports and Leave messages and forwards them only when necessary to the IGMP router function.
IGMP snooping operates upon IGMPv1, IGMPv2, and IGMPv3 control plane packets where Layer 3 control plane packets are intercepted and influence the Layer 2 forwarding behavior.
IGMP snooping has the following proprietary features:
Source filtering that allows forwarding of multicast packets based on destination and source IP addresses
Multicast forwarding based on IP addresses rather than the MAC address
Note
For more information about IGMP snooping, see RFC 4541.
The APIC IGMP Snooping Function, IGMPv1, IGMPv2, and the Fast Leave Feature
Both IGMPv1 and IGMPv2 support membership report suppression, which means that if two hosts on the same subnet want to receive multicast data for the same group, the host that receives a member report from the other host suppresses sending its report. Membership report suppression occurs for hosts that share a port.
If no more than one host is attached to each switch port, you can configure the fast leave feature in IGMPv2. The fast leave feature does not send last member query messages to hosts. As soon as APIC receives an IGMP leave message, the software stops forwarding multicast data to that port.
IGMPv1 does not provide an explicit IGMP leave message, so the APIC IGMP snooping function must rely on the membership message timeout to indicate that no hosts remain that want to receive multicast data for a particular group.
Note
The IGMP snooping function ignores the configuration of the last member query interval when you enable the fast leave feature because it does not check for remaining hosts.
The APIC IGMP Snooping Function and IGMPv3
The IGMPv3 snooping function in APIC supports full IGMPv3 snooping, which provides constrained flooding based on the (S, G) information in the IGMPv3 reports. This source-based filtering enables the device to constrain multicast traffic to a set of ports based on the source that sends traffic to the multicast group.
By default, the IGMP snooping function tracks hosts on each VLAN port in the bridge domain. The explicit tracking feature provides a fast leave mechanism. Because every IGMPv3 host sends membership reports, report suppression limits the amount of traffic that the device sends to other multicast-capable routers. When report suppression is enabled, and no IGMPv1 or IGMPv2 hosts requested the same group, the IGMP snooping function provides proxy reporting. The proxy feature builds the group state from membership reports from the downstream hosts and generates membership reports in response to queries from upstream queriers.
Even though the IGMPv3 membership reports provide a full accounting of group members in a bridge domain, when the last host leaves, the software sends a membership query. You can configure the parameter last member query interval. If no host responds before the timeout, the IGMP snooping function removes the group state.
Cisco APIC and the IGMP Snooping Querier Function
When PIM is not enabled on an interface because the multicast traffic does not need to be routed, you must configure an IGMP snooping querier function to send membership queries. Within APIC, you define within the IGMP Snoop policy, the querier in a bridge domain that contains multicast sources and receivers but no other active querier.
The querier function can be configured to use any IP address in the bridge domain.
As a best practice, a unique IP address, one that is not already used by the switch interface or the Hot Standby Router Protocol (HSRP) virtual IP address, should be configured so as to easily reference the querier function.
Note
The IP address for the querier should not be a broadcast IP address, multicast IP address, or 0 (0.0.0.0).
When an IGMP snooping querier is enabled, it sends out periodic IGMP queries that trigger IGMP report messages from hosts that want to receive IP multicast traffic. IGMP snooping listens to these IGMP reports to establish appropriate forwarding.
The IGMP snooping querier performs querier election as described in RFC 2236. Querier election occurs in the following configurations:
Configuring and Assigning an IGMP Snoop Policy
Configuring and Assigning an IGMP Snoop Policy to a Bridge Domain in the Advanced GUI
Configuring an IGMP Snoop Policy Using the Advanced GUI
Procedure
The new IGMP Snoop policy is listed in the Protocol Policies - IGMP Snoop summary page.
What to Do Next
To put this policy into effect, assign it to any bridge domain.
Assigning an IGMP Snoop Policy to a Bridge Domain Using the Advanced GUI
ProcedureAssigning an IGMP Snoop policy to a bridge domain configures that bridge domain to use the IGMP Snoop properties specified in that policy.
The target bridge domain is now associated with the IGMP Snoop configuration specified in its assigned policy.
Configuring and Assigning an IGMP Snoop Policy to a Bridge Domain using the NX-OS Style CLI
ProcedureWhat to Do Next
Command or Action Purpose
Step 1 Create a snooping policy based on default values.
Example:apic1(config-tenant)# template ip igmp snooping policy cookieCut1 apic1(config-tenant-template-ip-igmp-snooping)# show run all # Command: show running -config all tenant foo template ip igmp snooping policy cookieCut1 # Time: Thu Oct 13 18:26:03 2016 tenant t_10 template ip igmp snooping policy cookieCut1 ip igmp snooping no ip igmp snooping fast-leave ip igmp snooping last-member-query-interval 1 no ip igmp snooping querier ip igmp snooping query-interval 125 ip igmp snooping query-max-response-time 10 ip igmp snooping stqrtup-query-count 2 ip igmp snooping startup-query-interval 31 no description exit exit apic1(config-tenant-template-ip-igmp-snooping)#The example NX-OS style CLI sequence:
Step 2 Modify the snooping policy as necessary.
Example:apic1(config-tenant-template-ip-igmp-snooping)# ip igmp snooping query-interval 300 apic1(config-tenant-template-ip-igmp-snooping)# show run all # Command: show running -config all tenant foo template ip igmp snooping policy cookieCut1 #Time: Thu Oct 13 18:26:03 2016 tenant foo template ip igmp snooping policy cookieCut1 ip igmp snooping no ip igmp snooping fast-leave ip igmp snooping last-member-query-interval 1 no ip igmp snooping querier ip igmp snooping query-interval 300 ip igmp snooping query-max-response-time 10 ip igmp snooping stqrtup-query-count 2 ip igmp snooping startup-query-interval 31 no description exit exit apic1(config-tenant-template-ip-igmp-snooping)# exit apic1(config--tenant)#
Note The ip igmp optimise-multicast-flood command is deprecated. It is only allowed for backward compatability.
The example NX-OS style CLI sequence:
Step 3 Assign the policy to a bridge domain.
Example:apic1(config-tenant)# int bridge-domain bd3 apic1(config-tenant-interface)# ip igmp snooping policy cookieCut1The example NX-OS style CLI sequence:
You can assign the IGMP Snoop policy to multiple bridge domains.
Configuring and Assigning an IGMP Snoop Policy to a Bridge Domain using the REST API
Procedure
Example:https://apic-ip-address/api/node/mo/uni/.xml <fvTenant name="mcast_tenant1"> <!-- Create an IGMP snooping template, and provide the options --> <igmpSnoopPol name="igmp_snp_bd_21" adminSt="enabled" lastMbrIntvl="1" queryIntvl="125" rspIntvl="10" startQueryCnt="2" startQueryIntvl="31" /> <fvCtx name="ip_video"/> <fvBD name="bd_21"> <fvRsCtx tnFvCtxName="ip_video"/> <!-- Bind igmp snoooping to a BD --> <fvRsIgmpsn tnIgmpSnoopPolName="igmp_snp_bd_21"/> </fvBD></fvTenant>This example creates and configures the the IGMP Snoop policy, igmp_snp_bd_12 with the following properties, and binds the IGMP policy, igmp_snp_bd_21, to bridge domain, bd_21:
Enabling IGMP Snoop Static Port Groups
IGMP static port grouping enables you to pre-provision ports, already statically-assigned to an application EPG, as the switch ports to receive and process IGMP multicast traffic. This pre-provisioning prevents the join latency which normally occurs when the IGMP snooping stack learns ports dynamically.
Static group membership can be pre-provisioned only on static ports assigned to an application EPG.
Static group membership can be configured through the APIC GUI, CLI, and REST API interfaces.
Enabling IGMP Layer 2 Multicast on Static Ports in the Advanced GUI
You can enable IGMP snooping and Layer 2 multicasting on ports that have been statically assigned to an EPG. Afterwards you can create and assign access groups of users that are permitted or denied access to the IGMP snooping and multicast traffic enabled on those ports.
Before You BeginBefore you begin to enable IGMP snooping and Layer 2 multicasting for an EPG, complete the following tasks. .Procedure
Identify the interfaces to enable this function and statically assign them to that EPG
Note
For details on static port assignment, see Deploying an EPG on a Specific Port with APIC Using the GUIIdentify the IP addresses that you want to be recipients of IGMP snoop layer 2 multicast traffic.
Step 1 Click . Navigating to this spot displays all the ports you have statically assigned to the target EPG.
Step 2 Click the port to which you intend to statically assign group members for IGMP snooping. This action displays the Static Port Configuration page. Step 3 On the Static Port Configuration page, click to display the IGMP Static Group table at the bottom of the page. Step 4 Locate the IGMP Snoop Static Group table and click + to add an IGMP Snoop Address Group entry. Adding an IGMP Snoop Address Group entry associates the target static port with a specified multicast IP address and enables it to process the IGMP snoop traffic received at that address.
When configuration is complete, the target interface is enabled to process IGMP Snooping protocol traffic sent to its associated multicast IP address.
- In the Group Address field, enter the multicast IP address to associate with his interface and this EPG.
- In the Source Address field enter the IP address of the source to the multicast stream, if applicable.
- Click Submit.
Note You can repeat this step to associate additional multicast addresses with the target static port.
Step 5 Click Submit.
Enabling IGMP Layer 2 Multicast on Static Ports in the NX-OS Style CLI
You can enable IGMP snooping and Layer 2 multicasting on ports that have been statically assigned to an EPG. Then you can create and assign access groups of users that are permitted or denied access to the IGMP snooping and multicast traffic enabled on those ports.
The steps described in this task assume the pre-configuration of the following entities:
Tenant: tenant_A
Application: application_A
EPG: epg_A
Bridge Domain: bridge_domain_A
vrf: vrf_A -- a member of bridge_domain_A
VLAN Domain: vd_A (configured with a range of 300-310)
Leaf switch: 101 and interface 1/10
The target interface 1/10 on switch 101 is associated with VLAN 305 and statically linked with tenant_A, application_A, epg_A
Leaf switch: 101 and interface 1/11
The target interface 1/11 on switch 101 is associated with VLAN 309 and statically linked with tenant_A, application_A, epg_A
Note
For details on static port assignment, see Deploying an EPG on a Specific Port with APIC Using the NX-OS Style CLIBefore You BeginBefore you begin to enable IGMP snooping and Layer 2 multicasting for an EPG, complete the following tasks.Procedure
Identify the interfaces to enable this function and statically assign them to that EPG
Note
For details on static port assignment, see Deploying an EPG on a Specific Port with APIC Using the NX-OS Style CLIIdentify the IP addresses that you want to be recipients of IGMP snoop layer 2 multicast traffic.
Command or Action Purpose
Step 1 On the target interfaces enable IGMP snooping and layer 2 multicasting
Example:apic1# conf t apic1(config)# tenant tenant_A apic1(config-tenant)# application application_A apic1(config-tenant-app)# epg epg_A apic1(config-tenant-app-epg)# ip igmp snooping static-group 225.1.1.1 leaf 101 interface ethernet 1/10 vlan 305 apic1(config-tenant-app-epg)# end apic1# conf t apic1(config)# tenant tenant_A; application application_A; epg epg_A apic1(config-tenant-app-epg)# ip igmp snooping static-group 227.1.1.1 leaf 101 interface ethernet 1/11 vlan 309 apic1(config-tenant-app-epg)# exit apic1(config-tenant-app)# exitEnabling IGMP Layer 2 Multicast on Static Ports Using the REST API
ProcedureYou can enable IGMP snoop and layer 2 multicast processing on ports that have been statically assigned to an EPG. You can create and assign access groups of users that are permitted or denied access to the IGMP snoop and multicast traffic enabled on those ports.
In the following example, IGMP snoop is enabled on leaf 102 interface 1/10 on VLAN 202. Multicast IP addressses 224.1.1.1 and 225.1.1.1 are associated with this port.
Example:https://apic-ip-address/api/node/mo/uni/.xml <fvTenant name="tenant_A"> <fvAp name="appplication_A"> <fvAEPg name="epg_A"> <fvRsPathAtt encap="vlan-202" instrImedcy="immediate" mode="regular" tDn="topology/pod-1/paths-102/pathep-[eth1/10]"> <!-- IGMP snooping static group case --> <igmpSnoopStaticGroup group="224.1.1.1" source="0.0.0.0"/> <igmpSnoopStaticGroup group="225.1.1.1" source="2.2.2.2"/> </fvRsPathAtt> </fvAEPg> </fvAp> </fvTenant>Enabling IGMP Snoop Access Groups
An “access-group” is used to control what streams can be joined behind a given port.
An access-group configuration can be applied on interfaces that are statically assigned to an application EPG in order to ensure that the configuration can be applied on ports that will actually belong to the that EPG.
Only Route-map-based access groups are allowed.
IGMP snoop access groups can be configured through the APIC GUI, CLI, and REST API interfaces.
Enabling Group Access to IGMP Layer 2 Multicast in the GUI
After you enable IGMP snooping and Layer 2 multicasting on ports that have been statically assigned to an EPG, you can then create and assign access groups of users that are permitted or denied access to the IGMP snooping and multicast traffic enabled on those ports.
Before You BeginBefore you enable access to IGMP snooping and Layer 2 multicasting for an EPG, Identify the interfaces to enable this function and statically assign them to that EPG .Procedure
Note
For details on static port assignment, see Deploying an EPG on a Specific Port with APIC Using the GUI
Step 1 Click . Navigating to this spot displays all the ports you have statically assigned to the target EPG.
Step 2 Click the port to which you intend to assign multicast group access.to display the page. This action displays the Static Port Configuration window. Step 3 Click to display the IGMP Snoop Access Group table. Step 4 Locate the IGMP Snoop Access Group table and click + to add an access group entry. Adding an IGMP Snoop Access Group entry creates a user group with access to this port, associates it with a multicast IP address, and permits or denies that group access to the IGMP snoop traffic received at that address.
When the configuration is complete, the configured IGMP snoop access group is assigned a multicast IP address through the target static port and permitted or denied access to the multicast streams that are received at that address.
- select Create RouteMap Policy to display the Create RouteMap Policy window.
- In the Name field assign the name of the group that you want to allow or deny multicast traffic.
- In the RouteMaps table click + to display the route map dialog.
- In the Order field, if multiple access groups are being configured for this interface, select a number that reflects the order in which this access group will be permitted or denied access to the multicast traffic on this interface. Lower-numbered access groups are ordered before higher-numbered access groups.
- In the Group IP field enter the multicast IP address whose traffic is to be allowed or blocked for this access group.
- In the Source IP field, enter the IP address of the source if applicable.
- In the Action field, choose Deny to deny access for the target group or Permit to allow access for the target group.
- Click OK.
- Click Submit.
Note Step 5 Click Submit.
Enabling Group Access to IGMP Layer 2 Multicast using the NX-OS Style CLI
ProcedureAfter you have enabled IGMP snooping and Layer 2 multicasting on ports that have been statically assigned to an EPG, you can then create and assign access groups of users that are permitted or denied access to the IGMP snooping and multicast traffic enabled on those ports.
The steps described in this task assume the pre-configuration of the following entities:
Tenant: tenant_A
Application: application_A
EPG: epg_A
Bridge Domain: bridge_domain_A
vrf: vrf_A -- a member of bridge_domain_A
VLAN Domain: vd_A (configured with a range of 300-310)
Leaf switch: 101 and interface 1/10
The target interface 1/10 on switch 101 is associated with VLAN 305 and statically linked with tenant_A, application_A, epg_A
Leaf switch: 101 and interface 1/11
The target interface 1/11 on switch 101 is associated with VLAN 309 and statically linked with tenant_A, application_A, epg_A
Note
For details on static port assignment, see Deploying an EPG on a Specific Port with APIC Using the NX-OS Style CLI
Command or Action Purpose
Step 1 Define the route-map "access groups."
Example:apic1# conf t apic1(config)# tenant tenant_A; application application_A; epg epg_A apic1(config-tenant)# route-map fooBroker permit apic1(config-tenant-rtmap)# match ip multicast group 225.1.1.1/24 apic1(config-tenant-rtmap)# exit apic1(config-tenant)# route-map fooBroker deny apic1(config-tenant-rtmap)# match ip multicast group 227.1.1.1/24 apic1(config-tenant-rtmap)# exitStep 2 Verify route map configurations.
Example:apic1(config-tenant)# show running-config tenant test route-map fooBroker # Command: show running-config tenant test route-map fooBroker # Time: Mon Aug 29 14:34:30 2016 tenant test route-map fooBroker permit 10 match ip multicast group 225.1.1.1/24 exit route-map fooBroker deny 20 match ip multicast group 227.1.1.1/24 exit exitStep 3 Specify the access group connection path.
Example:apic1(config-tenant)# application application_A apic1(config-tenant-app)# epg epg_A apic1(config-tenant-app-epg)# ip igmp snooping access-group route-map fooBroker leaf 101 interface ethernet 1/10 vlan 305 apic1(config-tenant-app-epg)# ip igmp snooping access-group route-map newBroker leaf 101 interface ethernet 1/10 vlan 305Step 4 Verify the access group connections.
Example:apic1(config-tenant-app-epg)# show run # Command: show running-config tenant tenant_A application application_A epg epg_A # Time: Mon Aug 29 14:43:02 2016 tenant tenent_A application application_A epg epg_A bridge-domain member bridge_domain_A ip igmp snooping access-group route-map fooBroker leaf 101 interface ethernet 1/10 vlan 305 ip igmp snooping access-group route-map fooBroker leaf 101 interface ethernet 1/11 vlan 309 ip igmp snooping access-group route-map newBroker leaf 101 interface ethernet 1/10 vlan 305 ip igmp snooping static-group 225.1.1.1 leaf 101 interface ethernet 1/10 vlan 305 ip igmp snooping static-group 225.1.1.1 leaf 101 interface ethernet 1/11 vlan 309 exit exit exitEnabling Group Access to IGMP Layer 2 Multicast using REST API
ProcedureAfter you have enabled IGMP snooping and Layer 2 multicasting on ports that have been statically assigned to an EPG, you can then create and assign access groups of users that are permitted or denied access to the IGMP snooping and multicast traffic enabled on those ports.
The following example sequence configures: Access group "foobroker" associated with tenant_A, Rmap_A, application_A, epg_A, on leaf 102, interface 1/10, VLAN 202. By association with Rmap_A, the access group "foobroker" has access to multicast traffic received at multicast address 226.1.1.1/24 and is denied access to traffic received at multicast address 227.1.1.1/24.
Example:<!-- api/node/mo/uni/.xml --> <fvTenant name="tenant_A"> <pimRouteMapPol name="Rmap_A"> <pimRouteMapEntry action="permit" grp="226.1.1.1/24" order="10"/> <pimRouteMapEntry action="deny" grp="227.1.1.1/24" order="20"/> </pimRouteMapPol> <fvAp name="application_A"> <fvAEPg name="epg_A"> <fvRsPathAtt encap="vlan-202" instrImedcy="immediate" mode="regular" tDn="topology/pod-1/paths-102/pathep-[eth1/10]"> <!-- IGMP snooping access group case --> <igmpSnoopAccessGroup name="foobroker"> <igmpRsSnoopAccessGroupFilterRMap tnPimRouteMapPolName="Rmap_A"/> </igmpSnoopAccessGroup> </fvRsPathAtt> </fvAEPg> </fvAp> </fvTenant>EPG Static Port Deployment
Enabling IGMP snoop processing on ports requires as a prerequisite that the target ports be statically-assigned to associated EPGs.
Static deployment of ports can be configured through the APIC GUI, CLI, or REST API interfaces.
Deploying an EPG on a Specific Port with APIC Using the GUI
Procedure
Step 1 On the menubar, click TENANTS. Step 2 In the Navigation pane, expand the appropriate . Step 3 Right-click Application Profiles and click Create Application Profile. Step 4 In the Create Application Profile dialog box, perform the following actions:
Step 5 In the Navigation pane, expand Application Profiles to view the new application profile. Step 6 Expand Application EPGs, to view the new EPG. Step 7 Expand the EPG and click Static Bindings (Paths), and in the Properties pane, view the details of the static binding paths that are established.
Deploying an EPG on a Specific Port with APIC Using the NX-OS Style CLI
Procedure
Step 1 Configure a VLAN domain:
Example:apic1(config)# vlan-domain dom1 apic1(config-vlan)# vlan 10-100
Step 2 Create a tenant:
Example:apic1# configure apic1(config)# tenant t1
Step 3 Create a private network/VRF:
Example:apic1(config-tenant)# vrf context ctx1 apic1(config-tenant-vrf)# exit
Step 4 Create a bridge domain:
Example:apic1(config-tenant)# bridge-domain bd1 apic1(config-tenant-bd)# vrf member ctx1 apic1(config-tenant-bd)# exit
Step 5 Create an application profile and an application EPG:
Example:apic1(config-tenant)# application AP1 apic1(config-tenant-app)# epg EPG1 apic1(config-tenant-app-epg)# bridge-domain member bd1 apic1(config-tenant-app-epg)# exit apic1(config-tenant-app)# exit apic1(config-tenant)# exit
Step 6 Associate the EPG with a specific port:
Example:apic1(config)# leaf 1017 apic1(config-leaf)# interface ethernet 1/13 apic1(config-leaf-if)# vlan-domain member dom1 apic1(config-leaf-if)# switchport trunk allowed vlan 20 tenant t1 application AP1 epg EPG1
Note The vlan-domain and vlan-domain member commands mentioned in the above example are a pre-requisite for deploying an EPG on a port.
Deploying an EPG on a Specific Port with APIC Using the REST API
Procedure
Example:<fvTenant name="<tenant_name>" dn="uni/tn-test1" > <fvCtx name="<network_name>" pcEnfPref="enforced" knwMcastAct="permit"/> <fvBD name="<bridge_domain_name>" unkMcastAct="flood" > <fvRsCtx tnFvCtxName="<network_name>"/> </fvBD> <fvAp name="<application_profile>" > <fvAEPg name="<epg_name>" > <fvRsPathAtt tDn="topology/pod-1/paths-1017/pathep-[eth1/13]" mode="regular" instrImedcy="immediate" encap="vlan-20"/> </fvAEPg> </fvAp> </fvTenant>Copyright © 2016-2017, Cisco Systems, Inc. All rights reserved.

 Feedback
Contact Cisco
- Open a Support Case

- (Requires a Cisco Service Contract)