Release Notes for Cisco Virtual Network Management Center, Release 2.0
Available Languages
Table Of Contents
Cisco Virtual Network Management Center 2.0 Release Notes
Configuring Chrome for Use with VNMC
NTP Requirements for Deploying and Operating VNMC
Support for ASA 1000V in HA Configurations
User Interface Enhancements and Changes
Policy Management Profiles and Policies
VNMC VM Manager and VMware vCenter Server Connections
Upgrading vCenter to a New Version
Characters in Names Retrieved from vCenter
Value Displayed in Parent App or Resource Pool Field
Cisco Virtual Network Management Center Documentation
Cisco Virtual Security Gateway Documentation
Cisco Nexus 1000V Series Switch Documentation
Obtaining Documentation and Submitting a Service Request
Cisco Virtual Network Management Center 2.0 Release Notes
August 21, 2012This document describes the features, bugs, and limitations for the Cisco Virtual Network Management Center (VNMC) 2.0 release.
Use this document in combination with the documents listed in the "Related Documentation" section.
Contents
This document includes the following sections:
•
NTP Requirements for Deploying and Operating VNMC
•
Introduction
VNMC is a virtual appliance, based on Red Hat Enterprise Linux, that provides centralized device and security policy management of Cisco virtual services. Designed for multiple-tenant operation, VNMC provides seamless, scalable, and automation-centric management for virtualized data center and cloud environments. With both a built-in UI and an XML API, VNMC enables centralized management of Cisco virtual services by an administrator or through an API.
VNMC is built on an information model-driven architecture in which each managed device is represented by its subcomponents (or objects), which are parametrically defined. This model-centric approach enables VNMC to provide a secure, multiple-tenant virtualized infrastructure with Cisco Adaptive Security Appliance 1000V (ASA 1000V) and Cisco Virtual Security Gateway (VSG) virtual services.
Table 1 describes the primary features of VNMC.
System Requirements
Table 2 identifies VNMC system requirements.
Table 2 VNMC System Requirements
One virtual CPU
1.5 GHz
Memory
3 GB RAM
Disk space
25 GB on a shared network file storage (NFS) or a storage area network (SAN) if VNMC is deployed in a high availability (HA) cluster
Management interface
One management network interface
Processor
x86 Intel or AMD server with 64-bit processor listed in the VMware compatibility matrix
VMware vSphere
Release 4.1 or 5.0 with VMware ESX or ESXi (American English)
VMware vCenter
Release 4.1 or 5.0 (American English)
HTTP/HTTPS
—
Lightweight Directory Access Protocol (LDAP)
—
If the VNMC server is protected by a firewall, the following ports must be enabled.
80
HTTP
443
HTTPS
843
Adobe Flash
Intel Virtualization Technology (VT)
Enabled in the BIOS
Operating System
Either of the following:
•
•
Browser
Any of the following:
•
•
•
Flash Player
•
•
1 We recommend Mozilla Firefox 11.0 with Adobe Flash Player 11.2.
2 You must disable Pepper Flash in Chrome before using Chrome with VNMC 2.0. For more information, see Configuring Chrome for Use with VNMC.
Configuring Chrome for Use with VNMC
To use Chrome with VNMC 2.0, you must disable the default Adobe flash players that are installed by default with Chrome.

Note
To disable default Adobe flash players in Chrome:
Step 1
Step 2
Step 3
Step 4
Step 5
Performance and Scalability
Table 3 lists the performance and scalability data for VNMC 2.0.
NTP Requirements for Deploying and Operating VNMC
You must do the following for proper VNMC operation with VMware, ASA 1000V, VSG, and VSM:
1.
For information, see Configuring Network Time Protocol (NTP) on ESX/ESXi 4.1 and ESXi 5.0 hosts using the vSphere Client at http://kb.vmware.com/selfservice/microsites/search.do?language=en_US&cmd=displayKC&externalId=2012069.2.
Configuring NTP
Before you perform any operation in VNMC, configure NTP on ASA 1000V, VSG, and VSM. If you do not do so, ASA 1000Vs, VSGs, and VSMs will not be able to register with VNMC.
To configure NTP in VNMC, ASA 1000V, VSG, and VSM:
3.
Configuring NTP in VSM
To configure NTP, enter the following CLI command from the VSM console:
ntp server x.x.x.xwhere x.x.x.x is the NTP server IP address.
Configuring NTP in VSG
To configure NTP, enter the following CLI command from the VSG console:
ntp server x.x.x.xwhere x.x.x.x is the NTP server IP address.
Note
Configuring NTP in ASA 1000V
Before you install ASA 1000V in VNMC, ensure that you have configured NTP on all ESX and ESXi servers that run ASA 1000V. For information, see Configuring Network Time Protocol (NTP) on ESX/ESXi 4.1 and ESXi 5.0 hosts using the vSphere Client at http://kb.vmware.com/selfservice/microsites/search.do?language=en_US&cmd=displayKC&externalId=2012069.
After installation, ASA 1000V receives the Real Time Clock (RTC) value from the VMware ESX or ESXi host.
Configuring NTP in VNMC
To synchronize VNMC with the NTP Server:
Step 1
Step 2
Step 3
Step 4
a.
b.
c.
Step 5
a.
b.
c.
d.

Caution
New Features in VNMC 2.0
The following sections describe the new features introduced in this VNMC 2.0 release:
•
•
For more information about these features, see the VNMC documentation, available on cisco.com at http://www.cisco.com/en/US/products/ps11213/tsd_products_support_series_home.html.
Cisco ASA 1000V Management
VNMC 2.0 adds support for ASA 1000V instances, enabling you to:
•
•
•
–
–
–
–
–
–
–
–
–
•
–
–
–
–
•
–
–
–
–
–
–
–
•
Support for ASA 1000V in HA Configurations
VNMC 2.0 supports virtual ASA 1000V instances in high availability (HA) configurations by verifying that the HA role and mode match. The supported HA configurations are those that result from pool associations, in which a logical edge firewall is assigned to a pool of firewall instances.
VNMC supports virtual ASA 1000V instances in HA configurations by:
•
•
–
–
This behavior occurs under the following conditions:
—The ASA 1000V instance is in a pool.
—The pool is assigned to a logical edge firewall.
—No matching resources for the edge firewall were available before the HA role change.
Note
Site-to-Site VPNs
VNMC 2.0 adds support for site-to-site IPSec VPNs, enabling you to:
•
–
–
–
–
–
•
•
•
NTP Support
VNMC enables you to configure NTP for compute firewalls, edge firewalls, and VNMC itself. You can configure three or more NTP servers for VNMC.
The default time zone value for the VNMC profile is UTC, and is selected in the UI when VNMC starts.
Security Policy View
VNMC enables you to verify and examine the resolved policies that have been applied to compute and edge firewalls. With this feature, you can:
•
•
•
Policy Administrative Status
VNMC allows you to enable or disable the administrative status for the following types of policies:
•
•
•
•
•
•
•
•
•
•
Fault Detail View
The VNMC interface provides links to browser windows that enable you to:
•
•
•
ASDM Cross-Launch from VNMC
VNMC 2.0 enables you to launch the Cisco Adaptive Security Device Manager (ASDM) GUI from the UI.
After you deploy a virtual ASA 1000V instance and register the ASA 1000V instance to VNMC, you only need to navigate to the virtual ASA 1000V instance and click Launch ASDM for the ASDM GUI to open in a separate window.
System Enhancements
In addition to system upgrades, VNMC 2.0 provides system backup and restore operations.
User Interface Enhancements and Changes
The following topics describe new and changed features in the VNMC 2.0 UI:
•
Policy Management Profiles and Policies
The following changes have been implemented in the VNMC interface to improve ease-of-use:
•
–
–
–
•
Field Aids
The VNMC interface includes the following new field aids:
•
Figure 1 Administrative Status Indicator

•
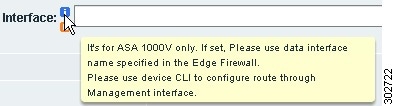
Figure 2 Information Icon
•
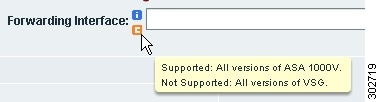
Figure 3 Compatibility Icon
•
Figure 4 Fault Information and Links

Event Log Option Removed
The Event Log option has been removed from the following locations in the UI:
•
•
•
Limitations
The following topics describe the limitations in VNMC 2.0:
•
•
•
•
VNMC VM Manager and VMware vCenter Server Connections
VNMC VM Manager automatically connects to the VMware vCenter server on HTTP port 80. A vCenter extension file is required to establish a connection between VM Manager and vCenter. The extension file is exported from VNMC and linked on the VM Managers tab. You install it as a plugin on all vCenter servers to which you want to connect.
For more information on installing and registering the vCenter extension file, see the Cisco Virtual Network Management Center 2.0 GUI Configuration Guide.
Upgrading vCenter to a New Version
If you upgrade vCenter to a new version and use the same IP address, vCenter attributes are not updated in VNMC. For example, the vCenter attributes for VMs and hosts on the upgraded vCenter are not updated.
To resolve this issue, add the vCenter to VNMC again by choosing Resource Management > Resources > Virtual Machines > VM Managers and clicking Add VM Manager.
Characters in Names Retrieved from vCenter
If you choose Resource Management > Resources > Virtual Machines, the following characters are not allowed in names that are retrieved from vCenter:
" ' ^ & ` < > ? = \ "
If a name that is retrieved from vCenter contains any of these characters, VNMC does not recognize the characters.
Names that can be affected include:
•
•
•
•
•
As a result of this behavior, VNMC attribute names do not display correctly in the UI and might be evaluated differently when these attributes are used in policy conditions.
Value Displayed in Parent App or Resource Pool Field
The VM Properties pane displays Parent App and Resource Pool fields, but only one field contains a value at any time. For example, if the parent application name is displayed, the resource pool name is not displayed. This situation occurs because a VM can be part of a parent application or part of a resource pool, but not both simultaneously.
You can view the VM Properties pane by choosing Resource Management > Resources > Virtual Machines > VM Managers > vm-manager > host-ip-address > vm where:
•
•
•
Open Bugs
The open bugs for VNMC are available in the Cisco Bug Toolkit. The Cisco Bug Toolkit enables you to search for a bug by identifier or product and version, and can provide additional details about the bug, such as more information or that the bug has been fixed.
Table 4 identifies the bugs that are open in the VNMC 2.0 release.
Related Documentation
The following topics contain information about the documentation available for VNMC and related products:
•
•
•
•
Cisco Virtual Network Management Center Documentation
The following VNMC documentation is available on Cisco.com at the following URL:
http://www.cisco.com/en/US/products/ps11213/tsd_products_support_series_home.html
•
•
•
•
•
•
•
Cisco ASA 1000V Documentation
The Cisco Adaptive Security Appliance (ASA) documentation is available at the following URL:
http://www.cisco.com/en/US/products/ps12233/tsd_products_support_series_home.html
Cisco Virtual Security Gateway Documentation
The Cisco VSG documentation is available on Cisco.com at the following URL:
http://www.cisco.com/en/US/products/ps11208/tsd_products_support_model_home.html
Cisco Nexus 1000V Series Switch Documentation
The Cisco Nexus 1000V Series switch documentation is available on Cisco.com at the following URL:
http://www.cisco.com/en/US/products/ps9902/tsd_products_support_series_home.html
Obtaining Documentation and Submitting a Service Request
For information on obtaining documentation, submitting a service request, and gathering additional information, see the monthly What's New in Cisco Product Documentation, which also lists all new and revised Cisco technical documentation, at:
http://www.cisco.com/en/US/docs/general/whatsnew/whatsnew.html
Subscribe to the What's New in Cisco Product Documentation as an RSS feed and set content to be delivered directly to your desktop using a reader application. The RSS feeds are a free service. Cisco currently supports RSS Version 2.0.
This document is to be used in conjunction with the documents listed in the "Related Documentation" section.
Cisco and the Cisco logo are trademarks or registered trademarks of Cisco and/or its affiliates in the U.S. and other countries. To view a list of Cisco trademarks, go to this URL: www.cisco.com/go/trademarks. Third-party trademarks mentioned are the property of their respective owners. The use of the word partner does not imply a partnership relationship between Cisco and any other company. (1110R)
Any Internet Protocol (IP) addresses and phone numbers used in this document are not intended to be actual addresses and phone numbers. Any examples, command display output, network topology diagrams, and other figures included in the document are shown for illustrative purposes only. Any use of actual IP addresses or phone numbers in illustrative content is unintentional and coincidental.
© 2012 Cisco Systems, Inc. All rights reserved.
 Feedback
Contact Cisco
- Open a Support Case

- (Requires a Cisco Service Contract)