Cisco Prime Access Registrar Jumpstart 6.1.1 Quick Start Guide
Available Languages
Table of Contents
Configuring Prime Access Registrar Jumpstart Configuring Prime Access Registrar Jumpstart
Configuring Network Information for ESXi
Configuring Prime Access Registrar Virtual Appliance
Configuring Prime Access Registrar to Automatically Power Up
Configuring Virtual Appliance to Automatically Power Up
How to Recover Prime Access Registrar Jumpstart Recovering Prime Access Registrar Jumpstart
Obtaining Documentation and Submitting a Service Request Table of Contents
Configuring Prime Access Registrar Jumpstart
Configuring Prime Access Registrar to Automatically Power Up
Configuring Virtual Appliance to Automatically Power Up
Introduction
The Cisco Prime Access Registrar Jumpstart (Prime Access Registrar Jumpstart) product is a high performance appliance for using the Prime Access Registrar application for RADIUS/Diameter authentication, authorization, accounting (AAA) services. It includes the following components:
- Prime Access Registrar 6.1.1 application software
- RedHat Enterprise Linux (RHEL) 6.2 Operating System
- VMware ESXi 5.1 Hypervisor
- Cisco UCS C220 M3 Hardware
These components are integrated together into a single flexible and easy to use appliance (see Figure 1).
Figure 1 Prime Access Registrar Jumpstart Configuration
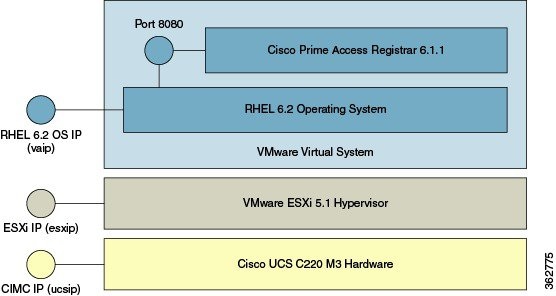
Figure 1 shows the three primary layers in the Prime Access Registrar Jumpstart appliance. Each of these layers has its own capabilities. Each of these layers can be controlled independently as well as remotely, and each requires its own independent connection to the network. Thus, three unique IP addresses are required.
You can connect to each layer as described below:
- Connecting to Virtual Appliance (Open Virtualization Format) Layer—You can connect to the Prime Access Registrar application using a web browser. Use http:// vaip :8080, where vaip is the virtual appliance IP address (which is also the IP address of the RHEL 6.2 Operating System) . For a secure connection to the Prime Access Registrar Web UI, use https:// vaip :8443.
To access the Prime Access Registrar Command Line Interpreter (CLI), you can use an SSH connection to the virtual appliance IP address using ssh -l root vaip .
You can manage the RHEL 6.2 OS by connecting to it using ssh -l root vaip . There is no window system installed on the Prime Access Registrar virtual appliance, but the standard Linux commands necessary to manage a networking application are all present on the RHEL 6.2 OS.
- Connecting to ESXi Hypervisor Layer—You can connect to the ESXi hypervisor layer, identified by the IP address esxip, using the VMware vSphere client. esxip is the IP address designated to the ESXi layer.

Note The VMware vSphere client is supported only on systems running Microsoft Windows.
For SSH connection to ESXi layer, enter ssh -l root esxip .
- Connecting to Cisco Integrated Management Controller (CIMC) UCS Management Console—This allows you to configure and manage the ESXi layer. You can connect to the CIMC by using a browser using http:// ucsip /. ucsip is the IP address assigned to the Jumpstart. After you log into CIMC, you can start virtual KVM console to get access to the ESXi configuration window and manage hardware such as power, temperature, and fan RPM.
Prerequisites
You must have answers to some questions in order to initially configure the Prime Access Registrar Jumpstart. The questions below beginning with Select require you to come up with a new value which is unique to this appliance, while the questions beginning with Determine require you to find out information that is not unique to this appliance.
You should have answers for the following questions when configuring the Prime Access Registrar Jumpstart:
- Select the IP address for the CIMC port on the Prime Access Registrar Jumpstart.
- Determine the netmask (subnetmask) for the CIMC port.
- Determine the gateway for the CIMC port.
You should have answers to the following questions when you are configuring network information for ESXi:
- Select the IP address for the ESXi installation on the Prime Access Registrar Jumpstart.
- Determine the netmask for the IP address for the ESXi installation.
- Determine the gateway address for the ESXi installation on the Prime Access Registrar Jumpstart.
- Determine the VLAN (if any) for the ESXi installation on the Prime Access Registrar Jumpstart.
You should have answers for the following questions related to configuring the Prime Access Registrar virtual appliance:
- Select a virtual machine name for the deployed virtual appliance.
- Select a root password for the RHEL 6.2 operating system on the virtual appliance. You will be prompted to enter and configure the root password during your first boot.
- Select an IP address for the Prime Access Registrar virtual appliance.
- Select a DNS name (hostname) for the virtual appliance. It should be placed into DNS using the IP address you selected for the virtual appliance.
- Select a username and password for the administrator of the Prime Access Registrar installation.
- Determine the netmask associated with the IP address for the virtual appliance.
- Determine the gateway address appropriate to the IP address and netmask.
- Determine the IP addresses of up to two DNS servers for the virtual appliance to use.
- Determine any proxy values necessary for the virtual appliance to access the Internet.
- Determine the server details for the Prime Access Registrar Jumpstart that you need to know based on the IP configuration of:
- DNS server details in case of static IP configuration
- DHCP server details in case of dynamic IP configuration.
- Ensure that you have the Prime Access Registrar licenses from Cisco.com before you get started. To obtain the license, go to https://www.cisco.com/go/license . Use the PAK that you obtained with Prime Access Registrar Jumpstart to obtain the corresponding software license.
Configuring Prime Access Registrar Jumpstart
Configuring Prime Access Registrar Jumpstart requires you to do the following configuration steps to connect it to the network:
- Configuring Prime Access Registrar Jumpstart
- Configuring Network Information for ESXi
- Configuring Prime Access Registrar Virtual Appliance
Configuring Prime Access Registrar Jumpstart
To configure the Prime Access Registrar Jumpstart:
Step 1
Configure the UCS CIMC Network Connection. To configure this, follow the steps in the Connecting and Powering On The Server (Standalone Mode) chapter of the enclosed Cisco UCS C220 Server Installation and Service Guide or you can see the document available online at http://www.cisco.com/en/US/partner/docs/unified_computing/ucs/c/hw/C220/install/install.html .
You have to configure NIC Redundancy as None in the Connecting and Powering On The Server (Standalone Mode) procedure.
The CIMC gives you considerable insight into the hardware as well as support for a virtual KVM console allowing remote management of the ESXi layer. For details on CIMC, see the Cisco UCS C-Series Servers Integrated Management Controller GUI Configuration Guide available at http://www.cisco.com/en/US/partner/docs/unified_computing/ucs/c/sw/gui/config/guide/1.4.1
/b_Cisco_UCS_C-Series_GUI_Configuration_Guide_141.html .Configuring Network Information for ESXi
After configuring the network information for the UCS CIMC console, use the virtual KVM console that the CIMC console provides to configure the network information for the ESXi hypervisor.
Note Note down the VMware ESXi license key. You will need the license key to reinstall VMWare ESXi in case of a failure.
To configure the Network Information for ESXi:
Step 1
Step 2
Note The default username is admin and default password is password. While configuring the CIMC console, you should change the password.
Step 3
Note If login fails, it may be that someone else already has a virtual KVM console already active for this UCS C220 server or that your browser is not configured to run Java Web Start. In that case, log that user off and try again.
The initial screen on the KVM console displays VMware ESXi 5.1.0.
Step 4
Note The virtual KVM console needs to capture the mouse to accept input. It may be necessary on some systems to use the mouse to select the Single Cursor option from the Tools menu of the KVM Console window. If nothing happens when you press F2, select the Session Options from the Tools menu and click OK. Usually this causes the mouse to be captured, and then the functions keys will make it through to the console. If you want the mouse back, you can press F12.
Step 5
Step 6
Select Configure Password option and reconfigure the root password after you log in.
Step 7
Note Once you log in, you should reconfigure the root password.
Configuring IP
a.
b.
c.
d.
e.
f.
Note If you want to use IPv6 with Prime Access Registrar, use the arrow keys to select the IPv6 Configuration and enter the requested information.
Configuring DNS Servers
Step 9
a.
b.
c.
d.
Note Ensure that you enter the entire hostname, including the domain name. For example, localhost.localdomain.
e.
Step 10
Enter the VLAN for this network connection and press Enter to accept the change.
Press Esc to exit the Configure Management Network window which you are in now.
Step 11
You can see the addresses to be pinged and the hostname to be resolved. Use the arrow keys and select the address to be pinged and press Enter . The test pings your default gateway and DNS servers and tests the connectivity. Press Enter when the test is complete.
At this point, ESXi listens on the IP address that you configured.
Step 12
A window displaying VMware ESXi 5.1 Welcome appears if you are successful.
Note If a warning message about an untrusted SSL certificate appears, select the appropriate action based on your security policy.
Step 13
If you have not downloaded VMware vSphere, ensure that you are connecting to the Jumpstart from a system running with Microsoft Windows.
If the system on which the browser is running is connected to the Internet, you can click on the Download vSphere Client. This downloads the VMware vSphere installable on your system which you can then install.
Note The Windows machine that runs the browser needs to have access to the Internet.
If you are not connected to the Internet, go to the system that is connected to the Internet and go to the VMware website. You have to download the vSphere client installation kit. The simplest way to get the vSphere client is to connect to the Jumpstart with a browser running on a Windows machine which also has Internet connectivity.
After you install the vSphere client on your system, proceed to “Configuring Prime Access Registrar Virtual Appliance” section.
Configuring Prime Access Registrar Virtual Appliance
The Prime Access Registrar Virtual Appliance is delivered as a virtual machine installed on the ESXi hypervisor. The virtual machine name as shipped from Cisco is "CPAR611".
Note You can change the virtual machine name to something more descriptive, and you are encouraged to do so, although the underlying disk storage will remain under the name originally used to deploy the Open Virtualization Format (OVF), that is "CPAR611".
To manage the virtual machine containing Prime Access Registrar, as well as manage any other virtual machines which you may deploy on the Jumpstart, you must use the VMware vSphere client. See the procedure “Configuring Network Information for ESXi” section for instructions on how to acquire a copy of the VMware vSphere Client.
To configure the Prime Access Registrar Virtual Appliance:
Step 1
Step 2
) on the console and click inside the window after clicking the Power on button. vSphere captures the mouse when you click inside the console window. If you want to release the cursor, press CTRL + ALT .
Step 3
Step 4
Note This is the root password for the underlying RHEL 6.2 operating system on which the Prime Access Registrar application is installed. You will be asked to enter this password twice. You will need root access to the underlying RHEL 6.2 operating system later on, so make sure that you remember this password.
Step 5
Step 6
a.
ifconfig eth2 IP-chosen-for-cpar netmask maskvalule up
b.
route add default gw ip-chosen-for-gateway
Note If you want to use DHCP, modify the /etc/sysconfig/network-scripts/ifcfg-ethX file to make a Linux box look to the dhcpd server for server’s network configuration; where X in ethX refers to the appropriate file and the interface. The file must have BOOTPROTO=dhcp and ONBOOT=yes.
The next time you boot your Linux computer, or restart the network, you will obtain the IP address, netmask, broadcast address, and routing information from the dhcpd server.Step 7
Step 8
Note In order to import the example configuration into Prime Access Registrar, import the /cisco-ar/examples/cli/add-example-configuration.rc file. Following is the procedure is to execute the command: /cisco-ar/bin/aregcmd -f /cisco-ar/examples/cli/add-example-configuration.rc.
Note If you want to set the Oracle home directory in the arserver, you need to use the updateOracleHome.sh script under the /cisco-ar/bin directory.
Step 9
a.
b.
c.
/cisco-ar/bin/arserver restart
Step 10
Configuring Prime Access Registrar to Automatically Power Up
There are several layers of processing involved in running the Prime Access Registrar application. Each layer has choices it can make about what to do when it is first powered up after power failures.
You can configure Prime Access Registrar to start automatically when power is restored to the Jumpstart.
The two places where you have to change the configurations to make this possible are:
- UCS Hardware—The UCS hardware has to be configured to power up the ESXi hypervisor when power is restored.
- ESXi Hypervisor—The ESXi hypervisor has to be configured to power up the Prime Access Registrar virtual appliance when power is restored to the ESXi hypervisor layer.
To configure the UCS Hardware to automatically power up the ESXi hypervisor:
Step 1
Step 2
Step 3
If you want, you can enter a delay value in the Power Delay Value field.
Step 4
Configuring Virtual Appliance to Automatically Power Up
There are several layers of processing involved in running the Prime Access Registrar application. Each layer has choices it can make about what to do when it is first powered up after power failures.
You can configure Prime Access Registrar to start automatically when power is restored to the Jumpstart.
The two places where you have to change the configurations to make this possible are:
- UCS Hardware—The UCS hardware has to be configured to power up the ESXi hypervisor when power is restored.
- ESXi Hypervisor—The ESXi hypervisor has to be configured to power up the Prime Access Registrar virtual appliance when power is restored to the ESXi hypervisor layer.
To configure the automatic power up:
Step 1
Step 2
Step 3
Step 4
The Virtual Machine Startup and Shutdown page is displayed.
Step 5
Step 6
This ensures that whenever power is restored to the ESXi hypervisor the Prime Access Registrar appliance powers up automatically.
How to Recover Prime Access Registrar Jumpstart
These topics describe how to recover Prime Access Registrar Jumpstart:
Prerequisites
To start the recovery process, make sure that you have the following:
- Internet connectivity—Internet connectivity is required to download the recovery images and to request Prime Access Registrar replacement licenses from Cisco.com. Ensure that you have the licenses with you before you start the recovery process.
- Recovery DVD—See Recovery Procedures for more information.
- Connection to CIMC UCS Management Console—Ensure that the CIMC port is configured on the Prime Access Registrar Jumpstart appliance. This allows you to configure and manage the ESXi layer. For more information, see Configuring Prime Access Registrar Jumpstart.
Recovery Procedures
This section explains the following recovery procedures:
Note Before you reinstall, contact the Technical Assistance Centre (TAC) and confirm whether the issue really requires a reinstall.
Recovering Prime Access Registrar Jumpstart
To recover Prime Access Registrar Jumpstart:
Step 1
Step 2
Note Make sure that the ESXi iso is compatible with the CIMC.
Step 3
Step 4
Step 5
Step 6
Step 7
Step 8
Step 9
You may be presented with a choice to upgrade or re-install and re-partition, depending on the situation. Choose the option appropriate for your situation.
ESXi is always installed in the evaluation mode. If you do not have the ESXi 5.1 license key, call the Cisco Technical Assistance Center (TAC) and ask for the Licensing Team. For your local Cisco TAC phone number, see the Cisco Worldwide Contacts page at: http://www.cisco.com/en/US/support/tsd_cisco_worldwide_contacts.html .
Step 10
Step 11
Step 12
Step 13
Step 14
Step 15
Step 16
Step 17
Recovering Licenses
You can now restore your original license or request a replacement license at http://www.cisco.com/go/license .
Troubleshooting
If you encounter any issue for which you are not able to find a solution, contact the Cisco Technical Assistance Center (TAC) for help.
For assistance in troubleshooting, the appliance comes with a secure FTP server and a TAC tool.
Ensure that you send the data gathered by the TAC tool to the Technical Assistance Centre (TAC) team in case of issues.
You can use the FTP server (vsftpd) to transfer files to and from the virtual appliance. You have to create a user to log into the vsftpd because the 'root' user cannot be used for logging in. The vsftpd will not be up and running when you power on the appliance, so you have to manually start it.
You can start the vsftpd using the command:
Related Documentation
Note We sometimes update the documentation after original publication. Therefore, you should also review the documentation on Cisco.com for any updates.
The following is a list of documentation that you can refer to:
Go to the following page to see the documentation for UCS server hardware:
http://www.cisco.com/en/US/products/ps10493/index.html
The following is a list of sites with platform-specific documentation:
- For VMware ESXi specific documentation, go the VMware website.
- For RHEL specific documentation, go to the Red Hat website.
The following documentation is available for Prime Access Registrar Jumpstart:
- Prime Access Registrar Jumpstart Quick Start Guide
http://www.cisco.com/en/US/products/ps11946/prod_installation_guides_list.html- Open Source Used In Prime Access Registrar Jumpstart
http://www.cisco.com/en/US/products/ps11946/products_licensing_information_listing.htmlThe following documentation is available for Prime Access Registrar:
- Prime Access Registrar User Guide:
http://www.cisco.com/en/US/products/ps12721/products_user_guide_list.html- Prime Access Registrar Install Guide:
http://www.cisco.com/en/US/products/ps12721/prod_installation_guides_list.html- Prime Access Registrar Release Notes:
http://www.cisco.com/en/US/products/ps12721/prod_release_notes_list.html- Prime Access Registrar Documentation Guide:
http://www.cisco.com/en/US/products/ps12721/products_documentation_roadmaps_list.html- Open Source Used in Prime Access Registrar:
http://www.cisco.com/en/US/products/ps12721/products_licensing_information_listing.htmlObtaining Documentation and Submitting a Service Request
For information on obtaining documentation, submitting a service request, and gathering additional information, see the monthly What’s New in Cisco Product Documentation , which also lists all new and revised Cisco technical documentation, at:
http://www.cisco.com/en/US/docs/general/whatsnew/whatsnew.html
Subscribe to the What’s New in Cisco Product Documentation as a Really Simple Syndication (RSS) feed and set content to be delivered directly to your desktop using a reader application. The RSS feeds are a free service and Cisco currently supports RSS version 2.0.
Cisco and the Cisco logo are trademarks or registered trademarks of Cisco and/or its affiliates in the U.S. and other countries. To view a list of Cisco trademarks, go to this URL: www.cisco.com/go/trademarks . Third-party trademarks mentioned are the property of their respective owners. The use of the word partner does not imply a partnership relationship between Cisco and any other company. (1110R)
Any Internet Protocol (IP) addresses and phone numbers used in this document are not intended to be actual addresses and phone numbers. Any examples, command display output, network topology diagrams, and other figures included in the document are shown for illustrative purposes only. Any use of actual IP addresses or phone numbers in illustrative content is unintentional and coincidental.
 Feedback