User and System Administration
Available Languages
Table Of Contents
User and System Administration
Overview of User Administration Tasks
Changing Predefined NAM User Accounts on the Switch
or RouterEstablishing TACACS+ Authentication and Authorization
Configuring a TACACS+ Server to Support NAM Authentication and Authorization
Configuring a Cisco ACS TACACS+ Server
Viewing the Current User Sessions Table
Overview of System Administration Tasks
Setting and Viewing Network Parameters
Setting and Viewing the NAM SNMP System Group
Working with NAM Community Strings
Creating NAM Community Strings
Deleting NAM Community Strings
Synchronizing the NAM System Time with the Switch or Router
Configuring the NAM System Time with an NTP Server
Generating Diagnostics for Technical Assistance
Monitoring and Capturing Configuration Information
User and System Administration
These topics provide information about performing user and system administration tasks and generating diagnostic information for obtaining technical assistance:
•
Overview of User Administration Tasks
•
•
Overview of User Administration Tasks
When you installed the NAM interface card in the switch or router, you used the NAM CLI to enable the HTTP server and establish a username and password to access the NAM Traffic Analyzer for the first time.
After setting up the initial user accounts, you can create additional accounts, enabling or disabling different levels of access independently for each user. You do this by assigning privileges that correspond to tasks each user can perform, such as configuring RMON collections, configuring system parameters, viewing RMON data, and so on.
The User Privileges table (Table 2-1) describes each privilege.
Recovering Passwords
You can recover passwords by using CLI commands on the switch or router. A user with appropriate privileges can reset the NAM CLI and passwords to the factory default state. For information on resetting the NAM passwords on Catalyst 6000 and 6500 Series NAMs, see the Catalyst Network Analysis Module Installation and Configuration Note Release 3.1. For information on resting the NAM passwords on NM-MAN devices, see the Network Analysis Module (NM-NAM) feature module.
If you have forgotten NAM Traffic Analyzer admin password, you can recover it using one of these methods:
•
•
have forgotten the password, use the NAM rmwebusers CLI command;
then enable http or https to prompt for the creation of a NAM Traffic
Analyzer user.Changing Predefined NAM User Accounts on the Switch
or RouterThe predefined root and guest NAM user accounts (accessible through a Telnet login from the NAM CLI) are static and independent of the NAM Traffic Analyzer; you cannot change these static accounts nor can you add other CLI-based users with the NAM Traffic Analyzer.
Creating a New User
Step 1
Step 2
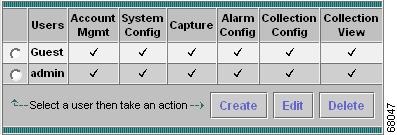
The Users Table (Figure 2-1), showing users registered in the local database, is displayed.
Figure 2-1 Users Table
Step 3
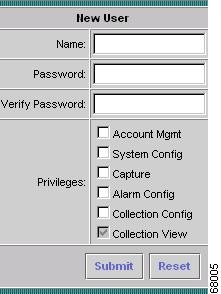
The New User Dialog Box (Figure 2-2) is displayed.
Figure 2-2 New User Dialog Box
Step 4

Note
Step 5
•
•
Editing a User
Step 1
Step 2
The Users table is displayed.
Step 3
Step 4
Step 5
Step 6
•
•
Deleting a User
Step 1
Step 2
The Users table is displayed.
Step 3
Step 4
Note
Establishing TACACS+ Authentication and Authorization
Terminal Access Controller Access Control System (TACACS) is an authentication protocol that provides remote access authentication, authorization, and related services such as event logging. With TACACS, user passwords and privileges are administered in a central database instead of an individual switch or router to provide scalability.
TACACS+ is a Cisco Systems enhancement that provides additional support for authentication and authorization.
When a user logs into the NAM Traffic Analyzer, TACACS+ determines if the username and password are valid and what the access privileges are.
Step 1
Step 2
Step 3
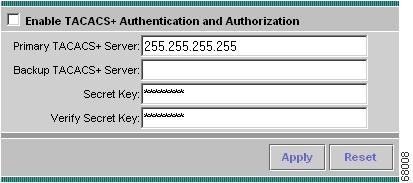
The TACACS+ Authentication and Authorization Dialog Box (Figure 2-3) is displayed.
Figure 2-3 TACACS+ Authentication and Authorization Dialog Box
Step 4
Step 5
•
•

Tip
Configuring a TACACS+ Server to Support NAM Authentication and Authorization
In addition to enabling the TACACS+ option from the Admin tab, you must configure your TACACS+ server so that it can authenticate and authorize NAM Traffic Analyzer users.
Note
you use.
Configuring a Cisco ACS TACACS+ Server
For Windows NT and 2000 Systems
Step 1
Step 2
Step 3
Step 4
Step 5
Note
Step 6
Step 7
Adding a NAM User or User Group
Step 1
Step 2
Step 3
Step 4
Step 5
Step 6
Step 7
Step 8
a.
b.
c.
d.
e.
f.
permit capture
permit system
permit collection
permit account
permit alarm
permit view
Step 9
Configuring a Generic TACACS+ Server
Step 1
Step 2
Note
Step 3
service
cmd
cmd-arg
One or more the following;
accountmgmt
system
capture
alarm
collection
view
password authentication method—Password Authentication Protocol (PAP)
Viewing the Access Log
The access log is a historical record of users who logged into the NAM Traffic Analyzer. It includes the login name and time, the originating IP address, and a summary of login activity. It also records logouts, unsuccessful login attempts, and attempts at unauthorized access (denials).
The user access log is checked daily and trimmed when it exceeds 100,000 bytes; trimming deletes the older 50,000 bytes so the most recent log data remains. If the log grows too quickly and reaches 200,000 bytes before the daily check, logging stops until the daily trimming or until you manually clear it.
Step 1
Step 2
Step 3
The access log is displayed.
Note
Viewing the Current User Sessions Table
The Current User Sessions table is a record of the users who are logged into the application. The user session times out after 30 minutes of inactivity. After a user session times out, that row is removed from the table.
Step 1
Step 2
Step 3
The Current User Sessions Table (Table 2-4) is displayed.
Overview of System Administration Tasks
The System option of the Admin tab provides features for:
•
•
•
Viewing System Resources
Step 1
Step 2
The System Overview Table (Figure 2-4) is displayed.
Figure 2-4 System Overview Table
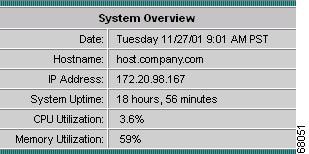
The System Overview Table (Table 2-5) describes each field.
Setting and Viewing Network Parameters
Step 1
Step 2
Step 3
The Network Parameters Dialog Box (Figure 2-5) is displayed.
Figure 2-5 Network Parameters Dialog Box
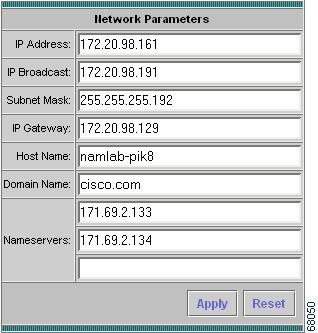
Step 4
Step 5
•
•
Setting and Viewing the NAM SNMP System Group
Step 1
Step 2
Step 3
At the top of the window, the SNMP System Group Dialog Box (Figure 2-6) and NAM Community Strings Dialog Box (Figure 2-7) are displayed.
Figure 2-6 SNMP System Group Dialog Box
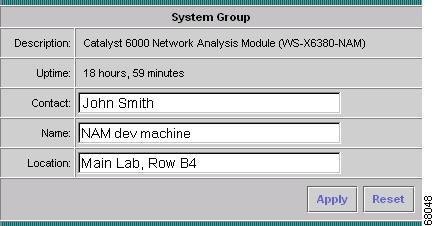
Step 4
Step 5
•
•
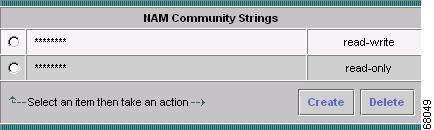
Working with NAM Community Strings
You use community strings so that other applications can send SNMP get and set requests to the NAM, set up collections, poll data, and so on.
Creating NAM Community Strings
Step 1
Step 2
Step 3
At the bottom of the window, the NAM Community Strings Dialog Box is displayed (Figure 2-7).
Figure 2-7 NAM Community Strings Dialog Box
Step 4
The Create Community String Dialog Box (Figure 2-8) is displayed.
Figure 2-8 Create Community String Dialog Box
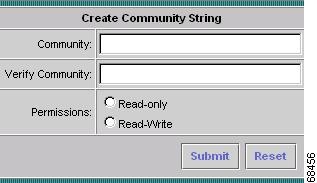
Note
Step 5
Step 6
Step 7
•
•
Step 8
•
•
Deleting NAM Community Strings
Step 1
Step 2
Step 3
At the bottom of the window, the NAM Community Strings Dialog Box is displayed (Figure 2-7).
Step 4

Caution
The community string is deleted.
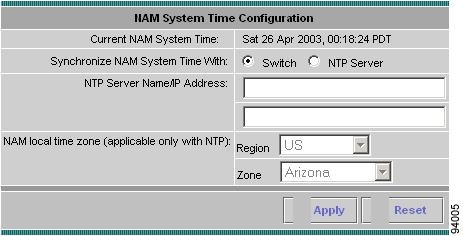
Setting the NAM System Time
The NAM gets the UTC (GMT) time from one of two sources—the switch./router or an NTP server. You can configure the NAM system time by using one of the following methods:
•
•
After the NAM system time has been configured, you can set the local time zone using the NAM System Time configuration screen.
Figure 2-9 NAM System Time Configuration Screen
Synchronizing the NAM System Time with the Switch or Router
Step 1
Step 2
Step 3
•
•
Configuring the NAM System Time with an NTP Server
Step 1
Step 2
Step 3
Step 4
•
•
Generating Diagnostics for Technical Assistance
The Diagnostics option of the Admin tab provides tools to aid in troubleshooting. You can use these tools when you have a problem that might require assistance from the Cisco Technical Assistance Center (TAC). There are options for:
•
Viewing System Alerts
You can view any failures or problems that the NAM Traffic Analyzer has during normal operations.
Step 1
Step 2
Step 3
The Tech Support System Alerts table is displayed.
Step 4
Monitoring and Capturing Configuration Information
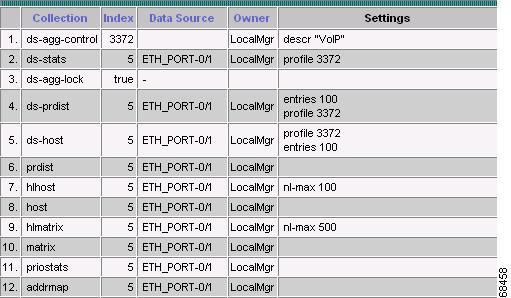
The Monitor and Capture Configuration option contains information about NAM data collections configured by NAM Traffic Analyzer and other management applications (such as NetScout nGenius Real-Time Monitor). If the name LocalMgr is displayed in the Owner column, the collection was configured by the NAM Traffic Analyzer.
You can save this information when you have a problem that might require assistance from the Cisco Technical Assistance Center (TAC).
Some common collections are:
Step 1
Step 2
Step 3
The Monitor and Capture Configuration Table is displayed (Figure 2-10).
Figure 2-10 Monitor and Capture Configuration Table
Step 4
Step 5
Viewing Technical Support
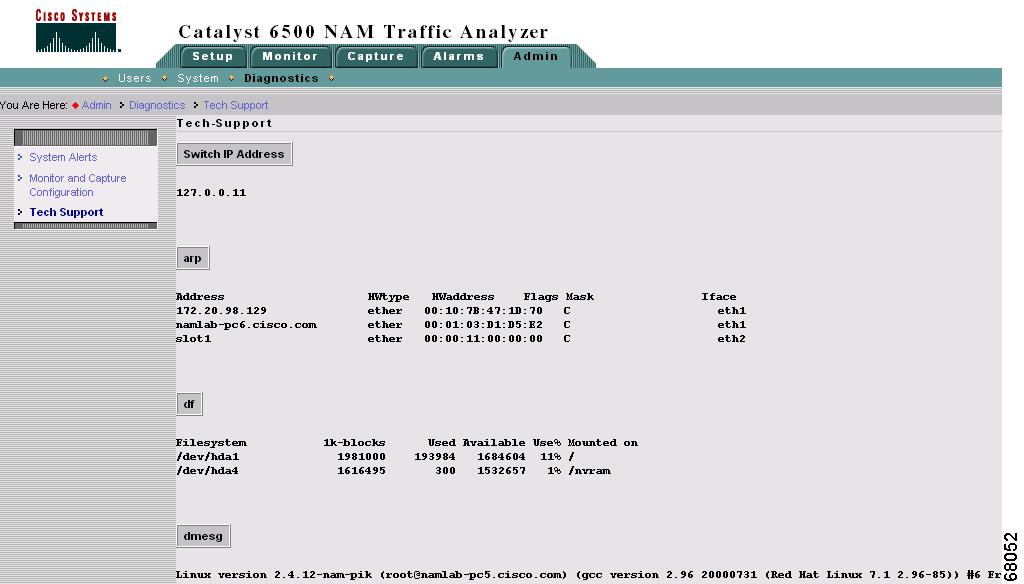
The NAM syslog records NAM system alerts that contain event descriptions and date and timestamps, indicating unexpected or potentially noteworthy conditions. This feature generates a potentially extensive display of the results of various internal system troubleshooting commands and system logs.
This information is unlikely to be meaningful to the average user. It is intended to be used by the Cisco TAC for debugging purposes. You are not expected to understand this information; instead, you should save the information and attach it to an email message to the Cisco TAC.
Note
Step 1
Step 2
Step 3
After a few minutes, extensive diagnostic information is generated and displayed in the Diagnostics Tech Support Window (Figure 2-11).
Figure 2-11 Diagnostics Tech Support Window
Step 4
Step 5
 Feedback