Cisco Signaling Link Terminal Dual Ethernet
Available Languages
Table Of Contents
Cisco Signaling Link Terminal Dual Ethernet
Related Features and Technologies
Supported Standards, MIBs, and RFCs
Configuring the Session Manager and RUDP
Verifying the Session Manager and RUDP Configuration
Monitoring and Maintaining the Cisco SLT
Cisco Signaling Link Terminal Dual Ethernet
Feature History
This feature module describes Cisco Signaling Link Terminal (SLT) dual Ethernet support for virtual switch controller (VSC) backhaul resiliency in Cisco IOS Release 12.2(2)XU.
This document includes the following sections:
•
Supported Standards, MIBs, and RFCs
•
Feature Overview
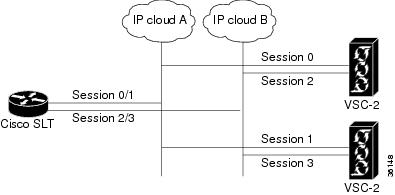
The Cisco SLT Dual Ethernet feature adds Cisco SLT dual Ethernet support to the VSC. This enhanced Cisco SLT support provides two IP networks and two additional Session Manager sessions (for a total of four Session Manager sessions) for improved backhaul communication. These additions increase the resilience of Cisco SLT/VSC communications by supporting two Reliable User Datagram Protocol (RUDP) sessions from each Ethernet interface to each VSC. These VSC enhancements help to determine when to switch Ethernets and when to switch VSC activity.
The Cisco SLT, which is based on the Cisco 2611 Multi-Service Access Router, is shipped with two Ethernet interfaces. Until this feature was released, the Cisco SLT/VSC solution supported only one of the two Ethernet interfaces. Both Session Manager sessions had to travel over this single Ethernet interface. The Cisco SLT Dual Ethernet feature supports the second Ethernet, which improves the resilience of the backhaul IP communications.
Currently, the SLT Session Manager sessions are numbered 0 and 1. This feature adds sessions 2 and 3 and changes the command-line interface (CLI) syntax. The new CLI supports both single and dual Ethernet configurations (the Cisco SLT image supporting dual Ethernet can still be used with a VSC in a single Ethernet configuration). To maintain backward compatibility, the previous session commands from nonvolatile RAM (NVRAM) have been converted to the new format so that when the configuration is written to NVRAM, the new formats are used.
Cisco SLT Enhancements
The Cisco SLT Dual Ethernet feature adds the following enhancements to Cisco SLT configuration:
•
•
•
•
•
•
VSC Enhancements
Enhancements to the VSC ensure that the following features are supported:
•
•
•
•
•
Figure 1 Dual Ethernet Configuration Topology
Benefits
Backward Compatibility
Implementation of dual Ethernet support has backward compatibility with earlier versions of the Cisco SLT. Backward compatibility includes the following:
•
•
•
•
•
•
•
•
Improved Fault Tolerance.
This feature supports full redundancy: Each Cisco SLT Ethernet maintains two sessions on each Ethernet, one session to each VSC.
Support for Second Ethernet
The Cisco SLT is shipped with two Ethernet interfaces. This featurette adds support for the second Ethernet and a total of four Session Manager sessions.
Restrictions
This feature does not address any other Cisco SLT requirements or development. This feature does not address remotely located Cisco SLTs, or WAN topologies, nor does it change the backhaul protocol or the selection of active/standby sessions.
Related Features and Technologies
•
•
Related Documents
•
•
•
•
•
•
•
•
Supported Platforms
•
Determining Platform Support Through Cisco Feature Navigator
Cisco IOS software is packaged in feature sets that are supported on specific platforms. To get updated information regarding platform support for this feature, access Cisco Feature Navigator. Cisco Feature Navigator dynamically updates the list of supported platforms as new platform support is added for the feature.
Cisco Feature Navigator is a web-based tool that enables you to quickly determine which Cisco IOS software images support a specific set of features and which features are supported in a specific Cisco IOS image. You can search by feature or release. Under the release section, you can compare releases side by side to display both the features unique to each software release and the features in common.
To access Cisco Feature Navigator, you must have an account on Cisco.com. If you have forgotten or lost your account information, send a blank e-mail to cco-locksmith@cisco.com. An automatic check will verify that your e-mail address is registered with Cisco.com. If the check is successful, account details with a new random password will be e-mailed to you. Qualified users can establish an account on Cisco.com by following the directions found at this URL:
Cisco Feature Navigator is updated regularly when major Cisco IOS software releases and technology releases occur. For the most current information, go to the Cisco Feature Navigator home page at the following URL:
Availability of Cisco IOS Software Images
Platform support for particular Cisco IOS software releases is dependent on the availability of the software images for those platforms. Software images for some platforms may be deferred, delayed, or changed without prior notice. For updated information about platform support and availability of software images for each Cisco IOS software release, refer to the online release notes or, if supported, Cisco Feature Navigator.
Supported Standards, MIBs, and RFCs
Standards
There are no new or changes standards with this feature.
MIBs
There are no new or changed MIBs with this feature.
To locate and download MIBs for selected platforms, Cisco IOS releases, and feature sets, use Cisco MIB Locator found at the following URL:
http://tools.cisco.com/ITDIT/MIBS/servlet/index
If Cisco MIB Locator does not support the MIB information that you need, you can also obtain a list of supported MIBs and download MIBs from the Cisco MIBs page at the following URL:
http://www.cisco.com/public/sw-center/netmgmt/cmtk/mibs.shtml
To access Cisco MIB Locator, you must have an account on Cisco.com. If you have forgotten or lost your account information, send a blank e-mail to cco-locksmith@cisco.com. An automatic check will verify that your e-mail address is registered with Cisco.com. If the check is successful, account details with a new random password will be e-mailed to you. Qualified users can establish an account on Cisco.com by following the directions found at this URL:
RFCs
There are no new or changed RFCs with this feature.
Prerequisites
•
–
–
–

Note
•
•
Note
Configuration Tasks
See the following sections for configuration tasks for the Cisco SLT Dual Ethernet feature. Each task in the list is required.
•
•
For more information about configuring the Cisco SLT and the VSC, refer to the Cisco Signaling Link Terminal and the telephony controller Software Operation and Maintenance documents.
Configuring the Session Manager and RUDP
The Session Manager and RUDP are responsible for managing the communication sessions with the VSC. Regardless of the number of SS7 links that the VSC activates on the Cisco SLT, the router can maintain two Session Manager session with each of the VSC devices.
Note
Perform the following tasks to configure the session for establishing communications with the VSC. You can define just one session or as many as four.
Verifying the Session Manager and RUDP Configuration
Use the following show commands in privileged EXEC mode.
Step 1
Router# show running-configBuilding configuration...Current configuration:!version 12.1service timestamps debug uptimeservice timestamps log uptimeno service password-encryption!hostname Router2!enable secret 5 $1$MJSK$i4zvh7ONl9IEyeXuMoiW6/enable password xyz!username user password 0 passwd!memory-size iomem 40ip subnet-zeroip domain-name cisco.comip dhcp smart-relay!!controller E1 0/0!controller E1 0/1!interface Ethernet0/0ip address 172.18.193.57 255.255.255.0!interface Ethernet0/1ip address 10.1.2.13 255.255.0.0!interface Serial0/2no ip address!ip default-gateway 172.18.193.1ip classlessip route 0.0.0.0 0.0.0.0 172.18.193.1no ip http server!dialer-list 1 protocol ip permitdialer-list 1 protocol ipx permitsnmp-server engineID local 00000009020000107B1D08A0snmp-server community rtpdevlab ROss7 session 0 address 161.44.3.203 8100 172.18.193.57 8100ss7 session 1 address 161.44.3.204 8101 172.18.193.57 8101ss7 session 2 address 10.1.0.6 8100 10.1.2.13 8100ss7 session 3 address 10.1.0.7 8101 10.1.2.13 8101ss7 mtp2-variant Bellcore 0ss7 mtp2-variant Bellcore 1ss7 mtp2-variant Bellcore 2ss7 mtp2-variant Bellcore 3!line con 0exec-timeout 0 0timeout login response 0full-helptransport input nonespeed 115200line aux 0line vty 0 4password lablogin!endStep 2
Router# show ss7 sm sessionSession[0]: Remote Host 161.44.3.203:8100, Local Host 172.18.193.57:8100retrans_t = 600 millisecondscumack_t = 300 millisecondskp_t = 2000 millisecondsm_retrans = 2m_cumack = 3m_outseq = 3m_rcvnum = 32Session[1]: Remote Host 161.44.4.204:8101, Local Host 172.18.193.57:8101retrans_t = 600 millisecondscumack_t = 300 millisecondskp_t = 2000 millisecondsm_retrans = 2m_cumack = 3m_outseq = 3m_rcvnum = 32Session[2]: Remote Host 10.1.0.6:8100, Local Host 10.1.2.13:8100retrans_t = 600 millisecondscumack_t = 300 millisecondskp_t = 2000 millisecondsm_retrans = 2m_cumack = 3m_outseq = 3m_rcvnum = 32Session[3]: Remote Host 10.1.0.7:8101, Local Host 10.1.2.13:8101retrans_t = 600 millisecondscumack_t = 300 millisecondskp_t = 2000 millisecondsm_retrans = 2m_cumack = 3m_outseq = 3m_rcvnum = 32Step 3
Router# show ss7 sm statistics-------------------- Session Manager --------------------Session Manager state = SESSION SET STATE-ACTIVESession Manager Up count = 2Session Manager Down count = 1lost control packet count = 0lost PDU count = 0failover timer expire count = 1invalid_connection_id_count = 0Session[0] statistics SM SESSION STATE-STANDBY:Session Down count = 0Open Retry count = 0Total Pkts receive count = 9Active Pkts receive count = 5Standby Pkts receive count = 4PDU Pkts receive count = 0Unknown Pkts receive count = 0Pkts send count = 0Pkts requeue count = 0-Pkts window full count = 0-Pkts resource unavail count = 0-Pkts enqueue fail count = 0PDUs dropped (Large) = 0PDUs dropped (Empty) = 0RUDP Not Ready Errs = 0RUDP Connection Not Open = 0RUDP Invalid Conn Handle = 0RUDP Unknown Errors = 0RUDP Unknown Signal = 0NonActive Receive count = 0Session[1] statistics SM SESSION STATE-STANDBY:Session Down count = 0Open Retry count = 0Total Pkts receive count = 7Active Pkts receive count = 4Standby Pkts receive count = 3PDU Pkts receive count = 0Unknown Pkts receive count = 0Pkts send count = 0Pkts requeue count = 0-Pkts window full count = 0-Pkts resource unavail count = 0-Pkts enqueue fail count = 0PDUs dropped (Large) = 0PDUs dropped (Empty) = 0RUDP Not Ready Errs = 0RUDP Connection Not Open = 0RUDP Invalid Conn Handle = 0RUDP Unknown Errors = 0RUDP Unknown Signal = 0NonActive Receive count = 0Session[2] statistics SM SESSION STATE-STANDBY:Session Down count = 0Open Retry count = 0Total Pkts receive count = 7Active Pkts receive count = 4Standby Pkts receive count = 3PDU Pkts receive count = 0Unknown Pkts receive count = 0Pkts send count = 0Pkts requeue count = 0-Pkts window full count = 0-Pkts resource unavail count = 0-Pkts enqueue fail count = 0PDUs dropped (Large) = 0PDUs dropped (Empty) = 0RUDP Not Ready Errs = 0RUDP Connection Not Open = 0RUDP Invalid Conn Handle = 0RUDP Unknown Errors = 0RUDP Unknown Signal = 0NonActive Receive count = 0Session[3] statistics SM SESSION STATE-ACTIVE:Session Down count = 0Open Retry count = 0Total Pkts receive count = 7Active Pkts receive count = 4Standby Pkts receive count = 3PDU Pkts receive count = 0Unknown Pkts receive count = 0Pkts send count = 0Pkts requeue count = 0-Pkts window full count = 0-Pkts resource unavail count = 0-Pkts enqueue fail count = 0PDUs dropped (Large) = 0PDUs dropped (Empty) = 0RUDP Not Ready Errs = 0RUDP Connection Not Open = 0RUDP Invalid Conn Handle = 0RUDP Unknown Errors = 0RUDP Unknown Signal = 0NonActive Receive count = 0
Monitoring and Maintaining the Cisco SLT
Use the following show and clear commands in privileged EXEC mode.
Configuration Examples
This section provides the following configuration examples:
SS7 Session
In the following example, an SS7 session has been set up on session 3:
Router(config)# ss7 session 3 address 209.165.200.224 8100 209.165.200.225 8100For more information about the Cisco SLT, refer to the Cisco Signaling Link Terminal document.
Command Reference
This section documents the modified commands used for the Cisco SLT Dual Ethernet feature. All other commands used with this feature are documented in the Cisco IOS Release 12.2 command reference publications.
debug ss7 sm session
To display debug messages for the SS7 Session Manager, use the debug ss7 sm session privileged EXEC command. To disable, use the no form of this command.
debug ss7 sm session 0-3
no debug ss7 sm session
Syntax Description
Defaults
If you do not specify a session, the command shows information for all sessions.
Command History
Usage Guidelines
Use this command to watch the Session Manager and RUDP sessions. The Session Manager is responsible for establishing the RUDP connectivity to the VSC.
Support for up to four Session Manager sessions was added. Session Manager sessions are now numbered 0 through 3. This feature changes the CLI syntax, and adds sessions 2 and 3.
Examples
The following is an example of debug ss7 sm session command output for session 3. The Session Manager has established the connection (RUDP_CONN_OPEN_SIG):
Router# debug ss7 sm session 3*Mar 8 09:37:52.119:SM:rudp signal RUDP_SOFT_RESET_SIG, session = 3*Mar 8 09:37:58.129:SM:rudp signal RUDP_CONN_RESET_SIG, session = 3*Mar 8 09:37:58.129:SM:Opening session[0] to 10.5.0.4:8060*Mar 8 09:37:58.137:SM:rudp signal RUDP_CONN_OPEN_SIG, session = 3show ss7 sm session
To display information about a Signaling System 7 (SS7) Session Manager session, use the
show ss7 sm session command in privileged EXEC mode.show ss7 sm session [session]
Syntax Description
Defaults
If you do not specify a session, the command shows information for all sessions.
Command Modes
Privileged EXEC
Command History
Usage Guidelines
If no sessions are configured, the message "No Session is configured" appears.
Support for up to four Session Manager sessions was added. Session Manager sessions are now numbered 0 through 3. This feature changes the CLI syntax, and adds sessions 2 and 3.
Examples
The following example shows how to display session information for both sessions. Table 1 explains the fields.
Router# show ss7 sm sessionSession[0]: Remote Host 255.255.251.254:8060, Local Host 255.255.255.254:8060retrans_t = 600cumack_t = 300kp_t = 2000m_retrans = 2m_cumack = 3m_outseq = 3m_rcvnum = 32Session[1]: Remote Host 255.255.251.255:8061, Local Host 255.255.255.254:8061retrans_t = 600cumack_t = 300kp_t = 2000m_retrans = 2m_cumack = 3m_outseq = 3m_rcvnum = 32
Related Commands
ss7 session
To create a Reliable User Datagram Protocol (RUDP) session, use the ss7 session command in global configuration mode. To delete the session, use the no form of this command.
ss7 session-session number {address remote-address remote-port local-address local-port}
no ss7session-session number address
Syntax Description
Defaults
No session is configured.
Command Modes
Global configuration
Command History
Usage Guidelines
You can configure a maximum of four sessions, two for each Cisco SLT. In a redundant VSC configuration, session 0 and session 2 are configured to one VSC, and session 1 and session 3 are configured to the other. Session 0/1 and session 2/3 run to the Cisco SLT.
The VSC must be configured to send messages to the local port, and it must be configured to listen on the remote port. You must also reload the router whenever you remove a session or change the parameters of a session.
This command replaces the ss7 sm session-0 address and ss7 sm session-1 address commands, which contain hard-coded session numbers. The new command is used for the new dual Ethernet capability.
The new CLI supports both single and dual Ethernet configuration by being backward compatible with the previous session-0 and session-1 commands so that you can configure a single Ethernet instead of two, if needed.
Examples
The following example sets up two sessions on a Cisco SLT (Cisco 2611):
Router# ss7 session 0/1 address 255.251.255.255 7000 255.255.255.254 7000Router# ss7 session 2/3 address 255.255.255.252 7002 255.255.255.254 7001
Note
Related Commands
Glossary
backhaul—A scheme where telephony signaling are passed from a gateway to a separate control for processing. With such a scheme, the gateway does not need to interpret the signaling information.
failover—The capability to re-route signaling traffic as required between related ASPs in the event of failure or unavailability of the currently used ASP (for example., from primary MGC to backup MGC). Failover also applies to the return to service of a previously unavailable process.
MG—Media Gateway. A Media Gateway terminates PSTN facilities (trunks), packetizes the PCM stream into IP/ATM and/or forwards packets into the IP/ATM network. Optionally, Media Gateways can provide signaling backhaul.
MGC—Media Gateway Controller. A Media Gateway Controller provides call control capability to handle signaling traffic from a variety of sources. It also manages connections and resources of its Media Gateways. Can also be called a Call Agent.
MGCP—Media Gateway Control Protocol.
NVRAM—nonvolatile RAM. RAM that retains its contents when a unit is powered off.
PRI—Primary Rate Interface. ISDN interface to primary rate access. Primary rate access consists of a single 64-Kbps D channel plus 23 (T1) or 30 (E1) B channels for voice or data.
RUDP—Reliable User Datagram Protocol.
Session-Group—Collection of session(s) in a group to implement switchover in case of a session failure. In case of a session-group, each session in the group is assigned a priority. In case of the inservice session failure, the next session is chosen according to its state and priority.
Session-Manager—Manages all the session in a specific client and server.
Session-set—A collection of session-groups. Session-set provides an interface to the application layer.
Session—Connection between a client and server. The connection can be either over a physical or logical transport layers.
SM—Session Manager
SS7—Signaling System 7
VSC—virtual switch controller.
 Feedback