
SD-WAN Integration
Cisco Software-Defined Wide Area Network (SD-WAN) is a cloud-delivered overlay WAN architecture connecting branches to datacenter and multicloud environments through a single fabric. Cisco SD-WAN ensures predictable user experience for applications, optimizes SaaS, IaaS and PaaS connections, and offers integrated security either on-premises or in the cloud. Analytics capabilities deliver the visibility and insights necessary for you to isolate and resolve issues promptly and deliver intelligent data analysis for planning and what-if scenarios.
On the dataplane side, SD-WAN deploys an ASR or ISR routers as edge devices (shown as cEdge in the following diagram) with each fabric’s spine switches connecting to these edge devices. SD-WAN is managed by a separate controller called vManage, which allows you to define service-level agreement (SLA) policies to determine how each packet’s path within SD-WAN is chosen based on its DSCP value.
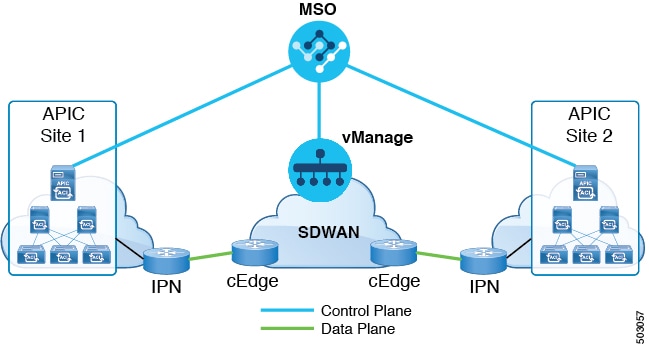
Release 3.0(2) of Cisco Nexus Dashboard Orchestrator adds support for SD-WAN integration. You can configure the NDO to import SLA policies from a vManage controller, assign DSCP values to each SLA policy, and notify the vManage controller of the DSCP-to-SLA mapping. This enables you to apply preconfigured SLA policies to specify the levels of packet loss, jitter, and latency for intersite traffic over SD-WAN. The vManage controller, which is configured as an external device manager that provides SD-WAN capability, chooses the best possible WAN link that meets the loss, jitter, and latency parameters specified in the SLA policy.
Multi-Site SD-WAN integration allows traffic between multiple fabrics to traverse the SD-WAN network while enabling returning traffic from a remote site to retain the ACI QoS level assigned to it. After you register your Cisco NDO to vManage, it imports the SLA policies allowing you to translating the ACI QoS levels to the appropriate DSCP values. NDO then applies DSCP translation policy for traffic transiting SD-WAN to enable quality of service on the returning traffic.
Release 3.0(2) also enables you to assign ACI QoS levels to Contracts and EPGs directly in the NDO GUI. Any time traffic leaves the fabric, its QoS level is translated into a DSCP value, which vManage uses to pick a path for the traffic through SD-WAN.
SD-WAN Integration Guidelines and Limitations
When enabling Multi-Site and SD-WAN integration, the following guidelines apply.
-
To enable uniform user QoS Level and DSCP translation for east-west traffic across sites with Muilti-Site SD-WAN integration, the spine switches in each fabric must be connected to the SD-WAN edge devices, either directly or via multiple hops.
This is in contrast with the existing implementation of APIC SD-WAN integration for north-south traffic where the leaf switches must be connected to the SD-WAN edge devices.
-
Global DSCP policy is supported for on-premises sites only.
-
SD-WAN integration is supported for Nexus Dashboard Orchestrator deployments in Cisco Application Services Engine only.
For more information, see the Deployment Overview chapter in the Cisco Nexus Dashboard Orchestrator Installation and Upgrade Guide.
-
When defining the global DSCP policy, you must pick a unique value for each QoS Level.
-
In addition to existing DSCP policy values, you can import up to four SLA policies from vManage with one of the following values: 41, 42, 43, 45, 47 and 49.
-
SLA policies must be already defined in your Cisco vManage.
-
When assigning QoS level, you can choose to assign it to a specific Contract or an entire EPG.
If multiple QoS levels could apply for any given traffic, only one is applied using the following precedence:
-
Contract QoS level: If QoS is enabled in the Contract, the QoS level specified in the contract is used.
-
Source EPG QoS level: If QoS level is not specified for the Contract, the QoS level set for the source EPG is used.
-
Default QoS level: If no QoS level is specified, the traffic is assigned Level 3 QoS class by default.
-
Adding a vManage Controller
This section describes how to add vManage controller to your Cisco Nexus Dashboard Orchestrator to import any configured SLA policies.
-
Log in to your Cisco Nexus Dashboard Orchestrator GUI.
-
Add a vManage Controller.
-
Navigate to Admin > IntegrationSD-WAN.
-
Click Add Domain Controller name.
The Add Domain window opens.
-
-
Provide the vManage controller information.
In the Add Domain window that opens, provide the following details:
-
Name of the vManage domain to display in your NDO.
-
The device’s fully qualified domain name or IP address.
-
Username and password that is used to sign in to the vManage controller.
Then click Add to save the vManage domain. After the vManage controller information is entered, it can take up to 1 minute before the list of existing SLA policies is displayed in the main pane: image::503067.jpg[,width=720]
-
Define the global DSCP policy in your Cisco Nexus Dashboard Orchestrator, as described in Configuring Global DSCP Policy.
Configuring Global DSCP Policy
-
You must have added a vManage controller to your NDO, as described in Adding a vManage Controller.
-
You should be familiar with Quality of Service (QoS) functionality within ACI fabrics.
QoS is described in more detail in Cisco APIC and QoS.
When traffic is sent and received within a Cisco ACI fabric, it is prioritized based on the ACI QoS Level, which is determined based on the CoS value of the VXLAN packet’s outer header. When traffic exits the ACI fabric from a spine switch toward an intersite network, the QoS level is translated into a DSCP value which is included in the outer header of the VXLAN-encapsulated packet.
This section describes how to define the DSCP translation policy for traffic entering or exiting ACI fabric. This is required when traffic must transit through non-ACI networks, such as between multiple fabrics separated by SD-WAN, where devices that are not under Cisco APIC’s management may modify the CoS values in the transiting packets.
-
Log in to your Cisco Nexus Dashboard Orchestrator GUI.
-
Open the global DSCP policy configuration screen.
-
Navigate to Configure > Tenanat Template >Tenanat Policies.
-
Click Global DSCP Policy name.
The Edit Policy window opens.
-
-
Update the global DSCP policy.
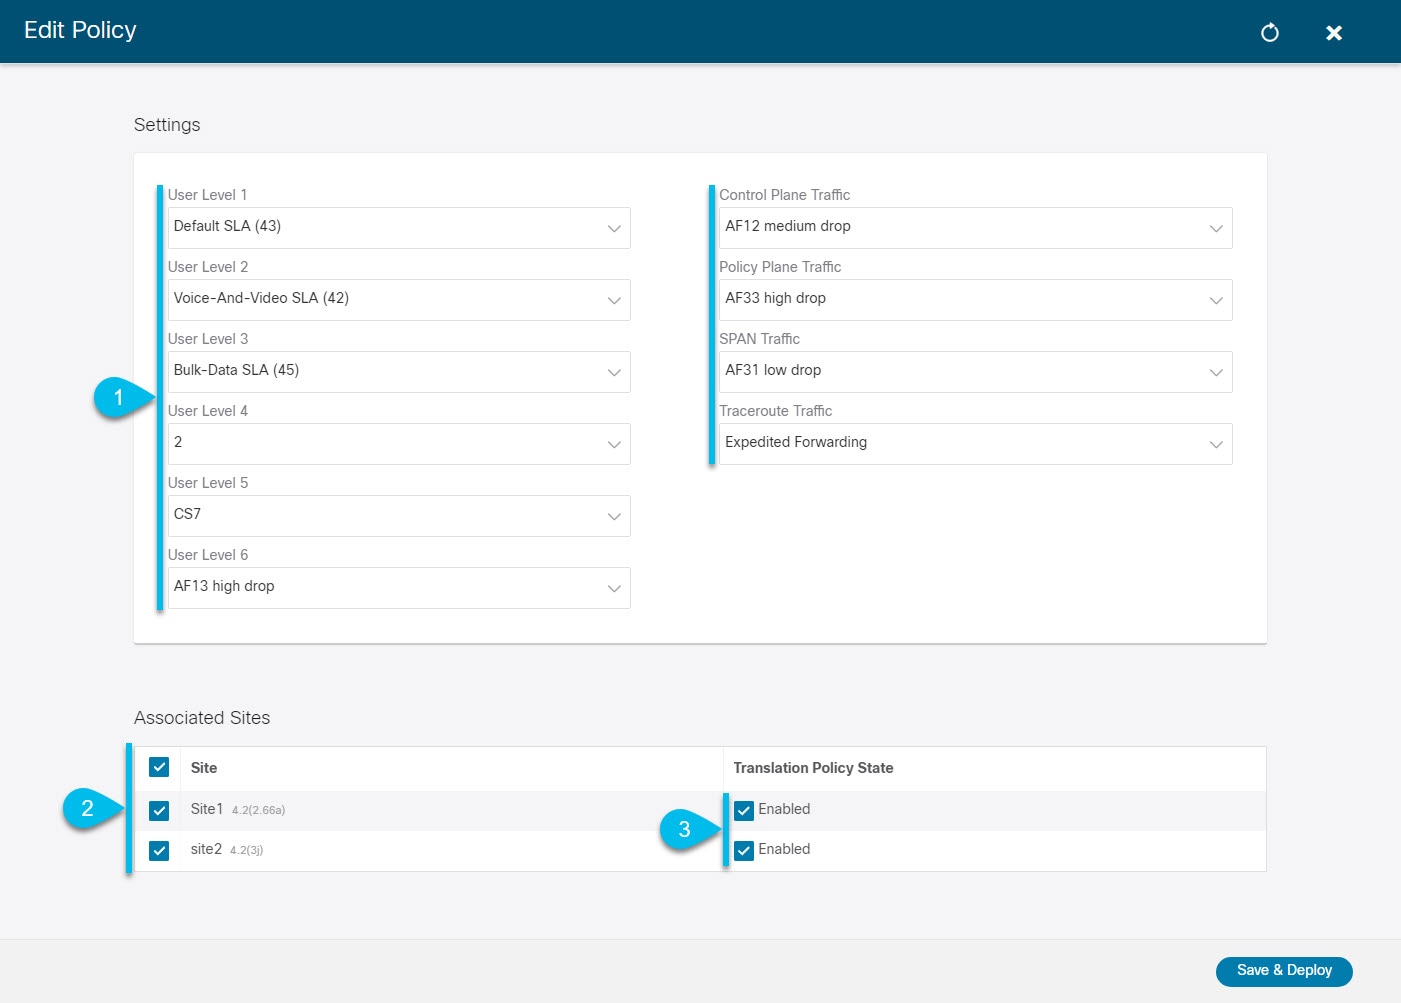 Figure 2. Update the global DSCP policy
-
Choose the DSCP value for each ACI QoS level.
Each drop-down contains the default list of available DSCP values and any values imported from the vManage SLA policies, for example
Voice-And-Video SLA (42). -
Choose the sites where you want to deploy the policy.
We recommend deploying the policy to all sites that are part of the Multi-Site domain in order to achieve a consistent end-to-end QoS behavior.
-
Choose whether you want to enable the policy on each site when it is deployed.
-
Click Save & Deploy.
After you save and deploy, the DSCP policy settings will be pushed to each site. You can verify the configuration by signing in to the site’s APIC and navigating to Tenants > infra > Policies > Protocol > DSCP class-CoS translation policy for L3 traffic.
-
After you have defined the global DSCP policy, you can assign the ACI QoS Levels to EPGs or Contracts as described in Set QoS Level for EPGs and Contracts.
Set QoS Level for EPGs and Contracts
-
You must have added a vManage controller to your NDO, as described in Adding a vManage Controller.
-
You must have defined the global DSCP policy, as described in Configuring Global DSCP Policy.
-
You should be familiar with Quality of Service (QoS) functionality within ACI fabrics.
QoS is described in more detail in Cisco APIC and QoS.
This section describes how to choose an ACI QoS level for traffic in your fabrics. You can choose to specify QoS for individual Contracts or entire EPGs.
-
Log in to your Cisco Nexus Dashboard Orchestrator GUI.
-
Choose the Schema that you want to edit.
-
Navigate to Configure > Tenanat Template > Applications > Schemas
-
Click the name of the schema you want to edit or Create Schema to create a new one.
The Edit Schema window opens.
-
-
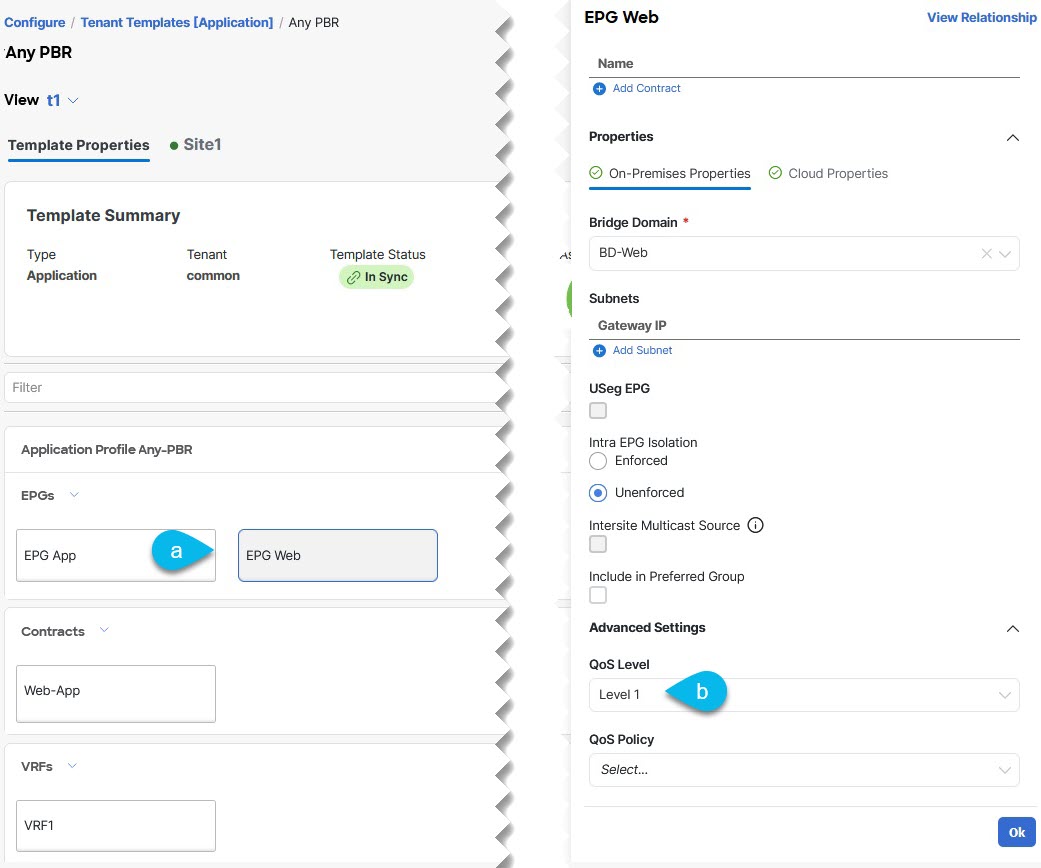
Pick a QoS Level for an EPG.
-
In the main pane, scroll down to the EPG area and select an EPG or click Add EPG to create a new one.
-
In the right sidebar, scroll down to the QoS Level drop-down and choose the QoS Level you want to assign to the EPG.
You must choose the QoS level based on the previously configured Global DSCP policy to ensure that intersite traffic from the EPG is treated with the needed SLA across the SD-WAN network.
-
-
Pick a QoS Level for an EPG.
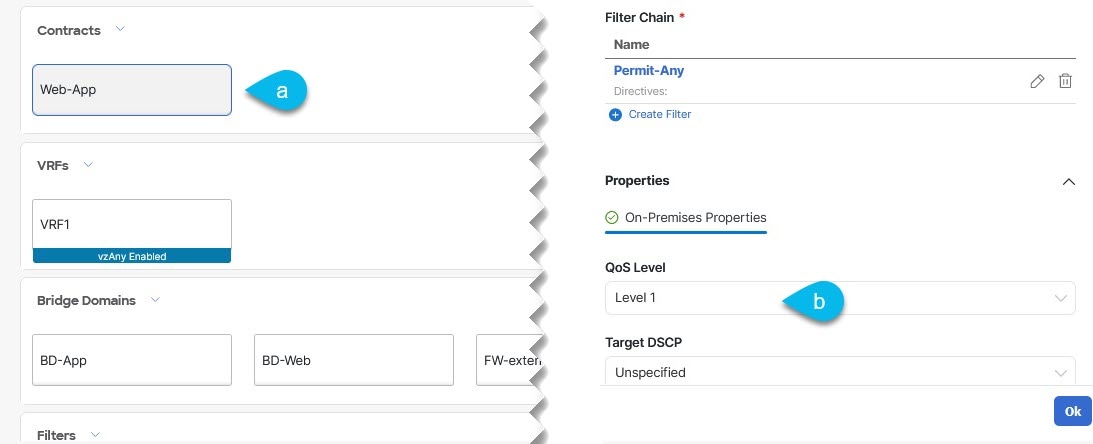
-
In the main pane, scroll down to the Contract area and select a Contract or click the + icon to create a new one.
-
In the right sidebar, scroll down to the QoS Level drop-down and choose the QoS Level you want to assign to the Contract.
You must choose the QoS level based on the previously configured Global DSCP policy to ensure that intersite traffic between two EPGs is treated with the needed SLA across the SD-WAN network.
-
First Published: 2024-03-01
Last Modified: 2024-03-01
Americas Headquarters
Cisco Systems, Inc.
170 West Tasman Drive
San Jose, CA 95134-1706
USA
http://www.cisco.com
Tel: 408 526-4000
800 553-NETS (6387)
Fax: 408 527-0883