
New and Changed Information
The following table provides an overview of the significant changes up to this current release. The table does not provide an exhaustive list of all changes or of the new features up to this release.
| Release Version | Feature | Description |
|---|---|---|
|
There were no major changes from the previous release. |
||
About Change Control
Beginning with the NDFC 12.1.3 release, support is available for change control. The change control feature allows you to track intent changes using a unique ticket that is associated with a specific action, and provides a stage/approve/deploy workflow with users that have the required privileges.
When you enable the change control feature, any supported deployment operations will be allowed only through change control tickets; all other deployment operations through the GUI or REST API will not be allowed without a change control ticket.
For example, when creating a fabric without change control enabled, you would select the appropriate fabric template, complete the necessary configurations for that fabric, and then click Recalculate & Deploy as you normally would. However, if you have the change control feature enabled, you will be able to save the configurations that you entered for the new fabric, but you will not be able to deploy those configurations until the change control workflow has been completed for this specific operation. See Typical Change Control Workflow for more information.

The rollback feature, also introduced in the NDFC 12.1.3 release, is a related feature to the change control feature, and is covered in the About Rollback area of this document.
The following topics provide more information on the change control feature:
Guidelines and Limitations: Change Control
Following are the guidelines and limitations for the change control feature:
-
The change control feature is supported in the following areas:
-
Operations in Fabric Controller (LAN) operational mode
-
Operations related to endpoint locator
-
Operations related to Layer 4 to Layer 7 services
-
Fabric create/edit/delete
-
NDFC backup and restore
-
Interface create/edit/delete
-
Link/IFCs create/edit/delete
-
Network create/edit/delete
-
VRF create/edit/delete
-
Policy create/edit/delete
-
The act of adding or deleting fabrics and switches require a ticket for tracking, but those actions are not pending on the ticket approval. For example, a switch will be added to the fabric immediately, before the ticket is approved.
-
The change control feature is not supported in the following areas:
-
Operations related to Nexus Dashboard Orchestrator (NDO)
-
Operations in IP Fabric for Media (IPFM) fabrics
-
Fabric backup and restore
-
Interface group create/edit/delete
-
Private VLAN
-
The Wait for switch mode change to maintenance on deploy option introduced in NDFC release 12.2.1
-
Interface-based flow telemetry (refer to the Nexus Dashboard Insights documentation for more information)
-
-
Operations related to image management, such as switch image upgrades and changing the switch mode, will continue to work as-is for the admin and device-upgrade-admin role users. No change control ticket is required for this operation.
-
The Reload Switch option will continue to work as-is for the admin and device-upgrade-admin role users. No change control ticket is required for this operation.
-
The Push Config option will continue to work as-is for the admin and device-upgrade-admin role users. No change control ticket is required for this operation.
-
Change control tickets are fabric agnostic. In other words, changes from multiple fabrics can be tracked and deployed with a single ticket.
-
Change control tickets are user agnostic, within an NDFC. In other words, UserA can create a ticket, UserB and UserC can associate changes, and so on.
-
Users with the intent CRUD privileges (Create, Read, Update, and Delete) can create the ticket and associate changes.
-
There is no limitation on the maximum number of outstanding tickets that can be initiated.
-
Change control is supported for all LAN fabric template types.
-
Multiple tickets can be active at the same time and worked on by different users, subject to conflict detection rules, and intent changes can be associated with each of those tickets. However, changes to an entity can only be associated with a single ticket.
For example, assume a change control ticket Ticket1 is created, where the operation is to edit Ethernet1/1. You cannot create another change control ticket (Ticket2) where that operation is also to edit Ethernet1/1. In this situation, NDFC will detect the conflict and will automatically deny the operation for Ticket2, and will provide the reasons for the denial. See Conflict Detection: Change Control for more information.
Change Control Support with NDI
Change control support with Nexus Dashboard Insights (NDI) varies, depending on the release:
-
For releases prior to NDFC 12.2.1 and ND 3.1.1, change control is not supported with NDI
-
Beginning with NDFC release 12.2.1 and ND release 3.1.1, change control is supported with NDI. When change control is enabled on NDFC, all NDI-triggered configurations will be tracked with tickets. The change control tickets are managed internally by NDI and NDFC, and does not require user intervention.
For more information on NDI, refer to the Nexus Dashboard Insights documentation.
Enabling the Change Control Feature
The change control feature is disabled by default.
To enable the change control feature:
-
Navigate to the Feature Management page in NDFC:
Admin > System Admin > System Settings > Feature Management
-
Apply the correct configurations in the Feature Management page for change control:
-
Verify that the Fabric Controller option (the LAN operational mode) is selected in the Feature Management page.
-
Verify that the IP Fabric for Media option is not selected.
As described in Guidelines and Limitations: Change Control, the change control feature is supported only with the Fabric Controller option (the LAN operational mode). The change control feature is not supported with Fabric Discovery, SAN Controller, or the IP Fabric for Media (IPFM) feature.
-
Click the box next to Change Control to enable the change control feature.
-
-
Click Apply.
Once you have enabled the change control feature, all areas that are supported with change control are now tracked with a ticket. See Guidelines and Limitations: Change Control for a list of areas that are tracked with a ticket when change control is enabled, and see Typical Change Control Workflow to understand how having the change control feature enabled affects the NDFC operations that are supported with change control.
You can return to the Feature Management page to disable the change control feature; however, disabling the change control feature after you have enabled it is not supported when active tickets (works in progress) are detected. You must complete the change control process on any active tickets before you can disable the change control feature in this case.
Once you have successfully disabled the change control feature, the change operations will no longer be tracked with change control tickets. Completed tickets and associated data remains, but you cannot perform any actions against those areas.
Roles Associated With Change Control
Two new roles are introduced as part of the change control feature:
-
NDFC Change Approver: Users with this privilege can approve change control tickets.
A user that is assigned with the NDFC Change Approver role can double-check changes that are associated with a specific ticket and approve or deny those changes.
-
NDFC Change Deployer: Users with this privilege can deploy change control tickets.
Once a change control ticket is approved by a user with the NDFC Change Approver role, that ticket is then available to any user that is assigned with the NDFC Change Deployer role, who can then deploy the changes that have moved to the deployment stage in the change control workflow.
A user who is assigned an NDFC Change Deployer role will also have to go through the necessary credentials process in the LAN Credentials Management window:
Admin > Switch Credentials > LAN Credentials Management
For more information, see the "LAN Credentials Management" section in the Overview and Initial Setup of Cisco NDFC: LAN.
In addition to the new roles described above, following are descriptions of several roles that are not new to the change control feature introduced in NDFC release 12.1.3 but are still related to change control:
-
NDFC Network Admin: The traditional role of NDFC Network Admin is also valid in the change control workflow, where a user with the traditionial admin role can also perform the actions associated with the new NDFC Change Approver and Deployer roles.
A user with the NDFC Network Admin role can perform all the operations in Cisco Nexus Dashboard Fabric Controller. For example, a user with this role can freeze a particular fabric or all fabrics in Cisco Nexus Dashboard Fabric Controller.
-
NDFC Network Stager: A user with the NDFC Network Stager role can make configuration changes on Cisco Nexus Dashboard Fabric Controller and can deploy these changes later.
An NDFC Network Stager can perform the following actions:
-
Edit interface configurations
-
View or edit policies
-
Create interfaces
-
Change fabric settings
-
Edit or create templates
However, a Network Stager cannot perform the following actions:
-
Cannot make any configuration deployments to switches.
-
Cannot perform deployment-related actions from the Cisco Nexus Dashboard Fabric Controller Web UI or the REST APIs.
-
Cannot access the administration options like licensing, creating more users, and so on.
-
Cannot move switches in and out of maintenance mode.
-
Cannot move fabrics in and out of deployment-freeze mode.
-
Cannot install patches.
-
Cannot upgrade switches.
-
Cannot create or delete fabrics.
-
Cannot import or delete switches.
-
When you perform a Recalculate & Deploy action as part of a switch or interface configuration process, the host port resync process pulls the running configuration from the switches using LAN credentials. However, a user with the Network Stager role does not have access to the LAN credentials, so the Recalculate & Deploy action will fail in this case for users with the Network Stager role. Instead, a user with the NDFC Network Admin role, with the appropriate LAN credentials, should perform the Recalculate & Deploy action in this case. Note that this issue exists regardless of whether change control is enabled or not.
-
Assigning NDFC Change Approver and Deployer Roles
To assign NDFC Change Approver or Deployer roles to specific users:
-
From the Nexus Dashboard, navigate to:
Admin > Users
-
Click Create Local User.
The Create Local User window appears.
-
Enter the necessary information in the fields in the Create Local User window to create a new local user as you normally would.
-
Click Add Security Domain and Roles.
The Add Security Domain and Roles window appears.
-
Locate the following fields in the Add Security Domain and Roles window:
-
NDFC Change Approver
-
NDFC Change Deployer
-
-
Click the box in the Write Privilege column for one or both of those fields to assign the NDFC Change Approver and/or NDFC Change Deployer role to this user.
-
A user can have multiple roles, such as Stager and NDFC Change Deployer.
-
While having a single user with both the NDFC Change Approver and Deployer roles is supported, it is a best practice to have only one of the two roles assigned to each individual user.
-
-
Click Save.
You are returned to the Create Local User window.
-
Click Create.
Typical Change Control Workflow
Change control tickets have a defined workflow lifecycle, and include state information that indicates where they are in the workflow.
Following is a typical workflow when using change control:
-
Verify that the change control feature has been enabled.
See Enabling the Change Control Feature for those procedures.
-
Verify that the appropriate users have been assigned the necessary NDFC Change Approver and Deployer change control roles.
See Roles Associated With Change Control for more information.
-
If you are performing an operation where change control is supported, at the end of that operation, a change control popup window appears, similar to the following:
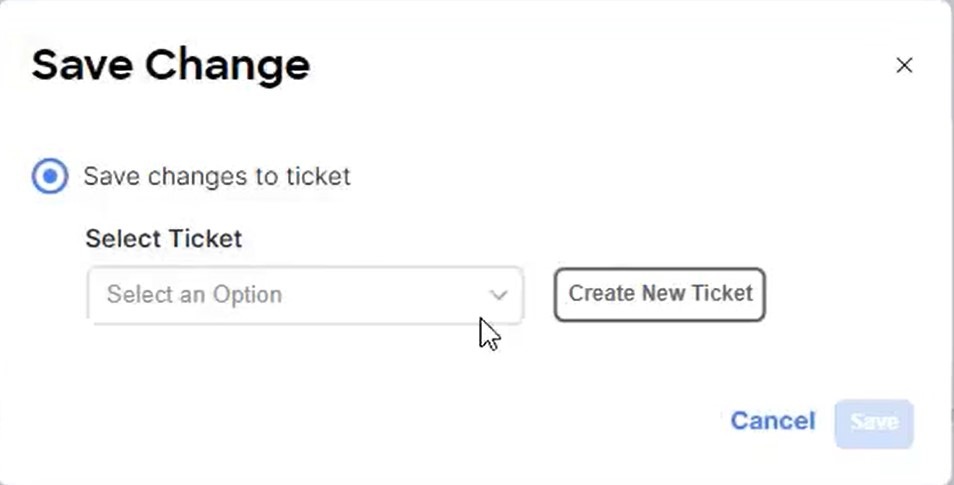
For example, if you have change control enabled and you are creating a new fabric using any of the supported fabric templates, once you have entered all of the necessary information in the configuration fields and you have clicked the Save button at the end of the fabric creation process, a change control ticket similar to the image above appears.
-
Enter the necessary information when the change control ticket appears to describe this change:
-
In the Select Ticket field, select a previously-configured change control ticket, or click Create New Ticket to create a new change control ticket for this operation.
See Guidelines and Limitations: Change Control for more information on scenarios where you might choose to use a previously-configured change control ticket for an operation.
-
If you selected a previously-configured change control ticket for this operation, click Save, then go to Step 5 in these procedures. Note that the following applies for the previously-configured change control tickets listed here:
-
Only tickets that are in the PENDING or DENIED states will be listed.
-
The ticket list is filtered with RBAC rules, so you will only see tickets that are associated with fabrics that you have access to.
-
-
If you clicked Create New Ticket to create a new change control ticket for this operation, the Save Ticket window appears.
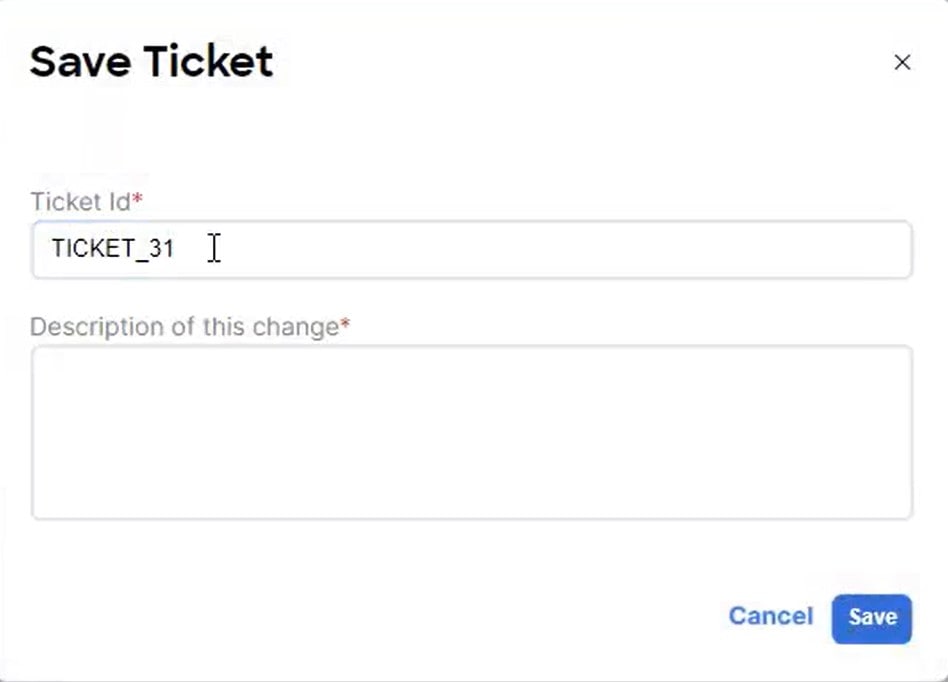
Continue with these steps to configure the new change control ticket.
-
-
In the Ticket Id field, note that an automatically-generated change control ticket ID is entered by default for the new change control operation.
Each new change control ticket is given an automatically-generated ticket ID in this format:
<Ticket ID prefix string><Sequence id>
-
The <Ticket ID prefix string> part of the ticket ID is automatically generated based on the configurations in the Admin > System Admin > System Admin > System Settings > Server Settings > LAN-Fabric area. If you want to change the <Ticket ID prefix string> part of the automatically-generated ticket ID, see Configuring the Auto Generated Ticket ID.
-
The <Sequence id> part of the ticket ID is a numerical value that is automatically incremented.
-
-
Determine if you want to use the automatically-generated change control ticket ID for this operation or if you want to manually enter a different, unique ticket ID for this operation.
If you do not want to use the automatically-generated ticket ID, you can delete the default text in the Ticket Id field and replace it with new text, if necessary. The new ticket ID must meet the following criteria:
-
Only a-z, A-Z, 0-9, _, - characters are allowed.
-
The ticket ID should start with an alphabetical character.
-
Maximum length is 64 characters.
-
-
In the Description of this change field, enter the reason for this change control ticket (for example, "This ticket is for creating the 'DC1' Data Center VXLAN EVPN fabric"). The maximum length for the text in this field is 255 characters.
-
Click Save after you have entered the necessary information in the fields in the Save Ticket window.
You are returned to the Save Change window, with the new ticket ID showing in the Select Ticket field by default.
-
Click Save in the Save Change window.
-
-
After you have completed the configurations in the Save Change window and clicked Save, you are returned to the original window where you were attempting to perform an operation where change control is supported.
For example, using the example operation that we described earlier in these procedures, you would return to the Create Fabric page. You would then proceed through that remaining set of processes specific to this action as you normally would, such as clicking Save in the Create Fabric page and returning to the Fabric Overview window for that new fabric.
Note that you may not be able to perform certain subsequent actions the same way as before if you have change control enabled. For example, continuing with the fabric creation scenario, normally you would be able to click Actions > Recalculate & Deploy in the Fabric Overview window for the fabric that you just created. However, when change control is enabled, that option changes to Actions > Recalculate; a user with the NDFC Change Deployer role can only deploy the change through the change control ticket process once change control is enabled.
-
View the information on the new change control ticket.
Navigate to Manage > Change Control to view detailed information about this change control ticket, and other change control tickets that are already configured on this system. See Viewing Change Control Ticket Information for more information.
-
Submit the ticket for approval, if necessary.
If you have an NDFC Network Admin user role, you do not have to submit the ticket for approval in this step; the ticket will be automatically approved internally. Skip to the deployment process in Step 8 below in this case.
-
With the Active tab selected in the Change Control window, select the change control ticket that you want to submit for approval.
-
Click Actions > Submit for Approval.
A warning message appears, asking if you’re certain that you want to submit this change control ticket for approval.
-
Enter a reason for the approval request in the text window, then click Ok.
-
-
Complete the next steps in the change control workflow, depending on your role:
-
If you are a user with an NDFC Change Approver role:
-
Review your pending approval tasks.
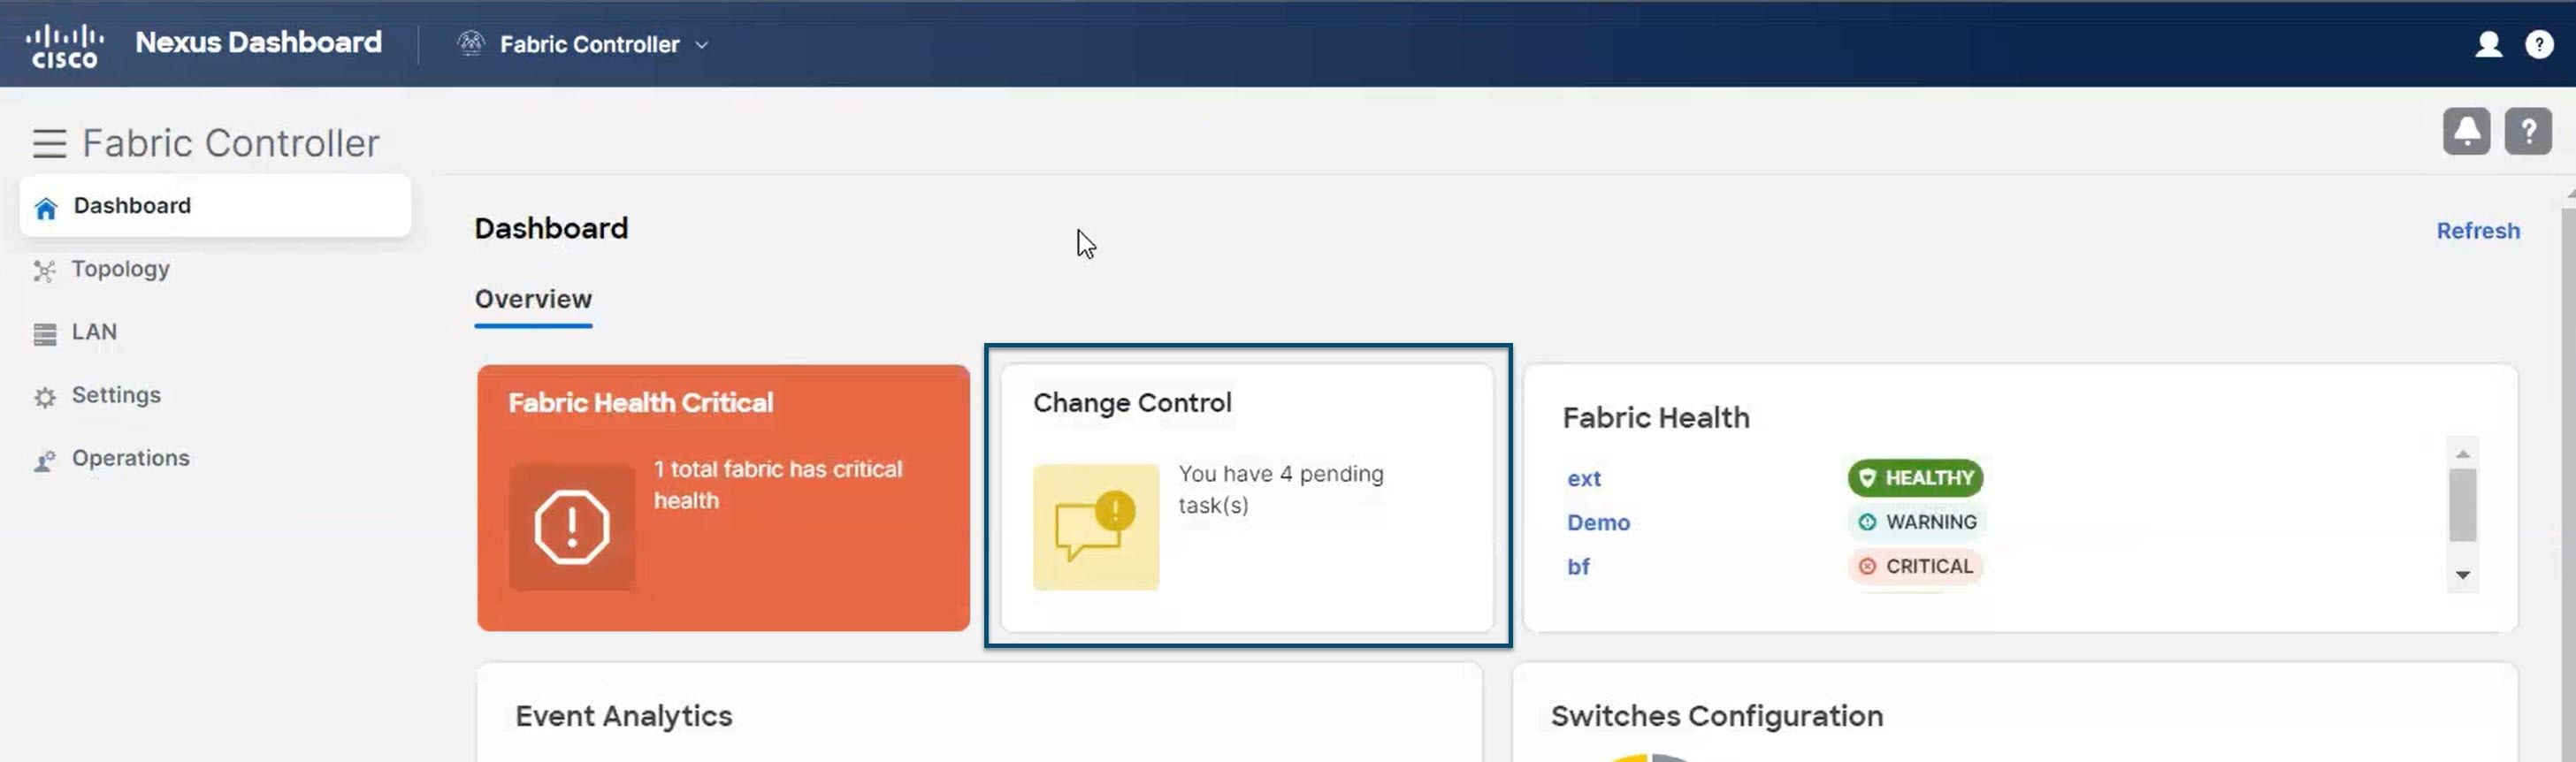
When a user with an NDFC Change Approver role logs into the NDFC, if there are pending approvals for that user, they will see those pending approval tasks in the Change Control area in the Dashboard window when they first log in.
-
Click on the Change Control box in the Dashboard window.
You are redirected to the Change Control window, with the Active tab selected and the change control tickets with a status that require actions relevant to your current user role will be shown.
For example, if you have a deployer role, only APPROVED tickets will be shown with a pending state in this window.
-
Select a change control ticket to review and determine the next course of action to take for the ticket.
Click Actions > Preview to review the reason for the change control ticket.
-
If you agree with the operation that is associated with the change control ticket, click Actions > Approve.
-
If you disagree with the operation that is associated with the change control ticket or you want to return the ticket for further edits, enter the reason why you are returning the ticket for further edits and click Actions > Deny/Return For Edits.
-
-
-
If you are a user with an NDFC Change Deployer role, take the next steps in the workflow after you get a ticket that was approved by a user with an NDFC Change Approver role:
-
Navigate to Manage > Change Control.
-
With the Active tab selected in the Change Control window, select the change control ticket that was approved by the NDFC Change Approver.
-
Review the change control ticket to determine the next course of action to take for the ticket.
If you want to verify that you also agree with the actions that were approved already by the NDFC Change Approver, click Actions > Preview to review the reason for the change control ticket. If you agree with the operation that is associated with the change control ticket, click Actions > Deploy to deploy the operation that is associated with this ticket.
-
If you deployed the operation associated with this ticket, navigate back to Manage > Change Control, then click the Complete tab to verify that the operation associated with this ticket was deployed successfully. Also see Deployment History for additional information on successful deployments.
-
-
If you created the change control ticket for an operation and that operation was denied by a user with an an NDFC Change Approver role, review the reason why your ticket was denied and make the necessary modifications, then resubmit the ticket, if necessary.
-
Special Change Control Workflows
The following change control workflows have special characteristics that make them unique in some way:
-
Cancelling All active tickets and disabling the change control feature: Normally, the change control feature cannot be disabled if active tickets are present. However, there may be situations where the change control feature must be disabled forcefully with active tickets. The Cancel All option (Actions > More > Cancel All) is available to NDFC Network Admin users to forcefully move all active ticket states to CANCELLED.
This does not perform the rollback action. The ongoing configuration intent is kept intact.
After performing the Cancel All action, you can then disable the change control feature from Admin > System Admin > System Settings > Feature Management. You can enable the change control feature again from the same location at a later date, if desired.
-
Deleting unwanted tickets: Only tickets in the CREATED state can be deleted. All records for this will be purged.
-
Changing the switch mode: NDFC supports changing the switch mode in the Topology and Image Management windows; however, since operations related to image management are not integrated with change control, changing the switch mode or other operations from image management will work as-is, while the other flows will require ticket IDs for making changes.
-
Resolving switch Out-Of-Sync conditions resulting from OOB changes: When NDFC detects out-of-band (OOB) configuration changes to switches, their Config Status changes to Out-Of-Sync. Gettting those switches back to an In-Sync state without additional configuration intent changes will require deploying the pending diffs using this procedure:
-
Select the switches whose Config Status is Out-Of-Sync or Pending.
-
Click Actions > More > Bind to Ticket and associate with a ticket.
-
Deploy the diffs using the usual Change Control ticket workflow.
-
-
Resolving bad intent issues:
-
If a ticket is in the APPROVED state but you then need to edit the intent, the NDFC Change Approver user can DENY the ticket to allow further edits.
-
If a deployment attempt has been made on a ticket in APPROVED state, the deployment may fail due to a bad intent, such as a typo, an invalid CLI entry, and so on. The ticket state will show as DEPLOYMENT_ATTEMPTED once the deployment fails. The NDFC Change Approver user can then DENY the ticket to allow further edits and go through the normal ticket deployment flow.
-
-
Deny/Return For Edits:
-
For tickets that are in the APPROVAL_PENDING or APPROVED states, it is possible to make further changes to these tickets by using the Action > Deny/Return For Edits option. This is supported for users with any of these roles:
-
NDFC Network Admin
-
NDFC Change Approver
-
NDFC Network Stager
An NDFC Network Stager can perfom this action only if they created the ticket.
-
-
For tickets that are in the DEPLOYMENT_ATTEMPTED state, it is possible to make further changes to these tickets by using the Action > Deny/Return For Edits. This is supported for users with any of these roles:
-
NDFC Network Admin
-
NDFC Change Approver
-
-
-
Issues with user roles and VXLAN EVPN Multi-Site Fabrics:
An issue may arise due to user roles when working with VXLAN EVPN Multi-Site fabrics.
Assume your NDFC has a VXLAN EVPN Multi-Site fabric (MS-fab1) with two child fabrics (fab1 and fab2). A user with a NDFC Network Stager role (StagerFab1), who has write access to the "all" domain and to the the fab1 child fabric, wants to make configuration changes, such as creating overlay definitions, to the VXLAN EVPN Multi-Site fabric.
-
If change control is not enabled, the StagerFab1 user is allowed to create overlay definitions in the VXLAN EVPN Multi-Site fabric. That’s because, under normal conditions, a user has write access to a VXLAN EVPN Multi-Site fabric if they have both:
-
write access (network-admin or network-stager) on the "all" domain, and
-
write access (network-admin or network-stager) on at least one child fabric in the VXLAN EVPN Multi-Site fabric
-
-
However, if change control is enabled, the StagerFab1 user is allowed to create overlay definitions in the VXLAN EVPN Multi-Site fabric, but since the change control ticket involves a VXLAN EVPN Multi-Site fabric and the fab1 and fab2 child fabrics, the change control ticket will get filtered out for the StagerFab1 user because the change control ticket has changes in the fab2 child fabric, which the StagerFab1 user does not have write access for.
To work around this issue, the StagerFab1 should be assigned an MSD network-admin role instead of an NDFC Network Stager role. A user with an MSD network-admin role is given the following access:
-
network-admin access to domains associated with all member fabrics
-
network-admin access to the “all” domain
A user with an MSD network-admin role will be able to successfully make the configuration changes described above with change control enabled.
-
Viewing Change Control Ticket Information
Navigate to the Tickets screen to view information on the change control tickets that have been configured for your NDFC system:
Manage > Change Control
Information on the all of the configured change control tickets are provided in the two tabs in the Tickets screen:
You can also view detailed information on a specific change control ticket. See Details on a Specific Change Control Ticket for more information.
Active
Tickets in any state other than DEPLOYED or CANCELLED are considered Active.
The Active tab provides the following detailed information on active change control tickets:
|
Field |
Description |
|
Time |
The date and time that the change control tickets were triggered. |
|
Tickets |
The names of the change control tickets. |
|
Description |
The reason for the change control tickets (the information provided in the Description of this change field in the change control tickets). |
|
Status |
The status of the change control tickets, such as CREATED, PENDING, APPROVED, DENIED, and so on. See Change Control Ticket Lifecycle for more information on the various states that are displayed in the Status field and what they mean. |
|
Last Reason |
The last reason of the change control tickets, such as Change Associated. |
|
Created By |
The IDs of the users who triggered the change control tickets. |
|
Approved By |
The IDs of the users who approved the change control tickets. See Roles Associated With Change Control for more information. |
|
Deployed By |
The IDs of the users who deployed the change control tickets. See Roles Associated With Change Control for more information. |
In the Active tab, the Actions button provides the following actions:
-
Create Ticket: Allows you to create a change control ticket.
-
Submit for Approval: Click a box next to a change control ticket that has a status of PENDING, then click Submit for Approval to send that change control ticket to an NDFC Change Approver.
-
Preview: Allows you to preview information about the change control ticket, such as the devices that are part of the change control ticket and the progress of the operation that is associated with the change control ticket.
-
Approve: If you have an NDFC Change Approver role, click a box next to a change control ticket that is in the Active state, then click Approve to approve that change control ticket.
-
Deny: If you have an NDFC Change Approver role, click a box next to a change control ticket that is in the Active state, then click Deny to deny that change control ticket.
-
Deploy: If you have an NDFC Change Deployer role, click a box next to a change control ticket that is in the Active state, then click Deploy to deploy that change control ticket.
-
Rollback: Click a box next to a change control ticket that has a status of PENDING, then click Rollback to roll back that change control ticket. See About Rollback for more information.
-
Delete: Click a box next to a change control ticket that is in the Active state, then click Delete to delete that change control ticket.
Complete
Tickets in the DEPLOYED or CANCELLED state are considered Complete.
The Complete tab provides the following detailed information on active change control tickets:
|
Field |
Description |
|
Time |
The date and time that the change control tickets were completed. |
|
Tickets |
The names of the change control tickets. |
|
Description |
The reason for the change control tickets (the information provided in the Description of this change field in the change control tickets). |
|
Status |
The status of the change control tickets, such as DEPLOYED or CANCELLED. |
|
Last Reason |
The last reason of the change control tickets, such as Deployment Successful - No Changes or Ticket Rolled Back. |
|
Created By |
The IDs of the users who triggered the change control tickets. |
|
Approved By |
The IDs of the users who approved the change control tickets. See Roles Associated With Change Control for more information. |
|
Deployed By |
The IDs of the users who deployed the change control tickets. See Roles Associated With Change Control for more information. |
In the Complete tab, the Actions button provides the following actions:
-
Rollback: Click a box next to a change control ticket that has a status of DEPLOYED, then click Rollback to roll back that change control ticket. See About Rollback for more information.
Details on a Specific Change Control Ticket
Additional details are available for each change control ticket.
-
Navigate to the main Tickets window:
Manage > Change Control
-
Double-click on any change control ticket listed under the Tickets column in either the Active or the Complete tab in the Tickets window.
The details window for that specific change control ticket appears.
Change Records
The Change Records page shows the set of changes that are associated with this ticket.
The following fields are shown in the Change Records page:
|
Field |
Description |
|
Action |
Indicates the user activity. |
|
Operation |
Indicates the type of operation used in the change control ticket, such as Update or Add. |
|
Fabric |
The name of the fabric that the change control ticket is associated with. |
|
User |
The user ID of the person who triggered the change. |
|
Rollback Allowed |
Indicates if a rollback is allowed for this specific change control action. For more information, see Guidelines and Limitations: Rollback. |
|
Timestamp |
The date and time when the change was triggered. |
|
Details |
Click View Details to view additional details on this change control ticket. |
Audit History
The Audit History page shows the state of the transitions associated with this ticket.
The following fields are shown in the Audit History page:
|
Field |
Description |
|
Updated Time |
The date and time that the stage in the change control ticket workflow occurred (the stage shown in the Status column). |
|
User |
The user ID of the person who triggered the change. |
|
Status |
The state of the transition for the change control ticket. |
|
Reason |
The reason for the change control ticket (the information provided in the Description of this change field in the change control ticket). |
Deployment History
The Deployment History page shows the set of deployment records that are associated with this ticket (available only when a deployment has been attempted).
The following fields are shown in the Deployment History page:
|
Field |
Description |
|
HostName |
The IP address of the entity that the change control ticket was triggered on. |
|
Entity Name |
The name of the entity that the change control ticket was triggered on. |
|
Entity Type |
The type of entity that the change control ticket was triggered on. |
|
Source |
The source where the entitythat the change control ticket was triggered on resides. |
|
Commands |
Click Detailed History to view details of the before and after commands associated with the change control ticket was triggered. |
|
Status |
The state of the transition for the change control ticket. |
|
Serial Number |
The serial number of the entity that the change control ticket was triggered on. |
|
Status Description |
The status of the change control ticket. |
|
User |
The user ID of the person who triggered the change. |
|
Time of Completion |
The date and time when the change control ticket was successfully deployed. |
Configuring the Auto Generated Ticket ID
The change control ticket ID is set to be automatically generated, where each change control ticket uses the following format:
<Ticket ID prefix string><Sequence id>
Where:
-
The <Ticket ID prefix string> is a configurable property, with TICKET_ used as the default value.
-
The <Sequence id> is a numerical value that is automatically incremented that cannot be changed, starting with the default value of 0.
For example, if you were to change the value of the <Ticket ID prefix string> from TICKET_ to NDFC1_, then the change control tickets would start with the names NDFC_0, NDFC_1, and so on.
To configure the auto generated Ticket ID information:
-
Navigate to:
Admin > System Admin > System Settings > Server Settings > LAN-Fabric
-
Locate the Change Control Ticket name prefix field.
-
Enter the value that you want to use for the <Ticket ID prefix string> part of the change control ticket ID.
Only a-z, A-Z, 0-9, _, - characters are allowed, and the name should start with an alphabetical character.
-
Click Save.
Change Control Ticket Lifecycle
The following figure shows the various states that a change control ticket goes through.
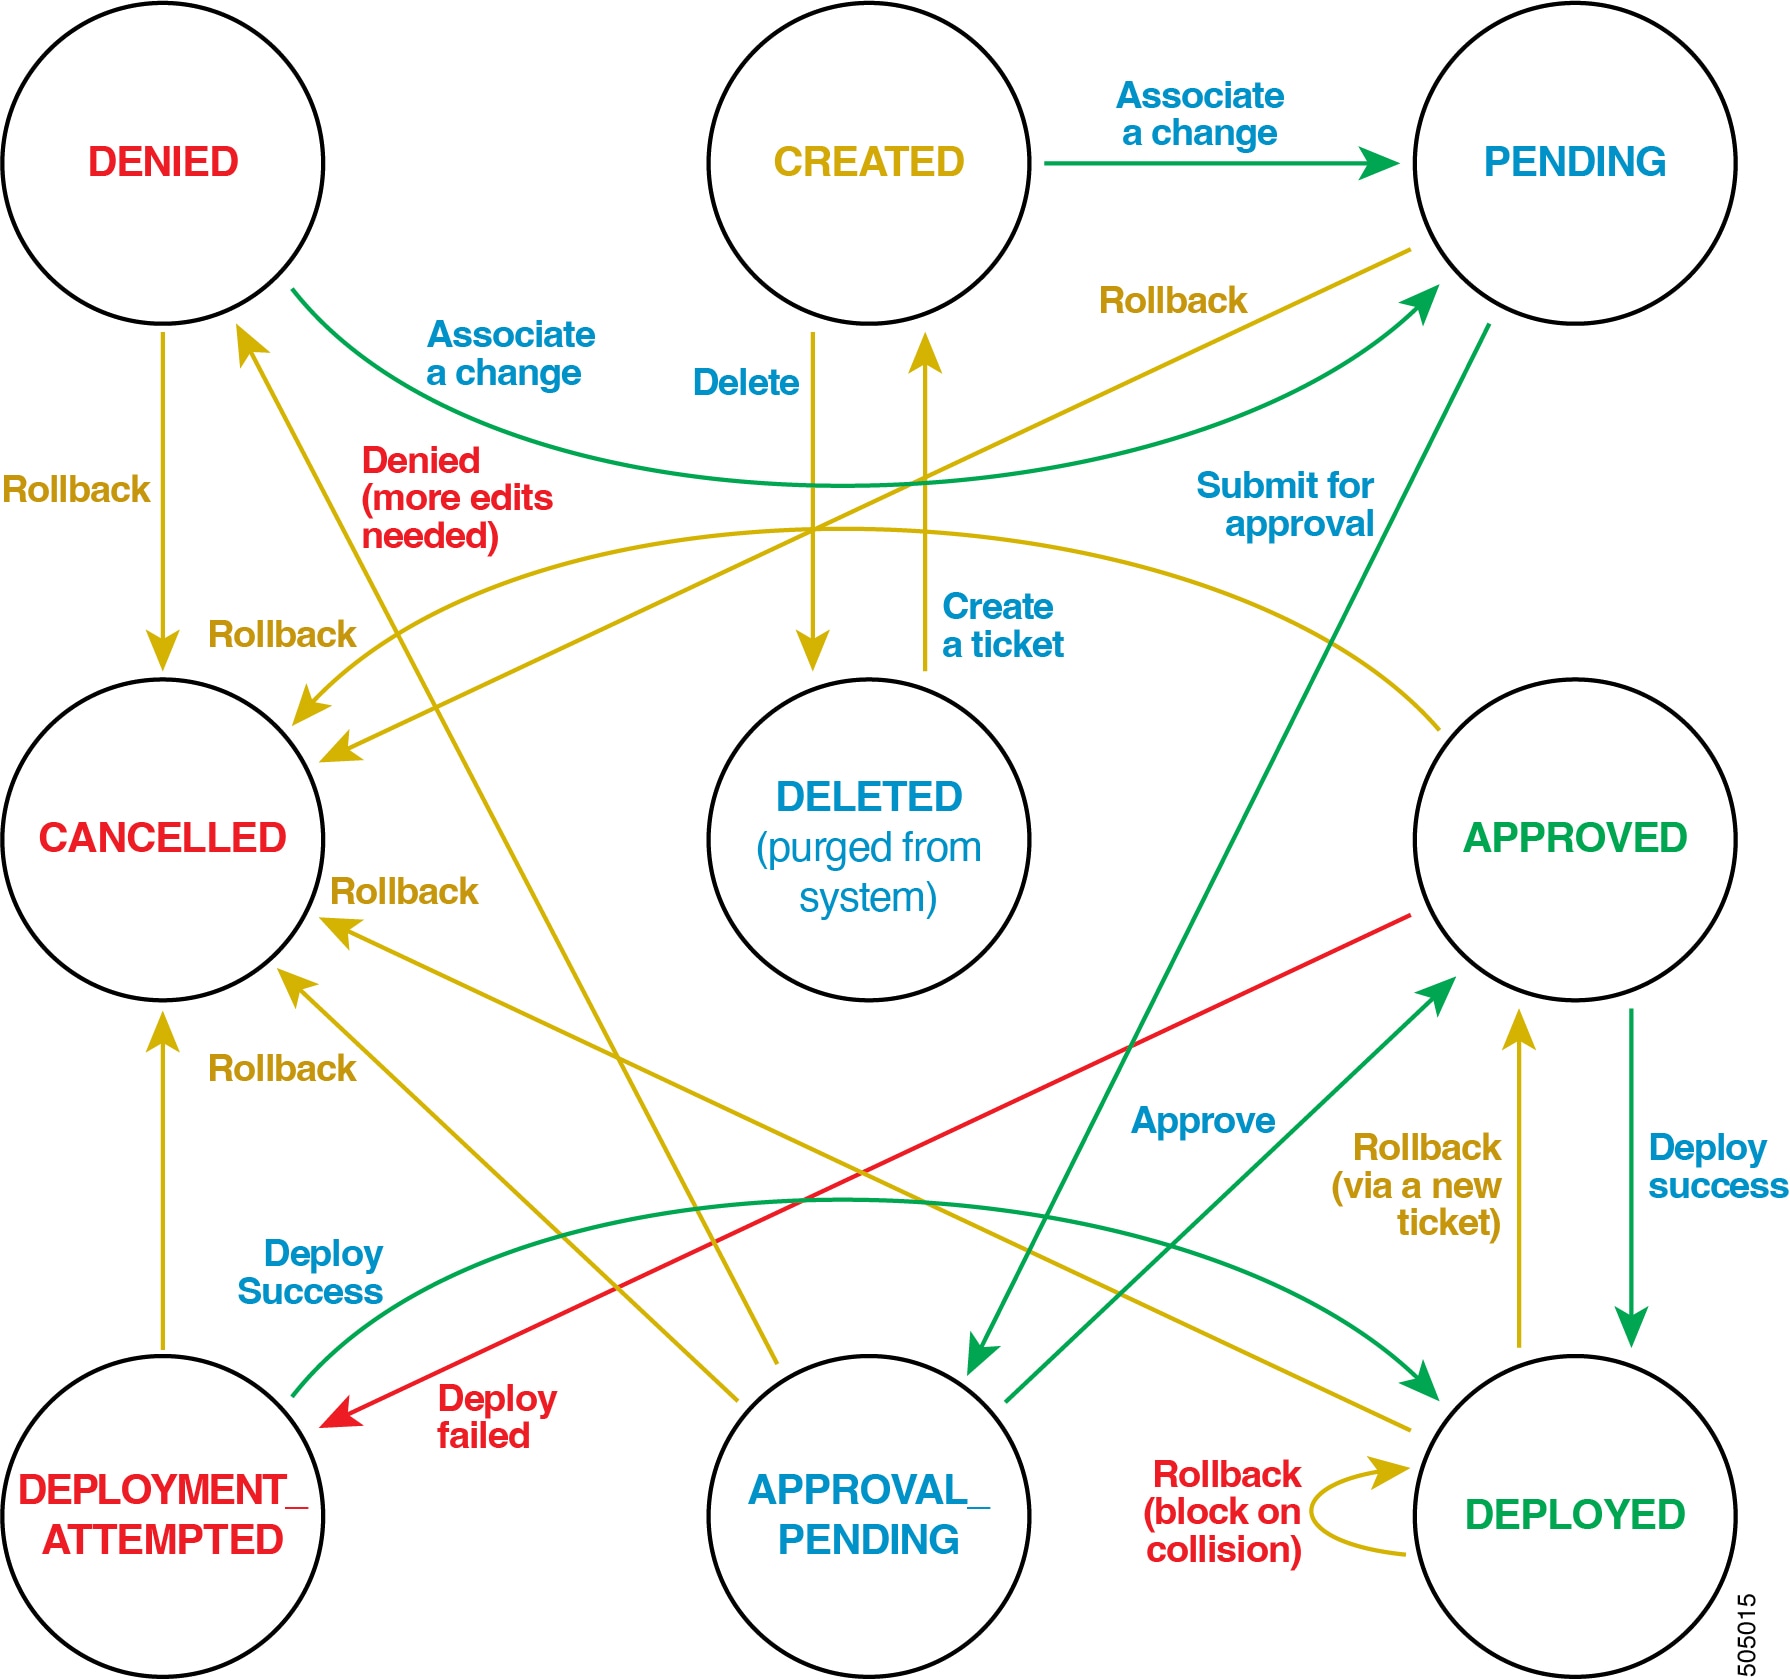
The following table describes each stage of the change control ticket lifecycle.
|
Field |
Description |
|
CREATED |
Newly-created tickets will be in the CREATED state. |
|
PENDING |
A ticket with at least one associated change will be in the PENDING state. |
|
APPROVAL_PENDING |
Intent changes associated with an APPROVAL_PENDING ticket are completed and have been submitted for approval. Only users with admin and stager privileges can perform this action. |
|
APPROVED |
The user with NDFC Change Approver (and admin) privileges has reviewed the changes and is satisfied with the content. This state indicates that the ticket is ready for deployment. |
|
DENIED |
The user with NDFC Change Approver privileges (and admin) has reviewed the changes but requests more changes to be associated. This state indicates that the stager must amend the existing ticket. Once a change is associated with a ticket in this state, it will move to the PENDING state. |
|
CANCELLED |
This could ndicate a ticket that has been rolled back. This is a terminal state. See About Rollback for more information. This can also occur when an NDFC Network Admin user performs a Cancel All action. This action is not a rollback, but instead forcefully moves the ticket to a CANCELLED state, leaving all the intent changes as is. |
|
DEPLOYED |
The user with NDFC Change Deployer (and admin) privileges has successfully deployed the ticket. This is a terminal state. |
|
DEPLOYMENT_ATTEMPTED |
This indicates an earlier failed deployment attempt. Users with NDFC Change Deployer (and admin) privileges have attempted a deployment that may have failed due to bad intent, issues with the reachability of the switch, or some other error condition. The ticket will either need to be edited (a change of intent) and/or will require a reattempt deployment after the error condition is fixed. Changing the intent will require the NDFC Change Approver user to Deny the ticket so that it goes to the DENIED state, and will then go through the approval process again. Any number of deployment attempts can be performed in this state until the entire set of diffs gets deployed successfully. Once the deployment is successful, the ticket will move to the DEPLOYED state. |
Ticket Purging Policy
-
Tickets in the DEPLOYED and CANCELLED states (Complete), along with their associated records, will be retained for a certain number of days based on a setting in the LAN-Fabric tab in the Server Settings page.
Set the amount of time that tickets will be retained by navigating to:
Admin > System Admin > System Settings > Server Settings > LAN-Fabric
Locate the Change Control Completed Tickets Purge Interval in days field and enter the appropriate value. The default value for this field is 30, and the acceptable range for this field is 10-60 days.
-
The purging check occurs once per day.
-
Tickets identified for purging will be removed from NDFC along with their associated Policy Change History and Deployment History records. No record of the purged ticket will be maintained on NDFC.
Policy Change History Usage
Change control tickets use the Policy Change History record for tracking changes.
-
The PTI History Tracking server setting, if checked, will disable the tracking of Policy Change records. When the Change Control feature is enabled, this server setting is a no-op.
-
The Purge limit for PTI history server setting controls the maximum number of policy change records that will be retained. When the Change Control feature is enabled, change records associated with tickets will not be purged. The Policy Change History records will be purged along with the ticket identified to be purged.
Deployment History Usage
Tickets use the Deployment History record for tracking deployment changes.
The Purge limit for deployment history server setting controls the maximum number of deployment records that will be retained. When the Change Control feature is enabled, deployment records associated with tickets will not be purged. The Deployment History records will be purged along with the ticket identified to be purged.
Conflict Detection: Change Control
NDFC entities (such as switches, interfaces, networks, VRFs, and so on) can be associated with one active ticket at a time (any ticket whose state is not DEPLOYED or CANCELLED). If you attempt to trigger a change control ticket when a conflict is detected, NDFC will not allow that change control ticket to be triggered and will describe the conflict so that you can resolve the issue.
The following conflict checks are performed when changes are associated with active tickets:
-
Entity conflicts: Each entity can be part of a single active ticket. For example, if Ethernet1/1 of switch A is associated with a change in ticket T1, the same interface cannot be updated by another ticket (T2). However, the same ticket T1 can be used for making further changes to Ethernet1/1 of switch A.
-
Fabric level actions: Edit settings and Recalculate actions must be in same ticket. If a Recalculate action is part of a ticket, another Recalculate action with a different ticket will be denied.
-
Switch level conflicts: python, python_cli check at switch level (serial number), template_cli and switch_freeform check PTI id
-
Host Port Resync: A Recalculate action must be part of the same ticket.
About Rollback
Beginning with the NDFC 12.1.3 release, support is available for rollback, where tickets that have been created for change control can be rolled back or reverted, if necessary.
Rollback is supported in the following situations:
-
Change control tickets can be rolled back while they are still being worked on, such as a situation where a change was started but then a decision was made to abandon that change. This ticket can be rolled back, at which point all the intent changes made are reverted back to their previous state.
-
Tickets that have been deployed can also be rolled back. In this case, a new ticket will be automatically created, which has the intent to be rolled back.
Because the rollback feature is an extension of the change control feature, the rollback feature is available only if you have enabled the change control feature. See Enabling the Change Control Feature for those procedures.
The following topics provide more information on the rollback feature:
Guidelines and Limitations: Rollback
Because the rollback feature is an extension of the change control feature, all guidelines and limitations listed in Guidelines and Limitations: Change Control are also applicable for the rollback feature.
Following are additional guidelines and limitations for the rollback feature:
-
Only users with the following roles can perform a rollback:
-
Users with an admin role
-
Users with a stager role can perform a rollback; however, an additional deployer role is needed to be able to deploy the rollback.
Following is an example scenario that illustrates where users with certain roles can perform the approval and deployment actions associated with change control tickets, and can also perform a rollback action on those change control tickets:
-
User-A, who has a stager + deployer role, creates an intent and associates it with a change control ticket. Later on, User-A also submits the ticket for approval.
-
User-B, who has an approver role, approves the change control ticket.
-
User-A then deploys the ticket, since User-A has the stager + deployer role.
-
Later on, when it’s determined that this change control ticket should be rolled back, User-A is also able to roll back this ticket due to the stager + deployer role.
-
-
-
Rollback is supported in the following situations:
-
Undeployed Tickets: These are change control tickets where changes have been staged but have not yet been deployed (tickets shown in the Active tab in the Change Control window). In this case, the changes associated with the ticket will be discarded and the ticket will be moved to the CANCELLED state.
For undeployed tickets:
-
You can perform a full ticket rollback, or you can perform a rollback of the last action for the undeployed ticket.
-
This rollback can be performed by an NDFC Network Admin or any of the staging-related roles.
-
-
Deployed Tickets: These are tickets where changes have been deployed (tickets shown with a DEPLOYED status in the Complete tab in the Change Control window). In this case, a new ticket with changes to revert the original changes will be created. The new ticket must go through the usual approval process to get deployed, and the original ticket will be moved to the CANCELLED state.
For deployed tickets:
-
You can only perform a full ticket rollback. You cannot perform a rollback of the last action for a deployed ticket.
-
This rollback can be perfomed by an NDFC Network Admin or the NDFC Network Stager.
-
-
-
Rollback is not supported in the following situations:
-
A rollback of auto-generated rollback tickets is not allowed. The auto-generated rollback tickets are shown as NDFC_RB-xxxx tickets; they are generated during the rollback of deployed tickets.
-
Any action that involves an inventory change (for example, if you add or delete switches).
-
There may be challenges when rolling back certain actions that were “one way” (for example, some role changes).
-
Any change control ticket that has Layer 4 to Layer 7 services actions associated with it cannot be rolled back. In other words, if you take an action in the Layer 4 to Layer 7 services window with a new or existing (shared) control ticket, you cannot roll back that change control ticket.
-
Similarly, any change control tickets associated with endpoint locator (EPL) cannot be rolled back.
-
Typical Rollback Workflow
Users with sufficient privileges can perform a rollback.
Following is a typical workflow when using the rollback feature:
-
Navigate to Manage > Change Control to view all of the undeployed and deployed change control tickets.
-
Identify a change control ticket that you want to roll back, listed either under the Active tab (undeployed tickets) or with a DEPLOYED status under the Complete tab (deployed tickets).
-
Click the box next to that change control ticket, then click Actions > Rollback.
A warning messsage appears, asking if you are sure that you want to roll back this ticket.
-
Click Confirm in the warning message to continue with this rollback action.
The Change Control window reappears.
-
If you rolled back an undeployed ticket, the rolled-back change control ticket is removed from the list of tickets shown on Active page. The rolled-back ticket now appears in the Complete page, with CANCELLED shown in the Status column and "Ticket Rolled Back" shown in the Last Reason column.
-
If you rolled back a deployed ticket, the rolled-back ticket in the Complete page changes states, with CANCELLED shown in the Status column and "Ticket Rolled Back" shown in the Last Reason column.
Follow these additional steps when rolling back a deployed ticket:
-
Click the Active tab in the Change Control page.
The rolled-back ticket now appears under the Active tab, with the status shown as APPROVED.
-
Click the box next to the rolled-back ticket, then click Actions > Deploy to deploy the rolled-back ticket again.
-
Navigate back to Manage > Change Control and click the Complete tab.
The rolled-back ticket now appears with DEPLOYED in the Status column.
-
-
Special Rollback Workflows
The following rollback workflows have special characteristics that make them unique in some way:
-
Rollback of last action for an undeployed ticket:
If you have an undeployed ticket, any user with stager or admin roles can roll back the last action that was taken for that undeployed ticket. When all the associated changes are rolled back, the ticket state will be moved back to the CREATED state. Note that you can roll back the last action only on a ticket that is in a pending or denied state.
For example, assume that you have a single change control ticket with 10 different changes as part of that single ticket, and you want to undo the last change in that undeployed change control ticket. Follow these procedures to rollback the last action in an undeployed ticket in this situation:
-
Navigate to Manage > Change Control, then select the Active tab to display all of the undeployed tickets.
-
Double-click on the undeployed ticket where you would like to rollback the last action on that ticket.
The overview window for that undeployed ticket appears.
-
Verify that you can see "true" as the value in the Rollback Allowed column for this undeployed ticket.
You will not be able to roll back the last action of this undeployed ticket if the value in the Rollback Allowed column is shown as "false".
-
Click Actions > Rollback Last Action.
A warning message appears, asking if you’re sure that you want to roll back the last action on this ticket.
-
Click Confirm to continue with the rollback.
The last action in this undeployed ticket is now rolled back.
-
Navigate back to the Active tab in the Change Control window.
The value in the Status column for this undeployed ticket changes to CREATED.
-
-
Full ticket rollback:
-
Deployed Tickets:
-
Users with the admin role can perform a rollback on a deployed ticket, which will move the current ticket to a CANCELLED state. A new ticket can then be created internally for the rollback that will be in an APPROVED state that needs to be deployed.
-
Following are the characteristics of an internally-created rollback ticket:
-
The ticket ID shows as NDFC_RB-xxxxx. For example, NDFC-RB-565666666.
-
The description is shown as "Changes for rolling back ticket XXXXXX".
-
Both the original and newly-created ticket will cross reference each other’s ticket IDs and will be shown in the NDFC GUI window.
-
Additional changes to the new ticket are not allowed.
-
The rollback ticket will be moved to an approved state at the end of rollback.
-
-
-
When a ticket is rolled back, it will be cancelled. No further actions can be performed on that ticket.
-
When a deployed ticket is rolled back, a new rollback ticket is created. That newly-created rollback ticket will be in the Approved state, so you can perform a deployment on that rolled back ticket.
-
Conflict Detection: Rollback
The following conflict checks will be performed when a ticket rollback is attempted:
-
For deployed tickets, each entity in a ticket that is being rolled back will be checked based on the rules provided in the Conflict Detection: Change Control section.
For example, assume a deployed ticket is rolled back and has an entity E1. If one of the other pending tickets are associated with the same entity E1, then the rollback request will be treated as a conflict and will be denied.
As another example, if there are one or more other deployed tickets that are associated with the same entity and if any of those changes are newer than the ticket being rolled back, then the rollback request will be treated as a conflict and will be denied.
-
Action level rollbacks are treated the same way as pending tickets, except that the scope is limited to one action.
-
The same rules for entity conflicts also apply for action conflicts, such as recalculate config.
Copyright
THE SPECIFICATIONS AND INFORMATION REGARDING THE PRODUCTS IN THIS MANUAL ARE SUBJECT TO CHANGE WITHOUT NOTICE. ALL STATEMENTS, INFORMATION, AND RECOMMENDATIONS IN THIS MANUAL ARE BELIEVED TO BE ACCURATE BUT ARE PRESENTED WITHOUT WARRANTY OF ANY KIND, EXPRESS OR IMPLIED. USERS MUST TAKE FULL RESPONSIBILITY FOR THEIR APPLICATION OF ANY PRODUCTS.
THE SOFTWARE LICENSE AND LIMITED WARRANTY FOR THE ACCOMPANYING PRODUCT ARE SET FORTH IN THE INFORMATION PACKET THAT SHIPPED WITH THE PRODUCT AND ARE INCORPORATED HEREIN BY THIS REFERENCE. IF YOU ARE UNABLE TO LOCATE THE SOFTWARE LICENSE OR LIMITED WARRANTY, CONTACT YOUR CISCO REPRESENTATIVE FOR A COPY.
The Cisco implementation of TCP header compression is an adaptation of a program developed by the University of California, Berkeley (UCB) as part of UCB’s public domain version of the UNIX operating system. All rights reserved. Copyright © 1981, Regents of the University of California.
NOTWITHSTANDING ANY OTHER WARRANTY HEREIN, ALL DOCUMENT FILES AND SOFTWARE OF THESE SUPPLIERS ARE PROVIDED “AS IS" WITH ALL FAULTS. CISCO AND THE ABOVE-NAMED SUPPLIERS DISCLAIM ALL WARRANTIES, EXPRESSED OR IMPLIED, INCLUDING, WITHOUT LIMITATION, THOSE OF MERCHANTABILITY, FITNESS FOR A PARTICULAR PURPOSE AND NONINFRINGEMENT OR ARISING FROM A COURSE OF DEALING, USAGE, OR TRADE PRACTICE.
IN NO EVENT SHALL CISCO OR ITS SUPPLIERS BE LIABLE FOR ANY INDIRECT, SPECIAL, CONSEQUENTIAL, OR INCIDENTAL DAMAGES, INCLUDING, WITHOUT LIMITATION, LOST PROFITS OR LOSS OR DAMAGE TO DATA ARISING OUT OF THE USE OR INABILITY TO USE THIS MANUAL, EVEN IF CISCO OR ITS SUPPLIERS HAVE BEEN ADVISED OF THE POSSIBILITY OF SUCH DAMAGES.
Any Internet Protocol (IP) addresses and phone numbers used in this document are not intended to be actual addresses and phone numbers. Any examples, command display output, network topology diagrams, and other figures included in the document are shown for illustrative purposes only. Any use of actual IP addresses or phone numbers in illustrative content is unintentional and coincidental.
The documentation set for this product strives to use bias-free language. For the purposes of this documentation set, bias-free is defined as language that does not imply discrimination based on age, disability, gender, racial identity, ethnic identity, sexual orientation, socioeconomic status, and intersectionality. Exceptions may be present in the documentation due to language that is hardcoded in the user interfaces of the product software, language used based on RFP documentation, or language that is used by a referenced third-party product.
Cisco and the Cisco logo are trademarks or registered trademarks of Cisco and/or its affiliates in the U.S. and other countries. To view a list of Cisco trademarks, go to this URL: http://www.cisco.com/go/trademarks. Third-party trademarks mentioned are the property of their respective owners. The use of the word partner does not imply a partnership relationship between Cisco and any other company. (1110R)
© 2017-2024 Cisco Systems, Inc. All rights reserved.