New and Changed Information
The following table provides an overview of the significant changes up to this current release. The table does not provide an exhaustive list of all changes or of the new features up to this release.
|
Cisco ACI CNI plug-in Release Version |
Feature |
|---|---|
|
5.2(3) |
Support for Red Hat OpenShift 4.10 on VMware vSphere 7 User-Provisioned Infrastructure (UPI). |
Openshift 4.10 on VMware vSphere
Cisco ACI supports Red Hat OpenShift 4.10 on VMware vSphere 7 User-Provisioned Infrastructure (UPI). This document provides the instructions on using Ansible playbooks to provision OpenShift 4.10 on VMware vSphere with the Container Network Interface (CNI) plug-in.
The Ansible playbooks provision virtual machines (VMs) with the needed interface configuration and generate the ignition configuration files. You must deploy your own DHCP, DNS, and load-balancing infrastructure following high-availability best practices.
The Ansible playbooks are available on Github.
The following are the Ansible playbooks:
-
asserts.yml: This playbook performs basic validations of variable declarations in the all.yml file.
-
setup.yml: This playbook performs the following tasks:
-
Configures the orchestrator node:
-
Installs Terraform, the OpenShift client, and the OpenShift installer. It creates the following: Terraform variables for the bootstrap, master, and worker nodes; the master and worker machine-config operator; the OpenShift install config file.
-
Configures load balancer node: It disables Security-Enhanced Linux (SELinux), configures HAProxy, sets up DHCP and DNS if selected.
This optional step configures these three components only if you set the
provision_dhcp,provision_dns, andprovision_lbvariables to true.
-
-
-
oshift_prep.yml:
-
Sets up the install and bootstrap directories.
-
Generates manifests using openshift-install.
-
Adds the additional machine-config operator manifests.
-
Adds the Cisco ACI-CNI manifests.
-
Creates a backup of the manifests.
-
Sets up the bootstrap, master, and worker nodes ignition files.
-
Copies the bootstrap ignition file to the loadbalancer node.
-
-
create_nodes.yml:
-
Provisions the bootstrap, master, and worker nodes, using Terraform.
-
Sets up a cron job to approve Cisco Certificate Signing Requests (CSRs), if selected.
-
-
delete_nodes.yml: Deletes all master and worker nodes.
Prerequisites for Installing OpenShift 4.10 on VMware vSphere
To install OpenShift Container Platform (OCP) 4.10 on VMware vSphere, fulfill the following prerequisites:
Cisco ACI
-
Download the acc-provision tool version 5.2.3.3 or later.
Specify the “--flavor” option value as “openshift-4.10-esx,” and use the “-z” option. The tool creates a .tar archive file as specified by the “-z” option value. You need this archive file during installation.
Make sure that the Cisco ACI container images that are specified as input to the acc-provision tool are version 5.2.3.3 or later.
VMware vSphere
Obtain user credentials with privileges to create virtual machines (VMs).
OpenShift
Obtain the following from the Red Hat website:
-
The OCP4 Open Virtualization Appliance (OVA) - ensure to download the relevant release of the OVA image. Navigate to the mirror page on the OpenShift website where all the RHCOS versions are listed, and select the required version. Download the
rhcos-vmware.x86_64.ovafile. -
OCP4 client tools - navigate to the mirror page on the OpenShift website where the installation and client tool versions are listed, and select the required version. Download the
openshift-client-linux.tar.gzandopenshift-install-linux.tar.gzfiles. -
Pull Secret
Installing OpenShift 4.10 on VMware vSphere
 Note |
Before you begin
Complete the tasks in the Prerequisites section.
It is recommended to see the RedHat OpenShift documentation for prerequisites and other details about Installing a Cluster on vSphere.
Procedure
|
Step 1 |
Provision the Cisco ACI fabric using the acc-provision utility:
|
||||
|
Step 2 |
After the Cisco ACI fabric is provisioned, verify that a port group with the name system_id_vlan_kubeapi_vlan is created under distributed switch. This document refers to this port group as api-vlan-portgroup.
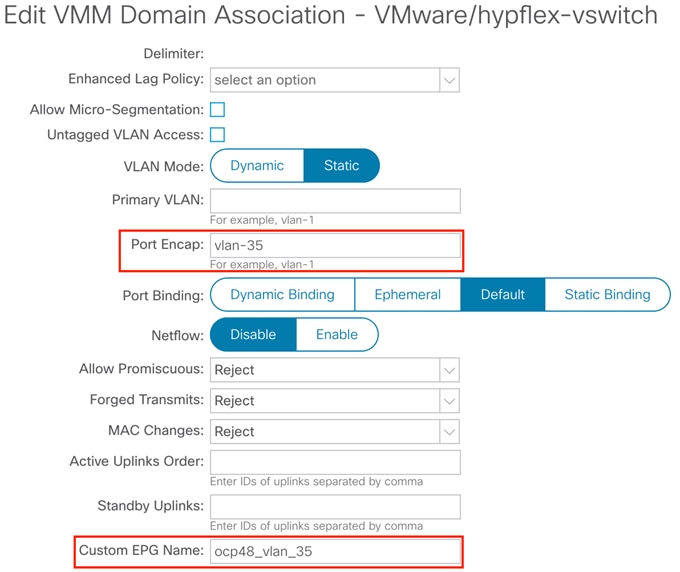
Kube_api VLAN is added to the dynamic VLAN pool associated with the VMware VMM Domain. Allocation mode will be set to Static.  |
||||
|
Step 3 |
In VMware vSphere, import the OpenShift Container Platform 4 (OCP4)Open Virtual Appliance (OVA) image. Specify |
||||
|
Step 4 |
Provision a Red Hat Enterprise load balancer virtual machine (VM) with the network interface that is connected to the api-vlan-portgroup. The Ansible playbooks optionally configure this VM as a load balancer, DNS server, and DHCP server for the OpenShift cluster. |
||||
|
Step 5 |
Provision a Red Hat Enterprise orchestrator VM with the network interface that is connected to the api-vlan-portgroup. The Ansible playbooks play from the orchestrator VM. |
||||
|
Step 6 |
Perform the following tasks on the orchestrator VM: |
What to do next
You can use the commands openshift-install wait-for bootstrap-complete and openshift-install wait-for install-complete to check the progress of the installation. Execute the commands from the bootstrap directory.
Updating the Default Ingress Controller
For updating the default Ingress Controller publish strategy to use the ACI Loadbalancer, log in as a user with cluster-admin privileges and run the following:
oc replace --force --wait --filename - <<EOF
apiVersion: operator.openshift.io/v1
kind: IngressController
metadata:
  namespace: openshift-ingress-operator
  name: default
spec:
  endpointPublishingStrategy:
    type: LoadBalancerService
    loadBalancer:
      scope: External
EOF
For more details, see the Configuring the default Ingress Controller for your cluster to be internal section in the Ingress Operator in OpenShift Container Platform Red Hat guide.
Configuring MachineSets with ACI CNI
The Machine API is a combination of primary resources that are based on the upstream Cluster API project and custom OpenShift Container Platform resources.
For OpenShift Container Platform 4.10 clusters, the Machine API performs all node host provisioning management actions after the cluster installation is completed. OpenShift Container Platform 4.10 offers an elastic, dynamic provisioning method on top of public or private cloud infrastructure because of the Machine API.
The two primary resources are:
-
Machines-A fundamental unit that describes the host for a node. A machine has a providerSpec specification, which describes the types of compute nodes that are offered for different cloud platforms. For example, a machine type for a worker node on Amazon Web Services (AWS) might define a specific machine type and required metadata.
-
MachineSet-MachineSet resources are groups of machines. Machine sets are to machines as replica sets are to pods. If you need more machines or must scale them down, you change the replicas field on the machineset to meet your compute need.
Changes to operating systems on OpenShift Container Platform nodes can be done by creating MachineConfig objects that are managed by the Machine Config Operator.
Creating a MachineConfiguration File
Use this procedure to create a MachineConfig file that will configure network interfaces for the new nodes with:
-
ACI Infra interface (ens224)
-
ACI Infra SubInterface (ens224.{InfraVlanID})
-
Opflex-route for BUM traffic replication (224.0.0.0/4)
The required configurations (sample) are shown in the procedure below, however, they need to be customized to match your specific environment. In general the following changes are required:
-
Replace every occurence of {InfraVLAN} with the ACI Infra VLAN for your fabric.
-
Replace every occurence of {MTU} with the MTU you selected for your cluster.
Note |
Ensure that your network interface is ens224 (not a different name). |
Procedure
|
Step 1 |
Create an 80-opflex-route. |
||
|
Step 2 |
Create an ens224.nmconnection. |
||
|
Step 3 |
Create an ens224.{InfraVLAN}.nmconnection. |
||
|
Step 4 |
Convert the above three configurations (steps 1,2,3) into base64 encoded strings, and use it in the machineconfig (after base64) template, as shown below.
|
||
|
Step 5 |
Use the oc create -f command to create the MachineConfig for your cluster. The machineconfig is applied to the pre-existing workers nodes (two) and replaces the three files already existing with identical copies. When you include the md5 configuration in the machine config, three files are created on the node. The pre-existing worker nodes will reboot one at a time. |
||
|
Step 6 |
Get you cluster id using the oc get -o jsonpath='{.status.infrastructureName}{"\n"}' infrastructure cluster command. |
||
|
Step 7 |
Create the machineset. The above is a sample configuration, you may need to modify as below:
|
Scaling of Compute Nodes Using MachineSet
Use this procedure to scale compute nodes using MachineSet.
Procedure
|
Step 1 |
Create a VM folder - |
|
Step 2 |
Create a Template in vCenter. Ensure that the template name matches the cluster name in the RHCOS410 template. |
|
Step 3 |
Create a TAG category called id in vCenter. |
|
Step 4 |
Configure the DHCP server to allocate IP addresses to the nodes. |
Sample Files for Installing OpenShift 4.10 on VMware vSphere
This section contains sample files that you need for installing OpenShift 4.10 on VMware vSphere.
Sample acc-provision-input File
The following is a sample acc-provision-input.yaml. The highlighted or bold values are those that you must modify to meet your site requirements.
#
# Configuration for ACI Fabric
#
aci_config:
  system_id: ocp4aci
  #apic-refreshtime: 1200
  apic_hosts:
  - 1.1.1.1
  vmm_domain:
    encap_type: vxlan
    mcast_range:                # Every opflex VMM must use a distinct range
      start: 225.28.1.1
      end: 225.28.255.255
    nested_inside:
      type: vmware
      name: my-vswitch
	elag_name: <eLAG_name>   # Beginning Cisco APIC 5.0(1), you can configure VMware teaming policy
                               # when link aggregation groups (LAGs) are used.
    installer_provisioned_lb_ip: 10.213.0.201

  # The following resources must already exist on the APIC.
  # They are used, but not created, by the provisioning tool.
  aep: my-aep
  vrf:                          # This VRF used to create all kubernetes EPs
    name: myl3out_vrf
    tenant: common
  l3out:
    name: myl3out
    external_networks:
    - myl3out_net

#
# Networks used by ACI containers
#
net_config:
  node_subnet: 192.168.18.1/24
  pod_subnet: 10.128.0.1/16     # Subnet to use for Kubernetes
                                #   Pods/CloudFoundry containers

  extern_dynamic: 10.3.0.1/24   # Subnet to use for dynamic external IPs
  extern_static: 10.4.0.1/24    # Subnet to use for static external IPs
  node_svc_subnet: 10.5.0.1/24  # Subnet to use for service graph
  kubeapi_vlan: 35
  service_vlan: 36
  infra_vlan: 3901
  #interface_mtu: 1600
  #service_monitor_interval: 5  # IPSLA interval probe time for PBR tracking
                                # default is 0, set to > 0 to enable, max: 65535
  #pbr_tracking_non_snat: true  # Default is false, set to true for IPSLA to
                                # be effective with non-snat services

#
# Configuration for container registry
# Update if a custom container registry has been setup
#
kube-config:
  image_pull_policy: Always
  ovs_memory_limit: 1Gi

registry:
  image_prefix: quay.io/noiro
Sample Ansible group_vars/all.yml File
The following is a sample group_vars/all.yml. The highlighted or bold values are those that you must modify to meet your site requirements.
#domainname
#   type: string, base dns domain name, cluster metadata name is added as subdomain to this
#   required: yes
domainname: ocplab.local

#provision_dns
#   type: boolean, True or False
#   required: yes
#   notes: If set to true, load balancer is configured as dns server.
#          If false, it is assumed that the dns server pre-exists.
provision_dns: True

#dns_forwarder:
#   type: ip address
#   required: yes
#   notes: This value is used when setting up a dhcp service and also for 'forwarders' value in dns configuration.
dns_forwarder: 172.28.184.18

#loadbalancer_ip:
#   type: ip address or resolvable hostname
#   required: yes
#   notes: This host is configured as load balancer for cluster and also as dhcp and dns server if required . This IP address is the same as the one that you configure in installer_provisioned_lb_ip in the acc-provision config.
loadbalancer_ip: 192.168.18.201. This IP address is the same as the one that you configure in installer_provisioned_lb_ip in the acc-provision config.

#auto_approve_csr:
#   type: boolean
#   required: yes
#   notes: when set to true, sets up a cron job to auto approve openshift csr
auto_approve_csr: True

#proxy_env
#
proxy_env:
   #donot remove dummy field, irrespective of whether setup needs a proxy or not.
   dummy: dummy
   #set the http/https proxy server, if setup does not need proxy, comment the below values.
   #these values are used for ansible tasks and also passed on to openshift installer
   http_proxy: http://1.1.1.1:80
   https_proxy: http://1.1.1.1:80
   no_proxy: 1.2.1.1,1.2.1.2

#packages
#  defines the urls to download terraform, openshift client and openshift-install tools from.
packages:
   validate_certs: False
   terraform_url: https://releases.hashicorp.com/terraform/0.13.6/terraform_0.13.6_linux_amd64.zip
   openshift_client_linux_url: https://mirror.openshift.com/pub/openshift-v4/clients/ocp/4.10.21/openshift-client-linux-4.10.21.tar.gz
   openshift_install_linux_url: https://mirror.openshift.com/pub/openshift-v4/clients/ocp/4.10.21/openshift-install-linux-4.10.21.tar.gz

#default_aci_manifests_archive:
#  default filename that is searched under files directory.
#  this can be overridden by passing extra parameter aci_manifests_archive on ansible command line
default_aci_manifests_archive: aci_manifests.tar.gz

#opflex_interface_mtu:
# required: yes
# MTU size for interface connected to fabric, must be greater than 1564
opflex_interface_mtu: 1800


#vsphere
vsphere:
   server: myvshpere.local.lab
   user: administrator@vsphere.local
   passwd: xxxx
   allow_unverified_ssl: true
   datacenter_name: my-dc
   cluster_name: my-cluster
   datastore_name: mydatastore
   RHCOS_template_name: RHCOS410

#base_dir
#  type: directory path
#  required: yes
#  notes: All install files and directories are created under this directory
base_dir: /root/ocpinstall

#node network details. This is common for bootstrap, master and worker nodes.
node_network_cidr: 192.168.53.0/24
node_network_gateway: 192.168.53.1
node_network_netmask: 255.255.255.0

#bootstrap node variables
bootstrap_vars:
   node_ip: 192.168.18.210       #required
   cpu_count: 8                  #optional: defaults to 4
   memory_KB: 16384              #optional: defaults to 8192
   disk_size_MB: 40              #optional: defaults to 40

masters_vars:
   cpu_count: 8                  #optional: defaults to 4
   memory_KB: 16384              #optional: defaults to 16384
   disk_size_MB: 40              #optional: defaults to 40
   nodes:
      #mac address and ip address for each node is required
      - master-1:
         ip: 192.168.18.211
      - master-2:
         ip: 192.168.18.212
      - master-3:
         ip: 192.168.18.213

workers_vars:
   cpu_count: 8                #optional: defaults to 4
   memory_KB: 16384            #optional: defaults to 16384
   disk_size_MB: 40            #optional: defaults to 40
   nodes:
      #mac address and ip address for each node is required
      - worker-1:
          ip: 192.168.18.214
      - worker-2:
          ip: 192.168.18.215

#user_ssh_key:
#  required: no
#  notes: if specified this key is setup on nodes, else ssh key of current
#        user is used.
user_ssh_key: ssh-rsa AAAAB3NzaC1yc2EAAAADAQABAAABAQD...

#additional_trust_bundle:
#  required: no
#  notes: use this field to add a certificate for private repository
#
# example:
#additional_trust_bundle: |
#   -----BEGIN CERTIFICATE-----
#   MIIDDDCCAfQCCQDuOnV7XBjpODANBgkqhkiG9w0BAQsFADBIMQswCQYDVQQGEwJV
#   UzELMAkGA1UECAwCQ0ExDDAKBgNVBAcMA1NKQzEOMAwGA1UECgwFQ2lzY28xDjAM
#  -----END CERTIFICATE-----

#openshift_pullsecret:
#  required: yes
#  notes: refer to https://cloud.redhat.com/openshift/install/pull-secret
#  example:
#    openshift_pullsecret: {"auths":{"cloud.openshift.com":{"auth":.........}
openshift_pullsecret: xxx
Sample hosts.ini file
The following is a sample hosts.ini. The highlighted or bold values are those that you must modify to meet your site requirements.
[orchestrator]
192.168.18.200

[lb]
192.168.18.201
Decommissioning OpenShift
Use this procedure to decommission OpenShift and remove the ACI-provisioned configuration from ACI.
Note |
Starting with Cisco APIC release 5.2, VMM domains for OpenShift cannot be removed from the APIC GUI. It is only possible using
REST API, therefore, it is convenient to use the acc-provision tool to remove the VMM domain, and other related objects used
by the decommissioned OpenShift cluster. Ensure you have the |
Before you begin
In case of decommissioning or removing Openshift cluster, ACI configuration provisioned for that cluster should be removed from ACI. The acc-provision tool can be used to remove that configuration.
Procedure
|
Use the following command from the machine and folder which was used to provision the ACI infrastructure, to delete the pre-provisioned configurations and the VMM domain. acc-provision -d -f openshift-4.10-esx -c acc-input-file -u user -p password Example: |
 Feedback