New and Changed Information
The following table provides an overview of the significant changes up to this current release. The table does not provide an exhaustive list of all changes or of the new features up to this release.
|
Cisco ACI CNI plug-in Release Version |
Feature |
|---|---|
|
5.2(3) |
Cisco Application Centric Infrastructure (ACI) supports Red Hat OpenShift 4.12 nested in Red Hat OpenStack Platform (OSP). |
OpenShift 4.12 on OpenStack
Cisco Application Centric Infrastructure (ACI) supports Red Hat OpenShift 4.12 nested in Red Hat OpenStack Platform (OSP) 16.2. To enable this support, Cisco ACI provides customized Ansible modules to complement the upstream OpenShift installer. This document provides instructions and guidance that follows the recommended OpenShift on OpenStack User-Provisioned Infrastructure (UPI) installation process as outlined in the following documents:
-
Installing a cluster on OpenStack with customizations for OpenShift 4.12 on the Red Hat OpenShift website
-
Installing OpenShift on OpenStack User-Provisioned Infrastructure on GitHub
 Note |
If you have an existing OpenShift 4.11 cluster installed with Cisco ACI CNI, you can upgrade to OCP 4.12 by first upgrading the ACI CNI (refer to the Upgrading the Cisco ACI CNI Plug-in guide), and then following Red Hat documentation to upgrade from OpenShift 4.11 to 4.12. |
Network Design and the Cisco ACI CNI Plug-in
This section provides information about the network design that takes advantage of the Cisco ACI Container Network Interface (CNI) plug-in.
The design separates OpenShift node traffic from the pod traffic on different Neutron networks. The separation results in the bootstrap, control, and compute virtual machines (VMs) having two network interfaces, as shown in the following illustration:
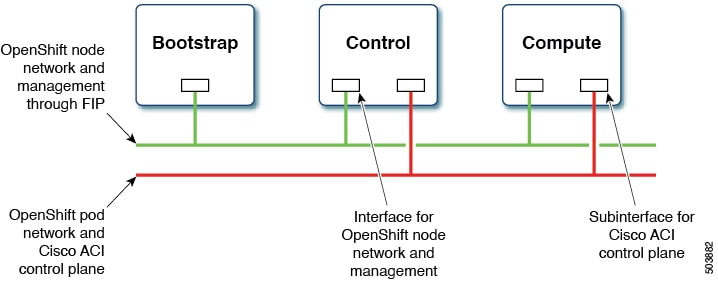
One interface is for the node network and the second is for the pod network. The second interface also carries Cisco ACI control plane traffic. A VLAN tagged subinterface is configured on the second interface to carry the pod traffic and the Cisco ACI control plane traffic.
This network design requires some changes to the Red Hat OpenShift Installer UPI Ansible modules. These changes are implemented in the Cisco-provided OpenShift Installer UPI Ansible modules, which are packaged in the OpenShift installer tar file (openshift_installer-5.2.3.<z>.src.tar.gz) that is made available along with the other Cisco ACI CNI 5.2(3) release artifacts. More specifically, the changes are to:
-
Create a second Neutron network in a separate playbook.
-
Modify the existing playbooks that launch the control, and compute virtual machines (VMs) to:
-
Create a second port on the second Neutron network and add it as a second interface to the VM configuration.
-
Add an extra attribute "nat_destination" to the Neutron floating IP address.
-
-
Update the playbook that creates the first Neutron network to:
-
Create the Neutron address-scope to map to a predefined Cisco ACI virtual routing and forwarding (VRF) context.
-
Create a Neutron subnet-pool for the address-scope in the previous step.
-
Change the subnet creation to pick a subnet from the subnet-pool in the previous step.
-
Set the maximum transmission unit (MTU) for the neutron Network (which is picked up from the configuration file described later).
-
-
In addition to creating a second network interface (and subinterfaces on that interface), the stock ignition files created by the “openshift-install create ignition-configs” step need to be updated. This is being done by additional playbooks, which are also provided.
Note |
The configuration required to drive some of the customization in this section done through new parameters in the inventory file. |
Prerequisites for Installing OpenShift 4.12
To successfully install OpenShift Container Platform (OCP) 4.12 on OpenStack 16.2, you must meet the following requirements:
Cisco ACI
-
Configure a Cisco ACI Layer 3 outside connection (L3Out) in an independent Cisco ACI VRF and "common" Cisco ACI tenant so that endpoints can do the following:
-
Reach outside to fetch packages and images.
-
Reach the Cisco Application Policy Infrastructure Controller (APIC).
-
-
Configure a separate L3Out in an independent VRF that is used by the OpenShift cluster (configured in the acc-provision input file) so that the endpoints can do the following:
-
Reach API endpoints outside the OpenShift cluster.
-
Reach the OpenStack API server.
The OpenShift pod network uses this L3Out.
-
-
Identify the Cisco ACI infra VLAN.
-
Identify another unused VLAN that you can use for OpenShift cluster service traffic.
The service is configured in the
service_vlanfield in the acc_provision input file for the OpenShift cluster.
OpenStack
-
Install Red Hat OpenStack Platform (OSP) 16.2 with Cisco ACI Neutron plug-in (release 5.2(3)) in nested mode by setting the following parameters in the Cisco ACI .yaml Modular Layer 2 (ML2) configuration file:
-
ACIOpflexInterfaceType: ovs -
ACIOpflexInterfaceMTU: 8000
To update an existing installation (and if the above two parameters are not configured), see Cisco ACI Installation Guide for Red Hat OpenStack Using the OpenStack Platform 16.2 Director on Cisco.com.
-
-
Create an OpenStack project and the required quotas to host the OpenShift cluster and perform the other required configuration.
Follow the procedure Installing a cluster on OpenStack on your own infrastructure for OpenStack 4.12 on the Red Hat OpenStack website.
-
Create an OpenStack Neutron external network, using the relevant Cisco ACI extensions and mapping to the OpenStack L3Out to include the following:
-
A subnet configured for Secure Network Address Translation (SNAT).
-
A subnet that is configured for floating IP addresses.
Refer to the chapter "OpenStack External Network" in Cisco ACI Installation Guide for Red Hat OpenStack Using the OpenStack Platform 16.2 Director on Cisco.com.
Note
All OpenStack projects can share the OpenStack L3Out and Neutron external network.
-
-
If direct access to the OpenShift node network is required (i.e by not using the Neutron Floating IPs) from endpoints that are not managed by the Cisco ACI fabric, identify every IP subnet from where this direct access is anticipated. These IP subnets will later be used to create Neutron subnet pools during the installation process.
-
Follow the instructions in the section "Red Hat Enterprise Linux CoreOS (RHCOS)" of Installing OpenShift on OpenStack User-Provisioned Infrastructure to obtain the RHCOS and create an OpenStack image:
$ openstack image create --container-format=bare --disk-format=qcow2 --file rhcos-4.12.3-x86_64-openstack.x86_64.qcow2.gz rhcos-4.12
OpenShift
Identify the SNAT IP address that will be used by the Cisco ACI Container Network Interface (CNI) for source NATing the traffic
from all the pods during installation. You will use the SNAT IP addresses in the cluster_snat_policy_ip configuration in the aci_cni section of the inventory.yaml file.
Installer Host
You need access to a Linux host to run installation scripts with access to node network and OpenStack Director API. It should have the following installed:
-
Install Ansible 2.8 or later.
Refer to Installing Ansible on the Ansible website.
-
Python 3
-
jq – JSON linting
-
yq – YAML linting: sudo pip install yq
-
python-openstackclient 5.4 or later: sudo pip install python-openstackclient==5.4.0
-
openstacksdk 0.56 and later : sudo pip install openstacksdk==0.56.0
-
python-swiftclient 3.9.0: sudo pip install python-swiftclient==3.9.0
-
Kubernetes module for Ansible: sudo pip install --upgrade --user openshift
openupi for the OpenShift cluster and the directory structure: ~/openupi/openshift-env/upi.$ cd ~/
$ mkdir -p openupi/openshift-env/upi
$ cd openupi/
$ tar xfz <path>/openshift_installer-5.2.3.<z>.src.tar.gz
$ cp openshift_installer/upi/openstack/* openshift-env/upi/
Installing OpenShift 4.12 on OpenStack 16.2
You initiate installation from the installer host that you prepared earlier.
Before you begin
Complete the tasks in the Prerequisites section .
Procedure
|
Step 1 |
Download and untar the
|
||
|
Step 2 |
Install the acc-provision package present in the Cisco ACI Container Network Interface (CNI) 5.2(3) release artifacts.
|
||
|
Step 3 |
Run the acc-provision tool to configure the Cisco APIC for the OpenShift cluster, which will also generate the manifests for installing the Cisco ACI CNI plug-in. Example:This step generates the aci_deployment.yaml file and also a tar file containing the Cisco ACI CNI manifests with the name aci_deployment.yaml.tar.gz. Note the location of the The following is an example of an acc-provision input file: (Note that the acc-provision flavor used here is Ensure that the system_id you use in the above acc-provision input file conforms to the Cisco ACI Object Naming and Numbering: Best Practices. This will also be the case for the tenant name you choose at the time of the OpenStack project creation (and which you will provide in the input file above). |
||
|
Step 4 |
The install, create, wait-for OpenShift installer commands are run from the openshift-env directory. Ensure that the clouds.yaml file is either present in the current working directory or in ~/.config/openstack/clouds.yaml with the environment OS_CLOUD set to the correct cloud name. See Configuration for python-openstackclient3.12.3.dev2 on the OpenStack website. |
||
|
Step 5 |
Untar the aci_deployment.yaml.tar.gz file which the acc-provision tool generated earlier. |
||
|
Step 6 |
Create the install-config.yaml as described in the "Install Config" section of Installing OpenShift on OpenStack User-Provisioned Infrastructure for release 4.12 on GitHub. The following is an example of an install-config.yaml file that sets Cisco ACI Container Network Interface (CNI) as the |
||
|
Step 7 |
Edit the file generated in the previous step to match your environment. As noted in the example, the edits must include changing the |
||
|
Step 8 |
Edit the
Note that after you run |
||
|
Step 9 |
Generate the OpenShift manifests and copy the Cisco ACI CNI manifests:
|
||
|
Step 10 |
Disable the creation of the OpenStack Octavia load balancer for Cisco ACI network type. |
||
|
Step 11 |
Make control-plane nodes unschedulable. Follow the instructions in the "Make control-plane nodes unschedulable" section of Installing OpenShift on OpenStack User-Provisioned Infrastructure for Release 4.12 on GitHub. |
||
|
Step 12 |
Update the ignition files: The commands in this step create the ignition files and update them according to Cisco ACI CNI and upload the bootstrap.ign file to swift storage. It also generates the bootstrap-ignition-shim as described in the "Bootstrap Ignition Shim" section of Installing OpenShift on OpenStack User-Provisioned Infrastructure for Release 4.12 on GitHub. |
||
|
Step 13 |
Complete the following tasks by running Ansible playbooks obtained from the Cisco OpenShift installer package: |
||
|
Step 14 |
If you created the compute nodes through Ansible playbooks, approve the pending Certificate Signing Requests. |
||
|
Step 15 |
Update the default IngressController publish strategy to use the LoadBalancerService: |
||
|
Step 16 |
Check the status of the installation: |
||
|
Step 17 |
Destroy the cluster: After your run the playbooks in this step, the Cisco ACI BridgeDomain corresponding to the node network will also be deleted.
To reinstall the cluster, run |
Optional Configurations
This section provides instructions for making several optional configurations.
Enabling Multus CNI Plug-in in OpenShift 4.x Cluster with ACI CNI
You can enable Multus in a new cluster or in an already-installed cluster.
Enabling Multus in a new cluster installation
When running acc-provision, set the disable-multus argument to False.
$ acc-provision -a -c acc_provision_input.yaml -f openshift-4.12-openstack -u <username> -p <password> -o aci_deployment.yaml --disable-multus false
The procedure below, is for enabling Multus in an already-installed cluster.
Procedure
|
Step 1 |
Generate a new ACI CNI deployment configuration.
|
||
|
Step 2 |
Delete acicontainersoperator CR. |
||
|
Step 3 |
Apply the new |
||
|
Step 4 |
Remove “disableMultiNetwork: true” from current OpenShift Network Object by editing |
Optional Inventory Configurations
In the section Installing OpenShift 4.12 on OpenStack , Step 8 we noted the required fields for Cisco ACI Container Network Interface (CNI) configuration in the aci_cni section of the inventory.yaml file.. This section provides optional configurations and the default values.
|
Option |
Description and Default Values |
||||
|---|---|---|---|---|---|
|
|
By default, this value is not set. The Source IP Network Address Translation (SNAT) IP address is used to create a Cisco ACI-CNI SNAT policy that applies to the whole cluster. This SNAT policy is created by running the cluster_snat_policy.yaml Ansible playbook as described in Installing OpenShift 4.12 on Openstack section in this guide. (If this value is not set, do not run this playbook.) |
||||
|
|
By default, this value is not set. Set this field if you do not follow the procedure that is described in the section "Subnet DNS (optional)" in Installing OpenShift on OpenStack User-Provisioned Infrastructure on GitHub. The procedure controls the default resolvers that your Nova servers use. Use the value to set the |
||||
|
|
|
|
The name of the node network interface as set by the RHCOS image. The default value is “ |
||
|
|
The MTU set for the The default value is 1500. |
||||
|
|
|
The name of the node network interface as set by the RHCOS image. The fault value is “ |
|||
|
|
The MTU set for the The default value is 1500. |
||||
|
|
The default value is This is the CIDR used for the subnet that is associated with the |
||||
 Feedback