New and Changed Information
The following table provides an overview of the significant changes to the organization and features in this guide from the release the guide was first published to the current release. The table does not provide an exhaustive list of all changes made to the guide.
|
Release |
New Feature or Update |
Where Documented |
|---|---|---|
|
4.3 |
First release of this document. |
-- |
Summary
Prior to the Cisco Cloud Network Controller (CCNC) 26.0.3 release, endpoints belonging to the on-premises ACI tenant common couldn’t communicate with endpoints in the cloud tenant. With CCNC release 26.0.3, it’s now possible for endpoints in the
tenant common of the on-premises ACI to communicate with the endpoints in the cloud. Additionally, external EPG prefixes in the on-premises
ACI can also communicate with endpoints in the cloud. Implementation requires Cisco Nexus Dashboard Orchestrator (NDO) version
4.3 or higher deployed in your Cisco Nexus Dashboard (ND) cluster.
A tenant is a logical container for application policies that enables the administrator to exercise domain-based access control. A tenant represents a unit of isolation from a policy perspective, not a private network. Tenants can represent a customer in a service provider setting, an organization, or a domain in an enterprise setting, or just a convenient grouping of policies. A tenant can be local on-premises, in the cloud or, it can be stretched between on-premises ACI and the cloud.
The common tenant is however a special on-premises ACI tenant with the purpose of providing "common services" to other tenants in ACI fabrics, based on the principles of global reuse. Some examples of "common services" associated with the on-premises ACI tenant common include shared L3Out, DNS, DHCP, Active Directory, and shared private networks or Bridge Domains (BD)
Even though there’s no common tenant providing "common services" on the cloud, a common tenant can still be seen in the CCNC policy model. The common tenant isn’t associated with any cloud account, however it holds the policy objects such as Filters and Contracts. Below are some of the supported scenarios:
Use Cases:
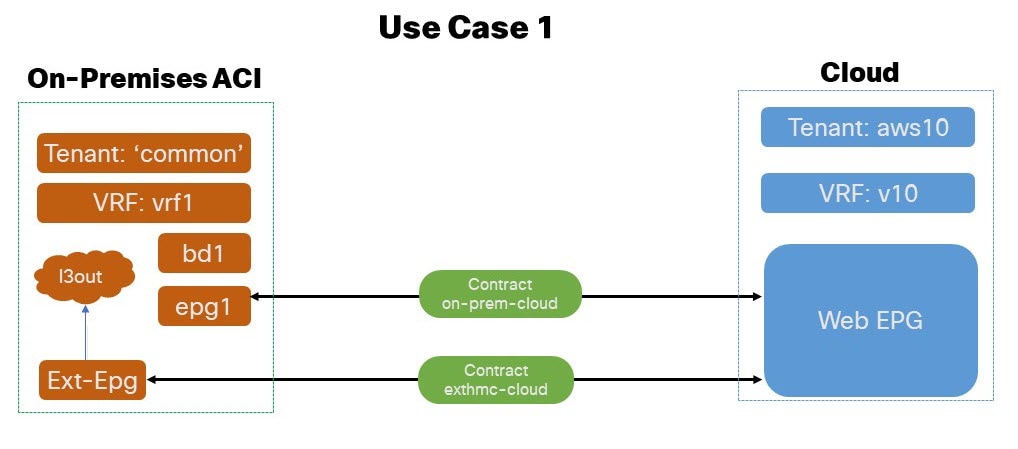
Application EPG (or external EPG) in On-Premises 'common' tenant to Cloud EPG: In this use case scenario we enable application EPG belonging to the
commontenant in the on-premises ACI to communicate with the endpoints in the cloud. All the tenants are local and not stretched.-
The VRF, BD, application EPG, L3Out and, external EPG are all defined in the same
commonapplication tenant of the on-premises ACI EPG. -
Subnets can be defined under BD or application EPG.
-
The
contractsandfiltersare defined in thecommontenant of the on-premises ACI and Cloud, though thecommontenant isn’t associated to any cloud account.
-
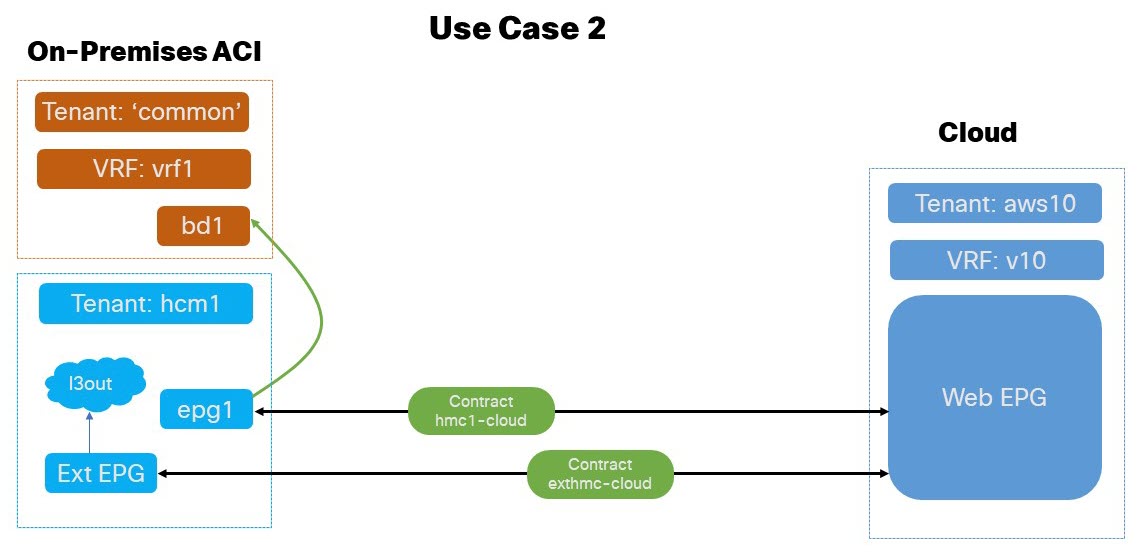
Application EPG (or external EPG) in On-Premises User Tenant to Cloud EPG (BD in '
common' tenant): In this use case scenario we enable application EPGs belonging to the tenantcommonon-premises ACI to communicate with endpoints in the cloud. All the tenants are local and not stretched.-
The VRF and BD are defined in the
commontenant of on-premises ACI. -
Subnets can be defined under BD or application EPG.
-
External EPG and L3Out are defined in a separate User Tenant of on-premises ACI application EPG.
-
The
contractsandfiltersare defined in thecommontenant of the on-premises ACI and Cloud, though thecommontenant isn’t associated to any cloud account.
-
Application EPG (or external EPG) in On-Premises User Tenant to Cloud EPG (BD in user tenant): In this use case scenario we enable external EPG tenant defined under the user tenant of the on-premises ACI to communicate with the endpoints in the cloud. All the tenants are local and not stretched.
-
The application EPG and BD can be alternatively defined in
commonor user tenant external EPG of on-premises ACI EPG. -
Subnets can be defined under BD or application EPG.
-
External EPG and L3Out are defined in the user tenant external EPG of the on-premises ACI.
-
The
contractsandfiltersare defined in thecommontenant of the on-premises ACI and Cloud, though thecommontenant isn’t associated to any cloud account.
-
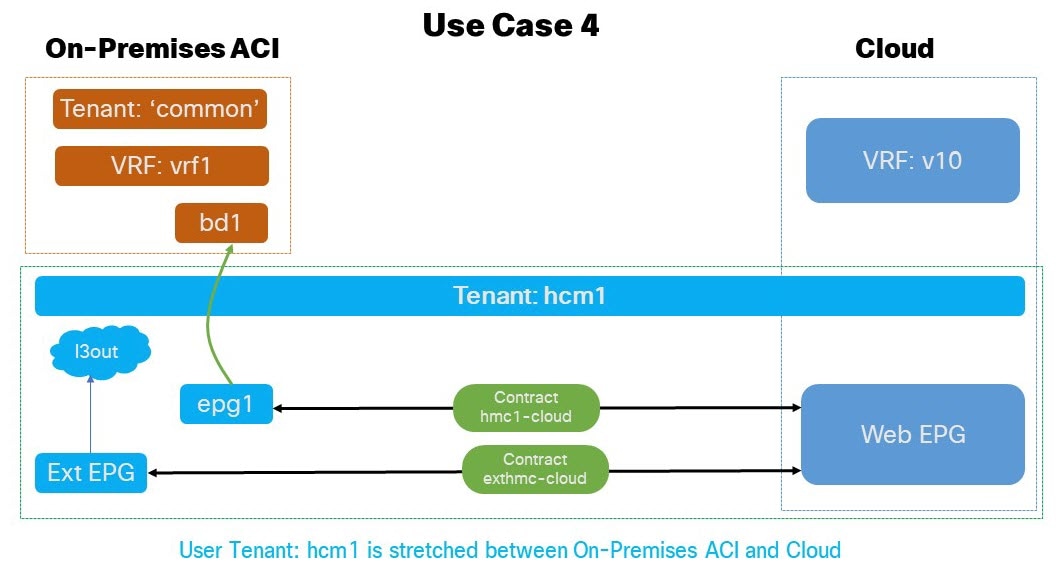
Application EPG (or external EPG) in stretched user tenant to cloud EPG (BD in '
common' tenant): In this use case scenario we enable the external EPG defined in the stretched user tenant to communicate with the endpoints in the cloud.-
The VRF and BD are defined in tenant
commonof the on-premises ACI EPG. -
External EPG, L3Out and, application EPG are defined under a user tenant external EPG that is stretched between on-premises ACI site and Cloud.
-
Subnets can be defined under BD or application EPG.
-
The
contractsandfiltersare defined in thecommontenant of the on-premises ACI and Cloud, though thecommontenant isn’t associated to any cloud account.
-
Guidelines and Limitations
Before you follow the procedures described in this document, you must complete the following basic configuration tasks:
-
Deploy and have ready a Cisco Nexus Dashboard cluster.
This is described in detail in the Cisco Nexus Dashboard Deployment Guide for your release.
-
Onboard one or more cloud sites in the Cisco Nexus Dashboard.
This is described in detail in the Cisco Nexus Dashboard User Guide for your release.
-
Install and enable Cisco Nexus Dashboard Orchestrator, Release 4.3 or later.
This is described in detail in the Cisco Nexus Dashboard Orchestrator Deployment Guide for your release.
-
Enable the cloud sites for management in the orchestrator service and complete the basic infra configuration.
This is described in detail in the Cisco Nexus Dashboard Orchestrator Configuration Guide for ACI Fabrics for your release.
-
Add sites to the schema and provide configuration for the subnets.
Default Configurations: Cloud and On-Premises Tenant 'common'
The following guidelines apply while verifying the common tenant on Cloud using the CCNC and tenant common using the Cisco Nexus Dashboard Orchestrator:
Before you begin
-
You must have a user with either the
Power UserorSite Managerread/write role to create and manage tenants. -
Cisco Nexus Dashboard Orchestrator (NDO) version 4.3 or higher deployed in your Cisco Nexus Dashboard (ND) cluster
-
You must have at least one available tenant that you want to incorporate into your site.
For more information, see Cisco Nexus Dashboard Orchestrator Configuration Guide for ACI Fabrics.
Procedure
|
Step 1 |
Log in to your Cisco Nexus Dashboard and open the Cisco Nexus Dashboard Orchestrator service. |
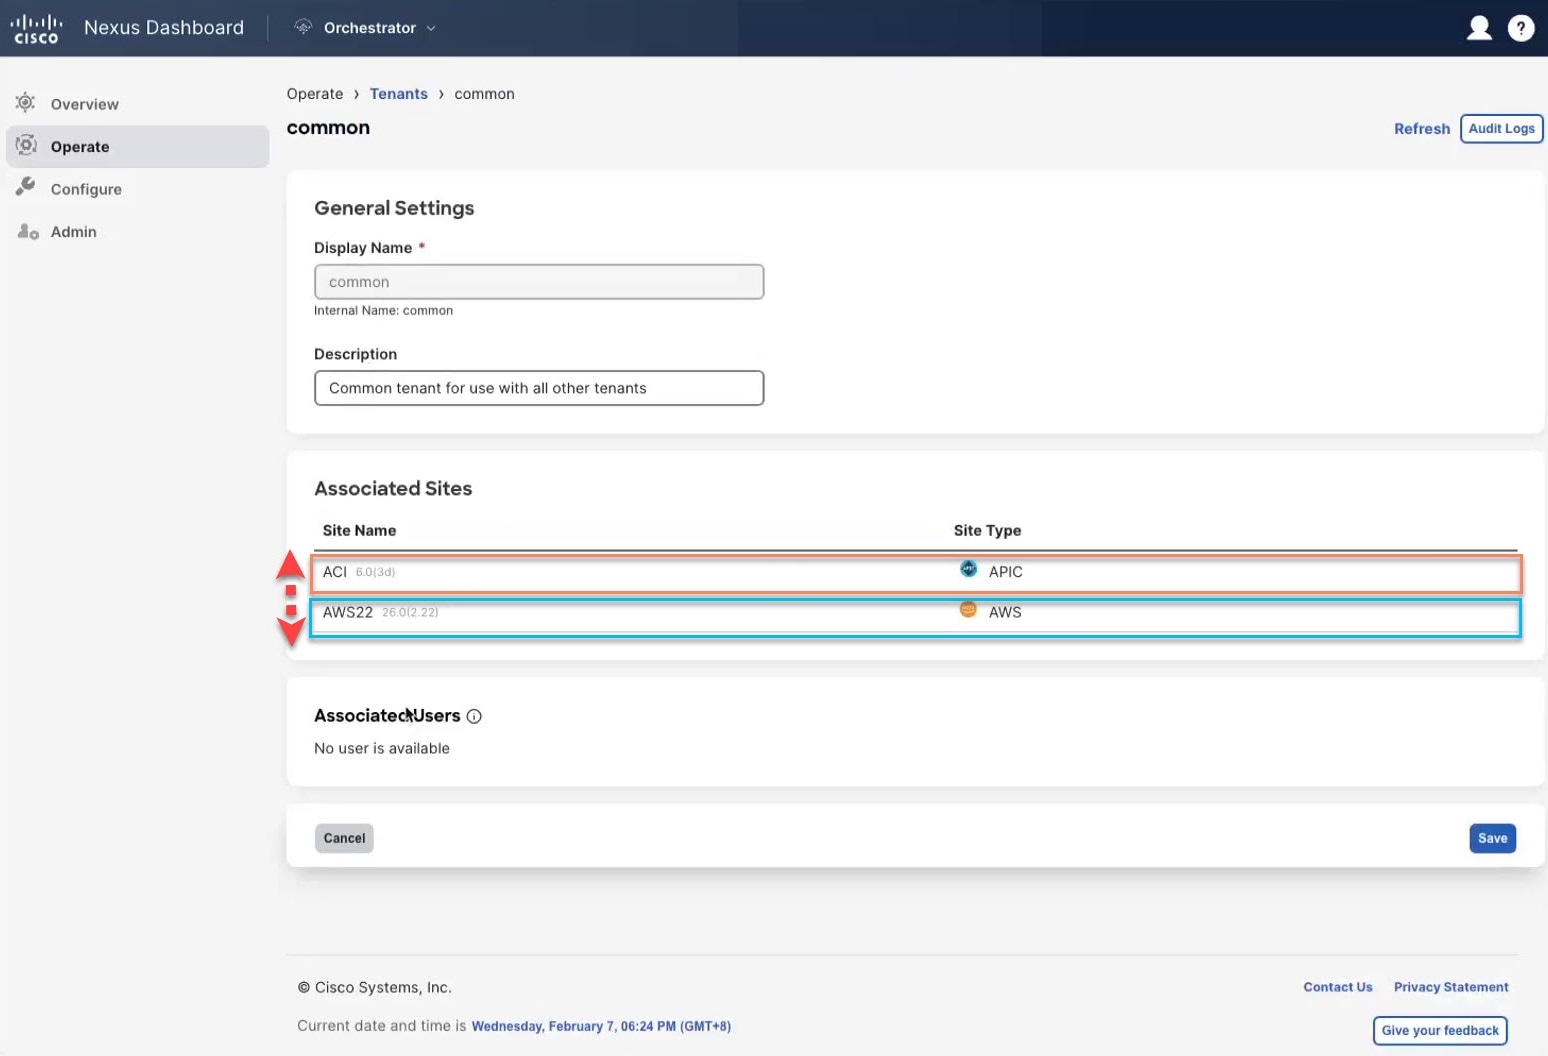
|
Step 2 |
Navigate to the tenant
|
|
Step 3 |
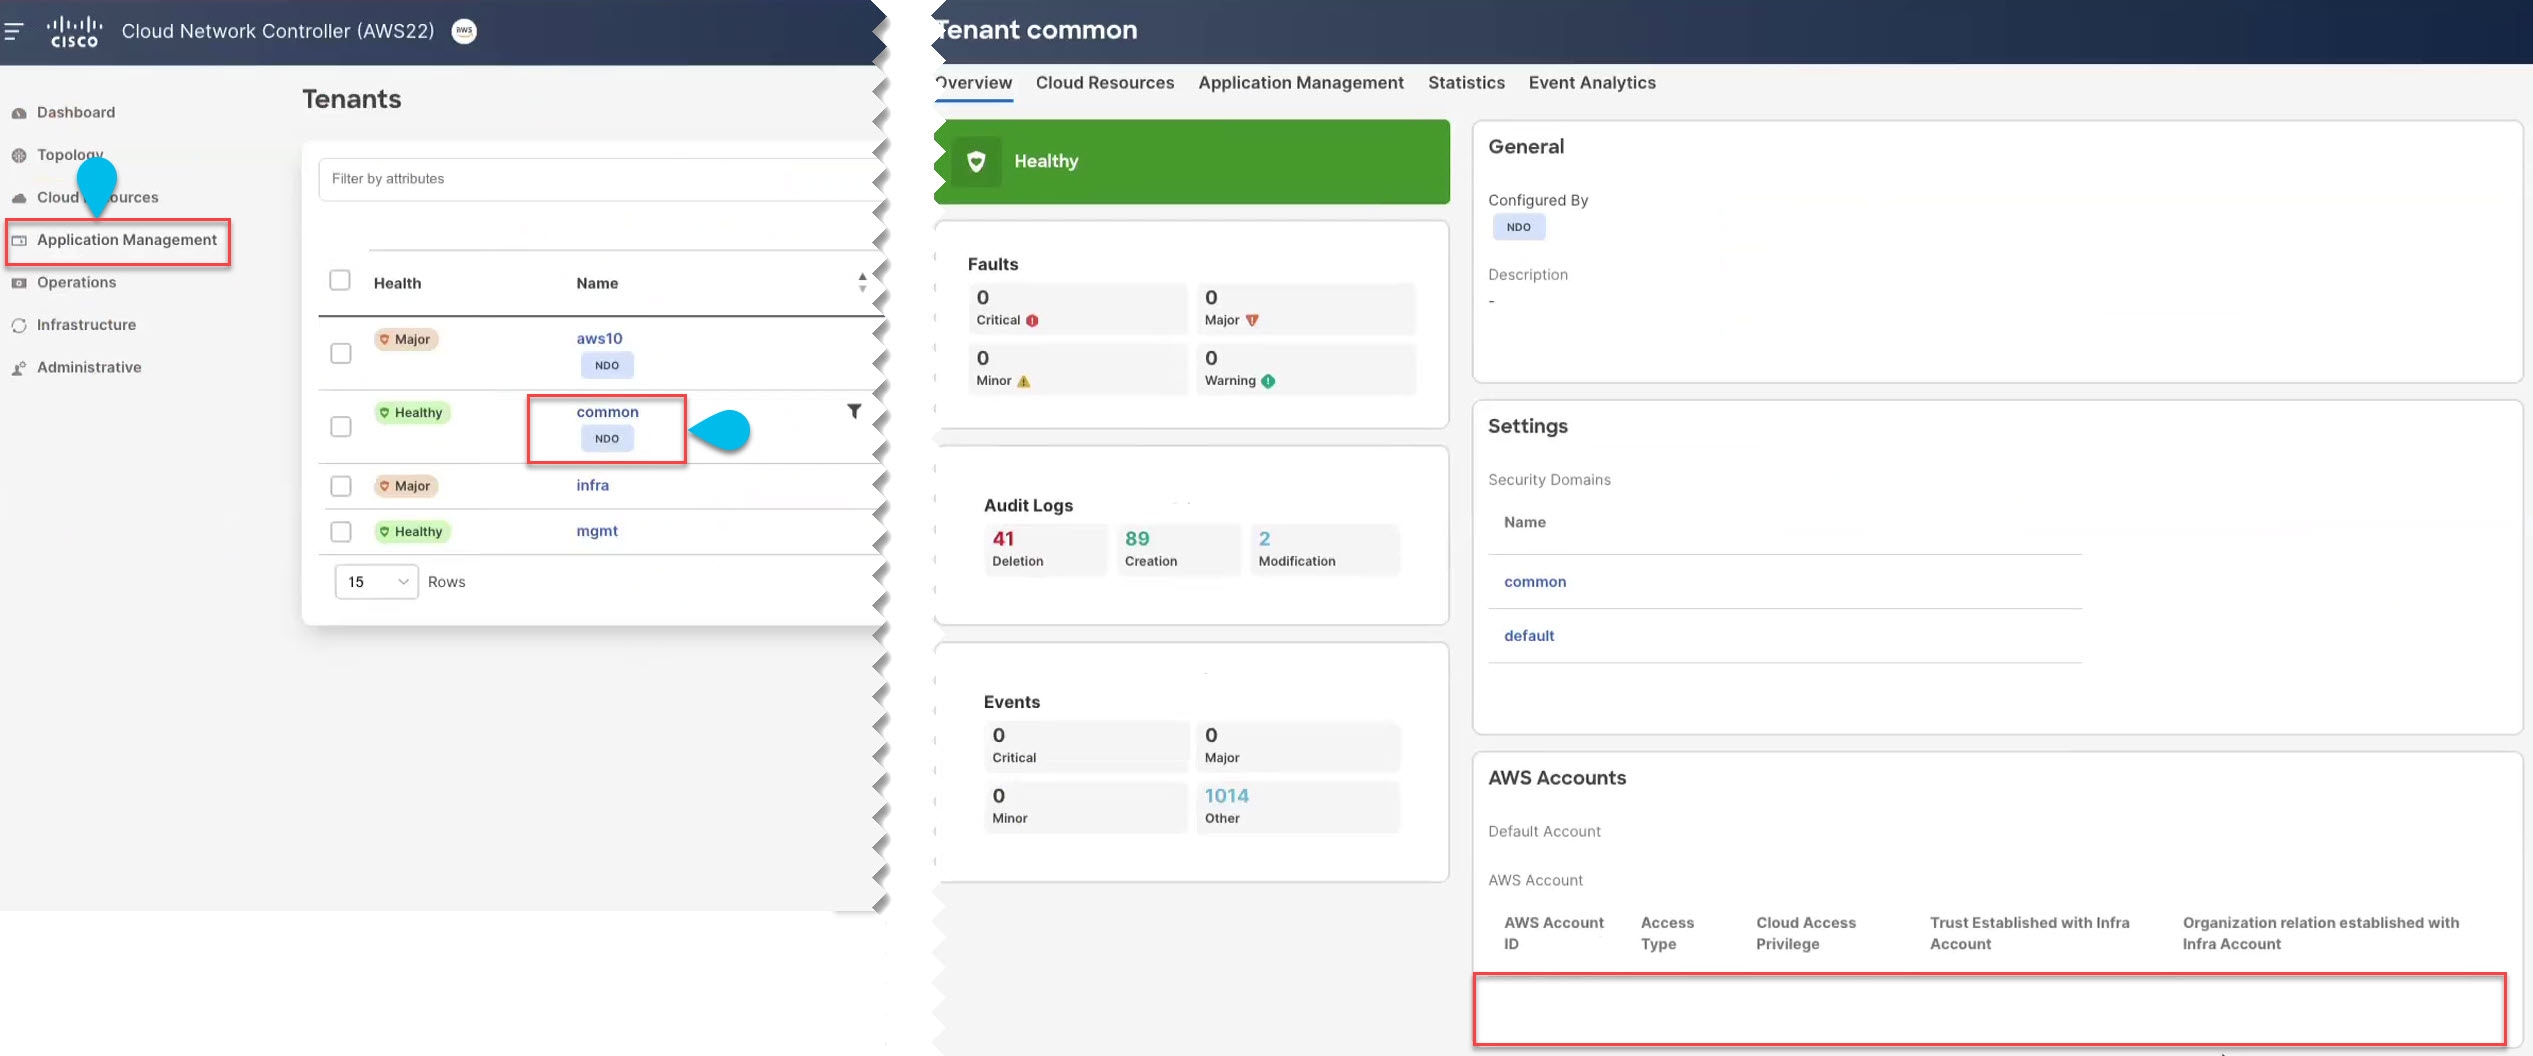
Log in to your Cisco Cloud Network Controller GUI.
|
Configuring Cloud Infrastructure
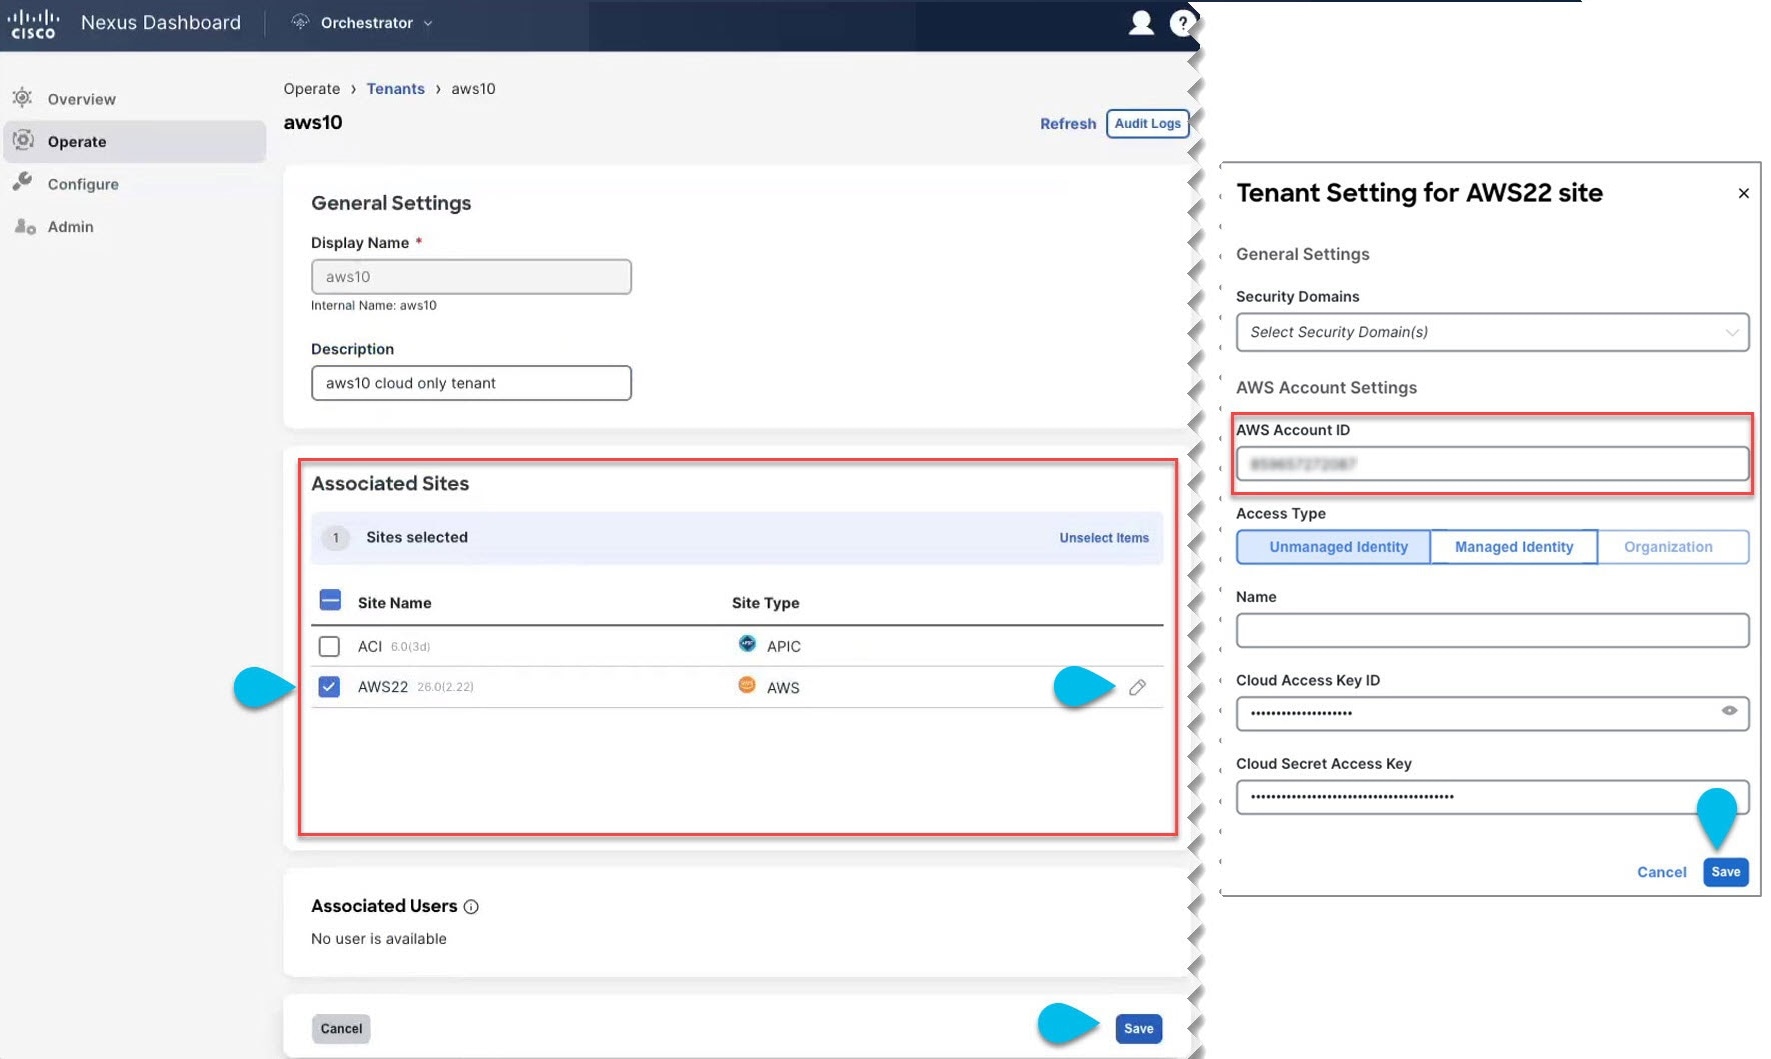
Configure User Tenant on Cloud
Before you begin
The following guidelines apply when configuring the cloud user tenant on the Nexus Dashboard Orchestrator and associate it with the cloud site.
If you want to import an existing tenant from your fabrics, follow the steps that are described in Importing Existing Tenants instead.
Procedure
|
Step 1 |
Create User Tenant: |
|
Step 2 |
Configure cloud user tenant. |
|
Step 3 |
Click Save to finish adding the tenant.
|
Configure Cloud Schema and Templates
The following guidelines apply when configuring the schemas and templates for the cloud tenant using the Cisco Nexus Dashboard Orchestrator:
Before you begin
-
You must have at least one available tenant that you want to incorporate into your site.
For more information, see Tenants and Tenant Policies Templates.
Procedure
|
Step 1 |
Create a schema.
|
|
Step 2 |
Create a template.
|
|
Step 3 |
Set site associations. You deploy fabric configuration by deploying one template at a time to one or more sites. So you must associate the template with at least one site where you want to deploy the configuration.
|
|
Step 4 |
Deploy the template. |
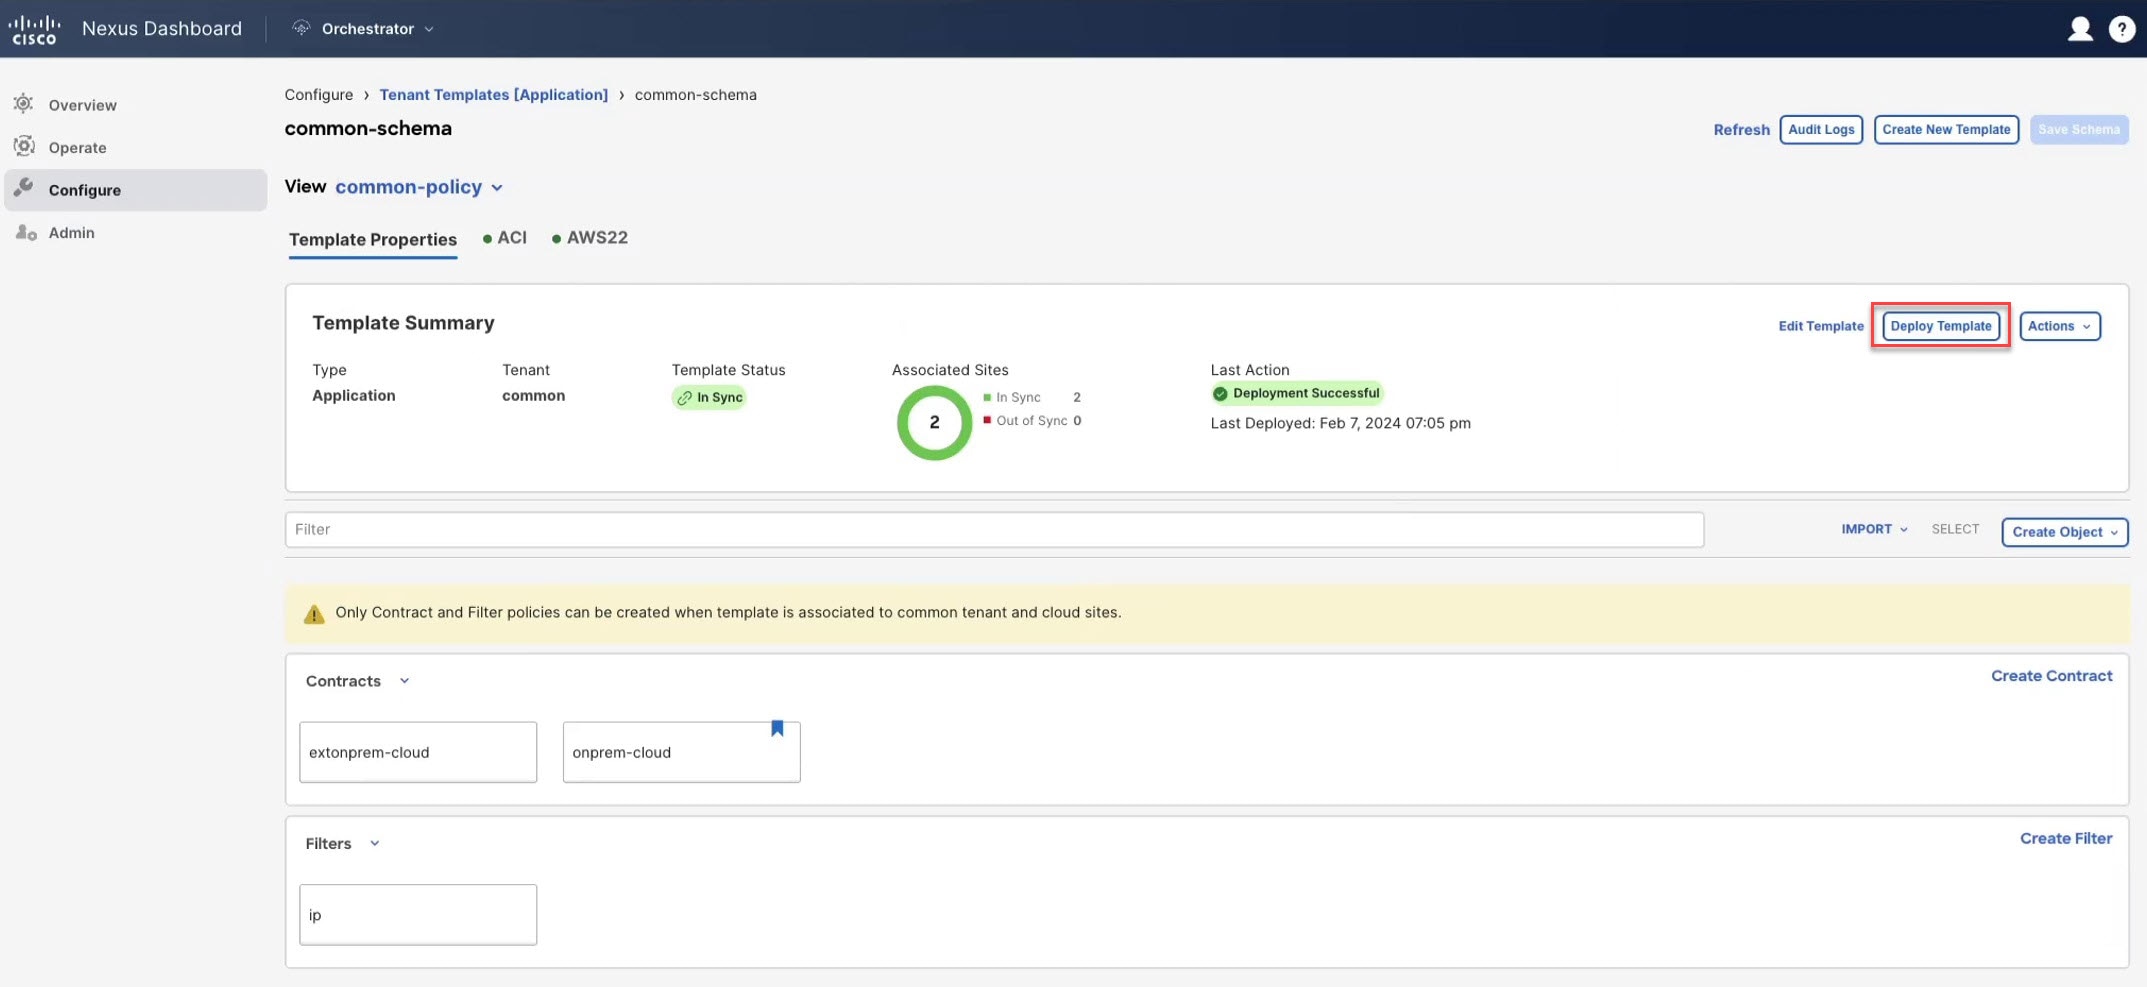
Configure 'common' Policies in the Cloud
The following guidelines apply when creating the VRF and application EPG in the cloud user template and configuring the various policy objects in the EPG.
Before you begin
Procedure
|
Step 1 |
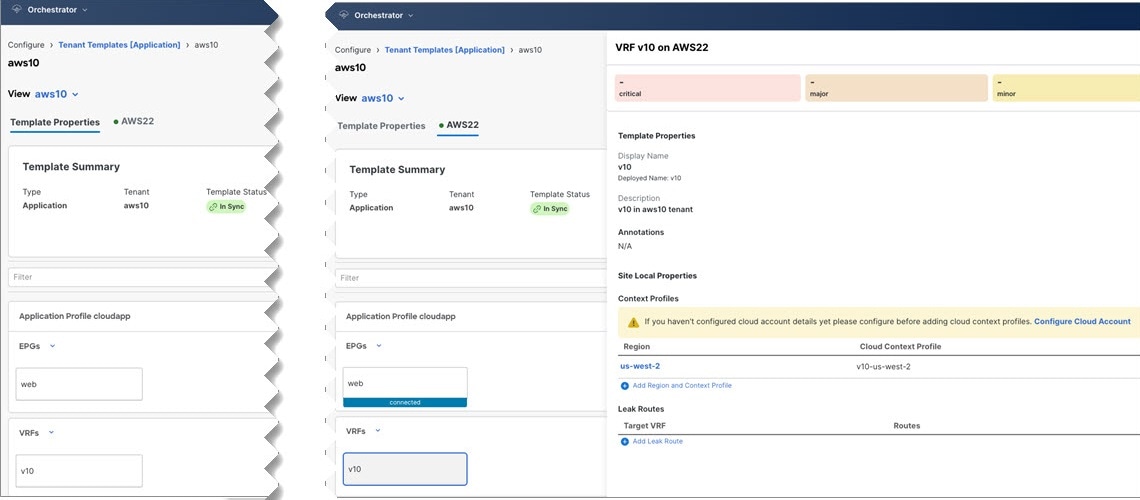
Configure the VRF and application EPG in the template.
|
|
Step 2 |
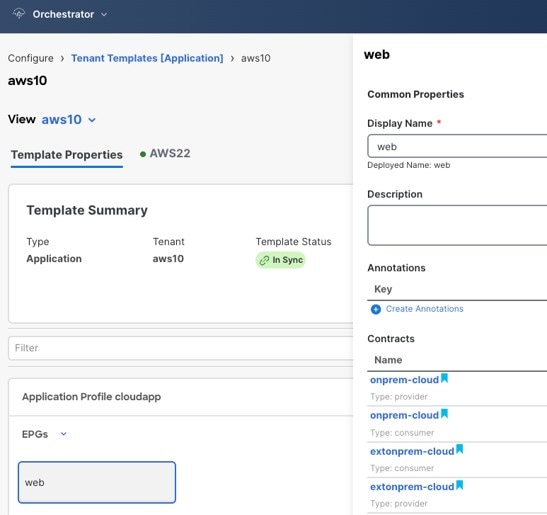
In the template view main pane, create an application EPG to the template, for more information see Configuring Application Profiles and EPGs.
|
|
Step 3 |
Associate
|
What to do next
Configure on-premises tenant common on Nexus Dashboard Orchestrator.
Configuring On-Premises Infrastructure
Configure On-Premises 'common' schema and Templates
The following guidelines apply when configuring the schemas and templates for the on-premises common tenant using the Cisco Nexus Dashboard Orchestrator:
Before you begin
-
You must have at least one available tenant that you want to incorporate into your site.
For more information, see Tenants and Tenant Policies Templates.
Procedure
|
Step 1 |
Create a schema.
|
|
Step 2 |
Create a template.
|
|
Step 3 |
Deploy the template.
|
What to do next
Configure 'common' Stretched Policies
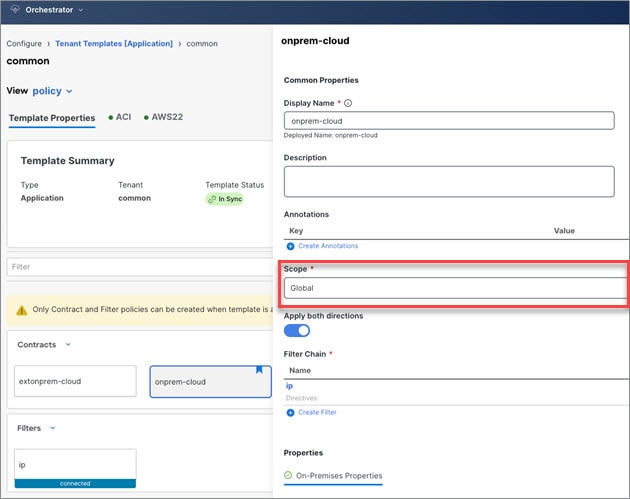
The following guidelines apply when configuring the on-premises common policy objects using the Cisco Nexus Dashboard Orchestrator:
Before you begin
-
You must have at least one available tenant that you want to incorporate into your site.
For more information, see Tenants and Tenant Policies Templates.
Procedure
|
Step 1 |
Configure the VRF.
|
||
|
Step 2 |
Configure
|
||
|
Step 3 |
Deploy the template. |
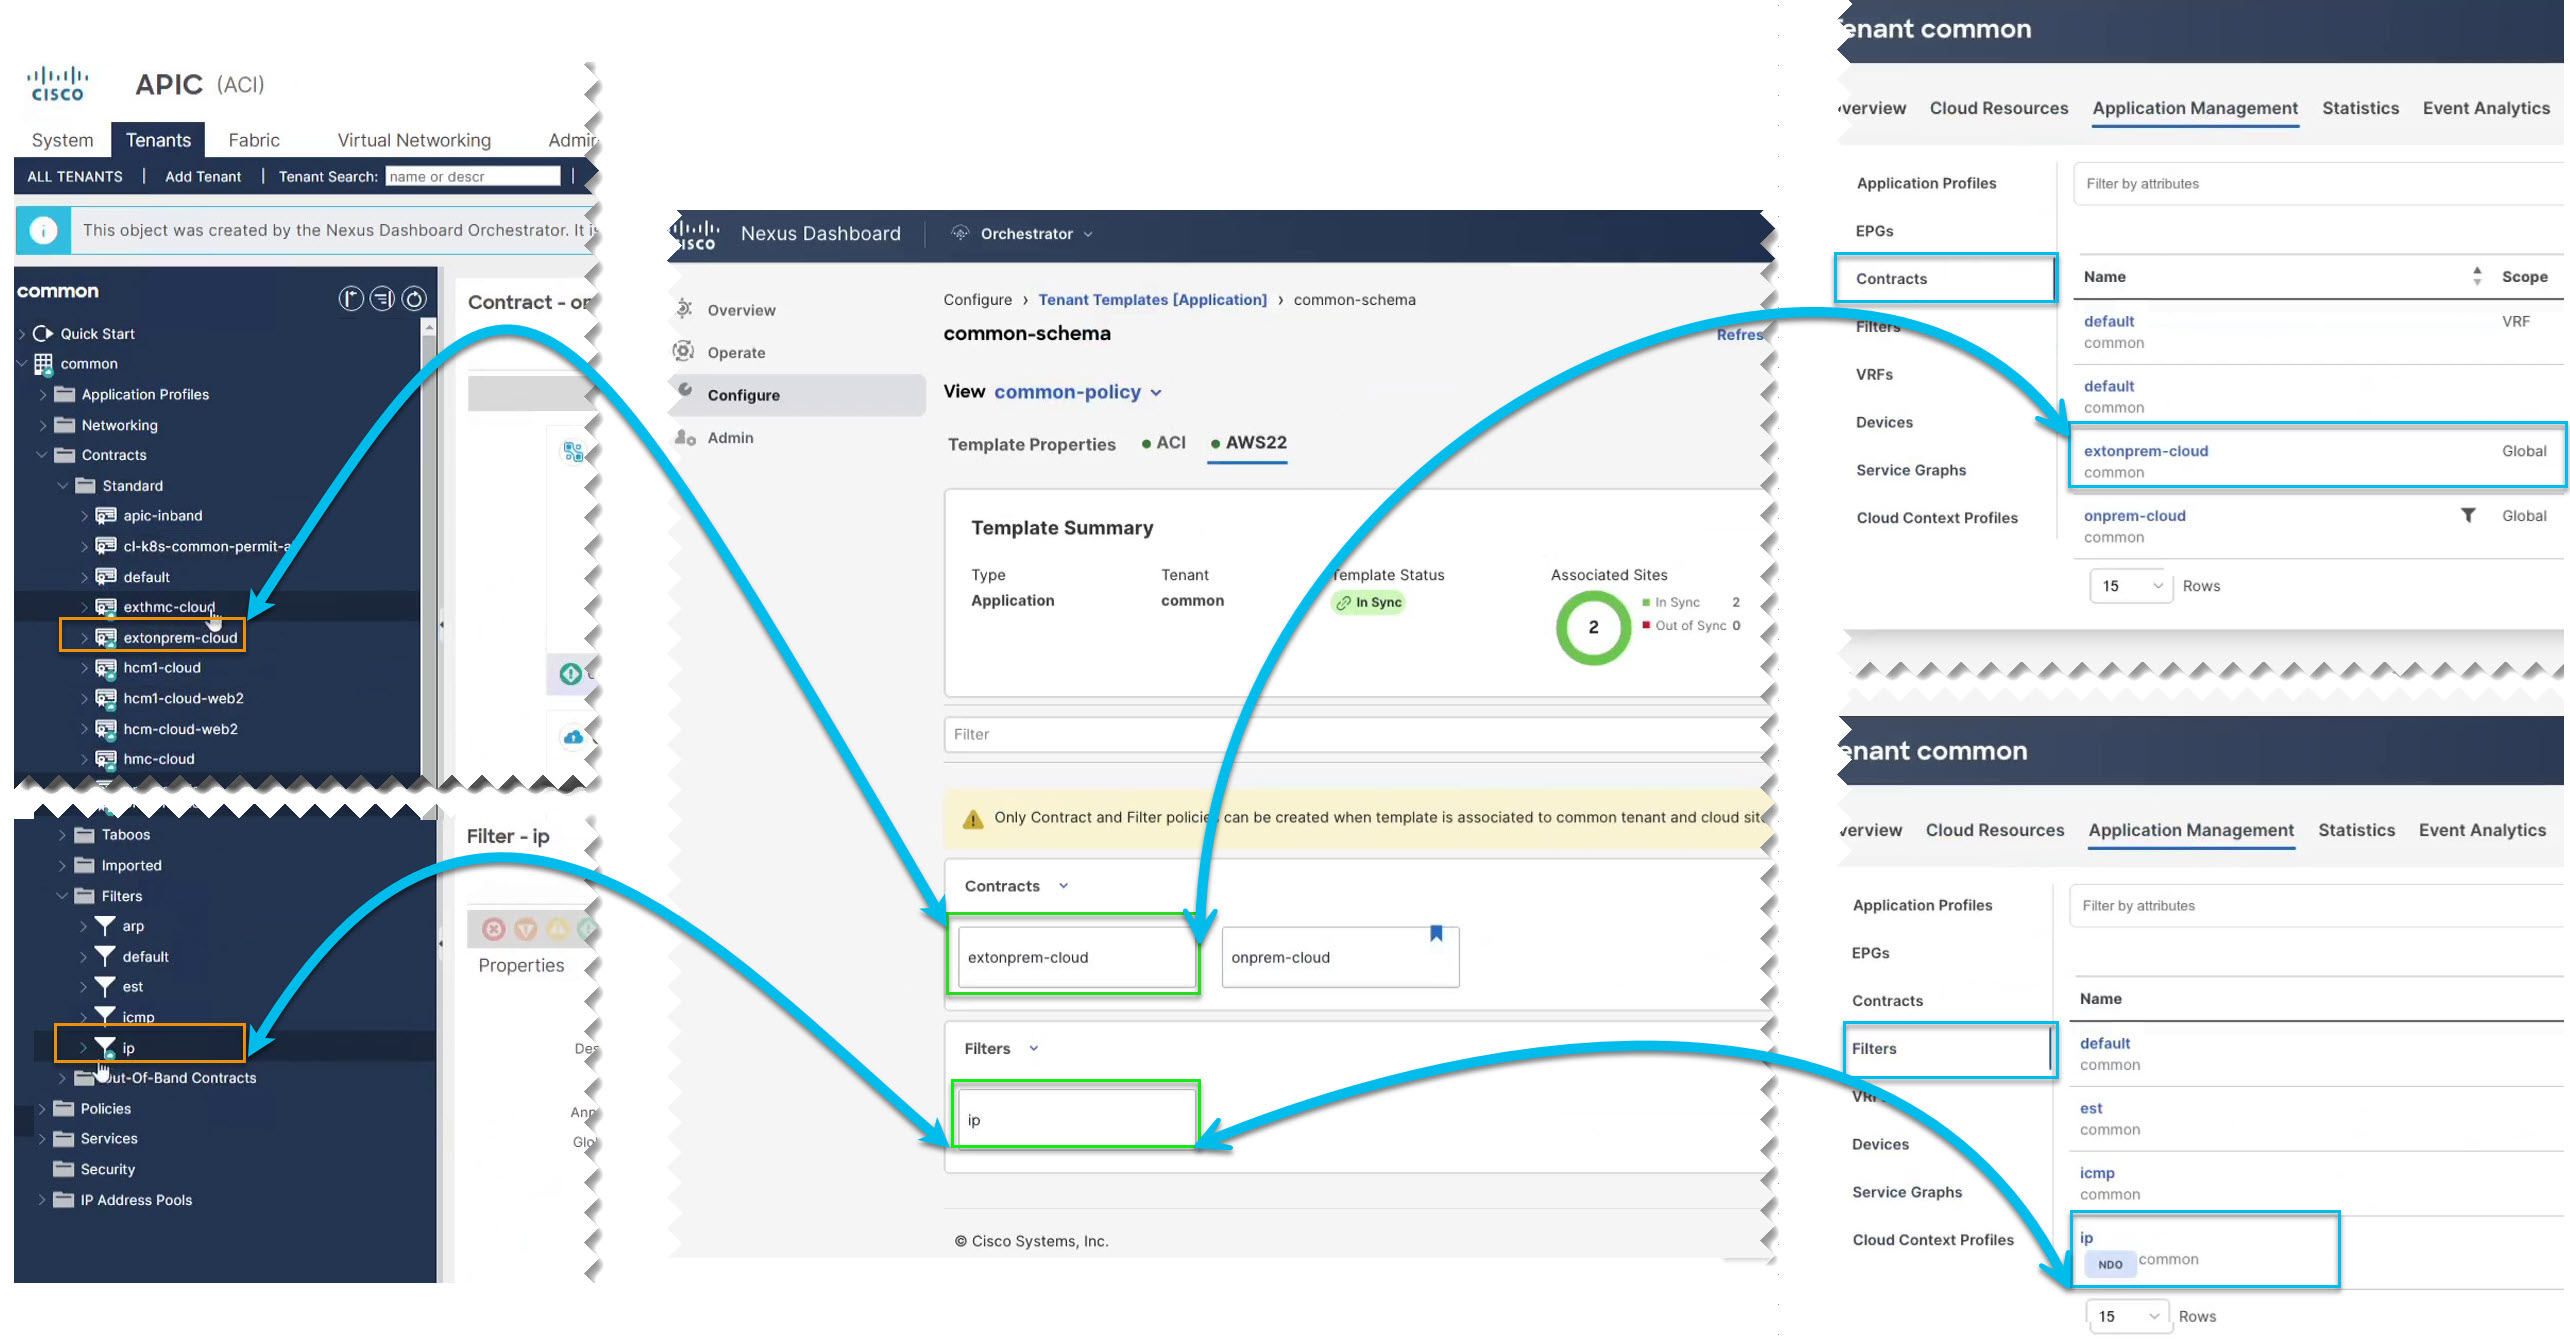
Deploy On-Premises Tenant and Policies
This section describes how to configure the tenant templates based on the four use cases scenarios and assigns the filter to the contract
Before you begin
You must have completed all the preceding procedures:
Procedure
|
Step 1 |
To implement the four Use-Cases: |
|
Step 2 |
Associate the application EPG with the
|
|
Step 3 |
Deploy the templates. |
What to do next
Login to your On-Premises ACI and CCNC to verify the availability of common
Contracts and Filters under relevant section.
|
On-Premises ACI |
Nexus Dashboard Orchestrator |
CCNC |
|---|---|---|
|
|
||
 Feedback