Cisco Service Control URL Blacklisting Solution Guide, Release 4.1.x
Available Languages
Table Of Contents
Cisco Service Control URL Blacklisting Solution Guide, Release 4.1.x
Managing URL Blacklists Using the Cisco Service Control Engine Platform
Configuring User Authorization
How to Specify a New Owner for the sce-url-database
How to Configure Write Protection for the sce-url-database
How to Configure Lookup Protection for the sce-url-database
How to Configure the sce-url-database Encryption Key
How to Remove All the Protection Rules for the sce-url-database
How to View the Current sce-url-database Protection Settings
Guidelines for Managing the sce-url-database
The sce-url-database Import File
How to Import a sce-url-database File
How to Add an Entry to the sce-url-database
How to View the sce-url-database
How to Look for a Specific URL in the sce-url-database
How to Clear the sce-url-database
How to Enable Deep HTTP Inspection
How to Enable URL Normalization
How to Disable URL Normalization
How to Reset URL Normalization to the Default State
How to Display the Currently URL Normalization Configuration
Protected URL Database Configuration Example
Obtaining Documentation and Submitting a Service Request
Quick Start Guide
Cisco Service Control URL Blacklisting Solution Guide, Release 4.1.x
Revised: December 23, 2013, OL-30601-01
Note
This document supports all 4.1.x releases.
1 Managing URL Blacklists Using the Cisco Service Control Engine Platform
The Cisco Service Control Engine (Cisco SCE) platform-managed URL database resides on the Cisco SCE platform. The URL database, sce-url-database, is managed by using CLI commands rather than the Cisco Service Control Application for Broadband (Cisco SCA BB) Console. In addition to the advantage of having a separate URL database that is configurable directly by CLI commands, this database can be used to hide a list of URLs to prevent them from being accessed by the Console or the CLI.
The URL database must be declared as a separate flavor in the Cisco SCA BB application, but all the other configuration and management tasks are performed using the CLI.
The URL database can be protected. As part of protecting the sce-url-database , one user is designated as the owner of the database and only that user can execute the CLI commands on the database. Protection involves defining the authentication, authorization, and accounting (AAA) method (either based on local users or on a TACACS+ server, and so forth) and defining at least one user to be the owner of the database. For further details about the configuration, see the "Configuring the Management Interface and Security" chapter of the Cisco SCE 8000 10GBE Software Configuration Guide or the "Configuring the Management Interface and Security" chapter of the Cisco SCE 8000 GBE Software Configuration Guide.
After the database is configured to be protected, no database information, (including information about the owner, database entries, authorization information, and the relevant saved configuration in the log files and in the relevant Cisco SCA BB reports, is accessible to any user. The database owner can change the authorizations by using the CLI. However, when any of the protection rules are relaxed (or all of the protection rules are relaxed by removing them) the database is reset automatically.
To protect the secrecy of the database information, the database entries can be imported to Cisco SCE (by using the CLI) in an encrypted form with the 128-bit key length Advanced Encryption Standard (AES). The key can be set or updated by using the appropriate CLI command; typically, this command should be run over a secure Telnet session.
There are two general categories of CLI commands related to the Cisco SCE-managed URL database:
•
•
2 Configuring User Authorization
The sce-url-database can be managed by a single authorized user, who is the designated owner of this database.
•
•
–
–
–
–
User Authorization Guidelines
These are some of the guidelines for user authorization:
•
•
•
–
–
–
•
–
–
How to Specify a New Owner for the sce-url-database
To specify a new owner for the sce-url-database, use the following command in the interface linecard configuration mode (config if):
sce-url-database protection owner (myself | (name user-name))
The authorization level required by a user to perform this task is Admin.
Prerequisites
If an owneris already assigned to the sce-url-database, that owner must first remove the owner designation using the no sce-url-database protection command, which removes all database protection (see the "How to Remove All the Protection Rules for the sce-url-database" section).
Options
The following options are available to specify a new owner in the sce-url-database:
•
•
Default
No owner is specified.
Results
The following are the results available after specifying a new owner in the sec-url-database:
•
•
•
•
•
How to Configure Write Protection for the sce-url-database
To configure write protection for the sce-url-database, use the following command in the interface linecard configuration mode (config if):
sce-url-database protection allow-write (all-users | owner-only)
This command can be executed only by the assigned owner of the sce-url-database. The authorization level required by a user to perform this task is Admin.
Prerequisites
A person should already be assigned as the owner of the sce-url-database.
Options
The following options are available to configure write protection in the sce-url-database:
•
•
Default
The following are the default settings available while configuring write protection in the sce-url-database:
•
•
Results
If protections are relaxed (changed from owner-only to all-users), the sce-url-database is reset automatically.
How to Configure Lookup Protection for the sce-url-database
To configure lookup-protection for the sce-url database, use the following command in the interface linecard configuration mode (config if):
sce-url-database protection allow-lookup (owner-only | no-user).
This command can be executed only by the assigned ownerof the sce-url-database. The authorization level required by a user to perform this task is Admin.
Prerequisites
An owner should already be assigned to the sce-url-database.
Options
The following options are available to configure lookup protection in the sce-url-database:
•
•
Default
The following are the default settings available while configuring lookup protection in the sce-url-database:
•
•
Results
If protections are relaxed (changed from no-user to owner-only), the sce-url-database is reset automatically.
How to Configure the sce-url-database Encryption Key
To configure the sce-url-database encryption key, use the following command in the interface linecard configuration mode (config if):
sce-url-database protection encryption-key encryption-key
This command can be executed only by the assigned owner of the sce-url-database.The authorization level required by a user to perform this task is Admin.
Prerequisites
An owner should already be assigned to the sce-url-database.
Options
encryption-key—AES encryption key (128-bits long). The key is supplied in hexadecimal format and contains 32, 48, or 64 hexadecimal digits.
Default
No encryption key is configured.
Removing the Encryption Key
To remove the encryption key, use the no sce-url-database protection encryption-key command.
This command does not change any other sce-url-database protection settings.
Note
You can ignore the message.
How to Remove All the Protection Rules for the sce-url-database
To remove all the protection rules for the sce-url-database, use the following command in the interface linecard configuration mode (config if):
no sce-url-database protection
This command can be executed only by the assigned owner of the sce-url-database.The authorization level required by a user to perform this task is Admin.
Prerequisites
An owner should already be assigned to the sce-url-database.
Results
The following are the results for removing all the protection rules in the sec-url-database:
•
•
–
–
–
How to View the Current sce-url-database Protection Settings
To view the current sce-url-database protection settings, use the use the following command in User EXEC (>) mode:
show interface linecard 0 sce-url-database protection.
The authorization level required by a user to perform this task is Viewer.
Results
The following information is displayed when the show interface linecard 0 sce-url-database protection command is run:
•
•
•
3 Managing the sce-url-database
The designated owner of the sce-url-database can do perform the following tasks:
•
•
•
•
If write protection is set to all-users, all the users can perform the following tasks:
•
•
•
If there is no designated owner (and therefore, no protection), all the users can view the entire sce-url-database.
If there is a designated owner, the contents of the sce-url-database are protected and cannot be displayed.
Guidelines for Managing the sce-url-database
The guidelines for managing the sce-url-database include:
•
•
•
•
The sce-url-database Import File
The maximum number of entries permitted in an import file are:
•
•
The database import file either contains cleartext or is encrypted. If the file is encrypted, the matching encryption key must be configured by the database owner.
If the file is encrypted, it must be prefixed with a cleartext header. The encrypted file header must be as follows:
Encrypted file version: 0x01Block cipher index: 0x01Mode of operation index: 0x02Padder index: 0x02IV length: 0x10IV: <16 unformatted bytes which form the 128 bits IV of the encrypted data >After the header, the following data appears in the encrypted format in the AES 128, CFB mode:
A random number (in the range [16...31]) of random bytes, followed by the word "Signed", and then again 32 random
bytes.
Each following line represents a single URL.The import file format of the sce-url-database is:
[Flavor <tab>] URLHere:
•
•
Table 1 lists some URL examples.
How to Import a sce-url-database File
See the "The sce-url-database Import File" section for information about the sce-url-database import file format.
To import the sce-url-database files, use the following command in the interface linecard configuration mode (config if):
sce-url-database import cleartext-file | encrypted-file file-name flavor-id flavor-id
If the import file does not contain a flavor, specify the flavor in the CLI. The specified flavor must be the same as the one that was designated for the blacklist in the PQB file that was applied. Otherwise the import operation fails.
If the import file contains a flavor, do not specify the flavor in the CLI.
The authorization level required by a user to perform this task is Admin.
Prerequisites
The user executing the command must have write permission to the sce-url-database.
Options
The following options are available to import a sce-url-database file:
•
•
•
•
Default
The sce-url-database is empty.
Results
The following are the results after importing a sce-url-database file:
•
•
•
•
The total number of failures and a listing of the failed file line numbers are reported after the import action is completed.
•
For example:
SCE8000(config if)#> do show int l 0 sce-url num-entries14 entries foundSCE8000(config if)#> <k:vk@64.103.125.217/c:/NirTemp/enc/URLONLY2E.CSVError - Line 1 can not be parsed. Flavor-id is not found, it wasn't supplied through CLIError - Operation aborted.SCE8000(config if)#> do show int l 0 sce-url num-entriesNo entries foundHow to Add an Entry to the sce-url-database
To add an entry to the sce-url-database, use the following command in the interface linecard configuration mode (config if):
sce-url-database add-entry url-wildcard URL-wildcard-format flavor-id flavor-id
The authorization level required by a user to perform this task is Admin.
Prerequisites
The user who is executing the command must have write permission to the sce-url-database.
Options
The following options are available to add an entry to the sce-url database:
•
URL: (* | [*] [Host-Suffix] | [*] [Host-Suffix] / [URL-Prefix [*]] [URL suffix] [? Params-prefix])
See Table 1 for examples on how to define URLs.
•
How to View the sce-url-database
To view the sce-url-database, use the following command in the Privileged EXEC (#) mode:
show interface linecard 0 sce-url-database all-entries
The authorization level required by a user to perform this task is Admin.
Prerequisites
All protection must be removed from the sce-url-database and there should be no assigned owner. If an assigned owner exists, the database becomes protected and cannot be displayed.
How to Look for a Specific URL in the sce-url-database
To look for a specific URL in the sce-url-database, use the following command in the Privileged EXEC (#) mode:
show interface linecard 0 sce-url-database url url
The authorization level required by a user to perform this task is Admin.
Prerequisites
The user who is executing the command must have lookup permission in the sce-url-database.
Options
url—Specific URL to look up in the sce-url-database.
Results
The following are the results when the user tries to look for a specific URL in the sce-url-database file:
•
•
How to Clear the sce-url-database
To clear the sce-url-database, use the following command in the interface linecard configuration mode (config if):
sce-url-database remove-all
The authorization level required by a user to perform this task is Admin.
Prerequisites
The user executing the command must have write permission in the sce-url-database.
4 Enabling Deep HTTP Inspection
The HTTP flows may contain multiple transactions. Typically, each such inner URL should be verified against the protected URL database, not just the initial one. However, because this has a deep impact on performance HTTP inspection is disabled by default.
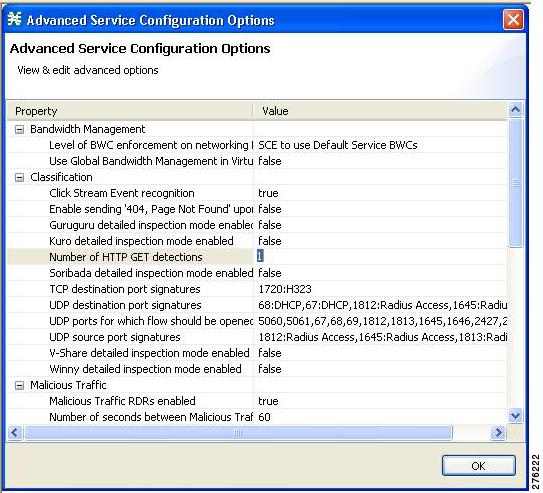
You can enable the deep HTTP inspection option from the Cisco SCA BB Console. The actual configuration relates to the number of HTTP transactions that are examined per HTTP flow (number of HTTP GET detections). By default, only the first transaction is examined; you can define this to be any number of transactions between 1 and 65535.
Note
How to Enable Deep HTTP Inspection
Step 1
Configuration > System Settings > Advanced Options tab > Advanced Service Configuration Options.
Figure 1 Advanced Service Configuration Options Window
Step 2
5 URL Normalization
URL normalization is a procedure that brings URL flavors having the same meaning into a canonical presentation, which minimizes the number of false-negative lookup results and may significantly improve the efficiency of the protected blacklisting operation.
URL normalization involves the following:
•
•
By default, these normalization operations are disabled, but when enabling URL normalization, both of them come into effect for the protected blacklist.
You must first enable URL normalization and then import the blacklist entries so that they are affected accordingly.
Configuring URL Normalization
Use the URL normalization commands to:
•
•
•
•
URL normalization should be configured before service configuration (PQB file) is applied to the Cisco SCE platform and before the sce-url-database is loaded.
How to Enable URL Normalization
To enable the URL normalization, use the following command in the interface linecard configuration mode (config if):
lookup canonical
The authorization level required by a user to perform this task is Root.
How to Disable URL Normalization
To disable the URL normalization, use the following command in the interface linecard configuration mode (config if):
no lookup canonical
The authorization level required by a user to perform this task is Root.
How to Reset URL Normalization to the Default State
To reset the URL normalization to the default state, use the following command in the interface linecard configuration mode (config if):
no lookup canonical
By default, the URL normalization is disabled. The authorization level required by a user to perform this task is Root.
How to Display the Currently URL Normalization Configuration
To display the current URL normalization configuration, use the following command in the User EXEC (>) mode:
show applications slot 0 lookup canonical
The authorization level required by a user to perform this task is Viewer.
6 Protected URL Database Configuration Example
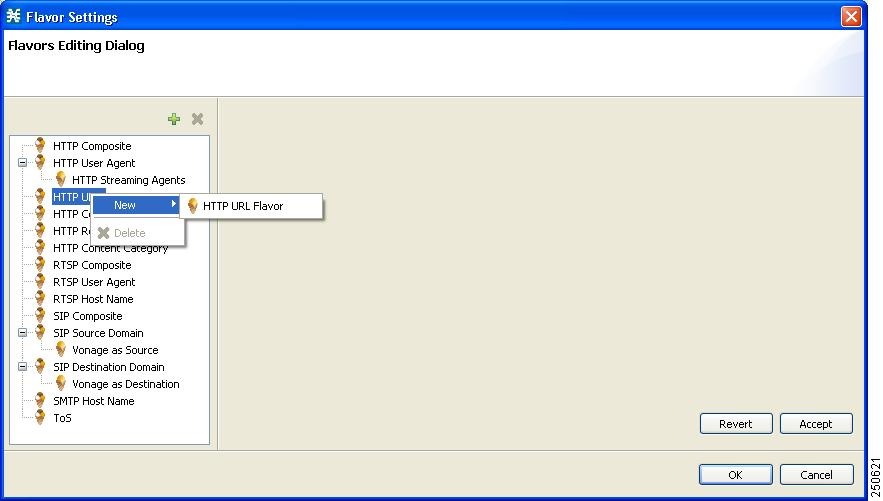
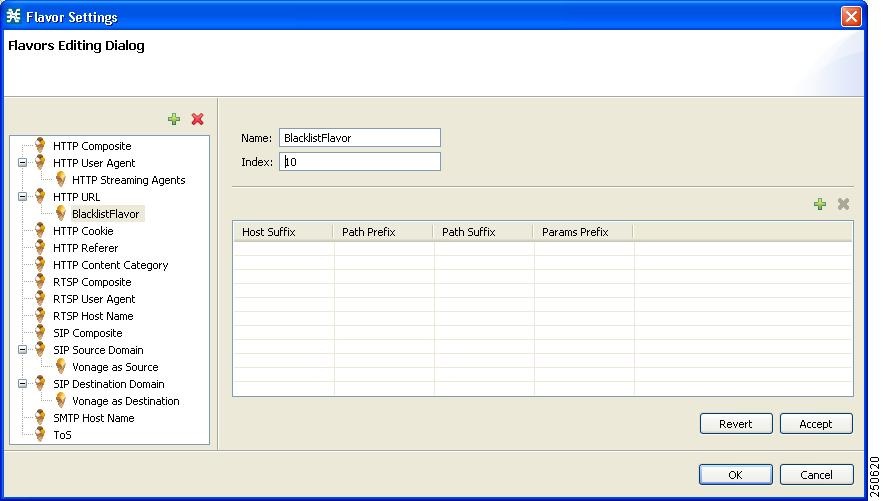
The following example shows how to configure the protected URL database, including defining the flavors in the Cisco SCA BB Console, configuring the protections in the Cisco SCE platform, and importing a URL file.
Step 1
SCE> enable 15SCE#> configureSCE(config)#> interface LineCard 0SCE(config if)#> lookup canonicalStep 2
Figure 2 Flavor Settings—Flavors Editing Dialog Box
Step 3
Figure 3 Flavor Settings—Flavors Editing Dialog Box with Name and Index Information
Step 4
Step 5
Step 6
Figure 4 Advanced Service Configuration Options Window
Step 7
Step 8
Step 9
Step 10
#configure(config)#aaa authentication login default local enable none(config)#username BlacklistOwner privilege 10 password passStep 11
User Access VerificationUsername: BlacklistOwnerPassword:Step 12
# configure(config)# interface LineCard 0(config if)# sce-url-database protection owner myselfStep 13
(config if)# sce-url-database protection allow-write all-usersStep 14
(config if)# sce-url-database protection allow-lookup owner-onlyStep 15
This should be done periodically over a secure Telnet session.
(config if)# sce-url-database protection encryption-key AABBCCDDEEFF11223344556677889900Step 16
(config if)# sce-url-database import encrypted-file urls.csv flavor-id 10This should be done periodically; either by copying the file to Cisco SCE first or by importing directly over FTP.Step 17
(config if)#> exit(config)#> exit#> copy running-config-all startup-config-allWriting general configuration file to temporary location...Backing-up general configuration file...Copy temporary file to final location...Writing general (protected) configuration file to temporary location...Backing-up general (protected) configuration file...Copy temporary (protected) file to final location...Writing general configuration file to temporary location...Removing old application configuration file...Renaming temporary application configuration file with the final file's name...Writing general (protected) configuration file to temporary location...Removing old application (protected) configuration file...Renaming temporary application (protected) configuration file with the final file's name...Step 18
# logout
Obtaining Documentation and Submitting a Service Request
For information on obtaining documentation, using the Cisco Bug Search Tool (BST), submitting a service request, and gathering additional information, see What's New in Cisco Product Documentation at: http://www.cisco.com/en/US/docs/general/whatsnew/whatsnew.html.
Subscribe to What's New in Cisco Product Documentation, which lists all new and revised Cisco technical documentation, as an RSS feed and deliver content directly to your desktop using a reader application. The RSS feeds are a free service.
Cisco and the Cisco logo are trademarks or registered trademarks of Cisco and/or its affiliates in the U.S. and other countries. To view a list of Cisco trademarks, go to this URL: www.cisco.com/go/trademarks. Third-party trademarks mentioned are the property of their respective owners. The use of the word partner does not imply a partnership relationship between Cisco and any other company. (1110R)
Any Internet Protocol (IP) addresses used in this document are not intended to be actual addresses. Any examples, command display output, and figures included in the document are shown for illustrative purposes only. Any use of actual IP addresses in illustrative content is unintentional and coincidental.
© 2013 Cisco Systems, Inc. All rights reserved.
 Feedback