Cisco Smart+Connected Residential Licensing and Registration Guide, Release 2.5
Available Languages
Table Of Contents
Cisco Smart+Connected Residential Licensing and Registration Guide, Release 2.5
Creating a Dealer User Account
Guidelines for Creating Consumer Account Usernames
Creating Consumer Accounts and Registering the Controller
Creating Controller Registration Codes
Obtaining and Applying Optional Licenses
Obtaining and Installing Licenses
Understanding Smart Device, MyHome and 4Sight Licenses
Assigning Optional Feature Licenses to Consumer Accounts
Enabling Smart Device and PC Access
Installing Cisco Remote Management Solution (Cisco RMS) Licenses
Smart Device Checklist for Residents
Cisco Smart+Connected Residential Licensing and Registration Guide, Release 2.5
Revised: July 18, 2013This document describes the accounts used to enable the features and devices used in a Cisco Smart+Connected Residential Solution. This document also describes the licenses required to enable optional features, and how to purchase and enable those licenses
Refer to the following topics for more information.
–
Creating a Dealer User Account
•
Creating Controller Registration Codes
•
Obtaining and Applying Optional Licenses
–
Obtaining and Installing Licenses
–
Understanding Smart Device, MyHome and 4Sight Licenses
–
Assigning Optional Feature Licenses to Consumer Accounts
–
Enabling Smart Device and PC Access
–
Installing Cisco Remote Management Solution (Cisco RMS) Licenses
•
Smart Device Checklist for Residents
Introduction
This guide provides detailed instructions on how to access, use, and deploy software licenses related to the Cisco Smart+Connected Residential Solution. These include end-user licenses used to remotely control the Smart+Connected residence and licenses used by partners and/or property managers for deploying the Smart+Connected Residential Solution in multi-dwelling units.
Managing Accounts
•
Creating a Dealer User Account
Account Types
The following accounts are required to install and deploy a Cisco Smart+Connected Residential Solution:
Creating a Dealer Account
The main dealer account is created by Cisco or a Cisco Partner representative. An email containing the login credentials is sent to the designated contact for your organization when the account is created.
Creating a Dealer User Account
Once the Dealer account is created, the dealer portal is used to create additional dealer logins for your organization.
Procedure
Step 1
Log into the dealer portal:
a.
Launch a web browser and go to https://my.control4.com.
b.
Enter the dealer username and password provided by your system administrator.
c.
Click Sign In.
d.
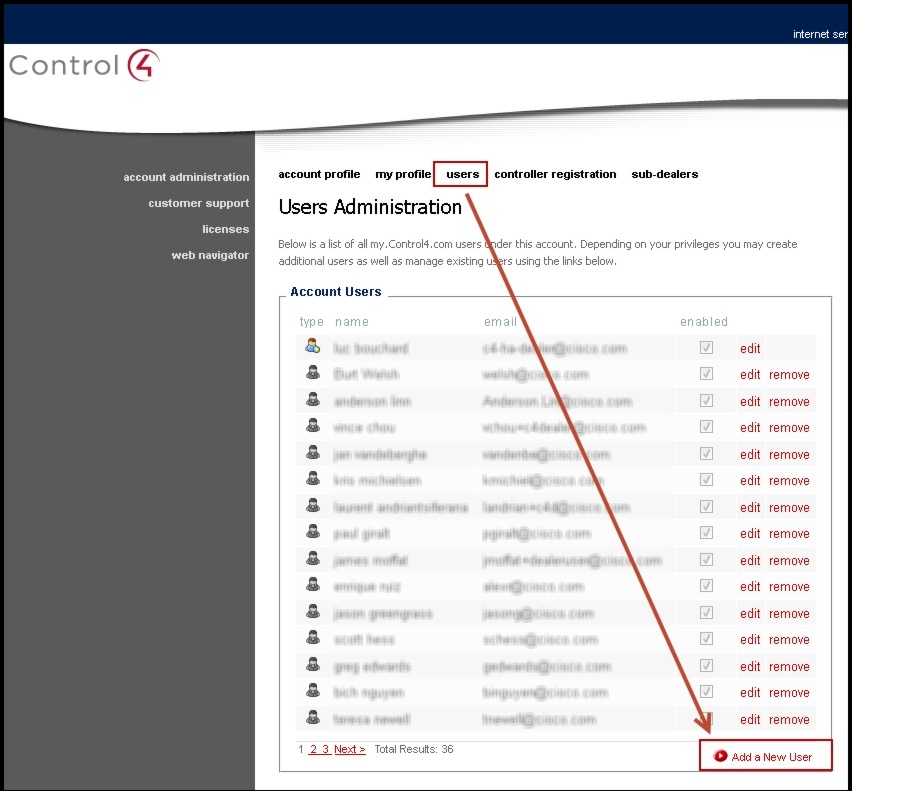
Select the Users tab.
e.
Click Add a New User.
f.
Complete the form.
g.
Select the Permissions for the account.
h.
Click Save.
Figure 1 Create a Dealer User Account
Creating Consumer Accounts
A Consumer account must be created for each dwelling in the Smart+Connected Residential project. The Consumer account is used for the following:
•
Once a Consumer account is created, it generates a registration code used to associate the primary Controller in each dwelling to the Consumer account.
•
Once registered, the primary Controller is linked to the Consumer account and can receive software licenses for the residential automation devices.
•
Cisco Smart+Connected Smart Device license and intercom licenses are also assigned to the Consumer account.
•
The Consumer account login credentials are used by the dwelling occupant to log in to the Cisco Controller to access and manage their residential automation features (via a web browser or their smart device).
•
The 4Sight license (included with the Cisco Smart+Connected Smart Device license) also enables remote technical support.
Guidelines for Creating Consumer Account Usernames
The Consumer account username and password must be meaningful to the dwelling occupant, since they will use these credentials to access their Cisco Smart+Connected residence using a smart device or PC.
The username is an email. Although you can use any email address, each address must be unique in the Dealer portal, should be meaningful to the tenant, and should be tracked and recorded by your organization.
Examples of Consumer account email/usernames include:
•
The dwelling occupant's email.
•
An email assigned by the Cisco partner/reseller.
•
A generic email address that meets the needs of your Dealer organization.
Creating Consumer Accounts and Registering the Controller
To create a Consumer account and Controller registration code, do the following:
Step 1
Launch a web browser and go to https://my.control4.com.
Step 2
Click Create Account in the top right.
Step 3
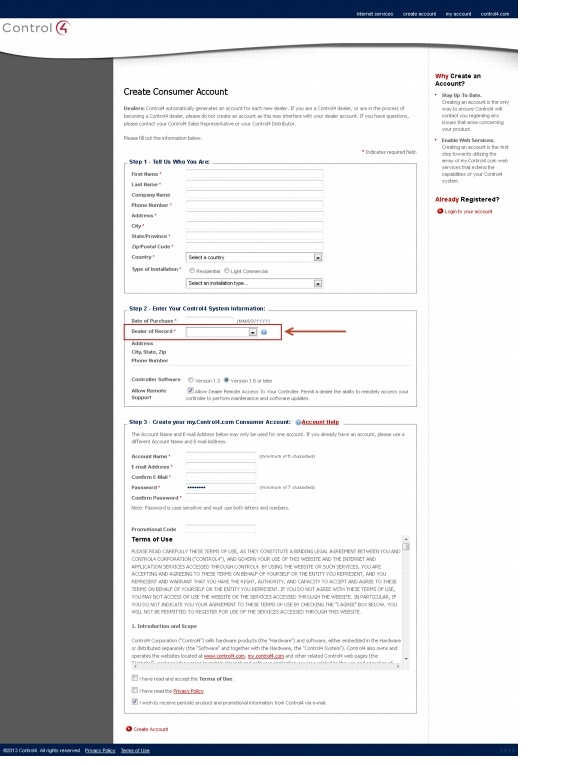
Enter or select the required information in the Create Consumer Account page.
Step 4
Click Create Account.
Step 5
Enter the account information:
•
Step 1 - Tell Us Who You Are: Enter the name, address and other contact information.
•
Step 2 - Enter Your System Information: Enter the Date of Purchase and Dealer of Record. For example, enter the date the Controller was purchased, and select your organization (such as Cisco). Also select Controller software version 1.6 or later and Allow Remote Support.
Important! The correct Dealer of Record must be selected. This binds the consumer account to your dealer account and allows you to assign licenses to the consumer, register the Cisco Controller, and perform other important functions. If the correct Dealer of Record is not selected, you will not be able to access the Consumer Account.
Step 6
Step 3 - Create your Consumer Account: Enter an account name that represents where the Controller will be installed or the name of the occupant. Also enter an email address and login credentials for the account (see the "Guidelines for Creating Consumer Account Usernames" section for more information).
Step 7
Terms of Use: Accept the Terms of Use and Privacy Policy.
Step 8
Click Create Account.
Step 9
Create a registration code for the primary Cisco Controller.

Tip
You can also create the registration code later. See the Creating Controller Registration Codes for more information.
a.
Register the Controller by clicking "here" (on the Complete Registration page).
b.
Copy the registration code that appears on the Controller Registration Confirmation page.
c.
Enter the code in Composer Pro (Tools > Account Services) to register the Controller, as described in the Cisco Smart+Connected Residential Installation and Configuration Guide.
Creating Controller Registration Codes
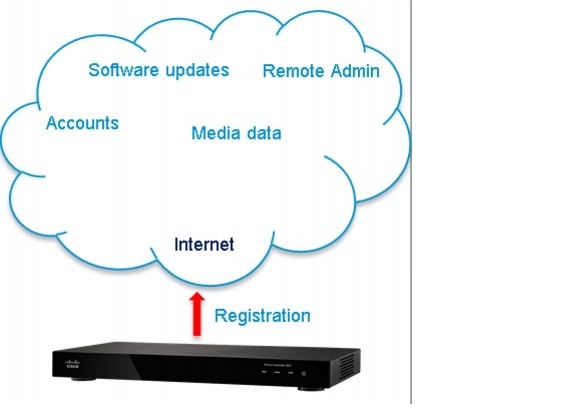
Controllers must be registered in order to access online services such as device updates, media information, remote administration, and other features.
If the Controller registration code was not created when you created the Consumer account, you can re-login to the Consumer account and generate the code.
Registering a Controller does the following:
•
Binds the primary Controller to the Consumer Account
•
Enables online software updates
•
Enables 4Sight
•
Enables remote administration (requires a 4Sight license, which is included with the Cisco Smart Device license)
•
Enables online updating of music cover art, titles and other information.
•
Allows you to add music titles and artwork
Figure 2 Controller Registration
Procedure
To create a registration code for an existing Consumer account:
Step 1
Launch a web browser and go to https://my.control4.com.
Step 2
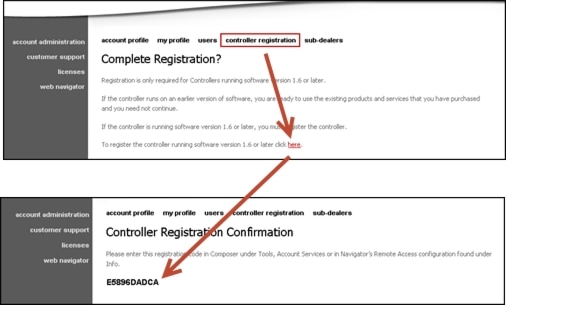
Click Controller Registration.
Step 3
Click "here" to generate a Controller registration code.
Figure 3 Controller Registration Code
Step 4
Copy the registration code that appears on the Controller Registration Confirmation page.

Note
If Unregister Controller appears, you can remove the registration and create a new registration code. This will delete any existing license assignments and other information. For example, unregistering the Controller will disable access to 4Sight, media, and other online services, and may interfere with your ability to support the account. You should only unregister the Controller if instructed by your system administrator or Cisco representative.
Step 5
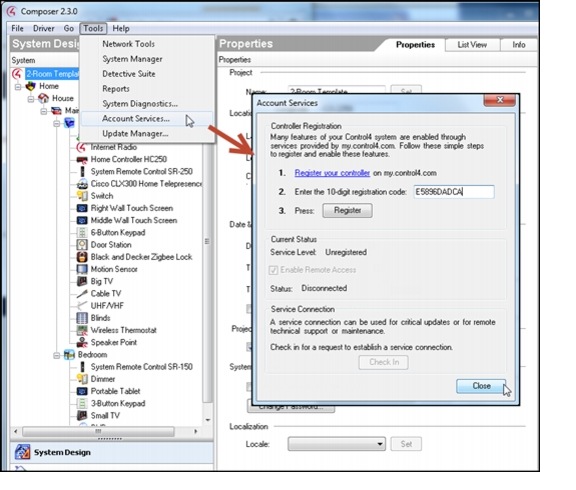
Use the code to register the Cisco Controller in Composer Pro, as described in the Cisco Smart+Connected Residential Installation and Configuration Guide.
a.
Launch Composer Pro
b.
Select a "Director".
c.
Add and identify the primary Controller (if necessary).
d.
Select Tools > Account Services.
e.
Enter the registration code.
f.
Click Register and Close.
Figure 4 Enter the Registration Code in Composer Pro
Obtaining and Applying Optional Licenses
Cisco licenses must be purchased to enable optional features such as smart device access and the Cisco Smart+Connected Remote Management Solution.
Refer to the following topics for more information:
•
Obtaining and Installing Licenses
•
Understanding Smart Device, MyHome and 4Sight Licenses
•
Assigning Optional Feature Licenses to Consumer Accounts
•
Enabling Smart Device and PC Access
•
Installing Cisco Remote Management Solution (Cisco RMS) Licenses
Obtaining and Installing Licenses
Procedure
Step 1
Purchase the license:
a.
Determine the part numbers for the license you want to purchase (see the License Part Numbers).
b.
Go to http://www.cisco.com/en/US/ordering/index.shtml.
c.
Select the Product Authorization Key (PAK) for the license and delivery method (paper or eDelivery).
d.
Select one or more licenses for the PAK.
For example, select either RMS Server or Client (or both) or Smart Device Subscription or Perpetual or both.
e.
When the purchase is complete, you are issued a Product Authorization Key (PAK) in paper form, or as an e-Delivery in an email message.

Note
You will receive one PAK per line item. For example, if ordering 1 RMS Server License and 10 RMS Client Licenses under the SCH-RMS-PAK=, you will receive 1 PAK.
Step 2
Submit the PAK to generate the license(s):
a.
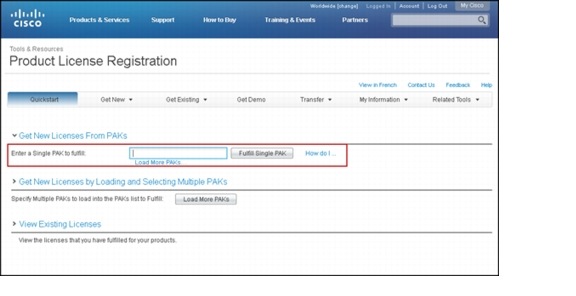
In a Web browser, open the Cisco Product License Registration Web page http://www.cisco.com/go/license/.
b.
Follow the onscreen instructions to complete the form and enter the Product Authorization Key (PAK).
Figure 5 Submit the PAK
Step 3
Access the licenses in one of the following ways:
•
Cisco RMS: the server and client license is sent as a single license file to your email address. The license file must be installed on the RMS server as described in the Cisco Smart+Connected Remote Management Server Installation Guide.
•
Cisco Smart Device Licenses: Wait for the licenses to be added to your dealer account, and then apply the licenses to individual Consumer accounts. See the Cisco Smart+Connected Residential Licensing and Registration Guide for instructions and more information.
License Part Numbers
See the Release Notes for the Cisco Smart+Connected Residential Solution for the license part numbers and requirements for the software release installed on your system.
Understanding Smart Device, MyHome and 4Sight Licenses
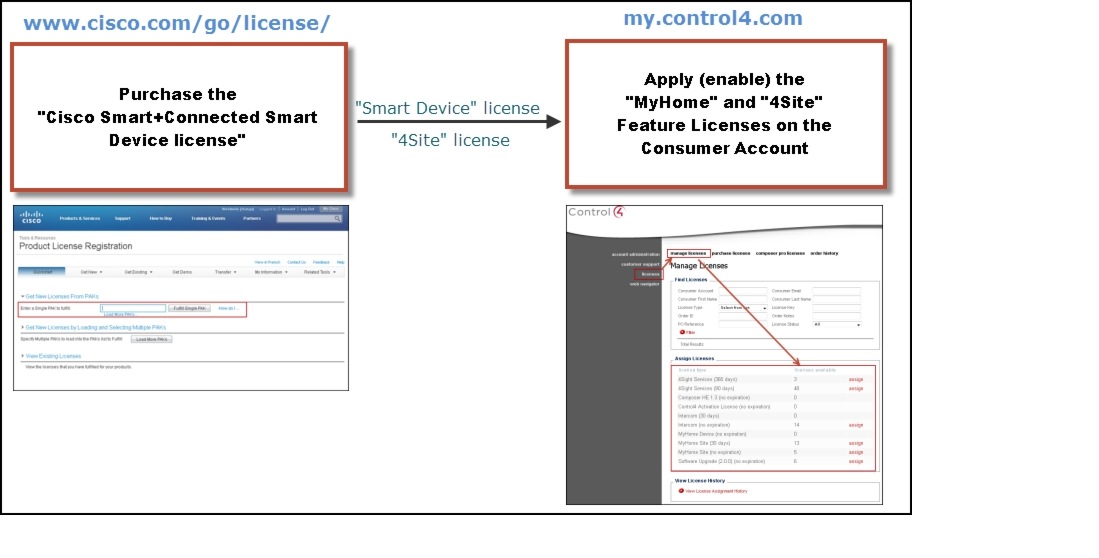
Each Cisco Smart+Connected Smart Device license purchased from the http://www.cisco.com/go/license/ results in two licenses that can be applied using the Dealer portal at my.control4.com (see Figure 6).
Figure 6 Understanding the Smart Device License
•
MyHome license—enables the use of smart devices and PCs with the Cisco Smart+Connected Residential Solution.
•
4Sight license—enable the following:
–
Email Notification Agent to recieve emails based on any event. For example, if a motion sensor triggers in the residence, an email can immediately be sent.
–
Allows dealers to remotely troubleshoot or configure the residential project.
See the following for more information:
•
Obtaining and Installing Licenses
•
Assigning Optional Feature Licenses to Consumer Accounts
•
Enabling Smart Device and PC Access
Assigning Optional Feature Licenses to Consumer Accounts
Procedure
Step 1
Launch a web browser and go to https://my.control4.com.
Step 2
Click Licenses.
Step 3
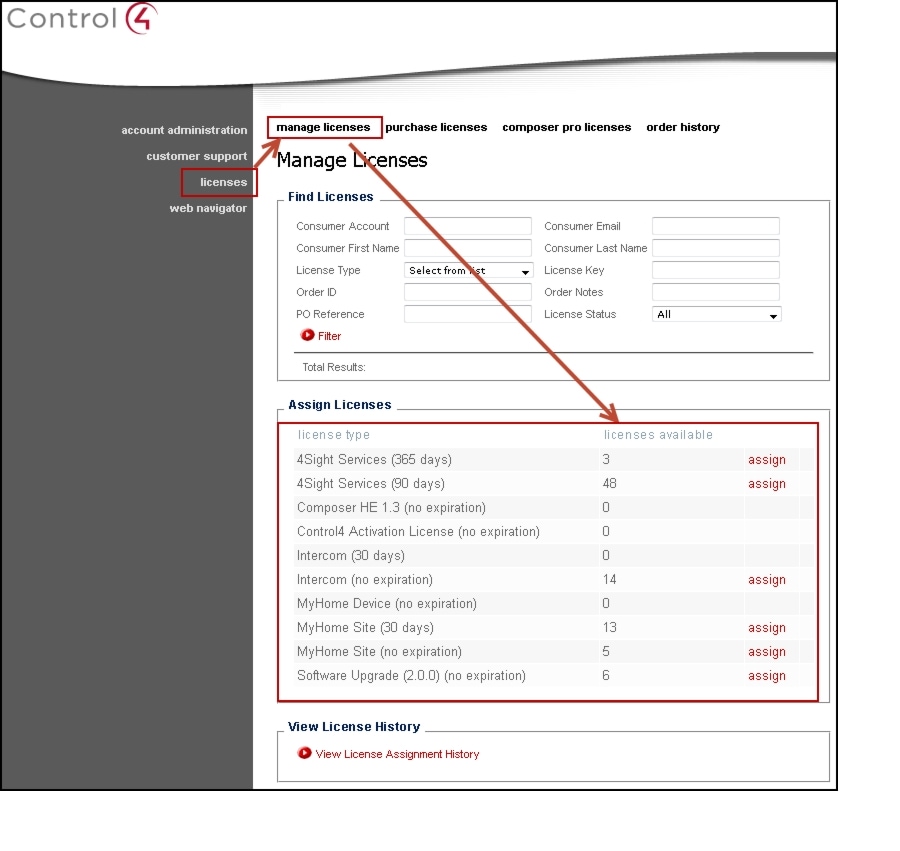
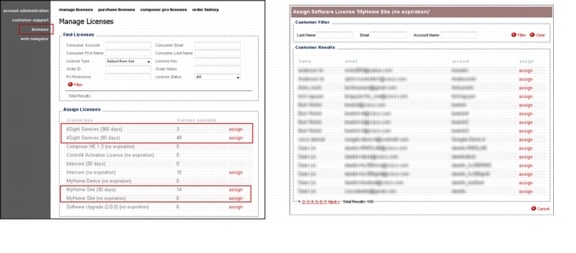
Verify that at least one license is available for the feature you want to enable (see licenses available column in the Assign Licenses section).
Figure 7 Manage Licenses Page in the Dealer Account Portal
Step 4
To assign a license to a Consumer account, do the following.

Note
Assigning a license enables that feature on the Controller that is registered to the selected Consumer account.
a.
Click the assign link for the license type.

Note
The assign link is only displayed if licenses are available for that feature (the link does not appear if licenses have not been purchased or if all purchased licenses have been assigned to other Consumer accounts).
b.
Click assign again in the pop-up window to select the Consumer account for the license.
c.
Click Assign and OK to confirm.
d.
Repeat these steps to assign additional licenses to the Consumer accounts.
Enabling Smart Device and PC Access
The following components are required to enable smart device access to a Cisco Smart+Connected residence:
•
Cisco Smart+Connected Smart Device license—This license must be purchased for each primary Controller, and includes the following licenses that are enabled using the my.control4.com dealer portal..
–
MyHome license—The dealer must apply the MyHome device license to the Consumer account (the Consumer account is associated with the dwelling primary Cisco Controller.
–
4Sight license—The dealer must apply the 4Sight device license to the Consumer account to enable features such as dealer remote access, customer remote browser access, and email/text notifcation.

Tip
See the "Understanding Smart Device, MyHome and 4Sight Licenses" section.
•
MyHome device drivers—(Release 2.2 only) A driver must be added to the project for each smart device or PC that will access the residential system. This step is not necessary if the Cisco Controller is running release 2.3 or higher.
•
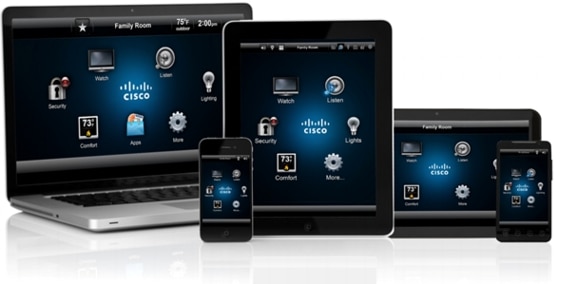
Cisco SC Residence App—Residents must install the Cisco SC Residence App onto each smart device or PC. Residents log in to their residential system using the Consumer account credentials.
Once complete, the user can use their smart device or PC to access the Cisco Smart+Connected Residential Solution.

Note
The Navigator is the menu that appears on a TV, touchscreen, PC or smart device.
Summary Configuration Steps
Step 1
Purchase a Cisco Smart+Connected Smart Device license for the dwelling.
•
Smart Device licenses can be perpetual (no expiration) or subscription-based (valid for 365 days).
•
Licenses can be purchased in bulk.
•
See the and the Release Notes for the Cisco Smart+Connected Residential Solution for more information.
p
Step 2
Enable the MyHome and 4Sight licenses on the Consumer account associated with the primary Controller in the dwelling.
p
Step 3
From the PC or smart device, download the Cisco SC Residence App from the appropriate app store.
See the and the Release Notes for the Cisco Smart+Connected Residential Solution for more information.
p
Step 4
Log on to the Cisco SC Residence App using the Consumer account registered to the primary Cisco Controller in the residence.
p
Step 5
(Release 2.2 only) Use the Cisco SC Residence App to identify the PCs and smart devices in the Composer Pro project.
Note
In release 2.3 and later, the smart device is automatically added to the project when the user logs in to the Cisco SC Residence App for the first time.
p
Procedure
Step 1
Purchase a Cisco Smart+Connected Smart Device license for the dwelling.
See the "Obtaining and Installing Licenses" section.
Step 2
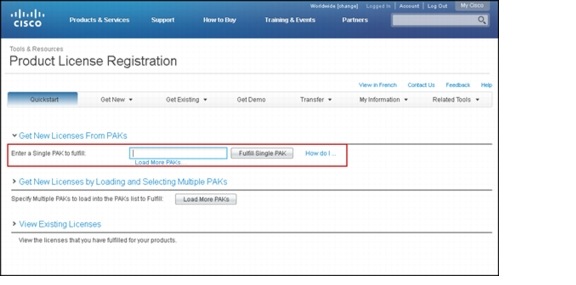
Submit the Product Authorization Key (PAK). See Figure 8.
You are issued a PAK in paper form, or as an e-Delivery in an email message.
Figure 8 Submit the PAK
a.
Go to: http://www.cisco.com/go/license/
b.
Enter the PAK.
Step 3
Wait for the purchased MyHome and 4Sight licenses to appear in your dealer account at https://my.control4.com.
Step 4
Create a Consumer Account (if necessary). See Figure 9.
a.
Go to https://my.control4.com.
b.
Click Create Account.
c.
Follow the instructions.
d.
Choose the correct "Dealer of Record".

Note
This binds the Consumer account to your Dealer account and allows you to manage the system!
e.
Document all information, credentials and settings!
f.
Give the credentials to the resident for smart device and 4Store access. See the "Smart Device Checklist for Residents" section for more information.
g.
Respond to the validation email.
h.
Log out of the Consumer account.
Figure 9 Create a Consumer Account
Step 5
Enable the license for the Consumer account. See Figure 10.
•
You must be logged in to your dealer account to enable licenses.
•
Your dealer account must also have access permissions to manage licenses.
•
If the purchased licenses do not appear in the Manage License page, verify that the order was placed, and that enough time has passed for the order to be fulfilled (for example, be sure you successfully submitted the license PAK.
Figure 10 Enable the License for the Consumer Account
a.
Log in to Dealer Account ( https://my.control4.com).
b.
Click Licenses (Figure 10).
c.
Click assign (next to "MyHome Site" or "4Sight Services").
d.
Find the Consumer account in the pop-up window.
e.
Click assign next to the Consumer account.
Step 6
(Optional) Synchronize the newly-added licenses that were associated with the Consumer account (using the dealer portal).
This causes the Cisco Controller to retrieve assigned licensing from the remote access licensing service.
Cisco Controllers automatically check in on a regular schedule, but you should manually check in to apply the licenses immediately.
a.
Start Composer Pro and connect to a Director (the primary Cisco Controller).
b.
From the menu bar, select Tools > Account Services.
c.
On the Account Services dialog, click Check in.
d.
When the status indicator changes to "Check in successful" the subscription information is synchronized and the devices can be authenticated.
Step 7
Download the Cisco SC Residence App.
•
From the mobile device or PC/Tablet, either you or the device owner can go to the iTunes or Google Play app store to download the app. Follow the online instructions to download the app(s).
Step 8
Install the PC MyHome app.
a.
Install the Adobe Air utility.
Adobe Air allows you to run MyHome PC on a Windows, MacOS or Linux PC.
–
Go to get.adobe.com/air/.
–
Follow the onscreen instructions to download and run the installer file.

Note
Do not install Adobe Air updates after upgrading to Release 2.5, even if prompted to do so. This is an error from Adobe Air. Updating Adobe Air after you've installed Release 2.5 will make the Cisco SC Residence App non-functional.
b.
Install the MyHome PC app.
–
Go to http://update.control4.com/cisco/2.5.0.240493-cis/win/SCResidencePC.air
–
Follow the onscreen instructions to download the
MyHomePC.airinstaller file.–
Locate and double-click the
MyHomePC.airfile on your PC.–
Follow the onscreen instructions to install the application.
Step 9
Using the PC or smart device, log in to the Cisco SC Residence App to access the Cisco Smart+Connected Residential Solution features.
a.
Connect the device to the same network as the Cisco Smart+Connected Residential Solution.
b.
Select the app icon (smart device) or PC application.
c.
Review the onscreen instructions.
d.
Enter the system name.
e.
Enter the username and password for the Consumer account.
f.
Wait for the setup to complete.
g.
The application is ready to use.
Figure 1-11 Cisco SC Residence App
Installing Cisco Remote Management Solution (Cisco RMS) Licenses
The Cisco Smart+Connected Remote Management Solution (RMS) allows real estate developers and property managers to remotely deploy, monitor, and manage large numbers of Cisco Controllers and related residential automation equipment. After the physical equipment is installed, administrators can update software, apply patches, perform backups, and execute tests to check the status of the controllers and related equipment. If problems are found, Cisco RMS can automatically perform tasks, or notify an administrator of the problem.
The Cisco RMS server is installed on a physical or virtual machine, and requires a license to enable the solution features, including the web-based management console interface. See the Cisco Smart+Connected Remote Management Server Installation Guide for more information.
To enable Cisco RMS, you must do the following:
Step 1
Purchase a Cisco RMS server license for each server instance you want to deploy (see the "Obtaining and Installing Licenses" section).
Step 2
Purchase a Cisco RMS client license for each primary Controller (system) that will be managed by Cisco RMS (see the "Obtaining and Installing Licenses" section).
Step 3
Copy the Cisco RMS license file that you receive onto the Cisco RMS server (as described in theCisco Smart+Connected Remote Management Server Installation Guide). The license file enables one server and the number of purchased clients.
Smart Device Checklist for Residents
After the Cisco Smart+Connected residence is configured to support smart device access, provide the resident with the following information required to log in to their system.
Related Documentation
For more information about the Cisco Smart+Connected Residential products, see the following documents and websites:
Cisco and the Cisco logo are trademarks or registered trademarks of Cisco and/or its affiliates in the U.S. and other countries. To view a list of Cisco trademarks, go to this URL: www.cisco.com/go/trademarks. Third-party trademarks mentioned are the property of their respective owners. The use of the word partner does not imply a partnership relationship between Cisco and any other company. (1110R)
Any Internet Protocol (IP) addresses and phone numbers used in this document are not intended to be actual addresses and phone numbers. Any examples, command display output, network topology diagrams, and other figures included in the document are shown for illustrative purposes only. Any use of actual IP addresses or phone numbers in illustrative content is unintentional and coincidental.
© 2013 Cisco Systems, Inc. All rights reserved.
 Feedback