Configure Basic Radio Settings on the WAP125
Available Languages
Objective
The radio is the physical component of the Wireless Access Point (WAP) that creates a wireless network. The radio settings on the WAP control the behavior of the radio and determine the kind of wireless signals that the device transmits. It is typically configured when deploying the device for the first time, or after the device has been reset to default settings.
This article aims to show you how to configure the basic radio settings on the WAP125.
Applicable Devices
- WAP125
Software Version
- 1.0.0.3
Configure the Basic Radio Settings of the WAP
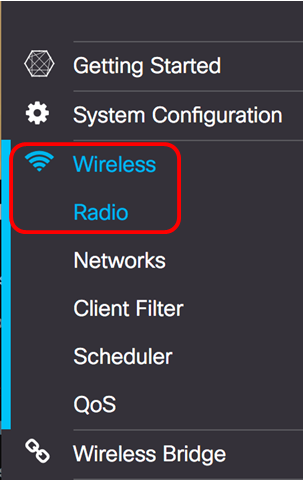
Step 1. Log in to the web-based utility of the WAP and choose Wireless > Radio.
Step 2. Choose a radio band from the Working Mode drop-down list. The options are:
- 2.4G Only — This option activates only the 2.4 GHz radio of the WAP. It supports 802.11 b/g, 802.11 b/g/n and 802.11n. If this option is chosen, proceed to Configure 2.4 GHz Basic Radio Settings.
- 5G Only — This option activates only the 5 GHz radio of the WAP. It supports 802.11 a/n/ac, and 802.11 n/ac. If this option is chosen, proceed to Configure 5 GHz Basic Radio Settings.
- Dual Bad — This option activates both the 2.4G and the 5G radios of the WAP. It supports 802.11 b/g, 802.11 b/g/n, 802.11n, 802.11 a/n/ac, and 802.11 n/ac. If this option is chosen, both the 2.4 GHz radio settings and the 5 GHz radio settings need to be configured.
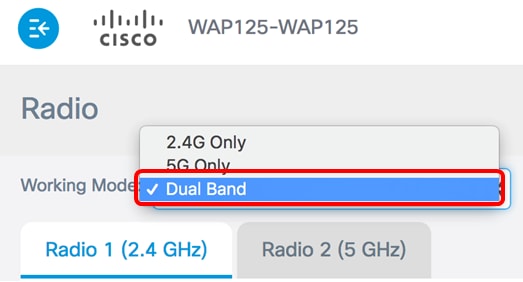
Note: In this example, Dual Band is chosen.
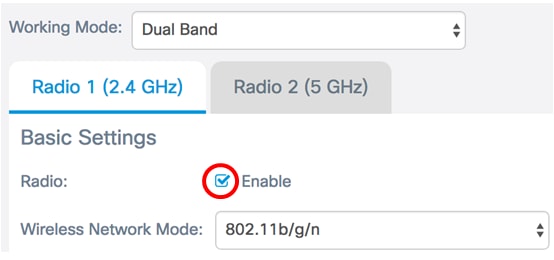
Configure 2.4 GHz Basic Radio Settings
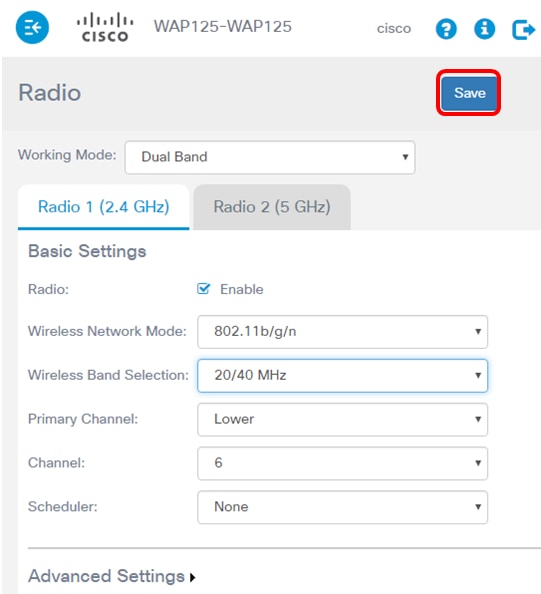
Step 1. Verify that the Enable Radio check box is checked to ensure that the radio is active. This is enabled by default.
Step 2. Choose a network mode from the Wireless Network Mode drop-down list. The options are as follows:
- 802.11b/g — This option lets wireless clients equipped with 802.11b or 802.11g wireless adapters connect to the WAP.
- 802.11b/g/n — This option is the default setting. It lets wireless clients equipped with 802.11b, 802.11g, and 802.11n adapters operating in the 2.4 GHz frequency connect to the WAP.
- 2.4 GHz 802.11n — This option lets wireless clients equipped with 802.11n adapters operating in the 2.4 GHz frequency connect to the WAP.
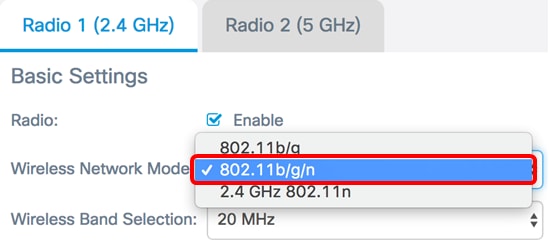
Note: In this example, 802.11b/g/n is chosen.
Step 3. (Optional) Choose a wireless band from the Wireless Band Selection drop-down list. The options are:
- 20 MHz — This option restricts the usage of the wireless band selection to a 20 MHz band.
- 20/40 MHz — This option allows for legacy devices that support Wireless-N connectivity, and devices that support 40 MHz band to connect to the WAP. The 20/40 MHz band enables higher data rates but leaves fewer bands available for use by other 2.4 GHz and 5 GHz devices.

Note: This option is available only when 802.11b/g/n or 2.4 GHz 802.11n is chosen as the Wireless Network Mode. If 802.11b/g was chosen as Wireless Network Mode, skip to Step 5. In this example, 20/40 MHz is chosen.
Step 4. (Optional) Choose a channel from the Channel drop-down list. The options are Auto, and channels 1 to 7.
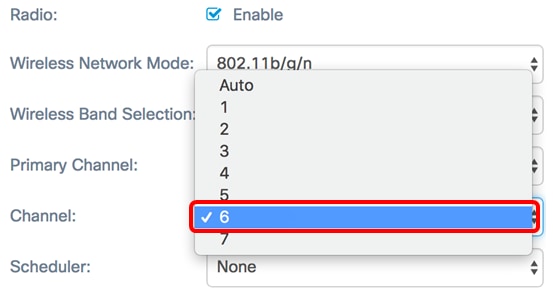
Note: In this example, 6 is chosen.
Step 5. (Optional) Choose a Scheduler profile from the drop-down list. This allows you to control the time interval when the radios would be operational.

Note: In this example, no Scheduler profile is configured.
Step 6. Click Save.
You should now have successfully configured the 2.4 GHz basic radio settings on your WAP125 access point.
Configure 5 GHz Basic Radio Settings
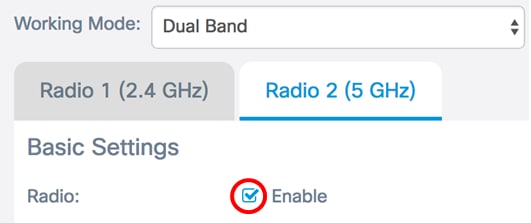
Step 1. Click the Radio 2 (5 GHz) tab and make sure that the Enable Radio check box is checked to ensure that the radio is active.
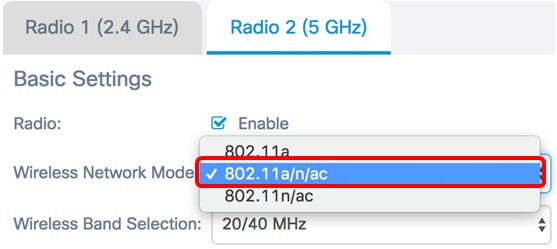
Step 2. Choose a network mode from the Wireless Network Mode drop-down list. The options are as follows:
- 802.11a — This option only lets wireless clients equipped with 802.11a wireless adapters connect to the WAP device.
- 802.11a/n/ac — This option lets wireless clients equipped with 802.11a, 802.11n, or 802.11ac wireless adapters connect to the WAP device.
- 802.11n/ac — This option only lets wireless clients equipped with 802.11n or 802.11ac wireless adapters connect to the WAP device.
Step 3. (Optional) Choose a wireless band from the Wireless Band Selection drop-down list. The options are:
- 20 MHz — This option restricts the usage of the wireless band selection to a 20 MHz band. It provides the best throughput for devices that support Wireless-N connectivity.
- 20/40 MHz — This option allows for legacy devices that support Wireless-N connectivity, and devices that support 40 MHz band to connect to the WAP. 20/40 MHz band enables higher data rates but leaves fewer bands available for use by other 2.4 GHz and 5 GHz devices. It allows for the best connection for a wireless environment with mixed adapters.
- 80 MHz — This option restricts the usage of the wireless band selection to a 80 MHz band. It provides optimal throughput for devices that use wireless-ac adapters.
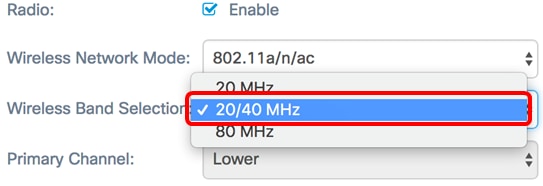
Note: In this example, 20/40 MHz is chosen.
Step 4. (Optional) Choose a channel from the Channel drop-down list. The options are Auto, 36, 44, 149, and 157.
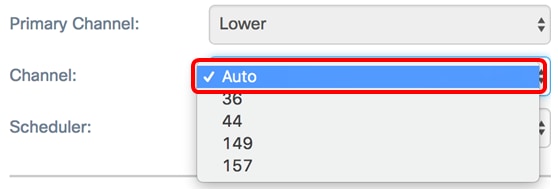
Note: In this example, Auto is chosen.
Step 5. (Optional) Choose a Scheduler profile from the drop-down list. This allows you to control the time interval when the radios would be operational.
Note: In this example, no Scheduler profile is configured.
Step 6. Click Save.
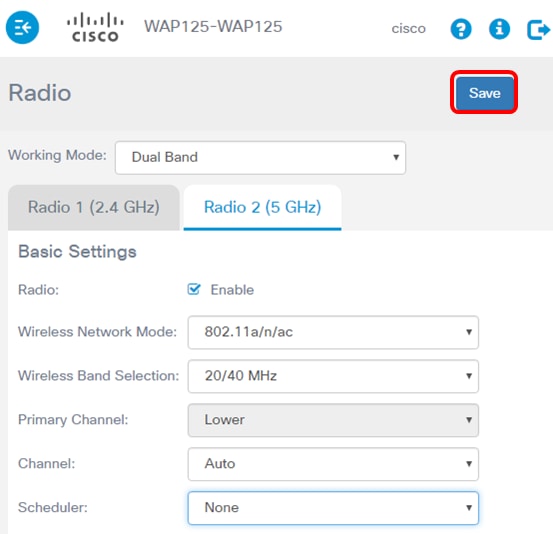
You should now have successfully configured the 5 GHz basic radio settings on your WAP125 access point.
 Feedback