Configuration of Optimal Fax Completion Rates for SPA100 Series Adapters
Available Languages
Objective
Issues can occur with fax transmissions over IP networks. Adjustments can be made to several settings on the ATA (Analog Telephone Adapters) to optimize fax completion rates. These adjustments enhance the performance of fax transmission.
The objective of this document is to explain how to configure line settings to optimize fax completion rates on SPA100 Series Adapters.
Applicable Devices
• SPA112
• SPA122
Software Version
• 1.3.2-XU (014)
Optimal Fax Completion Rates
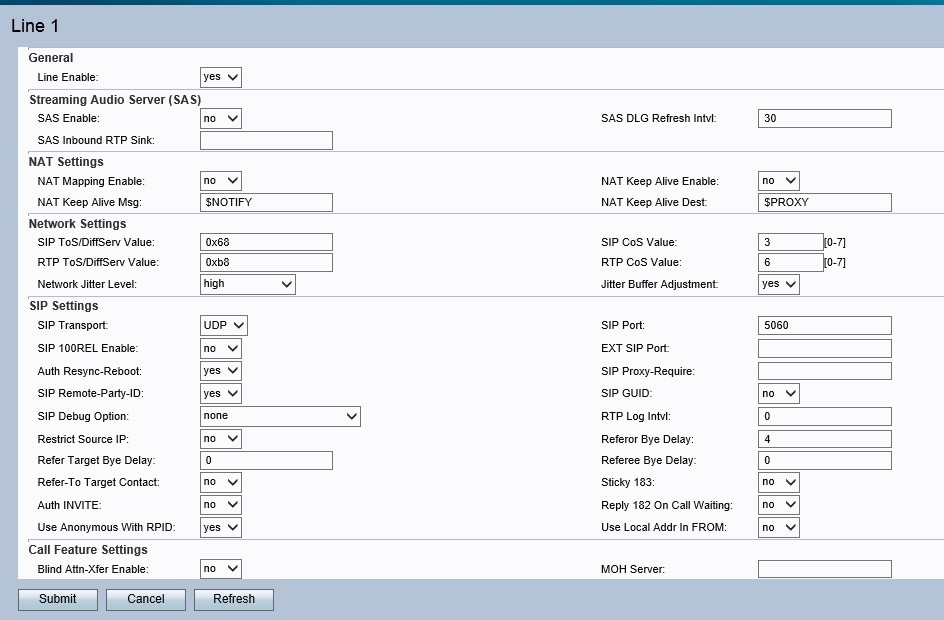
Step 1. Log in to the Phone Adapter Configuration Utility and choose Voice > Line 1 or Line 2. The Line 1 or Line 2 page opens:

Note: Make sure to choose the line for which adjustments are needed.
Step 2. Scroll down to the Network Settings section. Choose Very High from the Network Jitter level drop-down list. Jitter is the variation in the time between packets arriving, caused by network congestion, timing drift, or route changes. Network Jitter determines how jitter buffer size is adjusted by the ATA.

Step 3. Choose No from the Jitter Buffer Adjustment drop-down list. This allows the Network Jitter Level to remain at its set value.

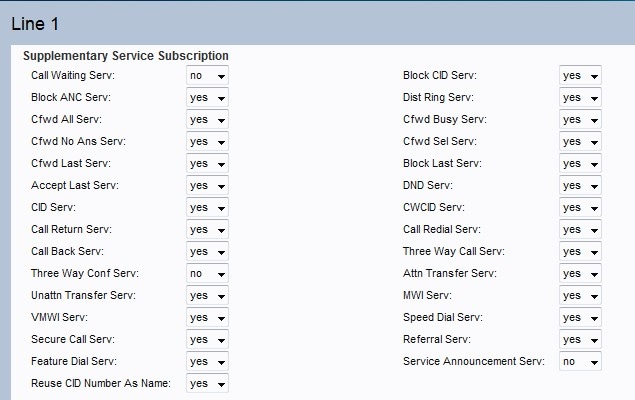
Step 4. Choose No from the Call Waiting Serv drop-down list. This disables call waiting on the device.
Step 5. Choose No from the Three Way Call Serv drop-down list. This makes the user unable to have a conversation with two users at the same time.
Audio Configuration
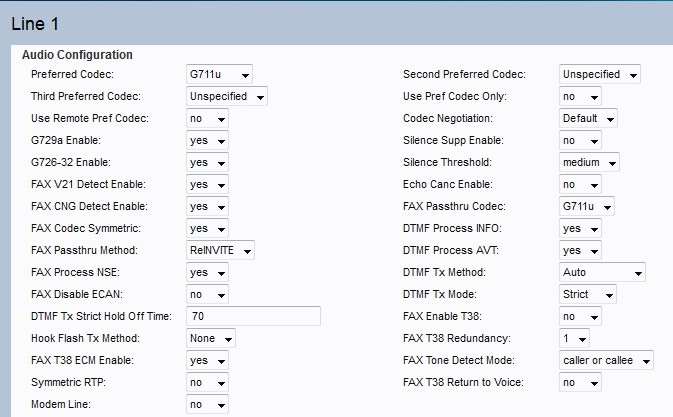
Step 6. Scroll down to the Audio Configuration area. Choose either G.711u or G.711a from the Preferred Codec drop-down list. Codecs are protocols that allow the receiver to be able to reproduce the information exactly as it was sent. Both options are used for companding. In companding, the dynamic range of a signal is compressed before transmission and it is later expanded to reproduce the original information at the receiver.

• G.711u — μ-law encoding takes a 14-bit signed linear audio as input, increases the magnitude by 32, and converts it to an 8 bit value.
• G.711a — A-law encoding takes a 13-bit signed linear audio and converts it to an 8 bit value.
Step 7. Choose Yes from the Use Pref Codec Only drop-down list. This will ensure that all calls use only the preferred codec.
Step 8. Choose No from the Silence Supp Enable drop-down list. The silence suppression is used to avoid the transmission of silent audio frames over the network. This feature reduces the bandwidth of the network as only speech is transmitted.
Step 9. Choose No from the Echo Canc Enable drop-down list. The echo cancelling feature is used to remove the echo in the communication; this not only improves the quality of the call but also improves the silence suppression.
Step 10. Choose ReINVITE from the FAX Passthru Method drop-down list. This FAX pass through method is used to demodulate or compress the information that is passed through the network, the ReInvite method is used to send a message to the device so this sends an invitation to the host device to join to the network.
Step 11. Click Submit to save the settings or click Cancel to abandon the unsaved settings.
Contact Cisco
- Open a Support Case

- (Requires a Cisco Service Contract)
 Feedback