Initial Configuration on Sx500 Series Stackable Switches
Available Languages
Objective
Cisco Switches provide layer functionality to meet layer 2 communication needs. Switch can be configured with the Initial configuration and also for advanced user can configure by navigating to the desired page in the switch with the web configuration utility. The objective of this document is to explain the initial setup of these switches.
Applicable Devices
• Sx500 Series Stackable Switches
Software Version
• 1.3.0.62
Initial Installation
Step 1. The switch turns on automatically when an active power cord is connected. The switch accepts voltage that ranges from 100V to 240V.
Step 2. Connect an RJ-45 (Ethernet) cable to one of the available ports on the switch. Connect the other end to your PC or to any other device through which the switch is accessed.
Access the Graphical User Interface (GUI)
Step 1. Configure your PC with a static IP address in the same subnet as the default IP address of the switch, which is 192.168.1.254.
Note: When the switch uses the factory default IP address 192.168.1.254, its System LED flashes green continuously. Otherwise, the System LED remains solid green.
Step 2. Open a web browser and enter IP address of the switch in the address bar, then press Enter on the keyboard. The Login page opens:

Step 3. Enter the username and password in the fields. The default username and password is cisco and cisco.
Step 4. (Optional) Choose the desired language from the Language drop-down list.
Step 5. Click Log In to log in into the device.
Change the IP Address of the Switch
Method 1: Statically Assign TCP/IP Settings

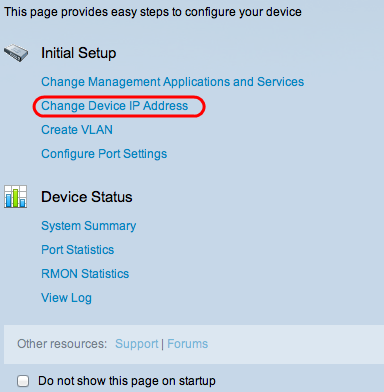
Step 1. In the Initial Setup area, click Change Device IP Address. The IPv4 Interface page opens:

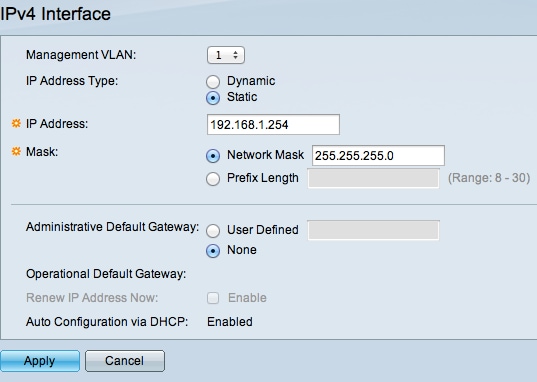
Step 2. Choose a VLAN number from the Management VLAN drop-down list. The management VLAN is also known as the native VLAN. It is the specific VLAN that provides access to the Sx500 switches for management purposes. The article titled Creating VLANs on Cisco Managed Switches can be used as a reference to create a VLAN.
Step 3. Click the Static radio button in the IP Address Type field to manually assign an IP address.
Step 4. Enter the desired IP address for the switch in the IPv4 Address field. The default IP address of the device is 192.168.1.254.
Step 5. Choose the desired radio button in the Mask field.
• Network Mask — Enter the respective network mask of the IPv4 address at step 4. The default subnet mask is 255.255.255.0.
• Prefix Length — Enter the length of the prefix of the IPv4 address at step 4. The values used are 8 to 30.
Step 6. (Optional) Click User Defined to enter the IP address of the default gateway in the Administrative Default Gateway field. The default gateway is usually a router or a layer 3 switch that has access to other networks. The default gateway is configured to provide the host connected to the Sx500 switch the gateway to reach other networks.
Step 7. Click Apply to save the settings.
Method 2: Dynamically Assign TCP/IP Settings

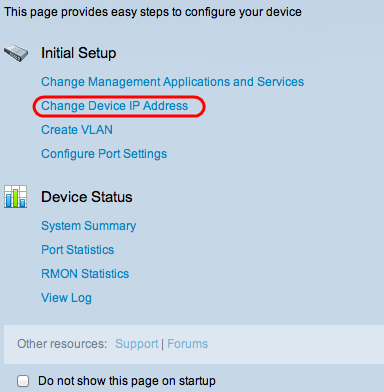
Step 1. In the Initial Setup area, click Change Device IP Address. The IPv4 Interface page opens:

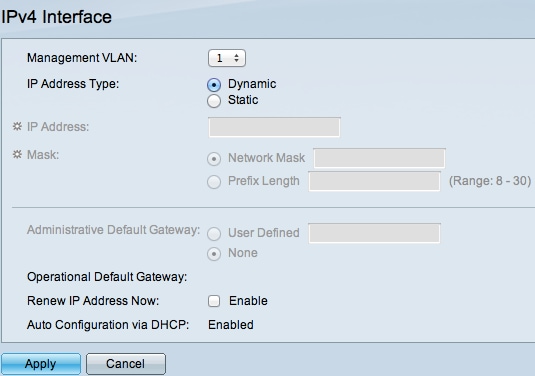
Step 2. Choose a VLAN number from the Management VLAN drop-down list. The management VLAN is also known as the native VLAN. It is the specific VLAN that provides access to the Sx500 switches for management purposes. The article titled Creating VLANs on Cisco Managed Switches can be used as a reference to create a VLAN.
Step 3. Click the Dynamic radio button in the IP Address Type field to dynamically assign an IP address.
Step 4. (Optional) To renew the dynamically assigned IP address, check the Enable check box in the Renew IP Address Now field.
Note: The Auto Configuration via DHCP field is enabled by default. DHCP auto configuration provides ip address to the connected the host. To get more information about DHCP Auto Configuration, refer to article DHCP Auto Configuration Setup on Sx500 Series Stackable Switches.
Step 5. Click Apply to save the settings. The switch automatically sets all TCP/IP settings such as the IP address, subnet mask, and the default gateway retrieved from the DHCP server.
 Feedback