Denial of Service (DoS) Martian Address Configuration on Sx500 Series Stackable Switches
Available Languages
Objective
A Denial of Service (DoS) attack is an attempt by an attacker to not allow a legitimate user to use the resources or services on the network. DoS attacks can result in significant loss of time and money. DoS attack prevention is configured to increase security on the network and to not allow packets with a certain IP address range to enter the network.
Martian addresses are IP addresses that are to be rejected by the switch. Martian addresses are useful for an added layer of security. If a packet is received from a martian address it is discarded. Currently martian addresses are only supported in the IPv4 format.
This article explains how to configure martian addresses on the Sx500 Series Stackable Switches.
Applicable Devices
• Sx500 Series Stackable Switches
Software Version
• v1.2.7.76
Martian Addresses
Step 1. Log in to the web configuration utility and choose Security > Denial of Service Prevention > Martian Addresses. The Martian Addresses page opens:

Step 2. (Optional) To add all the reserved Martial addresses to the Martian Address Table, check Include in the Reserved Martian Addresses field, and then click Apply to display the reserved addresses in the Martian Address Table. These IP addresses are illegal from the point of view of the protocol because they are already in use for important functions.
Note: DoS Prevention must be enabled on the Security Suite Settings page for this option to work. Please refer to the article, Configuration of Denial of Service Prevention Techniques (Security Suite) on Sx500 Series Stackable Switches for this configuration.
• 0.0.0.0/8 — Refers to source hosts on this network.
• 127.0.0.0/8 — Used as the Internet host loopback address.
• 192.0.2.0/24 — Used as the TEST-NET in documentation and example codes.
• 224.0.0.0/4 — Used in IPv4 Multicast address assignments. It was formerly known as Class D Address Space.
• 240.0.0.0/4 — Reserved address range. It was formerly known as Class E Address Space.
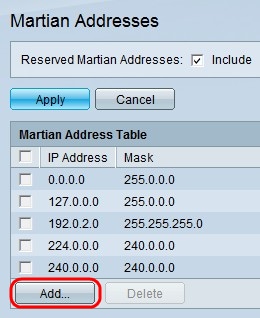
Step 3. Click Add to add a new martian address. The Add Martian Address window appears.
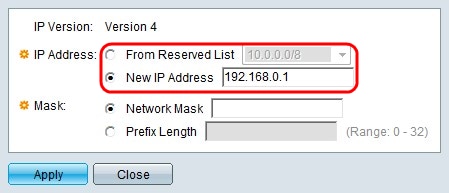
Step 4. Click the radio button that corresponds with the desired IP address to reject in the IP Address field.
• From Reserved List — Choose a reserved IP address from the drop-down list.
• New IP Address — Enter a new IP address that is to be rejected.
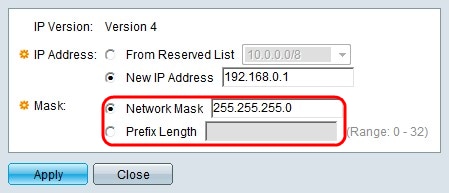
Step 5. If you clicked New IP Address in Step 3, click the radio button that corresponds with the desired mask of the martian IP address. This mask defines the range of IP addresses that are rejected.
• Network Mask — Enter the network mask in the Network mask field. This defines the subnet mask for the martian IP address.
• Prefix Length — Enter the prefix length (integer in the range of 0 to 32) in the Prefix length field. This defines the subnet mask by prefix length for the martian IP address.
Step 6. Click Apply.
 Feedback