Enable Loopback Detection on a Switch through CLI
Available Languages
Objective
This article aims to provide you with all the necessary steps to configure Loopback Detection (LBD) using the Command Line Interface (CLI). The steps outlined are performed in a Windows 10 environment.
Introduction
The purpose of LBD is to ensure that protection is provided against loops by sending loop protocol packets out of ports where LBD is enabled. LBD works by broadcasting periodic loopback detection packets. When the switch receives its own LBD packet it means that a loop is detected. When a loop is discovered, the port that has received the LBD packet is placed in a shutdown state. LBD can detect the following loops:
Shorted wire – a port that loops all receiving traffic.
Direct multi-ports loop – when the switch is connected to another switch where the Spanning Tree protocol (STP) is disabled.
Local Area N segment loop – the switch is connected to one or more Local Area Network (LAN) segments which have a loop.
Note: LBD is independent of STP. While Spanning Tree works across all connected switches within a network, LBD does not exchange information and does not take into account loop frames from other devices.
Applicable Devices
Sx350
SG350X
SG350XG
Sx550X
SG550XG
Software Version
2.2.5.x and newer
Before Configuring LBD through CLI
Make sure you have console access by using the serial cable supplied with the switch.
Ensure you have installed software for console access, for example, (PuTTy).
Enable LBD
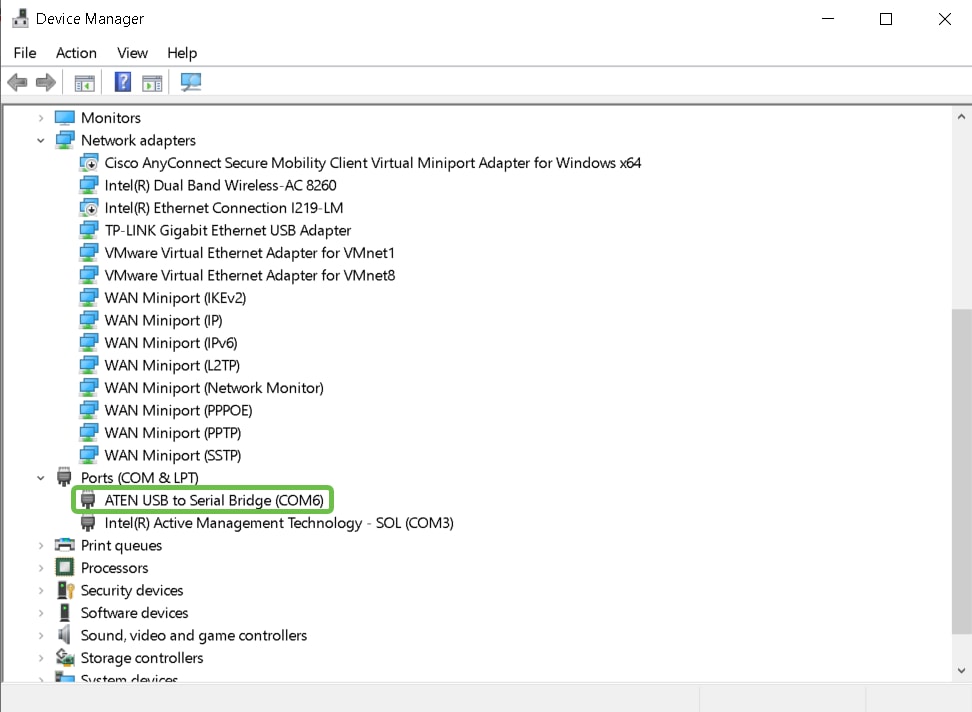
Step 1. Once you connect the serial cable to your computer and to the back of the switch, access the Device Manager by pressing Windows icon on your keyboard + X key and click on Device Manager. Verify which Communication port (COM) is used by your serial connection.
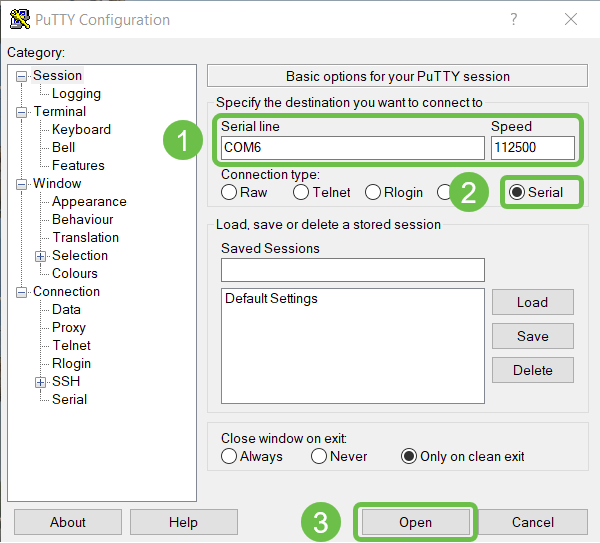
Step 2. Now that you know the COM port, open up PuTTy and configure the following:
In this example,
Enter COM6 as the Serial Line
Set the Speed to 112500
Choose Connection type as Serial
Click Open.
Step 3. To enter the Global Configuration Mode of the switch, enter the following.
switch336713#config tNote: At any configuration step, while in Global Configuration Mode, you may choose to save your settings permanently. In order to do that, type do copy running-config startup-config and press Enter.
Step 4. (Optional) You can also enable LBD per interface. In this case, you need to select the interface first by using the following command.
switch336713(config)#interface te1/0/1Note: In this example, the interface is te1/0/1.
Step 5. To enable LBD, enter the following.
switch336713(config)#loopback-detection enableStep 6. (Optional) You may now choose to set an LBD interval. To do so, enter the following command.
switch336713(config)#loopback-detection interval 45Note: In this example, the interval time is set to 45 seconds. A shorter interval allows more sensitive detection but consumes more resources.
Conclusion
You have now learned the steps to enable LBD on your Small Business Sx350, SG350X, SG350XG, Sx550X or SG550XG series switches using the CLI. For more information about our switches, please visit the following links:
Cisco 350 Series Managed Switches Data Sheet
Cisco 550X Series Stackable Managed Switches Data Sheet
Video: Introducing mGig on Cisco SMB 350 Series Switches For Best-In-Class Performance
Revision History
| Revision | Publish Date | Comments |
|---|---|---|
1.0 |
14-Aug-2019
|
Initial Release |
 Feedback
Contact Cisco
- Open a Support Case

- (Requires a Cisco Service Contract)