Synchronize (SYN) Filtering Configuration on the 300 Series Managed Switches
Available Languages
Objective
TCP is a transport layer protocol that provides reliable, ordered delivery of packets and also allows for detection of errors and for lost data to trigger retransmission until the data is correctly and completely received. Before the client sends data, it requests a connection with a synchronize (SYN) packet to the server to start connection. The server then sends a SYN and acknowledgement (ACK) packet to the client, and the client sends an ACK packet to acknowledge the server response. After this three-way handshake connection between the client and server, data can be sent.
A SYN flood attack occurs when this TCP three-way handshake is interrupted. A malicious client floods the server with SYN packets, the server responds with SYN and ACK packets for all the malicious client requests, but the malicious client does not send back ACK packets. The server waits for an ACK packet that simply will not arrive, which consumes the resources of the server for legitimate users and eventually brings down the network. SYN Filtering prevents these attacks. This article explains how to configure SYN filtering on the 300 Series Managed Switches.
Applicable Devices
• SF/SG 300 Series Managed Switches
Software Version
• v1.2.7.76
Enable Denial of Service Level Prevention
In order to apply SYN Filtering, first, you need to make sure the switch is in the correct Denial of Service level prevention. This section explains how to enable the correct prevention level on the 300 Series Managed Switches.
Step 1. Log in to the web configuration utility and choose Security > Denial of Service Prevention > Security Suite Settings. The Security Suite Settings page opens:
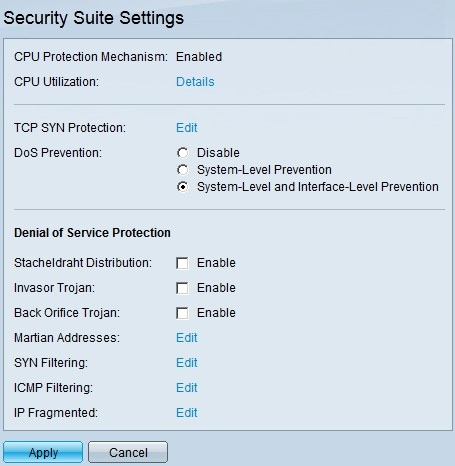
Step 2. In the DoS Prevention field, there are three levels of prevention. Click System-Level and Interface-Level Prevention. This level lets you configure SYN Filtering.
Step 3. Click Apply to save your configuration.
Filter TCP SYN Packets
This section explains how to configure SYN Filtering on the 300 Series Managed Switches.
Step 1. Log in to the web configuration utility and choose Security > Denial of Service Prevention > SYN Filtering. The SYN Filtering page opens:
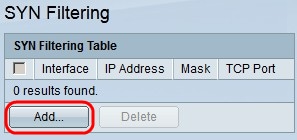
Step 2. Click Add. The Add SYN Filtering window appears:
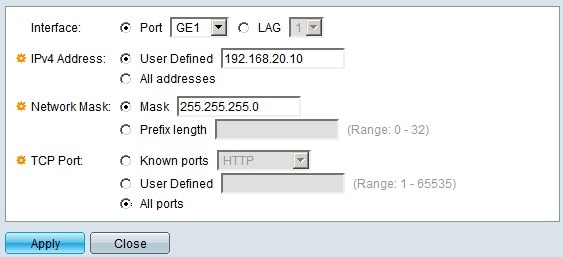
Step 3. In the Interface field, click the radio button of one of the available interface options:
• Port — Allows you to choose the port from which you wish to filter SYN packets from the Port drop-down list.
• LAG — Allows you to choose the LAG from which you wish to filter SYN packets from the Link Aggregation Group (LAG) drop-down list. A LAG groups multiple ports into a single logical port.
Step 4. In the IPv4 Address field, click the radio button of one of the available options to define the IPv4 address/addresses to filter SYN packets from:
• User Defined — Allows you to enter the IPv4 address for which SYN packets filter is defined.
• All addresses — This option filters all IPv4 addresses for SYN packets.
Step 5 In the Network Mask field, click the radio button of one of the available options to enter the network mask of the IP address configured in Step 4:
• Mask — This option lets you enter the subnet mask of the IP address.
• Prefix Length — This option lets you enter the subnet mask IP address in the prefix format.
Step 5. In the TCP Port field, click one of the available options to determine the TCP ports to filter:
• Known Ports — This option lets you choose ports from the Known Ports drop-down list. For example HTTP is 80 and TELNET is 23.
• User Defined — This option lets you enter the TCP port numbers to filter.
• All ports — This option filters all TCP ports.
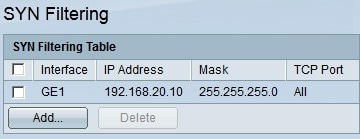
Step 6. Click Apply to save your configuration. The changes are made to the SYN Filtering Table:
Step 7. (Optional) to delete a SYN filter, in the SYN Filtering Table, check the check box of the SYN filter you wish to delete. Then click Delete.
Revision History
| Revision | Publish Date | Comments |
|---|---|---|
1.0 |
13-Dec-2018 |
Initial Release |
 Feedback