TR-069 Settings on the RV315W VPN Router
Available Languages
Objective
Technical Report 069 (TR-069) allows you to establish a connection between an Auto-Configuration Server (ACS) and Customer Premises Equipment (CPE). An Internet Service Provider (ISP) uses an ACS to automatically configure the device remotely without user intervention. Through the use of TR-069, the terminals contact the Auto Configuration Servers and establish a connection. CPE is a terminal and the associated equipment at the user premises, which is connected to the telecommunication channel of the service provider.
This article explains how to configure the TR-069 Settings on RV315W.
Applicable Device
• RV315W
Software Version
• 1.01.03
TR-069 Settings
Step 1. Log in to the web configuration utility and choose System Management > TR-069 Settings. The TR-069 Settings page opens:
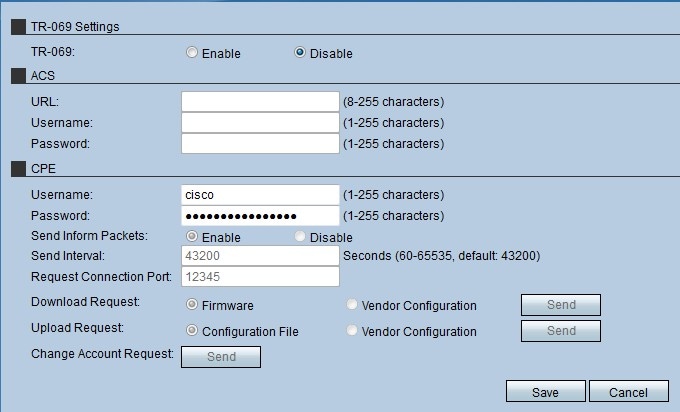

Step 2. Click the Enable radio button to enable the TR-069 on the RV315W.
Note: Enable the TR-069 allows the administrator to configure the ACS and the CPE on the device as well.
Auto Configuration Servers (ACS)
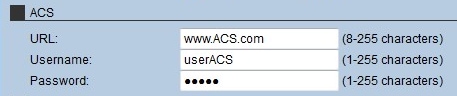
Step 1. Enter the URL of the ACS in the URL field. This URL connects the RV315W with the remote ACS server.
Step 2. Enter the username to access the ACS server in the Username field. This username is provided by the ISP.
Step 3. Enter the password that it is assigned to the username in the Password field. This password is provided by the ISP.
Step 4. Click Save.
Customer Premises Equipment (CPE)
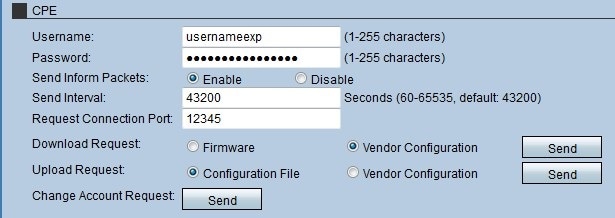
Step 1. Enter the username that makes a connection with the CPE in the Username field. This user has to be a user of the remote server.
Step 2. Enter the password of the remote server to establish the connection with the CPE in the Password field. This password is used to authenticate the user on the remote server.
Step 3. (Optional) To have the CPE send packets of information, click the Enable radio button in the Send Inform Packets field. The CPE packets include the information that the device currently uses.
Step 4. If Send Inform Packets was enabled in Step 3, enter the time interval at which the CPE sends information packets. This time is given in seconds.
Step 5. Enter the port number that is used to initiate a request to the TR-069 server in the Request Connection Port field.
Step 6. (Optional) To download software for the RV315W, click the request to send to the TR-069 server in the Download Request field. There are two options:
• Firmware — This sends a request to the TR-069 Server to download the RV315W firmware.
• Vendor Configuration — This sends a request to the TR-069 Server to download the RV315W vendor configuration.
Step 7. Click Send to send the request to the TR-069 server in the Download Request field.
Step 8. (Optional) To upload software from the RV315W to the TR-069 server, click the request to send to the TR-069 server in the Upload Request field. There are two options:
• Configuration File — This sends a request to the TR-069 Server to upload the RV315W configuration file.
• Vendor Configuration — This sends a request to the TR-069 Server to upload the RV315W vendor configuration.
Step 9. Click Send to send the request to the TR-069 Server in the Upload Request field.
Step 10. (Optional) To change the account request, click Send in the Change Account Request field. This change request allows for the change of the administrative password of the RV315W.
Step 11. Click Save.
 Feedback