Bandwidth Management on the CVR100W VPN Router
Available Languages
Objective
Bandwidth is the rate of data transfer over time. The CVR100W allows for the configuration of bandwidth to increase network efficiency through upstream, downstream, and service priority configuration. Service priority is a Quality of Service (QoS) feature that allows the CVR100W to prioritize a service such as HTTP or DNS. This is useful to manage bandwidth usage of specific services. This article explains how to manage bandwidth on the CVR100W VPN Router.
Applicable Device
• CVR100W
Software Version
• 1.0.1.19
Bandwidth Management
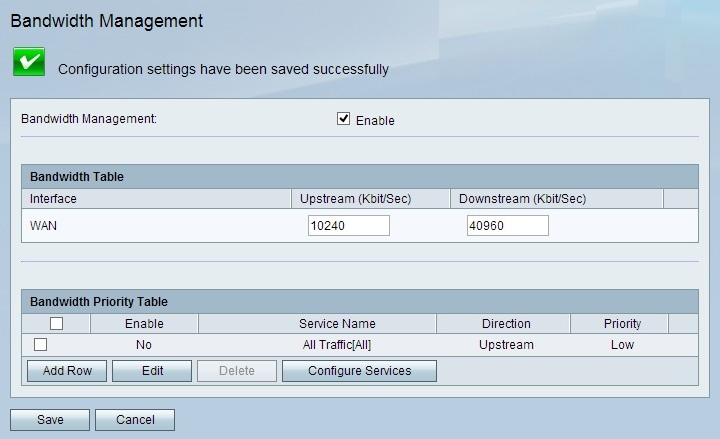
Step 1. Log in to the web configuration utility and choose QoS > Bandwidth Management. The Bandwidth Management page opens:

Step 2. Check Enable in the Bandwidth Management field to configure bandwidth settings.
Bandwidth Table

Step 1. Enter a value for the desired interface in the Upstream (Kbit/Sec) field. This value in Kb/s is the rate at which the CVR100W sends data through the interface. This is known as upload speed.
Step 2. Enter a value for the desired interface in the Downstream (Kbit/Sec) field. This value in Kb/s is the rate at which the CVR100W receives data from the interface. This is known as download speed.
Step 3. Click Save.
Bandwidth Priority Configuration
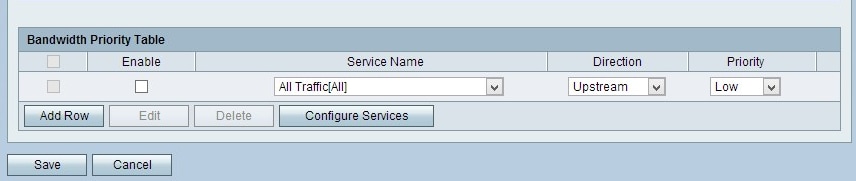
Step 1. Click Add Row to add a new service priority.
Step 2. Check Enable to enable the service priority.
Step 3. From the Service drop-down list, choose a service to prioritize.
Note: Click Configure Service to add a service. Refer to Configure Services subsection.
Step 4. From the Direction drop-down list, choose the direction which the traffic is to be prioritized.
• Upstream — The traffic flows from the CVR100W.
• Downstream — The traffic flows to the CVR100W.
Step 5. From the Priority drop-down list, choose a priority level for the specified service priority.
• High — Specifies that the data has a higher priority and is less likely to be dropped.
• Low — Specified that the data has a lower priority.
Step 6. Click Save.
Configure Services
A service is a protocol that applies to a range of ports. Services take certain actions under different protocols. This procedure shows how to add a new service or to edit an existing service.
Step 1. Log in to the web configuration utility and choose QoS > Bandwidth Management. The Bandwidth Management page opens:
Step 2. Click Configure Services. The Service Management page opens:
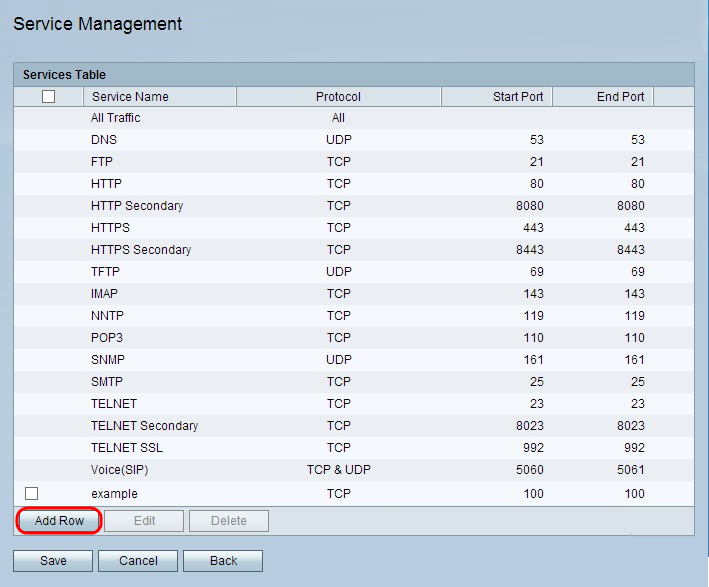
Step 3. Click Add Row to add a service.

Step 4. In the Service Name column, enter a name of the service.
Step 5. From the Protocol column drop-down list, choose a protocol that the service follows.
• TCP — Transmission Control Protocol (TCP) keeps track of connections and receives an acknowledgement for every message sent, increasing transmission time.
• UDP — User Datagram Protocol (UDP) does not keep track of connections or receive acknowledgements, decreasing the transmission time.
• TCP & UDP — This uses both TCP and UDP.
• ICMP — Internet Control Message Protocol is primarily used for sending error and diagnostic messages.
Step 6. In the Start Port column, enter the first port in the range to which the service applies.
Note: This field is not active if you choose ICMP.
Step 7. In the End Port column, enter the last port in the range to which the service applies.
Note: This field is not active if you choose ICMP.
Step 8. Click Save to save changes.
 Feedback