Port Management on the CVR100W VPN Router
Available Languages
Objective
A user may want to adjust the speed of the ports so that devices that need quick data traffic can connect to one port, while devices that do not need as much speed can connect to a different port. Bandwidth can be properly distributed over the ports. Flow settings help to control the flow data which further helps bandwidth management. This article explains how to configure port management settings on the CVR100W.
Applicable Device
• CVR100W
Software Version
• 1.0.1.19
Port Management
Step 1. Log in to the web configuration utility and choose Administration > Port Management. The Port Management page appears:
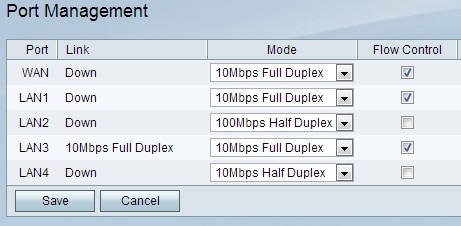
The page displays the following information:
• Port — Displays what ports are available on the device. The possible ports are:
– WAN — This port is used to connect Wide Area Networks (WAN) such as the Internet. The CVR100W has 1 WAN port.
– LAN — This port is used to connect Local Area Networks (LAN) such as all devices within a building, school etc. The CVR100W has 4 LAN ports.
• Link — Displays whether the link is up or down. A link is said to be in the Up state if it carries data, otherwise the link is said to be Down. When the link is up; the Link column shows the data capacity of that link.
Step 2. From the Mode drop down-list, choose a communication mode. The possible modes are:
• Auto Negotiation — Automatically sets a common speed between the CVR100W and the connected device.
• 10Mbps Half Duplex — Communicates data at 10Mbps, but only one way at a time.
• 10Mbps Full Duplex — Communicates data at 10Mbps in both directions at the same time.
• 100Mbps Half Duplex — Communicates data at 100Mbps, but only one way at a time.
• 100Mbps Full Duplex — Communicates data at 100Mbps in both directions at the same time.
Step 3. (Optional) To allow the CVR100W to regulate the data speed so that a fast sender does not overwhelm a slow receiver, check the Flow Control check box.
Step 4. Click Save to save changes or click Cancel to undo the changes.
 Feedback