Introduction
This document describes how to create a Content Filter to monitor Email Security Appliance (ESA) messages that can fail with SPF and DKIM.
Prerequisites
- Cisco Email Security Appliance product knowledge
- Acquaintance with the basics of Sender Policy Framework (SPF) and DomainKeys Identified Mail (DKIM) email authentication methods.
Requirements
- SPF and DKIM verification enabled in any of your mail flow policies.
- An appropriate user role where you are able to create and implement content filters.
- CLI access to your appliance if you want to use the command line option to search for filter coincidences.
Background Information
When you implement a content filter to monitor this two mechanisms, you have the advantage to provide visibility, track, and even the ability to be able to export messages that can fail with these email authentication technologies for future reference and needs based on your organization that also can help you make future implementation decisions.
What is SPF and DKIM
SPF and DKIM are mechanisms that maintain the security of email messages. These protocols have the ability to prevent unauthorized servers to send messages as if they were from your domain, and also give recipients a way to verify that emails that come from your organization.
SPF record improve authentication coverage, deliverability and help promote the desired level of security for your domains. SPF is applied at the receiver email server and check the IP address of the sender, the domain in the FROM header of the email and the list of allowed senders in the DNS SPF record for that domain. Delivery can fail if the IP of the sender is not in the list.
While SPF indicates whether a server can send as your domain, DKIM examine emails. It is a form of signature which allows recipient servers to trace emails back to their origin.
DKIM provides a way to verify that an email is authentic, that it has not been modified in transit, and actually sent by your server. When DKIM fails, the recipient can treat the email as untrusted and it be up to the recipient to decide what to do with the email. Most likely it end up in some spam folder of the recipient, but it can also be discarded altogether.
Configure
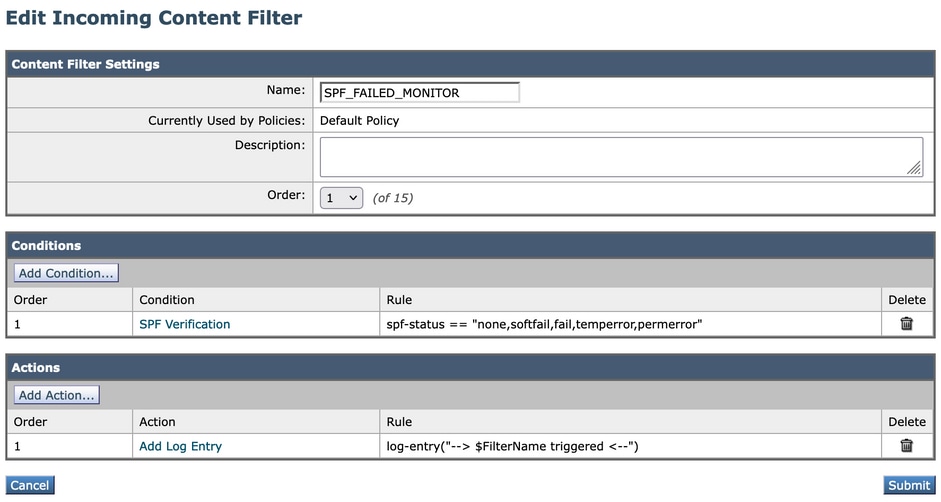
Create an Incoming Content filter for SPF monitor.
- From the ESA GUI, navigate to Mail Policies > Incoming Content Filters.
- Click Add Filter.
- In the name field, use a proper name to identify the filter. In this case SPF_FAILED_MONITOR.
- Click Add Condition.
- On your left side, search for SPF Verification. In here: None, SoftFail, Fail, TempError, PermError.
- Once you checked those options, click Ok at the bottom of that window.
- Now, click Add Action, and on your left side, choose Add Log Entry.
- In the text field you can add the text that best suits you, in this case, like this: --> $FilterName triggered <--

Note: A log entry can provide more control and visibility of when this filter is triggered within your ESA, and when you are troubleshoot via command line for example, provides you a better visibility on the filters that have been activated.
Example:
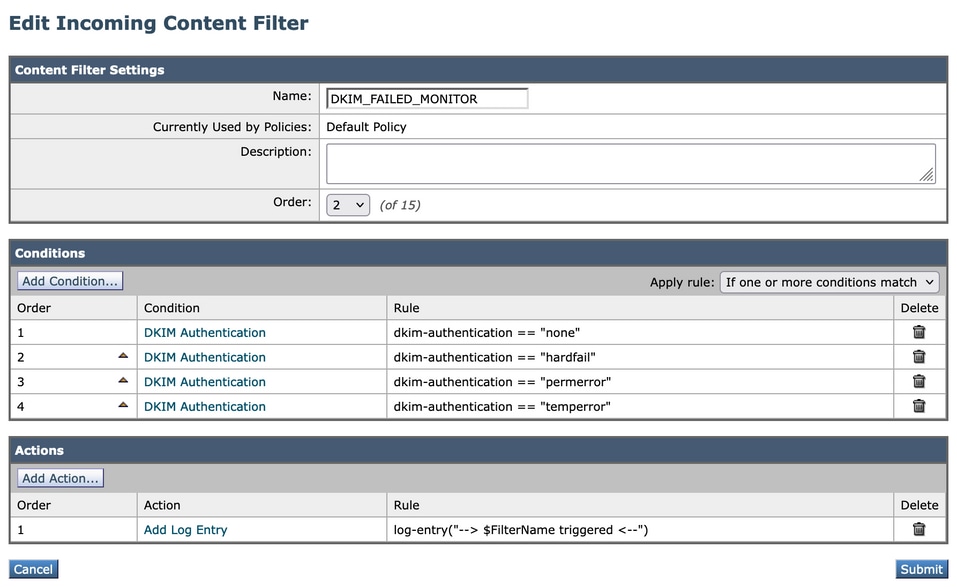
Create an Incoming Content filter for DKIM Monitor.
- From the ESA GUI, navigate to Mail Policies > Incoming Content Filters.
- Click Add Filter.
- In the name field, use a proper name to identify the filter. In this case use DKIM_FAILED_MONITOR.
- Click Add Condition.
- In your left side, search for DKIM Authentication. In here, use: none, hardfail, permerror, temperror.
- Once you checked those options, click Ok at the bottom of that window.
- Unlike SPF configuration, in this DKIM content filter, you have to add a condition for each Authentication Result.
- Once you add the conditions, click Add Action and in your left side choose Add Log Entry.
- In the text field, you can add the text that best suits you. In this case, like this: --> $FilterName triggered <--
Example:
Enable the Incoming Content Filters Into the Incoming Mail Policy.
Once you already have both content filters configured, you need to enable them in your Incoming Mail Policy. To accomplish that, you can perform these steps.
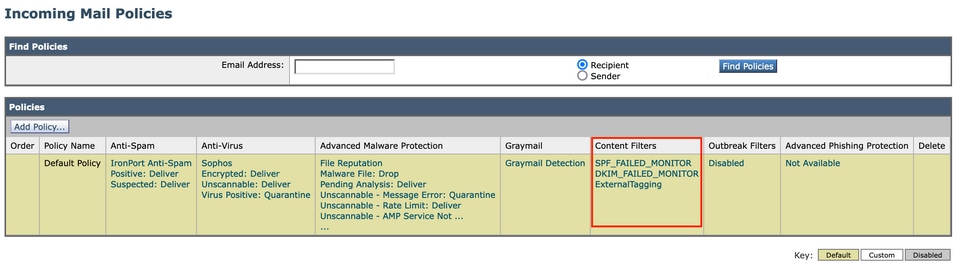
- From the ESA GUI, navigate to Mail Policies > Incoming Mail Policies.
- You need to choose which policy is where your content filters work. In this case, use the Default Policy.
- Go to the 7th column, the one that is related to Content Filters and click the fields that appear in that column.
-
You are presented with a window called Content Filtering for: Default Policy.
-
Once there, choose the Enable Content Filters (Customize Settings) option. With this option, you have the possibility to choose which Content Filters you want to enable in that policy.
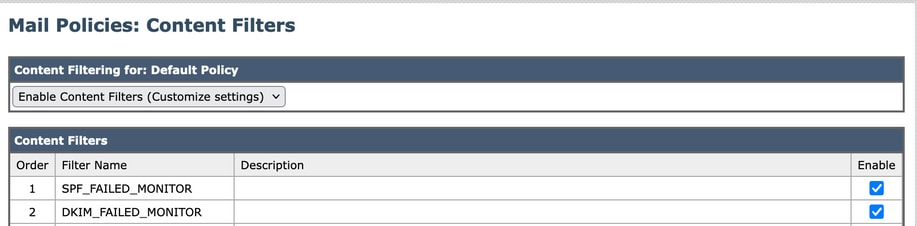
-
Then, click Submit.
- After you click Submit, the window returns you to your Incoming Mail Policies and in the Content Filters column, you see that new filters have been added.
Verify the Results
To check the results of these content filters, you can verify them in the monitor option via GUI or via the command line access.
Monitor via GUI
- From the ESA/SMA GUI, navigate to Monitor > Content Filters.
- Find all the matches of your Incoming Content Filters and the messages that match the matches that the filters have had.
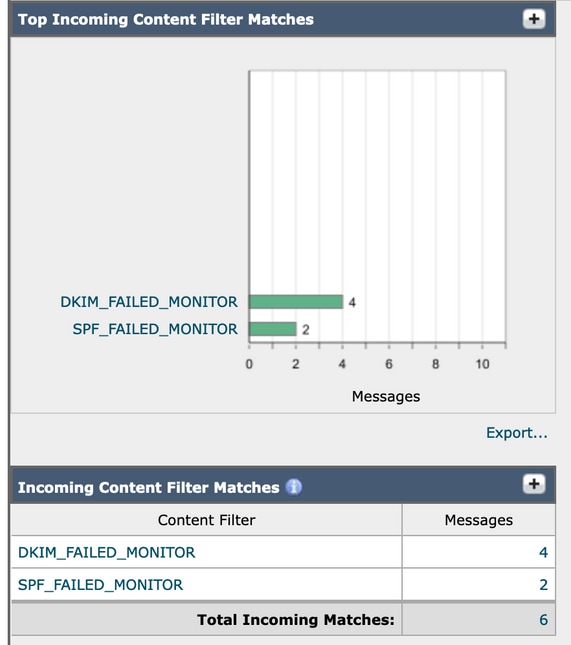
- You can click each one and this gives you the matches it made.
-
If you click the number of messages, it sends you to the Message Tracking to make a global search of the messages that made match that content filter.
Monitor via CLI
These content filters can also be monitored via CLI with this steps:
- Once you log in to your ESA via CLI, you can type this command to search for coincidences:
grep "SPF_FAILED_MONITOR" mail_logs
- The output of this command looks like this:
esa1.cisco.com> grep "SPF_FAILED_MONITOR" mail_logs

Tue Mar 28 08:13:59 2023 Info: MID 3365 Custom Log Entry: --> SPF_FAILED_MONITOR triggered <--
Tue Mar 28 08:22:24 2023 Info: MID 3367 Custom Log Entry: --> SPF_FAILED_MONITOR triggered <--
==================================================================================
esa1.cisco.com> grep "DKIM_FAILED_MONITOR" mail_logs

Tue Mar 28 08:09:04 2023 Info: MID 3364 Custom Log Entry: --> DKIM_FAILED_MONITOR triggered <--
Tue Mar 28 08:13:59 2023 Info: MID 3365 Custom Log Entry: --> DKIM_FAILED_MONITOR triggered <--
Tue Mar 28 08:17:45 2023 Info: MID 3366 Custom Log Entry: --> DKIM_FAILED_MONITOR triggered <--
Tue Mar 28 08:22:24 2023 Info: MID 3367 Custom Log Entry: --> DKIM_FAILED_MONITOR triggered <--
Related Information
 Feedback