Import and Export Certificates in ISE
Available Languages
Introduction
This document describes how to import and export the certificates in Cisco Identity Service Engine (ISE).
Background Information
ISE uses certificates for various purposes (Web UI, Web Portals, EAP, pxgrid). Certificates present on ISE can have one of these roles:
-
Admin: For internode communication and authentication of the Admin portal.
-
EAP: For EAP authentication.
-
RADIUS DTLS: For RADIUS DTLS server authentication.
-
Portal: In order to communicate among all Cisco ISE end-user portals.
-
PxGrid: In order to communicate between the pxGrid controller.
Create a backup of certificates installed on ISE nodes. This saves the backup of configuration data, and certificate of the admin node is taken. However, for other nodes, the backup of certificates is taken individually.
Export the Certificate in ISE
Navigate to Administration > System > Certificates > Certificate Management> System certificate. Expand the node, select the certificate, and click Export, as shown in the image:
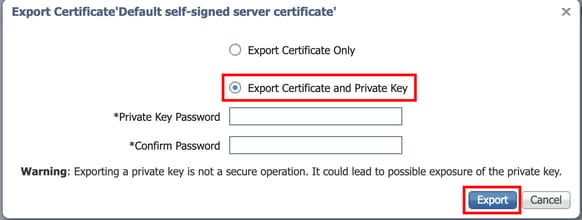
As shown in this image, select the Export Certificate and Private Key. Enter a minimum 8 character in length alpha-numeric password. This password is required to restore the certificate.
Import the Certificate in ISE
There are two steps involved to import the certificate on ISE.
Step 1. Determine if the certificate is self-signed or third party signed certificate.
- If the certificate is self-signed, import the public key of the certificate under trusted certificates.
- If the certificate is signed by some third-party certificate authority, import Root and all other intermediate certificates of the certificate.
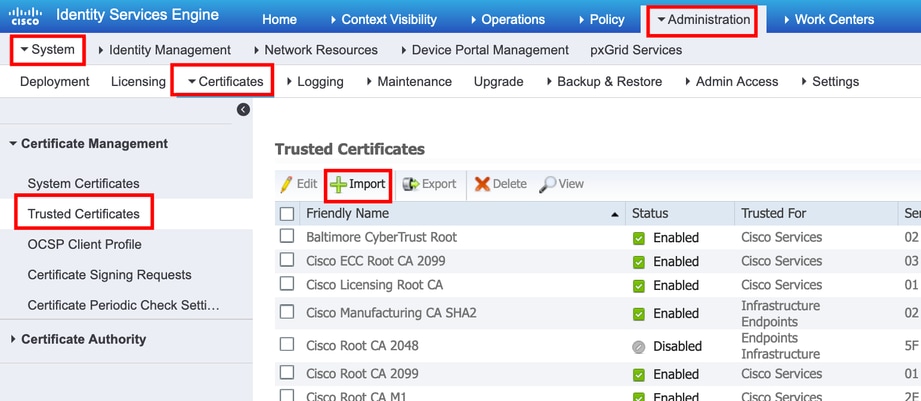
Navigate to Administration > System > Certificates > Certificate Management > Trusted Certificate, click Import.

Step 2. Import the actual certificate.
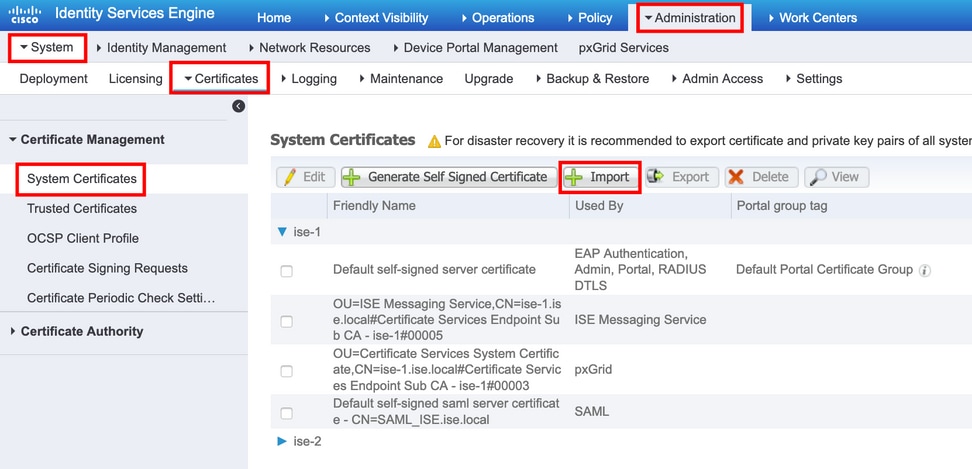
1. Navigate to Administration > System > Certificates > Certificate Management, click Import. If the admin role is assigned to the certificate, the service on the node restarts.

2. Select the node for which you want to import the certificate.
3. Browse the public and private keys.
4. Enter the password for the private key of the certificate and select the desired role.
5. Click Submit.
Revision History
| Revision | Publish Date | Comments |
|---|---|---|
5.0 |
05-Aug-2026
|
Recertification |
4.0 |
22-May-2024
|
Updated Article Description, Contributor List, and Formatting. |
1.0 |
14-Aug-2020
|
Initial Release |

 Feedback
Contact Cisco
- Open a Support Case

- (Requires a Cisco Service Contract)