PDF(618.0 KB) View with Adobe Reader on a variety of devices
ePub(649.5 KB) View in various apps on iPhone, iPad, Android, Sony Reader, or Windows Phone
Mobi (Kindle)(481.9 KB) View on Kindle device or Kindle app on multiple devices
Updated:June 22, 2020
Document ID:215638
Bias-Free Language
The documentation set for this product strives to use bias-free language. For the purposes of this documentation set, bias-free is defined as language that does not imply discrimination based on age, disability, gender, racial identity, ethnic identity, sexual orientation, socioeconomic status, and intersectionality. Exceptions may be present in the documentation due to language that is hardcoded in the user interfaces of the product software, language used based on RFP documentation, or language that is used by a referenced third-party product. Learn more about how Cisco is using Inclusive Language.
This document assumes that Load Balacing is already configured for your clustered Callbridges (CB) and working for direct calls to these CMS servers (calling directly to an existing CMS space). This means that these requirements are already configured:
All the CMS servers that are to be used for Adhoc conferencing are added to CUCM > Media Resources > Conference Bridge and are registered
A Media Resource Group List (MRGL) which contains a Media Resource Group (MRG) is created, and it has the CMS servers only, and is the first group in the MRGL
A Route List containing a Route group is created, and it has the CMS servers, and the selected distribution algorithm is Circular
Components Used
The information in this document is based on these software and hardware versions:
CMS 2.9.1
CUCM 12.5.1
The information in this document was created from the devices in a specific lab environment. All of the devices used in this document started with a cleared (default) configuration. If your network is live, ensure that you understand the potential impact of any command.
Methods to add participant to existing CMS conference
Note: There are three main methods of adding a participant to an existing CMS conference: add a participant via API, add a participant via Active Control, and add a participant without Active Control.
1. Add a participant via API
To use this method, LoadbalanceOutgoingCalls on the Callbridge Group has to be enabled.
To add the participant using this method, an API POST request has to be made to /calls/<active-call-id>/participants/. The POST request needs to include the participantID of the participant which is being added to the conference as value of the remoteParty parameter, which is part of this POST request.
This POST request instructs CMS to make an outgoing call to the participant which is being added. If LoadbalanceOutgoingCalls on the Callbridge Group is enabled, and if CMS has reached its load limit, it finds a free CMS server in the cluster to make an outgoing call to the participant being added, and a distributed call is created between the two servers. This is the same method used by CMM to add participants to a CMS conference.
2. Add a participant via Active Control
To use Active Control participant add, Active Control has to be negotiated first between the CMS server and the user which is adding the participant.
You need to enable Active Control on the SIP Trunk Profile that is configured on the SIP Trunk connecting CUCM with CMS, to do so enable parameter Allow IX application media, and note that the Standard SIP Profile For TelePresence Conferencing has it enabled by default. In addition, LoadbalanceOutgoingCalls on the Callbridge Group has to be enabled.
When a participant is added via Active Control to an existing CMS conference, CMS1 is instructed by the user (via active control message) to make an outgoing call to the new participant. If the load limit value configured on CMS1 is reached and the user tries to add a new participant with active control, CMS1 displays this error message (up to CMS version 2.9.1):
This applies to both use cases - when the participant is added to an adhoc conference, and when it is added to an exsiting CMS space via active control.
This is a deffective behaviour and it is being tracked under the defect: CSCvu72374
3. Add a participant without Active Control
When a participant is added without using active control (therefore Allow IX application media not enabled on the SIP Profile), CUCM makes a call between the user who is initiating the action and the new participant. Then, when the user is ready to join the new participant to the conference, CUCM makes an outgoing call to the adhoc conference running on CMS1. If the load limit is reached on CMS1, the participant cannot be added and CMS1 displays this error message (55 is an example call number):
call 55: ending; local teardown, system participant limit reached - not connected after 0:00
This error message is a normal error message to be printed by a CMS server when it receives an incoming call and after it has reached its max load limit. It is then up to the call control server (CUCM or VCS) to continue routing the call to other members in the cluster. However, in the case of an adhoc conference, this does not work and it is not possible since CUCM does not have a Route List for adhoc conferences.
Configure
This document provides the configuration steps required to use the 3rd way of adding participant to existing conference (Add a participant without Active Control).
The behaviour addressed with the configurational steps in this document is:
1. User creates an adhoc conference, CMS1 server is hosting it
2. After the adhoc conference is established, gradually CMS1 reaches its configured loadlimit (configured over API at /system/configuration/cluster)
3. The user tries to add a new participant to the ongoing adhoc conference, however, the new user does not get connected to the conference
Note: This configuration procedure allows for a user to add participants to an existing CMS adhoc conference even if the CMS server hosting the adhoc conference has reached its load limit, and it can be used until the active control defect is fixed. Active Control becomes disabled in that ad-hoc conference.
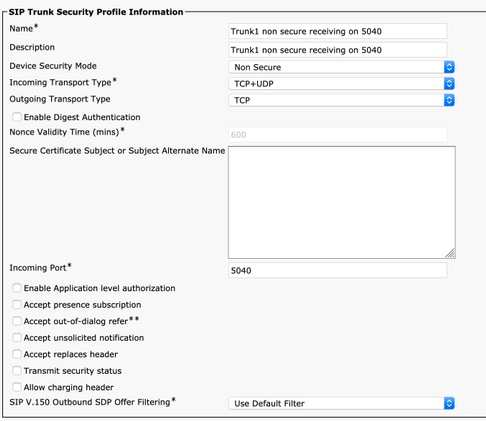
Step 1. Create a new SIP Trunk Security Profile for Trunk1
Navigate to System > Security > SIP Trunk Security Profile
Select Add New
Set the Name to be Trunk1 non secure receiving on 5040
Set the Device Security Mode to be Non secure
Set the Incoming Port to be 5040
Select Save
Trunk1 SIP security profile
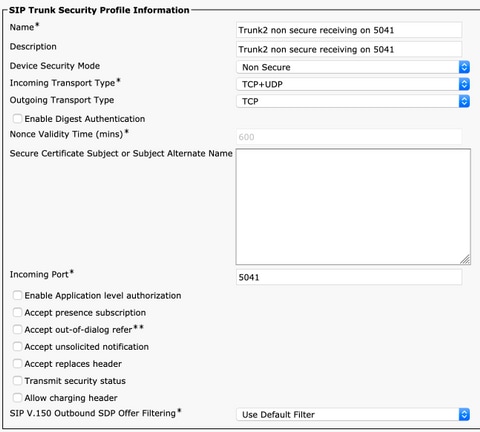
Step 2. Create a new SIP Trunk Security Profile for Trunk2
Navigate to System > Security > SIP Trunk Security Profile
Select Add New
Set the Name to be Trunk2 non secure receiving on 5041
Set the Device Security Mode to be Non secure
Set the Incoming Port to be 5041
Select Save
Trunk2 SIP security profile
Step 3. Create a new SIP Normalization Script
Navigate to Device > Device settings > SIP Normalization Scripts
Select Add New
Set the Name to be remove_conference_from_call_info_header
In the Content, use this script
M = {}
function M.outbound_INVITE(msg)
    msg:removeHeaderValue("Call-Info", "<urn:x-cisco-remotecc:conference>")
end
return M
Select Save
Step 4. Create a new SIP Profile
Navigate to Device > Device settings > SIP profile
Select the Standard SIP Profile For TelePresence Conferencing and Copy it
Set the Name to be No active control telepresence conferencing
Uncheck the Allow iX Application Media checkbox at the bottom of the page
Select Save
Step 5. Create a new Partition
Navigate to Call routing > Class of Control > Partition
Select Add New
Set the Name to be cms_adhoc_numbers
Select Save
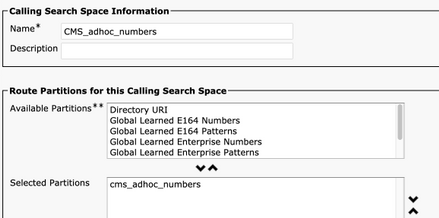
Step 6. Create a new Calling Search Space (CSS):
Navigate to Call routing > Class of Control > Calling Search Space
Select Add New
Set the Name to be CMS_adhoc_numbers
Add the partition created in step 5 cms_adhoc_numbers
Select Save
Calling Search Space configuration
Step 7. Create a new SIP trunk, Trunk1:
Navigate to Device > Trunk
Select Add New
Select SIP Trunk for the Trunk Type
Select Next
Enter these values and Save
Device Name
Enter a name for the SIP Trunk, Trunk1
Run On All Active Unified CM Nodes
Checked
Destination Address
Enter the IP of the CUCM server itself, for example 10.48.36.50
Destination Port
Enter the port on which Trunk2 listens on, 5041
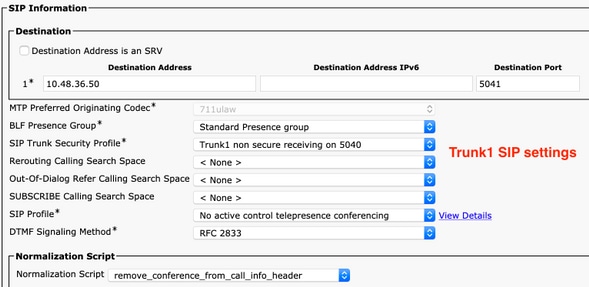
SIP Trunk Security Profile
Select the Profile created in step 1, Trunk1 non secure receiving on 5040
SIP Profile
Select the profile created in step 4, No active control telepresence conferencing
DTMF Signaling Method
Select RFC 2833
SIP Normalization script
Select the script created in step 3, remove_conference_from_call_info_header
Trunk1 SIP settings
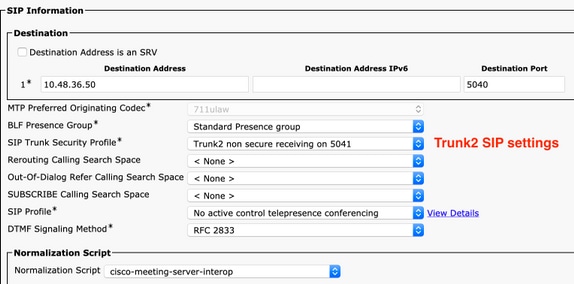
Step 8. Create a new SIP trunk, Trunk2:
Navigate to Device > Trunk
Select Add New
Select SIP Trunk for the Trunk Type
Select Next
Enter these values and Save
Device Name
Enter a name for the SIP Trunk, Trunk2
Run On All Active Unified CM Nodes
Checked
Calling Search Space
Select the CSS created in step 6, CMS_adhoc_numbers
Destination Address
Enter the IP address or FQDN of the CUCM server itself, for example 10.48.36.50
Destination Port
Enter the port on which Trunk1 listens on, 5040
SIP Trunk Security Profile
Select the Profile created in step 2, Trunk2 non secure receiving on 5041
SIP Profile
Select the profile created in step 4, No active control telepresence conferencing
DTMF Signaling Method
Select RFC 2833
SIP Normalization script
Select the existing normalization script cisco-meeting-server-interop
Trunk2 SIP settings
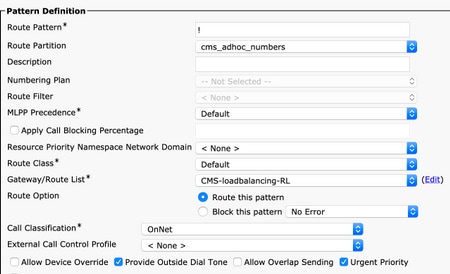
Step 9. Create a new Route Pattern
Navigate to Call routing > Route/Hunt > Route Pattern
Select Add New
Set the to !
Set the Route Partition to the partition created in Step 5, cms_adhoc_numbers
Enable the checkbox
Change Call Classification to OnNet
Set the Gateway/Route List to be the CMS Route List that is already configured (as mentioned in Requirments section earlier)
Select Save
Route pattern
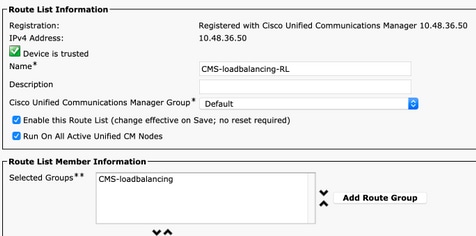
CMS loadbalancing Route list
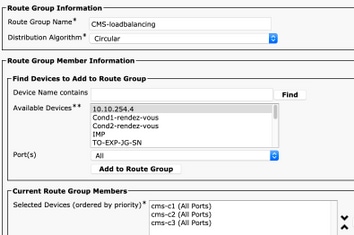
CMS loadbalancing route group
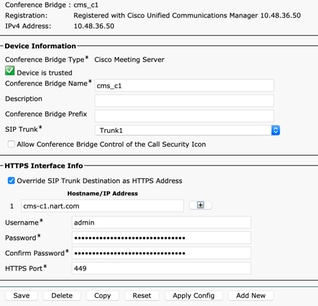
Step 10. Modify the CMS adhoc Conference Bridge configuration
Navigate to Media resources > Conference bridge
Select the first CMS server
Change the to Trunk1, the SIP trunk created in step 7
Enable the checkbox Override SIP Trunk Destination as HTTPS Address
In the Hostname/IP Address field, set the CMS Webadmin FQDN for that specific CMS server which must also exist in the Webadmin certificate of that server
Select Save
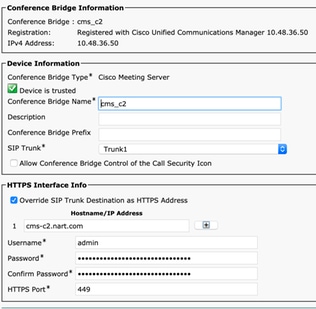
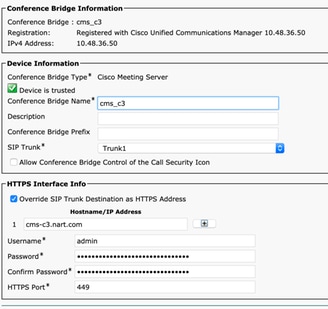
Do the same for all other CMS servers, set Trunk1 to be used on all of them, however change the Hostname/IP Address field to the specific CMS FQDN
CMS1
CMS2
CMS3
Step 11. Reset SIP trunks Trunk1 and Trunk2
Navigate to Device > Trunk
Select Trunk1 and Trunk2
Select Reset selected
Wait until both are showing Full service
Step 12. Reset CMS adhoc servers
Navigate to Media resources >Conference bridge
Select all CMS servers
Select Reset selected
Wait until all server are showing Registered
Verify
Use this section in order to confirm that your configuration works properly.
Create an Adhoc conference and check which CMS server is hosting the conference
CMS1 hosting the adhoc conference
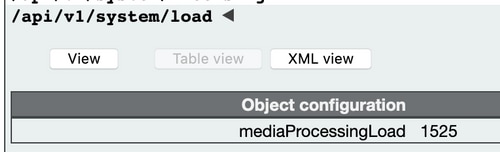
Check the current media processing load on that CMS server, use an APIGET to /system/load
Current media load
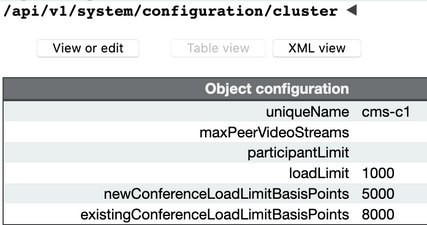
Set the load limit on the server to a value that is lower than the media processing load by sending a POST to /system/configuration/cluster with the paramter loadlimit, for example 1000
Chaning the loadlimit
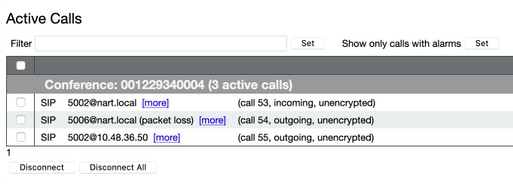
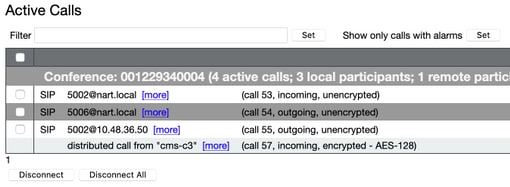
Add a new participant to the meeting. The participant gets added and a distributed is created between CMS1 and another CMS server since CMS1 has reached its limit
Distributed call
Troubleshoot
There is currently no specific troubleshooting information available for this configuration.
 Feedback