Supporting Multiple Brands on the Cisco Registered Envelope Service
Available Languages
Bias-Free Language
The documentation set for this product strives to use bias-free language. For the purposes of this documentation set, bias-free is defined as language that does not imply discrimination based on age, disability, gender, racial identity, ethnic identity, sexual orientation, socioeconomic status, and intersectionality. Exceptions may be present in the documentation due to language that is hardcoded in the user interfaces of the product software, language used based on RFP documentation, or language that is used by a referenced third-party product. Learn more about how Cisco is using Inclusive Language.
Organizations with more than one brand under their corporate umbrella may need to create encryption envelopes customized to each brand. This paper outlines how to configure multiple branded envelopes using the Cisco Email Security solution and the Cisco® Registered Envelope Service (CRES), a cloud-based encryption key service.
Background
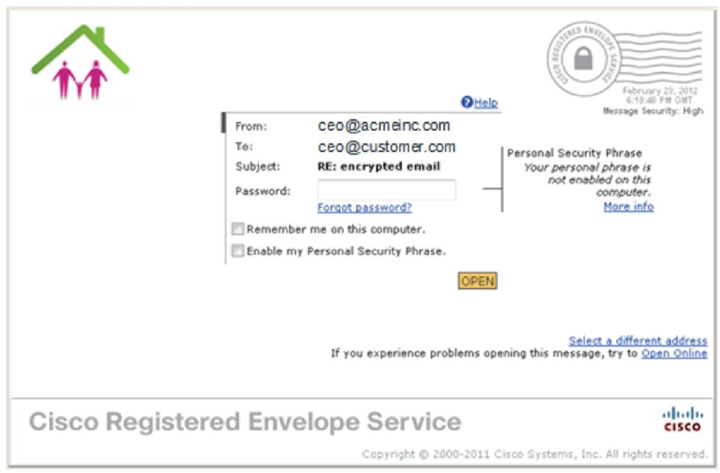
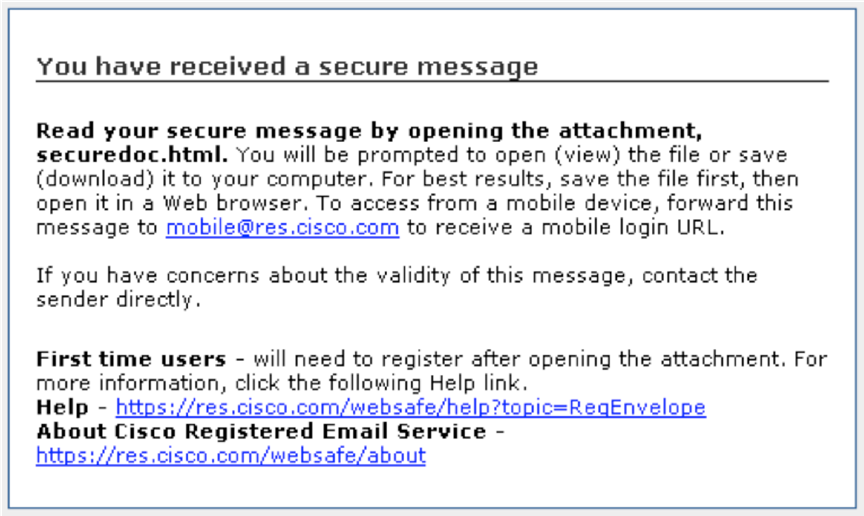
The Cisco Registered Envelope Service sends envelopes that display a Cisco logo if Account Image Profiles are not configured. However, customers may prefer to send envelopes featuring their own brand/logo. They also may want to send envelopes with different branding based on a variety of factors, including sender groups, subdomains, or separate email domains. Configuring Account Image Profiles allows customers to turn an envelope from this:
Figure 1. Default Cisco branded registered email service.

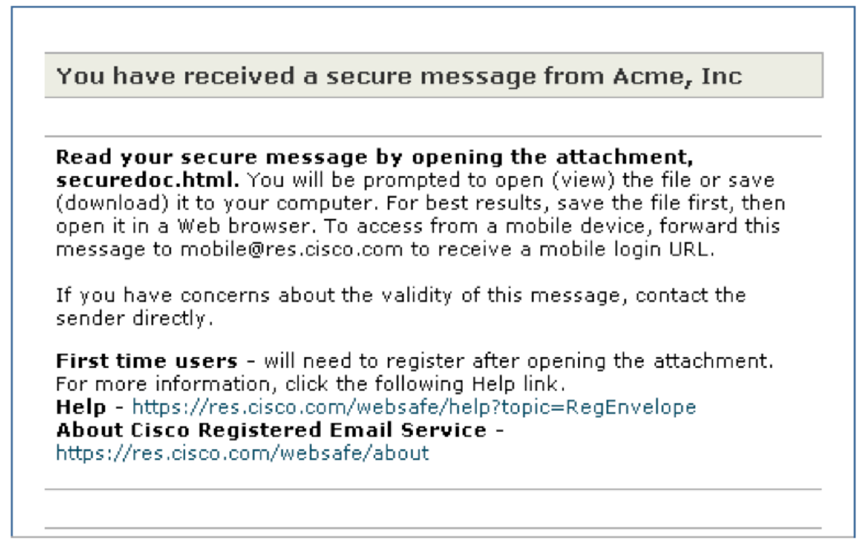
Into an envelope that features their brand/logo:
Figure 2. Custom branded logo in registered email service.
Additionally, the email text sent with the registered envelope can be customized.
For a full, detailed description of the various components of the envelopes shown, please refer to the “Components of a Registered Envelope” section of the Cisco Registered Envelope Recipient Guide, which can be found at: https://res.cisco.com/websafe/docs/Cisco_Registered_Envelope_Recipient_Guide.pdf.
Note: For the purpose of this paper, both Cisco Email Security Appliances and Cisco Cloud Email Security are referred to as “email security device” or “ESA.” The steps outlined in this paper are similar for both.
Items Needed
Before starting, verify that you have the items and access necessary to complete these tasks:
● Domain-Admin-level access to the Cisco Registered Envelope Service server: http://res.cisco.com/admin
● Logo files in the proper size/format (60x160 pixels max, 100 KB or less, and of image type GIF, JPG, BMP, or PNG)
● Administrative access to your ESA/cloud solution
Note: If you do not have the Domain-Admin-level access on the Cisco Registered Envelope Service for your email domain(s), please open a customer support ticket requesting access. Once administrative-level access has been granted, you can create additional administrative-level users. More information is available at: https://res.cisco.com/admin/CRES_Admin_Guide.pdf.
Required Steps
Although the steps for creating customized envelopes are simple, reviewing them ahead of time allows for workflow planning, which will shorten the time required for creation. These steps are:
● Creating the Account Image Profiles on the Cisco Registered Envelope Service
● Creating any required customized text resources to be used when sending encrypted envelopes
● Configuring the Encryption Profile on the ESA
● Provisioning the Encryption Profile on the ESA
We’ll examine these as a step-by-step process for creating customized email and attached envelopes.
Task 1: Creating Account Image Profiles
The Envelope Profile is what is used during provisioning to determine the logo that should be placed on a registered envelope being sent by the email security device.
1. Log on to the Cisco Registered Envelope Service at: https://res.cisco.com/admin.
2. Click the Accounts tab, then the Manage Accounts sub-tab.
This will bring up the Accounts page, which shows the different accounts for which you have administrative access.
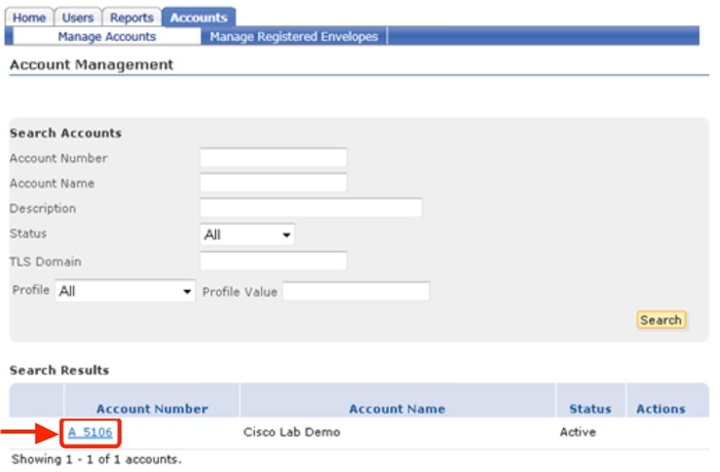
3. Click the appropriate Account Number for your organization to bring up the Account Management screen.
Figure 3. Cisco Registered Envelope Service Account Management
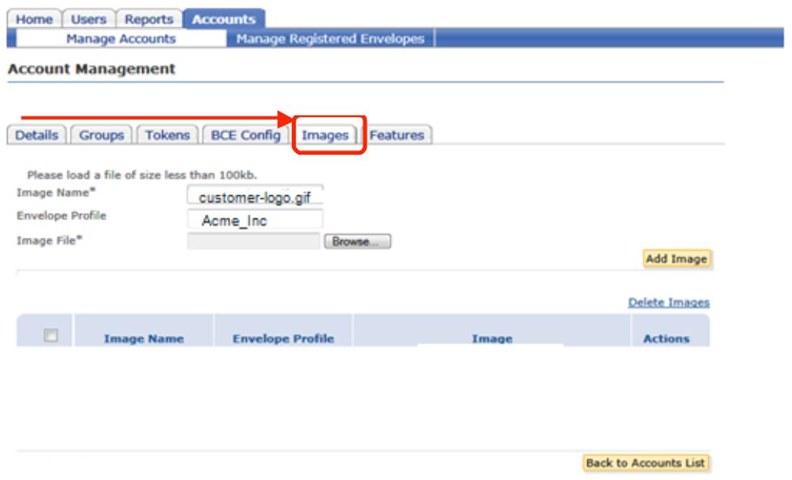
4. On the Account Management screen, click the Images tab. (Note: The Image File must be <100 KB in size. While it can be a GIF, JPEG, BMP, or PNG file type, the system will rename it to customer-logo.gif.)
Figure 4. Adding a custom logo to the Cisco Registered Envelope Service using the Images tab in Account Management
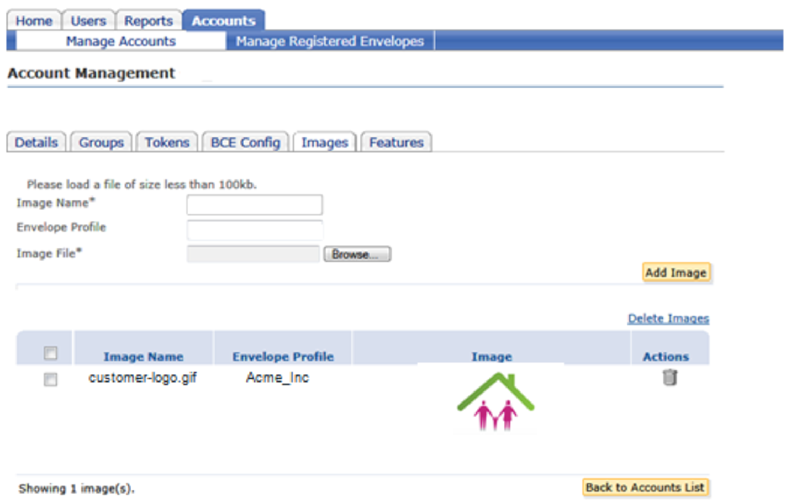
5. Enter the Envelope Profile name, then Browse to the Image File on your computer and select it. When finished, you will see something similar to this on your browser window:
Figure 5. Confirming logo in Account Management
Note: The Envelope Profile name is very important and must match the Encryption Profile name on the ESA. This is how the ESA and Cisco Registered Envelope Service know which logo to use for each registered envelope being sent. If an Envelope Profile has no matching name on the ESA, it will not be used. An exception is a blank
Envelope Profile name; in this case, it is the default if an ESA’s Encryption Profile has no matching Envelope Profile name in the Cisco Registered Envelope Service.
Additional note: The customer-logo.gif file name cannot be modified. The system chooses the image by the
Envelope Profile name and gives the image to the email security device’s Encryption Profile using this file name for inclusion in the encryption envelope.
Task 2: Creating Customized Text Resources
Two items that can be used when creating the Encryption Profile are the text resources for the Encrypted Message HTML Notification and the Encrypted Message Text Notification. The default system resource uses the following text on the email that contains the encrypted envelope attachment:
Figure 6. Default text for encrypted email notification to new recipient
Text can be modified to include language required by a security policy, information related to help desk contacts, and more. If the system default notification is acceptable, this section may be skipped.
1. Open Mail Policies -> Text Resources and Add Text Resource of type Encryption Notification Template (HTML).
The system will populate the template with the default text shown earlier, which can be edited or changed as desired. The template shows the raw HTML code and does not validate it. It is recommended that you use an HTML editor to compile the message, and then paste the HTML code into the template.
2. Name the template and edit the text as desired.
Note: Variables may be inserted to populate the Notification Template with information contained in the attached message. One such variable used in the sample text is $AttachmentName.
3. Use the Preview Text option to view the Notification Template using system-defined variables. Here is an example of a slight edit to include a company name:
Figure 7. Custom branded text for encrypted email notification to new recipient
4. Once satisfied with the edit, Submit then Commit the Notification Template.
Repeat the steps above to create an Encryption Notification Template (text) for text-based emails.
Note: Mobile smartphone users can download the Cisco Business Class Email app from their respective app stores to make it easier to open encrypted envelopes on those devices.
Task 3: Creating the Encryption Profile
The Encryption Profile is used by the ESA to set configuration options for delivery using encrypted envelopes. This paper does not cover all the options available; instead, it focuses on specific items that can be used for branding.
Information on these options can be found in the AsyncOS for Email Configuration Guide or in the online help files.
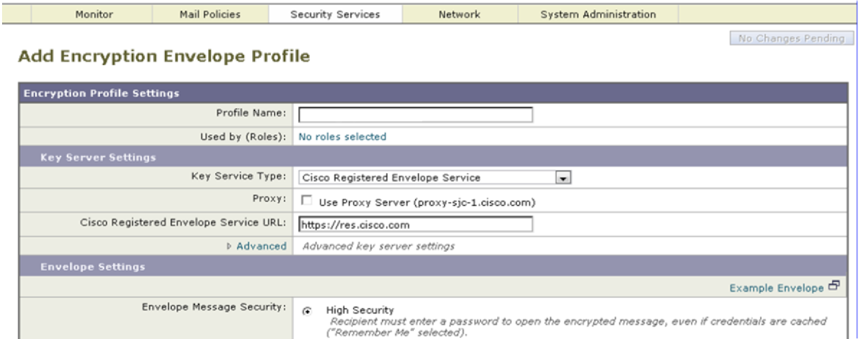
1. Open Security Services -> Cisco Email Encryption and Add Encryption Profile.
2. Give the profile a name. In this example, we are using Acme_Inc. This name must match the Envelope Profile name with the desired logo on the Cisco Registered Envelope Service.
Figure 8. Encryption Envelop Profile configuration
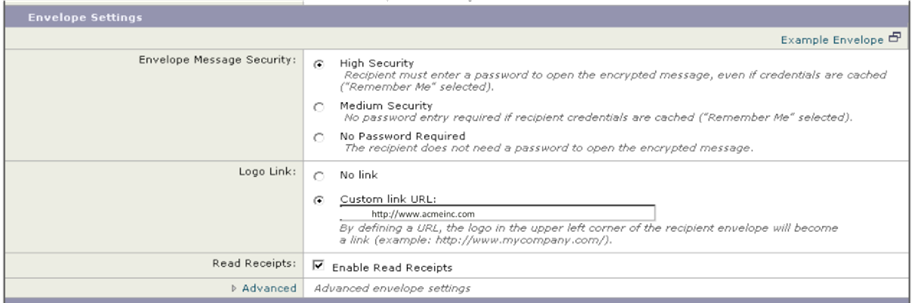
3. Scroll down the page and enter the Logo Link using a Custom Link URL.
This logo URL is used under the company logo on the envelope and allows recipients to click the logo to be taken to a website. It can be used for other purposes, such as linking to a corporate webpage listing self-help resources for envelope recipients.
Figure 9. Envelop Settings allow custom URLs for Logo Link
4. Optional. If you created Encrypted Message HTML or Text Notification messages, scroll down the page to Notification Settings and choose notification templates from the pull-down menus.
Note: If there are no Encrypted Message HTML or Text Notification Text Resources on the system, there will be no pull-down menu.
5. Submit the Encryption Profile and Commit the changes.
Task 4: Provisioning the Encryption Profile
Provisioning the Encryption Profile causes the ESA to communicate to the Cisco Registered Envelope Service and exchange information necessary for the ESA to create encrypted envelopes and upload keys to the Cisco Registered Envelope Service system for recipient retrieval. This is an easy, one-button task.
1. Open Security Services -> Cisco Email Encryption and click the Provision button for the desired encryption profile to be provisioned.
Figure 10. Provisioning Status for Email Encryption Profiles

Note: The button to do this will not show on the screen if the Encryption Profile is not committed on the ESA.
Finishing the Branding
At this point you have created the Envelope Profile and the matching Encryption Profile, and have provisioned it. To add additional company brands or logos, repeat these steps: Upload a new logo graphic into a new Envelope Profile, create a matching Encryption Profile, and provision it.
Once the brands and encryption components are configured as desired, create the Outgoing Mail Policies needed on the ESA to sort the outbound emails to use the appropriate encryption profiles. Please refer to the product documentation on how to define these policies by sender addresses, wildcards, LDAP groups, and so on.
Conclusion
Encryption elements provide an effective solution for email privacy for sensitive communications for organizations with more than one brand under their corporate umbrella.
For More Information
Cisco Email Security: http://www.cisco.com/go/emailsecurity
Cisco Email Encryption: http://www.cisco.com/en/US/prod/vpndevc/ps10128/ps10154/pxe_encryption.html
Cisco Business-Class Email At A Glance:
http://www.cisco.com/en/US/prod/collateral/vpndevc/ps10128/ps10154/aag_c45-720175.pdf