VMware ESXi CNS and CSI with Cisco HyperFlex HX Data Platform Clusters White Paper
Available Languages
Bias-Free Language
The documentation set for this product strives to use bias-free language. For the purposes of this documentation set, bias-free is defined as language that does not imply discrimination based on age, disability, gender, racial identity, ethnic identity, sexual orientation, socioeconomic status, and intersectionality. Exceptions may be present in the documentation due to language that is hardcoded in the user interfaces of the product software, language used based on RFP documentation, or language that is used by a referenced third-party product. Learn more about how Cisco is using Inclusive Language.
We recommend reviewing the Cisco HyperFlex® HX Data Platform release notes, installation guide, and user guide before proceeding with any configuration. The Cisco HyperFlex HX Data Platform should be installed and functioning as described in the installation guide. Please contact Cisco support or your Cisco representative if you need assistance. There are many flavors of Kubernetes that can be deployed and used with VMware vSphere Container Storage Interface (CSI) in conjunction with HyperFlex (HX). This guide uses a vanilla distribution of Kubernetes and assumes you have already built your environment.
This document is intended to provide operational guidance to supplement the Cisco HyperFlex and VMware vSphere Container Storage Plug-in administration guides for deploying and configuring vSphere CSI to work with NFS datastores on Cisco HyperFlex for the provisioning of Persistent Volumes (PVs) for Kubernetes (K8s). The goal is to help Cisco HyperFlex users understand the characteristics of vSphere-based container deployments of Kubernetes and how to utilize HX datastores for the persistent volumes. To this end, the document begins with an overview of general Cisco HyperFlex components and then outlines what the deployment covers.
This document provides recommended configuration settings and deployment architectures for Cisco HyperFlex HX Data Platform solutions specifically related to certain versions of Kubernetes, Docker, and vSphere CSI. It is intended to be used in conjunction with product documentation. A vanilla distribution of Kubernetes is used, and it is assumed that this is already functional in your environment. If it is not, please deploy a compatible Kubernetes cluster. You can use appendix A for guidance.
Cisco HyperFlex Data Platform general overview
Cisco HyperFlex clusters are built on common architectural components, but with some slight differences between deployment models related to Cisco Unified Computing System™ (Cisco UCS®) domains, installation processes, and failure modes. For example, HyperFlex Edge clusters and DC-no-FI clusters do not utilize Fabric Interconnects (FIs), while data-center clusters do. This section briefly examines the Cisco HyperFlex HX Data Platform components.
Cisco HyperFlex systems are designed with an end-to-end software-defined infrastructure that eliminates the compromises found in first-generation hyperconverged infrastructure products. Cisco HyperFlex systems combine software-defined computing in the form of Cisco UCS servers, software-defined storage with the powerful Cisco HyperFlex HX Data Platform software, and Software-Defined Networking (SDN) with Cisco unified fabrics that integrate smoothly with the Cisco Application Centric Infrastructure (Cisco ACI®) solution. With hybrid or all-flash storage configurations, self-encrypting drive options, and a choice of management tools, Cisco HyperFlex systems deliver a pre-integrated cluster that is up and running in an hour or less. With the capability to integrate Cisco UCS servers as computing-only nodes, you can scale computing and storage resources independently to closely match your application needs.
Cisco Unified Computing System
A physical HX-Series node is deployed on a Cisco UCS 220 or 240 rack server in either a hybrid or all-flash configuration.
A service profile is a software definition of a server and its LAN and SAN connectivity. A service profile defines a single server and its storage and networking characteristics. Service profiles are stored in supported Cisco UCS 2nd-, 3rd-, and 4th-generation fabric interconnects and are managed through specific versions of Cisco UCS Manager (the web interface for the fabric interconnect) or through purpose-written software using the API. When a service profile is deployed to a server, Cisco UCS Manager automatically configures the server, adapters, fabric extenders, and fabric interconnects to match the configuration specified in the service profile. This automation of device reduces the number of manual steps required to configure servers, Network Interface Cards (NICs), Host Bus Adapters (HBAs), and LAN and SAN switches.
The service profile for the HX-Series nodes is created during the cluster build process during installation and is applied to the appropriate devices attached to the fabric interconnects (identified by part number and associated hardware). These profiles should have their own, easily identifiable names and should not be edited after creation. They are preconfigured by the Cisco HyperFlex installer with the settings required for the Cisco HyperFlex system to operate securely and efficiently (VLANs, MAC address pools, management IP addresses, Quality-of-Service [QoS] profiles, etc.).
What is Container-Native Storage?
VMware Container Native Storage (CNS) is a storage solution designed specifically for containerized applications in VMware environments. It provides persistent storage capabilities for containerized workloads running on Kubernetes clusters.
Traditionally, containerized applications are ephemeral, and any data they generate or require is usually stored within the container itself. However, in many cases, applications need access to persistent storage that survives container restarts, scaling events, or container migrations.
VMware CNS enables this persistent storage by integrating with underlying storage systems, such as HyperFlex or other external storage arrays. It abstracts the underlying storage resources and exposes them to containers running on Kubernetes clusters as persistent volumes.
Here are some key components and features of VMware CNS:
1. CNS Storage Class: CNS introduces a custom storage class that allows users to define the properties and requirements of the underlying storage resources. This enables administrators to provision different types of storage based on application needs, such as performance, redundancy, and capacity.
2. CNS Volume: CNS creates a unique volume for each Persistent Volume Claim (PVC) made by a containerized application. These volumes are dynamically provisioned and attached to the relevant pods within the Kubernetes cluster. They can be mounted as read/write or read-only within the containers.
3. Integration with vSphere: VMware CNS leverages vSphere features such as vSphere Storage Policy-Based Management (SPBM) to align the storage requirements defined by users with the capabilities of the underlying storage infrastructure. This integration ensures that the appropriate storage resources are provisioned and managed efficiently.
4. Data persistence: CNS enables data persistence even during container migrations or failures. When a container restarts or moves to another node within the Kubernetes cluster, CNS ensures that the corresponding persistent volume is reattached to the container so that it can resume its operations with the required data intact.
5. Storage management: CNS provides storage management capabilities through the Kubernetes API, allowing administrators to create, manage, and monitor the lifecycle of persistent volumes and persistent volume claims. This integration simplifies storage administration within containerized environments.
By incorporating VMware CNS into their containerized environments, organizations can benefit from the scalability, portability, and resilience of containerized applications while ensuring the availability of persistent and resilient storage resources for their workloads.
To deploy VMware CNS in vCenter, you need to perform the following steps:
1. Prepare the Infrastructure: Ensure that you have a properly configured vSphere environment with vCenter Server, ESXi hosts, and the necessary storage resources.
2. Install the CNS CSI driver: The CNS CSI (Container Storage Interface) driver needs to be installed on your vSphere cluster. The CSI driver enables the integration between Kubernetes and vSphere storage. Obtain the CNS CSI driver package from VMware, follow the installation instructions provided, and deploy it onto your vSphere hosts.
3. Create a storage class: In vCenter, you need to define a storage class for CNS. This storage class determines the characteristics and capabilities of the storage that will be provisioned for containerized applications. You can create a storage class by using the vSphere client or by running the necessary kubectl commands.
4. Provision storage resources: With the storage class in place, you can now provision storage resources. This involves creating Persistent Volumes (PVs) and Persistent Volume Claims (PVCs). PVs represent the actual storage resources, while PVCs are the requests made by containerized applications for specific storage resources. CNS will dynamically provision the requested storage based on the defined storage class.
5. Attach volumes to pods: Once you have the PVCs and PVs in place, you need to ensure that the containers or pods within your Kubernetes cluster have access to the persistent storage. This involves specifying the appropriate PVCs in the pod's configuration file or YAML specification.
It's important to note that the exact steps and procedures may vary depending on the version of vSphere, the specific CSI driver being used, and the Kubernetes distribution.
This guide details the following build steps:
(Note that items 1 to 4 are covered in Appendix A.)
1. Ubuntu Server 22.04 VM deployment for Kubernetes
a. Deploy the VMs in vSphere 7.0U3 on vCenter 7.0
b. Apply the VM requirements for Kubernetes and vSphere CSI
2. Docker (Docker version 24.0.1, build 6802122) installation with the Container Runtime Interface (CRI) cri-dockerd for Kubernetes 1.27
3. A vanilla Kubernetes (1.27) deployment using KubeADM
4. Deployment of CNI for KubeADM networking with Calico
5. Building vSphere CNS: vSphere CSI (3.0.0) deployment
6. Creation of HX (5.0(2c)) datastore for K8s persistent volumes
7. vCenter configuration with the HX datastore
a. Datastore tag
b. Storage-Based Policy Management (SBPM)
8. CSI storage class construction
9. PV creation
10. PVC request
11. Demonstration of First Class Disk (FCD) deployment
Install vSphere Container Storage Plug-in
Create roles and privileges in vCenter. Apply to the appropriate entities listed in the table (for example, datastores, K8s nodes, etc.). If you create these objects as administrator, they will already have all the permissions required by an administrator.
Deploying the vSphere Container Storage Plug-in on a nVanilla Kubernetes Cluster
VMware vSphere Container Storage Plug-in 3.0
You can follow the procedures described in this section to install the vSphere Container Storage Plug-in on a Kubernetes cluster. The installation procedures apply only to generic (also called vanilla) Kubernetes clusters. Supervisor clusters and Tanzu Kubernetes clusters in vSphere with Tanzu use the pre-installed vSphere Container Storage Plug-in.
Perform all the installation procedures on the same Kubernetes node where you deploy the vSphere Container Storage Plug-in. VMware recommends that you install the vSphere Container Storage Plug-in on the Kubernetes control plane node (Master).
1. Create vmware-system-csi namespace for vSphere Container Storage Plug-in.
Before installing the vSphere Container Storage Plug-in in your generic Kubernetes environment, create the vmware-system-csi namespace. [Read more].
2. Taint the Kubernetes control plane node for the vSphere Container Storage Plug-in installation.
Before installing the vSphere Container Storage Plug-in in your generic Kubernetes environment, make sure that you taint the control plane node with the node-role.kubernetes.io/control-plane=:NoSchedule parameter. [Read more].
3. Create a Kubernetes secret for vSphere Container Storage Plug-in.
When preparing your native Kubernetes environment for installation of the vSphere Container Storage Plug-in, create a Kubernetes secret that contains configuration details to connect to vSphere. [Read more].
4. Install vSphere Container Storage Plug-in.
Install an appropriate version of the vSphere Container Storage Plug-in into your native Kubernetes environment. After you install the plug-in, you can verify whether the installation is successful. [Read more].
Make sure your Kubernetes deployment and CSI driver are compatible:
Create vmware-system-csi namespace for vSphere Container Storage Plug-in
VMware vSphere Container Storage Plug in 3.0
Before installing the vSphere Container Storage Plug-in in your generic Kubernetes environment, create the vmware-system-csi namespace.
Procedure
● To create the vmware-system-csi namespace in vSphere Container Storage Plug-in, run the following:
◦ $ kubectl apply -f https://raw.githubusercontent.com/kubernetes-sigs/vsphere-csi-driver/v3.0.0/manifests/vanilla/namespace.yaml.
Taint the Kubernetes control plane node for the vSphere Container Storage Plug-in installation
VMware vSphere Container Storage Plug in 3.0
Before installing the vSphere Container Storage Plug-in in your generic Kubernetes environment, make sure that you taint the control plane node with the node-role.kubernetes.io/control-plane=:NoSchedule parameter.
Procedure
● To taint the control plane node, run the following command:
◦ kubectl taint nodes <k8s-primary-name> node-role.kubernetes.io/control-plane=:NoSchedule
● Verify that you have tainted the control plane node.
◦ $ kubectl describe nodes | egrep "Taints:|Name:"
Name: <k8s-primary-name>
Taints: node-role.kubernetes.io/control-plane:NoSchedule
Name: <k8s-worker1-name>
Taints: <none>
Name: <k8s-worker2-name>
Taints: <none>
Name: <k8s-worker3-name>
Taints: <none>
Name: <k8s-worker4-name>
Taints: <none>
Create a Kubernetes secret for vSphere Container Storage Plug-in
Before installing the vSphere Container Storage Plug-in on a native Kubernetes cluster, create a configuration file that contains details to connect to vSphere. The default file for the configuration details is the csi-vsphere.conf file.
Procedure
1. Create a vSphere configuration file for block volumes.
vSphere configuration file for block volumes includes the following sample entries:
$ cat /etc/kubernetes/csi-vsphere.conf
[Global]
cluster-id = "<cluster-id>"
cluster-distribution = "<cluster-distribution>"
ca-file = <ca file path> # optional, use with insecure-flag set to false
thumbprint = "<cert thumbprint>" # optional, use with insecure-flag set to false without providing ca-file
[VirtualCenter "<IP or FQDN>"]
insecure-flag = "<true or false>"
user = "<username>"
password = "<password>"
port = "<port>"
datacenters = "<datacenter1-path>, <datacenter2-path>, ..."
The entries have the following meanings.
| Block volume parameter |
Description |
| cluster-id |
● The unique cluster identifier. Each Kubernetes cluster must contain a unique cluster-id set in the configuration file. The cluster ID cannot not exceed 64 characters. Use only alphanumeric characters, period (.), or hyphen (-).
● This parameter is optional from vSphere Container Storage Plug-in version 3.0 or later. If you do not enter a cluster ID, vSphere Container Storage Plug-in internally generates a unique cluster ID.
|
| cluster-distribution |
● The distribution of the Kubernetes cluster. This parameter is optional. Examples are
OpenShift, Anthos, and
TKGI. When you enter values for this parameter, keep in mind the following:
● vSphere Container Storage Plug-in controller goes into CrashLoopBackOff state when you enter values with special character
¥r.
● When you enter values exceeding 128 characters, the PVC creation might be struck in
Pending state
|
| VirtualCenter |
The section defines such parameters as the vCenter Server IP address and FQDN. |
| insecure-flag |
Takes the following values:
●
true indicates that you want to use a self-signed certificate for login.
●
false indicates that you are using a secure connection.
◦ For additional steps, see Use a Secure Connection for vSphere Container Storage Plug-in. ◦ If your environment includes multiple vCenter Server instances, see Use a Secure Connection in the Environment with Multiple vCenter Server Instances. |
| user |
The vCenter Server username. You must specify the username along with the domain name. For example, user = "userName@domainName" or user = "domainName¥¥username". If you don't specify the domain name for active directory users, the vSphere Container Storage Plug-in will not function properly. |
| password |
Password for a vCenter Server user. |
| port |
vCenter Server port. The default is 443. |
| ca-file |
The path to a CA certificate in PEM format. This is an optional parameter. |
| Thumbprint |
The certificate thumbprint. This is an optional parameter. It is ignored when you are using an unsecured setup or when you provide ca-file. |
| datacenters |
List of all comma-separated data-center paths where Kubernetes node VMs are present. Provide the name of the data center when it is located at the root. When it is placed in the folder, you need to specify the path as folder/datacenter-name. The data-center name cannot contain a comma because commas are used as delimiters. |
| migration-datastore-url |
If you use vSphere Container Storage Plug-in version 3, add this parameter when you migrate in-tree vSphere volumes to the vSphere Container Storage Plug-in. The parameter allows you to honor the default datastore feature of the in-tree vSphere plug-in. |
Note: To deploy the vSphere Container Storage Plug-in for block volumes in a VMware cloud environment, you must enter the cloud administrator username and password in the vSphere configuration file.
Here is the sample csi-vsphere.conf file for the deployment used here:
root@ubuntu-kube-master:/home/tme# cat /etc/kubernetes/csi-vsphere.conf
root@ubuntu-kube-master:/etc/kubernetes# cat csi-vsphere.conf
[Global]
cluster-id = ""
cluster-distribution = "KubeADM"
#ca-file = <ca file path> # optional, use with insecure-flag set to false
#thumbprint = "<cert thumbprint>" # optional, use with insecure-flag set to false without providing ca-file
[VirtualCenter "10.1.34.12"]
insecure-flag = "true"
user = "administrator@vsphere.local"
password = "password”
port = "443"
datacenters = "rtp"
2. Create a Kubernetes secret for vSphere credentials
◦ Create the secret by running the following command:
kubectl create secret generic vsphere-config-secret --from-file=/etc/kubernetes/csi-vsphere.conf --namespace=vmware-system-csi
◦ Verify that the credential secret is successfully created in the vmware-system-csi namespace.
$ kubectl get secret vsphere-config-secret --namespace=vmware-system-csi
● NAME TYPE DATA AGE
● vsphere-config-secret Opaque 1 43s
◦ Delete the configuration file for security purposes.
rm csi-vsphere.conf
Install vSphere Container Storage Plug-in
Procedure
● Deploy vSphere Container Storage Plug-in.
◦ $ kubectl apply -f https://raw.githubusercontent.com/kubernetes-sigs/vsphere-csi-driver/v3.0.0/manifests/vanilla/vsphere-csi-driver.yaml
● Verify that vsphere-csi-controller instances run on the control plane node and vsphere-csi-node instances run on worker nodes of the cluster.
◦ $ kubectl get deployment --namespace=vmware-system-csi
NAME READY AGE
vsphere-csi-controller 1/1 2m58s
◦ $ kubectl get daemonsets vsphere-csi-node --namespace=vmware-system-csi
NAME DESIRED CURRENT READY UP-TO-DATE AVAILABLE NODE SELECTOR AGE
vsphere-csi-node 4 4 4 4 4 <none> 3m51s
● Verify that the vSphere Container Storage Plug-in has been registered with Kubernetes.
◦ $ kubectl describe csidrivers
Name: csi.vsphere.vmware.com
Namespace:
Labels: <none>
Annotations: <none>
API Version: storage.k8s.io/v1
Kind: CSIDriver
Metadata:
Creation Timestamp: 2020-04-14T20:46:07Z
Resource Version: 2382881
Self Link: /apis/storage.k8s.io/v1beta1/csidrivers/csi.vsphere.vmware.com
UID: 19afbecd-bc2f-4806-860f-b29e20df3074
Spec:
Attach Required: true
Pod Info On Mount: false
Volume Lifecycle Modes:
Persistent
Events: <none>
● Verify that the CSINodes have been created.
◦ $ kubectl get CSINode
NAME CREATED AT
<k8s-worker1-name> 2020-04-14T12:30:29Z
<k8s-worker2-name> 2020-04-14T12:30:38Z
<k8s-worker3-name> 2020-04-14T12:30:21Z
<k8s-worker4-name> 2020-04-14T12:30:26Z
The following is a sample output from this deployment:
root@ubuntu-kube-master:/home/tme# kubectl get deployment --namespace=vmware-system-csi
NAME READY UP-TO-DATE AVAILABLE AGE
vsphere-csi-controller 1/3 3 1 2m36s
root@ubuntu-kube-master:/home/tme# kubectl get daemonsets vsphere-csi-node --namespace=vmware-system-csi
NAME DESIRED CURRENT READY UP-TO-DATE AVAILABLE NODE SELECTOR AGE
vsphere-csi-node 3 3 3 3 3 kubernetes.io/os=linux 3m10s
root@ubuntu-kube-master:/home/tme# kubectl get secret vsphere-config-secret --namespace=vmware-system-csi
NAME TYPE DATA AGE
vsphere-config-secret Opaque 1 117s
root@ubuntu-kube-master:/home/tme# rm /etc/kubernetes/csi-vsphere.conf
root@ubuntu-kube-master:/home/tme# kubectl describe csidrivers
Name: csi.tigera.io
Namespace:
Labels: <none>
Annotations: <none>
API Version: storage.k8s.io/v1
Kind: CSIDriver
Metadata:
Creation Timestamp: 2023-05-26T01:28:59Z
Owner References:
API Version: operator.tigera.io/v1
Block Owner Deletion: true
Controller: true
Kind: Installation
Name: default
UID: 52e54900-a3c9-40ef-becc-3d72df6eb11a
Resource Version: 829
UID: 6fa68d1e-355f-4a46-9523-81dd9f19d5c2
Spec:
Attach Required: true
Fs Group Policy: ReadWriteOnceWithFSType
Pod Info On Mount: true
Requires Republish: false
Storage Capacity: false
Volume Lifecycle Modes:
Ephemeral
Events: <none>
Name: csi.vsphere.vmware.com
Namespace:
Labels: <none>
Annotations: <none>
API Version: storage.k8s.io/v1
Kind: CSIDriver
Metadata:
Creation Timestamp: 2023-06-01T18:48:29Z
Resource Version: 201365
UID: e6c35908-159e-4aca-8751-ae636ae2e158
Spec:
Attach Required: true
Fs Group Policy: ReadWriteOnceWithFSType
Pod Info On Mount: false
Requires Republish: false
Storage Capacity: false
Volume Lifecycle Modes:
Persistent
Events: <none>
root@ubuntu-kube-master:/home/tme#
root@ubuntu-kube-master:/home/tme# kubectl get CSINode
NAME DRIVERS AGE
ubuntu-kube-1 2 6d3h
ubuntu-kube-2 2 6d3h
ubuntu-kube-master 2 6d17h
Now tag the resources in vCenter and create storage class, PVs, and PVCs
https://www.altaro.com/vmware/vsphere-cloud-native-storage/.
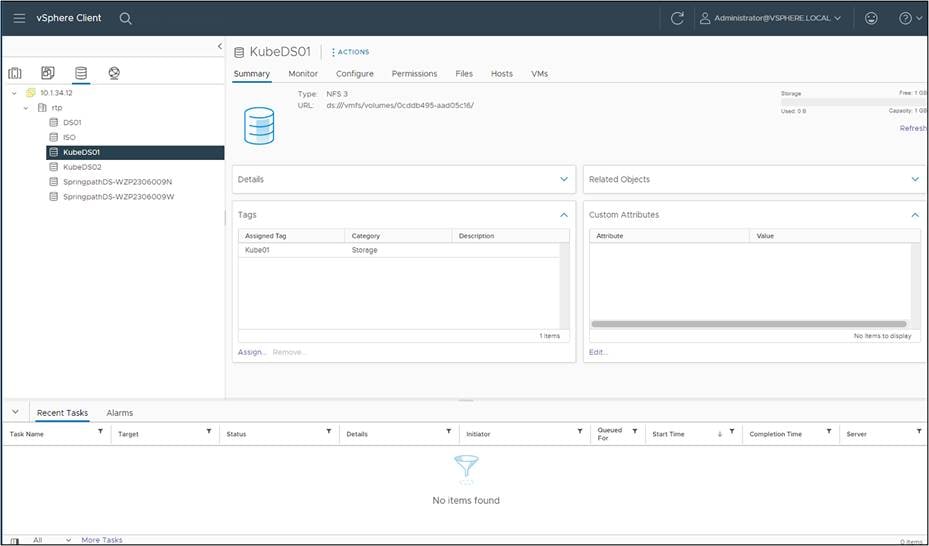
Create a datastore in HX Connect for the dynamically generated Persistent Volumes (PVs).
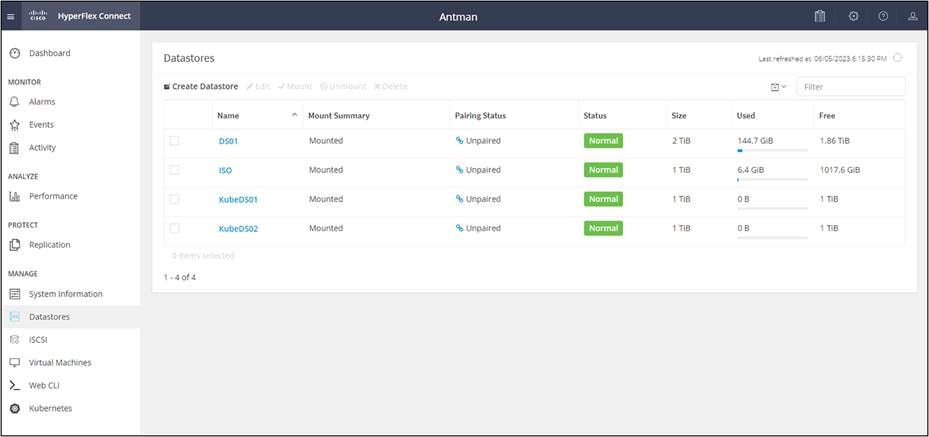
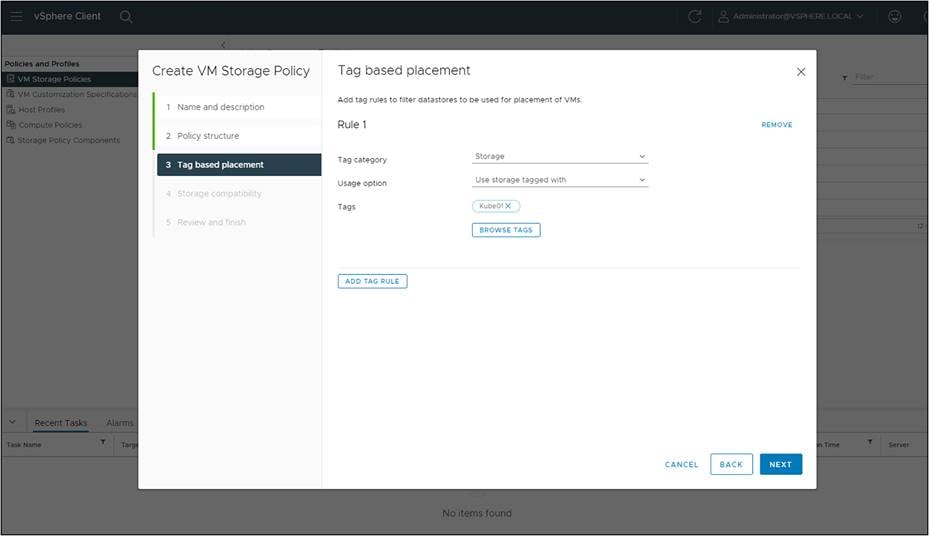
vSphere CSI uses a tag-based placement rule for the storage policies. Tag the HX Datastore in vCenter. Here we tag the KubeDS01 datastore with the Kube01.
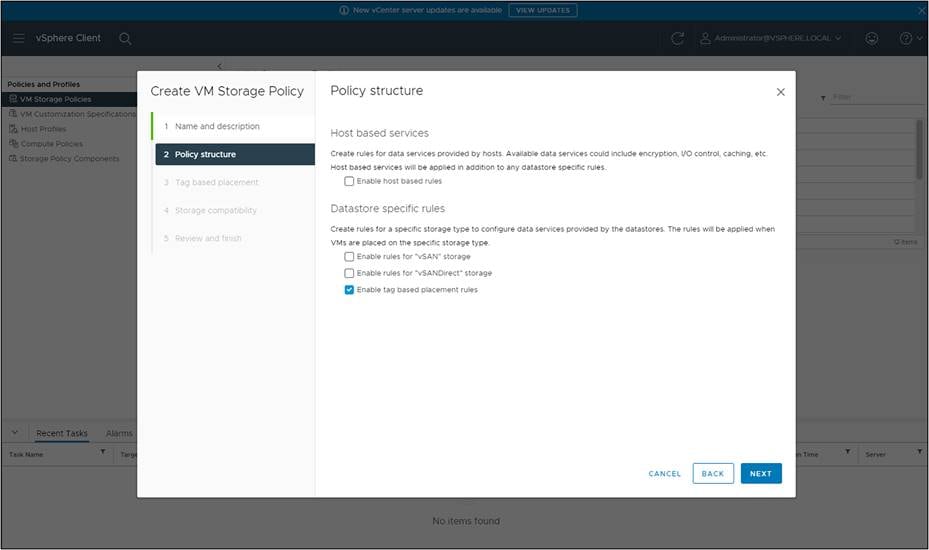
Under VM storage policies in the vSphere Client UI, click on the option to “Create VM Storage Policy.” From there, chose the option to do tag-based placement rules, as shown below.
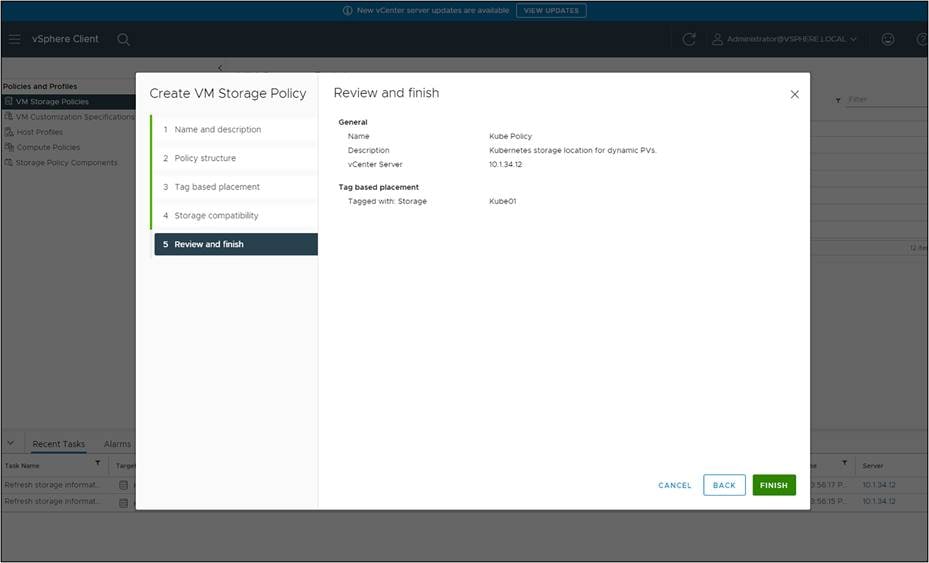
Name the policy.
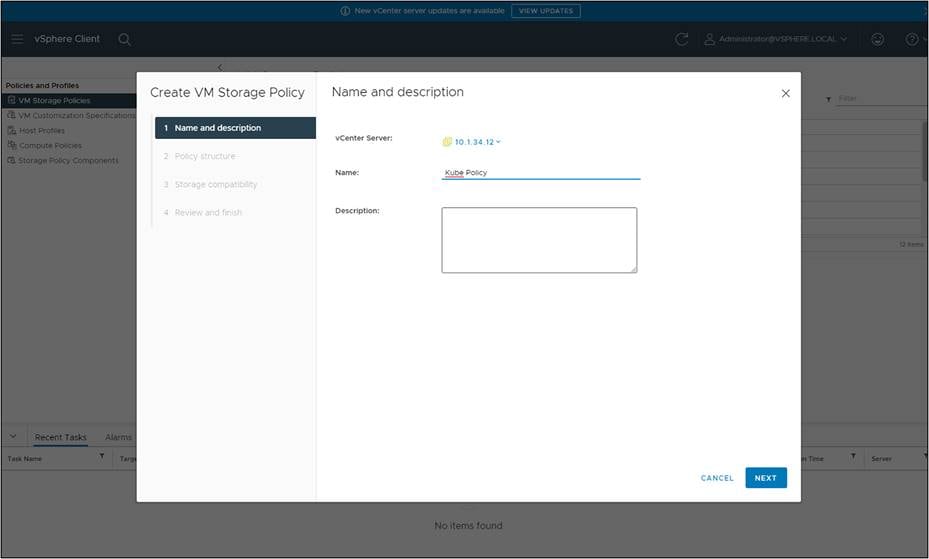
Select “Enable tag-based placement rules” for datastores.
Complete the tag requirements and select the tag created for the HX Datastore.
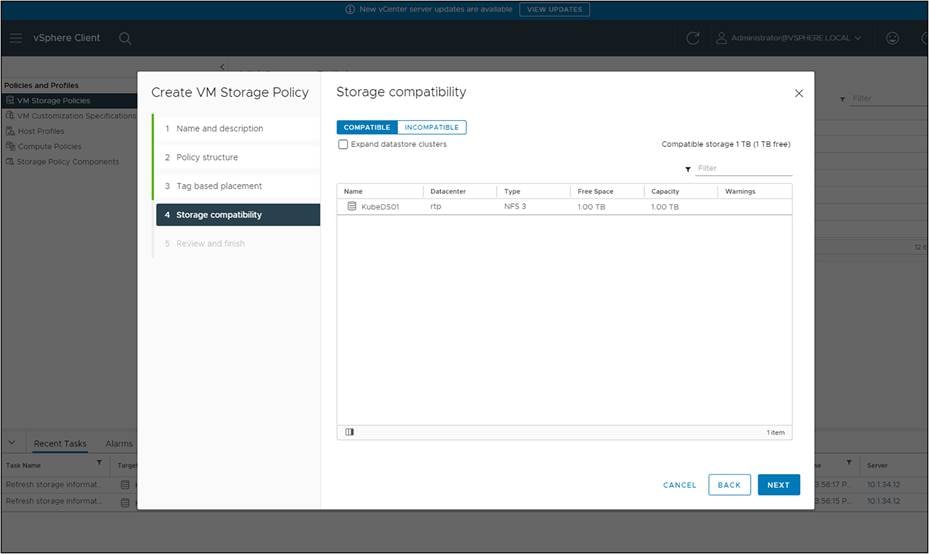
Choose the HX Datastore that was tagged. It should be the only one available under compatibility.
Click “Next,” then review and finish.
Now that the policies exist, the vSphere CSI driver allows the StorageClass construct in Kubernetes to reference SPBM policies simply by adding a parameter.storage policyname in the StorageClass manifest (yaml).
● Create a yaml file for the storage class called hx-nfs-sc.yaml:
kind: StorageClass
apiVersion: storage.k8s.io/v1
metadata:
name: hx-nfs-sc
annotations:
storageclass.kubernetes.io/is-default-class: "false"
provisioner: csi.vsphere.vmware.com
parameters:
storagepolicyname: "Kube Policy"
● Import this StorageClass into the Kubernetes cluster and verify.
root@ubuntu-kube-master:/home/tme# kubectl create -f /etc/kubernetes/hx-nfs-sc.yaml
storageclass.storage.k8s.io/hx-nfs-sc created
root@ubuntu-kube-master:/home/tme# kubectl get sc
NAME PROVISIONER RECLAIMPOLICY VOLUMEBINDINGMODE ALLOWVOLUMEEXPANSION AGE
hx-nfs-sc csi.vsphere.vmware.com Delete Immediate false 6m14s
root@ubuntu-kube-master:/home/tme#
● Define a PersistentVolumeClaim request yaml called hx-pvc.yaml.
apiVersion: v1
kind: PersistentVolumeClaim
metadata:
name: hx-pvc
spec:
accessModes:
- ReadWriteOnce
resources:
requests:
storage: 5Gi
storageClassName: hx-nfs-sc
● Import the PersistentVolumeClaim into the Vanila Kubernetes cluster.
root@ubuntu-kube-master:/home/tme# kubectl create -f /etc/kubernetes/hx-pvc.yaml
persistentvolumeclaim/hx-pvc created
root@ubuntu-kube-master:/home/tme#
● Verify that the PersistentVolumeClaim has been created and has a PersistentVolume attached to it.
$ kubectl describe pvc hx-pvc
root@ubuntu-kube-master:/home/tme# kubectl get sc
NAME PROVISIONER RECLAIMPOLICY VOLUMEBINDINGMODE ALLOWVOLUMEEXPANSION AGE
hx-nfs-sc csi.vsphere.vmware.com Delete Immediate false 6m14s
root@ubuntu-kube-master:/home/tme# ls /etc/kubernetes/*.yaml
/etc/kubernetes/hx-nfs-sc.yaml /etc/kubernetes/hx-pvc.yaml
root@ubuntu-kube-master:/home/tme# kubectl create -f /etc/kubernetes/hx-pvc.yaml
persistentvolumeclaim/hx-pvc created
root@ubuntu-kube-master:/home/tme# kubectl describe pvc hx-pvc
Name: hx-pvc
Namespace: default
StorageClass: hx-nfs-sc
Status: Bound
Volume: pvc-3f06483a-c4cf-4654-a0ed-c0baff3ae031
Labels: <none>
Annotations: pv.kubernetes.io/bind-completed: yes
pv.kubernetes.io/bound-by-controller: yes
volume.beta.kubernetes.io/storage-provisioner: csi.vsphere.vmware.com
volume.kubernetes.io/storage-provisioner: csi.vsphere.vmware.com
Finalizers: [kubernetes.io/pvc-protection]
Capacity: 5Gi
Access Modes: RWO
VolumeMode: Filesystem
Used By: <none>
Events:
Type Reason Age From Message
---- ------ ---- ---- -------
Normal Provisioning 56s csi.vsphere.vmware.com_vsphere-csi-controller-84bb459bd5-wmnd5_ba144c27-d300-443c-8e5f-ed39e9f73862 External provisioner is provisioning volume for claim "default/hx-pvc"
Normal ExternalProvisioning 55s (x2 over 56s) persistentvolume-controller waiting for a volume to be created, either by external provisioner "csi.vsphere.vmware.com" or manually created by system administrator
Normal ProvisioningSucceeded 55s csi.vsphere.vmware.com_vsphere-csi-controller-84bb459bd5-wmnd5_ba144c27-d300-443c-8e5f-ed39e9f73862 Successfully provisioned volume pvc-3f06483a-c4cf-4654-a0ed-c0baff3ae031
root@ubuntu-kube-master:/home/tme#
● Verify that PersistentVolume has been successfully created for the PersistentVolumeClaim.
root@ubuntu-kube-master:/home/tme# kubectl describe pv pvc-3f06483a-c4cf-4654-a0ed-c0baff3ae031
Name: pvc-3f06483a-c4cf-4654-a0ed-c0baff3ae031
Labels: <none>
Annotations: pv.kubernetes.io/provisioned-by: csi.vsphere.vmware.com
volume.kubernetes.io/provisioner-deletion-secret-name:
volume.kubernetes.io/provisioner-deletion-secret-namespace:
Finalizers: [kubernetes.io/pv-protection]
StorageClass: hx-nfs-sc
Status: Bound
Claim: default/hx-pvc
Reclaim Policy: Delete
Access Modes: RWO
VolumeMode: Filesystem
Capacity: 5Gi
Node Affinity: <none>
Message:
Source:
Type: CSI (a Container Storage Interface (CSI) volume source)
Driver: csi.vsphere.vmware.com
FSType: ext4
VolumeHandle: 65e55d6b-6d21-43ee-b066-cf3ae489cdd9
ReadOnly: false
VolumeAttributes: storage.kubernetes.io/csiProvisionerIdentity=1685653229605-8081-csi.vsphere.vmware.com
type=vSphere CNS Block Volume
Events: <none>
Verify that the Persistent Volume Claim (PVC) has been honored by the creation of a first class disk in vCenter:
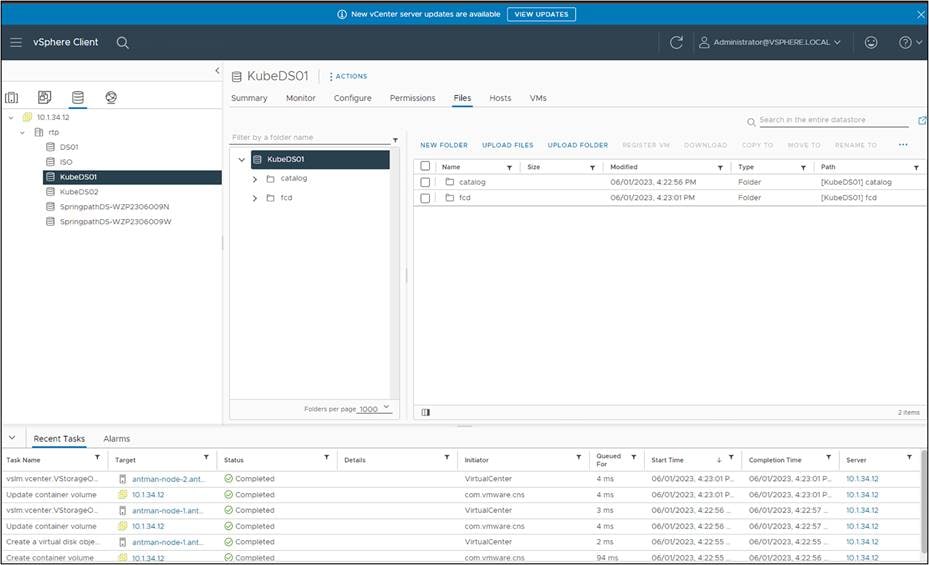
Expanding the FCD folder shows the actual virtual disk. The disk shows zero size because it is thin provisioned and has not been used yet.

This white paper has highlighted the integration of vSphere CSI with Kubernetes on Cisco HyperFlex. By leveraging the capabilities of vSphere CSI with HX datastores, organizations can unlock of benefits dynamic resource provisioning, efficient management of data services, and streamlined workflows. Moreover, the integration with Cisco HyperFlex brings additional advantages, such as simplified deployment, increased scalability, and enhanced data protection.
Appendix A – Install Kubernetes
Set up a vanilla Kubernetes cluster for CNS
There are many ways to deploy Kubernetes. Options include managed, cloud, on-premises virtual, and on-premises bare-metal. There are tools such as the open source Minikube that have been developed to install and operate a Kubernetes cluster on a single host, which is great for training. For enterprise use, though, most deployments require extensive setup work, new processes, and retraining of staff to install and operate Kubernetes effectively. These instructions cover the installation of KubeADM, a vanilla Kubernetes distribution, with Docker containers, starting with the initial VM deployment and going from there.
Deploy Kubernetes VMs using Ubuntu Server 22.04
Everything in this guide is installed as the root user (so you can ignore sudo and eliminate user/permission issues). If you do not have access to the root or would rather deploy with a more restricted user, you will need to use sudo and carefully follow the role and permission guidelines in the references listed for these various parts.
Cloud-native storage requirements
● vSphere 6.7 Update 3 or later.
● A compatible version of Kubernetes.
● A Kubernetes cluster deployed on the virtual machines. For details about deploying the vSphere CSI plug-in and running the Kubernetes cluster on vSphere, see the Driver Deployment documentation in GitHub.
Using a vSphere 7.0U3 environment with vCenter 7.0
● Create an Ubuntu Server 22.04 VM using the installation ISO downloaded from Ubuntu.
Requirements for Kubernetes cluster virtual machines
● Virtual machines with hardware version 15 or later. Install VMware Tools on each node virtual machine.
● Virtual machine hardware recommendations:
◦ Set CPU and memory adequately based on workload requirements.
◦ Use the VMware Paravirtual SCSI controller for the primary disk on the node VM.
● All virtual machines must have access to a shared datastore.
● Set the disk.EnableUUID parameter on each node VM. See Configure Kubernetes Cluster Virtual Machines.
● To avoid errors and unpredictable behavior, do not take snapshots of CNS node VMs (when running).
The Kubernetes VMs need the UUID property set.
Procedure for setting UUID properties
● In the vSphere Client, right-click the virtual machine and select “Edit Settings.”
● Click the VM Options tab and expand the Advanced menu.
● Click “Edit Configuration” next to “Configuration Parameters.”
● Configure the disk.EnableUUID parameter.
● Name: disk.EnableUUID Value: True
Make this into an Ubuntu template for future use.
● Using the template, deploy 3 Ubuntu Server 22.04 vms, each with a unique IP address in the VM Network address space.
a. Edit /etc/hostname and /etc/hosts to give each host a unique name and name resolution (unless using DNS).
b. One host should be the master K8s node.
c. Two hosts will be K8s worker nodes.
Example /etc/hosts file:
127.0.0.1 localhost
127.0.1.1 kube-master
10.1.34.51 kube-master
10.1.34.52 kube-node-1
10.1.34.53 kube-node-2
Ubuntu Server 22.04 uses a utility called “netplan” for networking. To set a static, edit the config file.
cd /etc/netplan/
sudo vi /etc/netplan/00-installer-config.yaml
The static IP config should look similar to this:
network:
renderer: networkd
ethernets:
eth0:
addresses:
- 192.168.10.5/24
nameservers:
addresses: [1.1.1.1,8.8.8.8]
routes:
- to: default
via: 192.168.1.1
version: 2
eth0: is the name of the network interface and will vary from platform to platform.
Under addresses: is the static IP to set using CIDR notation.
DNS servers are configured under nameservers: multiple servers should be command separated.
To apply the changes, run the following command:
sudo netplan apply
To confirm the settings:
ip addr show eth0
ip route show
Final tuning for the VMs:
● Disable the Ubuntu Firewall:
◦ ufw disable
● Disable the Ubuntu swap space:
◦ sudo swapoff -a on template VM
● Permanently disable swap in /etc/fstab by commenting out the swap entry.
● Install GO
◦ apt-get install golang-go
Install Docker on the Kubernetes VMs:
https://docs.docker.com/engine/install/ubuntu/.
Set up the repository:
● Update the apt package index and install packages to allow apt to use a repository over HTTPS:
◦ sudo apt-get update
◦ sudo apt-get install ca-certificates curl gnupg
● Add Docker’s official GPG key:
◦ sudo install -m 0755 -d /etc/apt/keyrings
◦ curl -fsSL https://download.docker.com/linux/ubuntu/gpg | sudo gpg --dearmor -o /etc/apt/keyrings/docker.gpg
◦ sudo chmod a+r /etc/apt/keyrings/docker.gpg
● Use the following command to set up the repository:
◦ echo \ "deb [arch="$(dpkg --print-architecture)" signed-by=/etc/apt/keyrings/docker.gpg] https://download.docker.com/linux/ubuntu \ "$(. /etc/os-release && echo "$VERSION_CODENAME")" stable" | \
◦ sudo tee /etc/apt/sources.list.d/docker.list > /dev/null
Install Docker Engine:
● Update the apt package index:
◦ sudo apt-get update
● Install Docker Engine, containerd, and Docker Compose. To install the latest version, run:
◦ sudo apt-get install docker-ce docker-ce-cli containerd.io docker-buildx-plugin docker-compose-plugin
● Verify that the Docker Engine installation is successful by running the hello-world image:
◦ sudo docker run hello-world
This command downloads a test image and runs it in a container. When the container runs, it prints a confirmation message and exits.
You have now successfully installed and started Docker Engine.
Install the Kubernetes Container Runtime Interface for Docker
This adapter provides a shim for Docker Engine that lets you control Docker through the Kubernetes Container Runtime Interface.
https://github.com/Mirantis/cri-dockerd
To install, on a Linux system that uses systemd and that already has Docker Engine installed:
● git clone https://github.com/Mirantis/cri-dockerd.git
The above step creates a local directory called cri-dockerd, which you will need for the following steps.
● Run these commands as root.
● Install GO if you haven’t already:
◦ wget https://storage.googleapis.com/golang/getgo/installer_linux
◦ chmod +x ./installer_linux
◦ ./installer_linux
◦ `source /root/.bash_profile`
Note that some of the commands below can take some time to complete.
● cd cri-dockerd
● mkdir bin
● go build -o bin/cri-dockerd
● mkdir -p /usr/local/bin
● install -o root -g root -m 0755 bin/cri-dockerd /usr/local/bin/cri-dockerd
● cp -a packaging/systemd/* /etc/systemd/system
● sed -i -e 's,/usr/bin/cri-dockerd,/usr/local/bin/cri-dockerd,' /etc/systemd/system/cri-docker.service
● systemctl daemon-reload
● systemctl enable cri-docker.service
● systemctl enable --now cri-docker.socket
Install the vanilla distribution of Kubernetes called KubeADM.
https://kubernetes.io/docs/setup/production-environment/tools/kubeadm/install-kubeadm/
The following will be installed:
● kubeadm, kubelet, kubectl
● sudo apt-get update
● sudo apt-get install -y apt-transport-https ca-certificates curl
● sudo curl -fsSLo /etc/apt/keyrings/kubernetes-archive-keyring.gpg https://packages.cloud.google.com/apt/doc/apt-key.gpg
● Use this for the key location instead if the key location above is unavailable:
◦ https://dl.k8s.io/apt/doc/apt-key.gpg
● echo "deb [signed-by=/etc/apt/keyrings/kubernetes-archive-keyring.gpg] https://apt.kubernetes.io/ kubernetes-xenial main" | sudo tee /etc/apt/sources.list.d/kubernetes.list
● sudo apt-get update
● sudo apt-get install -y kubelet kubeadm kubectl
● sudo apt-mark hold kubelet kubeadm kubectl
Configure the Kubernetes master node
For cri-dockerd, the CRI socket is /run/cri-dockerd.sock by default.
● kubeadm init --pod-network-cidr=192.168.0.0/16 --cri-socket=unix:///var/run/cri-dockerd.sock
This will create the Kubernetes master node.
Record the kubeadm join command with its token. If you have not created this with the root user, enter the following as your deployment user:
● mkdir -p $HOME/.kube
● sudo cp -i /etc/kubernetes/admin.conf $HOME/.kube/config
● sudo chown $(id -u):$(id -g) $HOME/.kube/config
The node will show "not ready" until the CNI plugin is installed in the next step.
root@tme-virtual-machine:~$ kubectl get nodes
NAME STATUS ROLES AGE VERSION
tme-virtual-machine NotReady control-plane 23m v1.27.2
root@tme-virtual-machine:~$
Install the CNI Plug-in for dockerd
Install the networking interface for cri-dockerd so that Kubernetes can use it. The Calico CNI is an easy-to-install CNI. Complete the following steps. Run this from the master node.
https://docs.tigera.io/calico/latest/getting-started/kubernetes/quickstart
● First, install the operator on your cluster.
◦ kubectl create -f https://raw.githubusercontent.com/projectcalico/calico/v3.25.1/manifests/tigera-operator.yaml
● Download the custom resources necessary to configure Calico
◦ curl https://raw.githubusercontent.com/projectcalico/calico/v3.25.1/manifests/custom-resources.yaml-O
◦ If you wish to customize the Calico install, customize the downloaded custom-resources.yaml manifest locally.
● Create the manifest in order to install Calico.
◦ kubectl create -f custom-resources.yaml
● Remove the taints on the control plane so that you can schedule pods on it.
◦ watch kubectl get pods -n kube-system
◦ kubectl taint nodes --all node-role.kubernetes.io/control-plane-
◦ kubectl taint nodes --all node-role.kubernetes.io/master-
Shut the node down and take a snapshot.
Configure the Kubernetes worker nodes
You will need the join syntax from creating the master node, using tokens. Add nodes by running the following from each worker node:
● kubeadm join <control-plane-host>:<control-plane-port> --cri-socket --token <token> --discovery-token-ca-cert-hash
● kubeadm join 10.1.34.71:6443 --cri-socket=unix:///var/run/cri-dockerd.sock --token o9p4wi.u5a7i74rfcpgrd0j --discovery-token-ca-cert-hash sha256:edd6a1c0753a8ab3399a21ee92fde09bdad65fd829c75120f7ee39493fe2bbc1
● kubctl show nodes
Shut all the nodes down and take a snapshot.
Useful Kubernetes commands:
kubectl get nodes
kubectl get deployment -n vmware-system-csi
kubectl get CSINodes
kubectl get pods -o wide --all-namespaces
kubectl get secret vsphere-config-secret --namespace=vmware-system-csi
kubectl get pod --namespace=vmware-system-csi
kubectl get pod --namespace=kube-system
kubectl describe pod vsphere-csi-node-5r4rh -n vmware-system-csi
kubectl logs vsphere-csi-controller-84bb459bd5-77hsk -n vmware-system-csi
kubectl describe nodes
For additional information, see the following resources:
● Getting started with vSphere and Kubernetes
◦ https://www.virten.net/2020/07/getting-started-guide-vsphere-with-kubernetes/.
● Deploying Kubernetes on vSphere 7 with Tanzu Kubernetes Grid (TKG)
● Configure Kubernetes cluster virtual machines
● VMware vSphere Storage Plug-in
◦ https://docs.vmware.com/en/VMware-vSphere-Container-Storage-Plug-in/index.html.
● Introducing Cloud Native Storage for vSphere
◦ https://blogs.vmware.com/virtualblocks/2019/08/14/introducing-cloud-native-storage-for-vsphere/.
● Requirements of Cloud Native Storage
| Document summary |
Prepared for |
Prepared by |
| V1.0 |
Cisco Field |
Aaron Kapacinskas |
| Changes |
||
| N/A |
||
This document contains confidential material that is proprietary to Cisco. The materials, ideas, and concepts contained herein are to be used exclusively to assist in the configuration of Cisco® software solutions.
All information in this document is provided in confidence and shall not be published or disclosed, wholly or in part, to any other party without Cisco’s written permission.