Install Cisco HyperFlex Using Cisco Intersight with Red Hat Ansible White Paper
Available Languages
Bias-Free Language
The documentation set for this product strives to use bias-free language. For the purposes of this documentation set, bias-free is defined as language that does not imply discrimination based on age, disability, gender, racial identity, ethnic identity, sexual orientation, socioeconomic status, and intersectionality. Exceptions may be present in the documentation due to language that is hardcoded in the user interfaces of the product software, language used based on RFP documentation, or language that is used by a referenced third-party product. Learn more about how Cisco is using Inclusive Language.
Note: This document contains material and data with multiple dependencies. The information may be updated as and when necessary and is subject to change without notice.
Privileged/Confidential information is contained in this document and may be subject to legal privilege. Access to this material by anyone other than those intended is unauthorized. If you are not the intended recipient (or responsible for delivery of the information to such person), you may not use, copy, distribute, or deliver to anyone this information (or any part of its contents) or take any action in reliance on it. In such case, you should destroy this information and notify Cisco immediately. If you have received this material in error, please notify us immediately and delete the material from any computer. If you or your employer does not consent to this message, please notify us immediately. Our company cannot accept responsibility for any loss or damage arising from the use of this material.
Cisco HyperFlex™ systems have earned a place in the modern data center as a hyperconverged hardware platform for computing virtualization with next-generation software-defined storage (SDS) technology. Beyond the data center, Cisco HyperFlex Edge is an excellent platform for remote-office and branch-office (ROBO) infrastructure, or any other small locations.
The proliferation of small virtualized systems in numerous locations can become a deployment and management challenge. The capability to install, configure, and monitor systems spread out over large geographic distances requires a different framework that does not require IT staff to travel and be on site physically. The Cisco Intersight™ platform allows the remote installation, management, and monitoring of Cisco HyperFlex and Cisco HyperFlex Edge systems from our centralized cloud-based web portal.
Despite this advancement, using a web-based GUI to deploy multiple systems can be time consuming, tedious, and at risk of human error. To mitigate these risks, customers can use the powerful Cisco Intersight API and the enterprise-class task-based tool Red Hat Ansible. Using Ansible to communicate with the Cisco Intersight API, customers can deploy Cisco HyperFlex systems without using the GUI. Systems can be deployed one at a time, or multiple Cisco HyperFlex clusters can be deployed all at the same time. Using a scriptable tool such as Ansible, customers can more quickly implement more widespread deployments with fewer errors, because configurations are predefined in variable text files. These files can be created and validated prior to deployment and retained for record keeping to track configuration history.
This document describes the installation of Cisco HyperFlex clusters using the Cisco Intersight platform, using Red Hat Ansible to communicate with the Cisco Intersight API. The use of Ansible for these tasks is fully described, and detailed explanations of all the variable options available are provided. Ansible playbooks have been developed by Cisco, and the playbooks are available for download from the Cisco® DevNet GitHub repository.
This document is intended to provide information, education, and guidance for individuals and organizations interested in deploying VMware ESXi–based Cisco HyperFlex systems using Red Hat Ansible. This deployment method uses Cisco Intersight and its API for installing one or more Cisco HyperFlex clusters, rather than the on-site Open Virtual Appliance (OVA)–based installer virtual machine. The document provides fundamental information and sample files based on internal development and testing of this deployment method. The document does not cover every possible deployment option or configuration of Cisco HyperFlex systems, but instead presents a solution based on common initial deployments and architectures in use by most customers.
Cisco HyperFlex systems are built on the Cisco Unified Computing System™ (Cisco UCS®) platform. They offer faster deployment and greater flexibility and efficiency than traditional virtualization systems at a competitive price, while reducing risk for the customer. The Cisco HyperFlex solution provides a fully contained virtual server platform with computing and memory resources, integrated networking connectivity, a distributed high-performance log-based file system for virtual machine storage, and the hypervisor software for running the virtualized servers, all within a single Cisco UCS management domain. A standard cluster requires a minimum of three hyperconverged nodes connected to Cisco UCS fabric interconnects, managed by Cisco Intersight software or Cisco UCS Manager. Cisco HyperFlex Edge systems can be deployed with as few as two nodes and are designed for use in small-office or remote locations, where they operate in a standalone configuration not connected to Cisco UCS fabric interconnects and are managed by the Cisco Intersight platform.
Red Hat Ansible is an agentless automation tool used for deployment, provisioning, and configuration of hardware, operating systems, and software. Using remote connectivity such as Secure Shell (SSH), Microsoft Windows Remote Management (WRM), and communication with existing APIs, Ansible allows administrators to install, configure, and manage multiple systems and applications programmatically, enabling what is known as infrastructure as code. Ansible playbooks are written using Ansible’s own language and syntax to describe the environment and perform tasks, also using a list of static or dynamically generated system inventories.
Figure 1 provides an overview of this solution.
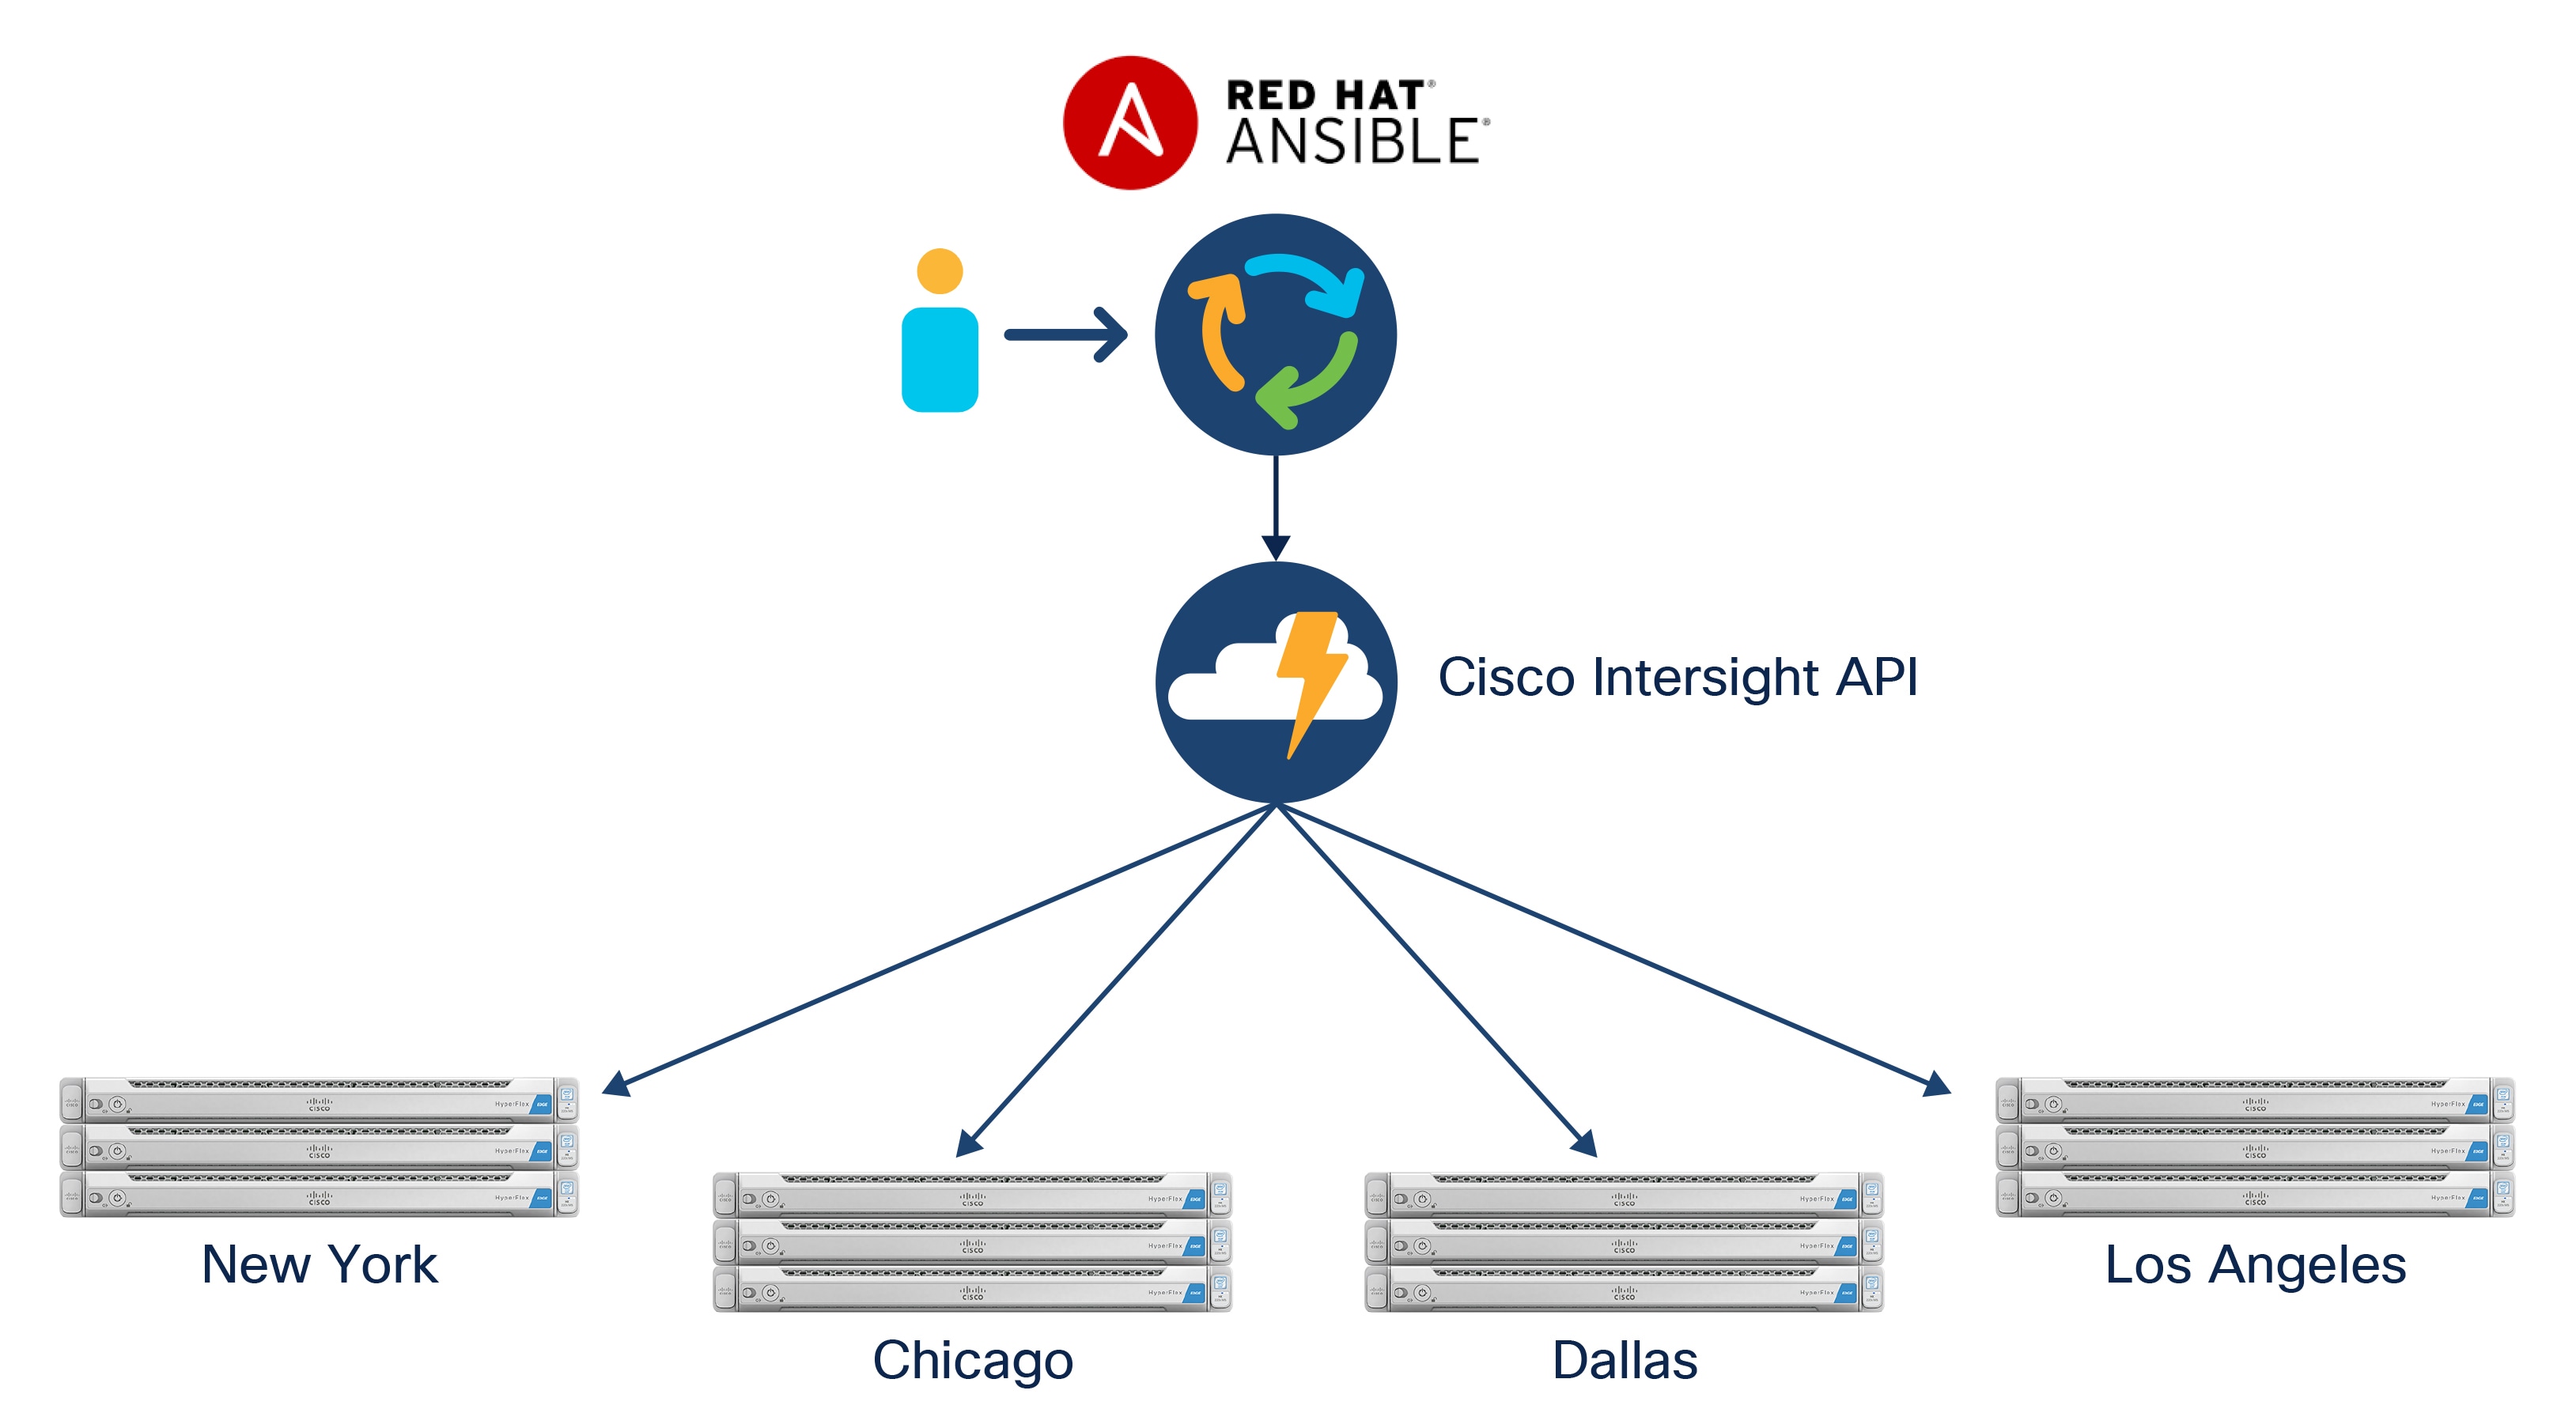
Cisco HyperFlex installation with Cisco Intersight and Red Hat Ansible
The Cisco HyperFlex solution with Cisco Intersite and Red Hat Ansible uses a management workstation to run Ansible playbooks that creates all of the necessary policies in Cisco Intersight and the corresponding Cisco HyperFlex cluster profiles. The configuration of the policies and profiles are based on the values entered in a host variable file for each Cisco HyperFlex cluster. The playbook then associates the physical servers listed in the host variable file with the clusters and proceeds with validation and deployment of the clusters.
Prerequisites
Setup of the solution begins with a management workstation that has access to Cisco Intersight and with a working installation of Ansible. The management workstation commonly runs a variant of Linux or MacOS for ease of use with these command-line-based tools. Instructions for installing and configuring the workstation and Ansible are not included in this document. A guide for getting started with Ansible can be found at the following link:
● Getting Started with Red Hat Ansible: https://www.ansible.com/resources/get-started
To use the Ansible playbooks demonstrated in this document, the management workstation must also have a working installation of Git and access to the Cisco DevNet public GitHub repository, using the intersight-ansible collection. The Ansible playbooks used in this document are cloned from the public repository, located at the following link:
● Cisco DevNet GitHub repository: https://github.com/CiscoDevNet/intersight-ansible
The Cisco HyperFlex HX-Series servers must be physically racked, cabled, powered, and claimed in Cisco Intersight before the Ansible-based installation procedure can begin. For more information about racking, cabling, and claiming devices, consult the installation guide at the following link:
● Cisco HyperFlex System Installation Guide for Cisco Intersight: https://www.cisco.com/c/en/us/td/docs/hyperconverged_systems/HyperFlex_HX_DataPlatformSoftware/HyperFlex_Installation_Guide_for_Intersight/b_HyperFlex_Installation_Guide_for_Intersight.html
Note: The preceding installation guide also describes how to install Cisco HyperFlex systems within Cisco Intersight. However, in this case the Cisco HyperFlex system will be installed using the Ansible playbooks. Therefore, these steps in the guide should be skipped.
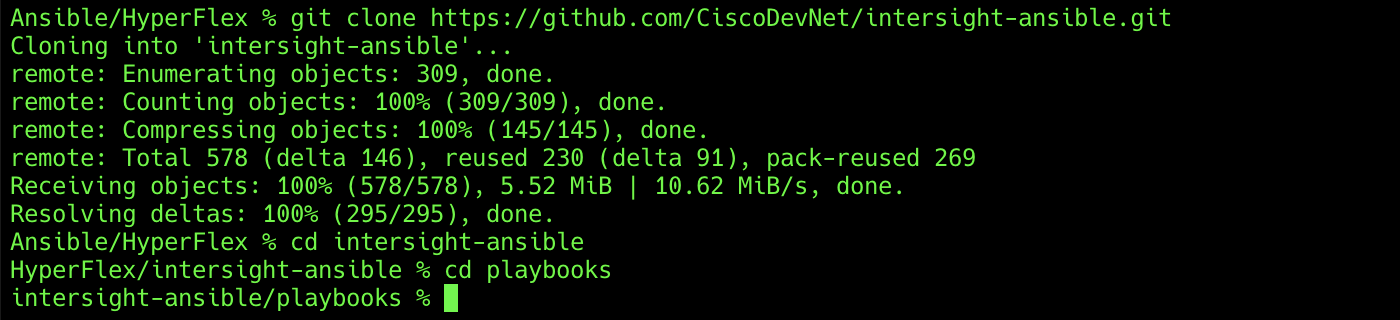
The first step in the process is to clone the GitHub collection named intersight-ansible to a new empty folder on the management workstation. Cloning the collection creates a local copy, which is then used to run the playbooks that have been created for this solution. To clone the GitHub collection, complete the following steps:
1. From the management workstation, create a new folder for the project. The GitHub collection will be cloned in a new folder inside this one, named intersight-ansible.
2. Open a command-line or console interface on the management workstation and change directories to the new folder just created.
3. Clone the GitHub collection using the following command:
git clone https://github.com/CiscoDevNet/intersight-ansible.git
4. Change directories to the new folder named intersight-ansible.
5. Change directories to the folder named playbooks.
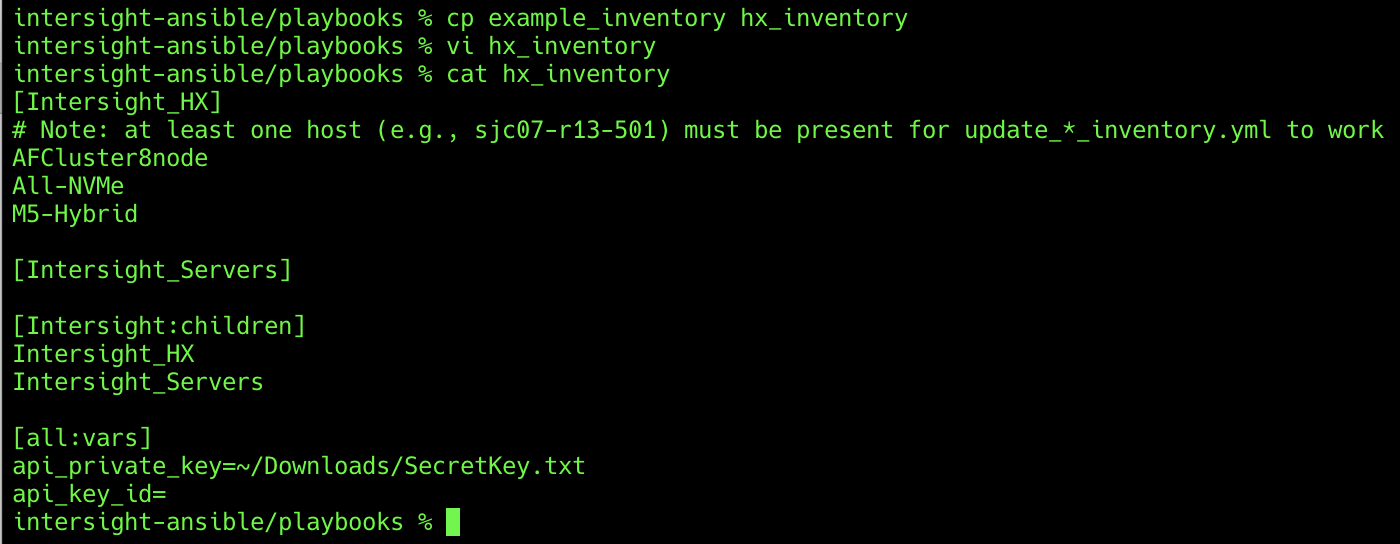
Ansible uses static or dynamically created inventory files to control the systems on which the playbooks take action. Inventory files can have groups of hosts, and files can also nest groups if needed. You can copy a sample inventory file in the GitHub collection and then modify it for use as the initial Cisco HyperFlex inventory file for all subsequent playbook executions. To create the initial inventory file, complete the following steps:
1. On the management workstation, using either the command line or a graphical file manager, copy the file in the playbooks folder named example_inventory to a new file named hx_inventory in the same folder.
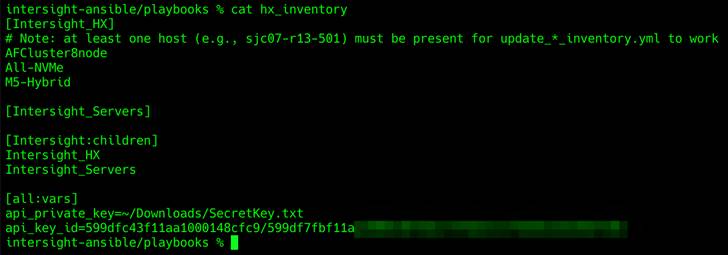
2. Open the new hx_inventory file for editing using a raw text editor, such as VIM, BBEdit, or Notepad++, or another similar tool.
3. Remove the names of the two sample hosts under the [Intersight_HX] group and replace them with one or more names of the Cisco HyperFlex clusters that you want to install. These names must match the names of the unique host variable files that will be created in a later step.
Configure Cisco Intersight API access
Before Ansible can access the Cisco Intersight API, you must configure the new hx_inventory file with information specifying the location of an API private key file and an API key ID. The key file and the ID are created and retrieved from within Cisco Intersight. To configure Cisco Intersight API access, complete the following steps:
1. Using a supported web browser, log in to Cisco Intersight at https://www.intersight.com.
2. Click the gear icon in the top-right corner. Then click Settings.
3. Click API Keys in the menu on the left.
4. Click Generate API Key in the top-right corner.
5. Enter a description for the API key, such as Ansible. Then click Generate.
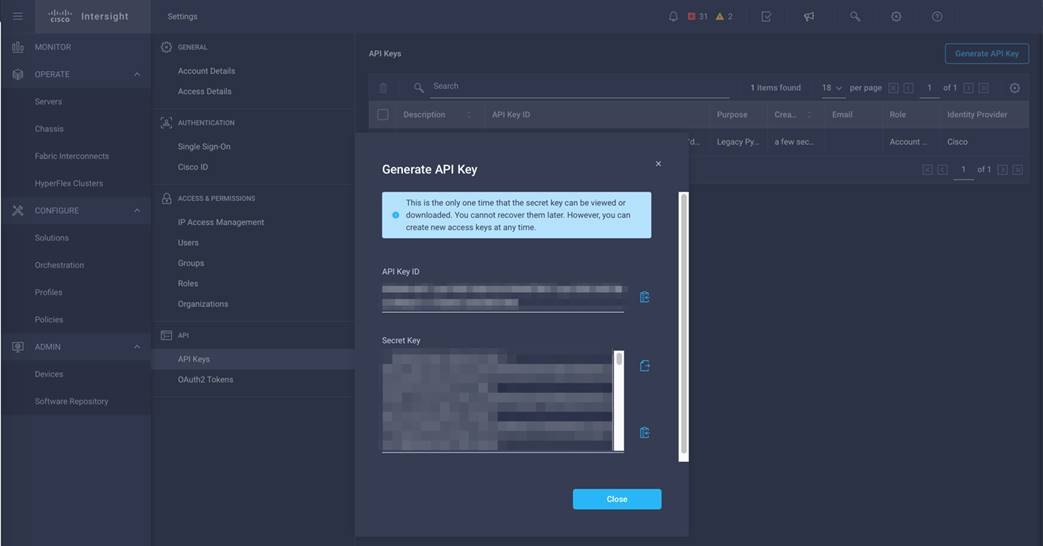
6. Click the icon to copy the API key ID and then paste the key ID in the hx_inventory file, in the line beginning with api_key_id=.
7. Click the icon to save the secret key to a local text file. Note the location of the downloaded file and move the file to a different folder if desired.
8. Enter the path to the downloaded file named SecretKey.txt in the hx_inventory file, in the line beginning with api_private_key=.
Generate Cisco HyperFlex HX-Series physical inventory
Access to the Cisco Intersight API should now be working for the Ansible playbooks. To test access to the API, you can use two playbooks, named update_hx_inventory.yml and update_hx_edge_inventory.yml. These two playbooks will access the Cisco Intersight API and add a list of physical servers to the hx_inventory file, in the [Intersight_Servers] group. The update_hx_inventory.yml file will find all HX-Series servers that are connected to fabric interconnects, which are suitable for use in standard clusters. The update_hx_edge_inventory.yml file will find all standalone HX-Series servers, which are suitable for Cisco HyperFlex Edge clusters. To test access to the Cisco Intersight API and generate the list of physical servers, complete the following steps:
1. Open a command-line or console interface on the management workstation and change directories to the intersight-ansible/playbooks folder.
2. Run the following command:
ansible-playbook -i hx_inventory update_hx_inventory.yml
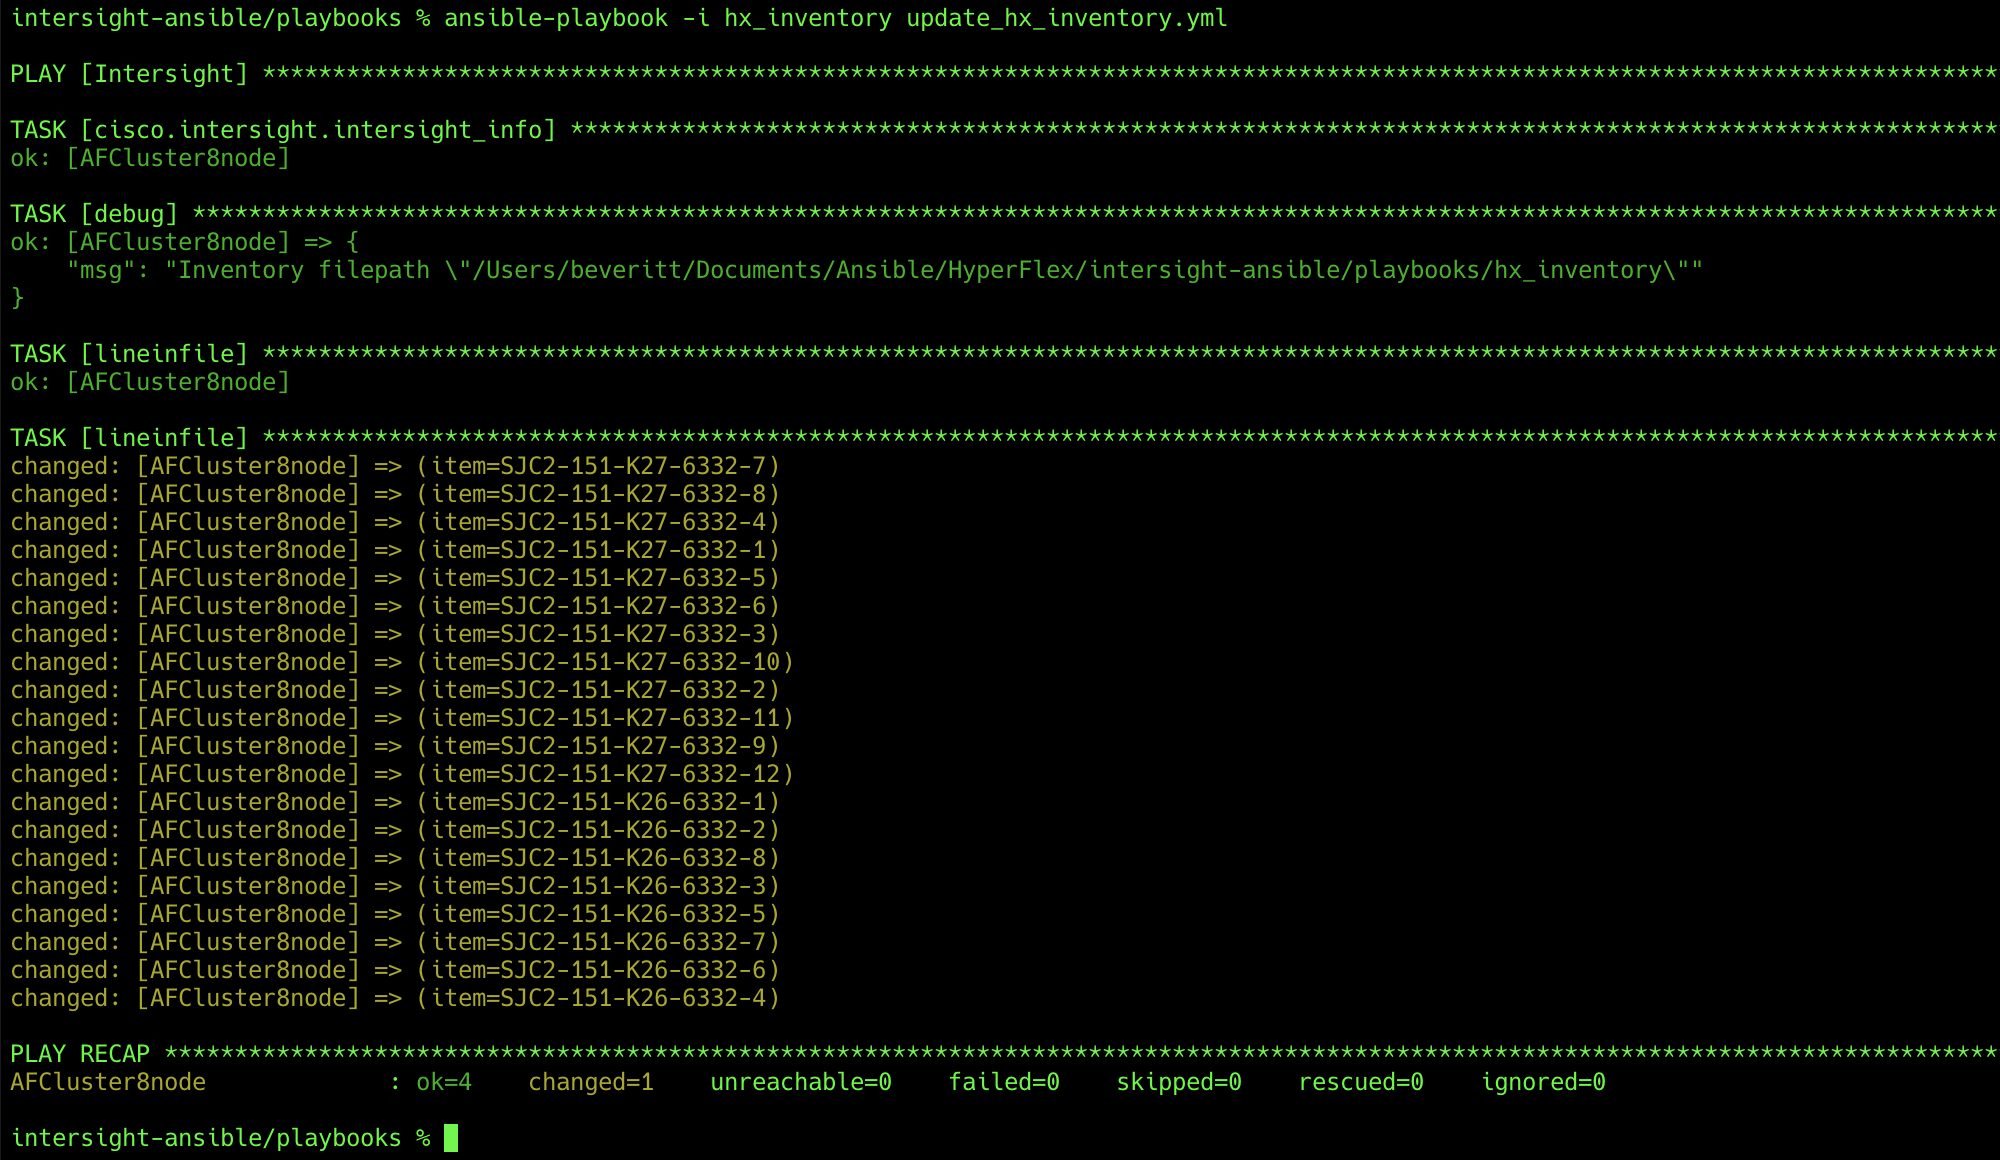
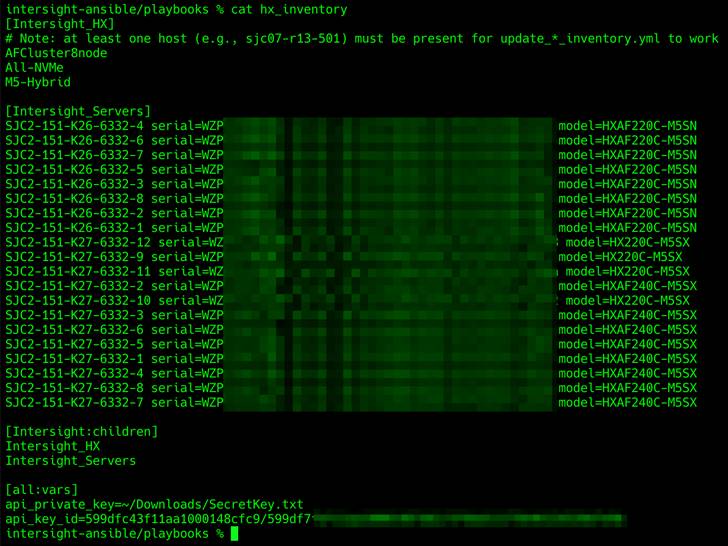
3. View the contents of the hx_inventory file to verify that the HX-Series servers in your Cisco Intersight inventory were found and added to the [Intersight_Servers] group.
The Ansible inventory file used in these examples is named hx_inventory, and inside the file is an inventory group named Intersight_HX. This group lists all hosts that will have actions taken against them by the Ansible playbooks. In reality, these are not individual hosts, but instead each one is a Cisco HyperFlex cluster that will be created and deployed. Even though each entry is not a traditional single host, you still use the host variable file structure that is part of Ansible. For each Cisco HyperFlex cluster to be created, a host variable file must be created in a folder named host_vars. The host_vars folder is not part of the GitHub collection; therefore, the folder and the individual variable files must be created. The next section provides a detailed description of each variable in the host variable file. The appendix provides sample files.
The values for each variable in the host variable file are explained here in the order that they appear in the sample files presented in the appendix.
hx_cluster_name: This variable is the name of the Cisco HyperFlex cluster as seen in Cisco Intersight, VMware vCenter, and Cisco HyperFlex Connect.
hx_mgmt_platform: For a standard cluster, enter FI. For a Cisco HyperFlex Edge cluster, enter Edge.
hx_hypervisor_type: Enter ESXi.
hxdp_version: Enter the version of the Cisco HyperFlex platform that you want to install: for example, 4.0(2c).
ucs_firmware_version: Enter the Cisco UCS firmware version that you want to use on the servers: for example, 4.1(2a). This variable is not used or required for Cisco HyperFlex Edge clusters.
hx_mgmt_mac_prefix: Enter the management MAC address prefix starting with 00:25:B5: for example, 00:25:B5:7E.
#hx_replication_factor: If you want to override the default replication factor of 3, then uncomment this line and enter 2. This variable is not used or required for Cisco HyperFlex Edge clusters.
#hx_vdi_optimization: If you want to enable virtual desktop infrastructure (VDI) optimizations, then uncomment this line and change false to true.
hx_disk_cleanup: If a cluster has been installed on these servers before, then leave the disk cleanup value as true; otherwise, change it to false.
#hx_laz_autoconfig: If you want to enable logical availability zones on a cluster of eight nodes or more, uncomment this line and change false to true. This variable is not used or required for Cisco HyperFlex Edge clusters.
hx_vcenter_hostname: Enter the host name of the managing vCenter server.
hx_vcenter_username: Enter an administrative user name for the managing vCenter server.
hx_vcenter_datacenter: Enter the name of the Datacenter object in vCenter in which the new cluster will be placed.
hx_hypervisor_admin: This variable specifies the administrator account name for the ESXi hypervisors, which should be left as root.
hx_hypervisor_factory_password: For all new installations and for any HX-Series hosts that have had their ESXi hypervisor reinstalled using the custom Cisco HyperFlex image, the factory password should be set to true.
#hx_hypervisor_password: This password will be dynamically entered during playbook execution.
#hx_dp_root_password: This password will be dynamically entered during playbook execution.
#hx_vcenter_password: This password will be dynamically entered during playbook execution.
hx_sys_config_timezone: Enter the name of the time-zone setting for the servers from the list of TZ Database Names as maintained by the Internet Assigned Numbers Authority (IANA): for example, America/Los_Angeles.
hx_sys_config_dns_servers: Enter one or more Domain Name System (DNS) servers, each on its own line, starting with two spaces, a dash, and another space, as in this example:
- 10.29.133.110
hx_sys_config_ntp_servers: Enter one or more Network Time Protocol (NTP) servers, each on its own line, starting with two spaces, a dash, and another space, as in this example:
- ntp1.hx.lab.cisco.com
- ntp2.hx.lab.cisco.com
hx_sys_config_dns_domain: Enter the DNS domain name for the system: for example, hx.lab.cisco.com.
hx_uplink_speed: This variable is required only for Cisco HyperFlex Edge clusters. Enter 1G or 10G, according to the speed of the links between the Cisco HyperFlex Edge nodes and their Ethernet switches.
hx_mgmt_ip: Enter the management IP address for the Cisco HyperFlex cluster: for example, 10.29.133.157.
hx_mgmt_vm_ip_start: Enter the starting IP address for the Cisco HyperFlex controller virtual machines: for example, 10.29.133.158.
hx_mgmt_vm_ip_end: Enter the ending IP address for the Cisco HyperFlex controller virtual machines: for example, 10.29.133.165.
hx_mgmt_netmask: Enter the netmask for the Cisco HyperFlex controller virtual machines: for example, 255.255.255.0.
hx_mgmt_gateway: Enter the gateway IP address for the Cisco HyperFlex controller virtual machines: for example, 10.29.133.1.
hx_jumbo_frames: Specify whether to enable jumbo frames on the network. For standard clusters, this setting should be true. For some Cisco HyperFlex Edge deployments, it may be false.
hx_mgmt_vlan_name: Enter the name of the management VLAN: for example, hx-mgmt-133. This variable is not used or required for Cisco HyperFlex Edge clusters.
hx_mgmt_vlan_id: Enter the ID of the management VLAN: for example, 133.
hx_migration_vlan_name: Enter the name of the migration VLAN: for example, vmotion-200. This variable is not used or required for Cisco HyperFlex Edge clusters.
hx_migration_vlan_id: Enter the ID of the migration VLAN: for example, 200. This variable is not used or required for Cisco HyperFlex Edge clusters.
hx_data_vlan_name: Enter the name of the storage VLAN: for example, storage-52. This variable is not used or required for Cisco HyperFlex Edge clusters.
hx_data_vlan_id: Enter the ID of the storage VLAN: for example, 52.
hx_guest_vm_vlans: Enter one or more guest virtual machine VLANs, each on their its line, using the syntax shown here. This variable is not used or required for Cisco HyperFlex Edge clusters.
- {"Name": vm-network-100, "VlanId": 100}
- {"Name": vm-network-101, "VlanId": 101}
hx_auto_support_receipient: Enter the email address of an autosupport recipient if you want to enable autosupport alerts.
hx_proxy_setting_hostname: Enter the host name of a proxy server if needed.
hx_proxy_setting_port: Enter the port number of a proxy server if needed
Note: if you want to create additional virtual host bus adapters (vHBAs) for Fibre Channel connectivity, enter the values that follow. Otherwise, you can leave these variables empty.
hx_vsan_a_name: Enter the name of the A-side VSAN: for example, vsan-10.
hx_vsan_a_id: Enter the ID of the A-side VSAN: for example, 10.
hx_vsan_b_name: Enter the name of the B-side VSAN: for example, vsan-20.
hx_vsan_b_id: Enter the ID of the B-side VSAN: for example, 20.
hx_fc_wwxn_range_start: Enter the World Wide Port Name (WWPN) range start value for the additional vHBAs, starting with 20:00:00:25:B5: for example, 20:00:00:25:B5:7E.
hx_fc_wwxn_range_end: Enter the WWPN range end value for the additional vHBAs, starting with 20:00:00:25:B5: for example, 20:00:00:25:B5:7E. The start and end values can be the same.
Note: if you want to create additional virtual network interface cards (vNICs) for Small Computer System Interface over IP (iSCSI) connectivity, enter the values that follow. Otherwise, you can leave these variables empty.
hx_iscsi_vlan_a_name: Enter the name of the A-side VLAN: for example, iscsi-110.
hx_iscsi_vlan_a_id: Enter the ID of the A-side VLAN: for example, 110.
hx_iscsi_vlan_b_name: Enter the name of the B-side VLAN: for example, iscsi-111.
hx_iscsi_vlan_b_id: Enter the ID of the B-side VLAN: for example, 111.
hx_node_profile_prefix: Enter the prefix for the names of the HX-Series nodes that will be assigned to the ESXi hypervisors: for example, hxaf240m5. The servers will be named sequentially with a two-digit number following the prefix, such as hxaf240m5-01, then hxaf240m5-02, and so on. These names should be prepopulated with A-records in your DNS server.
esx_mgmt_ip_start: Enter the starting IP address for the ESXi hypervisors: for example, 10.29.133.149.
esx_mgmt_ip_end: Enter the ending IP address for the ESXi hypervisors: for example, 10.29.133.156.
ucs_kvm_start_ip: Enter the starting IP address for the Cisco UCS Integrated Management Controller (IMC) interfaces of the servers: for example, 10.29.133.141. This variable is not used or required for Cisco HyperFlex Edge clusters, because their IMC IP address is already set.
ucs_kvm_end_ip: Enter the ending IP address for the Cisco UCS IMC interfaces of the servers: for example, 10.29.133.148. This variable is not used or required for Cisco HyperFlex Edge clusters, because their IMC IP address is already set.
ucs_kvm_gateway: Enter the gateway IP address for the Cisco UCS IMC interfaces of the servers: for example, 10.29.133.1. This variable is not used or required for Cisco HyperFlex Edge clusters, because their IMC IP address is already set.
ucs_kvm_netmask: Enter the netmask for the Cisco UCS IMC interfaces of the servers: for example, 255.255.255.0. This variable is not used or required for Cisco HyperFlex Edge clusters, because their IMC IP address is already set.
hx_mac_start: Enter the starting management MAC address prefix, starting with 00:25:B5: for example, 00:25:B5:7E.
hx_mac_end: Enter the ending management MAC address prefix, starting with 00:25:B5: for example, 00:25:B5:7E. The starting and ending prefix can be the same and should match the variable hx_mgmt_mac_prefix.
hx_servers: Enter the list of the physical servers to be assigned to this cluster, using their names as found in the Cisco Intersight inventory, one per line, with each line beginning with two spaces, a dash, and another space as shown here. The names of the servers can be retrieved from the hx_inventory file if needed, after you run the update_hx_inventory.yml playbook. Here is an example:
- SJC2-151-K27-6332-1
- SJC2-151-K27-6332-2
- SJC2-151-K27-6332-3
- SJC2-151-K27-6332-4
- SJC2-151-K27-6332-5
- SJC2-151-K27-6332-6
- SJC2-151-K27-6332-7
- SJC2-151-K27-6332-8
To create the host variable files, complete the following steps:
1. Open a command-line or console interface on the management workstation and change directories to the intersight-ansible/playbooks folder.
2. Create a new folder named host_vars.
3. For each Cisco HyperFlex cluster, create a new raw text file with a name matching the entry in the [Intersight_HX] group in the hx_inventory file created earlier.
4. Enter the variable values as needed for the standard Cisco HyperFlex cluster or Cisco HyperFlex Edge cluster being created. The contents of the file can be copied from the examples in the appendix and then modified as needed.
5. Enter the list of the physical servers to be assigned to this cluster underneath the last variable, named hx_servers. The names of the servers can be found manually within the inventory of your Cisco Intersight account, or they can be found in the [Intersight_Servers] group of the hx_inventory file after you run the inventory update playbooks from the previous steps.
After you have tested the access to the API and created the host variable files, you can run the Ansible playbooks to deploy Cisco HyperFlex systems. Two playbooks are available: hyperflex_cluster_profiles.yml, which is used to deploy standard clusters, and hyperflex_edge_cluster_profiles.yml, which is used to deploy Cisco HyperFlex Edge clusters. Because the playbooks for standard and Cisco HyperFlex Edge clusters differ, when you deploy multiple clusters at one time, they must all be either standard clusters or Cisco HyperFlex Edge clusters.
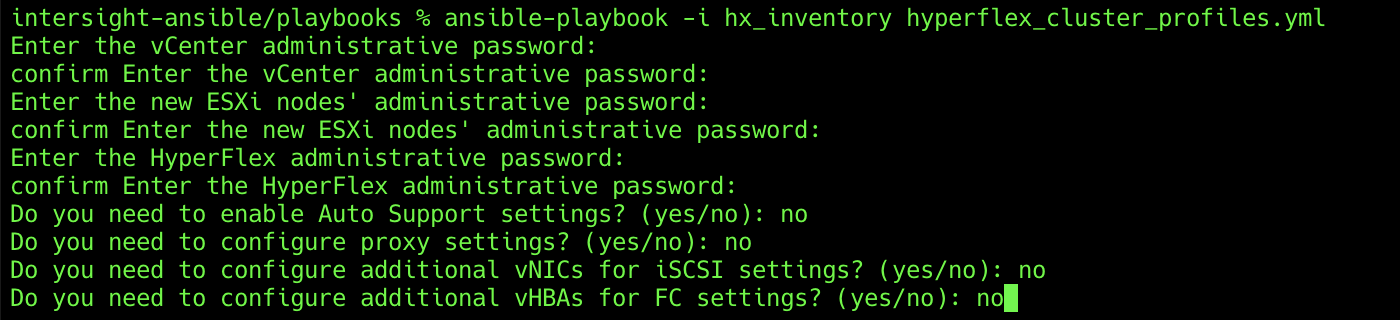
First, the playbooks will prompt for passwords interactively and ask if several optional features are needed. Then the playbooks will create all of the necessary policies for each cluster along with the Cisco HyperFlex cluster profiles. Next, the playbooks will prompt you to continue with physical node association, which you can skip if you prefer to complete this step manually within Cisco Intersight. Finally, the playbooks will prompt you to continue with validation and deployment of the clusters, which again you can skip if you prefer to complete these steps manually within Cisco Intersight.
To deploy Cisco HyperFlex clusters using Ansible playbooks, complete the following steps:
1. Open a command-line or console interface on the management workstation and change directories to the intersight-ansible/playbooks folder.
2. Run one of the following commands, as appropriate:
ansible-playbook -i hx_inventory hyperflex_cluster_profiles.yml
or
ansible-playbook -i hx_inventory hyperflex_edge_cluster_profiles.yml
3. Enter the passwords for access to the managing vCenter server, the desired ESXi management password, and the desired Cisco HyperFlex management password.
4. Enter yes or no to enable optional features, such as autosupport, proxy settings, additional vHBAs, and additional vNICs.
5. Enter yes or no to proceed with association of physical nodes to the cluster profiles.
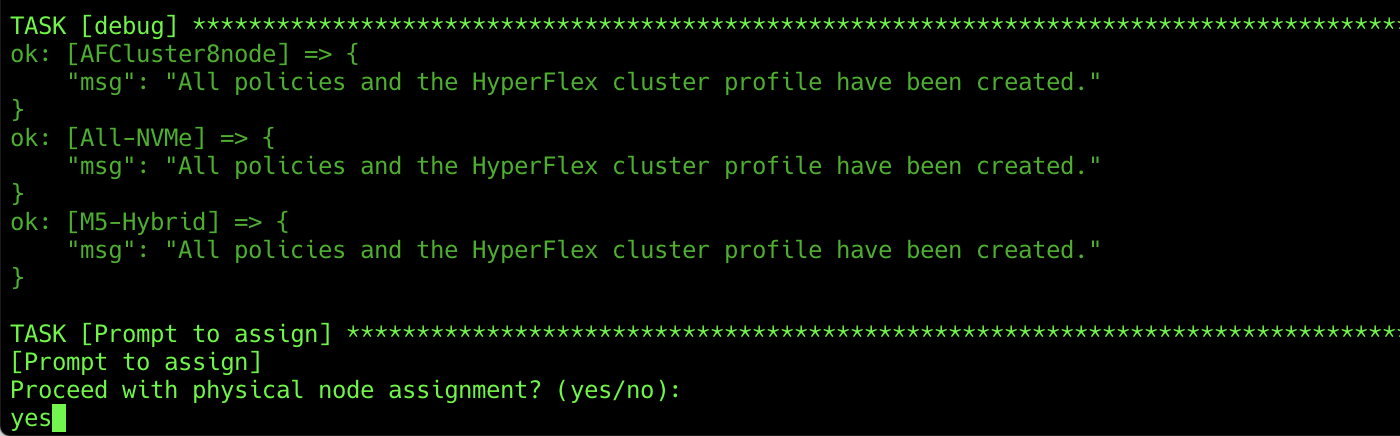
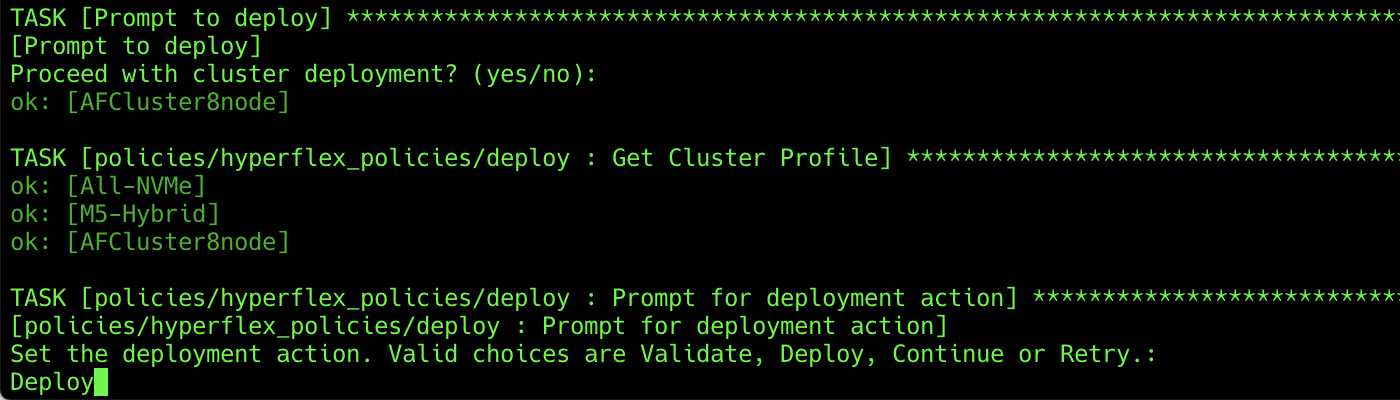
6. Enter yes or no to proceed with validation and deployment of the Cisco HyperFlex clusters.
7. Set the deployment action. The options available are Validate, Deploy, Continue, and Retry. Choosing Validate only validates the hardware and software configuration without installing Cisco HyperFlex clusters. Choosing Deploy performs validation and then, if no errors were found, proceeds to install Cisco HyperFlex clusters. Continue and Retry are valid only if validation or deployment has been attempted and resulted in a failure or warning. Enter Deploy and press Return.
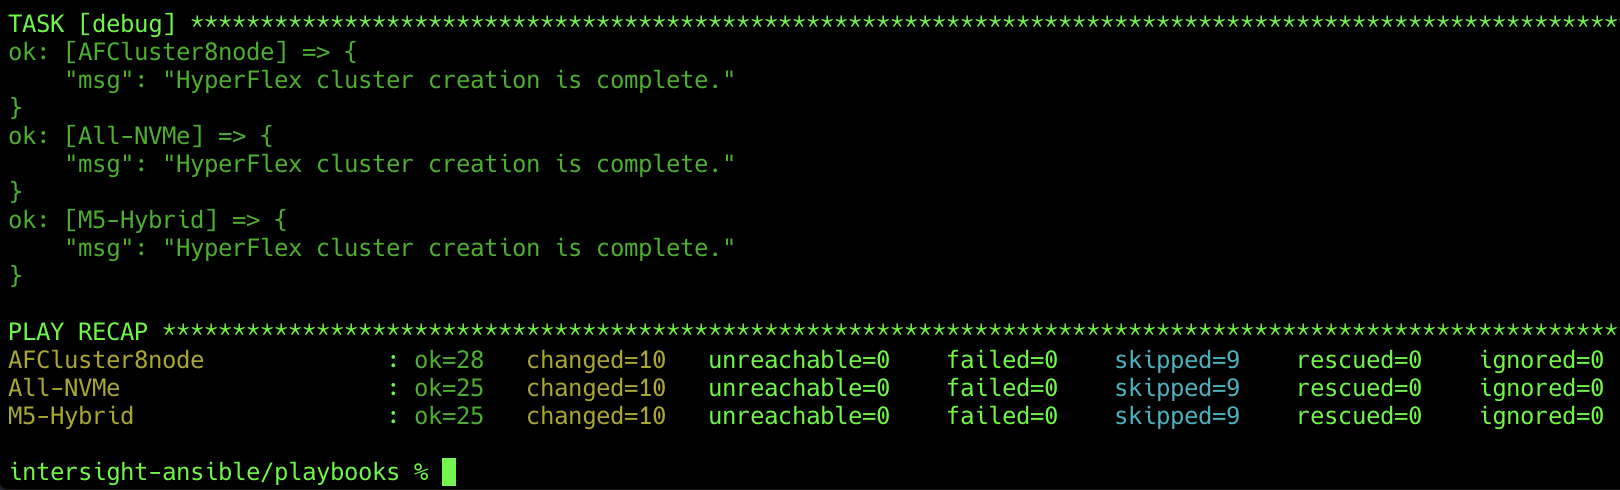
8. The playbook will trigger the deployment action and then end. Verify that the playbook has run without failures or errors, and that the tasks that were indicated as optional were properly skipped.
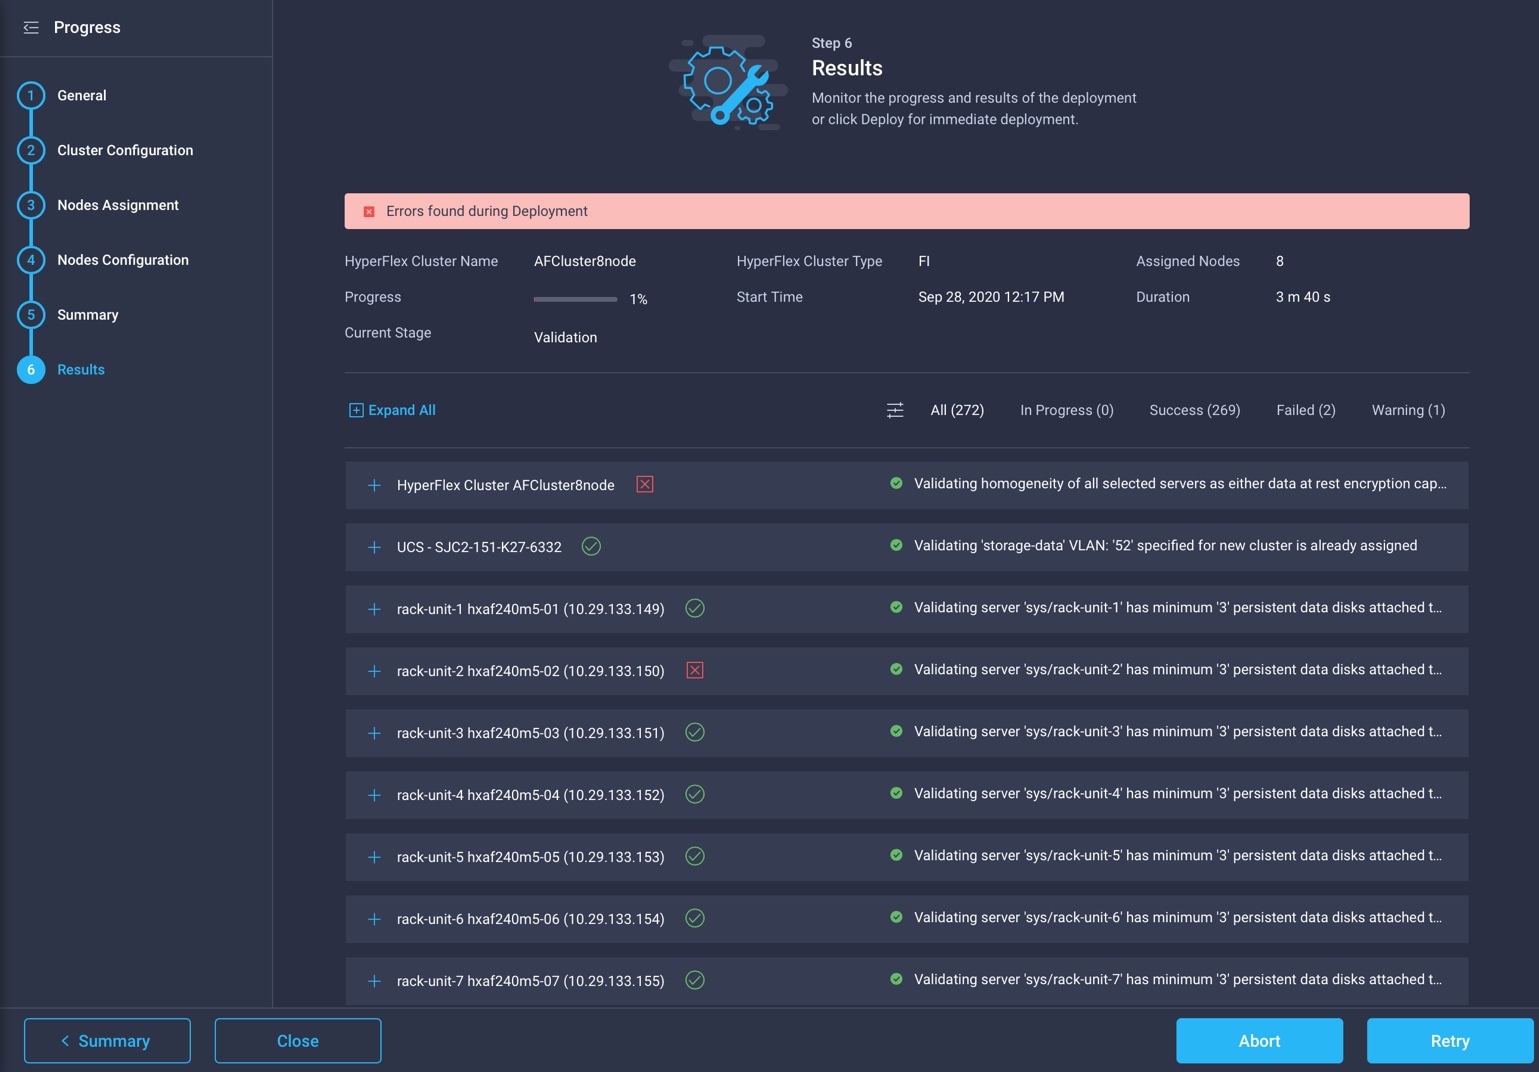
Monitor deployment using Cisco Intersight
You can most easily monitor the status of validation and deployment processes using the Cisco Intersight platform (Figure 2). If any warnings occur during validation, you can view and evaluate them in the Cisco Intersight interface. Then you can click Continue within Cisco Intersight to attempt validation and deployment again. Common warnings refer to the reuse of existing VLAN IDs or changes to quality-of-service (QoS) settings; these require the use of the Continue command. If any errors occur during validation, you can view them in Cisco Intersight and manually correct them. Then you can click Retry within Cisco Intersight to attempt validation and deployment again. For example, an individual server may encounter an inventory error as shown in Figure 3. This issue must be fixed by issuing a re-acknowledgement through Cisco UCS Manager. Then deployment can be retried in Cisco Intersight by clicking the Retry button.

Cisco Intersight HyperFlex cluster profile status
Cisco Intersight HyperFlex cluster error
Red Hat Ansible playbooks, developed by Cisco and available publicly through the Cisco DevNet GitHub repository, can be used to deploy Cisco HyperFlex systems. The playbooks communicate with the Cisco Intersight API to create the necessary policies and Cisco HyperFlex cluster profiles and then trigger validation and deployment jobs. Multiple clusters can be deployed simultaneously, aligning with a common use case for the Cisco Intersight platform, which often manages multiple Cisco HyperFlex clusters, especially multiple Cisco HyperFlex Edge systems spread across large geographic areas.
Deployment of multiple systems using the GUI-based wizard can be time consuming and prone to inadvertent mistakes. Deployment using Ansible playbooks allows IT staff to preconfigure the settings and values for multiple clusters using host variable files and then deploy them all at once. This method allows the settings and values to be easily checked and verified before deployment, saves time by deploying multiple systems in parallel, and allows retention of the configuration files to keep records of the configured system states.
Two examples of host variable files are provided here. One example shows a variable file for a standard cluster deployment, and one example shows a variable file for a Cisco HyperFlex Edge cluster deployment.
Standard cluster variable file
# HX Cluster Profile Settings
hx_cluster_name: AFCluster8node
hx_mgmt_platform: FI
hx_hypervisor_type: ESXi
hxdp_version: 4.0(2c)
ucs_firmware_version: 4.1(2a)
hx_mgmt_mac_prefix: 00:25:B5:7E
#hx_replication_factor: 3
#hx_vdi_optimization: false
hx_disk_cleanup: true
#hx_laz_autoconfig: false
# VCenter Settings
hx_vcenter_hostname: vcenter.hx.lab.cisco.com
hx_vcenter_username: administrator@vsphere.local
hx_vcenter_datacenter: Datacenter
# HX Credentials
hx_hypervisor_admin: root
hx_hypervisor_factory_password: true
#hx_hypervisor_password:
#hx_dp_root_password:
#hx_vcenter_password:
# HX Network Services Settings
hx_sys_config_timezone: America/Los_Angeles
hx_sys_config_dns_servers:
- 10.29.133.110
hx_sys_config_ntp_servers:
- ntp1.hx.lab.cisco.com
- ntp2.hx.lab.cisco.com
hx_sys_config_dns_domain: hx.lab.cisco.com
# HX Networking Settings
hx_mgmt_ip: 10.29.133.157
hx_mgmt_vm_ip_start: 10.29.133.158
hx_mgmt_vm_ip_end: 10.29.133.165
hx_mgmt_netmask: 255.255.255.0
hx_mgmt_gateway: 10.29.133.1
hx_jumbo_frames: true
hx_mgmt_vlan_name: hx-mgmt-133
hx_mgmt_vlan_id: 133
hx_migration_vlan_name: vmotion-200
hx_migration_vlan_id: 200
hx_data_vlan_name: storage-52
hx_data_vlan_id: 52
hx_guest_vm_vlans:
- {"Name": vm-network-100, "VlanId": 100}
- {"Name": vm-network-101, "VlanId": 101}
# HX Auto Support Settings
hx_auto_support_receipient: admin@cisco.com
# HX Proxy Settings
hx_proxy_setting_hostname: example-proxy.cisco.com
hx_proxy_setting_port: 80
# FC Settings
hx_vsan_a_name: vsan-10
hx_vsan_a_id: 10
hx_vsan_b_name: vsan-20
hx_vsan_b_id: 20
hx_fc_wwxn_range_start: 20:00:00:25:B5:7E
hx_fc_wwxn_range_end: 20:00:00:25:B5:7E
# iSCSI Settings
hx_iscsi_vlan_a_name: iscsi-110
hx_iscsi_vlan_a_id: 110
hx_iscsi_vlan_b_name: iscsi-111
hx_iscsi_vlan_b_id: 111
# HX Node Settings
hx_node_profile_prefix: hxaf240m5
esx_mgmt_ip_start: 10.29.133.149
esx_mgmt_ip_end: 10.29.133.156
ucs_kvm_start_ip: 10.29.133.141
ucs_kvm_end_ip: 10.29.133.148
ucs_kvm_gateway: 10.29.133.1
ucs_kvm_netmask: 255.255.255.0
hx_mac_start: 00:25:B5:7E
hx_mac_end: 00:25:B5:7E
hx_servers:
- SJC2-151-K27-6332-1
- SJC2-151-K27-6332-2
- SJC2-151-K27-6332-3
- SJC2-151-K27-6332-4
- SJC2-151-K27-6332-5
- SJC2-151-K27-6332-6
- SJC2-151-K27-6332-7
- SJC2-151-K27-6332-8
Cisco HyperFlex Edge cluster variable file
# HX Cluster Profile Settings
hx_cluster_name: SJC-Edge
hx_mgmt_platform: EDGE
hx_hypervisor_type: ESXi
hxdp_version: 4.0(2c)
hx_mgmt_mac_prefix: 00:25:B5:DD
hx_vdi_optimization: false
hx_disk_cleanup: true
# VCenter Settings
hx_vcenter_hostname: vcenter3.hx.lab.cisco.com
hx_vcenter_username: administrator@vsphere.local
hx_vcenter_datacenter: Datacenter
# HX Credentials
hx_hypervisor_admin: root
hx_hypervisor_factory_password: true
# HX Network Services Settings
hx_sys_config_timezone: America/Los_Angeles
hx_sys_config_dns_servers:
- 10.29.133.110
hx_sys_config_ntp_servers:
- ntp1.hx.lab.cisco.com
- ntp2.hx.lab.cisco.com
hx_sys_config_dns_domain: hx.lab.cisco.com
# HX Networking Settings
hx_uplink_speed: 10G
hx_mgmt_ip: 10.29.151.232
hx_mgmt_vm_ip_start: 10.29.151.228
hx_mgmt_vm_ip_end: 10.29.151.229
hx_mgmt_netmask: 255.255.255.0
hx_mgmt_gateway: 10.29.151.1
hx_jumbo_frames: false
hx_mgmt_vlan_id: 101
hx_data_vlan_id: 102
# HX Auto Support Settings
hx_auto_support_receipient: admin@cisco.com
# HX Proxy Settings
hx_proxy_setting_hostname: example-proxy.cisco.com
hx_proxy_setting_port: 80
# HX Node Settings
hx_node_profile_prefix: HXEdgeM5
esx_mgmt_ip_start: 10.29.151.224
esx_mgmt_ip_end: 10.29.151.225
hx_mac_start: 00:25:B5:DD
hx_mac_end: 00:25:B5:DD
hx_servers:
- HXEdgeM5-1
- HXEdgeM5-2
For additional information, see the following:
● http://www.cisco.com/go/hyperflex
Revision history
| Revision |
Coverage |
| Initial version |
Ansible deployment of Cisco HyperFlex Data Platform Release 4.0(2c) |